RSS
 

Archive for April, 2013

Ugandan Prayers by Ryan Estes

10 Apr

Last year I was asked to accompany two other people from my church to Uganda, to meet with a man named George Byabagambi who oversees a large number of churches, an orphanage, and various other ministries. My job was photographic, to communicate the need and opportunity our community at home might have to partner with him in his work.

424Uganda

We spent a lot of time in small villages, meeting and talking with people, and spending time in their churches and communities. At one point we were forced to head inside because of a violent storm that rolled through. About a hundred people crammed into a tin-roofed church, and we could hear next to nothing because of the sound of rain on the roof.

324Uganda

I love this image because it shows how people can be in poverty and yet give so much at the same time. In this picture, adding to the cacophony were the voices of everyone in the building crying out at the same time in prayer for some of our friends in the U.S. who were suffering from cancer.

396Uganda

I was crammed into a small corner of the building with a wide-angle lens, trying to capture some sense of what was happening in the room. One of my favorite details is the oversized suit the man in the center is wearing, as so much of their clothing is donated from the West, but of course when choosing suits in Uganda, a tailor is rarely available.

The second two images were taken just a bit earlier, before the storm forced us inside.

Ryan Estes is a Philadelphia portrait photographer.

dslrBlog

 
Comments Off on Ugandan Prayers by Ryan Estes

Posted in Photography


Future Architecture: 7 Surreal Award-Winning Skyscrapers

09 Apr

[ By WebUrbanist in Conceptual & Futuristic & Technology. ]

skyscrapers futuristic

The first skyscrapers were impossible drawings at the times they were imagined, yet today glass towers that scale to the skies are everyday structures.  On land, by sea, in the air (or in one case: outer space), these entries are daring and visionary, defying convention, technology and at times even gravity.

skyscraper polar umbrella project

First, the winner of the 2013 Evolo Skyscraper Competition, the Polar Umbrella (by Derek Pirozzi), a buoyant skyscraper that protects and regenerates the polar ice caps. The umbrella helps shade the ice below it, which is, in turn, rebuilt via water frozen by energy generated “through an osmotic (salinity gradient power) power facility housed within the building’s core.”

skyscraper first place award

It can much more than just a remote outpost: “Through its desalinization and power facilities, this arctic skyscraper becomes a floating metropolis equipped with NOAA (National Oceanic and Atmospheric Administration) research laboratories, renewable power stations, dormitory-style housing units, eco-tourist attractions, and ecological habitats for wildlife.”

skyscraper flying light park

From the sea we shift our sights to the sky, where a high-flying design (third-place winner) aims to supplement dense cities with much-needed recreational and green space. Capped with a helium balloon and supported by solar-powered propellers, Light Park (by Ting Xu and Yiming Chen) is a floating skyscraper.

skyscraper sky park diagrams

Lofted greenery helps clean the air above urban centers, and the plan balances program and structure: “Programmatic platforms that host parks, sports fields, green houses, restaurants, and other uses are suspended from the top of the structure by reinforced steel cables; the platforms fan in different directions around the spherical vessel to balance its weight. These slabs are also staggered to allow for maximum exposure to sunlight on each level.”

skyscraper space gravity grid

Before we get to a few back on the ground,  we have covered sea, sky and the next step? Space. That’s where the Stratosphere Network of Skyscrapers comes in – a bold idea by a Chinese team to create a skyscraper grid in space. The Buckminster-Fuller-worthy hex network of globe-spanning architectural infrastructure is mind-boggling in its implications. Independently, these incredible towers are impossible to support, but as a network, they reinforce one another, and are mutually suspended above the Earth.

skyscraper futuristic network diagrams

If is a tall order in practice, but a brilliant concept in theory: “In this case the network of buildings and bridges connected to each other, covering the entire circumference of the earth, will no longer need structural ground support and can be suspended in the air by the effect of the earth gravity. The elevated bridges and buildings that relate the grid can reach any height with out worrying about overturning, earth-quakes, floods and any other natural disasters.”

Next Page:
Future Architecture 7 Surreal Award Winning Skyscrapers

Share on Facebook


[ By WebUrbanist in Conceptual & Futuristic & Technology. ]

[ WebUrbanist | Archives | Galleries | Privacy | TOS ]


WebUrbanist

 
Comments Off on Future Architecture: 7 Surreal Award-Winning Skyscrapers

Posted in Creativity


Warm Your Big Flash at the Source with Glass Shells

09 Apr

Remember when we talked about gelling your light mods, and how some almost aren't worth the trouble?

If you frequently light people with large soft boxes, you can choose to warm your light up right at the source. Read more »


Strobist

 
Comments Off on Warm Your Big Flash at the Source with Glass Shells

Posted in Photography


Lofoten im Winter – Teil 2

09 Apr

Ein Beitrag von: Stefan Hefele

Mit einem sehr guten Gefühl konnten wir unsere Tour wieder Richtung Norden fortsetzen. Kaum ahnend, dass allem noch die Krone aufgesetzt werden sollte.

Wir hatten noch so manchen Ort auf unserer To-Do-Liste und haben uns absichtlich dafür entschieden, nicht schon alles bei der Hinfahrt abzufahren. So blieb auch die Rückfahrt spannend.

Wir wussten, dass es uns wegen der widrigen Bedingungen und des vielen Schnees eventuell unmöglich war, bestimmte Plätze zu erreichen. Kvalvika wird aber als wohl schönster Strand der Lofoten gehandelt und das war uns auf jeden Fall einen Versuch wert.

Dick eingepackt und mit Energieriegeln ausgerüstet, starteten wir unseren Marsch am Fjord Selfjorden bei einer roten Fischerhütte. Der erste Anstieg war schon recht mühsam und wir erreichten ein langgezogenes Tal, das zu durchqueren fast schon einem Halbmarathon ähnelte.

Ich ging voraus und sank immer wieder bis zur Hüfte in tiefen Schneeverwehungen ein. Tückische, versteckte Felsspalten machten das Vorankommen noch halsbrecherischer. Als wir endlich den höchsten Punkt erreichten, pfiff uns ein fieser Wind vom Meer kommend um die Ohren.

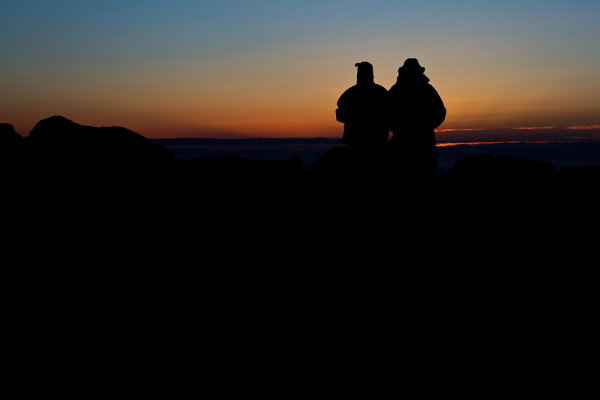
Vor uns lag ein tief eingeschneites, steiles Geröllfeld. Wir wogen unsere Chancen ab und kamen zum Entschluss, dass umzukehren die wohl gesündere Lösung war. Wir waren beide sehr hungrig und nach einer kurzen Pause hinter einem windgeschützten Stein ging es wieder bergab. Vor der letzten Steigung eröffnete sich uns ein faszinierendes Panorama mit Blick über den Selfjorden im weichen Licht der untergegangenen Sonne.

Die Konturen des windgeglätteten Schnees nutzte ich für die Bildgestaltung. Weiches Licht und das viele Weiß waren in dem Moment eine richtige Wohltat für die Sinne. Manchmal muss man eben große Hürden nehmen, um kleine aber sehr angenehme Erfolge zu feiern.

copyright Stefan Hefele

Schon auf dem Hinweg wollten wir den schönen Strand von Utakleiv anfahren, wurden jedoch durch wildes Schneegestöber und schlechte Sicht gezwungen, unsere Reise fortzusetzen. Unser nächster Halt war also Utakleiv, mit der Hoffnung auf besseres Wetter.

Die Aussichten waren gut und als wir ankamen wurde uns zwar kein Traumlicht geboten, jedoch schneite es nicht und sogar eine dezente Färbung lag in den Wolken. Jeder von uns packte seine Sachen zusammen und so gingen wir den Rest des Tages unserer Arbeit nach.

Auf den glitschigen, ins Meer ragenden Felsen, die mit Löchern und den verschiedensten Steinen in unterschiedlichen Farben gesäumt waren, war das fotografische Auge gefordert und so entstanden ein paar sehr interessante Fotos.

Utakleiv, copyright Stefan Hefele

Es wurde langsam, doch stetig dunkler und bald war nicht mehr genug Licht vorhanden, um vernünftige Seelandschaften zu fotografieren. Nachdem wir eine Woche lang jede Nacht vergeblich einige Stunden in der Kälte auf die Aurora gewartet hatten, hatte ich keine Lust mehr, mir meinen Hintern abzufrieren.

Der Tag war sehr anstrengend gewesen und ich beschloss, früher in den Schlafsack zu steigen. Felix wollte draußen nur noch etwas Musik hören und eine Zigarette rauchen. Als ich gerade in die Traumwelt verschwand, hämmerte er ans Auto und schrie: „POLARLICHTER!!“

In diesem Moment packte mich das Adrenalin und wir stürmten in totaler Dunkelheit über die mit tiefen Schnee bedeckten Felsen zur glitschigen Küste. Welch Glück, dass wir gerade an einem der schönsten Küstenabschnitte der Lofoten waren.

Alles fühlte sich an wie im Traum: Die Aurora wurde immer heftiger und trumpfte mit ihrem ganzen Farbspektrum auf. Während wir wie ferngesteuert über die rutschigen Felsen kletterten, wurde mir bewusst, welch unglaubliches Schauspiel wir hier gerade sehen durften.

Nach über einer Stunde Shooting kletterte ich in tiefer Dankbarkeit zurück in den Schlafsack und konnte beruhigter schlafen als je zuvor.

Epic creation, Stefan Hefele

Früh morgens beschloss ich, mir den sandigen Teil des Strandes vorzunehmen. Die Wolken waren sehr dicht, aber es kündigte sich eine warme Färbung in den immer wieder auftauchenden Wolkenlücken an.

Mit Steinen lässt sich wunderbar ein Bild gestalten. Etwas Geduld und ein offener Blick und man findet meist eine für das Auge angenehme Formation. Spielt dann noch, wie in diesem Fall, die Komponente Glück mit rein, vervollständigen die sonst eher passiven Wolken das Kunstwerk.

Schnell stellte ich meine Kamera aufs Hochformat ein, wählte eine etwas kürzere Langzeitbelichtung von einer Sekunde und fokussierte so, dass der komplette Bildausschnitt scharf war. Dank der Belichtungszeit von einer Sekunde war es mir möglich, die brechende Welle und die Bewegung der Gischt einzufangen.

copyright Stefan Hefele

Nach einem äußerst erfrolgreichen Besuch in Utakleiv – nicht zuletzt wegen der Polarlichter – neigte sich unsere Reise so langsam dem Ende zu. Während wir eine kurvenreiche Bergstrecke fuhren, wurde die Luft plötzlich in sattes Gold getränkt.

Nebelschwaden und tiefhängende Wolken wurden von frühem Morgenlicht durchflutet und ergaben ein zauberhaftes, verträumtes Bild.

copyright Stefan Hefele

Den restlichen Tag waren wir wieder auf der Suche nach einer passenden Location, jedoch ohne großen Erfolg. Außerdem hingen schon fast den ganzen Tag dicke Wolken am Himmel, die kaum Licht freigaben. So kam es, dass wir bis in die anbrechende Nacht ans nördliche Ende der Inselkette vorankamen.

Die einzelnen zerklüffteten Inseln der Lofoten sind übrigens seit einigen Jahren mit Brücken oder Tunneln miteinander verbunden, so dass man recht angenehm ohne Fähre zurechtkommt.

Noch in der Dämmerung versuchten wir, uns mit Hilfe unseres Kartenmaterials vorzustellen, welche Gegend ein eventuelles Fotomotiv bergen konnte. Schließlich bogen wir auf eine wenig befahrene Straße ab, die uns zum im Nordosten gelegenen Morfjorden führte.

Mittlerweile nun schon zu dunkel für Tageslichtaufnahmen, inspizierten wir trotzalledem mit Kopflampen ausgestattet die Gegend. Man weiß ja nie, schließlich hatten wir letzte Nacht das Glück und sahen Nordlichter. Ganz bestimmt würde uns das zwei Tage hintereinander passieren, witzelten wir.

Geduldig trotzten wir zum wiederholten Male, verpackt in warme Klamotten und dicke Schuhe, der Kälte und warteten stundenlang bei Minusgraden, während wir in den Himmel starrten. Die Wolkendecke löste sich etwas und die Pracht des funkelnden Sternenhimmels offenbarte sich uns.

Mit kaum Lichtverschmutzung um uns herum konnten wir problemlos die Milchstraße sehen. Ich machte einen Testschuss gen Himmel und sah, dass eine längliche Wolke vor uns leicht grün schimmerte und gar keine Wolke war, sondern ein Polarlicht, das dort schon ein Weilchen auf seinen Einsatz gewartet hatte.

Der Himmel hatte endgültig wieder unsere Aufmerksamkeit. Das lange Warten hatte sich erneut gelohnt. Nun musste sich die Aurora Borealis nur noch in all ihrer Schönheit entfalten. Einige Zeit später ging es los: Erst tänzelte sie nur langsam und sanft über einen Bereich im Himmel, bis schließlich alle Fesseln fielen und sie uns erneut ein Schauspiel, das ich nicht in Worte fassen kann, darbot.

Plötzlich eröffnete sich ein Feuerwerk direkt über unseren Köpfen. Zügig richtete ich das Stativ aus und wählte eine kurze Brennweite von 15 mm, um die gigantischen Ausmaße der „Explosion“ einzufangen. Gerade mit meiner 36MP auflösenden Nikon D800E muss ich penibel fokussieren.

Bei Offenblende f/2,8 stellte ich den Fokus schon im Vorhinein ein. Empfindlichkeit wählte ich auf ISO 800 bei einer Belichtung von 30 s. Auslöser gedrückt, warten. Der Bildschirm blitzte auf. Auf so ein Ergebnis hatte ich kaum gehofft. Es machte mich in dem Moment einfach nur gllücklich.

copyright Stefan Hefele

Das ganze Ausmaß des gigantischen Sonnensturms ist hier recht gut zu sehen. Ein Beweisportrait, das ich wohl bis an mein Lebensende gerne vorzeigen werde.

Aurora above my head, copyright Stefan Hefele

Die letzte Nacht auf den Lofoten hatte es also noch einmal so richtig in sich. Keinen besseren Zeitpunkt hätte es geben können, um eine besondere Reise zu beenden.

Ich hoffe, den winterlichen Charme der Inselkette jenseits des Polarkreises so eingefangen zu haben, dass Euch die ganze Mystik und Dramatik, die die Inseln ausstrahlen, erreicht hat. Weitere Bilder der traumhaften Lofoten gibt es für Neugierige auf meiner Webseite.


kwerfeldein – Fotografie Magazin

 
Comments Off on Lofoten im Winter – Teil 2

Posted in Equipment


Panasonic unveils DMC-GF6 with Wi-Fi and NFC capabilities

09 Apr

GF6k_front_H_FS1442A.png

Panasonic has announced the Lumix DMC-GF6 – a 16MP entry-level mirrorless camera with Wi-Fi. Like many of its competitors it has a capacitive touchscreen, that can tilt both downwards and upwards to face forwards for self-portraits. It gains a compact-camera style zoom lever around the shutter release that can alternatively be used to set exposure compensation, and an exposure mode dial on the top plate. It’s also the first interchangeable lens camera with Near Field Communication (NFC) that allows setup of Wi-Fi connections with compatible smartphones and tablets, simply by tapping the devices together. Movie recording is available at 1080p30 in either MP4 or AVCHD format.

News: Digital Photography Review (dpreview.com)

 
Comments Off on Panasonic unveils DMC-GF6 with Wi-Fi and NFC capabilities

Posted in Uncategorized


Just Posted: Panasonic Lumic DMC-GF6 hands-on preview

09 Apr

GF6.png

Just Posted: Our hands-on Panasonic Lumix DMC-GF6 preview. The GF6 expands the capabilities of Panasonic’s GF series away from the point-and-shoot focus that it had increasingly pursued. The latest model adds a more sophisticated touch-screen and additional control points that will benefit a range of users but it’s the NFC-mediated Wi-Fi system that we found really interesting. Add this on top of the 16MP sensor from the GX1 and you have an interesting combination of features. Click through to find out more.

News: Digital Photography Review (dpreview.com)

 
Comments Off on Just Posted: Panasonic Lumic DMC-GF6 hands-on preview

Posted in Uncategorized


Fine Tune Your Exposures With Spot Metering

09 Apr

The metering systems of today’s digital cameras are light years beyond cameras of just 10 to 15 years ago. What this means is that in many situations, the camera’s meter, left to its own devices, is going to do an excellent job at getting a good exposure. While evaluative (or matrix) metering and center-weighted average metering take into account the entire scene, albeit in different ways, spot metering mode provides a tool for metering only the part of the scene you as the photographer consider most important.

I used spot metering on this image  due to the sun setting over her shoulder, making the sun and sand exceptionally bright behind her. By metering on the model's shoulder, I was able to maintain detail in the shadow areas, without hurting the drama of the lighting.

I used spot metering on this image due to the sun setting over her shoulder, making the sun and sand exceptionally bright behind her. By metering on the model’s shoulder, I was able to maintain detail in the shadow areas, without hurting the drama of the lighting.

Spot metering is especially helpful when the subject is much brighter or darker than the background, and the subject does not make up a majority of the image.   Most cameras, when set to spot metering, are set to measure an area of the image as small as 1.5% of the total image area.  This varies from camera to camera, so check your manual for the exact specification.  In addition, while most consumer cameras use the center of the image for spot metering, usually defined by a circle in the viewfinder, others allow for tying spot metering to the active AF point, which then ties your choice of focus point to the meter.

When I saw this shot I immediately knew what I wanted.  I did not want to completely lose the detail in the dress, but I did want a near-silhouette effect to add to the mood of the image.  Using the spot meter, I metered off the sky, and then dialed in +1/3 of exposure compensation to bring back some dress detail.

When I saw this shot I immediately knew what I wanted. I did not want to completely lose the detail in the dress, but I did want a near-silhouette effect to add to the mood of the image. Using the spot meter, I metered off the sky, and then dialed in +1/3 of exposure compensation to bring back some dress detail.

Generally, if you’re spot metering, and your camera’s spot meter is at the center of the image area, you will have to use Exposure Lock as well. This is because if the meter only works at the center of the image, and the area you’re metering is NOT the center of the image, you will need to recompose after metering.  Exposure Lock ensures that your exposure is locked in once you have metered the scene, before you recompose the shot. Exposure lock is generally activated by pressing a button on your camera while metering.  It will then hold the exposure you locked in, at least until you release the shutter button.  Some cameras will hold the metered reading until you deactivate Exposure Lock. On Canon cameras, Exposure Lock is achieved by pressing the (*) button.  On Nikons, exposure can be locked by pressing AE-L.

When you’re dealing with a high contrast situation, such as a bright background with a dimly lit subject, or a dark background with a brightly lit subject, switching your metering mode to Spot Metering can be an easy way of ensuring that your exposure is exactly where you want it.

I was shooting the sunrise on Cadillac Mountain in Acadia National Park when I spied this couple sitting on a rock.  I moved around behind them, and spot-metered on the sky. Because the meter tries to make the metered area a mid-tone, I knew it would silhouette my subjects perfectly.

I was shooting the sunrise on Cadillac Mountain in Acadia National Park when I spied this couple sitting on a rock. I moved around behind them, and spot-metered on the sky. Because the meter tries to make the metered area a mid-tone, I knew it would silhouette my subjects perfectly.

Post originally from: Digital Photography Tips.

Check out our more Photography Tips at Photography Tips for Beginners, Portrait Photography Tips and Wedding Photography Tips.

Fine Tune Your Exposures With Spot Metering


Digital Photography School

 
Comments Off on Fine Tune Your Exposures With Spot Metering

Posted in Photography


Lawless Metropolis: Kowloon Walled City, Then and Now

09 Apr

[ By Steph in Architecture & Cities & Urbanism. ]

Kowloon Walled City 1
Twenty years ago, a dank, lawless, congested and compacted lawless city located just outside Hong Kong was evacuated and destroyed, putting an end to the nearly century-old settlement first created as a Chinese military fort. Kowloon Walled City was packed with at least 50,000 inhabitants in 6.5 acres just before its demolition in 1993, and its history included a period of mob rule with sky-high rates of prostitution, gambling and drug use. Today, it’s the Kowloon Walled City Park, a tranquil place modeled on traditional gardens of the early Qing dynasty.

Kowloon Walled City 2

The former fort became an enclave when Britain gained control of the New Territories, which is one of the three main regions of Hong Kong. During World War II, as the Japanese occupied Hong Kong, the walled city’s population began to multiply dramatically. Once Japan surrendered, China announced plans to take back the city from Britain, and even more refugees poured inside, increasing the number of squatters to 2,000. Unable to drive them out, both China and Britain washed their hands of the situation, allowing it to rule itself.

Kowloon Walled City 3

But it was hardly a democracy that rose inside Kowloon in response. Underground mob groups increased already-rampant crime, taking control of brothels, gambling parlors and opium dens. Hong Kong police would only attempt to infiltrate the city in large groups.

The architecture of Kowloon Walled City was haphazard, rising vertically with such narrow alleyways on the interior that sunlight rarely penetrated to street level. Pipes constantly dripped onto pedestrians. Children climbed to the rooftops to play. Many interior apartments had no windows. These factors came together to give it a dystopian feel, popularizing it as a setting for novels and games.

Kowloon Walled City 4

Exasperated with the unsafe, unsanitary conditions, China and Britain mutually agreed to tear it down. In its place, a 330,000-square-foot park was created, completed in 1995. Paths and pavilions inside are named after the streets and buildings of the vanished Walled City. Some artifacts, like entrance plaques and the city’s south gate, are on display. Where the city’s 300 interconnected buildings once stood are now floral walks, ponds and carefully cultivated gardens. Catch a glimpse into Kowloon Walled City’s fascinating past at the website of photographer Greg Girard.

Share on Facebook


[ By Steph in Architecture & Cities & Urbanism. ]

[ WebUrbanist | Archives | Galleries | Privacy | TOS ]


WebUrbanist

 
Comments Off on Lawless Metropolis: Kowloon Walled City, Then and Now

Posted in Creativity


Just posted: HTC 8X review

09 Apr

lifestyle_edit2.jpg

We’ve just posted our review of the HTC 8X on connect.dpreview.com. The 8X is HTC’s current Windows Phone flagship device and comes with a 4.3-inch 720p screen and an 8MP camera with a fast F2.0 lens. Can the HTC rival the Android and iOS competition and is it good enough to grab some of Nokia’s Windows Phone market share? We put the 8X through our usual review process to find out. Click through to go to the full review.

News: Digital Photography Review (dpreview.com)

 
Comments Off on Just posted: HTC 8X review

Posted in Uncategorized


Nikon Coolpix A Preview updated with studio comparison pages

09 Apr

specs-1.jpg

We’ve just updated our preview of the Nikon Coolpix A with a full set of studio shots, showing image quality in both JPEG and RAW capture modes. This is in addition to a gallery of real-world samples, and first impressions of our initial findings from shooting with the camera both in and out of the studio. The Nikon Coolpix A features a 16MP CMOS sensor, and a fixed, 28mm equivalent F2.8 lens. Click through for a link to our preview, which now includes our studio comparison pages. 

News: Digital Photography Review (dpreview.com)

 
Comments Off on Nikon Coolpix A Preview updated with studio comparison pages

Posted in Uncategorized