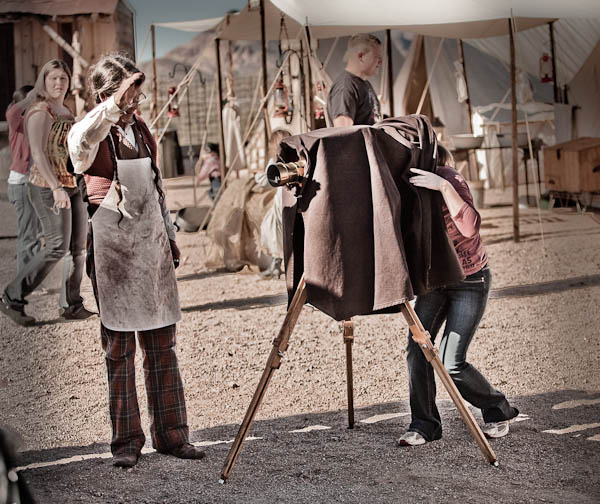
This is the third in a series of articles by Andrew S Gibson, the author of Understanding EOS: A Beginner’s Guide to Canon EOS cameras.

Joel Meyerowitz once asked ‘If the world is in colour, why shoot it in black and white?‘
Okay, I can think of plenty of good reasons for working in black and white, but it seems that most photographers work in colour a great deal of the time. And when you work in colour, you naturally want to configure your camera to give the best possible results. To do so, it’s important to understand how your digital camera records colour.
You may be wondering why this matters. Surely, digital cameras just accurately record the colours of the subject? Well, the truth is it doesn’t work like that. To understand why, we need to look at the nature of digital capture.

Digital capture
The creation of a digital photo occurs in two stages.
The first step happens when you take a photo. The shutter opens, light reaches the sensor, and then the shutter closes again. The sensor’s photodiodes react to the light that hits them and this information is converted to electronic form in a series of millions of bits and bytes.
The second step depends on the file format setting you have selected on your camera.
When you select Raw, the data captured by the camera’s sensor is compressed and recorded onto the memory card as a Raw file. The camera also generates a small JPEG file that is embedded in the Raw file so that you can preview it on your camera’s LCD screen.
When you select JPEG, the camera converts the information captured by the sensor into a JPEG file and then ditches the information captured by the sensor. The main aim of the JPEG format is to save memory card space (the file sizes are smaller) and to give you a file that doesn’t need any post-processing.
When the camera creates a JPEG file, it does so using the colour settings that you have dialled into the camera. Changing those settings alters the way the camera records colour.

Colour settings
There are two colour related settings you need to know how to use. One is white balance (I’ll tackle that in the next article in this series).
The second setting has a different name depending on the camera you have. It is called Picture Style on my Canon EOS cameras. It’s the term I’m accustomed to so it’s the one I’m going to use in the article.
Nikon calls it Picture Control.
Sony calls it Creative Style.
Pentax calls it Custom Image.
Olympus calls it Picture Mode.
Fuji calls it Film Simulation Mode. I like this name as it describes exactly what the settings do – emulate the look of various Fuji film types.

What’s the purpose of Picture Styles?
The purpose of Picture Styles, believe it or not, are to imitate the effects of using different films in the camera. Let me elaborate (I realise that this will seem a little abstract to anybody who hasn’t used a film camera).
If you use film, then you would select a film type that records the subject in a way that suits the subject.
For example, the film of choice for many years for most landscape photographers was Fuji Velvia. This was a high quality slide film that recorded deeply saturated colours. It emphasised hues like green and blue, making it ideal for creating punchy landscape photos.
On the other hand, if you are taking photos of people, Fuji Velvia is a poor choice of film. You would be better off using something like Kodak Portra. This is a colour negative film designed to give a softer, less saturated image with good skin tones.
In digital cameras, the idea that photographers should be able to change the colour settings to suit the subject they are photographing led to the development of Picture Styles. The same principle applies – you set the Picture Style that is most appropriate to the subject that you’re shooting.
Let’s take a look at the default options on EOS cameras (check your camera’s manual for details if you own a different brand):

Out of the six, the three you would use most often are:
Portrait: For when you’re taking portraits. Obvious enough really. This Picture Style is designed to give warm, flattering skin tones.
Landscape: Also straightforward. This Picture Style gives slightly sharper images than the portrait Picture Style and deeply saturated blue and green tones. It’s intended for landscape photos.
Standard: This is what you would use for just about every situation that isn’t a portrait or a landscape. It gives deeply saturated reds.
Neutral and faithful: These two Picture Styles are nearly identical and are designed to give soft, neutrally coloured JPEG files that are intended to be processed further in Photoshop. Given that most photographers who want to post-process now shoot Raw, these have virtually become redundant.
Monochrome: For black and white images. If you’re serious about black and white photography you’ll get much better results by shooting in Raw and converting the colour image to monochrome in post-processing. But, this Picture Style may come in useful if you want to dabble or simply don’t like to process images on a computer (not everybody does).

What is a Picture Style?
On Canon cameras, a Picture Style is made from four different settings. They are sharpness, contrast, colour saturation and colour tone. You can change any of these in the camera’s menu to alter the way a Picture Style works. This gives you a lot of control over the way your photos turn out.
Moving beyond Picture Styles
The Picture Style control is very useful if you use the JPEG format. But, as I touched on before, a lot of photographers now use the Raw format. Raw processing software has improved over the years to the point where the benefits in terms of image quality are too great to be ignored.

If you shoot Raw you don’t have to select the Picture Style at the time you take a photo. The Raw processing software lets you select the Picture Style at the time you process the file (the screenshot above is from Lightroom 4). That means you can select the Picture Style that most suits the image, and switch between the different options to see which you prefer.
Advanced workflow
If you use a program like Lightroom to process your Raw files, it has so many options for controlling and altering colour that the initial Picture Style you select may become irrelevant if you make lots of changes. If you use Lightroom presets to process your files the Picture Style hardly matters at all.
The same goes for Photoshop if you use Photoshop actions to change the look of your photos. Picture Style is just a starting point, and the result of the actions you use will have a much greater effect on the final result than the Picture Style you started with.
Conclusion
In short, the usefulness of the Picture Style setting depends very much on your shooting style and workflow.
If you use the JPEG format, then Picture Style is very useful as (along with the white balance setting) it determines the way in which your digital camera records colour.
If you use the Raw format, the Picture Style may not be very relevant at all. It provides a starting point and you may choose to use your Raw processing software to create a completely different look.
Did you know that the white balance setting is just as important as Picture Style when it comes to colour photography? I’ll explain why in my next article.
Previous articles
These are the earlier articles in the series:
Introducing the Creative Triangle
Finding Your Way Around the Mode Dial

Understanding EOS
Andrew S Gibson is the author of Understanding EOS: A Beginner’s Guide to Canon EOS cameras. The use of Picture Style is one of many topics explored within the ebook.
Post originally from: Digital Photography Tips.
Check out our more Photography Tips at Photography Tips for Beginners, Portrait Photography Tips and Wedding Photography Tips.
Understanding Colour on Your Digital Camera

Digital Photography School


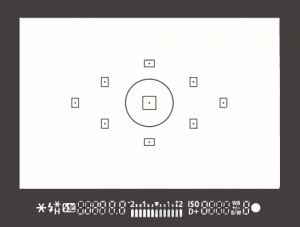 On most SLRs, and some of the mirrorless or four thirds cameras, there is an option of selecting what point it uses to focus. Meaning, when you look through the camera and see some flashing dots or squares (or something similar to the image on the right), those are your focus zones or spots. Make sure it is NOT set for the camera selecting which of those spots are targeted for focusing. When the camera chooses where to focus it can often pick the wrong thing. If you have a subject that is behind something in the foreground the camera will usually pick the closest object, which is not your intention, and you’ll end up with the wrong thing in focus.
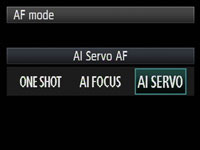 Most cameras have a few different types of focus modes. On Canon you’ll see them as Single (One Shot), AI (stands for Artificial Intelligence) Focus and AI Servo. On Nikon the modes are AF-S, AF-C and AF-A. Choose the one that bests fits for the subject you’re photographing.
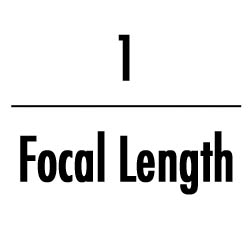 There is much debate about this subject in terms of how slow is too slow for hand holding your camera. Some instructors will say 1/60th of a second, I tend to use another rule of thumb which is 1 over the focal length of your lens. So if you are shooting with a 200mm lens, then 1/200 is how fast you need to be shooting to get rid of blur caused by camera shake. The longer lens you select, the more amplified any movement will become. If you are shooting with a cropped sensor camera, remember that 200mm is now acting like a 350mm so that changes your minimum shutter speed to 1/400. If you use a lens that has image stabilization then you can often stretch it a little bit more, say one or two stops, depending on how steady your hands are. You also want to make sure you are holding your camera in the most stable position with your left hand UNDER the body and lens (sort of cupping it) and both elbows in tight to your body. Then, hold your breath and shoot!


You must be logged in to post a comment.