Ein Beitrag von: Marcus Horstbrink

kwerfeldein – Fotografie Magazin
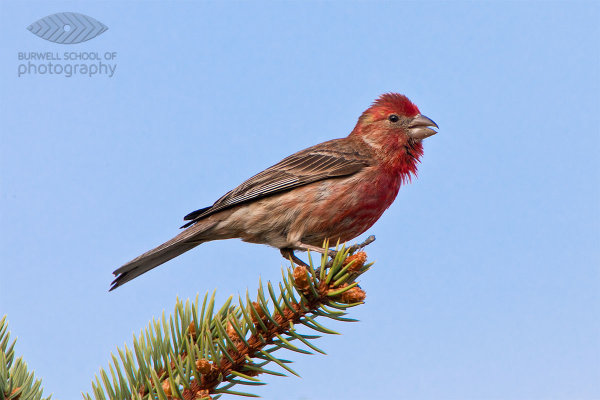
House Finch perched on a spruce tree branch: Canon 5D Mark II, Canon 500mm F4L IS lens, 1.4x Extender II and 2.0x Extender II @1400mm, 1/400th of a second at F10, ISO 800, Gitzo 3541 Tripod with Jobu Design BWG-Pro gimbal head
A contribution by Paul Burwell from Burwell School of Photography
In my last article I discussed the sort of equipment the average person might afford and use for wildlife photography. We discussed lenses and teleconverters along with tripods and monopods. This time, we’re going to look at how you use that equipment to come away with the sharpest possible images.
My first piece of advice is to learn how to use your tripod along with whichever type of tripod head you have. My recommendation for wildlife photography is to use some sort of Gimbal head like the excellent models sold by Canadian company Jobu Design.
These heads allow you to balance the lens/camera over top of the tripod while providing finger tip control. If you’re using a monopod, I’d mount the lens either directly to the monopod or use a quick release plate. At the risk of sounding like a children’s piano tacher, and not meaning to pester, but you do need to practice with this gear to become proficient. Photographic opportunities in the wild are often fleeting and you’ll need to rehearse so that when the time comes you’re making great images and not fumbling with knobs and latches.
Another aspect of making sharp images is using a fast enough shutter speed. As a rule-of-thumb when photographing off of a tripod or monopod, you’ll want your shutter speed to come close to matching 1/2 of your focal length. This rule means that if I’m photographing at a focal length of 400mm, I’ll want to make sure that I’ve got a shutter speed of at least 1/200th of a second to make a sharp image of a stationary critter. If there’s a lot of action going on and you want to freeze the motion, shutter speeds of 1/500th of a second or quicker may be required. I’m also not afraid to use my camera’s higher ISO settings to get a higher shutter speed if required.
There is little doubt that today’s lenses with their built-in gyroscopes to help stabilize the image go a long way in letting photographers get away with slower shutter speeds than the one over the focal length rule of thumb would allow for.
Many of today’s stabilized lenses claim that they can save three or even four stops of shutter speed and still return sharp results. My experience has been that these lenses (IS for Canon users, VR for Nikon shooters, OS or some variation thereof for the rest) do make a tremendous difference and are especially useful in low light shooting conditions. Look at many of my pictures and you’ll see I’m a big beneficiary of this new technology.

Muskrat pauses while eating: Canon 1Ds Mark II, Canon 500mm F4L IS lens, 1.4x Extender II and 2.0x Extender II @1400mm, 1/500th of a second at F10, ISO 640, Saddle-shaped bean bag from vehicle window
Another trick for making sharper images comes down to the connection between the camera and your body. While it might seem to make sense to just lightly rest your eye against the camera’s viewfinder, I suggest you do the opposite. When I’m photographing using telephoto lenses, I physically push my eye as firmly as possible against the viewfinder (or in my case glasses which leaves them very greasy at the end of a photo session).
This technique allows the mass of my body to help dampen vibrations the camera might be experiencing. Next, I hold the camera with my right hand positioned to press the shutter release and make adjustments to the camera’s settings. My left hand gets draped over top of the lens. Again, we’re trying to use our body’s weight to help dampen vibrations and steady the rig as much as possible.
Now that I’ve got my camera equipment mounted on a suitably weight-rated tripod or monopod, I’ve chosen a suitable shutter speed AND I’ve positioned my body against and on the camera to ensure steadiness, all I’ve got to do is shoot away and I’m good, right?
Not quite. The next trick is to learn how to press the shutter release. If you were a casual observer watching just my finger on the shutter release, I’d wager you’d never be able to accurately guess when I’d made a photograph. And that’s because I’ve practiced my technique to the point where, much like the way a sniper squeezes the trigger on a rifle, I can release the shutter on my camera with the same controlled almost indiscernible action.
While I’m photographing, my shutter finger never loses contact with the shutter button and I’m not so much pressing it as I am squeezing it. Remember to squeeze and never stab the shutter button. When photographing wildlife at the longer telephoto lengths, you need to keep all of your actions as smooth as possible and the way you press the shutter is a huge factor in making sharp images.
To summarize these techniques, get your camera gear supported in the best way possible, choose an appropriate shutter speed, brace your body against the equipment so that you almost become part of it and finally squeeze the shutter button with the most subtle of movements. Remember to utilize the three P’s of wildlife photograph (Practice, Practice, Practice) and you have my guarantee that you’ll be well on your way to producing sharper images.
Paul Burwell is the owner Burwell School of Photography
Post originally from: Digital Photography Tips.
Check out our more Photography Tips at Photography Tips for Beginners, Portrait Photography Tips and Wedding Photography Tips.
Making Sharper Wildlife Photographs – [Part 2 of 2]

Fujifilm UK has given more details of the upcoming XF 55-200mm F3.5-4.8 R LM OIS telephoto zoom for its X system cameras. Full specifications include an inner focusing system driven by no fewer than four linear stepper motors, and a promise of class-leading OIS with four to five stops correction, to go alongside the maximum aperture that’s half a stop faster than typical SLR lenses covering the same range. The company says the lens will be available in May 2013. Meanwhile the promised XF 23mm F1.4 R and XF 27mm F2.8 R pancake are expected to appear in the middle of the year, and the XF 56mm F1.4 R and XF 10-24mm F4 R OIS at the end of 2013.
News: Digital Photography Review (dpreview.com)
A guest post by San Diego Wedding Photographer, Wayne Yuan
As full-time photographers shooting 30+ weddings a year, we have to admit, sometimes it’s easy to fall into the same old formulas when it comes to portraits. Even with new poses, taking portraits can become very mundane if the same compositions and angles are used for every couple–we’ve definitely been through that creative rut where our pictures start looking very familiar. Throughout the years, we’ve challenged ourselves to stay on top of our game with a few useful techniques. Here are some of our best tips to help keep things fresh and unique for each couple.
A lot of photographers out there say that their 50mm is a “must-have” portrait lens, but what a mid-range lens offers is a very familiar perspective, something that our eyes are used to seeing all the time. To create a more interesting image, we avoid shooting portraits in mid-range because the images look too ordinary. Most of our portraits are shot at 200mm or 85mm to create beautiful image compression that a 50mm would not be able to produce. The compression will not only flatter your subjects with less feature distortion, but shooting at a longer focal length will also create more dramatic background blur (bokeh) and brings the background closer to your subject. It may be more difficult to communicate with your subjects while shooting at 200mm, but the difference will be apparent and well worth it. Our solution to this problem was to have one of us interact with our couples at close range while the other shoots from a distance.


Many times we are stuck seeing what is right in front of us. It is, after all, the easiest answer to everything. Challenge yourself to find a different angle from above or below eye-level to bring a new perspective to the image. This technique can also be used to flatter subjects of different body types and heights. In the image below, we asked the bride to sit on the ground in order to focus on her face and hair ornament while blurring out the rest of her body. It makes a more interesting image than the typical straight-on bridal portrait.

During a wedding, our speedlites are never on-camera, even during the reception. Flash rarely flatters a person’s face when it is straight on, and the image looses its dimensionality. Using flash to light our subjects from the side, we are able to create both light and shadow on our subjects, flattering their features and bringing a greater range of highlights and shadows to the image. It also helps us bring out details in the background to create a more dramatic landscape.

Shooting at mid-day is no easy task when using natural light. But with some artificial lights, something as simple as a couple of speedlites can diminish the power of the sun and darken the image for better exposure. We use this technique especially when we are trying to create environmental portraits that focus on the landscape. Using our speedlites, we are able to overpower the sun and underexpose the sky while only lighting up the subject. To create this amount of artificial light, we have to use 2-4 off-camera speedlites (with no diffuser) in order to generate enough light to overpower the sun. Holding the speedlites closer to the subject (to the side) also helps put more light on the subject and allows us to underexpose the background even more for dramatic effect.


It takes time and practice to train your eye to find great light. Once you learn how to “find the light” in any situation, it will help you master taking some amazing portraits. Lighting is, after all, the essence of photographic images. Whether you are using the sun, a window, or an ordinary light bulb, these light sources can be used to create beautiful edge light (a.k.a. hair light, rim light) when the light source is place behind your subject. The effect that rim light creates can enhance the dimension of your image by separating your subject from the background, outlining and focusing on your subject.


Learning to look for reflective surfaces and silhouetting opportunities will greatly enhance your images both visually and in depth. For silhouettes, it is key to find a strong light source and place it behind your couple; this could be anything from the sky to a window or even a patch of light on a wall. For reflections, try to be creative with the different types of reflective surfaces; sometimes, the best reflections are found in unexpected places like floors, glass, puddles, and granite walls.


When objects are in our way, we like to use them to our advantage. In fact, many times we are purposely trying to find elements to place in the foreground of our image. Learning to find holes between tree branches, abstract objects, or even ordinary household items are simple, everyday things that will help enhance your images by bringing an interesting, and sometimes colorful, element to your composition. Using a longer lens will help blur out the foreground objects to frame the subjects in a more intimate way.


It is not uncommon for photographers to avoid shooting in the sun and run for the open shade for an easier and even exposure. We covered back-lighting earlier as a solution for shooting in harsh sun-lit situations. But sunlight can also be used as a direct spotlight on your subject. By exposing for the areas directly in contact with the sun, the background and surrounding shadows will dramatically darken, drawing focus and light to your subjects. Applying this technique to different lighting situations will create varying visual effects.


Video lights are very useful when no light source is available to light up your subject in dark situations. The great thing about video lights is that they are a constant light source so you can see what the image will look like in camera. We use LED video lights, which give us enough power to last 2+ hours. They are a great alternative to speedlites for low light situations and are quicker to adjust for dark situations.


Adding CTO (orange) or CTB (blue) gels to your speedlites will change the mood of your image. Sometimes shooting in an environment which is overcast and very blue, adding a CTB gel will warm up the whole environment if you adjust the white balance correctly. CTO gels can also be used to emulate sunlight.

For more examples of on how to take great images, check out our website: San Diego Wedding Photographer – Wayne Yuan
Wayne and Angela are photographers/owners of Wayne Yuan Photography. They live in San Diego and New York area, but shoot weddings worldwide.
Join our Facebook Fanpage | Ask a question on our Formspring | Contact Us

Post originally from: Digital Photography Tips.
Check out our more Photography Tips at Photography Tips for Beginners, Portrait Photography Tips and Wedding Photography Tips.
10 Techniques for Amazing Portraits
This opinion piece was contributed by Declan O’Neill from www.newzealandscape.com.
The winner of one of Britain’s most prestigious photographic competitions was stripped of his title recently because of excessive use of Photoshop. David Byrne was the winner of the Landscape Photographer of The Year award and a £10,000 ($ 16000) prize but has now had his title and prize money taken away in a surprise move by the organisers of the competition which is supported by Epson, The Sunday Times Magazine and The National Theatre.

The dramatic reversal came about after other photographers pointed out that the image had been photoshoped to include clouds not in the original image. Other photographers pointed to the impossibility of the sun casting shadows in different directions.
Mr. Byrne defended his manipulation of the image by pointing out that altering images is hardly new. He was quoted by The Daily Mail as saying, ‘The purists out there were not happy. Messing about with pictures has been done for over 100 years. I treat my photography as art and I try to make the best looking picture.’
Those three sentences neatly define the battle lines which have been drawn over the digital manipulation of photographs.
First of all he seems to suggest that anyone who objects to manipulating images is a ‘purist’. It seems clear that ‘purist’ is not a compliment in this context. What this veiled insult fails to acknowledge is that many photographers do not object to using Photoshop to enhance photographs but they do object to its use in altering photographs.
The problem comes in defining when enhancement crosses a boundary into alteration. Removing power lines from a landscape is one thing. Changing the colour of the sky from grey to orange quite another. It isn’t as if there is any shortage of sunsets around to photograph and the joy of landscape photography is capturing the elusive, not manufacturing it with software. It’s no crime to create a sunset sky, it’s just rather sad that someone would need to do it when there is so much natural colour to photograph. How many times have you looked at a super saturated landscape photograph and known instinctively that it’s false? Yet we see these photographs constantly win awards in club and national competitions. Anyone who has studied the way sunlight paints the landscape from different angles knows how to capture the best colour without needing Photoshop. That’s what being out in the field teaches you. You learn how to use the light to maximum effect.
The second defence that Mr. Byrne advances is that photographers have been ‘messing about’ with photographs for a long time. His choice of words is both unfortunate and revealing. Photographers should respect their subject matter. You do not have to go very far to capture truly beautiful natural photographs and the idea that it’s ok to mess about with the captured image is a depressing comment on the craft of photography. This attitude tells us that the photographer has no qualms about creating a vision of what they wish they had captured, but failed.
Finally Mr. Byrne tells us that he treats his photography as ‘art’ and tries to make ‘the best looking picture’. Here is the real problem with the software tools that allow us to create our own photographs. Photography has always been a craft. Ansel Adams had no need to add clouds or alter tree shapes because his images were honest and beautiful. There is nothing wrong with painting new images with Photoshop, just don’t call it photography. It is something entirely different when a photographer wants to be an artist. An artist creates images from their imagination and that is a wonderful thing. Just leave photography to record what the camera sees not what the photographer wishes it had seen.
What is extraordinary is that Mr. Byrne should have won such a prestigious title as Landscape Photographer of the Year. Luckily, his alterations were brought to the attention of the judges who had been unable to detect them for themselves. But for the ‘purists’ his accolade would have reinforced the idea that we can alter images in the name of ‘art’ and still claim they are photographs. If something good can come out of this sorry debacle it is the lesson that landscape does not need our interference. The true joy of landscape photography lies in capturing its pristine beauty. Painting it in the crude lipstick of Photoshop is both unnecessary and an admission that we cannot leave it to speak for itself through our lenses.
Declan O’Neill is a photographer who lives in Nelson New Zealand. He specialises in landscape photography and runs photographic tours of the South Island. His website can be found at www.newzealandscape.com.
Post originally from: Digital Photography Tips.
Check out our more Photography Tips at Photography Tips for Beginners, Portrait Photography Tips and Wedding Photography Tips.
OPINION: Why Photoshop is Ruining Landscape Photography
Als Annie Leibovitz 2011 auf NBC das iPhone als Schnappschusskamera anprieß, ging ein Raunen durch die Fotografengemeinde: Eine Weltklassefotografin riet zu einem Mobiltelefon anstatt einer „richtigen“ Kamera zum Fotografieren.
Dass mit Mobiltelefonen wirklich großartige Fotos entstehen können, beweist der Wettbewerb Mobile Photo Awards. Wie der Name bereits verrät, geht es hier ausschließlich um Bilder, die mit Mobiltelefonen aufgenommen und bearbeitet wurden. Dabei ist es völlig egal, um welches Telefon es sich handelt.

Lobende Erwähnung in der Kategorie „Kinder“ von Millo Salgado
Das kurzfristige Ziel der Mobile Photo Awards ist es, das Medium der mobilen Fotografie, seine Künstler, die Entwickler der Apps und natürlich die Schönheit der Bilder zu feiern. Wir glauben, dass, um die Bilder weiter in die öffentliche Wahrnehmung zu rücken, das Medium sich über Online-Fotosharing hinausentwickeln muss.
Um dies zu erreichen, werden die Bilder nicht nur online präsentiert, sondern gedruckt, gerahmt und in Galerien ausgestellt. Für das Team der Mobile Photo Awards ist es wichtig, aufzuklären und zu zeigen, dass es vor allem auf die Bilder selbst ankommt und nicht auf das Werkzeug zur Erstellung.

Lobende Erwähnung in der Kategorie „Tiere“ von Theodore Kaye
Wir glauben, dass mobile Fotografie nichts anderes ist, als das, was einige als „echte“ Fotografie bezeichnen. Mobile Fotografie ist echte Fotografie. Es ist eine einzigartige Kunstform, die von Millionen praktiziert wird – ein wachsendes, globales Öko-System von Künstlern und App-Entwicklern, von denen viele außergewöhnliche Bilder und Anwendungen erstellt haben. Und sie verdienen mehr Aufmerksamkeit als Instagram-Herzen oder Flickr-Favoriten.
Dies unterschreiben wir und bestaunen die Gewinner des diesjährigen Wettbewerbs mit seinen insgesamt 19 Kategorien.

Gewinner in der Kategorie „Street“: „Hiding from the light“ von Oliver Lang
Die Gesamtgewinnerin der Mobile Phone Awards 2012 heißt Sarah Jarrett und wird bereits scherzhaft als App-Flüsterin bezeichnet, denn ihre Bilder erinnern durch die starke Bearbeitung am iPhone beinahe eher an Gemälde.
Die englische Fotografin setzte sich mit Abstand neben allen anderen Teilnehmern durch und stand bei allen sieben Jurymitgliedern als einzige auf der Top-Ten-Liste. Auch das Titelbild dieses Artikels stammt von ihr.

Gesamtgewinnerin des MPA 2012: Sarah Jarrett
Alle Gewinner und lobende Erwähnungen könnt Ihr auf der Awardseite ansehen. Nehmt Euch einen Tee und etwas Zeit, denn es lohnt sich.
Ich sehe die mobile Fotografie nach diesen Fotos auf jeden Fall mit anderen Augen, beeindruckt von der Qualität und den Möglichkeiten, die mir bisher völlig unbekannt waren. Zu schade, dass mein Handy keine Fotos machen kann, denn sonst würde ich wohl jetzt direkt damit losziehen.
kwerfeldein – Fotografie Magazin
Disclaimer: Obviously people will have different experiences at different Apple stores at different times. This is just a single experience, in a single store, at a single point in time.
Today is my daughter Holly’s birthday. She’s been asking for an iPad for her birthday for months. I’ve been telling her that an iPad is too expensive, but I broke down yesterday after work and stopped by the Union Square Apple Store in San Francisco to buy her one. She was thrilled and ecstatic to receive it — can you tell by her photo above ![]()
I’ve purchased many things at many different Apple Stores over the years, but yesterday’s experience was so fluid and flawless that I thought I’d write a short post about it.
5pm (approximately) I walk into the store. I don’t get more than two feet into the store before making eye contact with an Apple employee strategically positioned by the door. “Welcome to Apple,” he says. “Can I help you something?”
“I’d like to buy an iPad,” I reply.
“Ok, great,” he says. “Would you like an iPad or an iPad Mini?”
“I’d like an iPad,” I reply.
“Ok, do you just want the basic 16GB one?”
“Yes.”
“Alright, hold on, I’ll be right back.”
Less than two minutes later he returns with a new iPad in a shrink wrapped box.
“Would you like to put this on a credit card?”
“Yes,” handing him my American Express.
“Can I see your ID?”
I hand him my drivers license, he confirms it’s me, hands it back, says thanks and runs my card through a hand held device.
While the device is running the card he asks me, “are you buying your iPad for business or pleasure?”
I tell him that it’s for my daughter’s birthday. “Great,” he says.
A few seconds later he hands me his electronic device and asks me to sign it with my finger. I sign it with my finger.
“Would you like a printed copy of your receipt, or is just an email fine,” he asks. (God I HATE printed receipts, email receipts are sooooo awesome!).
I tell him that an email is perfect. “Ok,” he confirms, “to tom(at)thomashawk.com.”
“That would be great,” I answer back.
“Alright we’re all set then,” he says, “do you need a bag?”
“No,” I reply, “thanks for the help,” and put the iPad into my own bag and walk out the store — and just like that, four minutes later, I’m done.
This morning I received a follow up survey in my email about my experience at the Apple store. How could I not give them the highest possible ranking in every category?
Being able to walk into a store and purchase something right there at the entrance in less than five minutes is the absolute height of customer service. It’s delighting a customer who will certainly remember that experience the next time it comes to making a purchase and who will be back. No wonder so many people are buying Apple products.
Thomas Hawk Digital Connection
[ By Steph in Technology & Vehicles & Mods. ]

The Urbee 2 is strong as steel, half the weight of a conventional vehicle, and can be manufactured in a warehouse full of plastic-spraying 3D printers. The teardrop-shaped 3D-printed car is an ecologically sound hybrid, and it looks cool, too. Aerodynamic and futuristic, this car could be a total game-changer for the automobile industry, leading to a rise of small-batch automakers.

The three-wheel, two-passenger prototype vehicle with a generously sized, curved transparent roof (also made of plastic) was constructed by Kor Ecologic at RedEye, an on-demand 3D-printing facility with a Fused Deposition Modeling printer that sprays molten polymer one microscopic layer at a time to create the desired shape. The whole car takes about 2,500 hours to manufacture, but the process is fully automated.
The Urbee 2 3D-printed car’s light weight makes it so fuel-efficient, creator Jim Kor aims to make it from San Francisco to New York City on ten gallons of gas. Kor Ecologic’s design ideals for the project include causing as little pollution as possible during manufacturing, operation and recycling of the car, using local or regional and/or recyclable materials whenever possible, and making it affordable.

You might wonder just how safe a plastic car can really be, but Kor is aiming high in that department, too. The bumpers will be just as strong as their sheet-metal equivalents. The final goal for the Urbee is not just to exceed all current automotive safety standards, but be able to pass the tech inspection required for race cars.
![]()


[ WebUrbanist | Archives | Galleries | Privacy | TOS ]
![]()
 |
 |

US photographic trade body PMA and dpreview.com are conducting a survey looking for the views of dedicated amateur photographers. The survey asks about your photographic habits, the features you’d like to see in cameras and your use and experience of photo sharing sites and printing services. We’re aiming to get a clearer understanding of what committed non-professional photographers want from their cameras and related services and your answers may even result in those things getting a bit better – including dpreview.com. Responses will be discussed at this year’s 6Sight conference. As an incentive, one lucky respondent will be sent a shiny new Apple iPad with Retina Display.
News: Digital Photography Review (dpreview.com)

Last week Microsoft released the Windows Phone 8 version of its Photosynth 360 degree panorama app, making it compatible with latest generation smartphones such as the Nokia Lumia 920, HTC 8X or Samsung Ativ Odyssey. We installed the app on Samsung’s first Windows Phone 8 device, the Ativ Odyssey, and had a closer look at what it can do. Click though for our hands-on article.
News: Digital Photography Review (dpreview.com)
You must be logged in to post a comment.