RSS
 

Archive for February, 2013

New capacitor could make xenon smartphone flashes more popular

22 Feb

xenonflash.jpeg

A new, smaller capacitor could make Xenon flashes practical for use in ultra-slim smartphones. Researchers from a university in Singapore have partnered up with Xenon Technologies to develop a tiny capacitor for Xenon flashes that it claims is just as powerful as existing, larger versions. This is potentially big news for the smartphone industry which has primarily used LED lights in preference to Xenon flashes up to now. Few smartphones have incorporated Xenon flashes because of their higher power demands and larger physical size. Learn more about the tiny new capacitor at connect.dpreview.com.

News: Digital Photography Review (dpreview.com)

 
Comments Off on New capacitor could make xenon smartphone flashes more popular

Posted in Uncategorized


21. Februar 2013

22 Feb

Ein Beitrag von: GO.70°NORTH

8481755707_71f2b8ec16_b


kwerfeldein – Fotografie Magazin

 
Comments Off on 21. Februar 2013

Posted in Equipment


Take your Time and Work the Scene

22 Feb

I recently shared this photo on Facebook, Google+, and Flickr, with a quick tip on how to create a starburst effect. In this article, I’d like to share the thought process behind the image, and a few of the less successful images that led up to this final shot.

Final photo of the tree with a small starburst for creative effect

Canon EOS 5D Mark III with EF 40mm f/2.8 STM, 1/320, f/14, ISO 100

Here’s the first shot of the tree:

First Image

I shot this photo as soon as I saw the tree. It’s a fascinating tree, but not a very interesting photo. There’s just too much happening here. So I moved behind and tried a silhouette against the sky:

First silhouette

Sometimes your first few shots will not be the best, take your time to work the scene. Think about how you can best use the elements in the scene to create an interesting photo. There are 4 elements in this image:

1. The sun
2. The tree
3. The deep blue sky
4. The rocks

I liked the tree, and I wanted to shoot it as a silhouette against the blue sky. I also thought that I could use the sun to create a starburst and add a sense of drama. But after my first silhouette attempt, I realized the sun was just to big and bright to use as a separate visual element. It was upstaging my tree. Not cool. I also didn’t like all the rocks and fuzzy vegetation at the bottom of the frame. Too many distracting elements competing for the viewer’s attention.

So I moved closer, tilted the camera 45 degrees counterclockwise to eliminate some of the foreground, and put the sun behind the tree:

Intermediate image

Then came the decisive moment. I realized that if I allowed just a bit of sun to shine through the ‘V’ formed by two branches, I could bring back a little of that starburst, while preventing it from overpowering the image.

All in all, I shot 12 photos in two minutes to arrive at the photo that I felt was the strongest, the image at the top of this post. The key is work the scene and make small changes until you arrive at the shot you want.

I hope this behinds the scenes look at been helpful. Many of the amazing photos you see have several less interesting shots leading up to them. Next time something catches your eye as interesting, but your first few shots don’t capture that feeling, slow down and work the scene.

I appreciate feedback, please comment below or feel free to connect with me through Facebook or Google+. I’ll do my best to answer questions and reply to comments.

Post originally from: Digital Photography Tips.

Check out our more Photography Tips at Photography Tips for Beginners, Portrait Photography Tips and Wedding Photography Tips.

Take your Time and Work the Scene


Digital Photography School

 
Comments Off on Take your Time and Work the Scene

Posted in Photography


320-gigapixel photo of London is the world’s largest panoramic photo

22 Feb

London-Gigapixel.jpg

A 320-gigapixel image taken from top of London’s British Telecom Tower has set the world record of the largest panoramic photo. It breaks the previous record set by a 281-gigapixel electron micrograph of a zebrafish embryo taken in 2012. The London image was shot by panorama specialists 360 Cities and is made up of 48,640 individual frames. To get an idea of just how large this photograph is, BT says if it was printed at ‘normal resolution’ the photo would measure measure 98 x 24 metres.Click through for pictures and more information on the hardware used to make the image. 

News: Digital Photography Review (dpreview.com)

 
Comments Off on 320-gigapixel photo of London is the world’s largest panoramic photo

Posted in Uncategorized


Nikon posts sample images from new D7100

22 Feb

nikond7100sample.jpg

Nikon has just posted a small 6-image sample gallery from the new D7100. The D7100 is a 24MP, APS-C DSLR that does not feature an optical low-pass filter on its sensor. Theoretically, this should increase detail resolution. As well as an unconventional sensor, the D7100 offers a 51-point AF system and a 1.3X crop mode in stills and video capture. The images that Nikon has posted were taken in .NEF raw mode with the D7100 fitted with the AF-S NIKKOR 500mm f/4G ED VR and AF-S NIKKOR 70-200mm f/4G ED VR. Click through for pictures and a link to the images on Nikon’s website.

News: Digital Photography Review (dpreview.com)

 
Comments Off on Nikon posts sample images from new D7100

Posted in Uncategorized


Transportable Tourist Towers Provide Stackable Housing

22 Feb

[ By Steph in Architecture & Houses & Residential. ]

Transportable Tourist Tower 1

Prefabricated, portable and modular, the Transportable Tourist Tower (TTT) by Portuguese architect Jose Pequeno is an adaptable housing solution that can be installed on almost any site, vertically or horizontally, as a single unit or a larger stacked structure.  Capable of being made from local, recyclable materials, this nearly self-contained unit is ideal for temporary installations and sensitive building sites.

Transportable Tourist Tower 2

The tower debuted at the 2010 Shanghai Expo and has since made its way around the world, installed in various locations as a tourist information center. It needs as little as 10 square meters for its installation, fitting into tight spaces. It can be transported on a truck, and lifted into place with a crane.

Transportable Tourist Tower 3

Transportable Tourist Tower 5

Vertically, the Transportable Tourist Tower can be placed alone or side-by-side. But what makes this unit even more versatile is its ability to be placed on its side. All of the components within the building are flexible and modular, making them easy to move, remove or replace as needed.

Transportable Tourist Tower 4

The three-story unit is packed with functionality despite its small size. It contains a living space, dining area, kitchen, bedroom, bathroom, study and rooftop deck. It’s easy to imagine this tower in use at large events such as the Olympics, where compact housing is only needed for a short period of time.

Share on Facebook


[ By Steph in Architecture & Houses & Residential. ]

[ WebUrbanist | Archives | Galleries | Privacy | TOS ]


WebUrbanist

 
Comments Off on Transportable Tourist Towers Provide Stackable Housing

Posted in Creativity


Synology DS1512+ NAS review

21 Feb

Hello there! I’d just finished writing this Synology 1512+ review and subsequently deleted it all… Why, you ask? Well – I have a bit of a history in I.T. and as such, found myself getting TOTALLY geeky with my review..

Those of you that have read any of my reviews to date, here on dPS, will know that I try to keep it ‘real world‘ …So, I’m going to write it again and dispense with all the ones and zeros in an effort to help you decide if moving to a Synology NAS is the way forward, or not.

Synology DiskStation 5-Bay (Diskless) Network Attached Storage DS1512+

Unboxing_Synology_1512_NAS

The Synology DS 1512+ is a 5 drive NAS that can give you up to around 15TB of space depending on how you set it up – that’s a heck of a lot. You can also add external disk shelves (DX510 @ about $ 600) that will take you upto 60TB of space… To put that into perspective, my image library is between 3 and 4TB and it spans the last 10 years.. You may have a lot more, you may have less – but one day you WILL have more.

Here are a few of the specs as per the Synology website. This little black box is no lightweight!

Synology DiskStation DS1512+ offers a high-performance, scalable, and full-featured network attached storage solution that meets the needs of small and medium-sized businesses that require an efficient way to centralize data protection, simplify data management, and rapidly scale storage capacity with minimal time spent on setup and management. The Synology DS1512+ is backed with Synology’s 3-year limited warranty.

  • 194.83 MB/sec Writing, 200.31 MB/sec Reading1
  • Scaling up to 15 Drives with Synology DX510/DX513
  • Featuring SuperSpeed USB 3.0
  • Expandable RAM Module (Up to 3GB)
  • 2 LAN with Failover and Link Aggregation Support
  • CPU Passive cooling Technology & System Fan Redundancy
  • VMware®, Citrix®, Microsoft® Hyper-V® Compliance
  • Running on Synology DiskStation Manager (DSM)

The 1512+ can come configured with hard drives already in the unit and set up, mine came without drives and I went ahead and put four 2TB drives and a single 1TB drive in the unit and set it up using Synology’s Hybrid Raid.

SO, very basically, let’s look at what all these crazy acronyms mean, shall we? (Yes, I realise half of you (us) are a little geeky and already know this stuff) RAID for example, is not something my three year old constantly does to the biscuit tin, well, it is, but in this case RAID stands for “Redundant Array of Inexpensive (or independent, you choose) Disks” which is basically exactly what it says on the tin… A bunch of disks, joined together to act in a handful of different ways as one, i’ll explain those in a bit.

Synology_1512_Photographers_Nas_Review

NAS or Network attached storage is the next one we’ll cover… So, rather than sticking a USB or Firewire cable in the side of your computer, you can tuck this little fellow away near your home / office router (wireless modem / modem) and, obviously depending on if you have the right hardware, can connect it to your network and access it via either wireless or wired network.. Me, I use a Draytek Vigor 120 ADSL2+ modem attached to an Apple Airport Extreme.. My Synology is plugged into my Airport Extreme and I connect to it wirelessly from my computer.

Now, you asked about the different things RAID could do… Well, there are a few different ‘levels’ of standard RAID, the Synology can perform each of these, though I’m not going to bore the trousers off of you by explaining what each of them do here, you can spend a quiet evening reading up on them …as I said, I set up my NAS using “Synology Hybrid Raid” as it does what I want, and I’m semi-certain if you’re like me, it will do what you want.

  • JBOD
  • RAID-0
  • RAID-1
  • RAID-5
  • RAID-5+Spare
  • RAID-6
  • RAID-10

These different raid levels provide everything from no disk redundancy to a lot (2x) of disk redundancy with differences in read and write speed at each RAID level… For me, how to choose what RAID level was made very simple with the Synology, as they have the Synology Hybrid Raid. SHR is based on standard RAID, but allows the device to use all of the space on each disk… You can read the exact technical details on Synology’s website if you’re into that – as I said, I wasn’t going to bust out the pocket protector in this review… I do have a good analogy though!!

You have 5 water buckets, three medium sized ones and two large ones (and no, this isn’t a Bruce Willis film) …if you fill each bucket up to the same level as the smaller buckets when they’re full, you will see you have space left in the two bigger buckets… traditionally, that space is lost if you RAID that set of disks together. With SHR, you can group that remaining space together to give you another volume (or another drive letter if that’s easier to understand, depending on how you share it…) so, the first part of your Synology will give you 5TB and the remaining space might give you an extra 2TB. Winning! Finished reading Wikipedia? Have a quick look at this RAID calculator, It’s pretty neat!

Using a NAS / RAID on its own isn’t a backup as such… Be Warned!

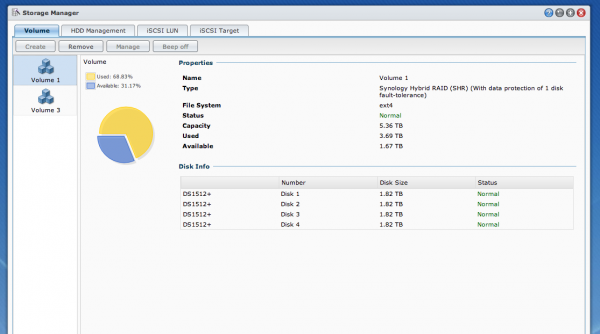
Whilst you have ‘fault tolerance’ when using a Synology Hybrid Raid setup, the same as with most RAID arrays, you still need a backup of your data. For example, my main portion of space is across four hard drives within my NAS as per the image below, if one of those drives should have an untimely death, my Synolgy would chuckle, beep and carry on serving data – this is how (some) RAID levels work. Here’s an overview of how my Synology is setup.

4 x 2TB Hard Drives, joined together using SHR to give me a single drive with 5.36TB of useable space – you can see that in the image below.

Synology_raid_array_setup_review

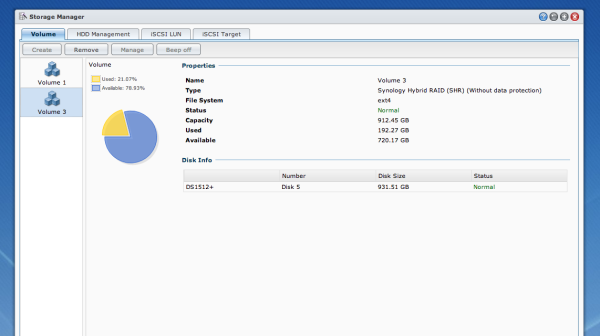
I also have a single 1TB drive in the Synology as it takes 5 disks and I didn’t have five 2TB disks, so I’ve added a single 1TB that I’ve called ‘Media’ and I use that to serve music, movies, tv shows and pictures to anyone on my network / to my Android DTV box. I also have “iTunes server” installed, this is software that installs in seconds and runs on the Synology and can serve any iTunes content out across my network to iTunes clients… (You can also add USB speakers to your Synology and play music directly from the unit… rad…)

Synology_DSM_Review

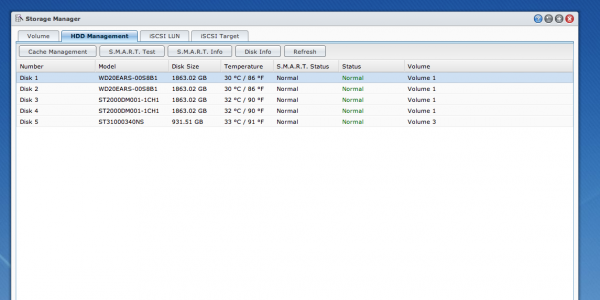
But the best thing is that I had a few of these eSata hard drives sitting around, not all the same brand or model, yet the Synology will happily treat them all nicely – have a look below at the list of drives.

synology_simon_pollock_review

So how do I use it?

After continually growing my photo library for the last 12 years or so, I have a lot of digital image files – the majority in the last four years as file size increased etc. So disks get bigger and rather than have a set of single external drives looking after my archive, I’ve employed this Synology. You can see above that I have 4 separate disks that are looking after my archive, they’re a similar size to the G-Tech I use as my working drive…

You use a G-Tech too? But didn’t you just implement a Synology?

Yes! Remember that part where I said that a NAS on its own isn’t a backup? Well, when you look at my workflow below, you’ll understand where the Synology comes into its own.

Here’s my workflow;

Take a photo -> Lexar USB 3 CF reader -> Macbook Pro with Lightroom 4 -> G-Tech 4TB which is my Firewire attached disk, the drive I work from etc. Now, where I’ve added this network attached storage drive is at this point – when I import a card full of images, I ask Lightroom to make a second copy to the Lightroom folder on my NAS, you can see in the image below..

simon_pollock_lightroom_synology_workflow

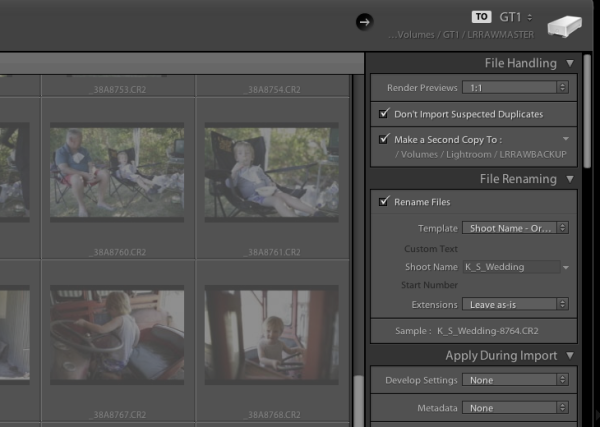
You can see at the top that I’m importing to GT1, a 4TB G-Tech Firewire drive, then below that you can see i’m rendering 1:1 previews and then below that I’m making a second copy to my Synology. All done, all backed up… At the end of my import and subsequent edit, I can export that catalogue into the same raw backup folder on the NAS and everything from that shoot is in one convenient place.

Sure, but why a NAS?

Well, yes, why a NAS? The Synology is around $ 800 and then you need to buy disks for it, whilst not the most expensive unit on the market – actually, it’s very competitively priced – it’s not spare change. For me there are a number of reasons to choose a Synology NAS, and after having the Synology installed and kindly and quietly doing exactly what I’ve asked it for a month or so, I question myself as to why I didn’t do it a LONG time ago! Here are my reasons for NAS…

  • Computer independent (a Mac and a PC can read it.. which if you share drives with your missus, is a good thing!).
  • It can be used for much more than a simple external drive in a one box format. WordPress server for example! take a look
  • When my 5 hard drives fill, I swap them out without having to buy external drives (cost saving in the long term).
  • The Synology sits quietly in a corner, stays cool and goes to sleep when I’m not using it. (depends how you set yours up)
  • It serves all the music / photos / media easily and quickly.

The ability to access my data from anywhere (with an internet connection) including my phone etc, knowing that my disks are monitored and i’ll be alerted if something looks fishy, to be able to grow my disks with ever increasing storage needs… major plus ticks in my book.

The Synology was so simple to setup, yes, I have an IT background but here’s what I did to set the unit up and connect to it… Plugged it in to the power, plugged in one of the provided network cables and put that in a free network port on the back of my Airport Extreme… and, err, turned it on… That was about it! I’ve since upgraded the operating system (DSM) which is a very simple and quick task. I’ve installed the virus software on the box which is an app and manages itself. There is also a great support forum, lots and lots of enthusiastic users etc.

The Synology is a very good unit with lots of software available to do anything from manage ip security cameras to run your small business network and back up your files to an offsite location. A great tool in my toolbox of digital life.

Who is the Synology 1512+ for? Anyone with storage requirements, but I’ll be personally suggesting it to anyone looking to break free of the constant external drive purchasing circle.

I find no negatives, only positives with the Synology DS 1512+ …bravo, Synology – 11 stars

–Sime

Post originally from: Digital Photography Tips.

Check out our more Photography Tips at Photography Tips for Beginners, Portrait Photography Tips and Wedding Photography Tips.

Synology DS1512+ NAS review


Digital Photography School

 
Comments Off on Synology DS1512+ NAS review

Posted in Photography


30 Things you Should Know to Help you Start a Photography Business

21 Feb

14“Follow your bliss and the universe will open doors for you where there were only walls.” – Joseph Campbell

1. Find the best photography course or workshops that work for you

If you are going to invest in a photography course/workshop do some serious research first.

It’s a huge investment so find out who the teachers are. Are they industry professionals that are going to be teaching you relevant styles and techniques?

Is the style of teaching suited to your personality and photography?

Who are the ex students that have gone on to create successful careers?

Consider weekend workshops and online courses held by experts in their fields.

2. Find a great mentor

A mentor should be someone who has had a successful career, whose work you admire and is passionate about what they do. They should be available for at least one hour a month.

3. Get as much industry experience as you can

Intern with as many different photography businesses as you can, both large and small. My first interning gig was with a food photographer. I’ve also worked with high-end commercial product photographers, car photographers, and fashion and wedding photographers. I came away with valuable skills that I still use today.

4. Be Flexible when looking for an internships

When you are looking for an internship it’s often easier to offer your services on a casual daily basis or weekends or even nights rather than trying to find someone who will commit to a long-term internship.

5. Sweep the floor and scrub the toilet

I landed a full time assisting job with a fashion and celebrity photographer because he noticed I scrubbed his toilet and cleaned his studio when I had nothing to do

6. Hang around with people who inspire and support you

Some of your friends and family are going to try and talk you out of pursuing your dreams.
They have good intentions but it’s your dream not theirs.

7. It takes 10,000 hours of work to become a master of your craft

If you spend 3 hours a day photographing and editing photos you will become a master at it in 10 years. There are no short cuts or magic formulas, just hard work.

8. Photography is not a job it’s a passion

When you love what you do it never feels like work.

9. Learn to embrace failure

Some of the world’s greatest entrepreneurs had spectacular failures before they found success.

Henry Ford had 5 businesses fail before he founded the successful Ford Motor Company.

Thomas Edison failed 10,000 times trying to invent the light bulb and after the 10,000th time; he succeed

Don’t be afraid to make mistakes

10. Your uniqueness is the most important asset you have

The photography industry does not need another Ansel Adams, Annie Leibowitz, or Alfred Stieglitz. Develop a unique style that sets you apart from everyone else

11. The most common cause of failure is quitting

Most people give too early. Building a business takes years, there will be set backs. Commit to the long haul.

Fact: the average entrepreneurial millionaire has been broke or nearly broke 3.2 times

12. There is no such thing as overnight success

It took me 5 years to actually make a profit. It took me ten years before that profit was enough to afford me a decent lifestyle

13. Having a full time or part time job while you build your business is a great idea

I worked full time in an Italian restaurant for the first 5 years

Having another job while I built my business had the following positive effects

  • It gives you something positive do everyday while you are waiting for your first breaks
  • It removes that “desperate” energy around you. Trying to find new clients in this headspace is really difficult. Nobody wants to hire someone that appears desperate it makes them wonder what is wrong with you.
  • Your part time job may be the source of photography leads or your first big break. It was for me.

14. You will constantly be surprised by where your big breaks come from

I landed my first paid advertising shoot from waitresses I worked with. She introduced me to her husband who ran an advertising agency. One day he asked me to do a shoot for his agency. It was a simple product shot that should have taken an hour. I worked on it for 2 days, made a loss but earned a very happy and lucrative client.

15. Every time you are rejected means you are one step closer to success

Collecting new clients is a numbers game. In my early years I discovered that when I was showing my folio to Art Directors and Editors I was getting 30-50 “no’s” to every “yes”.

It took me many, many years to work out that this rejection is never personal. It often just comes down to potluck if you meet with someone on the same day they happen to have an assignment that suits you.

There are some very famous examples of people who experienced countless rejections before they achieved success

  • Author, J.K Rowling’s manuscript Harry Potter was rejected 12 times before she found a publisher
  • Walt Disney was knocked back 302 times before he got financing for creating Disney World
  • Several record labels rejected The Beatles
  • Colonel Sanders, the founder of KFC had his famous secret recipe knocked back a staggering 1009 times

16. Seek constructive criticism and learn from it

One of my greatest learning periods was during a 3-month stint working in a photo lab printing Black and white prints. Yes, last century when we marveled at the new mobile phone that was the size of a small refrigerator and twice as heavy.

I was shooting models tests all weekend and bringing them into the lab to print and process during the week. Two of my co-workers were 30+ year veterans who would critique my work and give me suggestions on improving technique and style.

Show your photos to as many industry professionals as you can. Ask for constructive criticism and learn from it. This is a great time of growth and learning.

Be grateful for all the praise your family and friends will always give your work but remember they will always love everything you do and may find it difficult to point out any faults.

17. Dress to impress

If you want people to take you seriously then you should take your appearance seriously.

18. Always read the fine print

Never sign a contract before reading the fine print. If you don’t understand it then find someone who does.

19. Work your strengths, hire your weaknesses

Aim towards outsourcing all the things that take you away from earning money for your business like book keeping and web design. Your time would be better-spent blogging or marketing.

20. Social Networking

Blog, tweet, flickr, facebook, instagram, google+, linkedin do it all and do it often.

Share your work, support other artists whose work you love and be generous with your information.

21. Shoot personal projects that inspire you

Unless you are lucky enough to be working for cutting edge magazines or alternative clients who love to push the envelope shooting only paid work will give you a very generic looking folio.

Shooting personal projects give you a chance to test new lighting styles, lenses, locations and it’s a brilliant way to showcase your personality.

22. Have a consistent workflow

Name and number and file every shoot in a consistent way. If you’ve ever spent hours looking for an image or even worse lost files you will understand the importance of this point.

23. Back up twice

Keep one hard drive on location and another off site. Hard drives fail. Protect your files.

24. If you pay peanuts you get monkeys

Use professional assistants. Having a great assistant means you never have to sweat the small stuff. Everything is taken care of. This means you can focus on getting the shot

25. An inexperienced make up artist or stylist can ruin and entire shoot

Work with a variety of different Hair and Make Up artists and Stylists till you find the ones that compliment your shooting style.

26. Always shoot in RAW

A RAW image file contains all the original data that the camera censor captured.

A JPEG is a compressed file that only retains about half the data of a RAW file.

Give image the best possible chance from the start. No excuses. Just shoot RAW.

27. Never store your memory cards in your back pocket and don’t shoot an entire job on one card

Pockets get holes in them and cards fail. I found out the hard way.

28. Be quiet

If you depend on your creativity for your living, then your most valuable piece of equipment is your mind. Taking time out everyday is a great way to do this and

29. Make friends with other photographers

The best advice on equipment and technique has come from spending time with other photographers. Social networking makes it really easy to connect with different photographers from all around the world.

30. Just start. Today

“Whatever you can do, or dream you can, begin it.” -Johann Wolfgang von Goethe

The first thing I did when I decided to become a photographer was to get business cards printed that said Gina Milicia PHOTOGRAPHER. Even if I wasn’t 100% convinced I was ready or good enough the simple act of printing cards made it real to me.

I started out with a basic SLR camera and a cheap zoom I borrowed from my brother. I photographed only in daylight for the first 2 years because I could not afford flash gear and worked hand held because I also could not afford a tripod.

There will never be a time when you are 100% ready. There will always be something missing. Just start. Today.

A few great books that inspired me.

  • Think and Grow Rich: – Napoleon Hill
  • Power Stories: The 8 Stories you MUST tell to build an epic business: Valerie Khoo
  • Outliers: The Story of Success: Malcolm Gladwell
  • The Alchemist: Paolo Coelho

Enjoy this post? Check out more of Gina’s advice in her new eBook – Portraits: Making the Shot (and get a bonus one free for the next 24 hours only).

Portraits_468x190px.jpeg

Post originally from: Digital Photography Tips.

Check out our more Photography Tips at Photography Tips for Beginners, Portrait Photography Tips and Wedding Photography Tips.

30 Things you Should Know to Help you Start a Photography Business


Digital Photography School

 
Comments Off on 30 Things you Should Know to Help you Start a Photography Business

Posted in Photography


The Ultimate Guide to Vine: Pro-Tips, Awesome Ideas, and Who to Follow!

21 Feb

It’s easy to forget about the video function built into your camera phone.

It’s just that videos end being too big to send to friends, and who wants to wait for a video to download anyway?

Man, are we spoiled. Back in our parents’ day, they had to carry 20lb VHS recorders just to shoot a few minutes of film! Us? We have a video recorder that fits in our pocket.

Vine fixes all of this and then some.

It’s an app that lets you share snippets of video –six seconds to be exact– in a super-digestible format. As you scroll through a stream of friends’ videos, the video on your screen instantly plays.

This isn’t just another Instagram. It’s a whole new platform for showing off your creativity. There’s so much you can do in six seconds!

Plus, you get to share life-experiences with friends as they happen. And that right there is pretty much the coolest thing your phone has to offer.

So get it, and then read on for all the best tips, ideas, and inspiration on Vine.

The Ultimate Guide to Vine

p.s. Hey DSLR lovers! Have you seen the Lensbaby Spark? It’s a way fun, bendable tilt-shift lens that’s totally affordable.

(…)
Read the rest of The Ultimate Guide to Vine: Pro-Tips, Awesome Ideas, and Who to Follow! (1,319 words)


© lisbeth for Photojojo, 2013. |
Permalink |
No comment |
Add to
del.icio.us

Post tags:


Photojojo

 
Comments Off on The Ultimate Guide to Vine: Pro-Tips, Awesome Ideas, and Who to Follow!

Posted in Equipment


Sigma introduces Photo Pro 5.5 with Monochrome mode

21 Feb

sigma_dp3m.png

Sigma has released version 5.5 of its Photo Pro raw processing software, which adds a monochrome processing mode for cameras with the 15x3MP Foveon sensor – i.e. the SD1, SD1 Merrill, DP1 Merrill, DP2 Merrill and DP3 Merrill. It’s also now compatible with Windows 8. The software is available now from Sigma’s website – click through for more details and download links. 

News: Digital Photography Review (dpreview.com)

 
Comments Off on Sigma introduces Photo Pro 5.5 with Monochrome mode

Posted in Uncategorized