Ein Beitrag von: maldesowhat

kwerfeldein – Fotografie Magazin

AMAZON UK SPECIAL LINK www.amazon.co.uk Product Description Tokina ATX The new ATX 16-28 is the forerunner of Tokina´s new generation lenses designed for Professional Digital SLR Cameras including the Canon EOS 5D Mk2 and the Nikon D700 and D3X. The 16-28mm zoom range offers the photographer a super wide angle of view for dramatic close up effects or big takes of entire scenes. New silent DC motor with GMR sensor The Tokina 16-28 uses a newly developed silent DC motor that allows the lens to fast focus. The DC motor coupled with a new GMR magnetic AF sensor work together to increase AF speed. Aspherical and Super-low Dispersion glass elements A new 56mm diameter glass element is incorporated into the front lens group and 2 more aspherical elements in the rear group. 3SD super-low dispersion glass elements are also incorporated throughout the whole optical design. Features: Focal length 16-28mm Maximum aperture F2.38 Construction 12 elements in 13 groups Coating, multi layer Minimum focus distance .28 metres Angle of view 107.1 – 76.87 Reproduction ratio 1:5.26 Focusing mode, internal focusing Zoom mode, rotary zoom Aperture blades .8 Filter size, not applicable at present Lens width 90mm Lens length 133.3mm Weight 950g Mounts Canon and Nikon with Full Frame FX size sensors …Contact us if you need more help.
Video Rating: 0 / 5

Dell has announced its 27″ U2713H and 24″ U2413 LED monitors designed for color critical applications like photo editing. These latest flagship models promise 99% coverage of the AdobeRGB color space, feature a 12-bit internal processor and 14-bit LUT (lookup table) for software calibration. The U2713H and U2413 are currently available at prices starting at US $ 999/£802/€829 and US $ 599/£490/€519 respectively.
News: Digital Photography Review (dpreview.com)

Panasonic UK has announced a ‘Try Before You Buy’ service for the Panasonic Lumix DMC-GH3 Micro Four Thirds camera allowing customers to borrow it as a kit along with the 12-35mm for 48 hours. This offer is available across a number of UK retailers with no obligation to purchase. The company says the scheme lets customers ‘road test’ the camera before committing to such a big purchase. Click through for the list of 28 participating retailers.
News: Digital Photography Review (dpreview.com)
An HD video test, filmed by a 12.3 Megapixel Nikon D90.
Video Rating: 5 / 5
[ By Steph in Architecture & Houses & Residential. ]

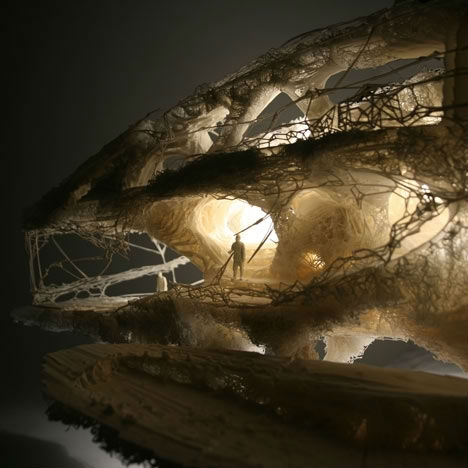
Dutch architects Universe Architecture hope their möbius strip ‘Landscape House’ will be the first home constructed with 3D printing technology, but London’s Softkill Design aims to beat them to the punch with this nest-like design. Made of plastic, the organic-looking ProtoHouse 2.0 could be built off-site in three weeks and assembled in a single day.

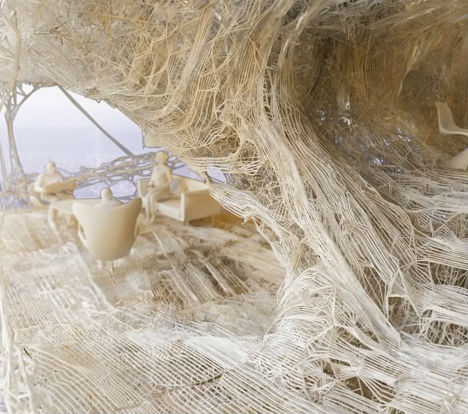
Softkill Design plans to have the first prototype out by this summer. The single-story house will be 8 meters (26 feet) wide and 4 meters (13 feet) long, with prefabricated sections small enough to transport in vans and snap together on-site. The lightweight pieces fit together like velcro or buttons, without the need for bolting, screwing or welding. Once assembled, the structure looks like a spider’s nest.
Gilles Retsin of Softkill Design told Dezeen of the competing Landscape House, “We actually don’t even consider that a 3D printed building because he is 3D printing formwork and then pouring concrete into the form,” Retsin said. “So it’s not that the actual building is 3D printed.”
The original ProtoHouse 1.0 represented the first prototype for a 3D-printed building, in which all elements of the house – structure, cladding, interior and finishing – were printed. “When we started this research, it was kind of science fiction,” says Retsin. “It’s not actually that far off any more.”
An unusual collaboration between an architect, an inventor and a mathematician-plus-artist is producing the world’s first 3D-printed home in real life.
Click Here to Read More »»
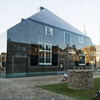
This project was deadlocked for decades until MVDRV showed up with a radical proposal remixing old and new, printing local historical-building photographs right onto glass.
Click Here to Read More »»
![]()


[ By Steph in Architecture & Houses & Residential. ]
[ WebUrbanist | Archives | Galleries | Privacy | TOS ]
Check My CHANNEL To See More Videos : www.youtube.com Sport bike Motorbike Motorcycle VLOG Edited By: Michael / FaithfulTrigger Please Check Out My Previous UpLoad. Please Click The Links Bellow : Motorcycle SportBike Sunday Ride w/ The Makabayan Riders GoPro 960 HERO HD Video Test www.youtube.com Riding My 2009 Kawasaki Ninja ZX6R OnBoard Camera GoPro 960 HERO HD Video Test www.youtube.com Street Ride The Makabayan Riders Getting Gasoline OnBoard Camera On Ninja ZX6R GoPro 960 www.youtube.com Street Ride With The Makabayan Riders Motorcycle SportBike GoPro 960 HERO HD Video Test www.youtube.com The Makabayan Riders Filipino Group Riders Fun Under The Sun Canon PowerShot ELPH 110 HS Video Test www.youtube.com Nikon D7000 Nikkor 18-300mm f/3.5-5.6G ED VR Lens UnBoxing First Impression Personal Review www.youtube.com Canon PowerShot ELPH 110 HS UnBoxing Sample Photo & Video www.youtube.com Near Death Experience Close Call Cheating Death Sport Bike Motorcycle www.youtube.com The Chase 2 Kawasaki Ninja ZX6R 2009 & 2013 Playing Around On ACH Canyons GoPro 960 HERO HD www.youtube.com 2009 Kawasaki Ninja ZX6R Monster Edition Street Ride Splitting Lanes Cruising Motorcycle Sport Bike www.youtube.com Angeles Crest Highway 2 Canyon Ride 2009 & 2013 Kawasaki Ninja ZX6R 636 & Ninja 250R www.youtube.com SportBike Ride Kawasaki Ninja ZX6R Splitting Lanes Street Rider GoPro 960 HERO HD Video Test www.youtube.com
 Extra photos for bloggers: 1, 2, 3  |
|||
You’ve probably got a bag of them stashed away with old envelopes and Mr. Sketch markers.
Rubber stamps. The classic currency of Valentine’s Day and letters from your penpal.
Stamps don’t have to be boring or cheesy. They can be classy, and they can even be art.
Especially if you design them from your very own photos!
Follow along with our DIY stamp project as we take you from the pixel to the pad without breaking a sweat.
Make a Custom Photo Stamp!
p.s. Need Photoshop skillz? creativeLIVE is hosting a week of Photoshop classes. You can take over 40 different online classes taught by pros for free!
p.p.s. Happy V-Day! Sign up for Phoneography 101 and add your sweetheart (or pal) on us. TODAY ONLY!

Remember that feeling of opening the mailbox and actually finding a letter addressed to you?
Give facebook a rest and show the world that snail mail isn’t dead!
Turn up the fun on your postcard with a stamp of your fat cat, or make that party invitation fancy with a stamp of people dancing.
The possibilities are endless so why not send someone a little love for the price of a stamp!

 When choosing a photo for your stamp aim for an image with high contrast and a plain background. The best designs will have strong lines and simple geometries.
 Import your image into photoshop and turn up the contrast as needed. The more defined the lines of your photo the easier it will be to carve.
Now turn it black and white by going to Image>>Adjustments>>Desaturate.
 Use your eraser tool to get rid of any distracting background elements from your photo leaving a clean white backdrop.
Trickier portions you may want to select with your lasso tool and delete. When using the lasso just select, hit the delete key, and set the color to white.
 To get that Banksy stencil effect go to Image>>Adjustments>>Threshold and adjust the toggle until you’ve got the prefered balance of black and white.
If you don’t get the perfect lines from your adjustment, you can always clean up your image with the brush and eraser tools.
Then you’re gonna tape your watercolor sheet of paper on top of the print out.
 Pixels? Where we’re going, we don’t need pixels.
We’ve reached that magical time where we’ll take your pic off the computer and onto your carving surface. Start by printing your design in the size that you would like to carve, and grabbing your tracing paper and a No. 2 pencil.
Trace over your printed design using a dull pencil to give you thicker lines. Also, try and leave out any tiny details which will be too tricky to carve.
 Now it’s time to break out a bucket of elbow grease for our transfer step. Place your tracing paper graphite side down onto a corner of your eraser and use the back of your cutting tool to rub over your design.
Make sure to hold down your tracing paper securely so it doesn’t slippity slide. Voilà! It transfers just that easy.
 Use your exacto knife or box cutter to trim down your stamp block to just the area surrounding your image. Be careful: These things are sharp!
Start with the smallest blade of your cutting tool, carving around the outside edges of your stencil. You may also want to carve any small details first just in case your lines start to smudge. Apply only light pressure when making cuts. You can always go back and cut deeper if you need to.
Once you have your outline carved, you can switch to a larger blade to carve out unfilled space. Your paint brush will help to clear off the dusty rubber bits that build up while carving.
Hint: If you’re not sure whether to cut something out or not, don’t! Wait until after you’ve tested your design to see how your stamp looks. Its a lot easier to take pieces off afterwards then to glue them back on!
 Ink up your carved creation with your ink pad and press it firmly into a piece of scratch paper. This will show you any stray dots or dashes that may need to be removed.
Excess rubber bits will show up black after you’ve tested your stamp and can be easily airbrushed out with your cutting tool.
 A little super glue and a wooden block will work wonders to class up that already ravishing stamp of yours.
Don’t limit yourself though, mount your stamp however you like: on a domino, an oversized lego, a serving spoon, or on the back of an old pattern block.

Related posts:

Pentax Ricoh has released the first firmware update for its Q10 mirrorless interchangeable lens camera. Firmware v1.01 improves operational stability and contrast AF performance. The update is available for immediate download from the company’s website. Click through for the download link.
News: Digital Photography Review (dpreview.com)
You must be logged in to post a comment.