RSS
 

Archive for January, 2013

Using Polar Coordinates In Photoshop

17 Jan

Make a square selection

1. Open an image in Photoshop (screenshots are from Photoshop CS2 on Mac). Higher resolution and size will give better results. I used a picture I found online on Freedom Wallpaper.

2. You need to make a selection that is squared. Use the selection tool, and set the aspect ratio to fixed:

fixed-ratio

3. Enter the same number in both fields. 1 and 1 works.
1-by-1

4. Make a selection.
make-a-selection

Apply The Filter

5. Apply the filter Polar Coordinates:
apply-filter

6. In this step, use the bottom radio button, marked “Polar to Rectangular”:
rectangle

7. Now your image will turn into something that may look interesting at best, but we’re not yet there:
after

Rotate And Apply Filter Again

8. Rotate the selection 180 degrees. There are a few different ways to do this. One of them is to use the Edit menu, then Transform and Rotate 180 degrees.
rotate

9. Now apply the same filter we did in point 5. But do NOT just choose it from the top of the Filter menu. We are going to change one of the parameters so you have to choose it from Filters > Distort > Polar Coordinates… again.

This time, choose the upper radio button, labeled “Rectangular to Polar”:
switch

Crop And Save

10. Crop your picture to get rid of the stuff surrounding your new circle:
final

Any suggestions, ideas? Feel free to comment on this article!

Back to Top

BlogPhoto

 
Comments Off on Using Polar Coordinates In Photoshop

Posted in Equipment


Darkroom Photography Techniques : How to Use a Photo Enlarger

17 Jan

Using a photo enlarger depends on the size and style, but generally the negative is placed under the light, the image is focused and the paper is set in place for exposure. Use an enlarger to create photograph prints with helpful tips from a fine art photographer in this free video on darkroom techniques. Expert: Deborah Gray Mitchell Contact: www.dgmfoto.com Bio: Professional Photographer, Deborah Gray Mitchell has been in business since 1981 as both a fine art and commercial photographer. Filmmaker: Paul Muller


Visual Journaling Workshop

17 Jan

Check out these visual art images:

Visual Journaling Workshop
visual art
Image by Asheboro Public Library

Visual Journaling Workshop
visual art
Image by Asheboro Public Library

 
Comments Off on Visual Journaling Workshop

Posted in Photographs


Manual mode vs Aperture Mode – Which mode do I normally use for outdoor photography?

17 Jan

photographyequipment.yolasite.com (Budget Equipment) razzi.me www.facebook.com twitter.com In this video you’ll learn that the light meter inside your DSLR will give you the same meter reading in both manual mode and aperture mode. Using aperture mode doesn’t mean you’re doing half the job. Shooting in manual mode doesn’t mean your pictures will come out right. The exposure is going to be the same if you balance it in manual mode vs if you let the camera does it for you automatically in aperture mode. Those who may be having difficulty shooting in manual mode should try aperture mode and see if they feel more comfortable. It’s less work and you can concentrate on composition and reduce camera shake.
Video Rating: 4 / 5

General Info: info@etinspires.com SOCIAL Subscribe to our channel: YOUTUBE : bit.ly TWITTER : bit.ly FACEBOOK fan page : on.fb.me INSTAGRAM : ETTHEHIPHOPPREACHER SOUNDCLOUD : bit.ly TUMBLR : bit.ly WEBSITE : etinspires.com GOOGLE + : bit.ly AUTOBIOGRAPHY& Other Merchandise etinspires.com (store page) EtInspires Store Page : bit.ly APP — ANDROID : bit.ly APPLE : bit.ly AUDIO CDBABY : bit.ly ITUNES (MP3’s) : bit.ly AMAZON (MP3’s) : amzn.to e-BOOK ITUNES (e-BOOK) : bit.ly AMAZON (e-BOOK) : amzn.to Barnes & Nobles : bit.ly New intro song by Fame Or Juliet www.facebook.com Download link: itunes.apple.com Clothing provided by Sleep is 4 Suckers: www.sleepis4suckers.com
Video Rating: 4 / 5


61 Amazing Kite Aerial Photography Images

17 Jan

ZERO wind AutoKAP in Auyuituiq Park, Bafin Island

Aerial Photography is something that many people would love to be able to do but find is out of their budget. One more affordable way to go about it is to try some Kite Aerial Photography (KAP).

Hey batta batta!

The 61 images in this post are all arial shots taken by strapping a camera to a kite to elevate it. It’s not something for the faint of heart as you are putting your camera at risk but the results can be pretty amazing in the right setting.

Red Sea 1995

KAP Trial Bikes @ Portinfer

Getting up high with your camera attached to a kite gives a fresh perspective on a scene and can highlight patterns, textures and shadows that might not be evident to anyone at ground level.

Aliens go to Braccagni I - R7573

Don’t just duct tape your camera to your kite though – most serious kite aerial photographers use purpose built rigging to get their shots like these:

KAP Rig - July 2009

KAP Rig as of 5 March, 2012

There’s a heap of information on KAP online – Google it and you’ll be sure to find some great advice. Now back to some great Kite Aerial Photography images – Enjoy!

Statue of Liberty 2009

Untitled

KAP of a hotel pool in Beberibe, CE, Brazil - 05

Porto de Galinhas - Verde e Amarelo.

Many Hondas!

Stone fishing in Maupiti 15 of 16

Le Mont Saint Michel (Manche-FR)

Tom

Autokap at the InterContinental Bora Bora Resort & Thalasso Spa Aug 03, 2008

Coney Island Polar Bears usher in 2009

wood national cemetery

Power of Two

Spinner-Dolphins-5680

Phranang beach à Railay

kites on ice

Falcon Attacks (KAP Rig) @ The China Great Wall

Reloj de arena 2 :)

the chat

KAP of a hotel pool in Beberibe, CE, Brazil - 03

Lone Swimmer at Lido Beach, Florida

Rice terraces, Sideman, Bali

Mini golf overhead

The Secret Life of Aliens

Aliens go to Braccagni IV- R7929

Children at Baltic Beach

AutoKAP from the SV/Star Flyer

MORNING_WALK

Le Mont Saint Michel (Manche-FR)

Champ de blé à Fontenailles (Calvados-FR)

Durrat al Bahrain

Ready to ride

Hand Warmer

4th of July, Jobos (img_6854+)

Playa 2

Umbrella Convention - Kite Over Avalon, NJ USA

Choice seats

strand puerto del carmen (6)

Orthogonal - R4263

Vazon Rakeart

KAP 2012-10-14 Coney Island 13.19_20

Campus panorama

Phra Pha Daeng

Kornkreis Edendorf

KAP Trial Bikes @ Portinfer

U.S. Pond Hockey Championships

Piscine de Tipaerui

Marken, buurtschap Rozewerf

Full Crop Circle and String

Checkered Flight

Mont Saint Michel (Manche-FR)

Waves III - R5839

360° x 120° Panorama View of West Coast, Singapore

Pineda de Mar 2

The young woman and the beach

boys on the barn

combat

Moisson à Maizières (Calvados-FR)

Falaises d'Etretat (Seine Maritime-FR)

Post originally from: Digital Photography Tips.

Check out our more Photography Tips at Photography Tips for Beginners, Portrait Photography Tips and Wedding Photography Tips.

61 Amazing Kite Aerial Photography Images


Digital Photography School

 
Comments Off on 61 Amazing Kite Aerial Photography Images

Posted in Photography


Red Tailed Hawk Call

17 Jan

Red Tailed Hawk Screaming its head off. Filmed this with my Nikon D90 with 18-200mm VR. Not bad I guess. Wish I could get in closer. It was much louder in person. You could hear it throughout the whole park and this park is big! Please excuse my shaky hands as I did not bring my tripod with me. It’s suppose to be 720p HD but its no where near as good as my GoPro HD Hero.
Video Rating: 4 / 5

Questions? Go here: www.youtube.com Hands-on review on Nikon 85mm ƒ/1.4D AF. See below for compatibility. AUTOFOCUS UNAVAILABLE D40 D40X D60 D3000 D3100 D3200 D5000 D5100 D5200 AUTOFOCUS AVAILABLE D50 D70-Series D80 D90 D7000 D100 D200 D300-Series D600 D700 D800-Series D1-Series D2-Series D3-Series D4-Series
Video Rating: 0 / 5


Stunning Portraits: Manipulating White Balance

17 Jan

I am always looking for more interesting and unique ways to take interesting and beautiful portraits. It is a personal challenge for me to push my own creative envelope as much as possible so that I am constantly broadening my own bold and colorful style. There are so many ways to take a portrait the possibilities are almost endless and the range of emotional and psychological expressions that can be achieved are truly spectacular. Portraits can be editorial, lifestyle, fashion, glamour or extremely creative in style and the true wonderment of any portrait is the amazingly, maddening ability of the human face to portray expression in so many captivating ways. So let’s look at a more creative way to take a portrait that I think gives the final photo a simply stunning look.

Before we get into the details of shooting, I think a little review of white balance is in order as this technique involves a basic understanding of the topic. Every light that we take photographs in, whether it be an incandescent light bulb indoors or the bright shining sun outdoors, is made of of a different spectrum of colors. Now when we look at objects under these light sources with our own eyes, we take it for granted that our vision compensates for all the different color casts of these lights amazingly well and we get a pretty standard representation of all colors in the scene. Basically, when we look at something that is supposed to be white in varying light conditions, our brain interprets the situation and our eye sees it as white. The camera works a little bit different.

The camera sees color in a much different way and has a less sophisticated way to interpret colors under different lighting situations. This is where the white balance setting helps us out. Many photographers that I know tend to keep there cameras white balance on the automatic setting. With the automatic white balance setting, your camera searches for a white reference point in the scene you are shooting. Then all of the other colors are set to this reference point. Therefore, your camera tries to make an educated guess to ensure the colors are represented correctly in your photo. The problem is that sometimes the camera is wrong and we have to bypass the automatic settings and go to that very scary place of setting the white balance in a more manual way, either by using the preset settings that the camera contains or even, heaven forbid, we might have to use some sort of white balancing device to help set our colors. There is a wealth of knowledge on this subject and I encourage you to pursue this topic at your leisure. You can also click on the following links for a decent explanation and breakdown of white balance (DPS-Intro to White Balance and White Balance in Digital Photography). The take home message is simply that we have to be conscious of how our camera views color and understand that we might have to give it some help by changing our camera’s white balance setting.

Now that we have introduced the concept of white balance let’s turn the tables on this subject and manipulate it to create some drama and eloquence in a portrait. The lighting setups for these portraits can be seen in the following diagrams:

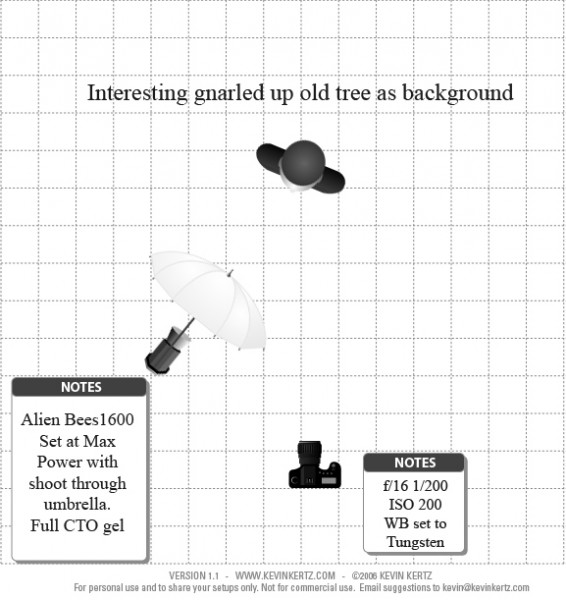
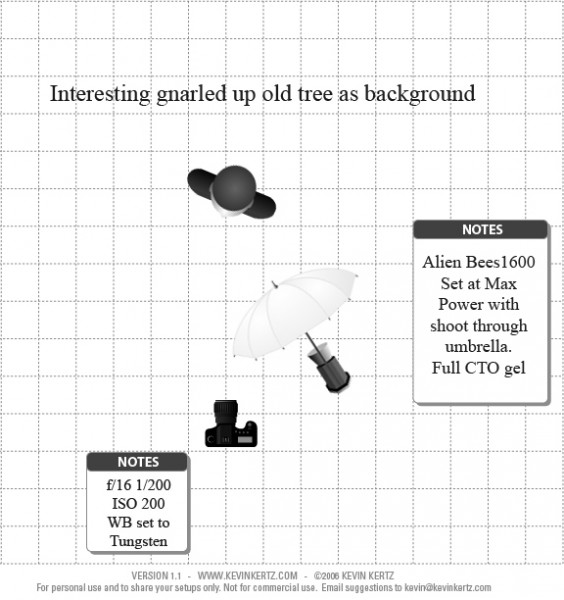
Essentially, both diagrams are the same with the only difference being the placement of the light with the shoot through umbrella. I switched it from one side to the other just to see what sort of difference it made and concluded that both light placements worked just fine.

The overall concept for the shot was to contrast the old, decayed tree with the young beautiful model (Brittney) and to highlight each with some warm and cool tones for effect. So where does one start with getting the camera settings and flash setup properly?

First, lets talk about the manipulation of the white balance. I used an Alien Bees 1600 flash unit set at full power, covered with a full CTO (color temperature orange) gel, and modified with a shoot through umbrella. The CTO gel is commonly used to balance the color of light from the flash to that of a tungsten light bulb. Thus, when one is shooting flash in an indoor setting, the color of the flash matches the color of the light bulbs in the room and a camera white balance setting switched to tungsten will create a wonderfully balanced color palette in the photo. When used outdoors, a CTO gelled flash, combined with a white balance setting to tungsten, will balance the colors for anything upon which the flash falls. However, this tungsten white balance setting will also cause the sky and anything not receiving light from the flash to take on a majestic deep blue color cast that can be captivating. Compositionally, this simple white balance manipulation creates a mix of cool blue tones with warm orange tones that works fantastically well and makes the image pop.

Now, if you find yourself a little anxious about using flash outdoors you should go ahead and relax cause you can definitely pull off this shot. Before you start shooting with any flash at all, the very first thing you want to do is meter the scene and reduce your exposure about 2 stops so that the background is underexposed. Doing this in full daylight requires a few considerations and I recommend shooting either in the morning or the evening so that the sun is not too high in the sky, otherwise you will have a hard time getting your flash to overpower the sun. Camera settings are pretty easy to figure out. First, the white balance needs to be set to tungsten to get the desired effect. You are shooting in daylight and want the background underexposed so low ISO is a must which in my case was 200. The shutter speed cannot be too fast as it can only be that of your flashes sync speed which in my case was 1/200 seconds. What does this mean exactly? If you set your shutter speed faster than your flash can fire, the shutter will open and close before any light from the flash can be seen by the camera and you will never capture your flash in the image. So the only real variable was the aperture in this case which in order to get 2 stops underexposed for the background had to be at f/16. Basically, the environment for the shoot had already dictated my camera settings.

Since my camera settings were already determined, the only thing I needed to do was to turn on my CTO covered flash and adjust the power until I could see the effect in the image. Since I am shooting in daylight and trying to overpower the sun I knew I would need a lot of power from my flash and actually had brought a second flash unit just in case I needed more power then one flash head had to offer. I started with one flash about 5 feet from the subject at full power and took a few sample shots and it was just a little shy on power. I moved the flash as close to the subject as I could without it being in the frame (about 2.5 feet) and took a few more shots and it looked great. A few outfit changes and a serendipitous bit of sun flare from behind the tree and I had the makings for a stunning set of portraits. I hope this post encourages you to not only push your creative boundaries, but also to take a small step further into the excitingly surprising realm of flash photography.

Post originally from: Digital Photography Tips.

Check out our more Photography Tips at Photography Tips for Beginners, Portrait Photography Tips and Wedding Photography Tips.

Stunning Portraits: Manipulating White Balance


Digital Photography School

 
Comments Off on Stunning Portraits: Manipulating White Balance

Posted in Photography


Flickr Commons marks 5-year anniversary with galleries of most-viewed pics

17 Jan

flickr-logo-5221212.png

Flickr Commons is five years old, and to celebrate, Flickr has created galleries of the most viewed, ‘favorited’ and commented-upon images. Commons was launched in 2008 with 1500 photos, in partnership with the US Library of Congress. Five years later, the collection of public domain photographs boasts more than 250,000 images. Click through for more information, and links to the galleries of most popular images in the growing collection. 

News: Digital Photography Review (dpreview.com)

 
Comments Off on Flickr Commons marks 5-year anniversary with galleries of most-viewed pics

Posted in Uncategorized


Pirated Architecture: Chinese Copies of Famous Buildings

17 Jan

[ By WebUrbanist in Architecture & Offices & Commercial. ]

china france copycat buildings

Consider what Le Corbusier would think if he were alive to see his famous church in France duplicated as a Chinese barbecue restaurant. Or imagine what an Austrian village  must feel about its entire township being copied to a lake in China. But more on that later – first: Zaha Hadid now is experiencing it all in real time, as she races to complete her original before its copycat takes shape.

copycat china architecture

Copycats exist in all disciplines, but reputation-sensitive architects are often self-policing, as they want their work to stand out as original – but there are exceptions. Hadid’s new project is the victim of the bold copiers (above) are not only building an identical complex to her Wangjing SOHO (below). And while the developers of the legitimate project may well be able to sue, it would only be for damages – not to stop (or undo) construction.

copycat zaha hadid

copycat zaha original complex

From Der Spiegel: “Satoshi Ohashi, project director at Zaha Hadid Architects for the SOHO complex that is now being cloned, said: ‘It is possible that the Chongqing pirates got hold of some digital files or renderings of the project.’ From these, he added, ‘you could work out a similar building if you are technically very capable, but this would only be a rough simulation of the architecture.’”

chinese duplicate village

As for the aforementioned village: Der Spiegel covered this strange phenomena a while back as well. Pictured above is the Chinese copy (top) of the Austrian original (bottom). Architects from China, passing as tourists, simply documented the entire town of 800, and, without permission, planned to replicate it back home as part of a large development. This may, of course, turn into a mixed blessing in the end – after all, it will almost certainly boost tourism as people experience the copy and seek out the original.

Share on Facebook


[ By WebUrbanist in Architecture & Offices & Commercial. ]

[ WebUrbanist | Archives | Galleries | Privacy | TOS ]


WebUrbanist

 
Comments Off on Pirated Architecture: Chinese Copies of Famous Buildings

Posted in Creativity


Pentax releases firmware updates for K-5 II and K-5 IIs DSLRs

17 Jan

pentax_k5iis.png

Pentax has released the first firmware updates to its K-5 II and K-5 IIs digital SLRs, which were released in September of last year. Firmware version 1.01 offers contrast adjustment option for the cameras’ LCD displays as well as ‘stability improvements’. The updates are available for immediate download from the company’s website – click through for download links. 

News: Digital Photography Review (dpreview.com)

 
Comments Off on Pentax releases firmware updates for K-5 II and K-5 IIs DSLRs

Posted in Uncategorized