8/26/2011 – 1:10am Actor sighting on Avengers set – Tom Hiddleston (plays Loki) Public Square West 3rd St & Superior/Detroit Ave Cleveland, Ohio
8/26/2011 – 1:10am Actor sighting on Avengers set – Tom Hiddleston (plays Loki) Public Square West 3rd St & Superior/Detroit Ave Cleveland, Ohio
The image below is a stitched panorama comprised of 7 separate frames, stitched together in Photoshop CS6, using the Photomerge feature. The full sized finished image weighs in at 85 megapixels. In this article I will share some tips for creating your own stitched panoramas.

Sunset Cliff, San Diego, CA – 1/160, f/5.0, ISO 125, 70mm (Canon 5DmkIII, EF24-70mm f/2.8L USM)
The first step in creating a stitched panorama with Photomerge is to shoot suitable images. Keep these points in mind:
The next step in the process is to prepare your files for Photomerge. This is actually optional. If you shoot JPEG and you’re happy with your images straight out of the camera you can go directly to Photomerge in Photoshop. If you shoot RAW, process your RAW images in whatever program you use, and export full size TIFF or PSD files to a temporary location on your computer so you can open them from Photomerge.
Lightroom users: If you process your RAW images in Lightroom, you don’t have to export to disk, because you can send your files straight to Photomerge from Lr.
1. Select the files
2. Right-click and choose “Merge to Panorama in Photoshop…”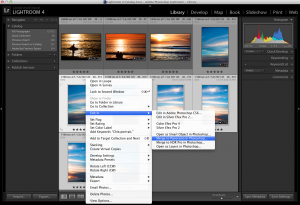
Sending files straight to Photomerge from within Lightroom
The next step is to open your images in Photomerge from within Photoshop, and stitch together your Panorama.
(Lightroom Users: if you jumped to Photomerge straight from Lr, skip to step 4 below)
1. From the file menu, chose Automate > Photomerge

Launching Photomerge within Photoshop CS6
2. Click “Browse” and navigate to the files you exported to a temporary folder in your drive.
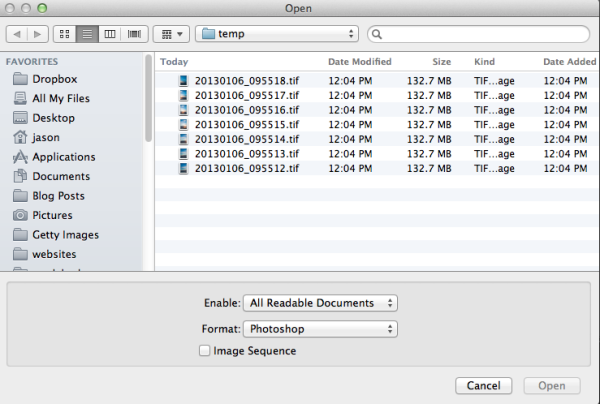
Browse to the location where your files are located
3. Select all of the files and click “Open.”

Select all files
There are several options under “Layout” on the left side of the Photomerge dialogue box, but I’ve had good success with Auto. For a detailed explanation of each of the options, check out the Adobe Help article here.
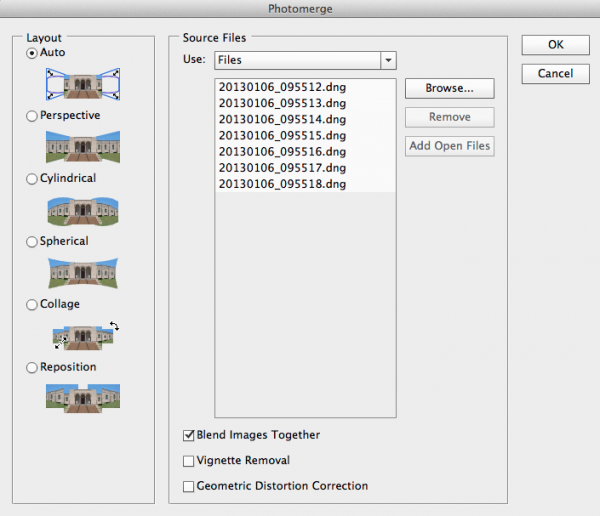
Photomerge dialogue
If you noticed any vignetting or distortion in your source images, select the options to correct that during the Photomerge process. Personally I don’t use these two options, as I’ve noticed they slow down the Photomerge process exponentially. Instead I prepare my images in Lightroom and apply Lens Correction in Lr before sending my images to Photomerge. However these features are there if you need them.

Photomerge options
4. Click OK and wait for Photomerge to complete.
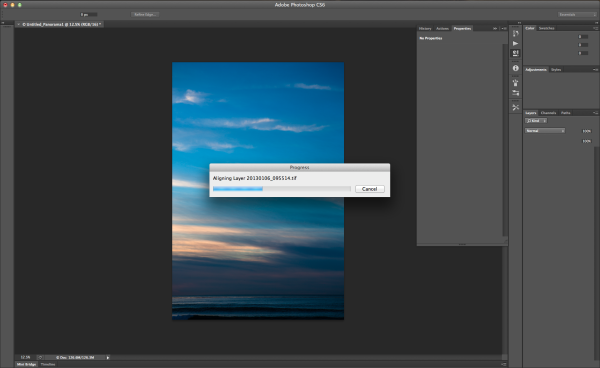
Photomerge working
5. When Photomerge finishes its magic, you will have a single panorama with each image in a separate layer. Zoom to 100% and check the seams between the images. If everything looks OK, flatten by navigating to the Layers menu and selecting “Flatten Image.”

Panorama in separate layers
6. Crop a rectangular composition from the center of your stitched panorama. This is where shooting in portrait mode really helps. There is a more vertical height to the photo and therefore more space available for cropping.
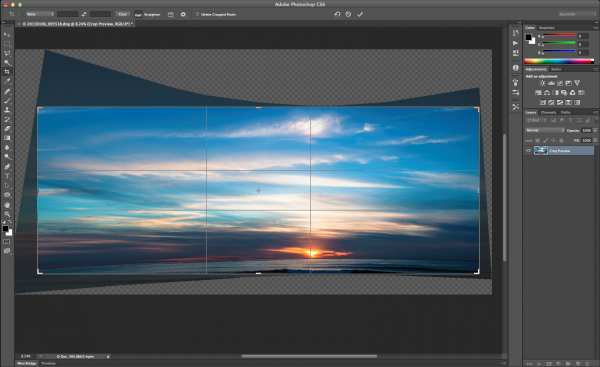
Cropping your Panorama
The Photomerge feature in Photoshop makes stitching Panoramas easy. For me, the hardest part is remembering to take advantage of this feature by shooting images when I’m out an about that I can later stitch together into a panorama. Next time you’re out shooting and the you can’t figure out how to fit the scene into your lens, try shooting multiple frames and stitching together a panorama when you get back to your computer.

7-frame stitched panorama of Matsumoto Castle. Matsumoto City, Nagano Prefecture, Japan – 1/500, f/7.1, ISO 100, 70mm (Canon 5DmkII, EF70-200mm f/2.8L IS USM)
I appreciate feedback, please comment below or feel free to connect with me through Facebook or Google+. I’ll do my best to answer questions and reply to comments.
Post originally from: Digital Photography Tips.
Check out our more Photography Tips at Photography Tips for Beginners, Portrait Photography Tips and Wedding Photography Tips.
How to Shoot Really Big Panoramas
Seit vier Monaten fotografiere ich ausschließlich mit dem iPhone, um herauszufinden, was passiert, wenn ich die DSLR liegen lasse und mich hundertprozentig auf das Mobiltelefon einlasse. Dies ist der vierte Monatsbericht.
Und bevor es gleich in die Tiefe geht: Ich bin mit meinen Bildern aktuell nicht wirklich zufrieden. Ich finde meine Fotos okay, aber auch nicht mehr. Dazu kommt noch, dass ich so tief in der Materie bin, dass es mir schwer fällt, eine Distanz zu den Bildern zu bekommen.
Das merke ich vor allem dann, wenn ich die Fotos für meinen monatlichen Bericht aussuche. Welches zeigen, welches nicht? Diese Unsicherheit gehört dazu. Jedoch möchte ich hier niemandem etwas vormachen.
Ich sehe mich auch nicht als toller Straßenfotograf, sondern habe – auch durch die technisch reduzierten Möglichkeiten des iPhones – das Gefühl, ganz am Anfang zu stehen. Mir ist klar, dass die Fotos, die ich hier zeige, keine Superknaller sind.
Jedoch ist ein Teil meines Projekts der monatliche Bericht. Und der ist, wie er ist: Nah dran am Geschehen und ohne Anspruch auf Perfektion.


Das iPhone selbst ist mittlerweile selbstverständlicher Teil meiner Arbeit geworden. Das bedeutet, dass die Euphorie vom Auftakt geschwunden ist und es sich nicht mehr ungewohnt anfühlt, mit dem iPhone zu arbeiten.
Das Fotografieren mit der DSLR war für mich immer der Inbegriff meiner Leidenschaft. Ich hatte ein gewichtiges Gerät mit Objektiv drauf in der Hand, das über lautes Auslöserklacken ein auditives Feedback gab.
Allerdings fallen mit dem iPhone diese Faktoren gänzlich weg und somit auch das Gefühl, fotografisch tätig zu sein. Wenn ich meinen Kollegen aus dem Büro sage, ich „gehe mal fotografieren“, dann stimmt da irgendetwas nicht.
Denn das Arbeitsgerät ist sehr leicht und wenn ich Handschuhe trage, fast unsichtbar. Das Objektiv ist im Vergleich zum 50mm als solches nicht zu erkennen. Und das elektronische Klickgeräusch habe ich ausgeschaltet, also das Letzte, was an eine Kamera erinnern könnte, eliminiert.
Nein, das Wort Fotografieren ist für mich überflüssig geworden und ich erlebe das als eine Art Befreiung. Es ist mehr ein Probieren, Skizzieren, Dokumentieren. In der Stadt, unter Menschen. Dort, wo der Alltag tobt.


Da in dieser Jahreszeit selten die Sonne scheint, es meist trüb und düster ist, kann ich erst ab 9:30 Uhr so richtig loslegen. Ich bin somit, mehr als vorher, angewiesen auf das Wetter. Warum das?
An einem dunklen Tag zeigt mir das iPhone an, dass es 1/30s belichtet. Damit einen Menschen, der sich ein wenig bewegt, scharf festzuhalten, ist unmöglich. So warte ich meist etwas ab, messe immer wieder nach und schaue, wann das Licht mindestens 1/120s erlaubt. Und selbst damit ist nicht garantiert, dass die Aufnahme scharf ist. Das ist manchmal ziemlich frustrierend.


Ich versuche, so weit möglich, einen besonderen Moment zu erwischen – und das heißt gar nicht zwangsläufig, dass eine Person (erkennbar) abgebildet sein muss. Es geht mir darum, einzufangen, wenn das Ungewöhnliche aus dem Gewöhnlichen hervortritt.
Ein Zufall sozusagen, in dem zwei oder mehr Aspekte im Einklang sind, sich widersprechen oder meinem inneren Auge komisch, trist oder gar fröhlich erscheinen. Und damit diese Vorgabe erfüllt werden kann, muss ich einige Kilometer laufen und stets offen für das Unvorhergesehene sein.
Und 99% meiner Fotos sind Bullshit. Sie sind vielleicht auf den ersten Blick ganz interessant, haben aber keine Seele, sprechen nicht zu mir oder es fehlt ihnen das gewisse Etwas, das ein Foto – wohlgemerkt – für mich spannend macht.
Jedoch ist dieses eine Prozentfitzelchen das, wonach ich suche. Dann passen viele Dinge zusammen. Oft bemerke ich erst beim Durchblättern der Bilder, dass es sich eben doch gelohnt hat, eine Aufnahme zu machen, die ich vor Ort nur potentiell gut fand.


Ich habe mich außerdem dazu entschieden, pro Tag nicht mehr drei, vier oder sogar mehr, sondern abends zwischen 19 und 21 Uhr ein einziges Foto zu veröffentlichen. Das reicht vollkommen und bringt auch ein wenig Ruhe in das Projekt.
Beim Fotografieren selbst versuche ich, einem Rat von Jay Maisel zu folgen. Er sagte einmal: „Go out empty“, was für ihn so viel bedeutet wie: Jedes Konzept, das im Kopf schwirrt, zu verwerfen. Nicht nach bestimmten Dingen (Farbkontrasten, Mustern und Formen, Gegenüberstellungen) zu suchen, sondern offen zu sein, für das, was kommt.
Denn jedes Konzept kann mir im Wege stehen, das zu sehen, was gerade vor mir passiert, weil ich quasi eine Art Tunnelblick habe, der alles andere ausschließt.


Meist nutze ich den späten Abend, um die Aufnahmen des Tages durchzugehen und zu finalisieren. Da ich aktuell komplett in Farbe arbeite und nicht stark in die Aufnahme eingreifen möchte, gibt es selten viel zu ändern.
In Snapseed beschneide ich, ziehe die Kontraste etwas an oder korrigiere die Farbtemperatur minimal. Die eigentliche Arbeit besteht darin, die guten von den schlechten Bildern zu trennen und Perlen im Sauhaufen zu finden. Wenn es denn Perlen gibt.
Und es gibt diese Tage, an denen ich weiß: Ein paar Fotos waren ganz okay, aber gut waren die nicht.
Doch es lohnt sich, mich immer wieder auf mein – zugegeben – kauziges Projekt einzulassen. Ich merke, dass ich so langsam richtig tief drin bin, aber noch weit entfernt von dem, was möglich ist. Die Straßenfotografie steckt voller Überraschungen und ich bin gespannt, was die Zukunft mir schenken mag.
kwerfeldein – Fotografie Magazin
A video review of my new lens, the Nikon 70-200 2.8 VR and Nikon’s 2x teleconverter. This lens was purchased for my portraiture work but today I took it to a country park to test it out as a setup for wildlife photography to play with the teleconverter. The lens is fantastically sharp and I try to cover all the main points about this lens that make it worth the money it costs. A very good lens for all kinds of work. I hope to show it again in a video of how I use it most and where I think it is best, portraiture. Any questions or comments, fire away! Review of this lens on my blog – wp-photography.co.uk www.wp-photography.co.uk www.twitter.com/wpphotographyuk www.facebook.com/wpphotographyuk
Video Rating: 4 / 5
Part 1 of Tour Singapore Lifestyle Photographer, Wong Kin Leong photographs Changi Airport, Singapore and collects it all into this clip. www.wahliao.com A wahliao.com production and features http Kin Leong takes a walk and photographs the architecture of Singapore International Airport, Changi, home to Singapore Airlines and Silkair. Inspired by the colors of sunny Singapore and its cultures, the photos reflects the vibrance of Changi International and its role in serving the international community and their air routes. Beginning where it should, the arrival hall. And as we venture around the airport, we see travellers, airport staff, pilots, stewardesses and well wishers all interacting within the airport, and showcasing the architecture of Terminal 3 and Terminal 2. Wong Kin Leong writes: “I woke up one day thinking that I should fly off just for a holiday, and when I got into Changi Airport, Singapore, I took these lot of photos, trying to break my usual photographic techniques and tried to have some fun instead, doing things to the camera and with weird settings, and then jammed all the photos into my Macbook and turned the saturation up, fooled around with the colors and just basically experimented. Pretty interesting outcome, and I didn’t care if it looked odd to people, as long as it felt awesome to me. I found this liberating, and a must-do sometimes in life. Just have fun! And let’s see where we end up.” We hope you love this clip, and spread it if you did. Thanks!
www.easytagger.ca One of the accessories available from EasyTagger Canada is a 2.5mm (female) to 10-pin (male) adapter that allows 2.5mm aftermarket remotes to be used directly with compatible Nikon DSLRs equipped with the 10-pin terminal. This allows you to use the 2.5mm remotes when you’re not using the EasyTag’s 2.5mm pass-through.
Video Rating: 0 / 5
I got a chance to use the new Rogue Grids from Expo Imaging. www.expoimaging.com I real like them! Thanks to the beautiful Julian for her modeling.
P???? ???????????? IRIN GORDON. ????? ?? ?????? ??????????. ????? 14 ??????? 2009 ???? ? ????? FORSAGE ????. ???????? ?????? ???????? ??????? CLUB-STYLES VIDEO MIX PROJECT ??????????: DJ Anna Lee ? DVJ Arnaby Photographer: Irin Gordon PRODUCTION NOTE: No Video cameras were used in the production of this music video. It was created entirely from Photographs taken by a Nikon D300.
Video Rating: 4 / 5
You’ve been reading their articles for months or years, have you ever wondered “Who are the photographers who write for DPS”? We thought it would be a good time to introduce them to you through a series of interviews. No worries, Darren will get his turn too.
Today meet Valerie Jardin, born and raised in France and currently living in Minnesota, USA.

I picked up my first DSLR about 15 years ago. It wasn’t a life-long hobby like many other photographers. It has since become a true passion, almost an obsession!

Valerie Jardin – Photographer, Instructor
I am a full time photographer. I shoot mostly interiors for commercial clients, some food as well as lifestyle portraits. Most of my time and energy is now devoted to leading international photo workshops. Sharing the passion for this beautiful craft and teaching people to see is the most gratifying experience.
I would have to pick street photography but more in the travel sense of the term. Including people in my frame to add life and a sense of place to my images. The quest for the story in a single frame is as exciting as the resulting image itself. I can spend days walking the street of any large city without tiring as long as I have my camera with me.
I started writing for DPS in 2010. I think it’s the teacher in me that drove me to writing articles to help other photographers learn from my mistakes and successes. My articles are all inspired by my own experiences. I love helping others and we are so lucky to be part of such a great global community of photographers from all walks of life.
I shoot with a Canon 5D Mark II and my favorite lens is the 24-70mm f/2.8. Yet, I find myself traveling light and shooting mostly with the 40mm pancake lens when working on self projects or shooting street photography. I love that lens, it’s sharp and inconspicuous!
Go out with your camera as often as possible, everyday if you can. Shoot with intent and make every frame count.
I am adding new photography workshops every year. I am running two workshops in Paris and two on the beautiful Normandy coast in France in 2013, those are all inclusive week-long workshops. I also offer weekend workshops in the US, San Diego in March and Minneapolis in June. I am also excited to announce a workshop in Melbourne, Australia to take place in February 2014! Ultimately for me it’s all about teaching and sharing my passion for this beautiful craft and hanging out with other photographers.
They can visit my website to see my commercial photography as well as my personal work. It also has links to everything such as my blog, my workshops, and social media platforms. I’m the most active on my Facebook page.


—
I would like to thank Valerie for her contributions to the photography community through her writing on DPS and also for starting this round of interviews. We hope you come away from these short interviews with a better idea of who is writing for DPS. Please let us know how we are doing.
Post originally from: Digital Photography Tips.
Check out our more Photography Tips at Photography Tips for Beginners, Portrait Photography Tips and Wedding Photography Tips.
Meet The Photographers Who Write For Digital Photography School ~ Valerie Jardin
See The Full Dead Rising 2: Off The Record Show Here!!! ? goo.gl ? Dead Rising 2: Off The Record – Walkthrough Part 19 – Laser Face In this episode Chris Jay takes you on a journey to find some survivors, some zombrex and even a laser face. =-=-=-=-= Director =-=-=-=-= By Chris Jay: goo.gl =-=-=-=-=-=-=-=-=-=-=-=-=-= ?Dead Rising 2: Off The Record ? At Captivate 2011, Capcom’s annual press show, the company announced that it was releasing Dead Rising 2: Off the Record, as a reinterpretation of the game with Frank West from the original Dead Rising as the main character. The game was released for the same consoles on October 11 in North America, October 13 in Japan, and October 14 in Europe for a discount retail price. Off the Record is intended as a complete reimagining of Dead Rising 2, with new missions, cutscenes, environments, enemies, and weapons. The photography mechanic from the first Dead Rising is also included. There are technical and system upgrades, such as optimization of loading times and improved network performance. Off the Record also features a new sandbox mode. This allows players to explore Fortune City without the obstacle of time. Off The Record has received mostly positive reviews, with the changes and additions both praised and panned. Developer ? Capcom, Blue Castle Games Publisher ? Capcom Genre ? action-adventure horror-comedy Release Date ? October 11th, 2011 Platforms ? Xbox 360, PS3, Microsoft Windows …
Video Rating: 5 / 5
Check out these visual art images:
VSP Visual Street Performance 2007 @ Fabrica Braco de Prata, Lisbon, Portugal

Image by Graffiti Land
VSP Visual Street Performance 2007 @ Fabrica Braco de Prata, Lisbon, Portugal

Image by Graffiti Land
VSP Visual Street Performance 2007 @ Fabrica Braco de Prata, Lisbon, Portugal

Image by Graffiti Land
Der Januar ist kalt, dunkel und mancherorts liegt sogar Schnee. Wir haben Euch einen bunten Teller leckerer und spannender Früchte zusammengestellt und im Fotospecial die Geister des Winters zusammengerufen, um eine fette Party zu schmeißen. Lasst Euch die ausgesuchten Links schmecken und genießt den Sonntag.
Fotospecial: Geister
Flickr


500px


Deutschsprachig
• Nur noch bis morgen könnt Ihr in der ARTE Mediathek die einstündige Dokumentation „Leben in Bildern“ ansehen, die Miriam Weissenstein vorstellt, die mit ihrem Mann Rudi von Anfang an den Aufbau des Staates Israel in Fotos festgehalten hat. Nun soll ihr „Photo House“ einem Neubau weichen.
• Der Fotograf Robert Harding Pittman hat sich mit seiner Bildserie „Anonymization“ auf die Spuren der vor- und zwischenstädtischen Einöde begeben.
• Wie sich 20 Jahre nach dem Abzug der Alliierten aus Deutschland ehemals militärisch genutzte Areale gewandelt haben, hat die Fotografin Isabel Kiesewetter mit ihrer Serie „Konversion“ untersucht.
• Eine kleine Vorstellung des australischen Fotografen Chris Round haben wir hier entdeckt und die Bilder überzeugen uns sehr.
• Torsten Mühlbacher zeigt Fotos seiner Reise nach Spitzbergen. Demnächst folgen auch Bilder aus Island.
~
International
• Voilà! Die Gewinner des National Geographic Contest 2012 sind auf Big Picture. Großartig.
• Urbanautica zeigt Andy Freebergs Serie „Guardians of Russian Art Museums“, in der die Hüter der staatlichen Kunstschätze mit selbigen zu verschmelzen scheinen.
• So ganz kann sich Lomography dann doch nicht vom Digitalen lossagen und springt daher auch einfach mal kreativ zwischen analog und digital hin und her. Neuestes Produkt dieser Verbindung ist der Lomography Smartphone Film Scanner, der über Kickstarter finanziert wird.
• Der Magnum-Fotograf Alex Webb redet in einem sehr langen und lesenswerten Interview auf dem Lensblog der New York Times über seine fotografische Entwicklung, seine Wahrnehmung und seine Liebe zu Film.
• 25 Bildern von Orten, die unnormal aussehen, aber real sind. Ein paar alte Bekannte sowie neue unglaubliche Flecken unserer Erde gibt’s hier zu bestaunen.
• The Photo Argus präsentiert nützliche Spickzettel für ein ambitioniertes Shooting.
• „Liebling, ich habe das Model geschrumpft.“ PetaPixel zeigt erstaunliche Miniaturisierungseffekte mit Photoshop.
• Wie würde der Mars aussehen, wäre er der Erde ähnlicher?
• Travis Jensen fotografiert meist mit dem iPhone und Hipstamatic auf der Straße. Auf digitaltrends.com gab er ein Interview über seine hervorragenden Bilder.
• Die Framed Awards haben ihre diesjährigen Nominierten bekanntgegeben. Und Ihr könnt mit abstimmen. Mit dabei sind auch einige Fotografen, die wir bereits vorgesellt haben.
• Auf straatfotografie.nl werden 12 Straßenfotografen vorgestellt, denen man auf 500px folgen sollte. Zwei davon haben wir hier ebenfalls schon vorgestellt.
• Instagram hat durch das TOS-Fiasko fast die Hälfte der Nutzer verloren.
• Wunderschöne Fotografien aus Jerusalem.
~
Neuerscheinungen und Tipps vom Foto-Büchermarkt
• Robert Harding Pittmans oben erwähnte Arbeit „Anonymization“* ist auch als Fotobuch im Kehrerverlag erschienen. Für 28 € gibt’s 120 Seiten im großen, quadratischen Format.
• Ihr erinnert Euch an Sam Jost, der letztes Jahr mit seiner Anleitung zum manuellen Belichten Erfolg hatte? Seit Kurzem gibt es von ihm eine Einführung in Lightroom 4, die als Buch vorbestellbar* und als Kindle-eBook* schon zu lesen ist.
~
Videos
Vielleicht kennt Ihr bereits Gregory Colberts fotografisches Meisterwerk „Ashes and Snow“. Hier kommt der Film dazu, der die fantastischen Bilder laufen lässt.
Der Bochumer Designer Sebastian Daniel hat seinen Kurzfilm „ruhrpottromantik“ mit den urbanen Klängen des Ruhrgebietes kombiniert. Entstanden ist das dynamische und eindrucksvolle Portrait einer Region.
Und mal wieder ein schönes Timelapse-Video zum Träumen.
~
Ausstellungen
Bonner Schule: Ausstellung
Zeit: 19. – 20. Januar 2013
Ort: Bonner Schule, Friedrichstraße 10, 53111 Bonn
Link
Konrad Rufus Müller – Schattenwelten
Zeit: 19. Januar – 16. März 2013
Ort: Galerie Pinter & Milch, Berlin
Link
Saul Leiter
Zeit: 31. Januar bis 26. Mai 2013
Ort: Kunst Haus Wien
Link
Mehr aktuelle Ausstellungen
* Das ist ein Affiliate-Link zu Amazon. Wenn Ihr darüber etwas bestellt, bekommen wir eine kleine Provision, Ihr bezahlt aber keinen Cent mehr.
kwerfeldein – Fotografie Magazin
You must be logged in to post a comment.