RSS
 

Archive for November, 2012

1/6 scale Hot Toys Collection — 300 Violin Orchestra

28 Nov

Hi everyone! I’m here to share my 1/6 scale figures from Hot Toys and a couple from Medicom. These figures are so amazing, very detailed, authentic likenesses, and poseable. Can’t wait for the others to come. But for the mean time, here are the figures i have… Enjoy! **I DO NOT OWN THE MUSIC USED. Music: 300 Violin Orchestra by Jorge Quintero Taken by Nikon D90 on 640×480 mode Thanks for watching!

 
Comments Off on 1/6 scale Hot Toys Collection — 300 Violin Orchestra

Posted in Nikon Videos


KnobColoring | Cydia Tweak: Customize your Lockscreen Slider’s Color

28 Nov

Click to share this video: clicktotweet.com Tweak: KnobColoring Description: Customize the Slider Color on your lock screen to your liking with RGB sliders Repo: BIgBoss Price: FREE Developer: iRon Melkhior Daily Vlog channel: www.youtube.com Become a fan on Facebook: www.facebook.com Follow me on Twitter: www.twitter.com Add me to your Google+ circles: gplus.to SenseiPhone Blog: www.SenseiPhone.com About SenseiPhone SenseiPhone covers the latest iPhone jailbreaks, tweaks, apps, firmware, latest iOS news, and more! We are mastering iPhone from all aspects. We bring everything about iPhone to our readers (you) in an easy and interesting way. Our goal is to make you a master of iPhone, like us. Music provided by: www.youtube.com Equipment Used to Produce this Video: Camera: Nikon D5100 Lens: Nikon DX AF-S NIKKOR 18-55mm Mic: Blue Snowball Editing Software: Final Cut Pro X Lighting: Cowboy Studio Lighting Kit
Video Rating: 5 / 5

 
Comments Off on KnobColoring | Cydia Tweak: Customize your Lockscreen Slider’s Color

Posted in Nikon Videos


Dublin Contemporary 2011 – Iveagh Gardens In Dublin

28 Nov

Some cool visual art images:

Dublin Contemporary 2011 – Iveagh Gardens In Dublin
visual art
Image by infomatique
A NEW VISUAL arts exhibition has opened in Dublin which features over 90 artists from five continents.

A major exhibition called The Office of Non-Compliance is housed in Earlsfort Terrace and I hope to publish some photographs later this week. The Iveagh Gardens are being transformed into a sculpture garden throughout the six-week event and I took the opportunity to photograph some go them. I assume that more are to be added, I will check on a regular basis.

Theme

The title and theme of Dublin Contemporary 2011 is Terrible Beauty—Art, Crisis, Change & The Office of Non-Compliance. Taken from William Butler Yeats’ famous poem “Easter, 1916”, the exhibition’s title borrows from the Irish writer’s seminal response to turn-of-the-century political events to site art’s underused potential for commenting symbolically on the world’s societal, cultural and economic triumphs and ills.

The second part of the exhibition’s title underscores Dublin Contemporary 2011’s emphasis on art that captures the spirit of the present time, while introducing the exhibition’s chief organizational engine: The Office of Non-Compliance. Headed up by Dublin Contemporary 2011 lead curators Jota Castro (artist/curator) and Christian Viveros-Fauné (critic/curator), The Office of Non-Compliance will function as a collaborative agency within Dublin Contemporary 2011, establishing creative solutions for real or symbolic problems that stretch the bounds of conventional art experience.

Venues and Programme

The main exhibition hub at Earlsfort Terrace, former home of University College Dublin, will provide a range of unusual spaces for mini solo exhibitions that range from large-scale installations to smaller intimate hangings. The Office of Non-Compliance, located within the Earlsfort Terrace exhibition site, will function as a promoter of ideas around a laundry list of non-conformist art proposals. This element of the exhibition will include ad-hoc, accessible structures for discourse around art and its place in society.

Extending its reach across the city, Dublin Contemporary 2011 will partner with four important Dublin galleries: The Douglas Hyde Gallery, Dublin City Gallery The Hugh Lane, The National Gallery of Ireland and The Royal Hibernian Academy.

Dublin City Gallery The Hugh Lane will present a retrospective of the work of renowned Irish artist Willie Doherty. An exhibition of American painter Alice Neel’s striking, psychologically penetrating portraits will take place at The Douglas Hyde Gallery.

The National Gallery of Ireland will host works by a number of international artists as well as a new commission by the distinguished Irish artist Brian O’Doherty. The Royal Hibernian Academy will host an exhibition of works by American painter Lisa Yuskavage and a new commission by Irish artist James Coleman.

 
Comments Off on Dublin Contemporary 2011 – Iveagh Gardens In Dublin

Posted in Photographs


5 Reasons Why You Need a 50mm lens

28 Nov

A video explaining why you ought to have a 50mm lens in your arsenal. Pricing Reference: Nikon D700 – www.digitalrev.com Nikon 50mm f/1.8G – www.digitalrev.com
Video Rating: 4 / 5

more at timelapsehq.com Recently I managed to get my hands on a Nikon D7000. I spent every waking minute getting to know this camera. The D7000 is said to be the next version of the D90. For the least part it is targeting the same market. The D7000 comes with a 39 focus points, which is a great deal more than the 11 that is set on the D90. The D7000 comes with a newly developed DX-format CMOS sensor. Two huge features for time-lapse photography on the D7000 are the double SD card slots, which means more images can be captured across two cards, and the built in Intervalometer. Both of these features were missing on the D90. With a built in intervalometer, this means you can perform time-lapse photography right there on the camera for the D7000, such a handy feature with no need to use a camera remote or tether to a laptop. The D7000 has an amazing picture control feature allowing you to set various adjustments to pictures right there on the camera. The D7000 also carries your standard D-lighting adjustments onboard the camera. Video on the D7000 is impressive to say the least. Although the auto focus while filming a moving subject is not the greatest. Hopefully they will fix this with some firmware upgrades.

 
Comments Off on 5 Reasons Why You Need a 50mm lens

Posted in Nikon Videos


Im Gespräch mit Ezgi Polat

28 Nov

Ein Beitrag von: Normen Gadiel

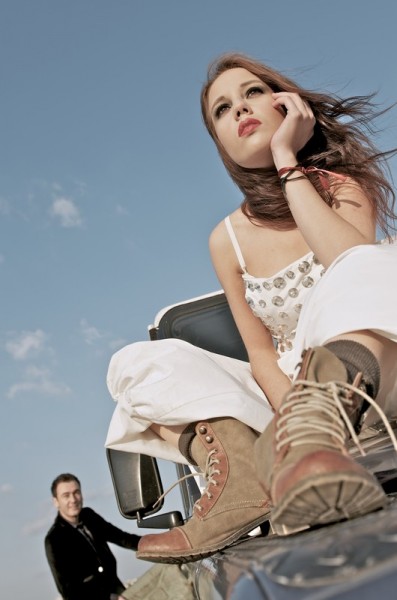
Ezgi Polat, die 22-jährige Berliner Fotografiestudentin, versteht es, Inszenierung und Natürlichkeit miteinander zu verbinden. Ihre Fotografien wirken dabei wie eine Hommage an den Moment. Natürlichkeit und Moment, zwei wunderbare Begriffe für die Fotografie. Was es dafür braucht, erzählte sie mir im folgenden Interview.

Hallo Ezgi. „Die Fotografie ist ein Medium für leichteren Zugang zu
fremden Menschen.“ Würdest Du dem zustimmen?

Es kommt darauf an, welche Menschen damit gemeint sind und wie man den Begriff „Zugang“ in dem Zusammenhang definiert. Wenn es darum geht, fremde Menschen zu fotografieren, kann es durchaus leicht sein, mit jemandem in Kontakt zu treten.

Das heißt aber nicht, dass Du gleich Zugang zu der Person hast. Für mich bedeutet es, dass Du jemanden kennenlernst, dieser Person sowohl mental als auch körperlich näher kommst, sei es mit der Kamera oder wenn Du kurz die Kleidung zurechtrückst, die Haare nach hinten streichst. Daher finde ich es manchmal auch relativ schwierig, aber genau das macht es auch so interessant.

Dann gibt es die Menschen, die von Deiner Arbeit fasziniert sind und auf dich zukommen, das ist wohl der einfachste Weg und auch sehr schön, da ich es sehr schätze, wenn mir andere ihre Meinung sagen und mich kennenlernen wollen.
Für mich steht jedenfalls fest, dass die Fotografie in vielerlei Hinsicht ein gutes Medium ist, um neue Kontakte zu knüpfen. Das verbinde ich dann aber eher damit, dass die Kunst, egal in welcher Form, oft für Aufmerksamkeit und Interesse sorgt.

Viele Deiner Fotos zeigen eine Mischung aus Alltag und Erotik. Wie
bist Du zu dieser Art der Fotografie gekommen?

Den Übergang habe ich selbst nicht so ganz mitbekommen. Es fing damit an, dass ich immer wieder mein Umfeld fotografierte, die Kamera war ständig dabei. Das fing vor zirka sieben Jahren an, wobei ich es schon als Kind gewohnt war, zu fotografieren. Dabei kam es mir nicht oft in den Sinn, fremde Menschen vor die Kamera zu stellen.

Mir war es sehr wichtig, dass die Momente authentisch wirkten und die alltäglichen Situationen nicht gebrochen wurden. Irgendwann gewöhnten sich meine Freunde daran, öffneten sich mehr, die Fotos wurden intimer und somit auch der Umgang mit der Fotografie.

Bis der Zeitpunkt kam, an dem ich sehr oft mit fremden Menschen arbeitete und merkte, dass mir die Körpersprache viel bedeutet und ich den Alltag und die gewohnten Situationen nicht missen möchte.

Wie entstehen Ideen bei Dir und wer sind Deine persönlichen Helden?

Meistens entstehen diese spontan und der Moment zählt. Was man daraus macht, ist wichtig und nicht, was ich unbedingt umsetzen möchte.

Die Umgebung, das Licht und vor allem die Person, ihre Bewegungen und die Gemütslage stehen im Vordergrund. Worte, die währenddessen fallen, dass ich dadurch versuche, auf jemanden einzugehen und nicht einen Menschen in eine bestimmte Situationen zwänge, in der er sich vielleicht gar nicht wohlfühlt.

Ich mache mir meistens erst dann Gedanken, wenn ich weiß, wen ich fotografiere. Dann kommen auch Ideen, die ich gern in Szene setze.

Ich habe keine Helden, eher ist es eine Art Bewunderung bei Nan Goldin und Francesca Woodman, deren Arbeiten bei mir immer für Faszination gesorgt haben und es immer noch tun. Mich inspiriert Musik jedoch viel mehr als andere Fotografien. Sie schafft es immer, mich in einen ganz andere Stimmung zu versetzen.

Wenn ich an Ideen sitze, darf die passende Melodie im Hintergrund nicht fehlen.

Gibt es mal abgesehen von Kamera und Film etwas Essentielles, ohne das
Du nicht arbeiten könntest?

Es gibt nichts Materielles, meine Kamera und Filme reichen mir da aus. Jedoch könnte ich nicht gut arbeiten, wenn es zwischenmenschlich nicht funktionieren würde. Ich mag es nicht, wenn es nur um das „Ablichten“ geht und man keine Gespräche führt. So entstehen auch keine guten Fotos für mich.

Wenn ich aber den Draht zu jemandem finde und die Person sich neben mir wohlfühlt, werden meine Arbeiten auch besser. Für mich hat das viel mit Empathie zu tun.

Hast Du schon Pläne für die Zeit nach dem Studium?

Nach meinem Studium, also nächstes Jahr, werde ich wahrscheinlich Berlin für eine gewisse Zeit verlassen. Ich möchte mehr sehen, andere Kulturen erleben, mein Blickfeld erweitern, mit anderen Menschen arbeiten und vor allem viel fotografieren.

Die Vielfalt gibt es zwar auch in Deutschland, doch mit dem Alltag verbunden, ist es manchmal etwas schwierig, sowohl Inspiration als auch Motivation für gewisse Sachen zu schöpfen. Pläne sind jedoch überbewertet, ich werde schauen, was auf mich zukommt, und mich gern leiten lassen.

Wie entsteht bei Dir der Kontakt zu den fremden Modellen? Kommen die Leute auf Dich zu, sprichst Du sie auf der Straße an oder gehst Du den Weg über Agenturen?

In dieser Stadt finde ich es so schön, dass es unglaublich viele verschiedene, interessante Gesichter gibt. Das merke ich jeden Tag – auf dem Weg zur Arbeit, in der U-Bahn, im Supermarkt – es sind genau die Alltäglichkeiten, in denen die Menschen natürlich wirken und in denen ich liebend gern beobachte.

Es passiert oft, dass ich jemanden ansprechen möchte, doch fühlt es sich in dem Augenblick dann doch nicht richtig an. Für mich zählt die Atmosphäre, es ist was anderes, wenn man zum Beispiel in einem Café oder in einer Bar sitzt und auf jemanden zugeht, die Zeit hat, statt kurz und hektisch auf der Straße die Visitenkarte zu zücken.

Das Internet bietet ebenfalls gute Möglichkeiten, da stoße ich manchmal auf Menschen, die ich anschreibe und man trifft sich auf eine Tasse Kaffee oder abends auf ein Bier, bevor es mit den Fotos zustande kommt. Mich schreiben auch einige an, jedoch könnte das auch ruhig etwas offensiver sein, da sich viele dann nicht trauen zu fragen und auf meine Anfrage warten.

Ich arbeite viel lieber mit Personen, die etwas Eigenes haben, nicht sofort wegen ihrer Äußerlichkeiten auffallen, auf ihre Art schön sind und nicht irgendwelche Ideale erfüllen. Über Agenturen finde ich es manchmal genau deshalb schwierig, da die Arbeitsweise eine andere ist, aber ich hatte da sowohl gute als auch schlechte Erfahrungen.

Wie sieht es bei Dir mit der Entwicklung der Filme aus? Machst Du das lieber selbst oder lässt Du sie in einem Labor entwickeln?

Mittlerweile gebe ich die Filme immer ab, da es Zeitaufwand bedeutet, wenn man sie selbst entwickelt. Doch habe ich mir für diesen Winter vorgenommen, wieder ab und an ins Labor zu gehen. Ich mag das Gefühl, sich in der Kälte zurückzuziehen und auf die Negative und Abzüge zu konzentrieren.

Das kann sehr beruhigend sein. Die Zeit verfliegt so schnell, da man sich jedes Mal wundert, wie spät es schon geworden ist. Am Ende des Tages ist man auch stolz auf die eigene Arbeit.

Vielen Dank für das Interview und noch viel Spaß und Erfolg im Studium.


kwerfeldein – Fotografie Magazin

 
Comments Off on Im Gespräch mit Ezgi Polat

Posted in Equipment


SKILL Concept Project 34 Night Practice PART III

28 Nov

Shot 100% on the HD HERO2® camera from ?GoPro.com This week I went out again at night. I didn’t have time to go during the day due to my trip to Okayama, so I was forced to go out after everybody went to bed. I had good fun, considering that I had no idea what i will do. It took me about 50 min to set up a course with lots of Front One-way action. I hope you will enjoy it as much as I did making it I also made this soundtrack to the video. If you like any of my music, you can download it from the address bellow. Feel free to use it as long as you give credit to MSPDawgs/Kezo sutros.com If you like my videos, please SUBSCRIBE!!! Thanks for watching and happy drifting to you all! Car: Chassis – Yokomo Drift package Basic with Stage 2 upgrade Yokomo’s Front One Way Body – HPI’s Mazda RX-8 Tires – SURGING SDT-002C D60 for carpet High speed steering servo (FUTABA BLS-451) Transmitter is also Futaba (4PL-2.4G) NO D box! Original music by MSPDawgs/Kezo

SUBSCRIBE/RATE VIDEO TOO =)! MaBSTOA’s West Farms Bus (BX36) | Gun Hill Bus (BX40/Bx42) | Kingsbridge Bus (BX41) BX36 | 179th Street/Broadway (US9), Manhattan and Soundview, The Bronx BX41| Gun Hill Road/White Plains Road, and Mott Haven, The Bronx BX40/BX42| River Park Tower and Throgs Neck, The Bronx New Flyer D60HF in the New MTA Livery is shown here Orion 5 CNG Bx36 and New Flyer D60HF BX40 or BX42 is seen here as well ENJOY! Video Taken: March 4, 2011
Video Rating: 5 / 5

 
Comments Off on SKILL Concept Project 34 Night Practice PART III

Posted in Nikon Videos


2 Days In New York

28 Nov

Hip talk-radio host and journalist Mingus (Chris Rock) and his French photographer girlfriend, Marion (Julie Delpy), live cozily in a New York apartment with their cat and two young children from previous relationships. But when Marion’s jolly father, her oversexed sister, and her sister’s outrageous boyfriend unceremoniously descend upon them for an overseas visit, it initiates two unforgettable days of family mayhem.

 
Comments Off on 2 Days In New York

Posted in Photography Videos


Studio Lighting: Building a Light Set-up

28 Nov

Studio flash photography often appears to be complicated and confusing for the new photographer.  The tangled, twisted mess of light size, power, angle, position, direction, etc… can be daunting to say the least.  Not to mention the need for extra equipment such as backdrops, light stands, modifiers, reflectors and the lights themselves. Wow! Already seems like too much huh? You might find yourself thinking, “I can just use the giant light source in the sky that is available everyday and be done with all this other mangled mess of an armamentarium.”  At times I would not disagree with you, as the natural light from the sun is hard to beat and is in great abundance, however, when I look at how much my understanding of light and shadow has improved from my many unsuccessful studio lighting shoots, the value of learning this sort of lighting is tremendous. And yes I did say “unsuccessful shoots!”

Strangely enough, when I got started with photography, studio lighting was one of the areas in which I was most interested. Not the easiest place to start I can assure you, but  it definitely does not need to be as awkwardly bemusing as it first appears. Now this article is not meant to be a full on detailed description of what lights or modifiers to buy or an in depth scientific analysis of the inverse square law complete with physics equations and Einstein like theorems.  It is more of a reason of why to get started with studio lighting and to break through any mental barriers that might be in your way.  I promise you, once you get your feet a little wet and wild in the studio, you will not only love it, but also find that you have a better eye for light even when you are out at the wee hours of the morning trying to capture that perfectly beautiful sunrise.

To shoot my studio work, I use simple, durable yet economically feasible equipment.  I currently use a set of Alien Bees strobes from Paul C. Buff. There are a lot of other brands of strobes out there, but these have worked well for me and fit within my budget.  Now, you do not necessarily need to use strobes. Westcott has their Spiderlite TD continuous lighting system that also could suffice. Basically any system of lighting can work fine. You could use a couple of lamps with a shower curtain liner to diffuse the light if you want. Don’t get too hung up on the equipment at first, but try to understand how to position and control the lighting to get the desired results.  I am trying not to get pulled into a discussion about equipment, but admittedly some equipment is required. In order to move on, I would recommend getting a good book or two on studio lighting to give you a thorough description of some lighting basics. Two that I have personally found useful are Master Lighting Guide for Portrait Photographers, by Christopher Grey or Basic Studio Lighting: The Photographer’s Complete Guide to Professional Techniques, by Tony Corbell. There was also a nice post here on DPS recently called One Light Portraits: Simple Elegance, by Rick Berk.

Whew! Let’s move on and get into some of the nitty gritty of setting up a studio portrait shoot. Lately, I have been working on some creatively themed portrait shoots as a personal project.  The basics of what you need for a shoot are simple. You need a background and a willing model or subject. This can be a plain wall in your house and a close friend or even some fabric taped to the wall with a bowl of fruit on a table in front of it. My theme was fire, so first I went to the fabric store and found an interesting black/grey charred looking swath. A quick aside, if you want to find some really cool backgrounds in the U.S. go to a fabric store around Halloween and they will have some really great stuff.  Next, I got a hold of a local model, the fabulous Brittney and set-up a time for the shoot. I also hired the amazing Dina Bree Nast a local make-up artist here in Denver, Colorado. I must say, and this is just my own opinion, but if you have never hired a make-up artist for a shoot, you have to try it as the results are spectacular and it will reduce your post-processing time tremendously.

Okay, the date, model, MUA and backdrop were set. Next and most importantly, how do I design the lighting set-up.  A little planning goes a long way with a studio shoot. When you are just getting started you do not want to have to deal with moving a lot of lights around or having your subject face the wrong way and have shadows in places where you do not want them. A sure fire way to avoid this is to first give your subject a stool or a chair to sit on. This will keep them in one place at the same distance and proximity from your lighting set-up and your background. Secondly, stick to one lighting set-up and limit the shoot to it. You want to focus on getting the shot that you want and not be constantly worried about fumbling with the lights. If you are more focused on the lights and everything else going on with the equipment, you will not pay attention to getting a great pose and expression and let’s be honest, the lighting can be less then perfect if you capture the right moment.  Finally, you would like to have an idea of what sort of depth of field at which you would like to shoot. If you want the background slightly blurred go with a wide open aperture of f/2.8-f/4. In my plan for this shot, I chose f/8 as I wanted to capture a bit of the look and texture in the background as I felt it complimented the shot. Additionally, I keep my ISO low which for my Nikon is 200 and my shutter speed I usually leave at 1/125 of a second. Thus, my camera settings are set already and I have not even taken a shot yet.

I always start my lighting set-up with the position and exposure setting of the main light or the one that will be responsible for lighting the subject.  In this shot, I already know I want my aperture around f/8 so that I can capture that background detail. This already let’s me know where I want my main lights exposure to be set. Now, there are two ways to set the main light’s exposure. You can use a light meter or you can wing it by taking some practice shots and checking your histogram and adjusting accordingly. Either way works well even though many people have opinions about one way or the other. Personally, I use a combination of both. So what about position of the light?

To start out with, I think using a glamour or butterfly lighting set-up (named for the shadow pattern created beneath the subjects nose) is very easy and is incredibly flattering for the subject. To achieve butterfly lighting the main light is set directly in front and slightly above the subject with the light angled down toward the subject. As a beginner, having the light directly in front of the subject is useful cause if the subject turns their head one way or the other they will still always be within the range of the main light. I used a 36-inch strip softbox in this set-up placed about 2-3 ft from the subject in the horizontal position to achieve a narrow, soft beam of light that would not spill onto the background very much. Then I took a few shots to see what it looks like.


As you can see with just the main light, the subject is adequately exposed, however, I cannot see the background and the subjects dark hair blends in so much with the background that you cannot see the outline of her hair. What does this tell me? I need to light the background as well as the hair to separate her from the background and gain some depth to the image. Since my theme was fire, I wanted to incorporate some colors that would support the theme. This made me think of reds, oranges and yellows. So to light the background I set a strobe just up off the floor angled up at the background with a standard reflector attached, however, I decided to place a red acetate gel over the light to give a little color to the background and support my theme. To set the power of this light I turned off my main light and took a few practice shots with only the background light on to see how it looked and adjusted the power of the light until I liked the look.


Here you can see with only the background light, I have a nice subtle red glow to the background that also brings out the interesting texture to compliment the fire theme of the shoot. The background light also wrapped around the subject just a little bit, likely bouncing a touch off the white surface of the softbox in front of her, giving a red tinge to the shadows. If I did not want this extra red in the image I could have moved my subject farther form the background, but I liked the effect so I left it alone.

Next, I needed to separate the subject’s  hair from the blending into the background.  I set up an additional light right behind the subject just below her shoulders and directed it with a standard reflector at the back of her head. I decided to add a yellow acetate gel over this light to hopefully give a bit of a fiery glow to the hair. Again I turned out the other lights and I took a few shots to see how it looked and adjusted it as needed.


As you can see, I now have a nice burning glow that highlights the outline of the hair and separates the subject form the background adding some depth to the image. I also get a little more of the yellow light reflecting of the strip softbox and filling in the shadows of the face with a bit of a golden tinge. When I looked back at the photo of the main light by itself I decided that this slight tinge would add some warmth into the shadow area and really compliment the photo. I have to admit this was a happy accident as a result of the light set-up.


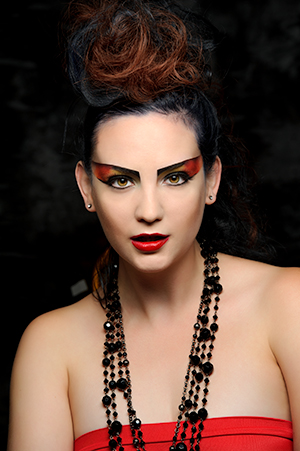
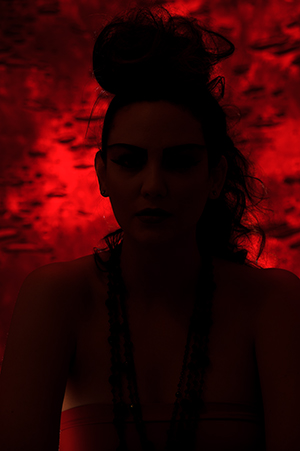
Next, I took a few shots of just the background and hair light together to check how the two looked combined.
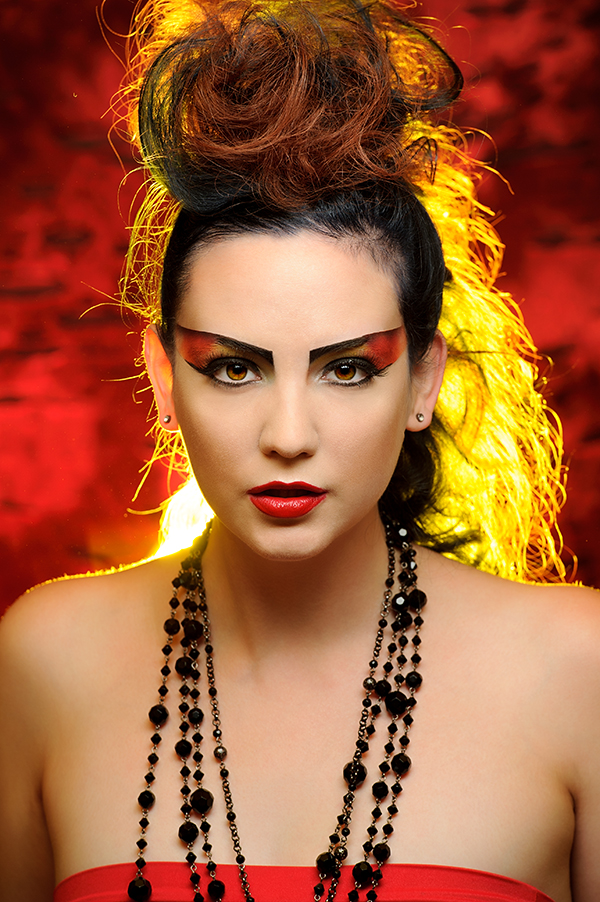
What do you think? A pretty nice combination that provided the shot with the fiery look I wanted, while also serving to bring out the background and help the subject stand out. To be critical, I was not pleased with the illumination of the subjects right ear, but I figured I could work with angles possibly to make it more subtle. Finally, I turned the main light back on and took a few more shots to see how all three lights looked together. I was very pleased with the result and felt that the little bit of red and yellow that spilled over into the shadows of the subjects face really helped to compliment the look and bring it all together.  At this point the light and camera settings were never touched and all I had to do was shoot and make sure I got the pose and expression I wanted, which when working with someone like the experienced Brittney was super easy. Is the light perfect? Definitely not, but it all comes together to produce a nice unique portrait.

I hope by going through my thought process step-by-step for this shot and by showing the effects of each light separately that it gives you a little insight into working with studio lighting and how you can construct an image one light at a time. Having total control of the lights is a bit scary, but once you start taking some baby steps with it, I promise you it will make all aspects of your photography better. Studio lighting is all about the direction and intensity of light and how it transitions and compliments into shadow. Wait, isn’t that what all photography is about? So go ahead and jump in head first. Inevitably, you will make a lot of mistakes, have many over and underexposed images, and end up with plenty of shots of which you are not proud, however, you will also absolutely get some fantastically, fascinating photos and learn a lot about the the interplay and visualization of light and shadows.  Plus, let’s be honest, don’t we have these same problems with any shoot? Any shot involves the light, background and subject and how we decide to capture and expose the image. Being able to control the light should actually make getting a great capture easier.

Post originally from: Digital Photography Tips.

Check out our more Photography Tips at Photography Tips for Beginners, Portrait Photography Tips and Wedding Photography Tips.

Studio Lighting: Building a Light Set-up


Digital Photography School

 
Comments Off on Studio Lighting: Building a Light Set-up

Posted in Photography


SKATERS SAVE TWO BABIES FROM LOCKED CAR

28 Nov

Kids locked in a dangerously hot car were saved by a group of skaters and some good samaritans. The parents locked there keys in the car and left there two 1-2 year olds in the car alone. Filmed at Crossroads Park in Bellevue Washington. Skaters- 1. Kenta 2. Julian Castaneda 3. Hunter Krech 4. Nick Lukens 5. Ken Maddy Filmers- 1. Nick Lukens 2. Hunter Krech Thanks too everyone that acted quick enough to save the babies.
Video Rating: 4 / 5

Music video by Royal Stell performing StelldaDick (PromoVideo). (C) 2012 Unbeatable Records mixtape “StelldaDick NO.1” download it now: bit.ly www.reverbnation.com Directed by Kryštof Šašek www.facebook.com
Video Rating: 4 / 5

 
Comments Off on SKATERS SAVE TWO BABIES FROM LOCKED CAR

Posted in Nikon Videos


Amateur or Professional?

28 Nov

Want to do some interesting reading? Do a Google search: “should amateur photographers charge a fee?” There is obviously a lot of expertise around the English speaking world on this topic – Google returned “about 2,760,000 results.”

Some of those results are so naive they are absolutely funny. For example: “I have a digital camera which takes pretty good pictures…” and “Call a photographer in town and see what they say for advice on how much $ $ $ …” and a classic “You won’t incur (in) any expenses by using your digital camera.”

As a professional with more than 20 years experience there are several things I have learned over that time. In order of the above statements I would respond with the following:

• Cameras don’t take the picture, it is the person standing behind it,
• Yes, I’m certain every professional photographer in town would be delighted to tell you how to establish a fee over the telephone; and
• What a wonderful day it will be when we can get our equipment and learn our skills for free.

This question of “how much do I charge” often revolves around the topic of weddings. The interesting point remains that one of the most difficult and high pressure disciplines of the entire practice of photography is … wedding photography. It is a one shot deal – bad pun intended.


  © Can Stock Photo

Is this the work of an amateur?

I know many photographers, myself included, that have tens of thousands of dollars worth of equipment and the knowledge to use it, know what we would have to charge to cover overhead costs even if we were doing it for free by not charging a creative fee, and know precisely what we pay in equipment costs every year; but, we wouldn’t touch a wedding job with a ten-foot barge pole. Simply put, it is not within our skill set. Wedding photography is very specialized.

What I really don’t understand is why folks would either ask, or offer, to photograph a friend’s wedding. Don’t they understand that by working at their friends weddings they will not enjoy the ceremony or festivities that follow the ceremony?

What happens when that well intended gesture goes south? Not only are you going to feel bad, your friend won’t have any pictures, and you run the risk of even losing a friendship from your well intended offering.

Equally as bad, or even worse, what happens when a guest catches a toe in the strap of your camera bag, trips and falls and suffers a personal injury? You will no longer be considered a friend of the bride, but the wedding photographer who is ripe for a lawsuit.

Another most likely scenario is that you decide to change lenses to capture that key moment; let’s say signing of the registry. In your haste to be ready you drop a lens, a lens you purchased just three months ago that cost $ 950. You want to cry as you look at it lying in pieces at your feet. Is your bride-friend going to pay for a replacement? Probably not. And because you are an amateur you most likely don’t have all-peril equipment insurance that would offset the replacement cost.

Before offering your services it is paramount a review of the costs and liabilities that will be absorbed. There is a multitude of what if scenarios that has to be explored. Beyond the cost of equipment, beyond the cost of liability insurance and even beyond the cost of losing a potential friend, there are also questions regarding taxation and industry ethics.

After reading all the above arguments suggesting why you should charge a nominal fee for your services you will have then entered another scenario. In most countries this fee will be considered income, and will be taxed accordingly. Should you decide to not report the income another topic enters the discussion. I suspect tax avoidance would not only come with potential legal consequences, but at its most basic form it raises questions of ethics.

Professional photographers contribute to the local economy. They hire local students (most often aspiring photographers who desire to learn the profession before hanging out their own shingle), they pay various taxes, they pay studio rent, they pay insurance to local brokers, and a host of other expenses that most often support local service industries and overall economy. If enough weekend Rebels (they all shoot with Rebel’s, don’t they?) start shooting weddings for free that professional photographer will eventually have to close shop and the community loses the local jobs and economic spin-off the professional photographer supported.


© Can Stock Photo

Professional wedding photographers today often bring a reportage style as opposed to the traditional and formal approach.

As I mention, I do not photograph weddings as I do not feel qualified. I also strongly believe that each of us has a moral obligation to ensure we do not undermine the capacity of our neighbour to earn a living, regardless of occupation.

Before you agree to photograph that friend’s wedding, be honest with yourself, your friend, your neighbour and your community.

Post originally from: Digital Photography Tips.

Check out our more Photography Tips at Photography Tips for Beginners, Portrait Photography Tips and Wedding Photography Tips.

Amateur or Professional?


Digital Photography School

 
Comments Off on Amateur or Professional?

Posted in Photography