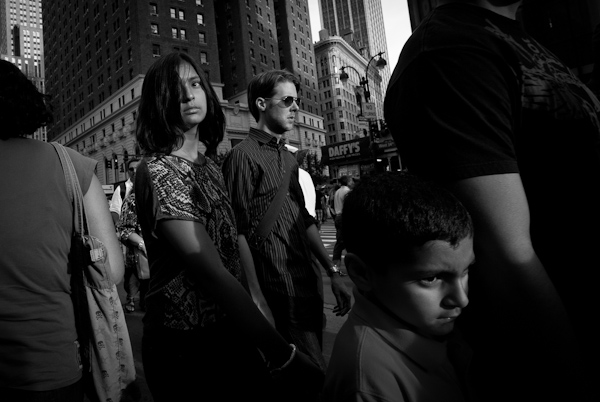
RSS
 

Archive for August, 2012

25 August, 2012 – Learning About Photography from Classical Music

25 Aug

Yes, I care as much about new gear and technology as you do. But, I also try to regularly publish essays on "photography" – you know, that thing we do with our shiny new toys to gives them purpose.

Today’s essay by contributor Mark Schacter is titled Everything That’s Important in Photography I Learned from Classical Music.


"You and Jeff did it again!  A great series of videos.

I’ve watched the earlier Camera to Print series as well as the LR 2 & 3 videos and as usual, I learned 
new technique and ideas even though I’ve been behind a camera for 45 years.

Additionally, the rapport you two have is most engaging, enjoyable, and totally different than the sterile video tutorials from others (I’m afflicted with being a visual learner). 

Again, a great series of videos that have helped me grow once again."


The Luminous Landscape – What’s New

 
Comments Off on 25 August, 2012 – Learning About Photography from Classical Music

Posted in News


Animation Desk for iPad presents you the virtual reality of creating animation.

25 Aug

? Animation Desk for iPad – App Info Animation Desk is an iPad application which allows users to sketch on their device screens and turn their drawings into real animations. Explore your creative side with Animation Desk now! – iTunes Link: itunes.apple.com – Product Website: www.kdanmobile.com – Facebook Page: www.facebook.com – Twitter: twitter.com Other apps from the Animation Desk Series: Animation Desk for iPhone itunes.apple.com Animation Desk for iPad – Lite Version itunes.apple.com Animation Desk for iPhone – Lite Version itunes.apple.com For instruction and demonstration, please visit our Facebook page. www.facebook.com For more information about other apps from Kdan Mobile, find us on Facebook www.facebook.com and Twitter twitter.com
Video Rating: 4 / 5

www.ka-gold-jewelry.com For Beautiful Sacred Geometry and other Spiritual Jewelry, please Visit Ka gold Jewelry


[ ROSES in 3D ] Pan & Zoom 3D Pictures/Videos SONY 3D 1080p

25 Aug

Update – i discover today 28 June 2012 , than Sony Bloggie 3D capture pictures in FULL Resolution 3D SBS 3840×1080 pixels ( 1920×1080 x 2 sbs ) , until now when i adjust bad parallax convergenge for each 3D picture with 3d video editor i re-save with only half resolution of original resolution . For example at place of 3840x1080p i saved in the past at only 1920x1080p , now i’m so happy with greatest resolution , the 3d pictures look more clear and crisp than never before , but YOUTUBE it didn’t support again FULL 3D Resolution (3840x1080p) only HALF 3D Resolution (1920x1080p) like this video here . – People with Gadmei 3D Free Glasses tablet’s (Gadmei T863-3D , Gadmei T883-3D , Gadmei E8-3D , Gadmei WikiPad-3D ) can watch all 3D FULL RESOLUTION 3840x1080p pictures with Android apk : “Stereoscope” found on Google Play or www.stereoscopie.fr – For watching 3D 1080p videos/movies i recommend VideoPlayer apk already pre-installed with all Gadmei 3D tablet’s because it know to read all 3D format’s available on the market today (3D SBS (the most popular format), 3D TOP-OVER , 3D Fiel Dept , 3D Half2Full , 3D Open Grating , etc ) all on 3D Free Glasses AMAZING !!! – 199$ SONY 3D Bloggie 1080p ( 2 x FULL HD 1920×1080 pixels 3D Camcorder – 2 lenses for the 2 eyes of humans vision perfect reproduction ) H.264 video codec Progressive Scan better than interlaced SONY 1500$ HDR -TD10 3D camcorder) – 2 Microphones for Stereo Sound Recording (for 2 ears of human perfect reproduction
Video Rating: 5 / 5

 
Comments Off on [ ROSES in 3D ] Pan & Zoom 3D Pictures/Videos SONY 3D 1080p

Posted in 3D Videos


Recommended Reading: Social-Media Marketing Essentials

23 Aug

This month I’m happy to have my article Social-Media Marketing Essentials featured in Digital Photo Pro magazine. In the article I provide a primer to social media marketing, discuss strategies and highlight the pros & cons of many of the most popular social media web sites used by photographers.  Be sure to check your recent copy of the magazine for it. If you’re not a subscriber be sure to pick up a copy or check it out line. Enjoy.

Copyright Jim M. Goldstein, All Rights Reserved

Recommended Reading: Social-Media Marketing Essentials

flattr this!


JMG-Galleries – Jim M. Goldstein Photography

 
Comments Off on Recommended Reading: Social-Media Marketing Essentials

Posted in Equipment


THE MASTERS – EOS DIGITAL TVC (feat. Melvin Sokolsky)

23 Aug

Like any craftsman worth his salt, Melvin Sokolsky has spent decades honing his skills. The dozens of awards garnered throughout his illustrious career bears proof of this life-long Canon user’s dedication to photography. Witness a true master at work, and witness the magic of photography and music come together in this symphony of master craftsmen. Find out more about the EOS Digital equipment Melvin Sokolsky trusts at: www.canon-asia.com
Video Rating: 4 / 5


The Ultimate Guide to Zone Focusing for Candid Street Photography

22 Aug

Glance, 34th Street

1/320th at F11, ISO 800 (17mm) – Canon 5D Mark II.

Capturing strangers candidly, yet tack sharp, is probably the toughest technical skill to learn in street photography.

With a genre such as landscape photography, you can find your location, plan your shot, wait patiently for the correct lighting, and make sure that you are ready to pounce when the perfect moment hits.  But candid street photography is an entirely different beast.  Often, you are presented with a moment so quickly that your reaction time is severely tested.  It is so tough to frame correctly, focus correctly, and capture a spontaneous shot at the right moment, all while trying to keep things candid.

The solution?  Learning to zone focus.  Not every street photographer zone focuses, but the ones that do swear by it.  While I use autofocus when I can, I too swear by it.  And with a little practice, it’s not all that hard to learn.

Honestly, it’s way harder to explain it than it is to actually do it.

Depth of Field (DOF)

Tiger

Tiger

1/250th at F4, ISO 3200 (28mm) – Canon 5D Mark II.

Before we go into what zone focusing is, we need to talk about the factors that go into creating DOF.  If you know this already then feel free to skip to the next section.

The term Depth of Field refers to the area in front of and behind a subject that you focus on that will appear acceptably sharp.  For instance, say you focus on a subject that is 10 feet away.  Depending on your camera settings, that might mean that everything from 8 feet away to 14 feet away will be acceptably sharp.  That would be your depth of field.  Also, keep in mind that the area behind your subject that is acceptably sharp will always be greater than the area in front of your subject, and in many cases much greater.

Depending on four factors, your aperture, your focal length, the distance that you are focusing at, and on your camera’s sensor size, your depth of field can change drastically.  Here are the four factors in detail:

  1. The smaller your aperture, the more DOF there will be in a scene.  So if you are shooting at F16, much more of your scene will be sharp than if you are shooting a F2.8.
  2. The wider your focal length, the more DOF there will be in a scene.  So if you are shooting at 28mm, much more of your scene will be in focus than if you are shooting at 100mm.  This is why I rarely zone focus using a lens longer than 35mm.
  3. The further away you focus, the more DOF there will be in a scene.  So if you focus on a person 10 feet away, then you may have a range of three feet in front and six feet behind your subject that will be sharp (depending on the other three factors), whereas if you focus on a person that is 3 feet away, you may have a range of 3 inches in front and 6 inches behind your subject that will be sharp.
  4. The larger your camera’s sensor is, the less DOF there will be in a scene.  If you are using a full frame camera like the Canon 5D, then there will be less DOF then if you are shooting with a camera with a smaller sensor, such as the 7D, 60D, or a micro-4/3rds camera, with the same settings.

Here is a website to test out these different depth of field factors: http://www.dofmaster.com/dofjs.html.  Keep in mind that the term ‘acceptable range of sharpness’ is just an opinion.  As your subjects veer further from the focus distance of your lens, they will appear less and less sharp, whether or not they are in the ‘acceptable’ range on the chart.  So practice with your own camera and lens to figure out what is ‘acceptable’ to you.  This website is only a general guide to get your started.

Zone Focusing

Traveler

Traveler

 1/400th at F8, ISO 1600 (17mm) – Canon 5D Mark II.

Zone focusing is pre-focusing your camera to a certain distance away, say 10 feet, guessing the DOF that you will have at that distance with the settings you are using, and then photographing subjects as they enter that range, and hopefully as close as possible to the actual focus distance on the camera.

It is also being able to change your focus distance quickly and accurately, without looking, as a subject moves closer or further from you.

The reason for doing this is that both using autofocus and turning the manual focusing dial takes time (and often will be noticeable to your potentially candid subjects) and most of the time things happen so fast on the street that you need to be focused ahead of time.  If your camera is already focused to an average distance away, then you can just wait for your subject to enter that range and there will be no delay from when a moment happens to when you are able to click the shutter.  It will be instant.  In addition, this will allow you to shoot without looking through the viewfinder, if you decide that you want to ‘shoot from the hip.’

Here is a specific example based on common settings that I use.  With the 5D Mark II and a 28mm focal length, if I pre-focus my camera to 8 feet away at F8, then everything from around 5.5 feet to 15 feet away will be ‘acceptably’ sharp.  Of course, as you get to the outer areas of that range the subject will not be perfectly sharp, but for fast-moving street photography, it gives me a serious range to work with.  At F11 or F16, even more so.

Manual Focus Meter, 5D Mark II

The only problem is that you need to have a lens with a manual focusing meter, such as the one in the photo above, that shows you the distance that the camera is focused at and is easily manipulated.  Many cameras and lenses don’t have this but some will tell you the focal length in the camera’s menu or viewfinder.  While not perfect, this will work somewhat.

But if you want to do candid street photography then I highly suggest getting a lens with a manual focus meter.

So it should be obvious to you why we generally want the range of sharpness to be as great as possible when zone focusing (unless you want more bokeh for aesthetic reasons).  It is for when we mess up slightly in guessing how far something is away so that there will still be enough leeway for our main subject to be sharp, or so we can get multiple subjects at different distances to all be relatively sharp.  These are two reasons that many street photographers prefer to use wide-angle lenses, such as 28mm or 35mm.  My go-to focal length is generally 28mm.

It is also the reason why you want to shoot at a high ISO in street photography (unless the light is strong).  If you shoot with a high-ISO, it allows you to shoot with a smaller aperture.  With my 5D Mark II, ISOs of 800, 1600, and 3,200 are usually my standards (unless the light is strong).  For many cameras, the ISOs may not be ideal at these levels, however that is quickly changing these days with each new camera released.  Test your camera at different ISO settings to see what its acceptable range is.

Guessing Distances

If you are like me then you often do street photography in less than ideal lighting, such as in the subway system.  When you’re shooting at F16 in bright sunlight, you don’t have to think as much about it.  It won’t matter much if your subject is 9 feet away versus 10 feet away.  But when you are shooting at F2.8 in the subway, it really does matter.

Reflection, Subway

Reflection, Subway

1/250th at F2, ISO 3200 (35mm) – Fuji X100.

For this reason, it is important to learn the distances away from your camera’s lens, all the way up to around 12 feet away.  I suggest using a tape measure and measuring out the distances, from 2 feet from your lens all the way to 12 feet.

Go out and practice.  Find different objects and try to guess how far they are away.  Before I go out I will still pick an object around eight feet away and focus on it to make sure I’m guessing my distances right.  It’s a skill that you need to constantly calibrate.  I have gotten a lot of strange looks over the years from people who have seen me focusing intently on lampposts 8 – 10 feet away.

The other reason to get good at guessing distances is that people move and scenes develop.  You might want to capture a person walking towards you at both 10 feet and 5 feet away.  So when you hold the camera you want to always have one of your hands on the focusing ring.  Practice manual focusing back and forth from 10 feet to 8 feet to 6 feet and so on.  Eventually, you’ll be able to capture someone walking towards you sharp at both 10 feet away and 6 feet away, without having to look through the viewfinder.  It’s an incredibly effective technique.  Doing this well, however, can be tough.

Couple, St. Marks Street

Couple, St. Marks Street

1/320th at F5, ISO 1600 (28mm) – Canon 5D Mark II.

My final word of advice is that if you have the time to autofocus or manual focus with a viewfinder on a subject without them noticing, then do it.  That is much more consistently accurate than trying to guess distances and zone focusing.  But for a majority of the time, zone focusing will be your best and quickest weapon on the street.

Post originally from: Digital Photography Tips.

Check out our more Photography Tips at Photography Tips for Beginners, Portrait Photography Tips and Wedding Photography Tips.

The Ultimate Guide to Zone Focusing for Candid Street Photography


Digital Photography School

 
Comments Off on The Ultimate Guide to Zone Focusing for Candid Street Photography

Posted in Uncategorized


6 Reasons Why Photography Matters

22 Aug

Declan O’Neill is a professional photographer who lives in the South Island, New Zealand. He travels extensively capturing the beauty of New Zealand’s extraordinary landscape. The photographs which accompany this article are part of a series entitled ‘The Anatomy of Melancholy’ which is dedicated to the memory of his sister, Ann, who died from Multiple Systems Atrophy.

1. Our photographs tell us what is important to us

When you ask people what possessions they would rescue from their burning house, one of the most frequent answers is the photograph album or a computer with their digital images. When in panic mode it’s interesting that we would probably grab photos rather than valuable jewelry. This impulse to save our recorded memories is a powerful force which tells us much about the role of photography in our lives and our constant desire to distil our most precious moments into images.

Why photography matters 1

We preserve the important events and people in our lives. The ceremonies of birth and birthdays, marriages and anniversaries, holidays and new houses are all recorded because they matter. Photographs are our personal story, a timeline of our lives filled with faces and places that we love. They are our story, which we can share with others. The hundreds of images come together to form a narrative of our lives.

2. Photographs are part of our legacy

Once I remember sitting in a train as it passed a playground where children were standing to attention for the annual school photograph. Across the front row sat the teachers and behind them, hundreds of children neatly preened and uniformed. For the briefest second the entire assembly was motionless. We were passing just as the photographer clicked the shutter. Suddenly, as if in slow motion, the huge group scattered as children escaped their enforced immobility. The neat rows dissolved and broke into individuals who were now kicking footballs or huddled in friendship groups. None of those children realised that the photograph was probably going to outlive them. A couple of generations later it might surface among old papers in an attic and someone would search for granddad among the fresh young faces. Photographs matter because they freeze moments of our lives which pass unremarkably and which seem to have little importance to us at the time. The significance, however, may be for others who search for the person we once were or the places we once knew. They can be small pieces of a jigsaw that complete the larger picture of our lives.

Why photography matters 2

3. Photographs allow us to share and to communicate.

Images are much more than a simple record. Photography speaks to the best and most generous part of our human nature – the desire to share what we find beautiful and interesting with others. You only have to look at Flickr and a multitude of photo sharing sites to see this impulse at work. Millions of people sharing their personal, passionate and sometimes quirky take on the world around them. Our images can involve a world of strangers in our life. How powerful is that?

Why photography matters 3

4. Photography makes us artists

Photography allows us to express ourselves through an art form. We notice a beautiful landscape or an old man’s lined face and we want to capture it. Each of us will have a different reason to do so but, essentially, we want to create something. However humdrum our nine-to-five lives may be, the creation of an image makes us an artist. It feels good.

5. Photography is a complex language

Our images can express joy and sorrow, wonder and sympathy. Every human emotion can find a place in photography. For many years I never valued my photographs of overcast landscape because I believed that there was no beauty in a land with muted colours and a leaden sky. I wanted the land to be alive with colour and vibrancy. However, lack of colour in a landscape makes you search for other things that often go unremarked in bright sunlight. It could be a symmetry of hills or a tree standing out from a forest of thousands. I have suffered from depression for most of my adult life and photography gave me a language to express feelings for which I can find no words. We have a miserably poor vocabulary for mental illness and photography has allowed me to develop a visual language for some of the most difficult emotions.

Why photography matters 4

6. Photography has the power to move us

Photographs can grab our attention and speak directly to our emotions. Nick Ut’s photograph of a crying Vietnamese girl whose clothes have been burnt away by napalm embodies the power of a single image. At a more subtle level, we can learn lessons about a whole range of emotions. Grief has the power to wash away the luminance and chrominance of our lives. There is no magic way to restore them at will. We have to be patient. But while waiting we can search for the shapes and patterns that are still there in the greyness. They will lead us back to colour eventually. At moments of great sorrow in my life I have used images to express that hope of returning colour.

Why photography matters 5

Photography, at its best, is a powerful language which speaks to our emotions. It allows us to tell our story and show others our framing of the world around us.

Declan O’Neill is a professional photographer living in the South Island of New Zealand.
site: www.newzealandlandscape.com

Post originally from: Digital Photography Tips.

Check out our more Photography Tips at Photography Tips for Beginners, Portrait Photography Tips and Wedding Photography Tips.

6 Reasons Why Photography Matters


Digital Photography School

 
Comments Off on 6 Reasons Why Photography Matters

Posted in Uncategorized


Windows 7 – Don’t Like How Songs, Photos, Videos or Webpages are Opened?

22 Aug

Tired of webpages opening in a particular browser, or movies in an old multimedia player you no longer use? Change these associations in Windows 7.

When installing and uninstalling software on Windows 7, you may note that files that used to open in one program now pop up in other software. For example, install a new text editor or notepad replacement tool and you may notice that text files open up in said tool instead of Windows Notepad. Install a multimedia player and your songs and videos may not open in Windows Media Player anymore. Run a new web browser and your web pages may appear differently than how you remembered.

While many applications ask you before making such changes, you may accidentally gloss over such screens when installing them. Plus, some software may just make the changes for you. Thus, if you want to open files in different software packages, do the following:…

Read more at MalekTips.
New Computer and Technology Help and Tips – MalekTips.Com

 
Comments Off on Windows 7 – Don’t Like How Songs, Photos, Videos or Webpages are Opened?

Posted in Technology


Funny Happy Birthday Animated Cards – Happy Birthday Wishes with Music

21 Aug

Happy Birthday – www.freeecardsgreetings.com Funny animated birthday greeting to wish your friends & loved one a very Happy Birthday online!! Send this card and let your friend be surprised after receiving this cute video in his/her email
Video Rating: 4 / 5


3D Halloween 2007

21 Aug

This is a bit too crunchy for YouTube, but try this out if you have some red/blue 3D glasses (anaglyphic). For a higher-res version, visit www.adcetera.com. Every year, Adcetera does something “fun” for clients, friends, and family. We thought we’d share what we did this year.
Video Rating: 4 / 5

An experiment in 3D, filmed in glorious Super 8! Use your own anaglyphic (red/green) 3D Glasses! Red Lens over the Left Eye, Please!! A short film by Al Magliochetti starring Joe Pascale, Chris Vegliante and Bob Fusaris. This movie was shot with two synchronized Super 8 cameras for Hamden High School’s film production class taught by Augustine Cofrancesco. This restored version incorporates an opening title sequence created with CGI to replace the original titles which were damaged in the intervening years. Enjoy !