RSS
 

Archive for August, 2010

[Trailer] Bolt True 3D in Anaglyph 3D (Green-Magenta)

09 Aug

Check here for more my videos : forum.gamevn.com
Video Rating: 5 / 5

a 3d anaglyph(stereoscopic) video made for Absolut Vodka for the releasing event of Absolut Rock. by Elad Magdasi & Livyatan Visuals. you’re gonna need stereoscopic glasses in order to watch this clip.
Video Rating: 5 / 5

 
2 Comments

Posted in 3D Videos


Summer’s Master Photographer Results and Round 2!

09 Aug

congrats to everyone who made it on! and awesome job to those who didnt… all ur photos were brilliant!
Video Rating: 5 / 5

When asked what a photographer’s life is about, the subject of this film replies that it is ‘a life looking through a lens’. She should know: Annie Leibovitz has been looking at all kinds of life through her lens for the last 30 years. Viewers who haven’t heard her name will certainly have seen her pictures: from a naked and pregnant Demi Moore to Bette Midler on a bed of roses; from Bruce Springsteen’s famous pose in front of the American flag, to a naked John Lennon curled up and vulnerable next to a distant-looking Yoko Ono, Leibovitz’s images are instantly recognisable. In her 50s now, the photographer is working harder than ever. She’s universally in demand from pop stars to political leaders, rebel-rousers to royalty (including our very own Queen) and she’s no stranger to controversy. Her recent photographs of Disney Star Miley Cyrus caused a storm when the 15-year-old was photographed wearing only a sheet and smudged lipstick. Leibovitz’s career began as a photo journalist for Rolling Stone magazine in the early 1970s, where she quickly rose to the position of chief photographer. She successfully captured the spirit of the age, from the rock and roll revolution to Watergate. She famously went on tour with the Rolling Stones, earning her reputation as photographer to the stars but picking up a drug habit along the way. Clean for years now, Leibovitz’s work is most familiar these days through the covers and pages of Vanity Fair magazine. In these shots, every picture
Video Rating: 4 / 5


The O Twins

09 Aug

“COMING SOON” Africa’s No 1 3D Animation Family For more information go to www.fusionng.com


James Cameron Stereoscopic 3D camera

09 Aug

bit.ly Cameron’s new way of film making. Very interesting stuff. Can’t wait to see the new Avatar movie.


Olympus E-3 Fourthirds Pro digital SLR camera

09 Aug

Olympus E-3 promotional video on Olympus E-series Fourthirds System professional digital Single Lens Reflex camera. The Olympus E-3 is the latest addition to the E-series high-end Fourthirds dSLR camera system.
Video Rating: 5 / 5


The Art of the Pose

08 Aug

Posing is hard!

If anyone tells you otherwise then they are a bona fide genius or they don’t realize how bad they are at either directing the action or being a model.

Some models are simply born with the ability to move freely in front of the camera, some are not.  Either way it is the job of the photographer to direct the shoot with just the right amount of attention.  Too much or too little are equally bad, and the tricky part is every shoot is different.

Over the years I have had a lot of experience working with models, in all that time I’ve learned a lot of tricks for directing the action.  How to make someone smile naturally, how to make someone laugh, how to make someone feel comfortable and how to start ordinary people on the path to being great models!  As always this process takes two people.  A director that knows their stuff and a model with enough talent and passion to actually make the shoot better.

Here is my single best piece of advice for working with new models.

Adapt (and use) these three styles of of directing

And know which one is best for the particular shoot and the particular model

1. Meticulously guide the action

Many photographers shy away from this technique, either they lack the confidence or on the opposite extreme they proudly wear the badge of honor that “I do not pose the model, it’s too contrived and I want PURITY in my photos.”  I’ve got news for everyone, the photos you see in magazines in advertising and editorials?  Lots of those are meticulously directed to look like they weren’t directed.  It is a rare combination for the model and photographer to be so in synch that absolutely no direction is necessary… though it does happen.

Personally I find myself using this style most when I’m doing conceptual shoots, close-ups and beauty head shots. I also revert to this style when the model is unexperienced or unconfident in her actions and just needs the extra help.

2. Shut up and Shoot

Sometimes a model knows his/her craft so well that any advice you give them couldn’t possibly make things better.  Just watch and move your camera/lights accordingly.

3. Inspire and Suggest

My favorite style!  I work with a lot of brand new models, a majority of them have never even posed before.  This style is a great way to give the model confidence enough to experiment with posing, in doing so you can mentally assess their modeling talent and create a collaboration worth documenting.

Here’s how you know when you’re doing it right!

Brynlee is not a professional model.  A month or so ago Ryan Muirhead and I went in to get a quick bite to eat on a lazy saturday afternoon, as we walked into the fast food restaurant we both spotted her.  She stopped us both in our tracks, literally, and Ryan and I exchanged a look.

She was beautiful.

So I did something I rarely do, only the second time in as long as I can remember I wrote a note on the back of a contest entry form they had at the front register.  It said simply:

“My name is Jake Garn, I am a photographer and I’d love to photograph you.  No charge.  Check out my work and email me if you’re interested.”

I left my website at the bottom, I only had to wait a day or two for an email.

Since then I’ve photographed Brynlee a couple of times, the images at top are from her third photoshoot.  I gently guided her to play with her dress, shake her hair, stand on tip-toes, and just play around.  Then I just shut-up and watched, click… click…. click…

According to the time-stamps on these images we started shooting this look at 7:13 exactly.  The last frame from this look was clicked at 7:18 and 6 seconds.

5 minutes and 6 seconds.  I think I may make a habit out of doing the five minute modeling challenge in the future… if you’d like to see future 9-image collages like this one leave a comment and let me know!

Equipment used to achieve these images

Classic lighting from both sides, put the softboxes as close as you can to the model and expose accordingly.  For this one I put the left-strobe slightly behind the model and the right-strobe slightly in front of her, the ratio of each strobe is about 1:1.


Jake Garn Photography

 
Comments Off on The Art of the Pose

Posted in Uncategorized


Friday Photo Recommendations

07 Aug

If you’re as passionate about photography as I am, I have some great sources of photo inspiration for you to start your weekend.

Art of Composition Lectures

If you’re looking to improve your photography Art Wolfe (@artwolfe) is running a series of lectures on the Art of Composition in 5 cities through October. Check out the schedule here on his web site and if you sign up be sure to share that you found out about it via the JMG-Galleries blog. If you’re in the SF Bay area Art will be in San Jose on September 25th.

Inspiring Books & Prints

Michael E. Gordon (@MichaelEGordon) has released a folio of amazing large format black and white photographs of the Southern California desert aptly titled “Desert”. Thanks to Twitter I caught wind of the release of this folio right away and bought it without hesitation. Given Michael’s fine artistic eye and technical prowess I knew this folio would be great. Upon receiving it I was not disappointed, impressed not just by the great photographs, but the detail applied to the presentation of his work. At “Desert” was a bargain. If you’re a fan of Michael’s work as well pick this one up before the price reverts to 9.

William Neill (@wgneill) has released an amazing collection of his early photos from Yosemite National Park in an eBook titled William Neill’s Yosemite: Volume One. William was kind enough to share a courtesy copy of his eBook with me and it brought back a flood of memories in reading his articles and viewing his photographs in years past. This particular eBook contains over 100 pages of inspiring photographs of Yosemite’s pristine beauty. If you’re unfamiliar with William Neill’s work this is certainly a great way to introduce yourself to his incredible photography. Well worth the price tag for the digital edition.

David Sanger (@davidsanger) has a wonderful book San Francisco Bay, Portrait of an Estuary. David was kind enough to provide a courtesy copy of this book to me and its an amazingly well done book. The images & essays are excellent and the print quality is superb. If you’re attracted to the beauty of the San Francisco bay area or want to learn more about its rich natural history this is a must have. David has signed copies available on his site for only .99. Definitely worth checking out.

Have a great weekend and as I can I’ll continue to bring you more sources of photo inspiration.

Copyright Jim M. Goldstein, All Rights Reserved

Friday Photo Recommendations


JMG-Galleries – Jim M. Goldstein Photography

 
Comments Off on Friday Photo Recommendations

Posted in Equipment


3D Animation Overview Tutorial

05 Aug

Pro 3D animator explains the process of modeling, animation, and rendering. Feel free to contact us if you’d like to see an overview on a specific topic! www.madcaplogic.com


16-bit Vs. 32-bit Vs. 64-bit: What Does it All Mean?

05 Aug

bits  

A Guest post by Steve Berardi from PhotoNaturalist

In digital photography, there’s a lot of talk about bits:

  • 12-bit vs 14-bit Analog to Digital Converters (ADC)
  • 8-bit vs 16-bit color
  • 32-bit vs 64-bit Photoshop

But, what does it all mean? Although more bits generally means better quality processing, it’s not always that simple. Sometimes you really need to know the full story before making a conclusion.

Before we jump into these specific examples that are common in digital photography, it’s important to understand what a bit actually is.

What is a bit?

The word “bit” comes from two words: binary and digit. Each bit has two possible values: 1 or 0. Sometimes it’s also helpful to think of a bit as either “on” (1) or “off” (0).

Although one bit can store two possible values, a sequence of two bits can store four possible values: 00, 01, 10, and 11. With a sequence of bits, order matters, so “01″ is very different from “10.”

Each time you add a bit to a sequence, you double the number of possible values, so if you go from two bits to three bits, you go from four possible values to eight possible values.

As an example, let’s say you were interested in storing something that has 16 possible values. You would need 4 bits in this case (2 x 2 x 2 x 2 = 16).

Analog to Digital Converters (ADC): 12-bit Vs. 14-bit

Every digital camera has some kind of analog to digital converter (ADC) that converts the analog signal captured by the sensor into a digital signal that produces your image. Most DSLRs these days either have a 12-bit or 14-bit ADC.

The bits in this case refer to the number of possible tonal values that your camera’s sensor can capture. For example, a 12-bit ADC can capture 4,096 possible tonal values for each pixel. On the other hand, the 14-bit ADC can capture 16,384 tonal values for each pixel.

At first, it may seem like the 14-bit ADC is a clear winner: it can capture 12,000 more tonal values! But, these two extra bits are not increasing the dynamic range of your camera, they’re only adding more steps within that range. It’s kind of like if you took a loaf of bread and cut each slice in half to make even smaller slices. You might have more slices of bread now, but the size of the loaf is the same!

So, you’ll experience slightly better image quality with the 14-bit ADC, but it’s really just noticeable in the deep shadows and smooth gradients (like those you find in a photo of a sunset).

For more details on 14-bit vs 12-bit ADCs, check out these helpful articles:

Color: 8-bit Vs. 16-bit

In most post-processing software, you have the option between 8-bit color and 16-bit color. The bits in this case refer to the number of possible tonal values available to each color channel (red, green, and blue) of each pixel.

With 8-bit images, you have 256 possible values for the red channel, 256 values for the green channel, and 256 values for the blue channel. And with 16-bit images, you have 65,536 possible values for each color channel.

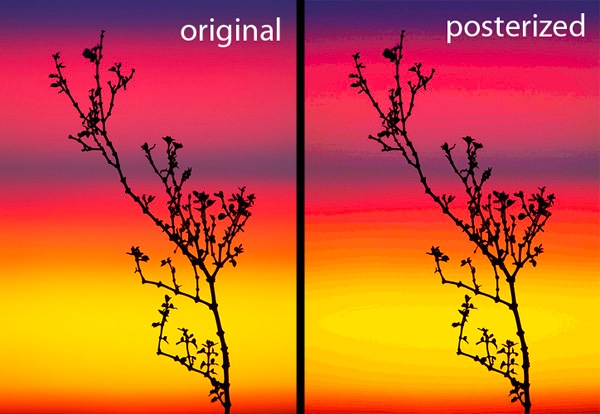
Using 16-bit color will result in some pretty large filesizes, but it’s worth the extra size because with 16-bit processing you’ll significantly reduce your chances of posterization (as seen in the photo below). It’s a good idea to use 16-bit color even if you originally shot in JPEG (which is 8-bit), because the extra bits will help reduce rounding errors when performing common post-processing tasks like Curves or Levels.

bits-posterized

For more information on 8-bit vs 16-bit color, check out these helpful articles:

Photoshop: 32-bit Vs. 64-bit

Some post-processing applications, like Adobe Photoshop, offer 32-bit versions and 64-bit versions. The bits in this case refer to the number of possible memory addresses. With 32-bits, you can use up to 4GB of physical memory, but with 64-bits you can theoretically use up to 17.2 billion GB of memory (although this amount is usually severely limited by the operating system).

There’s a common misconception that the 64-bit version of Photoshop is always faster, but in reality, to take advantage of the speedup (which is minimal), three things need to happen:

  1. You need more than 4GB of physical memory
  2. You need to be working with very large images (at least 800 MB)
  3. You need to be running a 64-bit operating system (e.g. Vista x64 or Mac OS 10.6)

You might think that 800 MB is larger than you’ll ever work with, but filesizes can get big pretty quick if you’re building a panoramic image, or working with multiple layers of images to blend exposures.

Even if you do meet all three conditions above, there’s still a chance you won’t notice any speed-up at all, depending on the operations you’re performing on the image. Also, keep in mind that many third-party plugins do not work with the 64-bit version of Photoshop.

For more details on 32-bit Vs. 64-bit Photoshop, check out these informative articles:

Remember: Not all bits are created equally

The key thing to take away from this post is that not all bits are created equally. Just because something has twice as many bits that doesn’t mean it’s automatically twice as fast or two times better quality. Before making any kind of conclusion about 16-bit vs 32-bit / etc, you really have to understand the story of how those bits are being used.

201008201339.jpgAbout the Author: Steve Berardi is a naturalist, photographer, and computer scientist.

You can usually find him hiking in the beautiful mountains and deserts of Southern California. Read more of his articles on nature photography at the PhotoNaturalist and follow him on Twitter.

Post from: Digital Photography School – Photography Tips.

dpsbook.png

16-bit Vs. 32-bit Vs. 64-bit: What Does it All Mean?


Digital Photography School

 
Comments Off on 16-bit Vs. 32-bit Vs. 64-bit: What Does it All Mean?

Posted in Uncategorized


3D SCREEN TEST – anaglyph – Adjust LCD/3D Glass

05 Aug

3D SCREEN TEST – anaglyph – Adjust LCD/3D Glass Try watch the movies on: 3Dstreaming.it
Video Rating: 0 / 5

 
Comments Off on 3D SCREEN TEST – anaglyph – Adjust LCD/3D Glass

Posted in 3D Videos