Archive for August, 2010
Green & Blue
Photowalking
The past few years have been really a lot of fun for me, photographically. Moments after I decided to jump into this fun hobby of taking photos, I stumbled upon a tiny group of photowalkers. The idea blew my mind. Within weeks I was trying to wrangle together my own photowalk. The first one I […]
TrevorCarpenter.com » Photowalking
Best Digital Cameras With Video Capability
© Ian MuttooAs more individuals and households own digital cameras, the specific video features to capture memories becomes more valuable. Selecting the right digital camera to record videos can be a challenging task.
Recently, Consumer Reports filed an investigation to find the best digital cameras in the market with the best capability to film good quality video footage. Each camera was used in various lighting and environments to test the best quality in all situations possible.
From indoors to bright lighting, the best …
lighting essentials advanced workshop – a brief review
For those not familiar, Lighting Essentials are a series of workshops put on by Don Giannatti (you may know him as “Wizwow” on flickr). I am a big fan of Don, not only is he an excellent photographer, with years of commercial experience under his belt, but he is also a fantastic teacher – which is just as difficult a skill unto itself. He’s also a really down to earth guy with a low tolerance for BS and fools, which I find refreshing, particularly in the online photo community which can often turn into a bit of a hive-mind circle-jerk at times (you know what I’m talking about)…
Anyway, I got to go to his workshop in Philly in ’08 and it was awesome – definitely kicked my work up a couple of notches. At the time I was already somewhat experienced with lighting, so I wasn’t sure what to expect, but I was blown away; it was amazing to watch Don demonstrate things that I already “knew” lighting wise, and still be able to pick up something new – a new way of thinking about it, new ways of analyzing and constructing and deconstructing light.
A few weeks back, I had the opportunity to attend the advanced lighting essentials ‘shop down in Baltimore. Different than the standard workshop, this one assumed a baseline familiarity with lighting to begin with – getting a baseline exposure, balatncing flash/ambient, ratios etc… This was fantastic, as we were able to jump right into working with little “catch up” required. The format was well done. Don split us up into groups, with various assignments/challenges – in the morning we worked “in studio” talking about and working on precision lighting techniques for still life/objects. I gained a whole new respect for product photographers – it’s a lot more difficult than you’d think. One light, and lots of carefully placed white/black cards/diffusers etc… I particularly appreciated this as it really made you focus on analyzing and constructing light carefully rather than the “throw some strobes on it till it looks good” approach which many lighting novices seem to take.
In the afternoons we worked with models, but instead of the standard “how to light/balance” we focused more on creating a mood or complex lighting schemes – sometimes using 4, 5 or more lights – little accents and subtleties to construct a meaningful lighting scheme. Now I tend to be more minimalist in terms of my own lighting (I tend to favor zero, one or two lights – rarely more) but even so it was valuable to concentrate on the subtleties of the lighting scheme as a whole.
One of the things I like the best about Don’s workshops is that it’s all hands-on. There’s no “sit around and listen to the instructor talk about how great he is” for 6 hours, as is the case with many “workshops” – Don has everyone jumping right in and shooting right off the bat. It’s simply “talk about technique -> apply technique”. Good stuff. We also spent quite a bit of time talking business. Don has been a full time photographer as well as designer and creative director for many years, so he has a fantastic amount of the experience in the industry and shares freely. There are few things more valuable for a new photographer than the lessons of experience from someone who has “been there and done that”. It’s like going through the school of hard knocks without having to take the knocks.
To sum up, aka the TL;DR version: if you get a chance to attend one of Don’s workshops, go for it – it’s worth every penny. What boggles my mind is that folks who will drop thousands on a new camera body or lens, are so hesitant to spend money on education or workshops. I can say without reservation that the couple of hundred bucks for the LE workshops improved my work far more than any gear purchase I have made (and yeah, I’m also guilty of chasing the latest and greatest toys when it comes to gear).
finally some shots from the ‘shop:
Tweet This Post Stumble This Post
Camera Exposure
![]()
In photography, ‘exposure’ means the amount of light that falls onto the sensor of your digital camera. In modern cameras the exposure is usually set to automatic by default and, most of the time, it can be left there and will produce beautiful pictures. There are times though, when the camera lets us down or we want to produce a particular effect and it would be nice to understand what is going on ‘under the hood’.
Getting a ‘correct’ exposure means recording as much of the relevant information in the scene as possible. In the shot on the left, the important information is the bird. The sky has gone completely white as it was much, much brighter than the bird. If I had let the meter expose for the sky, the bird would have been rendered as a black silhouette.
Even when the exposure is ‘correct’ the problem with all cameras is that they cannot record the entire range of contrast (black to white) that the eye can see. Especially when you take into account that the eye is constantly adjusting to cope with high contrast. On a sunny day if you look into the shadows of a scene then into the bright areas, the iris in your eye will quickly adjust so you can see detail in both.
Faced with the task of recording as much information as possible, the camera will try to average out all the light levels and expose accordingly. As burnt out highlights are normally considered uglier than black shadows, the camera, left to it’s own devices, will normally err on the dark side. Which is no good if you are shooting against a bright background. It’s the subject you want to see, and you don’t really care if the background is white.Auto Exposure Modes
The camera manufacturers have come up with all sorts of ingenious metering systems to try to help, there are now multi mode metering systems, which give you a choice of ‘center weighting’, ‘spot metering’ or ‘multi spot metering’ on many of the better cameras, but none can guarantee to give you what you want every time.
A common use for this technique is when you are taking a close up shot of two people and there is space between their heads, if you’re not careful the camera will focus on the wall or trees behind them. If the background is very dark or very light this can alter the exposure significantly and result in faces that are too dark or too light.
Skin tones are what most meters are set up to consider an ‘average tone’, they are also usually the part of the picture that we most want to get right. If I am photographing a group of people in difficult circumstances, like bright sunlight for instance, I will often move close in to the group and take a light reading from someone’s face or, if we are all standing in the same type of light, I will take a reading from the back of my hand. This is no good, of course, if the subject is in bright sunlight and I am in the shade.
Manual Exposure
Now it’s time to turn that dial away from ‘program’ mode and have a look at the dreaded ‘manual’ mode. There are also a bewildering array of other choices such as ‘aperture priority’, ‘shutter priority’, ‘exposure compensation’ etc., but once you understand the basics you will be able to select the most suitable mode.
The amount of light falling on the film is governed by four things.
- The amount of light reflected from the scene which, if you are outdoors, you can do very little about.
- The ‘shutter speed’ which is the amount of time the shutter is open, measured in fractions of a second.
- The ‘aperture setting’ which is the size of the hole through which the light enters. If you look at the lens of your camera you will see a diaphragm in the middle of the glass which the camera adjusts according to the light. This does exactly the same job as the iris in your eye. Aperture settings are measured in ‘f stops’.
- The ISO setting. This is the ‘sensitivity’ of the sensor. (see ISO Speed)
The shutter speed and aperture settings have other quite separate effects on the photograph which we will discuss in another article, but for the purposes of exposure, making the picture darker or lighter, they are interchangeable. Make the hole twice as big and open the shutter for half the time and you will expose the sensor the same amount.
Why use manual exposure?
The advantage of manual exposure is that the settings do not keep changing as your scene changes. Let’s suppose that you are taking close up photos of cars passing by. Some of the cars will be black or dark colors and some will be light colors or white. If you are filling the frame with almost nothing but car, the meter will be trying to render each car as mid gray. Although it will probably not succeed, what you will notice is that the background is a different shade in each photo.
I often have to take portraits of people, some are wearing very dark clothes and some are wearing white. If I am not careful with my exposure settings will be affected by the clothes.
Although it is by no means always necessary to use manual exposure, an understanding of how it all works will save a lot of disappointment. Below are some links to other articles covering various aspects of exposure.
Any suggestions, ideas? Feel free to comment on this article!
How to Photograph Bands in Bars, Part 3 – Shooting
A guest post by Music Photographer Rick Bennett.

Bars are challenging shooting environments now matter how you slice it–crappy lighting, drunk crowds, cramped spaces. Add in musicians who like to move around a lot, speakers in photographically inconvenient locations, and microphone stands that tend to bisect heads, and you’ve got an ideal situation for a photographer who likes a challenge. In Part 1, I covered the basics of equipment needed to shoot bands in bars: low-noise-at-high-iso cameras, off-camera flash, and mongo glass. In Part 2 I talked about where I’ve found success with placing my flashes, and the camera settings that have yielded the best results. Finally, in this part, I get to the shooting.
Before you start shooting, take care of your ears so that you can do this more than a couple of times–buy some ear plugs at your local hardware store (near the goggles and other protective gear) or pharmacy (near the sleep aids). I find I spend a significant amount of time standing right in front of the speakers, and my ears are ringing pretty badly by the end of a performance if I don’t use ear plugs. Even with the plugs in, you’ll be able to hear every part of the performance.
While shooting, you must be polite. Most people are accommodating if you step in front of them for a moment to make a shot, but do that too frequently or for too long, and you’ll start to irritate the fans of the band. Remember that the band is there to perform for their fans. The pictures you make are secondary to that purpose. I’ve only been in one situation where I felt like my presence as a photographer was not appreciated by one fan–I finished the shot and stepped off the dance floor. The huge majority of the time, people are very forgiving of me moving in and out of the crowd in order to get the shot I want. But I’m very careful to not obstruct any one person’s view for more than a few seconds–no more than any other fan would obstruct their view.
The easiest way to stay out of the fans’ view is to crouch down for the low angle. Most big bands perform on a stage that is raised several feet above the heads of the crowd so that everyone can see. Bands who play in bars don’t generally have this advantage, but you can create that look by taking pictures from low angles. The shots look cool, and the fans will appreciate not having to look around your f/2.8 lens to see their favorite guitar solo.

I find the most challenging aspect of shooting musicians is composing shots without microphone shadows or severe instrument shadows. This isn’t a problem for guitars, but any instrument that is close to the face can be problematic, e.g. saxophone, trumpet, violin/fiddle. The shadows are easy to see if you’re shooting with ambient stage lighting and no flash. But with remote flash, it means you have to be on the same side of the instrument or microphone as your flash is. In this lighting diagram, if the left flash fires, the microphone will cast a nasty shadow across the singer’s face. If the right hand flash fires, no shadow problem. So you have to stay close to the flash, but not so close that it looks like on-camera flash.

The other major compositional challenge is getting pictures framed so that microphones and stands don’t detract from, or steal attention in, the photo. Microphones and stands are part of a performance, but I don’t like them to dominate a picture. For example, if I’m framing two musicians in the shot and the microphone from one musician is covering the face of the other, I won’t take the shot (or I’ll delete it later). I’ll change my position, or wait until the musicians change theirs if I can.
I also don’t particularly care for shots from dead-center on a signer. It will look like they’re eating their microphone, or worse, have it shoved up their nose. That’s why I tend to take pictures from the side–I get great shots when the singer pulls back from the microphone a little bit so that you can see their whole face.

If I’m shooting the gig for the band, or in the hopes that the band will hire me in the future, I’ll work through the following shot list during their performance:
- a couple of shots of every member of the band. If some play and sing, I’ll capture them doing both.
- detail shots, generally closeups of instruments during a set break. Not all of them, just those that strike me as interesting photographically.
- detail shots of instruments being played. Again, not all of them, but whatever strikes me as interesting at the time. I love shots of accordions!
- motion blur of fingers on instruments, usually a guitar or bass. No flash here, just a 1/15 to 1/60s shutter, and up close with a f/1.8 lens. The challenge here is to capture a moment where the instrument isn’t moving very much, but the fingers are.
- any time the band interacts with the fans or fans enjoying the show, e.g. clapping, dancing, rock hands, etc, with band and fans in the frame
- a group shot where a) all the band members are visible in the frame, and b) everyone is playing, and c) a little bit of audience

Finally, be sure to give the drummer some lovin’. Drummers are usually in the back, with no stage lighting whatsoever, and as such, they rarely have pictures taken of them. I’ll even change the angle and power of remote flashes if I need to in order to capture a drummer. I make it my mission to capture at least one killer image of the drummer before I go home for the evening. If the drummer has any ambient lighting hitting them at all, a slow shutter will create some great motion blur.

When taking all of these pictures, I’m looking for “music faces”–points where the musicians are clearly enjoying themselves, and “music moments” where two (or more) musicians are jamming together. These are the images I really like to see. When I look at my images in post processing, I can tell who captured my attention photographically because I’ve got a lot more images of them. And I’ve walked away from shooting some gigs (not paid, or pre-arranged by the band) because the musicians weren’t performing–they just stood there playing their instruments. Meh, that’s no fun. I could have taken five shots and have faithfully captured their performance.

Make sure the band knows how to get in touch with you by the end of the performance. They’ll definitely have noticed you (especially if you have that 70-200 f/2.8 lens) and are probably interested in seeing your work.
What you do with the images and how you processes them will depend on your purpose in taking them. If you wanted to get the band’s attention and hopefully have them hire you, then pick a handful of the best and get them on-line in a hurry. That will help solidify in their memory that you were the one taking pictures, and, holy cow, you took some great ones! If the band had already hired you, then I assume you’ve already worked out a method of payment and delivery.
As you’re going through the images from the night, don’t sweat the deletes. I typically keep only 1/4 to 1/3 of the images from a night of shooting. And the band doesn’t see those out-of-focus poorly framed shots.
Don’t wait for the band to contact you–reach out to them through whatever means possible: Facebook, Twitter, their website. Let them know where to see your work and how to contact you for more.
Good luck! And share your work in the forums.
Rick Bennett has been shooting bands in bars, at festivals, and on big stages for about a year. You can see more of his work on his blog, portfolio, or Flickr stream.
Post from: Digital Photography School – Photography Tips.
How to Photograph Bands in Bars, Part 3 – Shooting
Probieren geht über studieren! Oder?
Tobias Kappel ist 22 Jahre alt und studiert an der Muthesius Kunsthochschule in Kiel. Er beschäftigt sich erst seit 2 Jahren mit der Fotografie, wobei viele seiner Arbeiten analog entstehen.Der folgende Erfahrungsbericht soll euch einen Einblick in das Studium in Kommunikationsdesign mit dem Schwerpunkt Fotografie geben. Vielleicht kann das hier dargestellte aber auch für den ein oder anderen eine Anregung sein, mal wieder analog zu fotografieren.
Wo fängt der Himmel an…
Die Faszination war meine größte Motivation und so suchte ich nach einem Weg, der mir eine Zukunft im Bereich oder mit der Fotografie ermöglichte. Klar dachte ich zuerst an ein Studium in Fotografie selbst. Ich wollte mich jedoch nicht nur auf dieses Medium festlegen und wusste, dass ein Studium in Kommunikationsdesign mir fotografisch gesehen keine Grenzen aufzeigen würde. Ich denke, Niemand kann im Zuge der digitalen Revolution sagen, was morgen ist. Mein Studium bietet mir die Chance Crossmedial zu arbeiten, weshalb meine Entscheidung gegen die Fotografie, auch eine für sie war.
und wo hört er auf?
Thematisch gesehen sollten wir uns im ersten Semester mit dem klassischen Portrait beschäftigen. Hierzu musste jeder unterschiedliche Personen vollformatig portraitieren und das sowohl mit einem Tele- als auch mit einem Normalobjektiv. Insgesamt sollten am Ende mindestens 6 Aufnahmen gezeigt werden, wobei 3 handwerklich anspruchsvoll ausgearbeitet sein mussten.
Die verbleibenden Bilder konnten mit dem klassischen Handwerk brechen und daraus ihre Kraft schöpfen (sog. Punkfotografie). Darüber hinaus sollte mit einem Weitwinkelobjektiv ein Halbakt-Portrait vor Ort und nicht im Studio erstellt werden. Realisiert wurde das Thema mit Hilfe der analogen s/w-Technik.
In den ersten Tagen des Studiums wurde ich mit Namen konfrontiert, die ich vorher noch nie gehört hatte. Richard Avedon, Nobuyoshi Araki, Robert Mapplethorpe oder Wolfgang Tillmans, um nur einige zu nennen. In unserer hochschuleigenen Bibliothek konnte ich Bildbände wälzen, die ich hätte niemals bezahlen können. Darüber hinaus widmete ich mich, schon in die Tage gekommener Pflichtlektüre, von Amsel Adams – Die Kamera / Das Negativ / Das Positiv.
Anfangs stand das Verstehen der Technik im Vordergrund. Wir besuchten parallel zur Fototheorie einen Grundlagenkurs in Gerätetechnik. Vielen war die Auseinandersetzung mit der Technik einfach zu komplex. Als man uns dann lediglich das Entwicklungsverfahren für einen Kodak T-Max 100 erklärte wobei es draußen so langsam Winter wurde, wandten sich viele ab. Probieren ging also erstmal über studieren 😉
Schnell äußerte sich allerdings auch ein Unverständnis gegenüber dem analogen Verfahren. Welchen Mehrwert sollte diese in die Jahre gekommene Technik schon haben? Viele von uns besaßen keine analoge Kleinbildkamera, die Kosten für Chemie und Papier förderten den Missmut nur.
Meine Erfahrung ist es, dass ich durch den Umgang mit analoger Technik gelernt habe, anders zu sehen. Darüber hinaus bin ich offener gegenüber experimenteller Fotografie, da diese sich durch das häufige Scheitern fast selbstständig ergibt. Heute versuche ich so oft wie möglich analog zu arbeiten. Ich nehme mir demzufolge die Zeit, die Fotografie mit Hilfe ihrer Vergangenheit zu verstehen.
Klassik vs. Punk
Die hier gezeigten Fotos sind das Ergebnis meiner Abschlusspräsentation im ersten Semester. Lediglich das Halbakt-Portrait wird hier nach Absprache mit der abgebildeten Person nicht gezeigt. Alle Arbeiten wurden auf Ilford Multigrade IV RC Deluxe Papier / 24×30,5cm vergrößert. Ich selbst erwartete von mir, mich jeder Aufgabe zu stellen.
Ich fotografierte dementsprechend mit einem alten 50mm f/2.8 Tessar von Zeiss, dem 85mm f/1.8 Nikkor und lieh mir manchmal eine Leica R4. Die ersten Bildbesprechungen mit meinem Professor verliefen anders als erwartet. Schnell wurde klar, für jedes gezeigte Bild einstehen zu müssen. Kritisiert wurde alles.
Nebenbei fielen immer wieder Bemerkungen zur Fotografie an sich. Wir müssten uns ihr bewusst werden gleichzeitig aber unsere Rolle als Fotograf dem gegenüberstellen. Was ist überhaupt ein Foto? Eine Momentaufnahme der Realität, die Interpretation der Kamera oder doch das, zu was es der Fotograf gemacht hat?
Beeindruckt von diesen kritischen Anmerkungen zum fotografischen Prozess, begann ich die Fotografie zu hinterfragen, bevor ich sie überhaupt verstand. Während der ersten Monate versuchte ich, Aufnahmeverfahren die ich schon digital angewandt hatte analog zu übertragen.
Konsequenz waren die klassisch angelegten High- und Low-Key Portraits. Das hier gezeigte Low-Key entstand mit Hilfe einer Studioblitzanlage und einem hochauflösenden Orthopan Ur ISO 20 Film von SPUR. Ich wollte dieses Foto unbedingt. Ich entschied mich also bewusst für die langweilig anmutende Schlüssellochperspektive, die Ausarbeitung der Hauttöne sowie dem Model. Als Kritik bekam ich lediglich “langweilig” zu hören.
Ich wusste nicht damit umzugehen, nahm das Foto aber trotzdem in meine Präsentation auf und orientierte mich um. Das nicht betitelte, sich in Unschärfe auflösende Portrait einer Kommilitonin war ein Ergebnis dieses Prozesses. Die Anregung für das Spiel zwischen Unschärfe und Bokeh lieferte mir übrigens ein Beitrag zum Lens-Tilting hier auf kwerfeldein.de.
Das Semester näherte sich dem Ende entgegen und ich konnte mich einfach nicht mit der Punkfotografie identifizieren. Andere zerkratzten ihre Bilder, bemalten sie oder vergrößerten sie durch einen Teebeutel hindurch. Und ich? Ich wollte dem Medium entgegen treten.
Mich hatten schon immer Fotos gereizt, die Verwitterungsprozessen ausgeliefert waren. Hierbei empfand ich die dem Prozess geschuldete Ästhetik als eine Auseinandersetzung der Natur mit dem Medium. Ich selbst fand darin meine Inspiration. Meine Vorstellung war es, den Film so weit wie möglich aufzulösen bzw. anzugreifen ohne die abgebildeten Personen zu stark zu deformieren.
Das Ergebnis ist eine Serie bestehend aus 3 Bildern (von ca. 50) die durch Wärme und Kälte verfremdet wurden. Bedingt durch den Zustand der Negative können diese niemals wieder so vergrößert werden.
Ist der Himmel die Grenze?
Auf mich warten in den folgenden Semestern Aufgabenstellungen zur narrativen Fotografie, inszenierter und manipulierter Fotografie sowie der angewandten Fotografie. In Zukunft werden wir die Technik zur Umsetzung unserer Arbeiten frei wählen können.
Was haben das analoge Mittel- oder Großformat für Potential? Wäre es zu früh, sich schon dem Digitalen hinzugeben? Ich kann euch diese Frage heute noch nicht beantworten aber vielleicht können wir auch weiterhin hier auf Kwerfeldein darüber in einen Dialog treten.
Bei Fragen und Co hinterlasst einfach einen Kommentar!
***
Werbepause: Buchtipp – Vom Alltäglichen zum Besonderen!
KWERFELDEIN | Digitale Fotografie
Redwood Canopy, Muir Woods National Monument
It’s ironic and sad that only when we lose something does it become treasured. Muir Woods is a perfect example of this. These majestic Redwood trees were nearly wiped out to build and rebuild San Francisco (after numerous fires and the great earthquake of 1906). This last stand of local Redwood trees was saved by rough terrain that made logging difficult if not impossible and the donation of the land by William Kent.
Muir Woods National Monument is among the most popular destinations in the San Francisco area. Just the other weekend my wife and I drove through Marin to see large crowds gathering at a shuttle stop to visit Muir Woods. The small parking lot there is quickly filled by early arrivals and numerous tour buses. I think it’s great that people now see the value in the serene beauty of this oasis of Redwood trees, but I can’t help but feel sad that it took their near destruction for others to appreciate their existence.
God has cared for these trees, saved them from drought, disease, avalanches, and a thousand tempests and floods. But he cannot save them from fools. – John Muir
Technorati Tags: California, Muir Woods, National Monument, Redwood, nature, stock photo
.gif)
Copyright Jim M. Goldstein, All Rights Reserved
Redwood Canopy, Muir Woods National Monument
JMG-Galleries – Jim M. Goldstein Photography
Sony A33 and A55 DSLRs [REVIEW]

It’s been a great year for the DSLR. Not only have we seen the top models capture stills of amazing quality, leading to many serious workers questioning the need for medium format digital capture … and then, to many an amazed onlooker, we’ve seen TV series and feature films shot with high end stills cameras. ‘Mazing!
So, in typical fashion, we now see Sony hit the Go! button and pack even more capability into these two new cameras.
Then, a few days ago, heavily disguised, I snuck into Sony HQ to get a top secret preview of the new cameras. And ‘mazed I was.
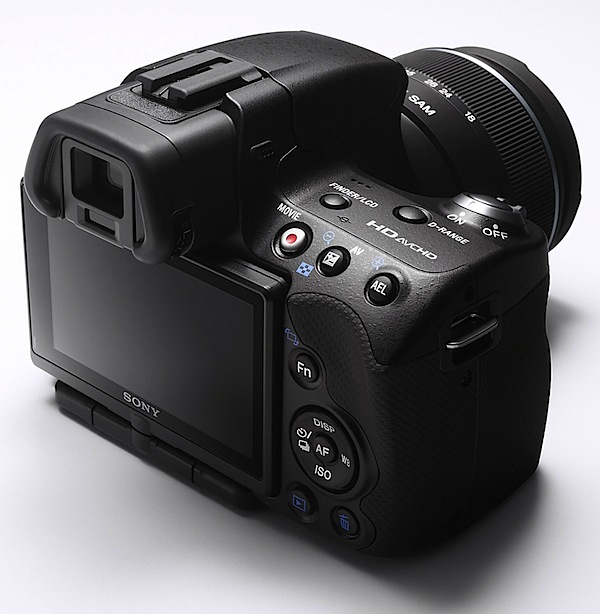
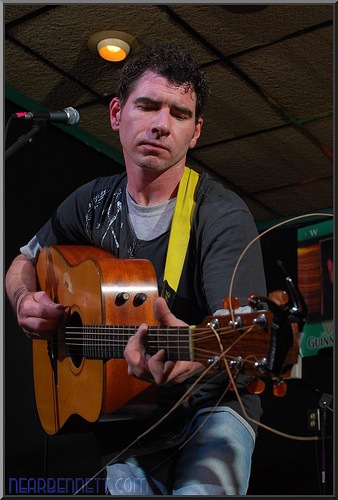
On leaving, I was given a review camera to bring you the good news. As it was early days, I had to be satisfied with the lesser of the two models — A33 (pictured above) — because there was only one A55 (pictured below) to hand, and this was in the Sony techo’s hands. Ne’r mind, you’ll still get the full whiff of excitement this pair generates as, aside from a few specs, the cameras are near-identical.

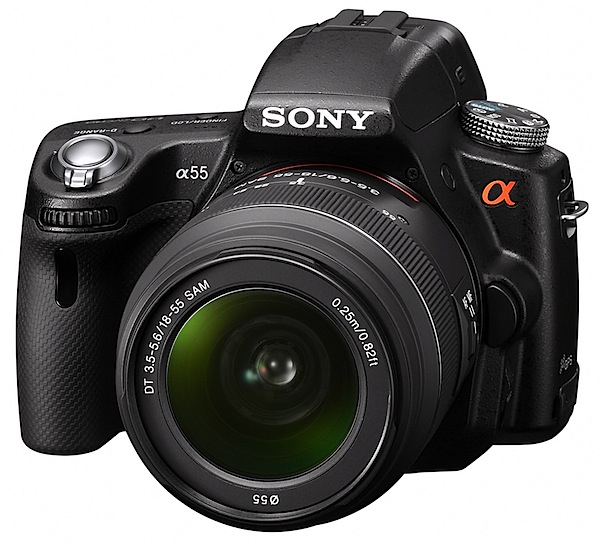
Initially I was surprised at the smallness and lightness of the A33, barely larger than some maxi zoom, fixed lens models. The Exmor CMOS sensor is APS-C size, with a 1.5x lens factor, when compared to 35 SLR glass.

The feature list would seem to satisfy even the most desperate photographer, anxious to bedeck him- or herself with the toppest end camera around.
Features like: 4592×3056 pixels maximum size (A55: 4912×3264), leading to a print size of 39×26cm (42×28cm); writing to SD/SDHC/SDXC and Memory Stick Pro Duo/Pro HG Duo cards (but not to CF); SteadyShot image stabiliser; RAW and JPEG capture in stills; MPEG4 and AVCHD at a maximum res of 1920×1080 pixels; Sweep Panorama shooting; 7.5cm LCD screen that swings 180 degrees vertically and 270 degrees laterally; exposure modes that include auto, auto+, Program AE, shutter and aperture priority, manual and scene selection; face and smile detection; flash compensation; ISO sett8ings to 25,600; GPS (A55 only); three exposure HDR.
The Sweep Panorama feature is to die for. Works quickly and accurately.
High Speed
Then we get to the continuous shooting figures: with the A33 you can pull in shots at a rate of 7 per second — and, amazingly, 10 images per second with the A55!
So, how does it do this? Simply because there is no flipping mirror to slow it down! Instead, there is a semi-reflective mirror in the light path that transmits 66.66 per cent of the light to the CMOS sensor in the back of the camera — and 33.33 per cent of it to a tiny LCD built into the camera’s roof. When you move your eye from the large LCD at the camera’s rear to the eye level viewfinder you view the action via the smaller LCD.
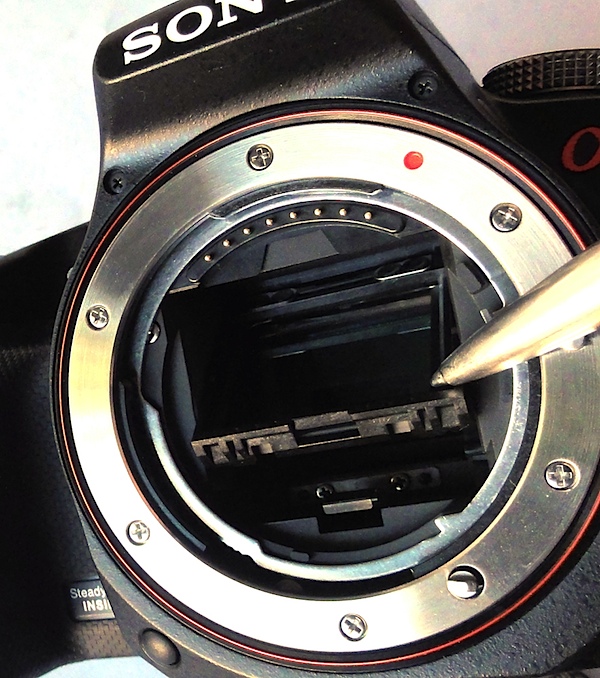
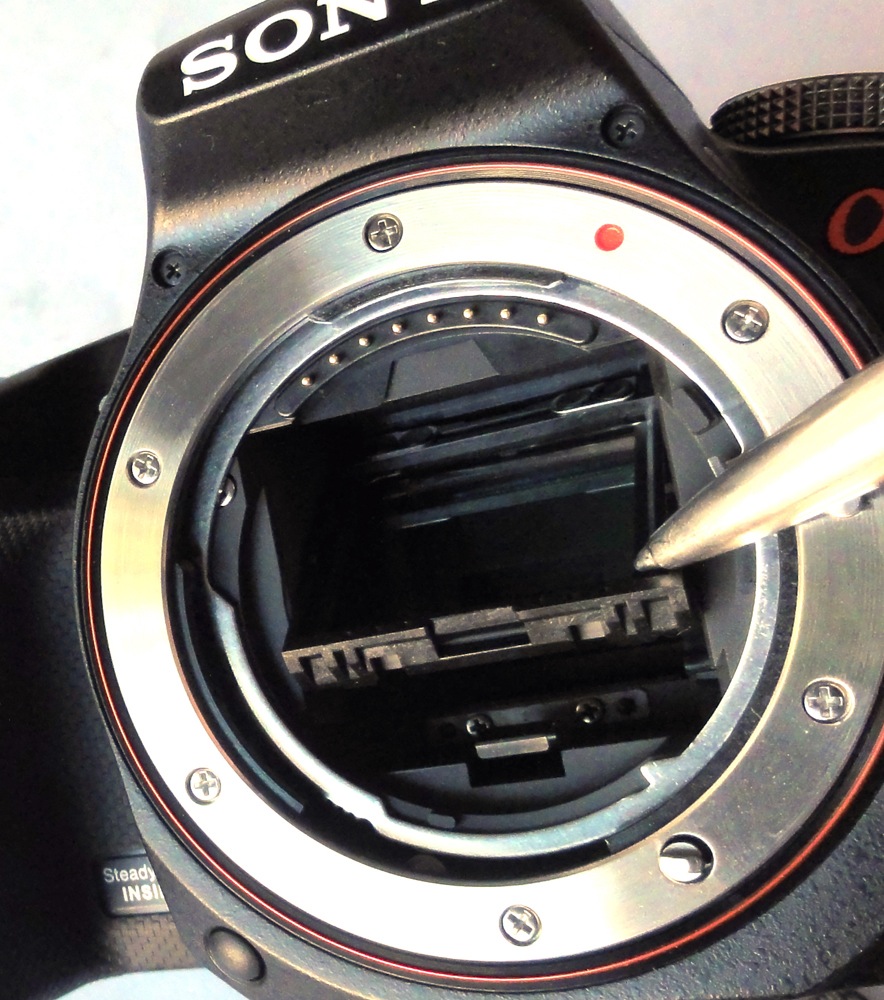
Remove the lens and you can see how it works, with the mirror in place throughout the shooting cycle. Outside of shooting, the mirror can be tilted up in order to clean the sensor, but normally remains in place at a 45 degree angle.
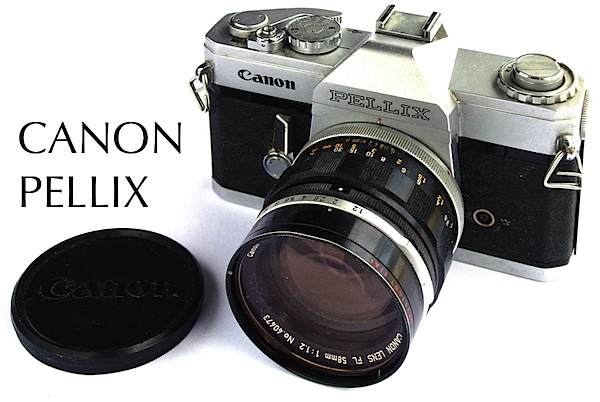
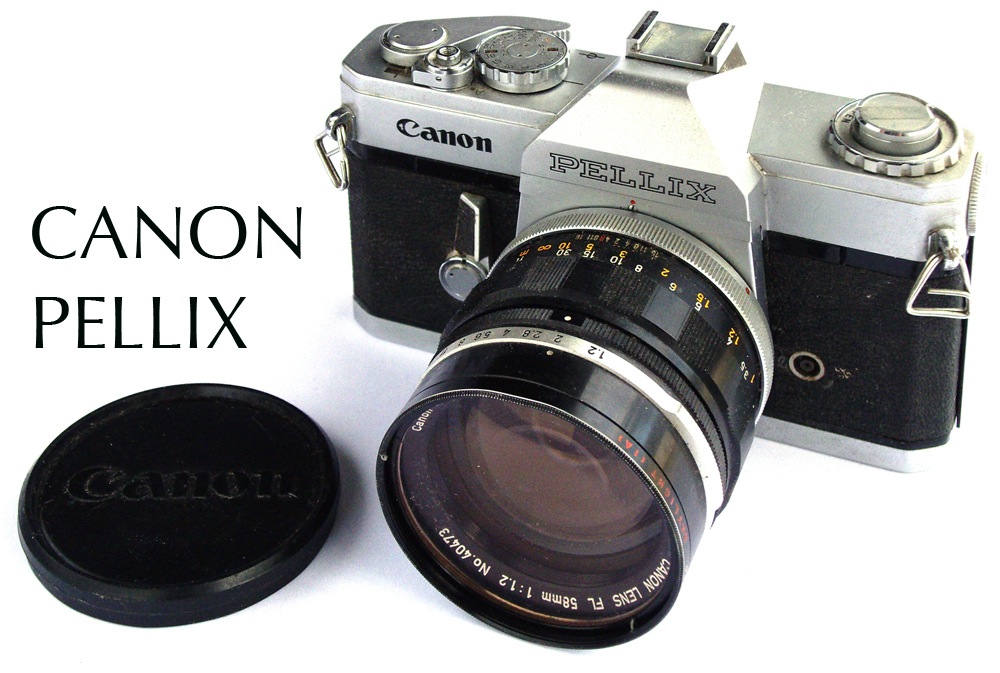
For this neat trick you can thank a pioneering invention by Canon in their 1965 Pellix camera in which the traditional moving SLR mirror was replaced by a fixed, semi-transparent pellicle mirror splitting the light rays from the lens: two thirds of an f stop went to the film, with the rest passing to the viewfinder. The objects: simpler construction, quieter operation, no finder blackout, faster continuous shooting.
Of course, you can ask the question: why didn’t Sony build in a pentaprism to provide a full live optical experience — a la Pellix? The LCD view is a little murky and an optical view would have been far superior. Perhaps the third of an f stop loss for viewing is the reason: a dark finder view.
Movies
With even the occasional compact able to shoot High Def video these days you could expect this little DSLR duo to lead the band — and they do.
You have a choice: record in Full High Definition 1920×1080i AVCHD or MPEG4 1440×1080.
Kick off the dedicated record button adjacent to the viewfinder, pan around, zoom as you wish… and the system follows you, pulling focus firmly on everything you point the camera at and taking care of exposure right through the shot.
These four frames come from an AVCHD sequence: the AF and exposure working hard and well.
One caution: you may find the AF and stabilising functions leave some noise on the audio. A fix: turn off the stabiliser and place the camera on a tripod. There is an input for an external stereo microphone, which may help as you will find the wind noise from the camera mic excessive if shooting outdoors.
But overall, I absolutely loved the video feature!
ISO Settings
These shots cover the ISO settings at 100, 800 and ISO 3200. All show excellent resolution, low noise, colour fidelity.
At ISO 12,800 the wagon falls over: definition is down, noise well up, along with colour artefacts. Not useable.
This shot was taken at ISO 6400 and cropped to a quarter its original size: as you can see, the right shot can take advantage of high ISO settings.
Comment
Quality: overall, excellent, good colour, high sharpness.
Why you would buy one of these: small size and light weight; superb video capture; rapid stills rate.
Why you wouldn’t: card compartment is in the base of the camera, so if using it tripod-mounted, it’s a hassle to remove and reload the card.
Part of the pleasure of the A33/55 is its compact size and light weight. Even with one or two more lenses, this outfit would make a painless traveling companion.
Sony A33 Specifications (A55)
Image Sensor: 14.2 (16.2) million effective pixels.
Metering: Multi-segment, centre-weighted metering and spot.
Effective Sensor Size: 23.4×15.6 — APS-C sized — CMOS.
35 SLR Lens Factor: 1:5x.
Compatible lenses: Sony and Minolta A-mount, Konica Minolta Alpha/Maxxum/Dynax.
Exposure Modes: Auto, Program AE, shutter and aperture priority, manual, scene selection, sweep panorama.
Shutter Speed: 30 to 1/4000 second, Bulb. Flash sync: 1/160 sec.
Memory: SD/SDHC/SDXC/Memory Stick Pro Duo/Pro HG Duo cards.
Image Sizes (pixels): 4592×3056 to 2288×1280 (4912×3264 to 2448×1376).
Movies: 1920×1080 to 640×480 at 25/29.97 fps.
Continuous Drive: 7 frames (10 frames).
Viewfinders: Turret 1.1cm LCD; rear 7.5cm LCD (921,600 pixels).
File Formats: RAW, RAW+JPEG, MPEG4, AVCHD, Dolby Digital (AC-3).
Colour Space: Adobe RGB, sRGB.
ISO Sensitivity: Auto, 100 to 25,600.
Interface: USB 2.0, AV, HDMI, microphone, wireless remote, DC input.
Power: Rechargeable lithium ion battery, AC adaptor.
Dimensions: 124.4×92×84.7 WHDmm.
Weight: Approx. 492 g (with lithium battery and card).
Price: $TBA.
Post from: Digital Photography School – Photography Tips.
Sony A33 and A55 DSLRs [REVIEW]


You must be logged in to post a comment.