The post Tips for Using Photographic Minimalism to Great Effect appeared first on Digital Photography School. It was authored by Simon Bond.
In today’s article, you’ll learn a key tip for improving your photography. After all, when you understand that photography is the art of subtraction, it makes sense that minimalism works so well for photography.
This means that employing photographic minimalism in your work will immediately improve your results. Let’s take a look at what minimalism is, where you’ll find it, and how to use it in your own photos.
Shooting upward toward the fisherman helped produce a minimalist photo.
What is minimalism?
Minimalism, as the name suggests, is about keeping things simple. It means avoiding clutter, which in photography equates to removing unwanted elements from your photos.
You do want a main subject, though; this is needed for the minimalist parts of your photos to have something to contrast with.
Key elements of photographic minimalism
The great thing about minimalism is that it can be applied to almost every genre of photography, including portrait, landscape, and still life. The only area where minimalism doesn’t always work well is street photography, where you often want to show more of the scene.
Therefore, the key aspects of photographic minimalism are the following:
Negative space: This refers to an area of empty space in your photo. The negative space still needs to work compositionally, but that space is what will give your photo its minimalism.
Small main subject: The main subject should not fill the frame. It needs to be present, but have enough space around it for the photo to breathe.
Avoid clutter: When you compose a photo, do so in such a way that you include the main subject and the background with little else.
This photo uses a wall similar in color to the ice cream.
The best location for photographic minimalism
It’s possible to produce photographic minimalism in almost any location.
The important factors are the angle you photograph at and the focal length of your lens. Here are a few possible ideas you can use:
Minimal locations: Places like coastlines and deserts offer minimalism pretty much wherever you point the camera.
Urban settings: Look for a plain wall and use this as a background for a minimalist portrait.
A shard of light: Go for low-key minimalism by locating a shard of sunlight, or by putting a snoot on a flash and aiming it at a person. Then expose for the light on that person, while leaving the background underexposed and dark.
Product photos: Use a lightbox to produce high-key product photos that are surrounded by white (or by the background color that you choose).
The ocean is minimal by nature. The ripples on the water add interest to the negative space.
Which lens works best?
The lens that works best for minimalism will depend a lot on the location you’re photographing. It may be hard to produce minimalism with a wide-angle lens in an urban setting, but take the same lens to a desert and it’ll do a great job. The following is a guide to help you choose the correct lens:
Wide-angle: Use a wide-angle lens in a location where you can fill the frame with one particular background. That background will often be the sky, but could equally be rolling green hills. This works best in rural areas.
Telephoto: It’s easier to produce minimalism when you use a telephoto lens. This is because you can zoom in on a specific area to avoid elements that clutter the frame. When using a long focal length, ensure there is enough negative space around your main subject.
It’s possible to take minimal street photos, as well. Simply find a wall with a strong color to photograph against.
Change the angle
A simple change of angle can have a big impact on your photos and help you produce photographic minimalism. Stepping to the side or crouching down to the ground can be all it takes to remove a distracting element from your composition.
Here are some options that will turn a cluttered scene into a minimalist one:
A bird’s-eye view: This works best where you have fields or a coastline, so the location is already minimalist.
Crouching below a wall: Use a wall as the horizon line and aim up towards the sky. The wall blocks out the usually busy horizon, and you can add a person as a silhouette against the sky.
Compression: I already talked about this in the section about lenses and focal length, but zooming in to remove distracting elements from the edge of the frame works well.
Move to the side: A single step can be all it takes to change the background from cluttered to minimal.
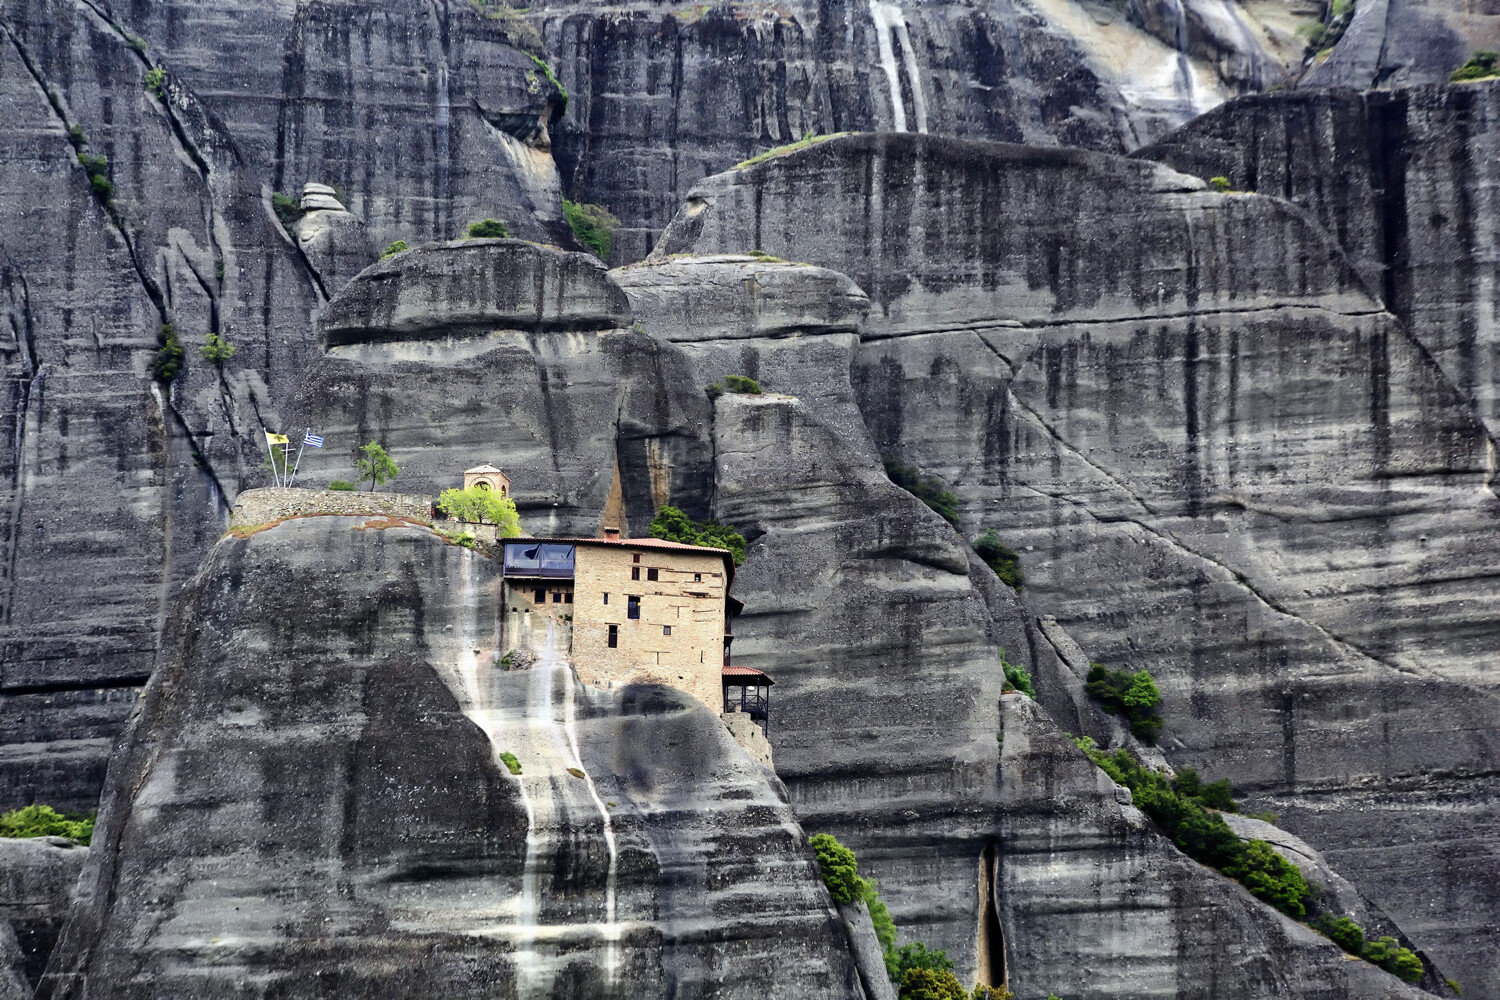
This photo shows a monastery at Meteora in Greece. A long focal length is used and the rocks create a minimal, textured background.
Post processing can help
Now, it’s best to get your photo right from the start and simply change your position so that you can compose a minimalist photo.
That said, there are times that creating a minimalist composition in-camera isn’t possible, yet the photo is still very much there to be taken. There could be a lamppost or an electric pylon that comes into your frame.
Fortunately, it’s increasingly easy to clone out unwanted elements from your photo. And once you’ve done that, you’ll have created minimalism.
This farmworker in Laos works as a great main subject to add interest to the composition.
Maximize your photos with minimalism!
A lot of successful photos use minimalism to great effect. Are you a minimalist with your photography? If so, how do you go about taking photos in the minimalistic style? If you have ideas and photos you’d like to share, please do so in the comments section below.
Now it’s time to maximize your creativity with photographic minimalism!
The post Tips for Using Photographic Minimalism to Great Effect appeared first on Digital Photography School. It was authored by Simon Bond.
The post Tips for Culling Images for Better Results and More Efficiency appeared first on Digital Photography School. It was authored by John McIntire.
When it comes to a photographer’s workflow, there is one stage that might be more important than any other. It is the image selection process, also known as the culling stage. This critical stage is the point where you get your images into Lightroom (or other software) and start choosing which to work on.
But while this is the stage where you choose the photos that ultimately end up representing your work as a photographer, without systems in place it can turn into a huge time sink.
So focusing on the process of culling images can help speed up image selection significantly.
Being able to quickly whittle down a set of photos is an important skill for any photographer. At 36 images, this is a small set of photos, but the principles are the same whether it’s 36 images or 360.
This article aims to show you why having a good system for image selection can be beneficial to your photography and your portfolio. It will also provide an overview of a basic system that you can start to use in your workflow right away, and it will provide tips on how to use Lightroom’s built-in functionality for this purpose.
Note: My examples here are portraits, but the system applies to just about any genre in photography. There are instances where you might not be able to apply some of these principles and the criteria you apply in different genres will be different, but they are exceptions.
The forest for the trees
Take a moment to imagine that you’ve just finished a big session and imported all the images into Lightroom. Now you may have hundreds of images that you have to sift through to find the ones that you want to work on.
When you have hundreds of photos from a shoot all in one place, and test shots, outtakes, and misfires are still included, it can feel like a chore to go through them all.
Without a system for culling images in place, it’s all too easy to find yourself continually scrolling through the same set of images and reviewing the same ones multiple times. This may not be a problem if you only have a handful of frames, but once you get into larger shoots, you can waste a lot of time doing things this way.
Additionally, after going through the same images over and over again, it can also become discouraging. This makes it easy to give up and leave some gems unspotted, which are ultimately relegated to obscurity on your hard drive.
By using Collection Sets to divide a large shoot into ten outfit changes, the images become much easier to manage.
So what type of system can you create?
Using Collection Sets to divide up large shoots into smaller, more manageable chunks is a good place to start.
This is just a small reason why you should consider developing a system for your editing process.
Editing
The image selection process is also known as editing. Now, I know that the word edit (and editing) has come to mean something else in everyday vernacular for photographers. You can call it whatever you want, as I am not one to dictate or prescribe. But as you will be going about image editing in the future, consider thinking about your post-processing workflow in terms of these two job descriptions:
Photo (Picture) Editor: Someone whose job it is to select photos appropriate for the use in question.
Retoucher: Someone whose job it is to alter the appearance of photos and manipulate photos to achieve a final result.
Tools
Lightroom has a huge variety of tools that makes culling images easier. While this is not an exhaustive list, here are a few features that I use regularly:
Fullscreen Mode
Using Fullscreen Mode during the image selection process will help to remove any distractions from your screen. You’ll see the photo that you are evaluating and nothing else.
Being able to view a single image at a time makes this whole process go more smoothly. It also takes away the distraction of Lightroom’s standard interface on the screen. To enter Fullscreen Mode, select any single image in the Library Module and press the “F” key.
Compare
If you want to look at two similar images side by side, use the Compare feature in Lightroom.
The Compare feature allows you to look at two images side by side. Although you won’t use this until later in the selection process, it becomes very useful when you are trying to choose between two similar images with minor differences.
To use the Compare feature, select any two images in the Library Module and press the “C” key. To get back to your normal view, press “G.”
Reject
When you reject a photo in Lightroom, the image will be grayed out and marked by a black flag with an “X.” Any images you mark in this way should be recognizable at a glance.
If you follow my process, you are going to use this tool a lot. When you press the “X” key while any image is selected, you flag that image as a reject. This marks the image with a black flag with an “X” in the upper left-hand corner, and it grays the image out in the Library Module. This makes it very easy to see which images you have already reviewed and marked as unsuitable.
Pick
Marking an image as a Pick will annotate it with a highly-visible white flag.
When you are going through your images, you will eventually come across a photo that you love. You’ll know that you want to work on it no matter what.
In this instance, press the “P” key; the image will be flagged as a Pick. A little white flag icon will appear at the top left of the image in Lightroom.
Star ratings
Using the star ratings in Lightroom is another quick and useful way to annotate images that you want to review again later.
Because you will be going through your images multiple times, you can use the star ratings in Lightroom to mark any images you are unsure of or aren’t able to make a final decision on yet. You can mark them with one to five stars by using the corresponding number key. This makes them clearly labeled when you return to them in the future.
On being ruthless
Before we get into the actual steps of the editing process, there is one thing to discuss. Most everything outlined in this article can be changed up as required, but there is one thing that will be important for you to follow no matter what.
To make this process faster and more efficient, and to ensure that you are only left with your best images, you have to be ruthless. If something is not right about an image, reject it. If you have to think about it for more than a few seconds, reject it. If you have even so much as a niggling doubt, reject it.
Being able to quickly recognize obvious faults will allow you to reject images quickly. Overexposure, outtakes, reflections in glasses, cropped body parts, and awkward arm placements are some of the reasons these images were rejected at first glance.
A lot of the wasted time in this part of the workflow comes from hemming and hawing over an image for a length of time when the image doesn’t wind up getting used anyway. Make decisions fast. Be ruthless.
The system
Keeping the images you are working on separate from the rest will make this process go much more smoothly.
Now that you know the desired end result, you can get started with the actual process of image selection.
The first step is to isolate the set of images you are working on from everything else. There should be no distractions. If you are working on a set from a portrait session where there were multiple outfit changes, separate each outfit into its own folder.
In Lightroom, this is easy. You can create a Collection Set for your shoot, and then create a Collection for every outfit change inside that set. This will keep all of the images from a session in one place, but separated by things like outfit changes or lighting changes.
Criteria
Chances are that you already have preconceived notions of what you don’t like in photos. Whether these ideas come from things you’ve heard from other photographers or opinions you’ve developed yourself, it doesn’t matter. Knowing what these things are is going to help you speed through the process much, much faster.
Technical: Things that fall on the technical side are relatively easy to identify. What you are evaluating for here are things like focus, exposure, the absence of motion blur, etc. When you are going through your images, learn to identify technical faults at a glance.
Technical faults, like reflections in glasses, are easy to spot and make quick decisions on.
Aesthetic: This one is all down to your personal tastes. If you can figure out what you don’t like, then you can spot those things in an instant and rule the photos out of the selection process.
Don’t like when portrait subjects bring their hands to their face? That rules out any photos fitting that description. Don’t like it when catchlights appear in the whites of the eyes? You get where I’m going with this.
Aesthetic faults come down to personal preference and taste. Here, the eyes are dark and the pose isn’t the best.
The first pass
The goal of your first pass is to reject as many images as possible as fast as possible. If you can identify a reject at a glance and mark it as such, you won’t waste any time later going over that image multiple times.
Once you’ve isolated the images that you’re working on, you can begin the first pass of the culling process.
The only goal here is culling images as fast as possible. Select the first photo in your folder and enter Fullscreen Mode in Lightroom (press “F”). Use the right arrow key to scroll through your images one at a time.
You should have an idea of what isn’t a good photo in your mind. You’re looking for things that fall into that category. Did the flash misfire? Are the eyes partly closed? Is the facial expression not flattering? Is the lighting not quite right? Is the focus off?
If there’s a fault in the image, find it and press “X.”
The second pass
Now that you have completed the first run through your images, you should find that you’ve rejected most of them. The next step is to isolate the images that you haven’t culled from the ones you need to review again.
There are a few ways you can do this. You can create a new Collection and add the images that are to be reviewed. Or you could remove the rejected images from the Collection you are working in.
Using the sorting options on the bottom toolbar, you can sort by Pick. This will put all of your rejects at the bottom of the catalog, making it easy to go through for the second pass.
You could also use the sorting options on the bottom toolbar in the Library Module. This will put any rejected images at the end of the gallery. From there, you can select all of the unflagged images and enter Fullscreen Mode again. As you cycle through the images a second time, you’ll first see the shots you have selected.
For this pass, you are trying to achieve the same thing as the first: to reject as many images as possible. This time it will take longer, as these are images that you have already decided don’t have any immediate faults. Feel free to take extra time and have a careful look over the images. Just remember that you are still not picking any photos yet, merely getting rid of the ones that aren’t suitable.
You can repeat this stage as many times as you need in order to narrow down your Collection to the few best images. For the sake of brevity, we’ll move directly on to the next stage and assume you’ve narrowed your images down as much as possible.
The third pass
Using this method, I was able to narrow down this set to three images in a little over ten minutes.
At this point, you should have a much smaller group of images to work with.
(If you still have a lot of photos, go back and be more ruthless.)
You can now go through and start making your final selections. It should be a lot easier now that you have a much smaller pool to go through. Use the Pick flags or star ratings to indicate the photos you want to work on and reject any photos that still need rejecting.
At the end of your culling sessions, you should have a concise selection of images that reflect the best shots from a particular set.
How many should you aim for?
If you’re wondering how many images you should aim to have left once this is all over, the answer is: it depends.
The number of final images is going to vary wildly depending on how you shoot and what you are shooting for. For example, if I am shooting for myself, I will be looking for one or two images per set. That set may start with 10 photos in it. It may start with 100. I am still only looking for one or two.
If I’m doing a short portrait session for a client, I might end up with 15-20 proofs to present. If I was photographing an event, I would go through and get rid of the obvious rejects and keep everything that was left.
Canon 5D Mark III | Canon EF 85mm f/1.8 | 85mm | 1/2000 sec | f/2.8 | ISO 200
There is no right answer. Only you can answer how many images you need in the end. This whole process of culling images is there to get you to those final photos faster, rather than get you to a certain number.
Keeping it basic
The tools and the process outlined in this article are very basic. It’s how I do it and it’s like that for a reason. The process is uncomfortable and forces you, for a little while, to focus on your mistakes.
When I am culling images, I want it completed as soon as possible, and I don’t want my tools to get in the way of the process. That said, Lightroom has a whole host of other features that could be used in the culling process. By all means, use them if they suit you. It doesn’t matter how you get the job done as long as you get it done.
Conclusion
I know that this can be a difficult process. You have a catalog of images on the screen that you created and poured all kinds of effort into. You just want to look through them and feel good about the photos you’ve made. You don’t want to jump in and start finding faults with 90% of them. I understand. I’m the same.
However, as disheartening as it feels at first, once you start culling images and the best images from a shoot start showing themselves (usually after a short while), that allows you to focus only on the best.
Trust me: The images that you cut get quickly forgotten, anyway. It’s best to be done with them fast; that way you can focus the rest of your time and effort on the images that will benefit you and your portfolio.
The post Tips for Culling Images for Better Results and More Efficiency appeared first on Digital Photography School. It was authored by John McIntire.
The post How Expanding Curiosity and Knowledge in Photography Can Help You Improve appeared first on Digital Photography School. It was authored by Kevin Landwer-Johan.
Maintaining curiosity and knowledge in photography is key to helping you improve your craft. Having a good grasp of your chosen subject material will keep you inspired and full of fresh ideas.
It’s easy to photograph what you find attractive. When you have a deeper understanding of what you enjoy, looking at your photos will have more depth and meaning.
In this article, we’ll take a look at some of the ways you can develop curiosity and knowledge in photography that will help viewers engage more with your photographs.
Start with what’s easy. Photograph what you love. When you do this, you’re already well on your way to creating more intimate photos.
Having feelings for your subject helps you see it differently than when you photograph something that looks nice but that you don’t care about. A snapshot made with feeling can be less technically correct but more engaging.
If you have more of a connection to, and concentration on, your camera, rather than your subject, you run the risk of taking technically-correct but otherwise dull photos. Curiosity and knowledge in photography must reach beyond cameras, lenses, and accessories.
Develop a curiosity for your subject. Learn more about it. You will learn to love what you photograph or you’ll grow indifferent. If you lose interest in your subject, find something else to photograph that captures your imagination.
When your imagination is captured, your photos are more likely to capture the imagination of those who see them.
Learning about a topic is easier than ever these days. We have millions of web pages, Youtube videos, forums, and podcasts online. These will teach you anything you desire to learn.
Then there are books, galleries, movies, and all manner of other visually stimulating ways to learn more about your favorite subject.
Open your imagination and you can learn anything you like. Combining your love of photography with becoming an expert on what you enjoy taking pictures of helps you improve.
With a more advanced understanding of the nuances of your subject, you’ll take more intimate, engaging photos of it. If you lack understanding, you’re more likely to miss seeing the subtle aspects that will make your pictures pop.
Even if you’ve been photographing the same subject for many years, I’m sure there’s something else you can learn about it. If you’re not sure that there is, start teaching someone. Once you start teaching about any subject you’re interested in, you’ll soon discover how much more you want to know about it.
Studying a subject until you’re an expert takes commitment. The best photographers know this by experience.
Look at portfolios of any truly successful photographers (not ones who’ve merely acquired large social media followings), and you’ll see what I mean. Their work displays the intimate connection that they have with their subjects.
This takes time and commitment to build. It does not happen quickly or frivolously.
For example, if you love the architecture of the city you live in and photograph it often, take some time to learn more about it. Study its history. Who designed it? Why does it have character? How has it evolved over time? Once you understand the answers to these and other questions, you’ll start to look at your neighborhood in a new light.
Use the internet. Visit your local library. Search out the work of other photographers who have a similar interest. Google is a great source of images. Type in any location and you’ll find others have photographed it and shared their images.
Find well-known photographers whose style and subject material you appreciate. Study how they compose their pictures. When do they take them? Look at the type of light that’s predominant in many of their photos.
You can research any subject you can think of. Taking time to do so on a regular basis will help you become a better photographer. You don’t always have to be out and about with your camera to learn to take better photos.
Taking photos frequently certainly does help you build camera skills, but photography is more than just about using your camera.
Maintain your curiosity and knowledge in photography
No matter how long or how often you’ve photographed a particular subject, it’s best to maintain a curiosity for it.
Explore new ways to photograph the same subject over and over. This should be a healthy challenge. If you find it repeatedly becoming a bit of a drag, consider starting to photograph something different.
The more curiosity you maintain, the more interesting your photos will be to others. Once you’ve covered all the more traditional approaches to taking pictures of a particular subject, a healthy curiosity will lead you further. Your creative journey can really come alive.
Push yourself out of your comfort zone. Think of ways to make new, fresh pictures that you normally would not take. Looking at the work of other photographers is one of the best ways to discover how you can do this.
Photograph your subject in light you normally wouldn’t use. If you typically work with a long lens, use a wide-angle lens next time. Explore alternative angles and different ways of seeing the same thing. You might surprise yourself with the results.
Be prolific. The more time you spend learning about your subject, the more you’ll want to get out and take photos of it. Frequently using your camera helps you remain immersed. This is also how to maintain healthy levels of inspiration.
Start with what you love. This makes learning easy and fun. Becoming immersed in a subject you are halfhearted about can lead to discouragement. Whatever subjects you photograph should be a pleasure to study and become an expert about.
Curiosity and knowledge in photography will improve the level of engagement viewers have with your art. Taking a serious approach to learning more and developing a more informed appreciation of your subject will elevate your photography experience.
The post How Expanding Curiosity and Knowledge in Photography Can Help You Improve appeared first on Digital Photography School. It was authored by Kevin Landwer-Johan.
The post News: ACDSee Photo Studio Ultimate 2021 Released appeared first on Digital Photography School. It was authored by Jaymes Dempsey.
ACDSee has just launched its latest software:
Photo Studio Ultimate 2021, which improves upon ACDSee’s Photo Studio Ultimate 2020 and continues to compete with programs such as ON1 Photo RAW and Luminar as one of the best all-in-one photo editors on the market.
ACDSee’s software is consistently impressive; Photo Studio Ultimate 2020 contained an excellent mix of digital asset management capabilities, basic adjustments, and more advanced, layer-based edits.
So what does Photo Studio Ultimate 2021 offer over its predecessor?
Quite a lot, as it turns out.
For one, Photo Studio Ultimate 2021 features increased performance. ACDSee promises “up to 100% faster start up, up to 50% faster mode-switching, up to 100% faster working with keywords & categories, and more.”
After trying Photo Studio Ultimate 2021, it’s clear that this is true. While I wouldn’t refer to the program as fast, it’s certainly speedier than Lightroom, Photoshop, or Luminar.
Photo Studio Ultimate 2021 also offers a brand-new color wheel, which allows you to make precise adjustments to colors in your images. Using an eye-dropper tool, you can select specific colors in your image. And you can modify the selection by way of an intuitive color wheel graphic:
Honestly, this has to be one of my favorite implementations of selective color adjustments, and should give photographers plenty to have fun with.
But ACDSee didn’t stop there. In addition to the Color Wheel feature, you get a set of handy tone wheels. Here, with a few simple clicks, you can selectively tone the highlights, the midtones, and the shadows. This makes it easy to color grade your images and to create a stylistic look that’s truly your own.
Plus, Photo Studio Ultimate 2021 offers a nifty little Refine Selection feature. While previous versions of the software allowed for selections while editing, you can now contract, expand, and feather your selection for a more precise result.
Additional new features include:
A modified batch rename option
Improved user experience and layout
Enhanced crop capabilities
Enhanced watermark capabilities
Much more!
So if you’re looking for a photo editor that includes complex digital asset management capabilities, powerful layer-based editing, and a whole host of new processing tools, check out Photo Studio Ultimate 2021.
You can grab it on ACDSee’s website for just $ 8.90 USD per month, $ 89 USD per year, or (if you’d prefer to make a one-time purchase), $ 149.99 USD.
Now over to you:
What do you think of ACDSee’s Photo Studio Ultimateseries? And which of the new features are you most excited about? Share your thoughts in the comments!
The post News: ACDSee Photo Studio Ultimate 2021 Released appeared first on Digital Photography School. It was authored by Jaymes Dempsey.
The post Wide Angle Versus Telephoto Lenses for Beautiful Landscape Photography appeared first on Digital Photography School. It was authored by Will Crites-Krumm.
An easy assumption to make, when shooting landscapes, is to use a wide-angle lens. After all, most landscape photographers favor wide-angle lenses for a reason: They naturally give you the widest view and allow you to get the full landscape into the frame, from the foreground to the horizon.
Wide-angle lenses also have the widest depth of field, so you get the whole landscape in focus. And their distortion enlarges objects in the foreground, letting you show off close-up details. The same distortion also emphasizes leading lines, enhancing your compositions and giving your image a more dynamic feel. But when you default to wide-angle glass, you miss many hidden opportunities offered by telephoto lenses.
Field of view: The whole and its parts
This is the most basic difference between the two lens types:
Wide lenses give you a wide view; telephoto lenses give you a narrow view.
And while landscapes look great in their entirety, it’s a good habit to take a moment and look for details. These details are beautiful elements of the landscape that might get shrunken or ignored in the expanse of a wide-angle image. This is where your telephoto lens comes in. Its narrow field of view is perfect for trimming the extra elements and for focusing on small, beautiful scenes like the curve of a mountain, a reflection in a far-off pond, or the silhouette of a tree.
In the two images above, you can see this in action. They were both taken from Olmstead point in Yosemite National Park, one with a wide-angle lens and the other with a telephoto.
In the first image, the wide-angle lens shows off the total landscape. It includes both sides of the valley, the up-close textures of the rocks, and the far-off peak of Half Dome. In the second image, the telephoto lens brings the eye right up to the mountains, showing off their shapes and the details of the geology.
Another pair of images (below) shows this effect even more dramatically. The first image is not just a wide-angle image, but an aerial shot as well, taken from a small airplane over the Okavango Delta in Botswana. From this vantage point, all of the individual elements of the landscape become incredibly small and your eyes pay more attention to their arrangement than their individual shapes. In the second image, also from the Okavango area but this time on the ground, a telephoto lens is used to draw attention to the beautiful curves of a single Acacia tree.
Depth of field: Focusing the eye
The second major difference between wide-angle and telephoto lenses is the innate size of their depth of field.
Put succinctly, the higher the focal length, the narrower the area of focus. In practice, this means that when shooting wide, it’s much easier for you to get everything in focus, from the grass at your feet to the ridge on the horizon. This is especially true when you’re trying to use your lens’s sharpest apertures (the so-called sweet spot).
However, a narrower depth of field is much better for isolating your subject from the background, and this is where your telephoto lens comes into play. Try shooting a close-up detail at a wide aperture, using the landscape as a nice, creamy bokeh backdrop.
The two images above are perfect examples of this effect. In the first image, the wide-angle lens brings the whole landscape into focus, from the close-up sunflowers to the far-off mountains.
In the second image, shooting with a telephoto blurs out the flowers and mountains in the background, turning them into a nice soft background for the main sunflower.
Depth compression: Playing with size
It’s no secret that wide-angle lenses expand the sense of depth in an image by enlarging elements in the foreground and shrinking those in the back. This is great for creating images that make you feel like you could step right into the frame.
On the flip side, you run the risk of making towering, awesome mountains in the distance look like puny hills. Telephoto lenses, on the other hand, compress depth, causing objects near and far to appear more similar in size. A compressed sense of depth is great for abstracting a scene and bringing out its graphical qualities. Colorful forest canopies, layered mountain ridges, and curving sand dunes are all great subjects for this kind of shooting.
In the left image above, notice how the wide-angle lens exaggerates the size of the flowers in the foreground at the expense of the mountains in the background. The mountains are so tall that they’re shrouded in clouds, but the lens keeps them from looking quite as grand.
Pull out a telephoto lens, and you can zoom straight in on the mountain, showing off the contrast between the rugged outline of the peak and the soft wispy form of the cloud (right).
Here are two more images, both taken at the same location in Big Bend National Park, that show off this effect. In the first image, you can see that the wide-angle lens increases the size of the plants and rocks in the foreground while shrinking the large desert mountains in the background. In the second image, a telephoto lens flattens out the depth of the many desert ridges, calling attention to their graphic patterns and outlines.
Summary: Space versus object
Have a hard time remembering all these details? Here’s an easy way to summarize it with a simple idea:
Wide-angle lenses show off space, telephotos show off objects.
The wide-angle lens’s big field of view, ease of uniform focus, and depth-distorting abilities are great at showing off big, expansive landscapes. However, they take focus away from individual elements within the landscape in favor of showing the whole. Telephoto lenses are naturally the opposite: they’re great at showing off the size, shape, and intricacy, of detail of individual elements within the landscape. But their narrow field of view, small depth of field, and depth-compressing qualities make it hard to capture the landscape as a whole.
You can analyze this pair of images to see exactly how all of these techniques work together. Starting with the photo above, you can see how the wide-angle lens fits the whole landscape into the frame, from close-up rocks to far off peaks and sky. Because of the lens’s large depth of field, the whole landscape is in acceptable focus as well. The lens’s depth distortion is readily apparent, as well: the foreground rocks look very large, creating a pleasing sense of depth, and emphasizing the leading lines that draw the eye from the edges of the frame to the center. Overall, you get a very good sense of the space and the expansiveness of the valley.
This image was taken in the same place, but the use of a telephoto lens captures it in a very different way. The photo brings out a single element of the landscape; look closely and you can see this peak in the previous image on the top right. It allows the viewer to appreciate its subtle details.
Because of the telephoto lens’s narrow depth of field, the sky is slightly out-of-focus while leaving the details of the peak itself perfectly sharp. And most of all, the compressed sense of depth flattens the image, showing off the rocky mass of the mountain, and calling attention to the beautiful curve of the ridgeline. Overall, you get a great sense of the mountain as a solid object, rather than a bounded space.
When to shoot what?
The best way to know which lens to use is to get out there, look, and think. What part of the landscape are you most drawn to? Does the landscape’s expansiveness give it its character? Are there stunning details surrounded by less photogenic elements? Are you shooting spaces or objects?
That said, my personal strategy is to just shoot both, because almost any landscape has enough beauty that just one type of lens isn’t enough to get to all of it.
The post Wide Angle Versus Telephoto Lenses for Beautiful Landscape Photography appeared first on Digital Photography School. It was authored by Will Crites-Krumm.
The post Good Crop Bad Crop – How to Crop Portraits appeared first on Digital Photography School. It was authored by Gina Milicia.
“Learn the rules like a pro, so you can break them like an artist.” Pablo Picasso
When it comes to knowing what is right for me, there are a few things I know for sure:
First, garlic and ice cream are never meant to be mixed together.
Second, even if I color my hair blonde I’m never going to look like Madonna.
Finally, when my mechanic warns me that the timing chain in my car should be fixed as soon as possible, I need to listen up and act.
If you have read my other articles or eBooks, you will know that I’ve also learned many lessons in my photography career from stupid mistakes or lapses in judgment. It’s through learning from failure, and from trial and error, that I’ve managed to discover what works best for me.
When it comes to how I crop my portraits, there are a few cropping styles I try to avoid because, just like eating garlic ice cream, I have learned what works best for me.
How I crop my portraits is just as important for defining my style as the lens I use, the way I light my subjects, and the way I process my files. I believe the way an image is cropped can change the look from “meh” to “amazing.”
I always crop a shot below the knee, mid-thigh, at the waist, across the forearm, or through the top of the head. If I’m going to crop through my model’s waist, I will usually ask my model to bring their arms up so I don’t have to crop through their arms.
I avoid cropping at any of the joints of the body. This includes fingers, toes, elbows, knees, and wrists. I also think cropping through the model’s chin looks odd.
It took me many years of trial and error, and studying the work of my favorite photographers, to learn that there are actually a few golden rules of cropping worth following. Rules that make a huge difference on the visual impact of my portraits, and on how flattering these portraits can be for the subject.
Like all rules, there are always exceptions, and the art world would implode if these rules were not constantly tested and broken. Pablo Picasso, Vincent Van Gogh, and Jackson Pollack are examples of artists whose styles broke every rule in the “how to paint book,” and in their time they were mocked and ridiculed by other artists and critics alike, yet today their paintings are priceless. Having said that, they all studied conventional painting rules of their time, then went on to break those rules and create their own signature styles. I wonder if they ever considered changing their hair color to look like Madonna.
My shooting, lighting, posing, and post-production style has developed and evolved over the years, but the way I crop my images has remained the same.
Here are my top five tips for how to crop portraits:
#1 Crop in-camera
Cropping in-camera basically means that you compose your image exactly how you want your final crop to look, rather than shooting loosely and cropping the shot in post-production. There are two reasons for this:
First, images cropped in-camera look totally different from images that are cropped in post-production. Filling the frame and cropping tight means that you will create great background blur (bokeh), which removes any background distractions and focuses more attention on your model, which is always a good thing.
The other advantage of cropping in-camera is that your file size is not affected. A cropped image may only leave you with 10-15% of your file size, so a file that was originally 30 MB as a full-size image is reduced to 3 MB with a tight crop. Lower-resolution images have less detail and won’t be as sharp as a full-size image.
#2 If it bends, don’t crop it
Bad crop
Good crop
I think cropping mid-thigh looks visually more pleasing than doing so at the knee. Seeing just part of the knee where the dress ends also looks untidy.
There are also certain ways to pose models that are more flattering to the body. I’m always looking for ways to pose my models that elongate, rather than shorten, their body parts. I try and emphasize their best features, and hide or diminish the features that are not as strong.
As a general rule, I crop in a way that will elongate and flatter the body. Cropping at the knees, waist, elbows, toes, fingers, ankles, or wrists can make your model look stumpy. Cropping off the arms or legs can make your model look square, or larger than they really are.
#3 Avoid cropping into the chin and keep the eyes in the top third of the frame
Bad crop
Good crop
Keeping the eyes in the top third of the frame is visually better than cropping into someone’s chin, which to my eye looks like I wasn’t paying attention when I took the shot, and visually this crop (above left) looks awkward.
I find my portraits look much stronger visually when the eyes are positioned in the top third of the frame. Cropping into the chin is visually jarring in the same way that garlic ice cream was jarring to my tastebuds.
This is the original framing of a shot I took for the cover of my dPS book, Portraits – Striking the Pose. I wasn’t sure how much of the shot we would be using, so I deliberately shot wider, and left space on the left of my frame to allow for text and other images.
The final shot for the cover was cropped very tightly because I felt including the hands looked a bit messy. I cropped this image with the eyes in the top third of the frame because this was visually the strongest option.
#4 Give yourself options
The explosion of social media has radically changed how I shoot my portraits. When a client booked me for a session a few years ago, I would shoot the majority of their portraits as vertical images. Now I make allowances for websites and social media platforms that run vertical, square, and horizontal images.
I will usually start with portraits framed as vertical images and then rotate my camera to shoot some horizontal frames.
I generally position my model to fill the left or right-hand third of the frame. This adds interest to the portrait and makes it visually more dynamic. Having said that, there are times when I will frame my portrait in the center of the shot because I personally love the way it looks.
I also love cropping into people’s heads, but this is not everyone’s cup of tea, so I always shoot a few frames with space above the head just in case.
You never know where the final image may end up in a few weeks or a few years, so I think it’s a good idea to plan ahead. It only takes a couple of minutes to shoot slightly wider, vertical, and horizontal at the end of each setup.
#5 Crop like you mean it!
Use these suggestions as a starting point and find a style that works for you. Start with a full-length portrait and first try cropping using traditional rules, then try breaking the rules and see which way you prefer.
Each person, location, and pose you shoot will always be different, so don’t be afraid to mix it up a bit and create your own signature style. The one question I always ask myself when I’m cropping my images is, “Does this crop look deliberate, or does it look like a mistake?”
Sometimes following cropping rules to the letter will still leave my portraits looking visually jarring. An example of this is if I photograph a model wearing 3/4 sleeves and crop at a point that is technically correct, leaving a tiny amount of arm showing just below the sleeve. This looks like a mistake and would look better if I cropped a little higher to remove the skin.
The more you shoot, the more you will start to get a feeling for what looks right to you. If you’re still not sure, do two versions and compare them.
You might like to deliberately create a series of portraits that are visually jarring because they will evoke an emotional reaction.
Like this article? Check out more of Gina’s work
This article was written by Gina Milicia, who has authored many articles here on dPS as well as the following best-selling eBooks:
Making the Shot: Say Goodbye to Dull and Lifeless Pictures of People
Lighting the Shot: Discover the Secrets of Beautiful Portrait Lighting
The post Good Crop Bad Crop – How to Crop Portraits appeared first on Digital Photography School. It was authored by Gina Milicia.
The post Weekly Photography Challenge – Kitchen objects appeared first on Digital Photography School. It was authored by Sime.
This week it’s simple! We’d love to see you take some regular, everyday object that’s in your kitchen and photograph it! The challenge is to photograph it in a way that adds interest. That might be through perspective (shooting along a bench as I have done with my orange, below) or using a lamp, torch, led light, flash to add some extra atmosphere to your morning coffee.
Use the #dPSKitchenThings hashtag wherever you post!
Here’s that orange! (It wasn’t actually that tasty, it was off the small orange tree, potted, out the back of my house)
Sony a7 Mk3 with a 55mm f/1.8 lens at 1.8 for 1/60th ISO 100
Trying to use a knife to add a leading line of sorts, to bring your viewer’s eye into your subject.
Here’s a neat article on food portraits if your object is food! clickety click
Photographing the espresso below, I used the Sony app to trigger my camera remotely and had a little AputureMW LED light just out of frame to light up the subject but keep the rest of the scene a little darker.
Sony a7 Mk3 with a 55mm f/1.8 lens at 1.8 for 1/125th ISO 100
Great! Where do I upload my photos?
Simply upload your shot into the comments field (look for the little camera icon in the Disqus comments section) and they’ll get embedded for us all to see. Or, if you’d prefer, upload them to your favourite photo-sharing site and leave the link to them.
Share in the dPS Facebook Group
You can also share your images in the dPS Facebook group as the challenge is posted there each week as well.
If you tag your photos on Flickr, Instagram, Twitter or other sites – tag them as #DPSKitchenThings to help others find them. Linking back to this page might also help others know what you’re doing so that they can share in the fun.
Follow us on Instagram?
The post Weekly Photography Challenge – Kitchen objects appeared first on Digital Photography School. It was authored by Sime.
The post Review of PhotoDiva by AMS Software: Can a Free Portrait Editor Be Any Good? appeared first on Digital Photography School. It was authored by Carl Spring.
When I was asked if I wanted to review PhotoDiva, a completely free portrait editor, I was intrigued. I wanted to see if something that you can get for free would actually be worth using as part of your editing routine.
Having now used the software, I can confidently say that (spoiler alert!) Photodiva is an excellent editing tool for those who value their time and other resources.
What can it do?
So what is the PhotoDiva portrait editor capable of? Well, whether you are looking to retouch a beauty shot or want to improve photos of your friends and family, this software will certainly do the job.
Using AI technology combined with the ease of one-click retouching, this free portrait editor is perfect for those who are new to portrait photography. And PhotoDiva can certainly take a large burden off those who are constantly showered with tons of pictures to retouch; thanks to PhotoDiva’s technology, many of the editing processes are now a one-click thing.
Getting started
The first thing to note is that PhotoDiva is currently Windows only. To download this portrait photo editor, you need to visit PhotoDiva’s website. One quick install later, and you will be ready to go.
When you open the software for the first time, you are met with a tutorial video which guides you through all the features and functions of the software. This is a great introduction and shows you how powerful this software can be.
For those of you who like a good feature list (who doesn’t?), the key features of PhotoDiva are as follows:
Edit portraits automatically
Smooth the skin, remove oily glare
Erase unwanted objects
Change facial features
Apply digital makeup (Pro & Ultimate editions only)
Change or blur the background (Pro & Ultimate editions only)
Contour face & add dimension (Pro & Ultimate editions only)
100+ photo filter effects (Ultimate edition only)
Importing your first image to the software is simple: just a click of the button in the middle of the screen. Once I’d done this, I began to work my way through the software, starting with the most common edit people do in portrait editing software: retouching the skin.
This skin tone picker lets you experiment with the model’s complexion.
Automatic skin retouching
When it comes to retouching skin, you have several one-click options. I love the fact that these are quite restrained when compared to other skin smoothing presets I have used. The AI finds facial features effectively and the “Overall Enhancement” preset did a great job of smoothing out the skin without going over the top.
For those who want a more natural approach, there is another preset called “Slight Enhancement” that is great for a lighter retouch that still enhances the skin. Going the other way: For those who prefer a glamour look, there is a “Glamour Portrait” preset that could be just what you are looking for.
When getting started, it is this type of simplicity that people look for in their portrait editing software. However, if you want to get more advanced, you can turn to custom skin retouching.
One click instantly improves the skin and gives you a great starting point.
Custom skin retouching
If you expect that custom retouching will be difficult, then PhotoDiva will subvert your expectations. Most of the custom editing is done with the use of intuitive sliders.
The way I found easiest when starting with the software was to turn each slider up to find out what portion of the image was being affected. I then reset the slider to zero and pushed it until I got my desired effect. Overall, it was simple and let me get exactly what I wanted from the retouch.
The ability to compare the before and after edit is great, as it allows you to easily check if you have pushed things a little far.
Applying a filter and adding a custom skin retouch gives you a great result incredibly quickly.
Other portrait beautifying features
PhotoDiva doesn’t limit you to skin retouching, as it comes with a boatload of other prettifying tools. First off, there is the teeth whitening feature that works both as a preset and as a manually controlled instrument. There is also an eye-circle remover, as well as other tools to highlight the model’s eyes, brows, and lips.
Removing larger objects using the clone tool
In the free version of PhotoDiva, you have the ability to use a clone stamp tool to remove larger objects such as a facial piercing. Using this reminded me of more expensive editing software. When testing, I used it to get rid of a nose stud, and it worked perfectly.
The Clone tool worked well for removing this model’s nose stud.
Face sculpting
The ability to reshape the face is a powerful tool in PhotoDiva. However, with great power comes great responsibility.
The AI is great at finding facial features. You can sculpt not only the width of the face, but also the eyes, nose, lips, and chin. All worked really well in my testing, although I will say that you really need to keep these sliders low. Pushing them to the extremes leaves a really unnatural look and makes the images look fake pretty quickly. That said, you really can get a powerful result when working with restraint.
A subtle use of the sculpting tool can give a great result.
General editing
PhotoDiva calls this “common editing.” Basic correction works well and is simple to use. For those new to editing, the addition of these tools allows you to do the whole edit in one piece of software. The ability to tweak individual colors is great. The color tools are something that is more associated with high-end software, so it is nice to see them included.
The ability to create black and white images using these advanced color controls is another great feature. There is also the option to create a negative which, while nice to see, is something that you may struggle to find a use for in day-to-day editing.
Adding vignettes is also easy. I know vignettes are a love-it-or-hate-it thing, but they are great for techniques such as bringing focus to the face. PhotoDiva has a variety of options for you to explore.
There is a good range of general editing tools included in PhotoDiva. This allows you to edit from start to finish in the software.
Effects
There are over a hundred photo filters within the software. As with all filters, some you will like, some you won’t. There are a good variety to choose from, though, including vintage looks, film based looks, and some more creative ones.
When using the photo filters, most feel heavy-handed when applied at 100%. However, it is really easy to tone down the effect to get a great result. My personal favorite effect was a film simulation called “Fuji FP 100C.” With the variety of styles available, there is sure to be something for everyone.
There are tons of filters included. You are bound to find one you like.
Export options
The exporting process is streamlined and effective. You click the “Save” button and set the picture parameters according to your needs. You can choose the file format, file quality, and even the output type for printing, further processing, social media, or viewing on an HD screen. The ease of this (as with many things in this software) makes PhotoDiva perfect for beginners. You are consistently given just what you need, with none of the options that confuse those new to photo editing.
Pro version perks
While the free version of PhotoDiva is great to get you started, there are also two paid versions of the software that offer you more options: Pro and Ultimate.
Virtual makeup is among those paid features. This is the Achilles’ heel of some portrait editors, since this effect comes out quite gaudy, but PhotoDiva shows remarkable restraint with the makeup tools. These makeup tools include lipstick, eyeshadows, blusher, highlighter, and bronzer. Once again, they are applied with a single slider drag, eliminating any need for manual selection.
The makeup effects are subtle but still fairly impressive.
If you’ve ever shot with poor lighting, then you might be familiar with the flat face effect. There is a way to get rid of it using the Add Dimension tool. Despite the cryptic name, this instrument is just a highlight and shadow adjuster that gives the model’s face the much-needed depth and contrast.
To go above and beyond simple portrait retouching, PhotoDiva also comes with a semi-automatic background-changing feature. It only took me a few brush strokes to completely remove the picture background and add my own. If that is too drastic of an approach for you, then the background-blurring tool might catch your interest instead.
Lastly, when it comes to photo editing, the upgrade gives you the ability to edit RAW images from over 450 different cameras, as well as remove noise and add haze.
These additions make PhotoDiva an even more powerful piece of software for portrait editing.
Upgrading to the Pro version of PhotoDiva gives you even more control over what this software can do.
Is it worth it?
Obviously. It’s completely free! What I will say, though, is that this software is more for those entering into portrait editing. There will be some of you out there who will have scoffed at this software from the moment you started reading this review. That’s fine; it’s not made for you.
PhotoDiva is made for those who want a less time- and effort-consuming way to retouch portraits, and those new to photography who have spent their hard-earned savings buying a camera and want to push their editing without the immediate expense of having to buy some high-end software. It is a great tool that allows you to get professional-level results with a few clicks. For those people, I cannot recommend PhotoDiva highly enough. In fact, if you own a Windows computer and edit photos, I would suggest you try this software.
The fact that PhotoDiva gives away such a powerful set of tools for free is amazing! For those who love it and want to do even more, the upgrade is available to you at a very reasonable price (under $ 30 USD at the time of writing). If the software gets you hooked then you are in luck, since the vendor is offering the upgrade at 55% off for Digital Photography School readers.
Rather than tell you how good PhotoDiva is, I will leave you with this: Try it for yourself. It is free, and if you edit portraits, you have no reason not to try it out. I am pretty sure you will be surprised by how good it is.
Where do I get it?
To download PhotoDiva, simply head over to https://photodiva.net and hit the Download Free button. Enjoy!
AMS Software is a paid partner of dPS.
The post Review of PhotoDiva by AMS Software: Can a Free Portrait Editor Be Any Good? appeared first on Digital Photography School. It was authored by Carl Spring.
There are two main schools of thought when it comes to lighting. One is to light your subject in a way that is not grounded in reality but merely looks cool. And the other is to use lighting to translate the way your eye sees light into a way that your camera can better understand it.
That latter choice is the option we'll be exploring today in a walk-through of a sunset portrait of artist Wendy Ng for the Howard County Conservancy.
You have filled your iPhone with thousands and thousands of photos over the last few years. Its a nice catalog of memories but now its time to move on. You are looking for a quick and safe way to delete all the photos on your iPhone but dont know how. Don’t despair. In this article we will tell you the Continue Reading
The post How To Delete All Photos From iPhone Using iPhone, Mac or PC appeared first on Photodoto.


 Bad crop
 Good crop
 Bad crop
 Good crop


You must be logged in to post a comment.