The post Capture One 21 Has Been Released, a Powerful Alternative to Lightroom appeared first on Digital Photography School. It was authored by Jaymes Dempsey.
Just last week, Phase One launched the latest version of their Capture One software:
Capture One 21, which offers several powerful new features, plus all the tools that made the post-processing program so compelling in the first place.
While Capture One is often pitched as a Lightroom alternative, it’s known among photographers as the “advanced” all-in-one photo editor, geared toward serious hobbyists and professionals looking for extensive editing capabilities in a single package.
In other words:
Compared to Lightroom, Capture One is more difficult to learn – but also the better program, once you get the hang of it. In nearly every area, Capture One (including Capture One 21) matches Lightroom edit for edit. But the program also outperforms Lightroom in a few key ways, which is why more and more serious photographers have been making the conversion to Capture One.
So what does Capture One 21 offer?
First, the new features:
Capture One 21 now boasts a Dehaze slider, which removes haze from your photos for a crisp, contrasty look.
You also get improved color profiles for certain cameras, including Sony’s high-end mirrorless models, plus a handful of Nikon and Canon DSLRs and MILCs.
Phase One has also promised performance upgrades, claiming that with Capture One 21 it’ll be “faster than ever to search and browse photos.” There’s also a brand-new “Speed Edit” feature, which lets you quickly edit images without using sliders; instead, you can make changes with a few hotkeys and the scroll wheel.
Additional new features include Capture One’s support of 8-bit HEIC files, so you can edit your HEIC smartphone photos directly in Capture One, and a set of integrated tips and tutorials for mastering Capture One 21 as quickly as possible.
Of course, Capture One 21 also packs its usual standout features. First, there’s the class-leading color tools, which allow you to take your photos to the next level with selective color adjustments and precise color grading.
Then there’s the powerful digital asset management capabilities, which allow for both session-based and catalog-based organization, plus keywording, comprehensive export options, and seamless Photoshop integration.
Finally, there’s a suite of powerful adjustment tools, including layers, luminosity masking, levels, curves, and more.
For advanced photographers looking for a comprehensive alternative to Lightroom, Capture One 21 is the way to go. You can grab it here starting at $ 129 USD for a one-time license, or you can purchase a subscription starting at $ 9.99 USD per month. Alternatively, you can download a 30-day free trial right here.
Now over to you:
Have you tried Capture One software? Are you a fan? And which do you prefer, Capture One or Adobe Lightroom? Share your thoughts in the comments!
The post Capture One 21 Has Been Released, a Powerful Alternative to Lightroom appeared first on Digital Photography School. It was authored by Jaymes Dempsey.
The post 7 Tips for Taking Better Photographs of Cars appeared first on Digital Photography School. It was authored by Desmond Louw.
Taking photos of cars is such an interesting activity; it’s like doing science. Every time you shoot a car, you’ll learn something from it!
That’s why I would like to share some basic guidelines to get you started with car photography.
And by the time you’ve finished this article, you should be one step closer to getting gorgeous photos of cars!
1. Shoot at the right time of day
This is by far the most common mistake people make when shooting cars.
You see, the best time to do car photography is a few minutes after sunset (or a few minutes before sunrise). Use a tripod and get that perfect soft light on the paint.
This photo was taken for Top Gear a few minutes before sunrise:
2. Be on the lookout for reflections
You must carefully control what reflects in the car. Have a look around you, then look closely at the car and see what reflects off its surface.
A car (especially a new, shiny one) is like a mirror. So try to have an open space behind you, like a field. Also, try to avoid shooting with buildings or trees in front of the car. One of the most important things you want to show in your car pictures is the design lines of the car. But reflections can spoil these lines very quickly.
Also, be very careful not to include your own reflection in the photo. If you can’t avoid your own reflection, it’s best to put the camera on a tripod, set the timer, and move out of the shot. Just look at this photo I took of a dark shiny BMW 428i (below); behind me was nothing except the horizon. In fact, you can clearly see the horizon reflecting in the car:
3. Take driving shots
One very easy way to get a cool image is to shoot the car out of another moving car. (Please be super careful when doing this!)
For instance, try shooting the car out of a window while driving at 37 mph (60 km/h) with a shutter speed of 1/100s or so.
By doing this, you’ll get some nice movement on the road and on the wheels. You can even decrease the shutter speed further, though this will increase your chances of ending up with blurry photos.
This Audi S3 was shot before sunset; it was driving at 70 km/h (43 mph), and I used a shutter speed of 1/125s:
4. Pay attention to the color of the car
All types of paint react differently at different times of the day with different light. Most colors hate direct sunlight, but some colors actually handle direct sunlight really well.
Just look at this baby blue Beetle shot in the middle of the day:
5. Choose your background carefully
Make sure your background suits the car and the theme. Avoid including objects in the background that will distract the eye.
Things like dustbins, power lines, and other cars can kill a picture. For this Aston Martin shot (below), I used a simple background. The yellow paint matches the car’s color:
6. Pan for motion blur
A cool way to get some motion in your car photography is to stand next to the road and let the car drive past you.
Follow the car with your lens in one smooth action and set the shutter speed to 1/125s. You will be amazed by how easy this is!
This Ferrari was shot at 1/125s at 200mm. The car was driving roughly 37 mph (60 km/h):
7. Let the car interact with nature
Here’s another way to capture a photo that speaks to you:
Make the car interact with its surroundings.
Examples of this could be a car creating dust or a 4×4 driving over an obstacle. Look at this Chevrolet Trailblazer climbing over a rock:
And this G-Class AMG drifting on loose sand:
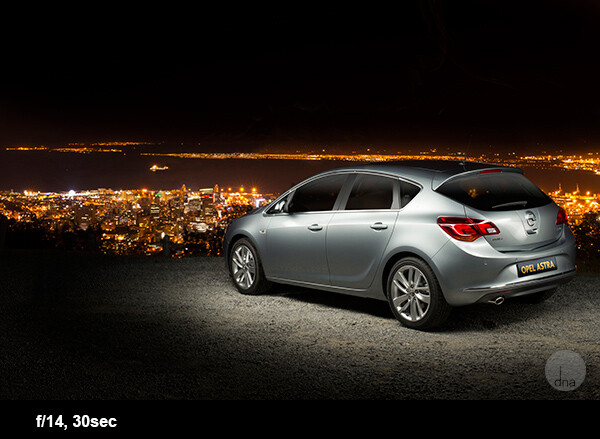
8. Shoot at night
Photographing cars at night might sound daunting, but you will be amazed by how easy and awesome it is! The biggest secret here is to find a spot where it’s completely dark; any streetlights or even a full moon could make life tricky.
Once you’ve found the right spot, set up your camera on a tripod. Set your ISO to 100, the shutter speed to 30 seconds, and the aperture to f/9.
When the shutter opens, take a strong constant light source and walk around the car, “painting” it with your light. A normal household flashlight works for this.
There are no rules here. Paint the car in different ways to get different effects, and you will be blown away by the results! Here are some examples of this technique:
This is an Opel Astra shot next to Table Mountain with Cape Town in the background.
This is a Dodge Charger with the skyline of Detroit in the background. The photo took me no longer than five minutes to set up and capture.
Tips for taking better photos of cars: conclusion
Car photography may seem difficult, but with these handy tips, you’re well-equipped to take some stunning car photos of your own.
So pick your favorite technique from the article, get outside, and start shooting!
Do you have any other car photography tips or favorite images you’ve taken of cars? Please share them in the comments below.
To learn related tips and techniques, check out these articles:
Light Painting Part One – The Photography
Showing Speed: Using Panning When Shooting Action
3 Tips for Creating Dramatic Images Using Motion
Do You Pack Up and Leave After Sunset and Miss the Fun of Night Photography?
The post 7 Tips for Taking Better Photographs of Cars appeared first on Digital Photography School. It was authored by Desmond Louw.
The post Posing Guide: 21 Sample Poses to Get You Started with Photographing Couples appeared first on Digital Photography School. It was authored by Guest Contributor.
This is a guest post by Kaspars Grinvalds from Posing App.
In this posing guide series, we’ve looked at posing female subjects, posing male subjects, and posing children. In those individual portraits, the main subject is a single person with a single personality. But couple photography is more about connection, interaction, and above all, feelings between two people. Generally, you’re working with very deep and passionate feelings, which is what makes couple photography so delightful and positive.
Couples are pretty easy to engage in a photoshoot. If they are initially a bit shy or feeling uncomfortable, just ask them to show you how they felt and looked when they met for the first time. You will touch them on an emotional level, providing you with natural and loving expressions in their portraits.
However, creating strong couple poses presents its own difficulties. That’s why we’re offering 21 simple, easy poses for photographing couples – so you can get started taking stunning couple photos, today.
1. Standing face to face (but looking at the camera); one partner should hold an arm on the other partner’s chest
Make sure you take both close-up and vertical shots.
2. Standing close together and looking toward one another
Ask the couple to stand very close to one another to create intimate close-up portraits. Don’t be afraid to zoom in and crop real tight!
3. Hugging from behind
This is a very easy and cordial pose, with one partner holding the other from behind. The couple may look straight into the camera or at each other. They can even kiss for a more emotive shot.
4. Holding from behind
This is a fun and loving pose, with one partner holding onto the other partner’s back and shoulders.
Pay attention to hand positioning; it should be simple and natural.
5. Holding from behind (alternative)
This is just a variation on the previous pose, with one partner holding the other from behind.
Remember that the couple doesn’t necessarily have to look into the camera. For better results, make them interact with each other by talking, offering flirtatious looks, laughing, etc.
6. Holding and looking out
This pose creates a very romantic mood, and it works best when outdoors with some open space in the background.
Shoot only slightly from behind the couple.
And remember that you have to be far enough to the couple’s side to capture each person’s closest eye. Otherwise, you will create an impersonal, empty shot.
7. Looking up
Find some elevation and shoot your subjects from above.
A common pose shot from an unusual angle is always creative and will often reward you with surprisingly good results.
8. Intimately holding hands
This is another romantic pose. It works best outdoors with some open space in the background.
It also works very well as a silhouette against a bright background (in front of a sunset, for example).
9. The gentle, staggered pose
This is an easy-to-create pose for a full-height shot. It’ll give your photos a calm and affectionate mood.
10. The piggyback pose
This one’s a fun pose, but don’t assume that it only works with younger people. If an older couple feels fine with it, this pose will work superbly with them, as well.
Try different framings, take full-height shots, half-height shots, and close-ups.
11. Standing face to face and kissing
This is a very nice way to show the affection a couple felt when they first met each other.
It works very well in crowded places, such as a famous meeting point in a city, at a train or metro station, etc.
12. Jumping and hugging
This pose offers a little bit of fun!
The crucial part is the leg positioning of your jumping subject; each leg should be bent at different angles.
Oh, and take a close-up portrait shot, as well.
13. Walking and holding hands
Take shots of the partners walking hand in hand as they approach from a distance.
Shoot in Burst mode only, because the majority of your shots will look awkward thanks to the leg movement. Therefore, the second part of your job is to select the photos with the best leg movement and positioning afterward.
14. Walking and holding each other
This is another pose with a walking couple. This time, the couple should walk close together and hold onto each other.
As with the previous pose, take several shots and choose the ones with the most elegant leg positioning.
15. Walking away from the camera
Never forget that there are often good opportunities when shooting from behind! This is a simple pose, but one that looks amazing when done right.
16. Lying on the ground
For this one, the couple should lie close together on the ground.
Ask them to lift their upper bodies a bit and use their arms for support. One partner might embrace the other partner gently. Shoot from a very low angle.
17. Lying on the ground and looking at each other
Here’s another variant with the couple lying on the ground, but this time with a little space between the partners.
18. Cuddling on the ground
This is a nice example of an asymmetrical pose, with one person positioned slightly above the other.
19. Lying together, looking up
This is an informal and fun way to pose – with the couple lying on their backs.
20. Sitting together on a sofa
Here’s a very cordial pose; ask the couple to sit comfortably on their favorite sofa.
21. The classic maternity pose
Shooting a couple may mean maternity photography.
Some poses from this couples series work pretty well for such an occasion. Simply adjust the pose accordingly to show the couple’s feelings about the baby!
This one here is a classic, and looks nice for pretty much any couple:
Grab our printable posing guide for photographing couples
Here’s 16 of our favorite couple poses for you to print and take with you on your next couple shoot:
Also, make sure you look at these couple poses as a starting point only.
That’s the reason why they are rough sketches instead of real photos. You cannot, and should not, repeat the poses exactly; instead, adjust the poses creatively according to your shooting environment and scenario.
Check out the other posing guides in this series
Posing Guide: Sample Poses for Photographing Women (Part 1)
Posing Guide: Sample Poses for Photographing Women (Part 2)
Posing Guide: Sample Poses for Photographing Men
Posing Guide: Sample Poses for Photographing Children
Posing Guide: Sample Poses for Photographing Groups of People
Posing Guide: Sample Poses for Photographing Weddings
Grab our guide to portrait posing
The post Posing Guide: 21 Sample Poses to Get You Started with Photographing Couples appeared first on Digital Photography School. It was authored by Guest Contributor.
The post Weekly Photo Challenge – Landscape 2020 appeared first on Digital Photography School. It was authored by Sime.
We’ve done ‘Landscape’ before now, but after Darren posted this over on our Facebook page, and with the number of awesome replies, I thought it might be a nice time to see what landscape photographs you’re taking, around where you live, in 2020.
Make sure you tag your photograph #dPSLandscape2020 if you post on social media
If you haven’t had a look at the images that jumped out at us from our November Challenges, take a look over here, and see all of the previous challenges HERE.
We want to see your ‘landscape’ and for some, that might be the confines of your house or your local area, you can interpret the theme to suit your environment, or you can wander out into a forest – take a moment, get outside and make your landscape photograph.
Make sure you tag your photograph #dPSLandscape2020 if you post on social media
Great! Where do I upload my photos?
Simply upload your shot into the comments field (look for the little camera icon in the Disqus comments section) and they’ll get embedded for us all to see. Or, if you’d prefer, upload them to your favourite photo-sharing site and leave the link to them.
Share in the dPS Facebook Group
You can also share your images in the dPS Facebook group as the challenge is posted there each week as well.
The post Weekly Photo Challenge – Landscape 2020 appeared first on Digital Photography School. It was authored by Sime.
The post Focus, Compose, and Expose with Intent in Photography appeared first on Digital Photography School. It was authored by Kevin Landwer-Johan.
Why do you take photographs? What’s your intention each time you press the shutter button? Do you visualize how you want your photo to look before you take it? When you photograph with intent, the pictures you make resonate more with the people who view them.
All of us have a unique worldview. No two people perceive what they see precisely the same way. Learning to express what you see through the lens of your camera requires paying attention to more than what you are looking at. You must also have intent as to how you want your photos to turn out.
Just as a musician’s instrument or a painter’s brush creates nothing on its own, your camera does not take photographs.
Instead, the interaction you have with your camera is what creates photos. The quality and creativity of your photographs depends on the level of synergy between photographer and camera. The connection between you and your chosen subject is also significant.
Modern digital cameras are all designed to be as simple as possible to use – especially consumer-level cameras. Scene modes, auto-exposure, autofocus, auto-everything allows unskilled photographers to take snapshots that turn out pretty well.
When I was a kid, our neighbors had a pianola. This was a piano that had a handy mechanism: we could push pedals with our feet and the pianola would play tunes. There were special rolls of paper with holes punched in them that could be loaded into the front of the pianola. As we pedaled, the paper roll would turn. The configuration of the holes determined what tune was played. We were playing music without being musicians.
This is similar to using a camera with its auto-functions turned on. It can be fun, and there will be a certain, but limited, satisfaction as pictures are created. Just as we loved “playing” the pianola, you can take photos with minimal creative input or skill.
To take truly wonderful photos, however, you must interact with your camera and your subject with intent. Relying on camera technology to make it easy to take photos will not make you a great photographer.
Being familiar with your camera and its controls means you can concentrate more on the art of photography. You’ll no longer be distracted by the technical aspects of the camera.
Learn to control your exposure, focus, white balance, and all the other settings. As you do this, you will grow in confidence and begin to “see” what you are photographing in different ways.
Cameras used in auto-exposure mode tend to make very generically-exposed images. Your camera is programmed to do things in certain ways to produce photos with an even exposure. But the more you take charge of what your camera is doing, the more creative your photography becomes.
Understand the exposure meter. Use your spot meter to measure the light from different zones in your composition. Experiment with manual exposure settings. Don’t always adhere to what the meter tells you is “correct.” Control where you are focusing and the amount of the image that is sharp.
This may all seem a bit overwhelming if you’re new to photography, or if you’ve been using your camera for years without adjusting the controls. But remember: We could not add any creative expression to the tunes we played with the pianola. Unless you intentionally set your camera’s controls, your photos will lack creativity.
Think about how you want your photos to look before you take them. Do you want to record a scene exactly as you see it? Or will your frame it in such a way as to exclude some ugly elements?
Make constant choices about what focal length lens you’ll use. How much of what you see will you include in the final shot? The same scene photographed with a 24mm lens will look very different than if you back up and photograph it with a 200mm lens.
How do you want your exposure to look? Will exposing for the highlights or shadows create a more interesting atmosphere? Are there things in the shadow areas you want to hide or reveal? When you have control over your exposure, you have the capability to express yourself in more creative ways.
Your choice of when you press the shutter release to take the photo can have an important creative influence on the outcome. This is sometimes a matter of a split second, or it can be a matter of waiting for the season to change. Picking the decisive moment when photographing a child playing versus photographing a landscape is very different. But timing is equally relevant to making good pictures.
Are you seeing in color or in black and white? Will your subject look more interesting as a monotone image? Will this alter the feeling of the photo? If you are intentional about color as you’re taking photos, you’ll create more compelling images.
As you’re taking photos, think about why you want to photograph your chosen subject. What has drawn you to want to make a picture of this person, thing, or scene?
When you think about the why, you can start to see your subject in new ways. Being aware of what motivates you can have an influence on how you photograph something.
Does your subject mean something personal to you? How can you show this in the photos you take? There are many ways you can choose to control your camera, or where you take your photos from, that will influence the final shot. Being aware of how you compose and expose your subjects will help build a story into your images.
Your photos will move from being snapshots to works of art that have depth and convey meaning.
The post How to Take Sharp Images appeared first on Digital Photography School. It was authored by Darren Rowse.
Taking sharp images is something that most photographers want – but clean, crisp, sharp images can be difficult to achieve.
Before we start exploring how to improve sharpness, let’s talk about the main causes of a lack of sharpness:
Poor focus – The most obvious way to get images that are ‘un-sharp’ is by shooting them out of focus. This might be a result of focusing on the wrong part of the image, being too close to your subject for the camera to focus, selecting an aperture that produces a very narrow depth of field, or taking an image too quickly without checking that it is in focus.
Subject movement – Another type of blur in shots is the result of your subject moving; this is generally related to the shutter speed being too slow.
Camera shake – You can get blur if you, as the photographer, generate movement while taking the image. This often relates to shutter speed and/or the stillness of your camera.
Noise – Noisy shots are pixelated and look like they have lots of little dots over them (get up close to your TV, and you’ll get the same effect).
10 Ways to Take Sharper Images: Tips for Beginners
Here’s a list of 10 basic things to think about when shooting – so you can get consistently sharp images.
(Note: There’s also a lot you can do in Photoshop after taking your images!)
1. Hold your camera well
A lot of blur in the photos that I see is a direct result of camera shake (i.e., the movement of your camera for that split second when your shutter is open).
While the best way to tackle camera shake is to use a tripod (see below!), there are many times when using one is impractical, and you’ll need to shoot while holding your camera.
I’ve written a tutorial previously on how to hold a digital camera, but in brief:
Use both hands, keep the camera close to your body, and support yourself with a wall, tree, or some other solid object.
2. Use a tripod
Regular readers of this site will have seen our articles on tripods and know that we’re a big fan of using tripods as a way to reduce (and even eliminate) camera shake.
While tripods are not always practical, the result you’ll get when you do go to the effort of hauling one around can be well worth it.
RelatedArticle: A Beginner’s Guide to Tripods
3. Select a fast shutter speed
Perhaps one of the first things to think about in your quest for sharp images is the shutter speed that you select.
Now, the faster your shutter speed, the less impact camera shake will have, and the more you’ll freeze movement in your shots.
As a result, you reduce the likelihood of two of the main types of blur in one go (subject movement and camera movement).
But how do you pick the right shutter speed? I recommend the “rule” for handholding:
Choose a shutter speed with a denominator that is larger than the focal length of the lens.
So:
If you have a lens that is 50mm in length, don’t shoot any slower than 1/60th of a second
If you have a lens with a 100mm focal length, shoot at 1/125th of a second or faster
If you are shooting with a 200mm lens, shoot at 1/250th of a second or faster
Keep in mind that the faster your shutter speed is, the larger you’ll need to make your aperture to compensate (see the next section!). And this will mean you have a smaller depth of field, which makes focusing more of a challenge.
4. Choose a narrower aperture
Aperture impacts the depth of field (the zone that is in focus) of your images. Decreasing your aperture size (which means increasing the f-number) will increase the depth of field – meaning that the zone in focus will include both close and distant objects.
Do the opposite (by moving to f/4, for example), and the foreground and background of your images will be more out of focus. Therefore, you’ll need to be exact with your lens focusing.
Keep in mind that the smaller your aperture, the longer your shutter speed will need to be – which makes moving subjects more difficult to keep sharp.
5. Keep your ISO as low as possible
The third element of the exposure triangle is ISO, which has a direct impact on the noisiness of your shots.
Choose a larger ISO, and you’ll be able to use a faster shutter speed and a smaller aperture (which, as we’ve seen, helps with sharpness). On the other hand, this will increase the noise in your shots.
Depending on your camera (and how much you plan to enlarge your images), you can probably get away with using an ISO of up to 400 (or even 800 or 1600 on some cameras) without too much noise. But for pin sharp images, keep the ISO as low as possible.
6. If you have image stabilization, use it
Many cameras and lenses are now being released with different forms of image stabilization (IS).
Image stabilization won’t eliminate camera shake, but can definitely help reduce its impact. I find that using IS lenses gives me an extra two or three stops (i.e., I can drop the shutter speed by around two to three stops) when handholding my camera.
Keep in mind that IS helps with camera movement but not subject movement – so it’s not helpful in low-light action scenarios.
Also, don’t use image stabilization when you mount your camera to a tripod.
7. Nail focus as often as possible
Perhaps the most obvious technique to work on when aiming for sharp images is focusing. Most of us use our camera’s autofocusing, and this works well – but don’t assume that your camera will always get it right.
Make sure you check what part of the image is in focus before hitting the shutter. And if the focusing isn’t right, then try again or switch to manual focus. This is particularly important if you’re shooting with a large aperture (small depth of field), where even the slightest focusing error can result in your subject being noticeably out of focus.
Most modern cameras have a range of focus modes you can shoot in, and choosing the right focusing mode is very important. You can learn how to do that here.
8. Make sure your lenses are sharp
This one is for DSLR and mirrorless owners:
If you have the budget for it, invest in good-quality lenses, because this can have a major impact upon the sharpness of your images.
For example, shortly after buying my first DSLR, I was in the market for an everyday zoom lens that would give me the ability to have both wide and telephoto zoom capabilities. I bought a Canon EF 28-135mm lens. It was a good lens (and reasonably priced), but it wasn’t as sharp as some of my other lenses.
A few months later, I borrowed a Canon EF 24-105mm “L” lens (“L” is Canon’s professional series of lenses) from a friend, and I was amazed by the difference in sharpness between the lenses.
While the first lens was good for what I paid for it, I ended up going for an upgrade. The new lens is now almost permanently attached to my camera.
9. Get your eyes checked
Since I was young, I’ve worn glasses. But in recent years, I’ve been a little slack in getting my eyes checked.
Recently, I got them tested for the first time in a number of years, and I was surprised to find that they’d deteriorated significantly. Getting new glasses improved a number of areas of my life, one of which was my photography.
Also connected to this is checking the diopter on your camera, if it has one.
What’s a diopter?
It’s usually a little wheel positioned next to your viewfinder that lets you tweak the sharpness of the image you see when shooting. The diopter is particularly useful for people with poor eyesight, because you can use it to compensate for your vision (so you won’t have to remember to wear glasses when out shooting!).
10. Clean your equipment
Recently, my wife and I went on a window-cleaning frenzy at our place. Over the previous months, the grime on our windows had gradually built up without us really noticing it.
But when we did clean the windows, we were amazed at how much more light got through and how much better the view outside was!
The same can be true for your lens. Keep it clean, and you’ll eliminate the smudges, dust, and grime that can impact your shots.
Similarly, a clean image sensor is a wonderful thing if you have a DSLR or a mirrorless camera, as getting dust on it can produce noticeable blotches in your final images.
11. Use your lens’s aperture sweet spot
Lenses have some spots in their aperture ranges that are especially sharp. In many cases, the ultimate “sweet spot” is one or two stops from the maximum aperture.
So instead of shooting with your lens wide open (i.e., where the f-numbers are smallest), pull it back a stop or two, and you might get a little more clarity in your shots. Learn more about identifying your lens’s sweet spot here.
Further reading about how to take sharp images
Learn more about how to take sharp images with the following tutorials:
Advanced Tips for Tack Sharp Images
Getting Sharper Images – an Understanding of Focus Modes
How to Get Super Sharp Landscape Photography Images
9 Ways to Ensure You Get Sharp Images When Photographing People
5 Tips for Getting Sharper Images
The Secret to Ultra-Sharp Photos
5 Simple Secrets To Sharper Photos
Making Sharper Wildlife Photographs
The post How to Take Sharp Images appeared first on Digital Photography School. It was authored by Darren Rowse.
The post dPS Roundup: The Best Photos of November appeared first on Digital Photography School. It was authored by Sime.
We’re back with our second in the series of monthly roundups! November was a fun month, with Wheels, Down, Coffee, and Dark & Moody as our weekly challenges.
Join the challenges here!
For our Wheels challenge, I was really drawn to the unique red light in this photograph from Ira Papamalama:
Moving swiftly on to our theme, Down, we had a handful of drone photographs along with some other great images; it was really fun to go through the photos posted in the Facebook group and on the blog and see how everyone interpreted the theme!
And our second choice in the Down challenge came from a regular challenge participant, Chinmoy Biswas. The shadow and action in the photograph is really great!
And in the photograph below by Amal, it’s the light and shadow that really sets the shot apart! The layering (as my good friend Deanne Fitzmaurice always tells me) with the coffee, the light, and the newspaper, is all great. Well done, Amal.
Another regular to our weekly challenge, Moncat, dropped a lovely photograph into the Dark & Moody challenge this month! I imagined rowing into the fog on an eerie morning – but maybe that’s just me. Great photo!
And rounding out our best weekly challenge photos of November is this photograph from matt93, another cracking photograph with all the makings of a dark and moody scene. Thanks, Matt!
Don’t forget, you can join all of our weekly challenges for free. To sharpen your skills, go ahead and submit a photo to all of the past challenges (click here). Or enter the latest challenge, Light Painting, which is still open (here).
Our weekly challenge isn’t about the best photographers showcasing their work. It’s about getting us all out to make photographs and to keep practicing so we get better at this fantastic medium that we’ve chosen! Come and interact and get feedback in the private Facebook group, and submit your photograph there if you’d like!
See you soon!
Simon
The post dPS Roundup: The Best Photos of November appeared first on Digital Photography School. It was authored by Sime.
The post Your Quick Guide to Understanding Photoshop Adjustment Layers appeared first on Digital Photography School. It was authored by Simon Ringsmuth.
Adjustment layers are one of the most essential aspects of editing images in Photoshop. They let you apply rich, detailed edits to your photos that go well beyond what you can accomplish in other programs.
Now, adjustment layers can be a bit difficult to understand if you’re used to a more streamlined application like Lightroom, Apple Photos, or Luminar. But with a bit of practice, you can easily master Photoshop adjustment layers and take your photo editing to the next level!
When you open a picture in Photoshop, you can’t just start dragging sliders to change its appearance. Before you can do much of anything, you need to start with layers, which serve as the bedrock of everything that makes Photoshop so powerful.
To help visualize the concept of adjustment layers, think about a physical picture sitting on your desk. If you wanted to give the picture a green tint, you could simply drape a sheet of green cellophane over it.
That’s exactly how adjustment layers work in Photoshop: They let you change the visual properties of your image without destroying the underlying file. You can add as many adjustment layers as you want and use them to change things like white balance, exposure, hue/saturation, and over a dozen other properties.
In other words:
Photoshop adjustment layers are like stacking sheets of digital cellophane on top of your images. Each layer can be controlled individually and combined with layer masks to apply edits to specific parts of your images. All of this might seem needlessly complicated compared to the simplicity of other programs, but once you get the hang of Photoshop adjustment layers, you’ll never want to go back.
Another way to think about Photoshop adjustment layers is by comparing them to panels in the Develop module of Lightroom.
However, the Develop panels only offer a handful of adjustments that you can use. Photoshop lets you stack as many layers as you need – even multiple layers of the same type of adjustment – so you can tweak your images as much as you could possibly want. There is a bit of a learning curve, but the results are well worth the effort.
How to add an adjustment layer
The first step when working with adjustment layers is to load an image into Photoshop. Then click on the Adjustments panel, which is usually located above the Layers panel.
(If you don’t see the Adjustments panel, go to the Window menu and choose Adjustments.)
Load an image into Photoshop and then click the Adjustments panel.
The Adjustment panel offers sixteen adjustments to choose from, and sorting through all of these can be overwhelming (especially if you’re used to the simple, straightforward editing parameters available in Lightroom).
Each one of these icons is a specific type of adjustment. Hover your cursor over each one to see a brief description.
Some of these adjustments are similar to what you might find in Lightroom, such as Brightness/Contrast and Color Balance. But using the adjustments is much different from working in Lightroom and, in some ways, more complicated. Fortunately, that also means you can get much better results.
To see how this process works, I’ve included an image (below) that clearly needs some editing. Thankfully, Photoshop adjustment layers are here to help!
Fujifilm X100F | 23mm | 1/4000s | f/8 | ISO 200
I’ll start by adding a Brightness/Contrast adjustment layer, which is a simple matter of just clicking the Brightness/Contrast icon in the Adjustments panel. Immediately, two sliders appear, which you can use to make the picture brighter or darker and to add or remove contrast.
After clicking an adjustment layer icon, the available editing parameters show up for you to start working with.
A few seconds later, my picture is much improved, thanks to a brightness boost. However, there is still a lot of work left to do.
Brightness +75, Contrast -5
One other thing happens when you click an adjustment layer icon that you might not notice but is critically important:
The Layers panel will create a layer specifically for that adjustment.
Clicking an adjustment icon automatically adds a new layer to your image with the selected adjustment as its title.
This new layer, along with all the icons associated with it, is what gives an adjustment so much flexibility. In Lightroom, you can enable and disable individual panels in the Develop module, but you don’t have this level of control over your adjustments.
Note the different icons in the short screen capture above:
Indicates layer visibility: Click this to hide or show the adjustment.
Layer thumbnail: Double-click this to show the editing parameters (sliders, eyedroppers, etc.) for the adjustment layer.
Indicates layer mask is linked to layer: Click this to unlink the adjustment layer mask from the adjustment. If you’re new to adjustment layers, you can just ignore this altogether.
Layer mask thumbnail: This is a very tiny preview of the layer mask that is created by default when you click on a new adjustment layer icon. Click this to show the editing parameters of the mask.
While my picture of the Minnesota sign is better than when I started, it still needs a lot of improvement. The next thing I want to do is set the white balance, but this option is missing from the Adjustments panel.
Instead, you have to use the Curves adjustment, then click the gray point eyedropper. Next, click a neutral or slightly gray portion of your image to counteract any color casts. Note that this process essentially replicates the White Balance function of Lightroom.
Select the gray point tool, then click a slightly gray or neutral area of your photo to set the white balance of the image.
One thing you might notice is that the Curves options in Photoshop are much more comprehensive than the Curves options in Lightroom. This should give you an indication of how much more flexibility you have with adjustment layers. You can use Curves to do everything you would do in Lightroom, along with much, much more.
The final operation to fix this image involves a Hue/Saturation adjustment layer. Click on the Hue/Saturation icon to bring up a panel that looks like this:
The Hue/Saturation adjustment layer parameters
The key to this panel is the hand icon in the top-left. Click it, then click on a part of your image that you would like to saturate or de-saturate.
In this case, I want to start with the grass below the sign. Clicking and dragging to the right makes it much greener, and gives a sense of vibrance that is sorely missing from the original.
The grass and foreground elements really pop, thanks to a quick tweak with the Hue/Saturation adjustment layer.
This is a good start, but I need to fix the sky, and that is where a layer-based approach really starts to come in handy.
Instead of editing the sky with the adjustment layer I just created, I can add a new adjustment layer and use that for the sky. This allows me to control my Hue/Saturation edits for individual parts of the image, instead of having just one Hue/Saturation adjustment layer that affects the entire scene.
The sky colors are now improved. These edits are applied using a layer separate from the grass edits, and thus can be controlled independently.
While the resulting picture is much better than the original, there is still some tweaking that needs to be done for it to truly feel finished.
Adjustment layer masks, explained
Eagle-eyed observers might notice something amiss with the picture above:
The Minnesota sign now has a purple tint to it.
Never fear, adjustment layers are here! Click the white rectangle next to a layer name to edit its mask:
You see, by painting black onto a layer’s mask, you prevent that area of the photo from being affected by the adjustment. So if you don’t want the sign to be affected by the Hue/Saturation adjustment layer, simply paint black over the portion of the mask that covers the sign!
Here’s how it works:
First, select the Brush tool (press B or click the Brush icon in the left-hand toolbar).
Make sure your foreground color is white and your background color is black (to do this quickly, just hit D).
Now it’s time to actually paint the mask. Press the X key to switch between white (revealing) and black (hiding), and the [ and ] keys to increase or decrease the size of the brush.
For tricky shapes like the sign, you can use the Magic Wand tool to select the shape. Then, with the shape still selected, use the Brush tool to mask (remove) the adjustment from that portion of the image.
A closer inspection of the Layers panel now shows a black silhouette over the portion that has been masked out of the top Hue/Saturation adjustment layer. I have also renamed the top two layers so as to accurately describe the type of effect they have on the image.
(Double-click a layer name to rename it, and press Enter when you finish typing.)
The mask for the Hue/Saturation Sky adjustment layer shows a black patch where the adjustment has been concealed.
Nondestructive editing
One mistake some beginners make when editing images in Photoshop is applying adjustments directly to the original photo. This can be done using the Image>Adjustments menu, which gives you common editing options such as Brightness/Contrast, Hue/Saturation, and more. Unlike adjustment layers, these edits are not easy to work with, nor are they easy to alter once they have been implemented.
Photoshop adjustment layers, on the other hand, are nondestructive. You can tweak and change layers after they have been implemented, and you can easily delete them. That’s why layer adjustments are much more flexible than edits applied directly to an image.
Adjustment layers can be renamed, re-sorted, locked, disabled, and made transparent. And that’s just the beginning!
You can perform all manner of custom tweaks and changes to adjustment layers, such as:
Showing/hiding a layer by clicking the eye icon
Editing the adjustment by clicking the light/dark circle icon
Adjusting the opacity of a layer
Changing the blend mode, which adjusts how the layer interacts with layers below it
Adjusting the order of the layers by clicking and dragging
Locking a layer to prevent further changes by clicking the lock icon
Photoshop adjustment layers open up new editing possibilities that simply cannot be achieved in Lightroom. For example, the image of a leaf from the beginning of this article can be altered with a selective color adjustment in a matter of seconds. All I need to do is add a Black & White adjustment layer. I can then select the leaf with the Magic Wand tool and paint over the selection on the layer mask.
Adding a selective color black and white effect took about four seconds.
Photoshop adjustment layers: conclusion
If you have a Creative Cloud Photography subscription, you can use Photoshop in addition to Lightroom at no extra charge. Now, if the sheer level of options and buttons in Photoshop makes you want to run to the comfort and safety of Lightroom, I get it. I have been there, too, and I still have that feeling from time to time.
However, learning to use Photoshop adjustment layers is one of the first steps in understanding how powerful and flexible Photoshop can be. If you have not yet tried working with layers, take a moment to test them out. See what layers can do for you.
You might be surprised at how easy it is!
The post Your Quick Guide to Understanding Photoshop Adjustment Layers appeared first on Digital Photography School. It was authored by Simon Ringsmuth.
The post Stellar Photo Recovery Software Review: An Easy Way to Reclaim Your Precious Photos appeared first on Digital Photography School. It was authored by Jaymes Dempsey.
Have you ever accidentally deleted photos or videos from your memory cards? Or, even worse, have you ever formatted your card, and only then realize it contained valuable photos or videos?
It happens to the best of us.
In fact, if you’ve never experienced either of the above situations, consider yourself lucky. Because while digital files are convenient, they’re all too easy to lose – and if you don’t have the right recovery software, those files will be gone forever.
That’s where Stellar Photo Recovery comes in.
You see, Stellar Photo Recovery offers an impressive set of DIY recovery tools for photographers and videographers; according to the website, you can recover almost any file on almost any device. And you can purchase a package that lets you repair corrupted files, which is tremendously useful for situations where your photos or videos have been damaged.
But how does Stellar Photo Recovery perform? Does it work as well as advertised? And how do you use it for file recovery?
That’s what this article is all about.
In it, I put Stellar Photo Recovery to the test, using some formatted memory cards of my own.
And I share all my findings with you.
So to find out whether Stellar Photo Recovery is a worthy purchase…
(Spoiler alert: The software works incredibly well!)
…keep reading.
Stellar Photo Recovery: Why might you need it?
Stellar Photo Recovery is a DIY recovery package, designed to help you find and recover lost photos, videos, and audio files.
But why, specifically, might you need Stellar Photo Recovery?
Imagine you’re out taking pictures and fill up several cards. You go home, download all the photos to your storage drives, and then – as many photographers do – format every card in-camera.
Moments later, you feel a dawning sense of horror, as you realize that you failed to transfer the photos from one of the now formatted cards.
At this point, your hard-earned photos are deleted, the card has been wiped, and your only real option is recovery software.
That’s just one of the many ways you could accidentally delete photos and videos. You could also format a hard drive and realize it had photos you needed. Or you could stick a full memory card into your camera while out shooting, format it, then suddenly realize that you hadn’t transferred the previous photos over to your storage drives. Or you could clear a flash drive, then realize it had valuable media that you needed for a client.
You could also end up with corrupted files thanks to faulty memory cards or old drives or viruses.
If you’ve been doing photography for a while, then you’re probably aware:
This sort of thing happens all the time. If it hasn’t happened to you yet, then it will, because it’s just the nature of having lots of easy-to-wipe memory cards. You’ll make a mistake.
And when you do, you’ll want to have software like Stellar Photo Recovery.
Right off the bat, you’ll be impressed by the sheer volume of scenarios Stellar Photo Recovery can handle. You’ve got the option to recover:
A whole host of image file formats, including Canon RAW files, Fujifilm RAW files, Sony RAW files, Nikon RAW files, Olympus RAW files, Pentax RAW files, Panasonic RAW files, JPEGs, TIFFs, GIFs, PNGs, and PSDs, plus quite a few others
Lots of video formats, including MP4, AVI, MPEG, AVI, 3GP, and so much more
Audio file formats, including MP3, WAV, MIDI, M4P, and AU
And you can do your recovery on a bevy of storage devices, including CF cards, SD cards of every kind, XQD cards, flash drives, HDD drives, and more (even if the drives are encrypted).
Plus, it doesn’t matter whether you’ve deleted individual files or simply formatted the storage device, because Stellar Photo Recovery can deal with both.
Honestly, if you’ve lost any type of photo, video, or audio to deletion or corruption, Stellar Photo Recovery Software probably has you covered.
Using Stellar Photo Recovery: A simple, three-step process
Using Stellar Photo Recovery is incredibly easy.
Once you have the software downloaded on your computer (you can grab your copy here), you’ll simply need to follow a three-step process:
Step 1: Select the drive in need of recovery, and hit “Scan”
When you first open Stellar Photo Recovery, you’ll see a list of all accessible drives:
By placing a checkmark next to the location you need to recover files from, you’re telling the software where to look. To save time on the scan, I’d recommend checking only the precise drive/memory card on which your files originally existed.
Then hit Scan:
As soon as you’ve done this, the software will start checking your drive for any and all media. This might take a while, depending on the size of your drive; I used a 32 GB SD card for my test, and the scan lasted around 30 minutes.
You can minimize the window while you wait and leave it scanning in the background.
By the way, if you’re in a hurry, you can always shorten the scan time by heading into the Advanced Settings menu:
And clicking on File List:
You’ll then see a list of all file types you can recover. By checking the files you’re after, you’re telling Stellar Photo Recovery where to focus its search.
Neat, right?
Step 2: Go through your recoverable files and select the ones you’d like to restore
Once the scan is complete, the software will report the number and size of the files it found:
Then you can go through the folders and preview files for recovery (not all file types will offer previews, but my Olympus RAW files showed up nice and clear).
By putting a checkmark next to a file, you indicate that you’d like to recover it:
So make sure you do this with all relevant files.
Step 3: Hit “Recover” and watch as your images appear!
Once you’ve checked off all the files you want to recover, hit the Recover button:
Then select the folder where you’d like to save the recovered files:
Finally, click Start Saving.
You can then watch (in the Saving Data window) as your files are recovered and saved. This isn’t a long process; each RAW image I recovered took about one second to save, which means that you can recover quite a few images in a minute or two.
Then, if you go to the folder where you’ve saved the files, you’ll see them completely intact and unharmed.
One nice additional feature here is the ability to go back and recover different photos, even once you’ve done one recovery sweep. So if you accidentally recovered the wrong files, you can just go back into the list of recoverable media and check off a different set of files – without having to scan the drive again.
What’s even nicer is that you can save your scan data when you exit Stellar Photo Recovery. So if you’re tired of recovering images and want to continue later, you can work from a previously-scanned drive without needing to go through the whole process again.
Stellar Photo Recovery: Performance
Speaking as a longtime photographer, I’m always worried about losing my photos.
Yet I’ve never managed to find any recovery software that I really, truly trust, especially because there’s all sorts of dodgy options out there that aren’t worth the money.
But I am genuinely so impressed by Stellar Photo Recovery. It’s easy to set up, easy to use, and it works amazingly well. I tested it out on a 32 GB SD card that was full of Olympus RAW files. The card had been formatted twice in recent days – but Stellar Photo Recovery managed to bring back every photo from before the second wipe, and what appeared to be all 400+ photos from before the first wipe, all in perfect condition.
The most difficult thing about Stellar Photo Recovery is the waiting – as I explained above, the scan takes some time. But you don’t have to babysit the software, so you can easily get the scan started, go do something else, and come back in 30 minutes or so.
Now, I do think it’s important to be up front, here:
I didn’t try to restore any corrupted files, and my sense is that Stellar Photo Recovery works here but won’t always do a perfect job. So it’s certainly worth using for that sort of thing, but while recognizing that repairing corrupt files is inherently difficult and might not happen.
Also recognize that the more you overwrite files, the more Stellar Photo Recovery will struggle to recover the originals.
In other words:
Don’t take pictures, format the card, take more pictures, and only then try to recover the originals; instead, make sure any accidentally-formatted cards are immediately put aside for recovery.
If you don’t do this, your results will vary, depending on the amount of new photos you took.
Make sense?
Ultimately, I’m now a huge fan of Stellar Photo Recovery. And I guarantee it’ll be the software I turn to the next time I lose images.
Stellar Photo Recovery: Pricing
There are three Stellar Photo Recovery packages (all are available for both Mac and Windows):
The Standard package, which costs $ 39.99 for a one-year subscription, and offers complete recovery capabilities, but cannot repair corrupted files.
The Professional package, which costs $ 49.99 for a one-year subscription, and offers complete recovery capabilities plus the ability to repair corrupted photo files.
And the Premium package, which costs $ 69.99 for a one-year subscription, and offers complete recovery capabilities, the ability to repair corrupted photo files, plus the ability to repair corrupted video files.
Which should you get?
If you’re just looking to recover deleted files, the Standard package will work just fine.
But if you have corrupted image files, then the Professional package is a must.
And if you have corrupted video files, you’ll want to go for the Premium option.
So make sure to grab your version of Stellar Photo Recovery software here.
Who should get Stellar Photo Recovery?
Stellar Photo Recovery is a fantastic option for photographers and videographers looking to recover files.
It’s simple to use, its performance is impeccable, and I can’t recommend it enough.
So the next time you find yourself needing to perform file recovery or repair…
…turn to Stellar Photo Recovery.
Stellar is a paid partner of dPS.
The post Stellar Photo Recovery Software Review: An Easy Way to Reclaim Your Precious Photos appeared first on Digital Photography School. It was authored by Jaymes Dempsey.
The post 6 Tips for Capturing Dramatic Skies in your Landscape Photography appeared first on Digital Photography School. It was authored by Hillary Grigonis.
Don’t let the “land” in landscape photography fool you; a great landscape photo relies just as much on the sky as the land. Boring gray skies make for boring landscape photos, after all!
That said, capturing a dramatic sky in-camera is trickier than it seems. When the sky is lighter than the land, your camera will typically overexpose it, turning a brilliant blue into a vague and unexciting gray or white.
But with a little fine-tuning, it is possible to capture a sky that is the cherry on top of a great scene! Here are six tips for capturing more dramatic skies in your landscape photography.
1. Time it right
Landscape photography may not require the split-second timing that’s necessary for capturing a toddler’s smile or a wide receiver’s catch, but timing is still a big part of the picture. The sky that’s gray one day could be bright blue the next. So when planning out a landscape photo, consider how the timing will impact the sky.
Watch for weather patterns that add interest to a shot, like a storm brewing just above the horizon. Weather plays a big role in the overall mood of the image – so if you’re hoping to capture a dark and gloomy shot, head out when the sky is stormy.
On the other hand, if you’re hoping to capture a more relaxed or happy photo, look for blue skies dotted with clouds.
The time of day matters, too. While the middle of the day will produce the most shadows on the land, it’s when the sky tends to be the clearest blue. And just after sunset and just before sunrise is often a good time to capture wispy clouds and a warmer tint of light.
Of course, sunrise and sunset is great for dramatic skies, as well.
2. Try the wrong white balance
Photography rules are sometimes meant to be broken, including rules about always using the correct white balance.
You see, the wrong white balance setting can create a more dramatic sky. This is especially true when shooting toward the beginning or end of the day – using a different white balance preset will adjust the color in the sky.
Auto, Cloudy, and Shade white balance presets will get you an orangish sunset with a light blue sky (with slight variations in warmth depending on the setting you choose). A florescent setting, on the other hand, will typically turn an orange sunset purple with a brilliant blue sky. Tungsten offers a similar effect, but with even deeper colors.
Using Kelvin temperatures to adjust your white balance results in even greater control over the colors in the sky. At around 5500K, you’ll usually capture a sunny sky with an accurate white balance – that is, where things that are white are still white in the picture, and where things that are gray are still gray in the picture.
A higher temperature – 6500K, for example – will give the land an orange glow but also enhance the colors in a sunset. A cooler temperature, on the other hand (e.g., 3000K), will play up the blues and purples. By using the Kelvin scale, you have more options for picking a white balance setting that best captures the colors in your photos.
Here, the white balance was altered in post-processing to warm up the sky.
While it’s always best to get the shot right in-camera, shooting in RAW offers you even more flexibility when it comes to adjusting the colors in the sky (and the rest of the image, for that matter).
If you overdid things by making the shot too warm or too cool, you can easily adjust a RAW photo in post-processing, so that you use the color temperature that best fits the image. If you have a landscape photo that you already shot in RAW, open it and try different white balance presets, or the temperature slider, to see first-hand how shooting with a different white balance would have impacted the shot.
3. Compose for the sky
When the sky is more dramatic than the land, why not use that to determine your composition?
Pay attention to where you place the horizon when you are composing your shot. Use the rule of thirds to imagine the image is divided into threes, then place the horizon on one of those horizontal lines. If you are shooting a photo with an average-looking sky, try placing the horizon on the upper third of the image, so more of the land is included in the photo, like this:
As the sky here isn’t very dramatic, the higher placement of the horizon improves the composition.
But if the sky is really dramatic, take advantage of that and include more of it in the frame – by placing the horizon on the lower third:
The sky here is dramatic, so the image was composed to show less ground and more sky.
4. Use a filter
There are two filters every landscape photographer should have in their camera bag in order to capture more dramatic skies.
The first is a graduated neutral density filter. Now, a regular neutral density filter is like putting sunglasses over your lens – it limits the light coming in for bright scenes or long exposures. But a graduated neutral density filter places that darkening effect only on a portion of the image. And by positioning the dark portion of the filter over a bright sky, you can properly expose the entire scene.
Without a graduated neutral density filter, the sky will often be overexposed and bland, or the land will be underexposed and dark. With the filter, you can achieve an exposure that works for both portions of the scene. The only downside is that graduated neutral density filters don’t work as well with an uneven horizon, like when shooting a cityscape. Graduated neutral density filters come in both circular and square formats, but the square is often preferred because you can place the horizon anywhere in the frame.
The second filter landscape photographers should use to capture more dramatic skies is a polarizing filter. Polarizing filters work by adjusting the reflected light coming through your camera lens. Since the sky is blue because of this reflected light, turning the front of the polarizing filter will adjust the intensity of the blues in the sky. Since polarizing filters only affect reflected light, they can still be used when mountains or buildings make the horizon uneven. Polarizing filters are also great for enhancing or removing reflections on water or other shiny surfaces.
5. Experiment with motion blur and long exposures
Long exposures aren’t just for photographing waterfalls. If you use a long enough shutter speed, the clouds will blur, too, creating a sky of wispy streaks and a slight feeling of motion.
To capture motion blur in the clouds, you’ll need to use a long shutter speed. The best settings will depend a bit on the weather and how much motion blur you’d like, but you can try starting with a two-minute exposure and adjust up or down from there.
If you are shooting during the day, you may not be able to balance out a two-minute exposure with a narrow-enough aperture or a low-enough ISO; instead, you’ll end up with a photo that’s way too bright.
So how do photographers capture motion blur in the clouds when the photo obviously wasn’t taken at dusk or dawn?
They use a neutral density filter – which helps block out some of the light so that you can set a long exposure during the day.
(Note that a neutral density filter is the same thing as a graduated neutral density filter, but the entire filter is dark instead of just half of the filter).
6. Use the Adobe Camera RAW Graduated Filter tool
While it’s always best to get the shot right in-camera, there are a few editing tools that can improve the sky in your landscape photos. One of those tools is the Graduated Filter inside Adobe Camera RAW (this works the same in Photoshop and Lightroom).
With the Graduated Filter, you can drag an effect over the sky in your photo. Like an actual graduated filter, the effect will only cover the top portion of the image and gradually fade away, making it possible to create natural-looking edits.
The Graduated Filter tool can be used to adjust the exposure, creating an effect much like an actual graduated neutral density filter. But the tool can also adjust contrast, saturation, clarity, sharpness, and color. That opens up a lot of possibilities for applying edits just to the sky for more drama – creating effects that sometimes can’t be done in-camera.
This is the original photo.
This is the same photo, but with a Graduated Filter used on the sky to increase the drama.
Capturing dramatic skies in your landscape photos: conclusion
The sky can make or break a landscape photo. From timing and composition to filters and post-processing, when you consider the sky as you shoot, you’ll end up with more dramatic, frame-worthy shots.
Do you have any other tips for creating dramatic skies in your landscape photography? Share them in the comments!
The post 6 Tips for Capturing Dramatic Skies in your Landscape Photography appeared first on Digital Photography School. It was authored by Hillary Grigonis.


You must be logged in to post a comment.