Modeling is one of those extremely competitive careers complete with its own fairytale-like model discovery stories. We’ve all heard about how Kate Moss was discovered at JFK airport or how Gisele Bundchen was found in a shopping mall. However, actually getting yourself signed to an agency and booking modeling gigs can be (and usually is) more similar to getting any Continue Reading
Photodoto
Archive for the ‘Photography’ Category
Top 65 Modeling Agencies in the US and Tips for Models
19
Mar
Abstract Street Photography: The Essential Guide
18
Mar
The post Abstract Street Photography: The Essential Guide appeared first on Digital Photography School. It was authored by Anthony Epes.

Want to know how to capture beautiful abstract street photography?
You’ve come to the right place.
While I am not a traditional street or abstract photographer, I love shooting in cities – and I love how street and abstract photography allow for so much fun and exploration.

So in this article, I’m going to share some tips, tricks, and ideas to enhance your abstract street photos.
And hopefully, the next time you’re out, you can capture some awesome photos of your own!

What is abstract street photography?
There is no one definition of abstract street photography, which is a relief. That way, you can make the genre your own.
For me, abstract photography means that you are removing the context of the subject so that what you’re looking at isn’t always clear. In abstract photography, you are re-forming the world to make your own subjects, making things that are not what they appear to be in real life.

And abstract photography is also most significantly about the emotion of the image – what mood, feeling, or atmosphere are you creating?
“Photography isn’t about seeing, it’s about feeling…If you can’t feel what you’re looking at, then you’re never going to get others to feel anything when they look at your pictures.”
– Don McCullin
Now, street photography often involves capturing candid moments of life out on the street. I like to keep the idea of street photography pretty broad, though – to include any imprint of humanity, any aspect of life, whether we see people or not!

Ultimately, when we take the idea of abstract photography out onto the street, we can have a lot of fun capturing the spontaneous, often chaotic, ever-changing nature of humans and life.
We can let our imaginations run wild and recreate the world around us.
So let’s get started!
Abstract street photos take work

Before I dive into my tips and tricks for abstract street photography, there is one thing I want to clear up:
Abstract street photography takes real work.
People sometimes presume that, because abstract street photos look simple, capturing great shots is easy, and that you don’t have to work hard to get a good result.
I would counter that taking an interesting photo is challenging in every genre – and perhaps even more so in abstract street photography, because there are no confines, no rules, nothing to aim for. Everything in your images is a reflection of what you can see in the world.
Your imagination is essential

For me, abstract street photography is pure imagination, because you are creating something almost from nothing. It relies on your ability to see the world creatively, not realistically.
Most of us are caught up completely in the real world, the things we have to do, the places we have to go, our responsibilities and tasks. So it’s easier to take a nice portrait than to go out and shoot something where you almost need to detach yourself from the real world that you live in and enter a state of pure creative imagination.
Abstract street photography is about capturing a feeling

The most important skill you should develop is the ability to be present in the moment when you are out shooting.
We love to escape the moment with continuous thoughts about the past and the future, about what emails we need to write, what we need to say to our annoying neighbor, what happened yesterday at work, etc.
We can also get too involved with thinking about how we are shooting – are we in the right spot, should we go somewhere else, did we bring the right lens?
But while some analysis of what we are doing is essential, it can also stop us from experiencing and seeing what’s happening all around us.
When we are fully in the present moment, and not thinking or planning, we can really appreciate our experience, and we can connect more fully to what’s happening around us.
When we see a brooding sky that gives an ominous feeling, we can capture that. When we see something weird and a little gross on the floor that intrigues us, we are more likely to notice it.
And if we see a man walking to work looking a little downcast, we can capture it:

And by being totally in the present moment, we are more likely to bring the feelings of what it’s like to be there and see what we are seeing into our photos.
Abstract street photography is your interpretation of the world
Photography helps me become more of who I am. It helps me see more of the world and really encourages me to pay attention. When I shoot, I allow myself free reign to follow my curiosity.
Abstract street photography is one of the most fun and joyful photographic genres. For me, it’s about playing, about just walking around and looking at things while thinking:
That reminds me of what I think the texture of the moon is like.
Or:
Those dark shadows make me think of a spooky story I read as a child.
Or:
A part of that sculpture looks like an elegant painting.
I am particularly fascinated by things I find at my feet. I have endless photos of weird things I’ve seen: crushed, burned burger buns, smashed fruit, accidental paint drippings, and more. I am entranced by these oddities.
“I really feel sorry for people who think things like soap dishes or mirrors or Coke bottles are ugly, because they’re surrounded by things like that all day long, and it must make them miserable.”
– Robert Rauschenberg

Find what entrances you out in the world. Find what makes you go, ooh, that’s super interesting!
The more curious you are, the more you’ll find. And the more it will become your photography, your interpretation of the world.
Composition in abstract street photography

How can you create beautiful abstract street compositions?
It’s useful to draw from all of the traditional compositional rules and techniques, such as negative space, leading lines, and the rule of thirds. But I’d like to mention a few other guidelines that are particularly useful when we are creating abstract street photos, starting with:
Reduction
I often like to say that composing a photo is more about removing and reducing what is in the frame. It’s extremely easy to overcomplicate your photos, to have complex backgrounds, to include elements that detract from your subject, to not notice things in the corner of the shot.
This is particularly true with street photography, because there is always so much going on in the city. Yet we often don’t actually notice all of the visual information because our brain spends a lot of time blocking most of it out. If we noticed everything, it would be very overwhelming for us. Our brain can only deal with so much, so it’s selective about the information allowed inside.
But when we are shooting, our camera notices everything! So we can end up with unwanted elements, or not really see the complexity of the background until afterward.
Ultimately, we have to be really aware and conscious of what we are placing in the frame.
When out with the camera, I encourage you to ask yourselves:
What can I remove from this photo? What is unnecessary? What distracts from the subject?

Breaking the world down into elements

One way to really help your brain deal with the visual complexity all around you – and to help your eyes compose beautiful, striking, and intentional photos – is to look at the world not as one mass of things, but as many elements.
When you break the world down into elements, you see a collection of shapes, lines, forms, etc. And you don’t see the world in 3D surround sound where everything is joined together.
Can you look around at your environment now and see each thing as one singular element? Try it! It’s an exercise that helps you become more intentional about what you are placing in your frame.
Celebrating the purity of light, form, and shape
I love abstract photography because you can focus on the singular elements of light, shape, and form.
Shapes can be fascinating as shapes, not as anything else:

When we focus our attention on something small that holds our interest, we can find fascinating worlds to photograph.
“The moment one gives close attention to anything, even a blade of grass, it becomes a mysterious, awesome, indescribably magnificent world in itself.”
– Henry Miller
What does the photo below make you think of?

How about this one?

Color

As you can see, I am not a black and white street photographer. I am an unashamed lover of color, and I love to celebrate all that color brings to our world.
My favorite photographer of all time, Ernst Haas, said:
“Color is joy. One does not think of joy. One is carried by it.” And I couldn’t agree more.
Abstract street photography is almost an excuse for me to just celebrate the power and joy of color. To let colors attract my attention and totally dominate the photo.

Texture
Being out on the streets is an invitation to explore so many fascinating textures.
Some of my favorite textures are the crumbling walls, torn posters, and disused locations of the forgotten parts of our cities.

Capturing textures gives such a feeling of realness to an image, as if the viewer can just reach in and feel the roughness of the wall, the coldness of the pipes, and the grain of the wood.

When we notice the world as a series of different textures, your photos gain plenty of depth. You’re giving people more of a sense of what it feels like to stand where you are standing, and what it feels like to look at what you are looking at.
Humor
Street photography is filled with humor. This is natural, given how much we humans love to do strange and funny things.
Humor is also a really fun thing to play with when you are doing abstract photos.
For instance, you can try disconnecting things from themselves:

Or you can just look for humorous objects:

Abstract street photography ideas
The best way to embed knowledge is to practice what you’re learning. Information is often retained only briefly if we don’t make the effort to implement it.
And here’s another reason to practice:
So you can take the ideas and knowledge you find interesting and make them your own. For me, it’s super important that I’m not confined in my photography, and that I’m not restrained by other people’s ideas of what’s right or wrong, good or bad.

So use these ideas as starting points to leap off in your own direction. Maybe take two ideas and see what happens. Or just do an in-depth exploration of one!
Pareidolia
The Cambridge Dictionary describes pareidolia as “a situation in which someone sees a pattern or image of something that does not exist, for example a face in a cloud.”
Photographing pareidolia is a fun challenge; it’s about finding things that look like other things.
Easiest for me is to find faces or animals in completely unrelated subjects.

Reflections
I love shooting reflections because they offer so many opportunities to create really cool images.

But while reflections create naturally busy images, still be conscious of what you are placing in the frame so the whole composition looks pleasing to you, not just chaotic.

Silhouettes and shadow
When we are shooting silhouettes and shadows, especially of people, we can capture some really amazing, pure expressions – because we don’t have the details of what the subjects look like.
I shot this one in Istanbul, and I love to wonder what was happening. Was it a morning greeting? An argument? A heated political discussion?

Here, I’ve gone more abstract and I’ve put two shadows together:

What are the objects? Who knows? What do they look like? That’s for your imagination to decide.
Abstract self-portraits
We always have a subject when we are shooting ourselves, right?
I didn’t use to enjoy taking self-portraits, but it’s something I do more now. Why?
Because I can experiment and not worry about what the subject thinks!
Take yourself to interesting places, then do self-portraits that play with reflections, color, and light. It will help you understand so much more about photographing people.
Plus, if you’re like me – the main photographer in your family group – at least you’ll finally have photos of yourself!

What’s at your feet?
Ever since I discovered Ernst Haas when I was young, I realized that anything could be my subject. All I had to do was be fascinated by it. That was the only requirement.
From that point on, I shot all kinds of road markings and things at my feet, as Ernst Haas did.
I find this exciting because it elevates everyday, mundane objects into something that can be beautiful (beauty in the mundane!).
We rarely pay close attention to things like the streets we are walking on, yet they offer so much possibility!

Perspective
We can use perspective in a really cool way with abstract street photography. We can find unique perspectives that present our subjects differently and make the subject look unexpectedly different.
I especially like to shoot upward and disconnect parts of buildings or things I see above me from their whole. The viewer then sees the shapes, the colors, and the textures without any knowledge of where or what it is.

Abstract street photography: conclusion
Hopefully, you now feel equipped to capture some beautiful abstract street photos!
So go out, explore, and have fun with your abstract photography.
Now over to you:
Do you have any abstract street photography you’d like to share? Do you have a favorite tip or trick from this article? Share your images and thoughts in the comments below!
The post Abstract Street Photography: The Essential Guide appeared first on Digital Photography School. It was authored by Anthony Epes.
The Best Online Photo Storage Platforms in 2021 Compared
17
Mar
The post The Best Online Photo Storage Platforms in 2021 Compared appeared first on Digital Photography School. It was authored by Simon Ringsmuth.

Of all the options for managing our digital images, which one offers the best online photo storage?
With dozens of services to explore, it can be difficult to find the right storage for your needs. Some prioritize features, while others compete based on price. Some services are basic but easy to use, and others are highly customizable but intimidating to set up.
The trick is to find the service that works right for you!
And that’s what this article is all about:
Exploring the current photo storage options to find one the one that best meets your needs.
Let’s get started.
Online photo storage: a brief overview
Not long ago, cloud-based storage was slow, expensive, and out of reach for most users. People kept their digital photos in folders on their computers, and images weren’t widely shared like they are today.
But now people take more photos than ever, and all those images can quickly fill up a phone, memory card, or hard drive.
Fortunately, online photo storage solves this problem – by giving people a way to store photos remotely and access them at any time from any device.
In 2013, Flickr rocked the photography world by offering one terabyte of free storage, and in 2015, Google fired back by offering unlimited photo storage.
Sadly, these deals didn’t last; in 2018 Flickr slashed the storage limit for free accounts to 1000 photos, and in June of 2021 Google will limit users to 15 GB of storage for their entire account: photos, movies, documents, and everything else.

While the halcyon days of near-infinite online photo storage might be over, that doesn’t mean there aren’t options.
In fact, you now have more storage solutions than ever, but they have a few caveats and tradeoffs that didn’t exist before. Pricing has finally caught up with demand, and most online photo storage sites now have a limited free tier along with paid options.
One immutable fact we have learned over the last two decades of digital photography is that the old adage rings true: There’s no such thing as a free lunch. Or in this case, free online photo storage. Some sites have free tiers, but all are limited in important ways.
So if you want the best online photo storage, you’re going to have to pay for it.
Not much, mind you – generally only a few dollars each month. Just know you can’t get something for nothing, especially when it comes to storing your photos in the cloud.

The best online photo storage in 2021: Flickr
Flickr has been in the online photo storage business longer than almost any other site. That doesn’t mean it automatically earns a place at the top of my list, since longevity does not equal quality when it comes to internet ventures.
But in the case of Flickr, it is a huge advantage, since the site carries a rich legacy that photographers have enjoyed for years. Its interface is specifically designed around sharing photos, which is a pleasant change from social media sites that seem to be more interested in advertising than photography.
Flickr’s main interface is the Photostream, or a scrollable list of the most recent pictures you have uploaded.

You can create Albums and Galleries, and mark photos as viewable for the public as well as friends or family members. Pro members get detailed statistics on how often their photos are viewed, favorited, and commented on. The mobile app automatically uploads all recent photos and videos. Images can be categorized with keywords, added to groups, and licensed with several types of Creative Commons.
Flickr shows complete EXIF data for photos, which is an invaluable tool that helps photographers learn more about how a given image was taken. Images can be embedded or downloaded (if the photographer allows), and prints can be purchased directly on the site.
Flickr also has over two million groups – online communities organized around specific topics where users engage in discussions about photos and share information and advice.

While the 1000 photo limit for free users seems positively anemic in the age of smartphones (when average users could easily reach that in a month or two), it does strike a good balance between end-user practicality and long-term business sustainability.
Also, the mobile app for Flickr can automatically upload pictures from your phone (though its interface is a bit simplistic compared to some other options).
Free Version: 1000 photo limit, ad-supported, no statistics for photos.
Paid Version: $ 59.99/year, unlimited photo/video uploads, no ads, advanced statistics, desktop app for automatic photo backup.
Pros: Easy to use for casual photographers. Rich set of tools for power users. No ads or storage quotas for Pro members. Photos are uploaded at full resolution with no compression.
Cons: Some interface elements are very outdated. RAW files are not supported, which limits Flickr’s appeal for professional photographers.
2nd place: Google Photos
Born from the ashes of the Google+ social media site in 2015, Google Photos quickly became the most popular photo-sharing site in the world thanks to its free, unlimited photo storage.
For five years, Google Photos reigned supreme as the go-to place for over a billion users to upload their images. Unfortunately, starting in mid-2021, a 15 GB limit will be imposed on new files added to free accounts.
But just because Google will start charging users who exceed 15 GB of storage doesn’t mean it is no longer a great option for people looking for online photo storage.

Unlike Flickr, Google Photos is built for mobile. The Google Photos app uploads your images automatically, where they are sorted, tagged, and automatically analyzed by Google’s AI-driven software. Some users find this to be a bit invasive, but Google has said that this data remains private and is not used for advertising. The app also contains a surprisingly in-depth photo editor that also uses AI to enhance your images and suggest edits.
Google Photos has powerful built-in sharing features that let you set up shared albums and galleries and allow multiple people to contribute to a single album. This works great for parties or events where everyone is taking photos; the files can be instantly shared among attendees.

AI software also recognizes people and uses geotagging for places, and this can help with sorting through your images. These algorithms also find objects in your photos, so you can search for words like “pumpkin” or “fireworks” and the app will display relevant images, all without you doing any extra work to add tags.
For privacy hawks, this might be a little too intrusive, as there’s no telling exactly what Google is doing with all this information in your photos. And there’s no way to adjust or customize the AI scanning and analyzing of your images. However, you do get to control who sees your images, and all photos are private by default.
Instead of offering a quantity limit, Google Photos restricts the free option to 15 GB. That might seem like a lot, but the 15 GB is for your entire Google account, not just your photos. If you have large files or other data already taking up lots of space in your Google account, there won’t be much left for your photos.
Free Version: No limits on functionality, but storage is limited to 15 GB.
Paid Version: $ 19.99/year for 100 GB. $ 29.99/year for 200 GB. $ 99.99/year for 1 TB. Same features as the free version, but storage is increased.
Pros: Excellent mobile interface. AI algorithms help with tagging and organizing. Sharing albums is easy since most people have Google accounts.
Cons: Some privacy concerns related to how Google uses your data. Storage that you pay for includes all your documents and files, not just photos.
3rd place: Apple iCloud Photos
Apple iCloud Photos is the de facto standard for iPhone and Mac users and with good reason. It’s designed to be extremely easy to use and integrates deeply with the Apple software and hardware ecosystem.
All photos you take with your iPhone are automatically uploaded to your iCloud account, where they can be synced with other devices such as iPhones, iPads, and Macintosh computers. The iOS Photos app has a rich set of editing options, and all edits are automatically synced across devices, as well. Images can be edited with the Photos app on a Mac, and edits are synced instantly.

Apple has steadily been improving iCloud Photos over the years with on-device machine learning, which ensures your photo information is not sent to the Cloud or mined for advertising or other purposes.
You can search for people, places, and objects without doing any extra work; on-device software analyzes your photos, organizes them into groups of related images (i.e., vacations, holidays, etc.), and even attempts to pick out favorite moments and memories. None of this information is done in the cloud, which makes iCloud Photos a little more attractive for people who value privacy at the expense of some functionality.
One of my favorite iCloud Photos features is its ability to back up all the images and videos on your mobile device and retrieve them instantly. This is great for people whose phones are constantly low on storage space. Small thumbnails of all your photos are left on the device, while the full-size originals are safely stored in the cloud. Tapping a photo will download the original file on the fly, so you can take thousands of pictures without using up all the space on your phone.

Unfortunately, iCloud Photos stumbles with the social and sharing functions. Flickr and Google Photos have easy options for sharing images and albums with others, making some photos public, and letting people leave comments or even their own tags. Some of this is possible with iCloud Photos, but it’s not as easy or seamless as other platforms.
Also, while Google Photos and Flickr work on both iOS and Android devices, iCloud Photos is specifically designed to work with Apple hardware and software. This is a dealbreaker for anyone who prefers to use non-Apple products.
Free Version: No limits on functionality, but storage is limited to 5 GB.
Paid version: $ 12/year for 50 GB, $ 35/year for 200 GB, $ 120/year for 2 TB.
Pros: Incredible suite of editing tools in the Photos app. Integrates seamlessly with Apple devices. Private and secure, with no advertising or data mining.
Cons: Limited to Apple devices. Sharing and social elements like commenting are not as easy as other platforms.
Honorable mentions
Flickr, Google Photos, and iCloud Photos are great options for online cloud photo storage, but you might have other requirements or workflows that are better suited to other platforms.
Thankfully, there are a host of other companies to consider. So if none of the above options meet your needs, here are a few excellent alternatives:
SmugMug

SmugMug is designed for professionals who need a way to showcase their images and create galleries for clients, but it has a good option for casual users, too.
The Basic plan has everything most non-professionals could want, including unlimited uploads, solid organizational tools, options for sharing, and even a front-facing website. The latter is somewhat unique among online photo storage tools and makes SmugMug one of the best options for people who want a web presence along with storage.
SmugMug’s features are about what you’d expect. You can upload images from your phone or computer, and people can follow you to see your public photos.
You do have some options for sharing photos with SmugMug, but not nearly the same as Flickr or Google Photos. There isn’t the same level of community and engagement as on other sites, but if you want a simple method for storing your photos, SmugMug might be worth a look.

If you’re a working professional who needs control over how your photos are presented, as well as methods for selling your images to clients, SmugMug is definitely worth considering.
Paid version: $ 55/year for unlimited uploads. $ 85/year, $ 200/year, and $ 360/year options for professionals, which include advanced organization options and client tools.
Pros: Unlimited photo uploads. Price includes a website for showcasing your best work, plus a high degree of control over organizing your images.
Cons: No free option with limited functionality (but you can get a 14-day trial).
500px
Like SmugMug, 500px is generally geared towards professionals and more serious artists, but it is worth considering for people who want a solid option for online cloud photo storage. It offers a limited, ad-supported free tier, but the basic paid plan is priced similar to other sites.
What separates 500px from other options on this list is its communal focus. It’s a great option if you want to get exposure and build engagement with a community.

In some ways, 500px is better compared with Instagram than Flickr or Google Photos. You can quickly gain a following and view statistics on which of your photos lead to the greatest audience engagement.
If you are tired of the endless advertising and data mining on social network sites, then 500px might be worth a look, but its walled-garden nature somewhat limits its appeal. That can be a good thing, as it leads to more considered, curated content – but ultimately, 500px doesn’t have the same level of broad appeal as other sites.

Free version: 7 uploads per week, ad-supported, with limited access to some of the more powerful features like statistics and liked photos.
Paid Version: $ 48/year for unlimited uploads, data on how your photos perform among the 500px community, and tools to organize, share, and promote your images. $ 72/year for professionals who want a powerful platform with tools for creating a website, gaining clients, and finding jobs.
Pros: Unlimited photo uploads and access to a vibrant community of artists sharing quality work. Tools to organize and share images with the community and others.
Cons: Free option is extremely limited.
Adobe Creative Cloud
If you pay for a $ 9.99/month Adobe Creative Cloud plan, you already have pretty awesome online photo storage built into your subscription. Whether you have the cloud-focused Lightroom plan or the desktop-centric Photography Plan, you can create online galleries and share them with specific people, or make them publicly viewable for anyone who has the link.

Best of all, if you use Lightroom Classic, these online galleries don’t even count against your storage quota. When you create a public gallery, Lightroom uploads Smart Previews of your images to the cloud. These aren’t full-size, high-resolution images, but they’re great for just sharing pictures with friends and family.
You can also use the Discover feature in Lightroom Mobile to join a community of photographers in order to showcase your work and engage with an audience.
While Adobe Creative Cloud isn’t as full-featured as Flickr, Google Photos, or others on this list, it’s definitely worth investigating if you already have an Adobe subscription and don’t want to pay more for an online photo storage site.
Paid Version: $ 9.99/month for 1 TB cloud storage or 20 GB cloud storage. Creating online galleries to share does not count against your cloud storage.
Pros: Included as part of the Adobe Lightroom or Photography plans. Unlimited images with no storage quota. A decent level of control over how your images are shown in online galleries.
Cons: Images you upload to online galleries are smaller-size previews of your images. Not as full-featured as other photography sites. No built-in support for sharing videos or allowing your photos to be purchased.
Amazon Prime Photos
If you’re one of the millions of people who pay for Amazon Prime, you already have access to Amazon Photos at no additional charge. This service allows you to upload an unlimited number of images (including RAW files) from desktop or mobile. You can organize your photos with Albums, buy prints, and share images with other people in just a few clicks.

The Amazon Photos app lets you back up all the images on your phone to save space. However, accessing them afterward involves using the same Amazon Photos app instead of the native Photos app on your device. You can also use the desktop app to automatically upload all the pictures on your computer to your Amazon Photos account.
All these features make Amazon Photos great for online storage, but there are a few glaring issues that hold it back from being a true competitor to the others on this list. For one, there are no social networking features and viewers can’t leave comments on your images. The desktop app is kind of clunky, and all your uploaded images are organized solely by the folder they happen to be in on your computer.

Amazon Photos also does auto-tagging by default, but you can turn this off if you prefer to keep Amazon’s artificial intelligence algorithms out of your images. This feature looks for easily-recognizable objects and also analyzes people using facial recognition algorithms, which is similar to a feature that Google offers. Some people find these extremely useful, but your mileage may vary.
If all you want is a simple way to back up your images, then Amazon Prime Photos is a great choice. If you are looking for robust organizing tools, options for sharing your images, and a full-featured image browsing experience, it’s best to look elsewhere.
Paid Version: Included with a $ 119/year Amazon Prime account. No limit for photo uploads; a 5 GB upload limit for videos.
Pros: Great for backing up your images. No extra charge for Amazon Prime members.
Cons: No social features. Web interface is unrefined and desktop uploading app is clunky with occasional bugs.
Dropbox
In the search for the best online photo storage platforms, Dropbox might not be the first option that comes to mind.
While it’s not exactly designed with photos in mind, if you want a solid option for storing, backing up, and even sharing your images, Dropbox is a great choice.
Now, there’s nothing in the way of social features and the web-based user interface is fairly utilitarian, so keep your expectations in check. But it’s one of the best services around for easily transferring and managing huge amounts of data, including images.

Designed first and foremost as a cloud-based storage platform, Dropbox works great, not just for storing photos, but also for syncing them across multiple devices. If you want to back up your photo library to the cloud and mirror it to another computer, Dropbox just might be the solution you are looking for.
DropBox’s free version is positively anemic with only 2 GB of storage, but the paid version is outstanding – if a little on the pricey side.

One of my favorite features of Dropbox is the ability to instantly share a file or folder with anyone via a public link. Navigate to a file or folder on your computer that is synced with Dropbox, right-click on it, and get a link you can copy and paste into an email, text message, or social media account. Anyone with the link can view the file or the contents of the folder, and of all the photo services on this list, Dropbox handles this simple task easier than the rest.
The mobile app can automatically upload your images to Dropbox and includes a host of other features for managing all your cloud-based files.
Free Version: 2 GB storage, limited to 3 synced devices.
Paid Version: $ 120/year for 2 TB storage, unlimited synced devices, 30-day deleted file recovery.
Pros: Rock-solid cloud storage with outstanding backup and syncing features. Easy to share photos with a public link. Images can be easily downloaded from the public link.
Cons: Designed more for file storage and backup than sharing photos. No social networking features. 2 TB storage is generous, but the price is expensive.
Microsoft OneDrive
We’re a little off the beaten path here, since OneDrive isn’t exactly known as the world’s greatest online photo storage platform.
However, it’s a service many people already pay for in order to use Microsoft programs such as Word, Excel, and PowerPoint. And since 1 TB of storage is included in a personal or family OneDrive plan, it’s something to consider if you want a simple way to back up your photos.

OneDrive is similar to Dropbox in that it is designed around file storage and syncing, but it has some useful features for photographers, as well.
You can automatically upload your mobile device pictures directly to OneDrive and share individual images or folders with others. OneDrive syncs across devices, too – though over years of using both platforms, I have found Dropbox to be more reliable and less prone to head-scratching glitches.

OneDrive won’t blow you away with its photo-centric features, AI-based image organization, or a community of shutterbugs to connect with. But if you already pay for the service, then it’s worth checking out for the features it does offer.
Free Version: 5 GB storage only. No access to Office apps like Word/Excel/PowerPoint.
Paid Version: $ 2/month for 100 GB storage. $ 70/year for 1 TB storage as well as access to Office apps.
Pros: If you already pay for OneDrive, you can use your 1 TB storage for managing photos. Great for backing up your images and sharing with others.
Cons: Designed more for file storage and backup than sharing photos. No social networking features.
iDrive
For photographers who want a simple, robust, and fairly inexpensive solution to backup their photos, it’s hard to beat iDrive. iDrive has a long history of offering cloud-based storage and backup, and this reputation makes it easy to recommend them over other storage providers.
While iDrive is more specifically geared toward backing up your entire computer, that doesn’t mean it has nothing to offer photographers. Quite the opposite, in fact.

If you have a massive photo library and care more about making sure your work is safely backed up than sharing your pictures with the world, iDrive is a good option to consider. Their software will securely transfer all your data, or just the files and folders you choose, to their cloud servers. You can sync everything with another computer, access your photos via the web interface, and use the mobile app to automatically upload your camera photos.
Don’t expect image editing tools, a community of photographers, or other advanced features found on photography-centric platforms. But you can share images with others and use iDrive to transfer large batches of photos to clients.
Free Version: 5 GB Storage
Paid Version: $ 70/year for 5 TB storage. Back up one or more computers continuously. Clone an entire hard drive, which is useful for backing up a photo library.
Pros: Great reputation for cloud-based storage and backup. Price is very good for the amount of storage, which is important for photographers with large photo archives.
Cons: Not specifically created for photographers, and options for creating galleries and for sharing images are limited.
pCloud
Like Dropbox and OneDrive, pCloud isn’t known first and foremost for online photo storage. It was created for easy-to-use file storage and syncing, and has a free tier with 10 GB of storage for people who want to try it out without committing to a monthly fee.
What sets pCloud apart is its price: It’s the only cloud storage option on this list that has a one-time fee option instead of monthly or yearly charges. While the one-time fee is expensive, it is far cheaper in the long term if you plan on using the service for years.

pCloud’s options for photographers won’t knock anyone’s socks off, but they do have some pleasing features. The mobile app can upload your images directly to pCloud, and the web-based interface lets you resize your photos to make them smaller. This is useful if you want to share photos while keeping an eye on file sizes and bandwidth usage.
Free Version: 10 GB storage. Includes all pCloud features in the commercial version.
Paid Version: $ 175 one-time fee for 500 GB storage. $ 350 one-time fee for 2 TB. Annual plans also available.
Pros: One-time fee. Uploading via the mobile app. Offers an easy way to resize photos.
Cons: Expensive up-front cost. Not designed for social networking or easy image-sharing.
Synology Photo Station
Synology Photo Station differs from the other options on this list because Synology isn’t really a cloud-based photo storage platform.
With Synology, you essentially build your own cloud storage server, called a NAS (network-attached storage). It’s a physical device you keep at home and can access from anywhere with advanced, highly-customizable software. This might make its inclusion on the list a little confusing, but hear me out.

Instead of an external hard drive that you plug into your computer, a NAS is a disk or array of disks that you access over a network. NAS devices are standard in many businesses, and are becoming more popular at home as people realize how flexible and powerful they can be.
In late 2020, Synology released a service called Photo Station. It’s designed for people who want to easily share images with others in online galleries, but need to control the physical media themselves. That way, you can buy a Synology NAS and use it to host photo galleries, share images, and manage all your digital images – without relying on a cloud server you can’t always control.

Synology Photo Station lets viewers engage with your images by leaving comments and clicking on highlighted areas, so it’s great for sharing images with clients or even the general public. Storage space isn’t a problem, since you can just add more drives to your NAS or swap out the existing disk for a bigger one.
There is a learning curve to set it all up, and if something goes wrong you might find yourself spending more of your own time to fix it than you want. But it’s definitely worth a look for photographers who require the highest level of control over their photos.
Price: Around $ 200 for a basic enclosure, but drives need to be purchased separately.
Pros: Highly customizable, infinitely expandable. Easy to share photos with others and no long-term recurring fees.
Cons: Steep learning curve. Not true a cloud-storage service, so your photos aren’t backed up remotely.
How to choose

With so many options available, how can you possibly pick the best online cloud storage option for your photos?
To answer that question, it’s helpful to reframe things just a little and realize that there is no one single solution that is ideal for everyone. Different people have different needs, and no single cloud platform is going to meet the needs of every individual.
Keeping that in mind, here are my picks for the best online photo storage options for three types of people:
The casual photographer: Flickr
Flickr occupies the ideal middle ground between storage, price, features, and community. Its yearly cost is right in line with what many other services offer, and it offers unlimited photo uploads so you never have to think about running out of space or upgrading your storage plan.
Flickr has existed since 2004 and has outlasted many competing services while still remaining relevant today. Its mobile app is perfectly usable, if not as feature-rich as some alternatives, and the 1000-photo free tier is enough for you to get plenty of use before paying to upgrade.
The lack of RAW uploads makes Flickr less appealing to professionals, and there’s no front-facing website for showcasing your best work to clients. Additionally, some elements of the Flickr web interface feel like they haven’t been updated since 2004, which can make using them a bit of a challenge.

You won’t find artificial intelligence sorting and organizing on Flickr, either. But if you’re a casual or even semi-professional photographer looking for an outstanding online photo storage platform – one that can meet your needs without requiring too much money – Flickr is the best option.
The professional photographer: SmugMug
SmugMug is the best storage option for professionals who require more feature-rich storage. The Basic plan is fine for casual photographers and shares many of the same features as Flickr, though it lacks the social elements and photography communities that have made Flickr so useful over the years.
SmugMug has tools for professionals to create a website and let clients order prints, and its SmugVault tool allows for uploading RAW, TIFF, and other high-quality image formats. Combine that with unlimited storage and the result is an online photo storage platform ideal for working professionals.
The archiver: Dropbox
If you’re a person with hundreds of thousands of photos and you just want to store them safely in the cloud, Dropbox is your best choice.
The price is a little higher than some of the other options, but you do get what you pay for. Dropbox handles tasks like uploading, downloading, syncing, versioning, and restoring deleted files and folders more smoothly than any other platform.

Dropbox syncs your files instantly across multiple devices and has a robust and full-featured mobile app for uploading photos and managing files. Plus, the one-click public sharing for pictures and entire folders is so useful that, once you have it, you won’t ever want to go back.
The cheapest paid tier offers a generous 2 TB of storage, and if you want to free up space on your computer, you can tell Dropbox to store originals in the cloud; you can then download them on an as-needed basis.
Dropbox doesn’t have productivity apps like OneDrive, and it’s more expensive than iDrive or pCloud, but it handles the straightforward task of cloud storage better than anything else on the market.
The best online photo storage: conclusion
I hope this guide was useful to you!
And now that you’ve finished, you should know the best online photo storage provider for your needs.
Now I’d like to ask you:
What do you think about online photo storage options? Do you have a site you like that didn’t make it on this list? Are there features of these tools that you use but I didn’t mention in my review? Leave your thoughts and questions in the comments section below!
The post The Best Online Photo Storage Platforms in 2021 Compared appeared first on Digital Photography School. It was authored by Simon Ringsmuth.
Composition in Photography: A Complete (and Modern) Guide
16
Mar
The post Composition in Photography: A Complete (and Modern) Guide appeared first on Digital Photography School. It was authored by Ana Mireles.

If you’re looking to learn about composition in photography, you’ve come to the right place.
In this article, I’ll cover what composition is, and I’ll explain how to use it to make your images eye-catching and unique.
So whether you’re a beginner photographer learning the basics or a more experienced shooter who wants to improve, read on to find out some of the most effective composition tools, concepts, and guidelines available!
What is composition in photography?
Composition in photography refers to the position of elements inside the frame and how they interact with each other.
Ultimately, composition is about the visual structure of your image.
Why is composition important?
The composition of your photograph impacts the way it’s perceived by others. When you choose what to fit inside the frame and what you leave out, where to position each element and so on, you’re capturing a scene with your unique vision.
That’s why it’s important to carefully compose your photos!
Basic techniques and concepts for composition in photography
We are instinctively attracted to images with a good composition.
Why?
Because we find them harmonious or interesting!
However, we are not as naturally skilled at creating stunning compositions.
That’s why photographers have developed basic compositional guidelines and concepts that can quickly improve photo compositions – without requiring years of experience.
Starting with:
The rule of thirds
You’ve probably heard about the rule of thirds – or at the very least, you’ve seen it. That’s because most cameras, including the one on your smartphone, have a rule of thirds grid overlay.
The rule of thirds grid is formed by four lines – two vertical and two horizontal – placed at an equal distance from each other and the photo edges (so the frame is divided into thirds).
Like this:

But what actually is the rule of thirds?
It’s a guideline stating that you should position compositional elements along your gridlines – and that the focal point of your composition should sit at one of the gridline intersection points.
You can follow this rule in both portrait and landscape orientation, and it works for all types of photography. For example, if you are doing a full-body portrait, you should often place the subject toward one of the gridlines and not in the center.
And when you’re photographing a landscape, you should put the horizon toward the top or bottom third of the image and never in the middle.
Note that the rule of thirds is a guideline, not a true rule. Once you’ve mastered it, I recommend trying to violate it with other concepts – such as symmetry, or with even more complex techniques such as the golden ratio (discussed below).
Leading lines
Leading lines direct the viewer through the image, like this:

When you read a text in English, you automatically start at the top left. Then you continue toward the right until the end of the line.
The same thing happens in photography. When we see an image, we also “read” it. Your eye goes from one element to the next – in order to view details and understand the story that’s being told.
That’s where the leading lines come into play: They guide the eye through the image.
Leading lines can be present or implied, and they can be straight or curved. For example, a leading line can be a curvy road getting lost in the mountains. This will compel viewers to follow the road, pulling them into the image.
Texture

Texture is often overlooked as an element of the composition. You can use it to create contrast between two elements – one that is smooth and one that is rough, for example.
You can also use texture to create interesting shapes and leading lines, or to add interest to an otherwise dull subject.
To work with textures, you need to consider the type and direction of the light. A hard light that comes from the side will emphasize the texture. A soft light coming from the front flattens the surface.
Color

Color is a key consideration for composition in photography. There are so many color harmonies that you have endless possibilities!
You can use complementary colors to create contrast and make your subject stand out. And you can bring together apparently unrelated elements that are united via a color scheme.
A good way to learn and understand color palettes is Adobe Color. You can use this tool even if you don’t have an Adobe subscription.
Simply select a color wheel with different color harmony rules, such as monochromatic, complementary, etc. You can also upload a photograph to extract the color scheme or gradient. And to stay updated, you can browse trends based on Adobe Stock and Behance.

My favorite tool in Adobe Color is Explore, where you can input a concept or a mood and see the colors that represent it (with multiple examples from the visual arts).
Shape

As photographers, we’re used to thinking of ways to add depth to a two-dimensional surface.
Because of that, it’s easy to overlook the importance of shapes. Yet when you’re composing your images, you can use shapes to establish a careful arrangement.
Think of a cake being photographed from the top; that’s a circle. If you cut out a slice, then you’re adding a triangle to the composition.
Every shape gives a different feel to our photographs. For example, squares convey stability, while circles make you think of movement and energy.
That’s why posing a group for a corporate portrait usually means forming squares or rectangles, whereas family portraits are often posed in triangles or dynamic shapes.
A good way to practice shape-based composition is by using shadows or shooting silhouettes. That way, you take out any three-dimensionality and focus only on the shape of objects.
Symmetry
Symmetry is defined as something that is exactly the same on both sides, such as a mountain peak or a tree trunk.
And it can work great in art – as long as you use it carefully.
Note that, in art, a scene is rarely 100 percent symmetrical. Instead, you’ll end up with scenes that are almost symmetrical and are well-balanced on both sides.
Like this lake photo:

The trees and water aren’t perfectly symmetrical, but they’re close, and the overall scene has a feeling of balance.
Take a portrait as another example. If you photograph a face perfectly centered in the frame, your image will be symmetric. It won’t matter if the subject has a birthmark on one of their cheeks, or that one of their eyes is slightly lower than the other – the symmetry will dominate.
One of the reasons we find symmetry so appealing is because we often find it in nature. And psychologically speaking, symmetry offers a sense of order that makes us feel at ease.
(A great way to play with symmetry in your photography is by shooting reflections or patterns!)
Contrast

Another important concept that can enhance your composition is contrast.
Since we are talking about photography, the first thing that comes to mind is contrasting light, such as low key photography. Here, you capture a very dark image where only a small detail is highlighted (which makes for a highly dramatic result).
However, tonal contrast is not the only type of contrast you can use to improve your compositions. You can also use color contrast (as discussed earlier), juxtaposition, and conceptual contrast (which pairs opposite ideas or aesthetics).
Advanced composition in photography
Once you’ve mastered the basics of composition, it’s time to challenge yourself and move on to more advanced techniques.
Here are some of the most popular tools to consider:
The rule of space
The rule of space tells you to leave space in front of the subject, especially if it’s a moving subject. The idea is that the viewer needs enough room to imagine the subject carrying on the action that it’s performing.
For example, if a duck is paddling away, you would put significant space in front, like this:

And according to the rule of space, if you photograph a person who’s running to the right, you should place them on the left side of the frame (and vice versa).

But remember that there’s an exception to every rule, especially when it comes to composition. So if you want to add tension or intrigue the viewer, try violating the rule of space!
The complicated thing about composition is that you must choose to apply or break the rules depending on the message you want your image to convey.
The rule of odds

The rule of odds is based on the principle that people find it more interesting to see odd numbers. While even numbers show stability and work well for symmetric compositions, odd numbers allow the eye to flow through the image.
So according to the rule of odds, you should include odd numbers of items in your compositions.
I recommend you use this rule when it fits the situation, much like you would with shapes. If you want a dynamic composition, you use triangles, diagonal lines, and odd numbers. And if you prefer stability, you can choose straight lines, squares, and even numbers.
In any case, the important thing is to use the rules to your advantage and take control of your compositions.
When you’re shooting food or products, it’s often easier to follow the rule of odds.
But following the rule of odds isn’t as easy when you’re photographing a family of four; you can’t just decide to exclude one of them!
(Though when you’re facing this situation, you can arrange the group so the viewer sees one plus three instead of four.)
Triangular composition
In the first part of the article, I talked about using shapes to compose your images.
But did you know that the most popular shape in composition is the triangle?
You can create triangles with poses in portraits, mountains in a landscape, or a church tower on your travels.
However, if you want to up your game a bit more, you can use golden triangles. This composition technique divides the frame first with a line that connects one corner with the opposite one, then adds two smaller lines coming out from each of the remaining corners.
Like this:

Ideally, you would place the most important elements of the composition where the lines intersect. To achieve this, you may have to tilt your camera; this is called a Dutch angle (aka the Dutch tilt, German tilt, or Batman angle).
That’s why it’s not always possible to use the golden triangle guideline (or, at least, it’s not always the best choice!).
The golden ratio
The golden ratio is a mathematical term that was later applied to art and eventually photography. It equates to 1.618, and there are two ways it can be applied to photographic composition:
As a grid or as a spiral.
The golden grid (aka the Phi Grid)
The Phi Grid divides the frame into nine blocks, just like the rules of thirds.
However, this grid doesn’t follow a 1:1:1 ratio – which means the blocks are not the same size. Instead, the grid is 1:0.618:1, so you get smaller blocks toward the center, like this:

This composition tends to be more natural, as the golden ratio is also found in nature. It also has a better reputation than the rule of thirds, which many consider to be amateurish – a first step that should be quickly outgrown for more complex techniques.
The golden spiral (aka the Fibonacci spiral)
For this composition tool, you should follow a spiral whose growth factor is the golden ratio.
It looks like this (though note that it can begin at any corner of the frame):

This spiral is found in natural structures such as sunflowers, pine cones, seashells, etc. You can also find it in many artworks and buildings because many artists have used it throughout the centuries.
To train your eye, you can print or draw a golden spiral, then use it to study the photographs from Irving Penn or Henri Cartier-Bresson, who both used the golden spiral to achieve astonishing results.

Composition in photography: conclusion
Now that you know most of the popular composition tools, you can use them to dramatically improve your images!
I know it’s a lot of information, but composition in photography will become more intuitive as you get more practice.
My suggestion is to keep it simple at first and practice the tools one by one.
Once you get comfortable with each composition guideline, you can combine them to achieve a more complex result.
And remember:
These are just guidelines you can use as you see fit to find your own artistic vision.
Now over to you:
Which of these composition techniques is your favorite? Which do you plan to use in the future? Share your thoughts in the comments below!
Composition in photography FAQs
How do I emphasize my subject?
To emphasize an element in your photograph, you need to draw the viewer’s attention to it. You can use composition techniques, such as leading lines, to achieve this.
Is the rule of thirds the most important composition rule in photography?
No, the rules of composition don’t have a hierarchy. Instead, rules work better in different situations, and the best technique for one photograph can be wrong for the next one.
Can I improve my composition by photographing with a smartphone?
Yes, these rules apply to all types of photography, including mobile and video. If you want some help getting started, most camera phones have a grid overlay that follows the rule of thirds. You can enable/disable it in the settings section. Alternatively, you can install a camera app that supports different types of grids (such as A Better Camera).
How can I improve my composition in Lightroom?
You can use Lightroom’s overlays to improve the compositions of your photos. To use these, select the Crop tool from the Develop panel. Make sure that the Overlay is enabled. Then press the “O” key to toggle between all the available overlays.
Can I break the rules of composition?
Absolutely! Even though some of them are called rules, they are only guidelines, tools, and techniques to help you achieve better results. There’s always flexibility to experiment. It’s important to know the rules before you break them, though!
The post Composition in Photography: A Complete (and Modern) Guide appeared first on Digital Photography School. It was authored by Ana Mireles.
How to Make Beautiful Portraits Using Flash and High-Speed Sync
14
Mar
The post How to Make Beautiful Portraits Using Flash and High-Speed Sync appeared first on Digital Photography School. It was authored by Sean McCormack.

The scene: Outdoors with full sunlight.
The gear: Your camera, lens, and flash.
The problem: You find that your flash only works at 1/200s or below, so you need to be at f/16 or f/22 to get a well-exposed shot. And at f/16-f/22, everything is in focus, including all the cars and other distractions in the background. (Those dust spots you keep meaning to clean are also perfectly visible.)
Why can’t you shoot with a higher shutter speed so you can have a wider aperture?
Well, it’s all down to the issue of sync speed.
More specifically, it’s about using flash and high-speed sync.
Generally speaking, to overpower the sun and stay below your camera’s sync speed, you’re forced to use a narrow aperture. Here I’m at f/20 just to stop the backlight overpowering the hair and the sky from blowing out:

The resulting aperture means that everything is pretty much in focus, leaving the background looking cluttered.
(This shot is for example only; you should generally make a point of choosing clutter-free backgrounds.)
What is sync speed?
Sync speed is the fastest shutter speed for which the camera can expose the whole frame at once.
It’s a bit technical, but when you fire any shot below the sync speed, the first shutter curtain opens fully, revealing the entire sensor to light. At the end of the exposure time, the second shutter curtain moves across the frame to finish the capture.
(Generally, the sync speed varies between 1/125s and 1/250s; it depends on your camera.)
When you go above the sync speed, the second curtain starts to move before the first one has completed its journey. As your shutter speed gets shorter and shorter, the gap between the curtains narrows to a tiny slit. Despite this, all parts of the sensor receive light and a full exposure is made. On a bright day with a prime lens, you can easily shoot at 1/8000s at f/1.4 and have a perfect exposure. All parts of the frame still receive light, because ambient (non-flash) lighting is continuous throughout the exposure.
So why does the sync speed actually matter?
The sync speed problem
It’s when you introduce flash that you start to have problems.
You see, when a flash is fired (which usually happens when the first curtain is opened), all the light from it comes out in a very short space of time (in the order of milliseconds).
When you go above the sync speed, the position of the curtains doesn’t reveal the entire frame at the time the flash fires. So the shutter curtain blocks part of the flash and prevents it from reaching the sensor.
Any ambient light will expose normally, but the flash gets hidden in part of the frame. As your shutter speed gets faster and faster, more and more of the flash is blocked until it’s no longer visible in the shot (i.e., your exposure is what you’d get if you never fired the flash at all).
Below is a set of images taken at 1/3-stop increments with a flash. The first photo is at 1/250s, the native sync speed of my Fujifilm X-T2 camera. The other shutter speeds are, in order from left to right (and top to bottom): 1/320s, 1/400s, 1/500s, 1/630s, 1/800s, 1/1000s, and 1/1250s. Note that 1/320s is potentially usable if the subject is away from the edge of the frame.

Everything in focus
Normally, when you use flash outside in daylight, you end up having everything in focus.
Remember the Sunny 16 Rule? If your subject is in direct sunlight during the day, you can set your aperture to f/16 and your shutter speed will be one over your ISO value.
So if your ISO is set to 100, your shutter speed would be 1/100s (at f/16). If your ISO is 200, then the shutter speed would be 1/200s.
Now, to get a darker, richer sky while using flash, you’d really need to be at f/22. Because you can’t get faster than 1/250s (remember, it’s the sync speed!), you have to increase the aperture to expose the shot correctly.

As you can see from the photos above, this is a huge problem. Shooting at an f/22 aperture just doesn’t give you the creamy bokeh that portrait photographers love, and it can leave you with unpleasant, distracting backgrounds.
So what do you do?
The solution: high-speed sync
There is a solution: high-speed sync, also known as focal-plane sync.
No, it’s not perfect, but it does work. You see, instead of firing the flash at the start of the shot, high-speed sync pulses the flash throughout the whole exposure, trying to simulate the effects of a continuous light.

It looks good, but it comes at the expense of power and heat, because HSS works the flash really hard. After a few shots, the flash may even shut down for cooling.
Now, for high-speed sync to work, you need the camera to transmit a signal to the flash and for the flash to have high-speed sync built in. Cactus Image makes a trigger called the V6 II, which allows you to use any HSS flash with any camera.

The look of high-speed sync
You can use high-speed sync to go over the sync-speed barrier, so settings like 1/4000s at f/1.4 are achievable with flash. You get complete control over the light, but while using the wide apertures you usually associate with natural-light photographs. Yes, please!
By shooting wide-angle photos with a shallow depth of field, you can even create images that look like stills from a movie.
Settings for high-speed sync
Let’s look at a typical setup and settings for a photo using high-speed sync. This particular shoot was done in the evening when the light was relatively low, but I really wanted a shallow depth of field – and therefore required high-speed sync.
I set my camera to f/1.4 for a super-shallow depth of field. To get the clouds properly exposed, I had to boost the shutter speed to 1/4000s. To get the flash to work, I had to set it to high-speed sync. Using a Cactus V6 II trigger, I could easily get my Fujifilm X-T10 to shoot with high-speed sync.


Another high-speed sync portrait example:

1/1000s | f/4 | ISO 800
The alternative
Note that high-speed sync isn’t the only way to shoot with a wide aperture and flash.
For one, you can always head out at the beginning or the end of the day when the light is pretty low; then the ambient lighting won’t add much to the shot, and you’ll be able to get a nice exposure at 1/200s. Plus, you can get great sky color and you won’t be fighting against strong sunlight.

Of course, if you’re doing any photoshoots with clients, you often have to work with the subject’s schedule rather than your own. So you may have to shoot at midday to suit them.
And that leads to the next option.
Using a neutral density filter
If you shoot landscape photography, you will be familiar with neutral density (ND) filters. This filter type allows you to slow the shutter speed down to get nice, silky water.
Neutral means that it adds no color, while density refers to blocking light. You can get ND filters in a range of values from 1 stop to 16 stops.
For portraits, neutral density filters allow you to widen the aperture instead of dropping the shutter speed. So a 4-stop ND filter would take you from f/16 to f/4.
The drawback is that, as you block light, focusing can become harder.
Another potential issue is that not all ND filters are actually neutral. Some tend to have a color cast. (I have a Firecrest 10-stop ND for landscapes, which is neutral, but the older 4-stop filter I own – also from Firecrest – is slightly pink.)

1/250s | f/16 | ISO 200

1/250s | f/4 | ISO 200
Flash and high-speed sync: conclusion
As you now know, you can make outdoor portraits even when the sun is bright – simply by using flash and high-speed sync.
So make sure you get a flash that has HSS capabilities.
And start practicing!
Now over to you:
Have you ever used high-speed sync? Have you ever struggled to get nice bokeh in bright sunlight? Share your thoughts (and high-speed sync images!) in the comments below.
The post How to Make Beautiful Portraits Using Flash and High-Speed Sync appeared first on Digital Photography School. It was authored by Sean McCormack.
Tamron 17-70mm f/2.8 for Sony Review: A Versatile Lens for a Great Price
13
Mar
The post Tamron 17-70mm f/2.8 for Sony Review: A Versatile Lens for a Great Price appeared first on Digital Photography School. It was authored by Suzi Pratt.

In December 2020, Tamron announced an exciting new lens: the 17-70mm f/2.8 for Sony.
The Tamron 17-70mm is small, lightweight, and designed for APS-C cameras – plus, it offers two excellent features often lacking on Tamron lenses.
But how does it function in the real world? And is it worth the $ 799 price tag?
Let’s find out in this hands-on Tamron 17-70mm for Sony review!
Tamron 17-70mm for Sony: overview
A 24-105mm lens offers one of the most popular focal length ranges available, thanks to its wide-to-telephoto reach. It’s a versatile pick used by casual and professional photographers alike.
And the 17-70mm is Tamron’s version of this lens because its focal length translates to 25.5-105mm on an APS-C body.
The Tamron 17-70mm is made for Sony APS-C (crop-sensor) cameras, so it’s ideal when combined with the popular Sony a6000 (or any of its recent variations). The lens can also be used on Sony full-frame cameras like the Sony a7S III – as long as the APS-C mode is selected.
Constant fast aperture
The 17-70mm f/2.8 for Sony is Tamron’s first fast-aperture zoom lens for APS-C cameras.
The lens maintains a constant f/2.8 aperture throughout the entire zoom range, while other APS-C Tamron zooms use variable apertures (i.e., apertures that shift as you zoom).
A constant aperture, especially a fast f/2.8 aperture, makes the 17-70mm great for shooting in low light. And at f/2.8, you can capture shots with creamy bokeh, like this one here:

Vibration compensation
The 17-70mm also comes with Tamron’s image stabilization (Tamron calls this VC, or Vibration Compensation) to reduce camera shake.
Note that VC is often missing on Tamron lenses, especially those with constant apertures, so it’s certainly a welcome bonus on the 17-70mm.
Lenses with VC make it easier to shoot handheld photos and videos, especially at slow shutter speeds. That’s how I was able to pull off this handheld long exposure:

1/6s | f/13 | ISO 320
(Speaking of video: the 17-70 is a great video lens, thanks to the flexible zoom range, constant aperture, and inclusion of VC!)
Build and handling
If you’ve tried any recent Tamron lenses, the 17-70mm will look and feel very similar.
The lens is made mostly of plastic, which helps keep the weight down (it comes in at 1.2 lb/525 g), though you also get rubber zoom and focus rings.
The lens physically extends and retracts when the zoom ring is twisted. With dimensions of 2.9 x 4.7 in (74.6 x 119.3 mm), the lens can feel a bit large and off-balance when attached to a smaller camera like the Sony a6000. It definitely feels more balanced when used with a Sony full-frame camera.
The Tamron 17-70mm f/2.8 for Sony is moisture resistant and also has a front element with a fluorine coating to protect it from smudging.
And speaking of the front element, the lens has a filter size of 67 mm, common among Tamron’s recent lenses.

Performance
I used the Tamron 17-70mm in outdoor hiking and indoor restaurant settings, and the autofocus worked well for photos and videos.
The lens has quiet focusing thanks to an RXD stepping motor. This works wonderfully with Sony mirrorless cameras, which still offer the best autofocus on the market.
It’s easy to switch to full manual focus simply by twisting the focus ring. Also, with a minimum focusing distance of 7.5 in (19 cm), the lens has decent macro capabilities (and close-up shots look great with that gorgeous f/2.8 bokeh).

Image quality
Constant-aperture lenses tend to produce sharp, crisp images. You pay for it, though, because constant-aperture lenses – especially zoom lenses – don’t come cheap.
But while the Tamron 17-70mm is priced well under $ 1000, image quality is tack sharp across the entire focal length range, even at f/2.8. If Tamron can make more lenses like this at similar price points, they’ll win over many photographers and videographers.
At times, the 17-70mm does produce chromatic aberration and excessive vignetting, especially when shooting scenes with high contrast. Luckily, these are problems that can easily be solved in most photo editing programs, including Lightroom or Photoshop.

Tamron 17-70mm alternatives
There are no true competitors to the Tamron 17-70mm f/2.8, at least not at its price point. When looking at similar lenses, the price goes up dramatically – or you sacrifice certain features.
Sony lens choices
The closest Sony competitor is the Sony E 16-55mm f/2.8 (24-82.5mm on APS-C cameras), which offers the constant f/2.8 aperture but is 15mm short on the telephoto side. The 16-55 also lacks image stabilization and will set you back $ 1,300.
The Sony E 18-105mm f/4 is a more affordable choice, coming in at around $ 600. This APS-C zoom lens offers a wider focal range than the Tamron plus image stabilization. However, the constant aperture is f/4, which is a lot slower than the Tamron’s f/2.8.

Who should buy the Tamron 17-70mm for Sony?
Considering the price and features of this lens, the Tamron 17-70mm is suitable for both professional photographers and videomakers alike, especially for those on a budget.
The lens’s features are typically found on glass that costs twice as much, including the constant f/2.8 aperture and the Vibration Compensation. It also offers remarkably sharp image quality considering its cost.
And given the relatively accessible price, the Tamron 17-70mm is also appropriate for beginner or amateur photographers and videomakers looking to increase their skills.
Using a constant f/2.8 aperture is a treat, and this lens will help budding photographers take better images in low light with nice, creamy bokeh.
So grab the Tamron 17-70mm f/2.8 for Sony right here!
Now over to you:
What do you think about the Tamron 17-70mm f/2.8? What do you like about it? What do you dislike? Will you consider buying it? Share your thoughts in the comments below!
Tamron 17-70mm f/2.8 sample images
-

1/60s | f/2.8 | ISO 800 -

1/100s | f/3.5 | ISO 640 -

1/320s | f/2.8 | ISO 300 -

1/1250s | f/2.8 | ISO 300 -

1/1000s | f/2.8 | ISO 300
The post Tamron 17-70mm f/2.8 for Sony Review: A Versatile Lens for a Great Price appeared first on Digital Photography School. It was authored by Suzi Pratt.
Weekly Photo Challenge – Sunrise
13
Mar
The post Weekly Photo Challenge – Sunrise appeared first on Digital Photography School. It was authored by Sime.
It’s 2021 and it’s simply time to see your sunrise, wherever you are in the world! This week, simply post your sunrise photograph and roughly where it was taken (which town are you in or near?) in the comment section. #dPSSunrise
Don’t forget, you can go back and try ALL of our CHALLENGES over HERE!
A sunrise can show many things, quality of light, silhouette, rays of sun, clouds, water… Whatever, as long as it’s a sunrise! Tag your post on social – #dPSSunrise
Share on Instagram and tag us so we can repost you! @DigitalPS

Remember! Note down where you made your photograph and share it in the comments!
Share on Instagram or Twitter and use the hashtag #dPSCars so we can see them!
How do I upload my photo to the comments?
Simply upload your shot into the comments field (look for the little camera icon in the Disqus comments section) and they’ll get embedded for us all to see. Or, if you’d prefer, upload them to your favorite photo-sharing site and leave the link to them.

The post Weekly Photo Challenge – Sunrise appeared first on Digital Photography School. It was authored by Sime.
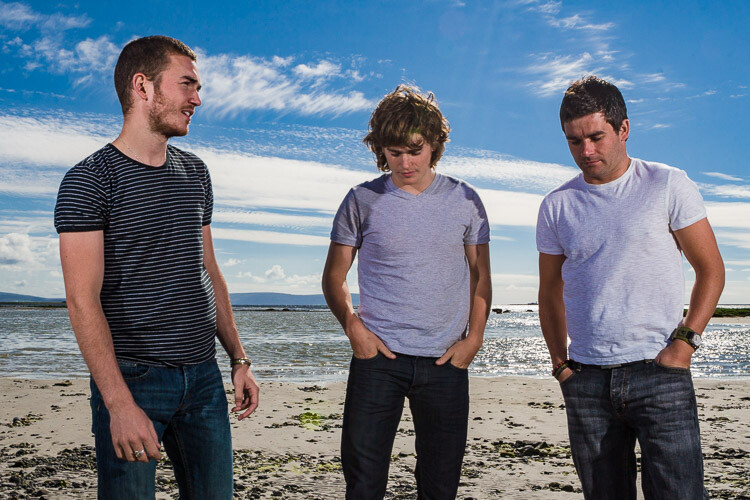
21 Family Portrait Ideas for Gorgeous Photos
11
Mar
The post 21 Family Portrait Ideas for Gorgeous Photos appeared first on Digital Photography School. It was authored by Simon Ringsmuth.

Preparation is key to any successful photoshoot, and having plenty of family portrait ideas will help ensure your session goes as smoothly as possible.
Whether you’re working with friends, repeat clients, or new customers, you want to make your family portrait sessions fun and engaging, because this will always lead to better pictures.
So if you’re stuck in a rut or just looking for something new to try, check out these 21 ideas. They’ll stimulate your creativity and get you thinking about fun ways to take pictures of families.
Let’s get started.
1. Standing together
This one won’t win any awards for creativity, but it’s a classic. It just works.
Position everyone close together, with those on the outside turned slightly inward. Kids can stand on the ground or be held by an adult.

I always like to start with shots like this to cover my bases before I try new and creative ideas. That way, you can always deliver a classic posed image your clients will love, in case your other ideas don’t quite work out.
2. Look for interesting backgrounds
While the focus of your family photos should always be the people, it can help to use different locations – especially if you find yourself working with repeat clients.
Introducing new background elements or other scenery can dramatically alter the look and feel of an image, and will give your clients pictures they will remember forever.

3. Group hug!
Family portraits should be a celebration of love and togetherness.
So find ways to use that in your images!
Get the kids to snuggle up with the parents so everyone’s near each other.
Let the family, and others who see the photos, remember the love that can barely be contained in a single image.

4. Go for a walk
Tell everyone to stand back, get in a line, and slowly walk toward you.
Here’s an example:

This type of shot is a classic for a couple of reasons. For one, families love it. Plus, it’s the type of photo you can’t get with a mobile phone.
I recommend using a zoom lens, because you can zoom from telephoto to wide as the group gets closer.
It also helps to have a camera with a fast continuous shooting speed and a deep buffer, so you can take as many shots as you need to nail the perfect one.
5. Go for a run!
This one works great if you have children involved. Just tell everyone to back way up and then run toward the camera.
(Kids love doing this type of shot!)

Make sure everyone is holding hands; otherwise, the speedier ones will end up ahead.
Also, quick tip:
Use your camera’s high-speed shooting functionality combined with a fast shutter speed to freeze the action.
6. Showcase the generations
When doing a multigenerational family portrait session, it’s a good idea to get at least one shot showing the eldest couple plus the family.
Put the eldest couple in the middle and surround them with their children, grandchildren, and other relatives. This creates a sense of closeness and family bonding that’s immediately apparent to anyone who looks at the photo afterward.

7. Headshots of each person
This might seem like cheating because a single headshot isn’t the same as a family portrait.
But I love taking headshots for my family clients since they require almost no extra effort on my part and the families always enjoy the results.
(I’ve found that most people aren’t expecting individual headshots when you do a family portrait session. So they’re seen as a fun bonus and will keep clients calling for repeat business.)

7. Use backlighting
It’s always important to look for the light any time you’re taking photos, and it’s especially true for family portraits.
Normally I like the light to be behind me, but it’s fun to play around with backlighting and see how it can dramatically alter your images.
In this example, the fountain behind the couple adds a brilliant shine to the shot, thanks to the power of backlighting:

The sun also adds a nice rim light to the newly engaged couple. See how they shine in the late afternoon sun?
The couple was thrilled with the result, and your clients will be, too.
8. Group the genders
Grouping the genders isn’t exactly new or groundbreaking. But it’s a tried-and-true formula for success – one that your clients might not think about in advance but will greatly appreciate afterward.
So put all the women together and take some shots, then do the same for the men.
My clients always have fun doing this, and it gives them some great photos to hang on their wall.

9. Show playfulness
Kids love to laugh, play, and run around.
So why not embrace that during a photoshoot?
Ditch the poses for a minute and let your clients just have fun. This works especially well with young kids; parents will pick them up, swing them around, and have a great time just enjoying the day.
But have your camera ready to capture those moments!

10. Build photo benches
I did many family photo sessions that left me frustrated. You see, I didn’t have a great solution for a very basic problem:
I didn’t have a spot for people to sit.
If you’re in a controlled studio environment, you can deal with this easily. If you like to shoot out in nature, however, you might not be so lucky.
Thankfully, with a few cheap pieces of wood from any home improvement store, along with some tools and a free afternoon, you can build your own photo benches (and solve this problem once and for all!).
I now have three benches in different sizes that I use to accommodate a variety of families. They can be used separately or placed together as one long bench. It doesn’t even matter if they get scuffed or dirty, since imperfections add to a sense of character.
And the results are amazing, plus I no longer worry about finding a spot for my clients to sit comfortably.

11. Just the kids
Amidst the joy and chaos of a family photoshoot, it’s easy to overlook this classic pose – but it’s one that you’ll regret leaving out.
Parents love shots with their kids together, and even when not all the kids are happy and cheerful, I still get positive comments. Pictures like this show the unique personalities of each child, and I usually get one or two kids smirking, grinning, or doing their own thing, to which their parents say, “Yup, that’s just who they are!”

Nikon D750 | Nikon 70-200mm f/2.8 | 200mm | 1/200s | f/4 | ISO 250.
12. Involve the pets
Bringing pets to a photoshoot can be a mixed bag. When you introduce a four-legged friend to a formal family photo session, you add a lot of uncertainty, and it’s almost impossible to make the animal do what you want it to.
Even so, there’s a host of important benefits: It puts your clients at ease, helps them remember their pets fondly, and can make for some genuine smiles.
I find this works best if you do your photo session at your clients’ house. But if you do go out, make sure the clients bring a portable kennel or some treats to keep the furry friend occupied when it’s not in the shot.

13. Use structures
I like going out around town to do family photo sessions (preferably to a handful of places I have scouted in advance and used many times before).
The nice thing about some of these spots is that they have built-in structures and other accoutrements that allow you to take fun, sometimes unplanned, pictures of your clients.
So don’t be afraid to include these! Embrace the structures around you and use them to add flair to your photos.

14. Show affection
This one is a little tricky, but the results can be absolutely heartwarming.
Just be careful how you talk with your clients and direct them during the shoot. You don’t want signs of affection to be forced or uncomfortable, and unless you are good friends with your clients, you might not know where to draw the line.
That being said, I’ve had nothing but positive results just by asking parents to give a quick hug or kiss to their little children. These simple signs of affection often end up being my clients’ favorite shots.

15. Read a book
Any time you do a family photo session with kids, particularly younger ones, you have to be willing to accept a degree of uncertainty.
After all, the kids might be hungry, fussy, or defiant – and it’s your job to make the best images possible in spite of these obstacles.
I don’t recommend handing out sweets or treats to children, as this can introduce even more unwanted uncertainty. But if you want to get the kids to cooperate, ask your clients to bring along some of their child’s favorite books. This helps them relax and can lead to some very special pictures.

16. Use their home
I do almost all of my work for clients outdoors. But sometimes I’m invited inside their homes, and this can make for some very special sessions.
If you schedule a shoot at your clients’ house, ask if you can arrive early. Assuming you get the go-ahead, come before the session and politely look for good spots to take pictures. Look for furniture, toys, and large windows that will let in plenty of light.
Ideally, you want to schedule a pre-consultation with your clients to discuss the session. Treat these at-home opportunities with the respect and dignity your clients deserve, and they will be glad to ask you for future photo sessions.

17. Show context
I sometimes get asked to photograph singular events in my clients’ lives: birthdays, graduations, and other milestones.
And while you can always use these opportunities to capture the same types of portraits you would normally shoot, what really matters is context.
So find ways of incorporating visual elements from the event into your photos, as I did in this image:

My friend asked if I would take pictures when he received his Ph.D., and I made sure to include campus buildings in the frame to serve as a reminder of his time in graduate school.
18. Capture candids
Sometimes the best shots of a photo session are completely unplanned. While posed pictures are nice, it’s also fun to get pictures of your clients just walking around, laughing, talking, and enjoying one another’s company.
In other words:
When photographing a family, show them being a family!
And it’s okay to cheat a bit here, too. For the shot below, I asked the couple to walk across the veranda, then I caught them in a candid moment of joy.

19. All hands on deck
When taking pictures of a large family, especially one that spans multiple generations, make sure to get an image with hands.
Clients love seeing mementos like this, and they can instantly pick out which individuals were present just by looking at the hands.
Plus, an image like the one below captures myriad details that are missing in headshots and full-body portraits: wedding rings, the weathered hands of the grandparents, and the small hands of children next to their mother’s and father’s hands. It’s a touching image that speaks volumes about the family without showing any faces at all.

20. Use their ideas
Any time I do a family session, I make sure I’m well prepared. I have a clear idea of my goals for the session, where I want to be, what kinds of images I want to get, and of course, plenty of spare batteries.
But you have to be willing to adapt and incorporate your clients’ ideas, too. They might want to try something different, go to a new location, or pose in a way you hadn’t considered.
Don’t shut these ideas down! Even if the images aren’t your personal favorites, your clients might love them, and they will certainly appreciate your willingness to listen to their suggestions.

21. Use a silly noise-maker
This idea is last because you have to use it carefully. If you know your clients well, and if there are young children in the family, then one fun thing to consider is a remote-controlled fart machine.
Yes, I know that seems absolutely ridiculous, but nothing sends kids into a gleeful bout of giddiness quite like an unexpected breaking of wind.
These little gadgets are inexpensive and can be hidden underneath a bench, taped to a stool, or tossed behind a tree. Right as you prepare to take a shot, click the remote and watch the kids erupt with laughter.
Adults might roll their eyes, but the kids will love it, and you’ll get some of your favorite shots of the session.

Family portrait ideas: Final words
There’s no guarantee that these family portrait ideas will result in perfect pictures. Any number of things can go wrong on a family shoot, but any number of things can also go right.
The point here is to fill your mind with possibilities. That way, you can do everything in your power to get the best possible shots.
And above all else, try to relax, have fun, and enjoy the session!
Your clients will love the results…
…and they’ll soon be asking you to come back for more pictures.
Frequently asked questions
What should my clients wear for a family session?
I recommend solid colors in matching groups (such as some people wearing blue, others wearing green, etc.). But remember that the photos are for your clients, and even if they show up in clothing you wouldn’t recommend, your job is to take good photos regardless.
Do I need a tripod for family photos?
Absolutely not! You can use one if you prefer, but I find that tripods and even monopods are more of a hassle than a help. You need to move around, especially if you’re shooting pictures of kids – and if you are tied down to a tripod, you won’t be nearly as flexible and adaptable.
You do a lot of outdoor family photos. What’s the best type of location to look for?
I try to avoid popular spots like botanical gardens and college campuses (which often have beautiful landscaping) and look for spots that are off the beaten path. My primary consideration is light: I like spots with tall trees and even lighting, even if there aren’t flowers or fountains. Choose your locations so the emphasis in your images will be on the people, not their surroundings.
What camera is best for family portraits?
You can use almost any camera for family photos, but I recommend one with a large buffer and the option for a battery grip. The former will prevent you from wasting time waiting for your camera while photo opportunities slip by. The latter will give your camera enough battery power to last for hours, which means one less thing for you to think about during the shoot.
Do I need an expensive portrait lens?
No, but if the only lens you have is the kit lens that came with your camera, I would recommend at least investing in a single prime lens. A 35mm or 50mm lens won’t be expensive and can yield amazing results, especially for family photos.
The post 21 Family Portrait Ideas for Gorgeous Photos appeared first on Digital Photography School. It was authored by Simon Ringsmuth.
A Guide To Camera Lens And Humidity: Protecting your Equipment
11
Mar
Are you struggling to capture incredible shots in a humid atmosphere? This is the story of almost every photographer. If you have worked in sweltering temperatures, you might be familiar with the preparations and care your camera needs to prevent condensation. Humidity and your camera are rivals. Photographers need to store their cameras and lenses in an ideal storage humidity Continue Reading
Photodoto
How to Create Panoramas in Affinity Photo
10
Mar
The post How to Create Panoramas in Affinity Photo appeared first on Digital Photography School. It was authored by Kevin Landwer-Johan.

Want to create a stunning Affinity Photo panorama? It’s easier than you might think!
In fact, Affinity has a built-in, automated feature specifically designed to make creating panoramas easy and fun.
And in this article, I’m going to share with you the step-by-step process for both capturing and editing panoramas – so you can get beautiful results.
Let’s get started.

Nikon D800 | 105mm | f/8 | 1/640s | ISO 400
© Kevin Landwer-Johan
Taking photos for your Affinity Photo panorama
If you don’t have a lens wide enough to capture the vista before you or the skyscraper above you, then creating a panorama is a great option.
Panoramas are often made of wide scenes, but you can also create vertical panoramas of very tall subjects.
Alternatively, you can create an Affinity Photo panorama with images taken in a grid. That way, rather than making a wide or tall panorama, you can stitch together photos to capture an image both taller and wider than you could shoot with your widest lens.
Note that you can make a panorama of anything; it doesn’t have to be a wide or tall scene.

© Kevin Landwer-Johan
Hardcore pano photographers will insist a tripod is necessary. Personally, I prefer not to use one when I make panoramas, with one exception: when I need a slow shutter speed and want to keep my camera steady.
Include overlap
When you take photos for a panorama, you must include a reasonable amount of overlap from one image to the next.
Without this overlap, Affinity Photo can’t seamlessly stitch the photos together.
But how much overlap should you include? Generally, I’d recommend around 25% or 30% overlap for great results.
When I take photos for a panorama, I look at an element in each frame about 25% from the edge. I then include that element in the next frame (also about the same distance from the edge). As I move my camera across or up and down while taking pictures, I am careful to line up the non-joining edges as evenly as I can. Trying to keep a straight line helps to make a panorama that will crop well.
Using a standard focal length lens or longer is best. If you use a wide-angle lens, you will run into problems lining up the images due to edge distortion.

Nikon D800 | 75mm | f/4 | 1/125s | ISO 400
© Kevin Landwer-Johan
Affinity Photo panoramas: the basics
Once you have a series of photographs for your panorama, open Affinity Photo.
If your photos are in RAW format, edit the colors and tones so the images look their best. Try to give each photo similar tones and color temperatures, because if your photos are different exposures or color temperatures, this will be noticeable.
I generally create a resized set of images for each new panorama. I make sure to reduce the file size, especially when I’ve taken a lot of photos. This makes it easier for Affinity Photo to manage many files at once.
(If you leave your images at full size and full resolution, you’ll be waiting a long time for your panorama to render.)

Import photos for your panorama
Once you’ve resized and saved your photos, go to the top menu in Affinity Photo.
Select File>New Panorama. This will open up a dialog box.
Click on Add, then navigate to the folder where you saved your images for the panorama.

Select every file, then click Open. The photos will be imported into Affinity Photo.
Then select Stitch Panorama. Once you’ve clicked this, you will see a preview of your panorama on the right and the individual files on the left.

If there are any images that Affinity Photo cannot stitch with the others, they’ll appear below the preview.
Click OK. Affinity Photo will render your panorama and open it as a new document. This may take a while, depending on:
- The number of images you have
- How large each image is
- How powerful your computer is
Tweaking your panorama in Affinity Photo
Once your panorama is rendered, you will most likely have some blank space around it. There are a few ways you can edit this.
Cropping is the easiest. When you click on the Crop tool, a new menu bar will appear above your document. If you select the option to Crop to Opaque, Affinity Photo will automatically adjust the crop bounding box to exclude any areas that are blank.
You can also rotate your panorama if your horizon or verticals are not straight. And you can freehand crop your panorama.
Another option is to Inpaint Missing Areas. You’ll see an icon in the middle of your screen above your document (though you’ll need to deselect the Crop tool first; otherwise, the icon won’t be visible).
When you click Inpaint Missing Areas, Affinity Photo will use its AI technology to autofill the blank areas around your panorama. This works best when there is not much detail along the panorama edges.
As you can see in my example below, Affinity has managed to fill in the sky very well. But at the bottom, the inpainting is not good because there’s too much detail in the rice field:

With the Inpaint Missing Areas tool selected, click Apply. Affinity Photo will render your panorama and present it as a single image file.
For this example, I chose to use the automatic inpainting because it filled in the sky nicely. Once my panorama rendered, I then cropped the funky area from the bottom where Affinity did not extend the rice field well.

Creating Affinity Photo panoramas: conclusion
Affinity Photo panoramas are very easy to create, especially if you’re careful to add plenty of overlap when taking your photos.
If you haven’t tried creating a panorama, give it a go. Experiment with a simple series of images to start with. You can make a panorama with two to five photos to keep things less complicated. Then, once you have a feel for the process, start to include more images in each series.
Try using different focal lengths to see which you prefer. If you want to make a very detailed panorama, use a long lens and take lots of photos.
Remember, though: The more photos you include, the longer it will take to render your panorama!
Now over to you:
What types of panoramas do you want to create with Affinity Photo? Share your thoughts – and photos – in the comments below!
The post How to Create Panoramas in Affinity Photo appeared first on Digital Photography School. It was authored by Kevin Landwer-Johan.
You must be logged in to post a comment.