Category: Photography

  • The Best Black Friday Deals for Photographers in 2020

    The post The Best Black Friday Deals for Photographers in 2020 appeared first on Digital Photography School. It was authored by Jaymes Dempsey.

    If you’re looking for the best Black Friday and Cyber Monday deals for photographers, then you’ve come to the right place.

    We’ve put together a huge crop of discounts, from incredible savings on cameras, lenses, photography courses, photo editing software, and more.

    black friday deals for photographers in 2020

    We’ve even included a few coupon codes, so our readers can have access to the best exclusive deals on the internet.

    Here’s the bottom line:

    If you want to level up your photography, then you need to take advantage of these deals while they’re still available.

    So without further ado, let’s look at the current best Black Friday deals!

    You can click below to go directly to the product category you’re interested in:

    1. Special Deals and Courses
    2. Cameras
    3. Lenses
    4. Software

    Photzy’s Snap Cards (at 86% off!)

    Have you ever been out taking photos and wished you could have your training materials open in front of you? Or, better yet, for a photography expert to be standing next to you, giving you advice as you choose your settings and press the shutter button?

    Thanks to Photzy’s Snap Cards, it’s possible.

    black friday deals for photographers in 2020 Photzy Snap Cards

    Because the Snap Cards are designed by experts to do exactly that:

    Tell you what you need to know about photography – when you need to know it. Not when you’re sitting in your room reading about photography, but when you’re actually out in the field taking pictures.

    The Snap Cards consist of 44 printable cheat sheets, including all the key information about:

    • working with your camera
    • creating perfect exposures
    • arranging perfect compositions
    • photographing people
    • working with flash
    • and much more!

    They’re easy to read, they offer quick solutions in the field, and they’re wildly effective. But don’t take our word for it; here’s what Snap Card customers have said about this one-of-a-kind product:

    • “I printed the set and laminated them straight away, took the applicable sets on specific shooting sessions, as designed. They helped remind me of details I had forgotten over the years.” – John M.
    • “Easy way to access good information during the learning process. I really enjoy the cards and the other emails I have received since buying the cards! ” – Ryan S.
    • “These are excellent, well-paced tips. Good for both beginners and advanced photographers. These cards reinforce known facts and add a lot more.” – Dilip R.

    Normally, the Snap Cards cost $ 220 USD.

    But for a limited time, you can grab the Photzy Snap Cards at an insanely low price:

    Just $ 29 (or less than $ 1 per card).

    Oh, and here’s another little tidbit:

    Simply enter the code “BF20” during checkout, and you’ll get another 20% knocked off the price.

    So make sure you grab the Snap Cards at this ultra-discounted price while you still can. Because the deal certainly won’t last!

    Click here to get the Snap Cards at over 89% off, right now.

    Contrastly’s Decoding Lightroom Video Course (Just $ 49)

    If you’re looking to create stunning photography, then editing your images is essential. After all, editing is how you take a decent photo and turn it into a masterpiece.

    Unfortunately, learning to edit can be overwhelming. Many photographers give up before getting anywhere at all. And they never manage to make their photos shine.

    Fortunately, there’s an easy way forward:

    Contrastly’s Decoding Lightroom Video Course.

    It’s an instant-access online course, one that gives you everything you need to start editing your photos in Lightroom Classic (one of the most powerful photo editors on the planet!).

    Decoding Lightroom video course from Contrastly

    Simply sit back and watch as professional landscape photographer Adam Welch takes you through the ins-and-outs of Lightroom, explaining everything you need to know – from making colors stand out to making details pop to exporting your photos for printing. There are over five hours of videos, plus several helpful bonuses including Lightroom presets (for one-click edits that will instantly improve your photos).

    Normally, you pay $ 129 for this course.

    But for the next few days only, you can get it at over 50% off, for just $ 49.

    To grab Decoding Lightroom before the deal disappears, just click here.

    So get the course. Try it out. Once you’ve mastered editing in Lightroom, your photos will never look the same again.

    Also note that Contrastly’s other products, including The Lightroom Mastery eBook and The Cameras in the Wild eBook, are also over 50% off during the Black Friday period, so I highly recommend you check them out.

    Capture Landscapes’ Into the Light Landscape Photography Course (Over 24% Off!)

    Do you wish you could take stunning landscape photos, day in, day out?

    That’s what Capture Landscapes’ Into the Light landscape photography course will show you how to do.

    Into the Light offers 9+ hours of instantly-downloadable video content, instructing you on camera settings, composition, gear, and more.

    black friday deals for photographers in 2020

    It even includes several post-processing videos, so you can learn how expert landscape photographers edit their images (and so you can start editing your photos like an expert, too!).

    Plus, you get a whole bunch of bonuses, including vlogs, membership to a private Facebook group, and RAW landscape files to practice on.

    The course is taught by the incredible William Patino, one of the best landscape photographers in the world – so don’t miss this opportunity to learn from a master.

    While Into the Light generally goes for $ 169, it’s currently available for $ 127, at over 24% off.

    You can purchase it here.

    Also note that Capture Landscapes is currently offering a host of other Black Friday discounts, so make sure you check out their other courses and eBooks!

    All Visual Wilderness Learn to Shoot Courses (50% Off)

    Visual Wilderness offers nature photography tutorials by some of the best photographers around, which will show you how to:

    • use slow shutter speeds for breathtaking results
    • create jaw-dropping colors, consistently
    • nail focus (so your images are tack-sharp)
    • use your camera’s aperture setting to take your photos to the next level

    And much, much more! There is literally days of nature photography video content just waiting to be watched, designed for beginners and advanced photographers alike. So why not take this opportunity to improve your photos?

    Visual Wilderness video courses

    For the next few days, dPS readers can get any of the Visual Wilderness Learn to Shoot video tutorials for 50% off. At checkout, simply enter the code “dps50” to claim your discount, and gain access to some of the most valuable nature photography instruction available today.

    To see the Visual Wilderness Learn to Shoot courses, and to claim your 50%-off discount, click here.

    SLR Lounge Premium Membership (28% Off)

    If you’re interested in portrait photography, creative photography, engagement photography, or artificial lighting of any kind, then you need to take a look at SLR Lounge’s video courses.

    Peek at the course catalog, and you’re bound to see something you’d love to watch. For instance, there are workshops on posing, headshot photography, flash photography, and much more. 

    black friday deals for photographers in 2020 SLR Lounge

    Each course offers hours upon hours of high-quality, practical advice – which will jumpstart your photography and get you shooting on a whole new level, fast. 

    Now, you can purchase the courses individually; each one goes for around $ 100. 

    Or you can grab a Premium membership, which gives you access to all SLR Lounge courses. Normally, you pay $ 348 for a 12-month membership – but, as part of the SLR Lounge Black Friday sale, you can currently purchase a 12-month membership for $ 248. 

    Alternatively, you can buy a 6-month membership for just $ 178 or a lifetime membership for $ 598 (note that these two memberships aren’t available at other times of the year).

    So click here to start your SLR Lounge photography education!

    Cameras and Camera Bundles

    Black Friday always comes with stellar camera deals, and this year is no exception.

    While there are too many excellent camera discounts to list, here are a few that we think you’ll really love:

    Canon EOS M50 With 15-45mm Lens (15% Off on Amazon)

    The Canon EOS M50 is one of Canon’s most eye-catching mirrorless cameras, offering great handling, beautiful images, and 4K video – all in a tiny package. It’s perfect for photographers aiming to upgrade from their point-and-shoot models, as well as anyone looking for an affordable entry into mirrorless.

    Canon EOS M50

    Thanks to the articulating screen and the recording capabilities, the Canon EOS M50 is also an excellent choice for vloggers, especially those that aim to shoot a mix of videos and photos.

    Plus, in addition to a handful of EF-M lenses, Canon sells an adapter that lets you use the entire suite of EF lenses.

    Not bad for an inexpensive mirrorless camera, right?

    So if you want a nice little camera that packs quite the punch, give the EOS M50 a try. It’s currently selling at 15% off with a 15-45mm kit lens, which puts the price at just $ 549 on Amazon.

    Canon EOS RP With 24-105mm Lens (29% Off on Amazon)

    The Canon EOS RP is Canon’s cheapest full-frame mirrorless camera, but don’t let that fool you; it can go toe-to-toe with models that cost far more, thanks to its powerful image sensor (26 MP), fully-articulating screen, and 4K video capabilities.

    Canon EOS RP

    For those who are thinking of going full-frame but aren’t sure where to start, the EOS RP is a perfect choice. Or if you’re a Canon user but haven’t made the jump to mirrorless, this EOS RP package has got you covered.

    After all, you get the powerful EOS RP, plus the ultra-useful 24-105mm lens, which is perfect for all kinds of shooting (from street photography to landscape photography to walkaround photography and more).

    So grab the Canon EOS RP plus the 24-105mm f/4-7.1 while it’s still on sale, because you can get it for an ultra-low $ 999 on Amazon!

    Sony a6000 With 16-50mm and 55-210mm Lenses (15% Off on Amazon)

    Are you thinking about getting your first mirrorless camera?

    If so, then I highly recommend you consider this Sony a6000 package, which gives you everything you need to get started in mirrorless photography.

    black friday deals for photographers in 2020

    It offers a compact body, an electronic viewfinder, and excellent image quality, plus you get two highly-useful lenses. The 16-50mm is perfect for sweeping landscape and wider portrait photography, while the 55-210mm is the better option for tighter portraits, action photography, and the occasional street shot.

    Usually, the Sony a6000 bundle goes for $ 999, but you can currently grab it for just $ 848 on Amazon.

    Sony a7 III (15% Off on Amazon)

    The a7 III is one of Sony’s most popular professional cameras, combining outstanding low-light capabilities, in-body image stabilization, class-leading autofocus, a 24 MP sensor, and 4K recording capabilities into one ultra-powerful package.

    black friday deals for photographers in 2020

    If you’re looking for a standout full-frame mirrorless camera that can do just about anything, the Sony a7 III is a great choice.

    And it’s currently available for 15% off on Amazon, at just $ 1698 (versus the usual $ 1998).

    Sony a7R IV (14% Off on Amazon)

    The Sony a7R IV is a resolution monster, packing 61 megapixels into its gorgeously crafted full-frame sensor. It also includes a stunning electronic viewfinder, excellent autofocus, and a line of brilliant lenses that you won’t want to miss.

    black friday deals for photographers in 2020

    If you’re a landscape photographer or a commercial photographer in need of mind-blowing levels of detail, then the Sony a7R IV is the perfect pick, especially at its current discounted price:

    $ 2998, versus its normal $ 3499 price tag.

    Nikon Z50 Plus a 16-50mm Lens (10% Off on Amazon)

    The Nikon Z50 is a user-friendly, high-performing APS-C mirrorless model from Nikon, perfect for photography beginners, casual photographers, and Nikon DSLR users looking to upgrade.

    Nikon Z50

    While the Nikon Z50 doesn’t include any true standout features, you get a very respectable 20 MP sensor, 4K video, a tilting touchscreen, and decently-fast shooting speeds.

    And there’s also the 16-50mm lens, which offers a nice range of wide-to-standard focal lengths, so you can smoothly shoot landscapes, portraits, street photos, and much more.

    Grab the Nikon Z50 plus the 16-50mm kit lens for just $ 896 on Amazon, down from its usual $ 996 price.

    Fujifilm X-T30 With 15-45mm Lens (10% Off on Amazon)

    The Fujifilm X-T30 is one of the best APS-C cameras to debut in recent years, and that’s saying something; Fujifilm managed to combine a beautiful design, a great shooting experience, excellent autofocus, and blazing-fast shooting speeds for a do-it-all camera that you won’t be able to put down.

    Fujifilm X-T30

    If you’ve never tried a Fujifilm camera before, you’re going to be in for a treat. Honestly, it doesn’t matter if you’re a beginner, an enthusiast, or a professional – as long as you’re a fan of the retro design, then you’re going to love this model.

    The Fujifilm X-T30 normally sells for $ 899 – but you can currently purchase it, with the excellent 15-45mm kit lens, for just $ 799 on Amazon.

    Lenses

    These are some of the best Black Friday lens deals that you’ll come across:

    For Canon

    • Canon EF 70-200mm f/2.8L USM (7% off for $ 1249 on Amazon)
    • Canon EF 40mm f/2.8 STM lens (10% off for $ 179 on Amazon)
    • Canon EF-S 10-22mm f/3.5-4.5 USM (34% off for $ 429 on Amazon)
    • Canon EF 17-40mm f/4L USM (25% off for $ 599 on Amazon)
    • Rokinon 35mm f/1.4 for Canon (15% off for $ 339 on Amazon)

    For Sony

    • Sony 70-200mm f/2.8 GM (5% off for $ 2398 on Amazon)
    • Sony FE 50mm f/1.8 (20% off for $ 198 on Amazon)
    • Sony 35mm f/1.8 (11% off for $ 423 on Amazon)
    • Sony 16-35mm f/2.8 (9% off for $ 1998 on Amazon)
    • Tamron 28-75mm f/2.8 for Sony (9% off for $ 799 on Amazon)

    For Nikon

    • Nikon AF-S 70-200mm f/2.8E VR (19% off for $ 1896 on Amazon)
    • Nikon AF-S 14-24mm f/2.8G ED (23% off for $ 1347 on Amazon)
    • Nikon Z 14-30mm f/4 S (15% off for $ 1097 on Amazon)
    • Nikon AF-S 28-300mm f/3.5-5.6G VR (11% off for $ 847 on Amazon)
    • Sigma 35mm f/1.4 ART for Nikon (27% off for $ 656 on Amazon)

    For Fujifilm

    • Fujifilm XF 16-55mm f/2.8 (25% off for $ 899 on Amazon)
    • Fujifilm XF 55-200mm f/3.5-4.8 (29% off for $ 499 on Amazon)
    • Fujifilm XF 50-140mm f/2.8 (19% off for $ 1299 on Amazon)

    For Panasonic

    • Panasonic Lumix 45-150mm f/4-5.6 (41% off for $ 148 on Amazon)
    • Panasonic Lumix 35-100mm f/2.8 (18% off for $ 898 on Amazon)

    Software

    Every year, the Black Friday software deals just seem to get better and better. Check out the incredibly low prices on these powerful editing programs:

    ACDSee

    ACDSee Photo Studio Ultimate 2021 is an all-in-one post-processing program, offering cataloging, basic editing, and advanced editing in a single package. You get all the power you expect from a serious Lightroom competitor, plus the streamlined workflow that comes from using a single image editor with dozens of capabilities.

    ACDSee Photo Studio Ultimate 2021

    If you’re looking to enhance your images with post-processing and you’re tired of the hassle of going between Lightroom, Photoshop, and various plugins, then ACDSee is a fantastic choice – one that’s currently available for a fantastic low price. 

    Currently, you can buy the ACDSee Photo Studio Ultimate 2021 with ACDSee’s Luxea Video Editor for just $ 109.95 (normally priced at $ 229.98).

    So don’t miss out on this excellent Black Friday opportunity from ACDSee; make sure to grab your Photo Studio Ultimate 2021 package before the deal disappears.

    Adobe Creative Cloud

    We all know Adobe’s products, but did you know that you can currently purchase Lightroom, Photoshop, and all the other Adobe CC apps for 25% off, at just $ 39.99 per month?

    The deal includes both versions of Lightroom – CC and Classic – as well as Adobe’s industry-standard video editing apps, graphic design apps, and more. 

    Adobe Creative Cloud

    If you’ve been on the fence about going all-in with an Adobe subscription, then now is the time to do it. Lightroom Classic is amazing, Lightroom CC is beautifully built, and Photoshop is on another level entirely. Plus, the video apps you’ll get as part of the full Creative Cloud subscription are perfect for vloggers, YouTubers, and videographers of all stripes. 

    So start taking your photos – and videos – to the next level, today. Click here to get your Adobe CC subscription!

    ON1 Photo RAW 2021

    ON1 Photo RAW 2021 is an easy-to-use, feature-packed alternative to Adobe Lightroom Classic. It combines streamlined image organization with pretty much all of Lightroom Classic’s editing functionality, plus a beautiful interface to boot.

    ON1 Photo RAW Black Friday deal

    There are die-hard Lightroom fans out there who won’t want to consider ON1 Photo RAW, but the fact is that the software is genuinely great. ON1 Photo RAW 2021 is a pleasure to use, mostly because it just feels right, thanks to ON1’s focus on user experience over advanced editing functions. 

    ON1 Photo RAW 2021 could easily take the place of Lightroom, and it’s way cheaper, too: 

    Normally $ 99.99, and now – thanks to Black Friday – just $ 79.99. So click here for the deal!

    Oh, and for those who are interested in really taking your ON1 Photo RAW 2021 software to the next level, you can also grab the ON1 Professional Plugin Bundle (including ON1 HDR, ON1 Resize, ON1 Effects, and ON1 Portrait AI) for just $ 59.99.

    Affinity Photo

    Affinity Photo Black Friday deals

    These days, Serif’s Affinity Photo is the most popular Photoshop alternative available. It goes toe-to-toe with Adobe’s advanced photo editor in pretty much every way, packing an incredible amount of power for a surprisingly cheap price ($ 50).

    And that cheap price just got even cheaper, thanks to Serif’s Black Friday sale, which makes Affinity Photo available for an ultra-low $ 34.99.

    Honestly, I can’t think of any reason you shouldn’t buy Affinity Photo at that price. At the very least, I recommend you grab the free trial to see what you think, because the program truly is exceptional.

    You can purchase Affinity Photo, or download the free trial, right here.

    The Best Black Friday Deals for Photographers: Conclusion

    I encourage you to grab these great discounts while they still exist. 

    Because while there are plenty of amazing deals, they won’t stick around for long. Pretty soon, Black Friday will be over and prices will go back to normal.

    So take advantage of these deals while you still can!

    Know of any fantastic Black Friday deals for photographers that we missed? Share them in the comments!

    The post The Best Black Friday Deals for Photographers in 2020 appeared first on Digital Photography School. It was authored by Jaymes Dempsey.


    Digital Photography School

  • Lightroom Color Grading: An Easy Way to Supercharge Your Photos

    The post Lightroom Color Grading: An Easy Way to Supercharge Your Photos appeared first on Digital Photography School. It was authored by Simon Ringsmuth.

    The October 2020 update to Lightroom Classic introduced a feature called Color Grading, which puts an advanced color-correction tool in the hands of everyone who uses Lightroom.

    For newcomers who have never tried this technique, it can feel a bit overwhelming.

    But with a bit of practice, you’ll get the hang of Lightroom color grading in no time at all. And you’ll be able to give your photos the Hollywood treatment you never knew you could achieve!

    young man portrait
    Nikon D7100 | Nikon 85mm f/1.8G | 85mm | 1/2000s | f/1.8 | ISO 200

    What is color grading?

    While color grading is often associated with film productions, it applies to photography just as easily.

    Color grading refers to the process of changing global attributes of an image to give it a specific look or feel. It’s a subjective, stylistic process that can involve many different types of edits, but generally involves changing the appearance of the highlights, shadows, and midtones of a picture. This allows a photographer to create a mood or tone, and convey a certain emotion to the viewer.

    In a strict sense, any stylistic adjustments to an image could be considered color grading. Adjusting the HSL/Color panel or tweaking the tone curve are both valid color grading techniques.

    However, when most editors talk about color grading, they are referring to the way a specific tint is applied to the shadows, highlights, and midtones.

    A common color grading technique in movies, for instance, involves giving shadows a teal color and making midtones more orange. This gives a more intense, cinematic feel to films and the same is true for photos.

    kids walking without color grading
    Nikon D750 | 200mm | f/2.8 | 1/250s | f/2.8 | ISO 220. Ungraded.
    kids walking with color grading
    The same image as above, but with color grading applied in Lightroom. The shadows are slightly more teal, the highlights are slightly more yellow, and the midtones are just a bit more orange.

    Color grading vs split toning

    The Color Grading tool replaces a tool called Split Toning, which was available as its own panel in the Develop module in earlier versions of Lightroom.

    Split Toning was like a beta version of Color Grading, in that it let users adjust the tint of shadows and highlights, but not the midtones. While this was certainly useful, the omission of midtone editing was a frustrating sore spot that dramatically limited the value of the tool.

    Lightroom color grading split toning
    The Lightroom Split Toning panel, which let users adjust the hue and saturation of only the highlights and shadows. The Color Grading tool does everything that Split Toning did and much more.

    Color Grading contains all the functionality of Split Toning – and much more. In fact, any photos that were edited using Split Toning will have their adjustments completely intact thanks to the Color Grading tool.

    In addition to midtone editing, the Color Grading tool introduces the vastly more useful color wheels in place of linear sliders:

    Lightroom Color Grading panel

    The Lightroom Color Grading tool: a step by step guide

    While the color grading tool has incredible depth, accessing it and getting started could hardly be easier.

    Open Lightroom and click on the Develop module.

    Then open the Color Grading panel on the right side, and you’re all set.

    The Lightroom Color Grading panel consists of three color wheels in the middle, a line of icons at the top, and two sliders at the bottom. Each of the color wheels lets you change the tint of its respective range: midtones, shadows, and highlights.

    Lightroom Color Grading panel

    Click and drag anywhere on one of the color wheels and you will immediately see the edit applied to your image. As you drag the slider, note that the distance from the center adjusts the saturation of the color grade, while the position of the slider around the circle adjusts its hue.

    You can also click and drag the inner circle to adjust only the saturation and use the outer circle to adjust the hue. The slider at the bottom can be used to change the overall luminance of the midtones, shadows, or highlights, depending on which color wheel you are using.

    Lightroom Color Grading panel
    You can also hold the Shift key to adjust only the saturation, or Ctrl/Cmd to adjust only the hue.

    Click and hold the eye icon just below and to the right of a color wheel to temporarily remove the tint adjustment, and then release the mouse button to re-engage the adjustment. Double-click anywhere inside a color wheel to reset the tint if you want to start over.

    The Blending slider at the bottom of the Color Grading panel lets you adjust how much the midtones, shadows, and highlights blend together.

    The Balance slider lets you customize the overall balance of highlights and shadows; values greater than 0 make the highlight edits more pronounced, while values less than 0 increase the presence of the shadow edits.

    Lightroom Color Grading blending balance
    Move Blending to the left to keep your shadows, midtones, and highlights separate from each other. Move Blending to the right to make your edits blend in with one another. Slide Balance to the left to make your edits to the shadows apply to more of the image. Slide it to the right to make your highlight edits more prominent. Or just leave these sliders alone and you’ll probably be just fine.

    Look closely at the top of the Color Grading panel and you will see a strange-looking row of circular icons. The first appears to be some kind of alien hieroglyph, while the rest look like circles with different shading patterns. These switch between the different modes within the Color Grading panel.

    The first icon, with three small circles, shows all three editing options at once: Highlights, Midtones, and Shadows. The others let you adjust a single parameter at a time. The final icon is a global Hue/Saturation/Luminance adjustment.

    Lightroom Color Grading panel
    These icons let you switch between editing highlights/shadows/midtones at once and editing each one individually. The final circle is a global Hue/Saturation/Luminance adjustment.

    If you want more fine-tuned adjustments, you can click on one of the icons that show a much larger version of any of the three adjustment parameters. This can help you select your adjustments with pinpoint accuracy and give you greater control over precisely how your edits are implemented.

    How to use the Color Grading tool for great results

    As you make adjustments, keep in mind that there is no one correct way to use the Color Grading panel. It’s merely another tool in your arsenal to help you get your images looking the way you want.

    That being said, if you want to get your feet wet but aren’t sure how to start, let’s walk through a color grading edit so you can see firsthand how it can be used to give your pictures an extra bit of punch and visual impact.

    kids running in an alley with no color grading
    Nikon D7100 | Nikon 50mm f/1.8G | 50mm | 1/180s | f/4.0 | ISO 1250. Original photo without any color grading applied.

    For a scene like the one above, with a lot of tonal variety, I like to start by editing the shadows first. Rather than using the all-in-one adjustment option with all three circles showing, I prefer to use the larger circles to edit each parameter individually. I like the fine-grained control this gives me.

    I recommend you start by adjusting the Luminance slider, which will make the darkest portions of the image even darker when pushed to the left, or brighter when pushed to the right. For this example, I’m going to make shadows punchier by decreasing the luminance.

    Lightroom Color Grading panel

    Then click and drag on the color wheel to add a teal tint to the shadows; this will start to give the photo a more cinematic feel. Your shot might look a little weird with only the shadows adjusted, but it will come together after you customize the highlights and midtones.

    kids running in an alley
    Color grading applied to the shadows.

    Next, click the Highlights option and adjust the Luminance slider to make the brightest portions of the photo lighter or darker. Some people prefer to adjust the Luminance before doing any color editing, but this is up to you.

    Once you have the Luminance adjusted, click on the wheel to add a bit of orange. This will make the brightest portions of the image really stand out from the darkest portions of the image, since teal and orange are on opposite sides of the color wheel.

    Lightroom Color Grading panel

    At this point, the example image is starting to come together. It has a grittier, cinematic feel compared to the original, thanks to a touch of teal in the shadows and orange in the highlights.

    kids running in an alley

    After the highlights and shadows are edited, head to the Midtones wheel to give your image a warmer or cooler feel overall. Instead of changing the appearance of the brightest or darkest portions of your image, the Midtones wheel affects everything between those two extremes.

    Midtone adjustments are useful for giving your entire picture more of a warm or cool feeling. Adjust the Luminance slider, then click and drag the dot to orange or red to make your photo warmer, or blue to make it cooler.

    Lightroom Color Grading panel

    At this point, the image is nearing completion, and you can see the results below. It’s a far cry from the original, which feels flat and boring by comparison.

    Lightroom Color Grading kids running alley
    The shadows, highlights, and midtones have been adjusted. But the image isn’t quite done yet.

    After editing the shadows, highlights, and midtones, it’s time to tweak the Blending and Balance sliders.

    As I explained above, blending refers to how much each of the three parameters stays within its own range. It has a default value of 50, which results in a relatively smooth color grade overall.

    Sliding Blending to the left means the edits to shadows are confined almost exclusively to the darkest portions of the shot, and the edits to the highlights are confined almost exclusively to the lightest portions of the shot. A balance of 0 essentially makes each of the edits stay in its own lane and not affect the rest of the picture. And bringing the Balance slider to the right will increase how much each tonal area overlaps with one another. The result is often quite subtle, but can have a noticeable impact when applied carefully.

    Lightroom Color Grading kids running alley
    Blending set to 0 after the shadows, highlights, and midtones were edited. The difference is most noticeable in the sidewalk.

    Now, the Balance slider determines how much of the picture is treated as shadows and how much is treated as highlights. Moving the slider to the left takes whatever adjustments you made to the shadows and applies them to more of the picture overall. The same happens to the highlight edits when you move the slider to the right.

    If you have applied a certain tint to the shadows but want that tint to affect more of the picture, move the Balance slider to the left. Likewise, if you want your highlight adjustment to apply to more than just the brightest portions, adjust the Balance slider to the right.

    kids running in an alley
    Balance set to -54. The teal colors in the shadows now bleed over to much more of the rest of the picture.

    Tips and tricks for Lightroom color grading

    The key to color grading is to remember that there is no one magic solution. Don’t think of color grading as a search for the right way to adjust your image, but as a doorway to infinite possibilities that can be used however you see fit.

    The best way to learn about color grading is to click around on the color wheels and experiment on your own. Lightroom is non-destructive, so you can always revert back to your earlier image. And in the meantime, you just might find a new way to edit your pictures that you never thought of before.

    sunset on a lake without color grading
    Fujifilm X100F | 23mm | 77 seconds | f/16 | ISO 200. Edited, but not color graded.

    That being said, these tips will send you on your way to improving your color grading skills:

    • Edit your image to have an even exposure prior to using the Lightroom Color Grading tool. Use the Basic panel for highlights/shadows adjustments.
    • Give your shadows a richer look by adjusting them to be teal, blue, or purple
    • Contrast the highlights with the shadows by making them yellow, orange, or red
    • Adjust the midtones a little, but not too much. The midtones should complement the highlights and shadows, not compete by standing out.
    • For subtle tweaks, use the Blending slider to control how your graded colors meld together
    • Click the eye icon next to one of the color wheels to toggle between a before and after view
    Sunset on a lake with color grading
    The same image as above, but color graded. The shadows are blue, the highlights are orange, and the midtones are yellow-orange.

    Lightroom color grading: conclusion

    You should now have enough to get started with Lightroom color grading. Just remember that the goal here is the same as it is with most editing: You want to end up with an image you like! Color grading is just another tool you can use to make that happen.

    Lightroom is a non-destructive editor. That means you can always undo your changes, so experiment with color grading as much as you want. And feel free to share your before and after images in the comments below!

    The post Lightroom Color Grading: An Easy Way to Supercharge Your Photos appeared first on Digital Photography School. It was authored by Simon Ringsmuth.


    Digital Photography School

  • A Guide to Repairing Camera Lens Scratches

    That feeling when you take the lens cap off to reveal a scratch. How did that get there? When did that happen? Is it going to affect my photos? These are just some of the questions that will no doubt run through your head should you find yourself in this situation. Cameras and their lenses are expensive pieces of equipment Continue Reading

    The post A Guide to Repairing Camera Lens Scratches appeared first on Photodoto.


    Photodoto

  • How to Shoot in Low Light – 9 Commonly Asked Questions

    The post How to Shoot in Low Light – 9 Commonly Asked Questions appeared first on Digital Photography School. It was authored by Bruce Wunderlich.

    low light photography moon rise
    This image of a moonrise over Marietta, Ohio was taken 20 minutes after sunset during the blue hour; the sun had set and the sky was a dark blue. The city lights create a great warm glow over the city.

    According to British photojournalist Donald McCullin, “There is no such thing as bad light, just misunderstood light.” Yet many photographers still consider low light to be bad light.

    The purpose of this article is to encourage you to not consider low light as inferior or unusable, but to instead look for subjects that work well with the available low light. Shooting in low light can often be a struggle, however, which is why I’ll answer nine of the most frequently asked questions about low light photography.

    Keep in mind that low light photography is not exclusively night photography. Low light photography opportunities may appear at any time of the day.

    For instance, shooting waterfalls in low light allows you to use a slow shutter speed, prevents overexposure of the white water of the falls, and helps you create a beautiful silky effect (by blurring the moving water).

    Using a flash will light up any subject, of course, but let’s take a look at how to improve your photography in naturally-occurring low light.

    Low light photography FAQs

    low light photography bridge
    Low light creates very dramatic scenes. Dark storm clouds turned this potential sunrise into a great low light opportunity.

    1. My low light images are blurry. Would a better lens alleviate the blur?

    The short answer to this question is, “Yes.” A fast lens with a maximum f-stop of f/1.8, for instance, will give you better results than a kit lens with a maximum f-stop of f/3.5 or f/5.6. 

    But even the faster, more expensive lenses will give you undesirable results if you’re using the wrong settings. You see, the wider aperture opening on fast lenses allows you to use a faster shutter speed, which helps you capture a sharper image – but unless you dial in the correct shutter speed, your shots will often turn out blurry anyway!

    Lenses with larger maximum apertures are called “fast” because they allow you to shoot with faster shutter speeds, thanks to the additional light that enters your camera through the bigger aperture opening.

    2. What are the best camera settings for shooting in low light?

    These are the best low light camera settings:

    Manual mode

    Shooting in Manual mode is essential for successful low light photography, as it allows you to control every functional aspect of your camera.

    Once in Manual mode, you basically have three ways to get more light onto your camera sensor:

    • Shutter speed
    • Aperture
    • ISO

    These three controls are together called the exposure triangle, and each of the settings can have a positive or negative result on your image’s exposure.

    Therefore, learning how to use shutter speed, aperture, and ISO for the best result is the key to low light photography.

    Note that your in-camera light meter will reveal where adjustments should be made to the camera settings, and well-exposed images will be the result.

    Shutter speed

    If you are shooting handheld, a good rule of thumb is to set your shutter speed to match the reciprocal of your focal length.

    For example, if you are shooting at 50mm, your shutter speed shouldn’t be any slower than 1/50s. Of course, if the subject of your photo is moving, then you will need to increase your shutter speed to freeze the action. Because while choosing a slower shutter speed will allow more light into your camera, you’ll also risk getting a blurry result.

    low light photography great blue heron
    A great blue heron in a fight was the subject of this low light image. I shot this at 1/250s, f/5.6, and ISO 1250. Using a combination of a slower shutter speed and a higher ISO, I was able to create the blurry wings while panning to match the speed of the fight.

    Aperture

    In most low light situations, you will probably need to shoot with your aperture wide open.

    But if there is enough light to shoot with a smaller f-stop, you’ll get an increased depth of field.

    So here’s what to consider:

    Choosing a wider aperture will let more light into your camera, but will decrease your depth of field. And this could lead to an important part of your image being out of focus.

    So what should you do?

    Generally, it’s better to risk an out-of-focus shot than to guarantee a blurry one – so, if necessary, widen that aperture!

    ISO

    The higher the ISO, the brighter the resulting shot.

    But there’s an important trade-off here:

    The higher the ISO, the more digital noise you’ll be adding to your image.

    So keep your ISO as low as possible, and only increase your ISO after you have decreased your shutter speed and widened your aperture.

    Shoot in RAW

    For the best results, shooting in RAW is recommended.

    This is for one simple reason: Your camera will save more shadow detail in RAW format compared to the compressed JPEG format.

    Also, it is very helpful to learn how to check your histogram; that way, you don’t have to just rely on what you see on your camera’s LCD screen. Use the histogram to check your exposure, and avoid clipping the highlights and shadows.

    black and white beach house
    I used the low light at Huntington Beach, California to create this black and white image with a five-second exposure.

    3. How do I take low light action shots?

    Shooting action in low light can be very challenging, and it is almost always going to require you to shoot with your aperture at its widest setting.

    Once your aperture is set, adjust your shutter speed to match the action you are trying to freeze. Of course, depending on the situation, there may simply not be enough light. If that is the case, adjust the ISO to a higher setting until a good exposure is set. If your ISO setting is so high that you are getting an unacceptable amount of digital noise, you have two options:

    Either add light with a flash or some other source, or live with the noise and try to remove some of it in post-processing.

    Sometimes, with the noise issue, it comes down to getting the shot with noise versus not taking the shot at all.

    4. How do I reduce the digital noise level in low light images?

    The simple answer to this question is to shoot at the lowest ISO that you can. But it is also a good idea to know the ISO at which your camera produces noise that you consider unacceptable.

    And always make sure your exposure is correct. Even at a low ISO, if your image is underexposed, you will have some noise in the shadow areas.

    long exposure waterfall
    A cloudy day at Blackwater Falls, West Virginia allowed for a long exposure without blowing out the highlights.

    5. How do I focus in low light?

    Another reason for blurry images in low light is the fact that some cameras just aren’t manufactured to focus properly with less light.

    So what should you do?

    Try shining a light on your subject to give your camera enough light to focus. You can also use your lens’s focusing ring to fine-tune your focus.

    Focusing via the central AF point may also help, as it usually focuses faster and more accurately than surrounding AF points.

    6. How can I take pro-like images in low light?

    Here are four things that most pros do in low light:

    1. Use a tripod
    2. Shoot in RAW
    3. Shoot in Manual mode
    4. Use the histogram
    low light photography silhouette
    Low light makes for great silhouettes!

    7. How do I choose the best white balance for low light?

    Set your white balance to match your environment:

    • Tungsten for photographing indoors with light from a regular lightbulb
    • Fluorescent for light from fluorescent bulbs
    • Cloudy for low light created by an overcast day
    • Shade for shooting in a shaded or shadowy area

    One thing to remember:

    If you are shooting in RAW, you can adjust your white balance later in post-processing.

    But if you are shooting JPEGs, it is very important to get your white balance correct in-camera. For this reason, if your camera is set to capture JPEGs, you should not use the automatic white balance function. White balance is hard, and sometimes impossible, to correct later in a JPEG.

    8. Should I raise my ISO or lower my shutter speed in low light?

    Assuming that you are shooting with your aperture wide open, in most situations this is an easy one to answer:

    Adjust your shutter speed!

    And only raise your ISO as a last resort.

    Remember that raising your ISO is going to add more noise into the image.

    Now, most new DSLRs do a much better job with noise levels at higher ISO settings. But as I mentioned earlier, it is a good idea to know what noise levels are unacceptable, and what ISOs these correspond to. In situations where your subject is moving, it may become necessary to boost the ISO to keep your shutter speed fast enough to freeze the action.

    fall scene with fog
    Fog created the low light conditions in this fall image.

    9. Why aren’t my low light shots sharp even when I use a tripod?

    Remember that, in most low light, you will be shooting with your aperture wide open (or nearly so).

    Hence, your depth of field will be very shallow (which can lead to blurry results).

    So be extra careful to lock your focus (you can even try back-button focus) on the part of your scene that needs to be in sharp focus.

    Case in point:

    When shooting a low light portrait, it is important to have the subject’s eyes in focus. So focus on the eyes!

    Also, if your subject is moving, increase your shutter speed until the subject is frozen by your camera. And when shooting with a tripod, make sure your camera’s image stabilization is turned off, because it can actually create blur!

    10. A bonus tip

    In low light, the LCD screen on the back of your camera is going to look very bright – and this will give you an inaccurate sense of your photo’s exposure.

    So if your camera has an adjustment for the brightness of your LCD screen, turn it down. You want to ensure your image will not seem overly bright when you view it!

    low light photography

    How to shoot in low light: conclusion

    The trick to low light photography is to take control of your camera, and know that every action or setting will have a reaction.

    Now, how is that different from photography in any other type of light?

    It’s not, really. Just consider photography in low light as an opportunity to be creative.

    Now over to you:

    What subjects do you like to shoot in low light? And do you have any low light shooting tips? Share your thoughts in the comments!

    The post How to Shoot in Low Light – 9 Commonly Asked Questions appeared first on Digital Photography School. It was authored by Bruce Wunderlich.


    Digital Photography School

  • Nikon Will Offer 27 Z Mount Lenses Before 2022 Is Out

    The post Nikon Will Offer 27 Z Mount Lenses Before 2022 Is Out appeared first on Digital Photography School. It was authored by Jaymes Dempsey.

    Nikon Z mount lenses

    Nikon’s Z lens roadmap has expanded substantially over the past two years – and the company’s most recent roadmap update promises a total of 27 Z-mount lenses before the close of 2022.

    It’s a clear sign that Nikon is devoted to their mirrorless system, which debuted just over two years ago with the Nikon Z7 but has remained limited in both camera and lens selection. But while a complete set of lenses is a long way off, it’s nice to know that Nikon is willing to dig in and create a mirrorless lineup that will eventually compete with the current heavy hitters.

    So what lenses can you expect from Nikon over the next couple of years?

    The existing set of Z mount lenses already offers a lot of the basics (note that this includes lenses coming out over the next couple of months):

    • A handful of fast primes and zooms for professional and amateur portrait shooters, including the 50mm f/1.2, the 35mm f/1.8, and the 24-70mm f/2.8
    • A few cheaper zooms, such as the 50-250mm f/4.5-6.3, the 24-200mm f/4-6.3, and the 16-50mm f/3.5-6.3
    • Some excellent glass for landscape photographers, including a 24-70mm f/4, a 70-200mm f/2.8, and a 14-24mm f/2.8

    However, despite a core set of strong Z mount options, Nikon has failed to offer a few “standards,” including a faster 85mm lens (e.g., an 85mm f/1.4), as well as a 70-200mm f/4 (for hobbyist landscape photographers, among others). The Z-mount lineup continues to lack lenses for specialized shooters, as well – such as super-telephoto primes and zooms, plus a macro lens or two.

    Which is where the Nikon Z mount roundmap comes in.

    While the roadmap doesn’t address all of these gaps, it does promise a number of powerful lenses, including:

    • A 24-105mm lens
    • An 85mm lens (likely an f/1.4 version!)
    • Both a 50mm and a 105mm macro lens
    • Four super-telephoto lenses, including a 200-600mm zoom, a 100-400mm zoom, a 400mm prime, and a 600mm prime

    If you’re a bird, wildlife, or even sports photographer, then Nikon’s Z system is going to become a lot more appealing over the next couple of years, as Nikon fills in its super-telephoto gap (with a 200-600mm and a 100-400mm option, no less!).

    The same is true for macro photographers, who will pounce on Nikon’s 105mm micro lens (though I do wish Nikon would offer a 180mm or 200mm Z mount macro lens; maybe it’ll be added to a future roadmap).

    Regardless, Nikon’s Z system is becoming more and more well-rounded – and the addition of these lenses will simply broaden its appeal.

    Now over to you:

    What upcoming Z mount lenses are you interested in? And what lenses do you wish Nikon would make? Share your thoughts in the comments!

    The post Nikon Will Offer 27 Z Mount Lenses Before 2022 Is Out appeared first on Digital Photography School. It was authored by Jaymes Dempsey.


    Digital Photography School

  • Google Photos — Bait Meet Switch

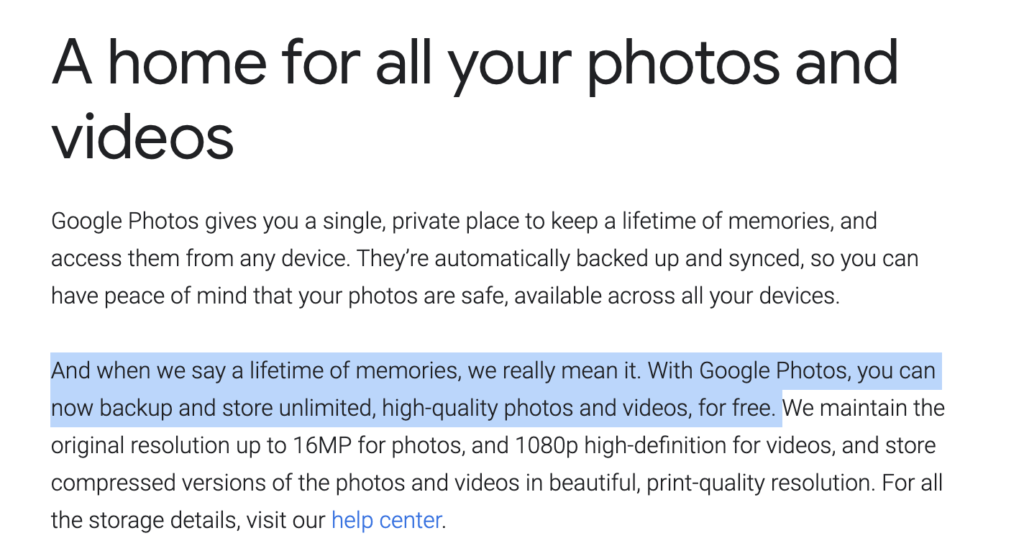
    Google Photos blog post announcing their new Google Photos service.

    In case you missed it recently, Google Photos has decided to end their free unlimited photo hosting service. Beginning in June of next year users will be limited to 15GB of space before being asked to pay for more storage. How much you’ll have to pay will depend on how much storage you use. Unfortunately for me, I have more photos than fit their top tier $ 100/year plan, so even if I wanted to pay I’d be capped out of the service.

    While I don’t begrudge Google, a trillion dollar company that makes billions of dollars a year, from wanting to make even MORE money, I am offended by the bait and switch approach that they took with Google Photos. Offering a user the first hit for free is classic dealer marketing. A lot of time and energy goes into organizing your photos on ANY photo sharing site and when someone spends hundreds or even thousands of hours organizing their photos at a site only to be priced out of the site, those are countless hours that you will never get back.

    Fortunately for me I’ve spent a lot less time using Google Photos for the past few years. Google’s consistent bad faith across photo hosting/sharing products has left me very skeptical of anything they do anymore.

    Some of you may remember Picasa (Google killed it). I was a user of that. I also was a big user of Google Buzz (they killed that too). Then I put hundreds of hours into my photography on Google+ (once again RIP). We used to do photowalks and hangouts and lots of other fun things around photography with Google+. Here’s my old Google+ url.

    Initially I was super excited about Google Photos, but that changed over time. I was disappointed that one of their early features, photo facial recognition, didn’t really work for me. It limited the service to 200 faces and unfortunately for me when the service launched it grabbed a bunch of faces of musicians I’d photographed performing at Coachella and chose those as the ones to tag. There was no way to delete those and have it choose people who were actually my family, friends, neighbors, etc.

    I was also disappointed that the hours and hours and hours I’d spent keywording all my photos in Adobe Lightroom were stripped out of my uploads to Google Photos. I’m not sure why Google would want to remove one of the best ways for me to search my photos from their service but for whatever reason they strip this data.

    Still, Google Photos was free (even though it downsized my photos). It’s hard to complain about free — until they locked my gmail. Last year I received a rather ominous message from Google threatening that unless I paid them for more storage they were going to turn my gmail off.

    It turns out that even though Google Photos claimed to be able to convert my photos to high quality JPEGs with free unlimited storage, that TIFF files generated by the software program Analog Efex Pro (ironically a former Google owned product before they jettisoned that as well) were not being converted by Google Photos and were sucking up my gmail storage which was then demanding payment from me. They actually locked my gmail and I missed several important emails that were blocked during this fiasco.

    By this point I was about ready to delete my Google Photos account — except I could not find ANY way to delete my Google Photos account. That’s right you can’t just delete Google Photos. You have to delete your entire Google account including your Gmail!

    While this is my unhappy story and experience with Google Photos, many, many users were duped into signing up for a free service that they thought would protect, as Google put it, their “lifetime of memories.” Now Google is demanding money from these users.

    To me it seems wrong (even evil — remember their old motto “don’t be evil” that they also abandoned?) that Google would bait and switch so many users on this product. You can’t/won’t get the many hours that you spent organizing your photos on Google Photos back. Some will just begrudgingly pay up. What I see is one of the world’s largest companies who used a classic monopolistic tactic to grab market share by pricing out and hurting smaller competitors and now wants to profit from their move.

    Once burned shame on you. Twice, three times, four times, five times, six times burned, shame on me. I will never trust Google with another product again.

    Thankfully there is an alternative to Google Photos, good old trustworthy Flickr. Here is a thoughtful analysis done by Jeremy Zero comparing Google Photos and Flickr.

    I’ve been using Flickr since 2004 and as long as I can remember my Flickr Pro account has remained unlimited. Flickr/SmugMug CEO Don MacAskill even recently re-iterated Flickr’s commitment to honoring their unlimited service. While Flickr may not be a trillion dollar company or make billions of dollars every year like Google does, they are a small company that cares about photographers and your photography. They also do a great job storing and sharing your full high-res, uncompressed, high quality images (and they even retain your photo keywords when you upload them there). I feel much better supporting an ethical small business than a trillion dollar company using monopolistic bait and switch tactics to try to drive the smaller guy out of business.

    You can find me on Flickr here. If you are an American Photographer come join the American Photographer Group I administer on Flickr and say hello.


    Thomas Hawk Digital Connection

  • Aspect Ratios in Landscape Photography

    The post Aspect Ratios in Landscape Photography appeared first on Digital Photography School. It was authored by Elliot Hook.

    Composition is often the difference between a good landscape photograph and a great landscape photograph. There are oft-quoted rules that we all try to adhere to and break in equal measure (the rule of thirds, leading lines, golden spiral, etc.), yet when considering what we are trying to capture, we don’t always think about the frame itself.

    The aspect ratio of a photograph can make or break the composition by either emphasizing the subject and removing distractions, or by putting the whole scene off-balance. When looking through the viewfinder, about to press the shutter, it’s a good idea to try and envisage the final shot, including the aspect ratio, in order to optimize your composition. Too often, the aspect ratio is an afterthought, applied during post-processing to correct for poor compositional choice.

    But how does each aspect ratio impact compositions in landscape photography?

    That’s where this article comes in. I’m going to discuss a few common aspect ratios (with examples). I’ll show the benefits and drawbacks for each, and explain where each aspect ratio may be applied.

    Note that there is an argument for cropping your photo without sticking to a defined ratio; in other words, that you should give an image a custom ratio based on your subject matter. But that can make printing and framing awkward, so I will therefore be sticking to well-defined ratios that most should be familiar with.

    1:1 – Square format

    The square format can often be used to simplify an image and give your subject a striking presence at the center of the frame. 

    By keeping the width equal to the height, the way in which we read the photograph changes, as there is less of a need to move from left to right through the frame. 

    The square format also offers a good opportunity to break the rules we so often follow; place the horizon along the center of the image or place a subject in the center of the frame, and the composition may only get stronger. 

    You’ll often see a 1:1 aspect ratio used to emphasize minimalism (again, it’s the theme of simplification).

    Derwent Water, Lake District, UK presented in a 1:1 aspect ratio

    4:3 – Four thirds format

    This format is the default aspect ratio of cameras that use Four Thirds sensors. 

    An image with a 4:3 aspect ratio is wider than it is tall, meaning that the eye naturally wants to move left to right through the image. However, given that the image is still fairly tall in relation to the width, this ratio is perfect for drawing the eye into the scene through leading lines. 

    The relative height of a 4:3 image encourages the use of wide-angle focal lengths to capture the depth of a scene, without including excess details at the edge of the frame.

    Lavender field at sunrise presented in a 4:3 aspect ratio

    6:4 – 35mm format (also called 3:2)

    This is the default aspect ratio for 35mm film, and therefore for full-frame and APS-C sensors used in most Nikon and Canon cameras. 

    With a 6:4 image, the width is significantly wider than the height. This encourages viewing the image from left to right, meaning diagonal leading lines can work quite well.

    A limitation of this aspect ratio is that the height is that much shorter in relation to the width. So capturing foreground detail using a wide-angle lens becomes more difficult due to the limited vertical space with which you can work. A 6:4 aspect ratio can even cause the subjects within the frame to become too disparate and therefore lose impact. 

    The 6:4 ratio can, however, be suited to capturing scenes where there is little to no foreground interest, especially if you’re using midrange focal lengths (e.g., 35mm).

    Rain over Lake Como presented in a 6:4 aspect ratio

    16:9 – Widescreen panoramic

    The widescreen panoramic format was supported in film by the Advanced Photo System (APS) upon its introduction, and has recently become more popular due to the prevalence of 16:9 aspect ratio displays in the home on TVs, computer monitors, and mobile devices. 

    With this format, the width of the image is dominant, so leading the viewer in from the foreground is difficult.

    But the format is ideally suited to presenting portions of landscape scenes captured with longer focal lengths (e.g., zoom lenses) from a distance.

    Beach abstraction presented in a 16:9 format

    12:6 or 18:6 – Panoramic (also called 2:1 or 3:1)

    I’ve chosen to adopt 12:6 or 18:6 as the panoramic format here for a few reasons.

    First, both 2:1 and 3:1 seem to be fairly well supported in that panoramic picture frame options are typically either 2:1 or 3:1. 2:1 is a panoramic format supported by a number of medium format film cameras and 3:1 was supported by the APS. 

    Typically, panoramic ratios will be used to present the result of stitching two or more images together; it’s quite challenging to capture a 3:1 aspect ratio image in one frame and still be able to print at any meaningful size.

    Often, frames to be stitched will have been captured using a longer focal length in order to pick out distant details in the landscape. There is no real option to include foreground detail here.

    Chalkfields at sunrise presented in a 3:1 aspect ratio

    Portrait mode

    I’m aware that I’ve discussed a number of different aspect ratios in “landscape” format, and not in “portrait” format.

    But that is because I believe the options for the successful presentation of landscapes in “portrait” format are much fewer in number. For a landscape to work, you need to balance the composition throughout the frame, and aspect ratios such as 6:4 make that very difficult, due to the image being too tall relative to its width. 

    For “portrait” landscapes to work, fatter rectangles, such as 4:3, 7:6, or 5:4, are ideal. In fact, 5:4 is heavily used by professional landscape photographers with medium and large format cameras. This aspect ratio allows the eye to be taken through the image from left to right, without having an excess amount of sky knocking the frame off-balance.

    Bwlch Y Groes, Wales, UK presented in three different portrait formats

    Conclusion

    While I have tried to describe specific uses of certain aspect ratios, I am aware that not all scenes will follow the suggestions I’ve made. Some images may work well with a certain ratio that’s contrary to what I’ve suggested.

    However, I’m hoping this introduction to aspect ratios will encourage you to think about them when composing your shot, before pressing the shutter. It isn’t always ideal to fill the frame with the landscape in front of you.

    And knowing that the aspect ratio you choose is not dictated by which camera you use means that you may be able to use aspect ratios effectively to boost the impact of your landscape photographs.

    The post Aspect Ratios in Landscape Photography appeared first on Digital Photography School. It was authored by Elliot Hook.


    Digital Photography School

  • 3 Simple Ways to Create Stunning Eyes in Your Portrait Photography

    The post 3 Simple Ways to Create Stunning Eyes in Your Portrait Photography appeared first on Digital Photography School. It was authored by Gina Milicia.

    portrait photography with beautiful eyes
    Image model credits, clockwise from top left: Chris Milligan/Fremantle Media, Rachael Lever, Danny Spannerz/East Brunswick Tattoos, Tiffany Diaz

    “Here’s looking at you, kid.”

    Reclusive Hollywood legend Marlon Brando would always close his eyes when paparazzi tried to take his photo. He knew that without his eyes open the image wasn’t worth publishing.

    The eyes are the single most important feature of any portrait. Beautiful eyes can make even the dullest portrait mesmerizing. Poorly lit, out of focus eyes, or eyes that lack connection, will weaken the impact of a portrait.

    Here are my three favorite techniques to make eyes really stand out in your portrait photography.

    1. Light

    Light makes photography. Embrace light. Admire it. Love it. But above all, know light. Know it for all you are worth, and you will know the key to photography.” – George Eastman

    Eyes look best when they are lit well, with beautiful catch lights. Catch lights are the reflection of a light source in the eyes. The size, shape, and brightness of your catch lights depend on the light source you use.

    An eye lit by windows
    Two large, frosted windows from my studio create beautiful catch lights. Model: Bryana Karanikos
    Naked Flash on camera
    Diffused on-camera flash creates a slightly softer, rectangular catch light.
    Eyes lit by a medium softbox off camera
    A medium softbox, off-camera and positioned at 2 o’clock, gives a soft, natural catch light.
    Badly lit eyes
    Poorly-lit eyes without catch lights look cold and a bit creepy.

    2. Expression

    You are what you think. All that you are arises from your thoughts. With your thoughts, you make your world.” – Anon.

    Comparison of portrait photography with bad and good eyes
    Model: Tiffany Dias

    In the image on the left (above), Tiffany’s eyes are cold, and she looks nervous. After I gave Tiffany a visualization exercise, her eyes became warm, confident, and connected (see the right image above).

    How you communicate, connect with, and direct your model is key to capturing a great expression in the eyes. If your model’s smile isn’t genuine, his or her eyes will appear cold and dull-looking. If your model is nervous or distracted, this too will be reflected in his or her eyes.

    One technique I use to create a great expression is visualization. I ask my model:

    If you could be anywhere right now, doing anything, where would that be? Tell me about that moment. Who is there? What does it feel like?

    Once your model is in the moment of their visualization, their body language and expression changes.

    3. Post-production

    Be willing to give that extra effort that separates the winner from the one in second place.” — H. Jackson Brown, Jr.

    Post-production can lift your portrait photography from good to great – when it’s done well. The key to great post-production is to avoid overdoing it. It’s easy to get excited with all the tricks and enhancements that post-production software offers. It’s addictive, and much like opening a jar of Nutella, it’s very difficult to control yourself once you’ve begun.

    I try and use the overnight rule when it comes to retouching. Once I’ve worked on an image, I won’t look at it again for at least a day. I find that my eyes constantly adjust to the modifications I’m making, so it’s more difficult to see when I’ve gone too far (which is also what happened when I dressed in the ’80s).

    Here’s a step-by-step technique to enhance eyes using Adobe Lightroom:

    Before and after images of eyes
    Before and after: I’ve used Lightroom to make the eyes sharper and brighter and to enhance their color.

    Step 1: Import your image into Lightroom and use the Basic panel in the Develop module to edit your shot. In this case, I’ve used one of my own beauty presets.

    Eyes edited in Lightroom
    eye adjustments in Lightroom
    Here are the basic adjustments I’ve used for this image.

    Step 2: Zoom in on the eyes (“B” in the image below) and select the Adjustment Brush tool (“A” in the image below). You can also select the Adjustment Brush using the keyboard shortcut “K.”

    Adjusting the eyes in portrait photography

    Step 3: Next, you should adjust the eye color with the Adjustment Brush:

    Adjusting the eyes in portrait photography
    • Increase the Temperature slider (A) to make the eyes appear warmer in tone.
    • Increase the Exposure slider (B) to brighten the iris.
    • Increase the Shadow slider (C) to bring more detail into the shadow area.
    • Increase the Sharpness slider (D) to make the eyes appear more detailed.

    Adjust only the colored part (the iris) of your subject’s eye (highlighted in red in the image above) and set the brush to have a slight feather and a low flow so you can build up your adjustments slowly.

    Step 4: Next, select a new Adjustment Brush (A, below), increase the Sharpness slider (B, below) by +22, and paint over the colored part of the eyes, eyelashes, and eyebrows. This will really make the eyes stand out.

    Adjusting the eyes in portrait photography

    Step 5: Finally, select a new Adjustment Brush. Set the Exposure slider to -29, and increase the Clarity to +10. Paint around the edge of the iris. This will darken the area slightly and give the eye more definition.

    Here, the final portrait was imported into Adobe Photoshop, where I did a basic skin retouching to remove a few small blemishes.

    Final image with beautiful eyes

    And that’s it!

    I’d love to hear about your techniques for enhancing eyes in portrait photography, and it’d be great to see some examples. So share them in the comments!


    Gina is the author of several dPS eBooks, including Portraits: Making the Shot.

    The post 3 Simple Ways to Create Stunning Eyes in Your Portrait Photography appeared first on Digital Photography School. It was authored by Gina Milicia.


    Digital Photography School

  • Weekly Photography Challenge – Down

    The post Weekly Photography Challenge – Down appeared first on Digital Photography School. It was authored by Sime.

    We did ‘Up’ a few weeks back… It made me think about how SO many of us walk from place to place looking down at devices (I’m not going to start in on the whole devices thing, don’t worry!) but it did make me think about what we miss by not looking at what we’re walking over, details or cracks in the pavement, etc. It can take some extra work to make ‘Down’ look good, and so with that gauntlet thrown down, let’s see what you’ve got… (Side note, if you fly a drone, this week is a good time to share your aerial photographs!)

    Make sure you tag your photograph #dPSDown wherever you post it!

    Weekly Photography Challenge – Down
    Weekly Photography Challenge – Down
    Weekly Photography Challenge – Down

    SO ‘down‘ from your camera or your drone or wherever you like, just has to be ‘down’ – and yes, bonus points for alternate interpretations of ‘down’ – Just make sure you tag your photo #dPSDown wherever you post it! Oh, and don’t forget, you can try all of our previous challenges over here —> CLICKETY CLICK!

    Great! Where do I upload my photos?

    Simply upload your shot into the comments field (look for the little camera icon in the Disqus comments section) and they’ll get embedded for us all to see. Or, if you’d prefer, upload them to your favourite photo-sharing site and leave the link to them.

    Weekly Photography Challenge – Looking Up

    Share in the dPS Facebook Group

    You can also share your images in the dPS Facebook group as the challenge is posted there each week as well.

    If you tag your photos on FlickrInstagramTwitter, or other sites – tag them as #dPSDown to help others find them. Linking back to this page might also help others know what you’re doing so that they can share in the fun.

    Follow us on Instagram?

    The post Weekly Photography Challenge – Down appeared first on Digital Photography School. It was authored by Sime.


    Digital Photography School

  • Product Photography 101: The Complete Guide To Perfect Product Photos

    Online shopping is the wave of the future. Already, e-retail sales account for 14.1% of all retail sales around the globe. That’s expected to grow to 22%. Every online retailer from small businesses to global giants face the same challenge — how to get customers to buy a product they can’t see. That’s where compelling, true-to-life product photography comes in. Continue Reading

    The post Product Photography 101: The Complete Guide To Perfect Product Photos appeared first on Photodoto.


    Photodoto