The Dismal River in Nebraska Sand Hills is one of my favorite paddling destination. I started paddling the Dismal in 2001 when training for Texas Water Safari. The river felt quite similar to the San Marcos River in Texas. Since […]
paddling with a camera
Archive for the ‘Photography’ Category
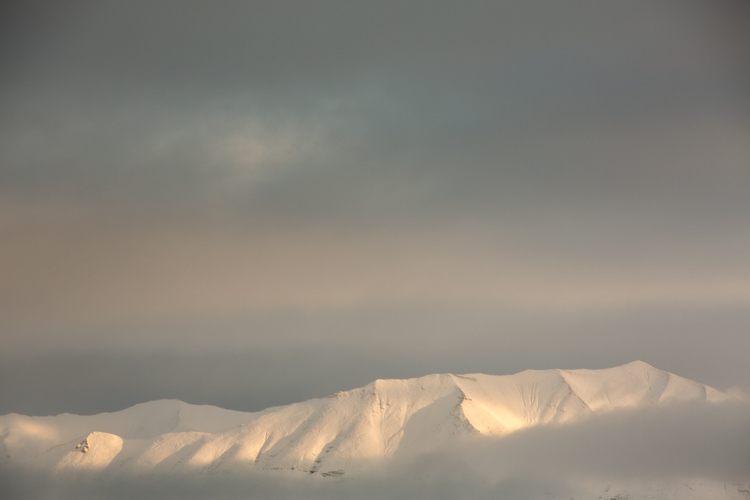
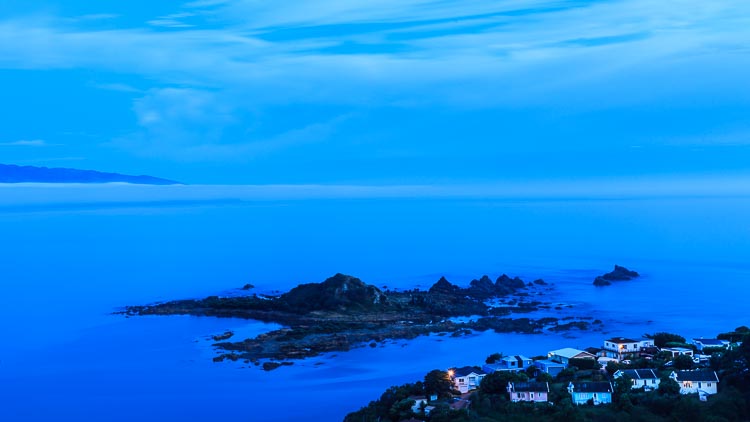
Dismal River in Nebraska Sand Hills from Above
06
Jun
Lighting 103: Greg’s Assignment
02
Jun
Abstract: The best way to get a better understanding of light and color is to just do it.
In the last part of our conversation with Greg Heisler, he gave what I think is a very good piece of advice about light and color:
"I think what you have to do to be able to see it, is to shoot it. And then shoot it.
Like, shoot it the clean way, with white light. Then the next way is to shoot it with a warm and a cool. And so you see that. And then muddy up the light a little bit, and then see it that way."
So that's exactly what we're gonna do. Read more »
Strobist
How to Use White Balance as a Creative Tool
02
Jun
White Balance is almost always used to match what colors our cameras detect to the colors we see with our eyes. Our brains are very good at managing how we see color. A sunny day looks warm and bright, but the actual color of the light is skewed heavily blue. Indoors, incandescent lights are notoriously warm (yellow/orange) and though our eyes may detect little of this warmth, you can bet our cameras will. White Balance is how we correct for that difference in light color, and how we can make images appear “natural” which is to say, how our brains detect it.

Auto White Balance
It’s useful, certainly, but most of us leave it up to the camera to make the decision about White Balance. I know I do. My cameras are almost always set to Auto White Balance. Since I shoot in RAW, any errors that the camera makes can quickly be corrected in post-processing. At this point, I rarely even think about White Balance. But, perhaps I should…
White Balance can be more than a mindless setting of camera functions or a digital slider in Lightroom. Instead, it can be used as a creative tool. Slight changes in White Balance can change the tone and impact of your images. From dramatic color shifts to subtle changes in tonality, it’s time to elevate White Balance into the realm of creative options in photography.
The methods I’ll discuss here can be done either in camera or in post-processing, but it’s easier using the latter since you can see the impact of your choices real time. Although I use Adobe Lightroom, any program that allows you to adjust White Balance will work.
Dramatic Shifts in White Balance
Big shifts in White Balance can completely change the nature of your image. Shifts from cool to warm tones can take the image from looking as though it was made during the blue hour to post-dawn, or even make the weather appear to change.
A few years ago I was leading a wilderness/photo tour in the Noatak National Preserve in northwestern Alaska. One evening, an afternoon storm was clearing off the mountains and I went down to the river to make a few images. The light was pink, the rolling clouds and falling rain lit by the low sun.
Below are three versions of the same image with only the White Balance changed. You can see the huge difference made by the shift from warm to cool tones. The bluest image is set 3600K, the warmest to 14750K, and the one somewhere in between is 7000K. In the end, you’ll probably choose an image that is neither overly cool, nor overly warm, but how the White Balance setting changes the feel of the image is worth noting.
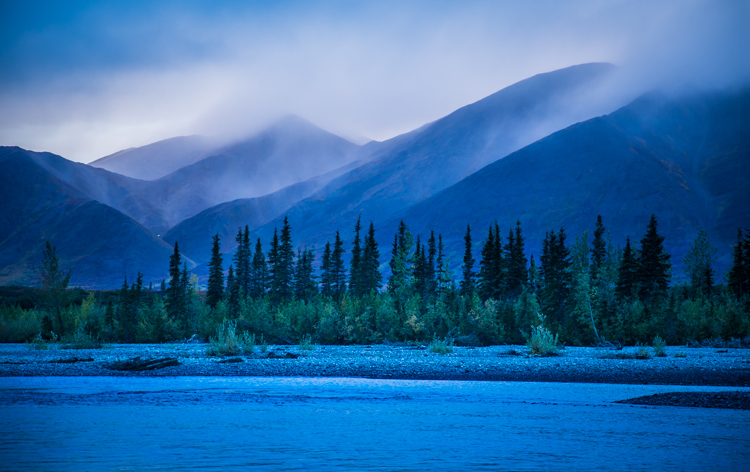
White Balance set to 3600K.

7000K
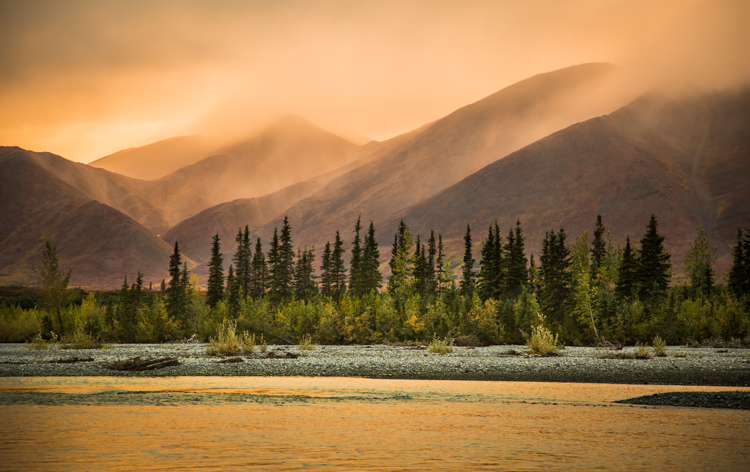
14,750K
Here is another example using autumn foliage, in this case, a Dwarf Birch in Alaska. The top image is 5050K, very close to what the Auto function on my camera selected, in the second I’ve warmed the image to 9000K. Although I prefer the cooler tones, I could see the second version appealing to editors looking for an autumn spread in a magazine or catalog.

White Balance set to 5050K.
White Balance set to 9000K.
Subtle Shifts in White Balance
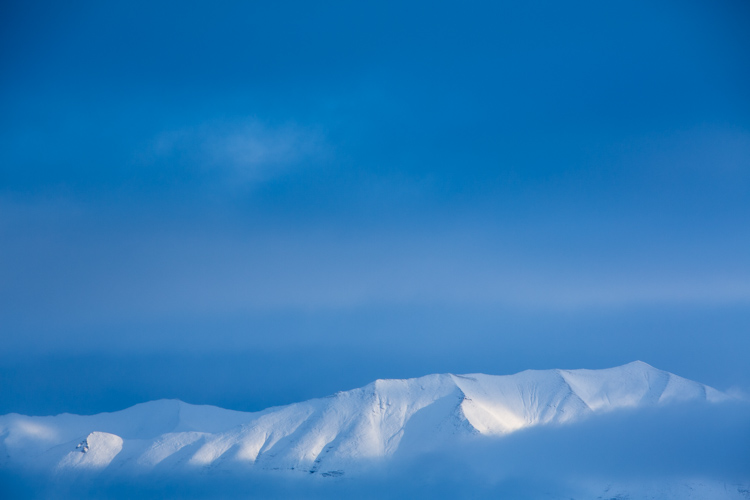
White Balance set to 4350K.
White Balance set to 8700K.
Subtle shifts in White Balance can also be effective, even though differences between images may be less obvious. A change of a few hundred to a couple thousand Kelvin (the K measurement used in White Balance) can make a surprising difference to the impact of an image. In the top photo, I chose a cool setting (4350K) which brings out the cool winter tones. The second is much warmer, set to 8700k, which to me, (aside from being a bit too warm) feels like an evening storm is approaching. Neither is exactly “accurate” to the scene as I saw it, but neither are they necessarily unnatural. I’ll return to this image shortly.
Water
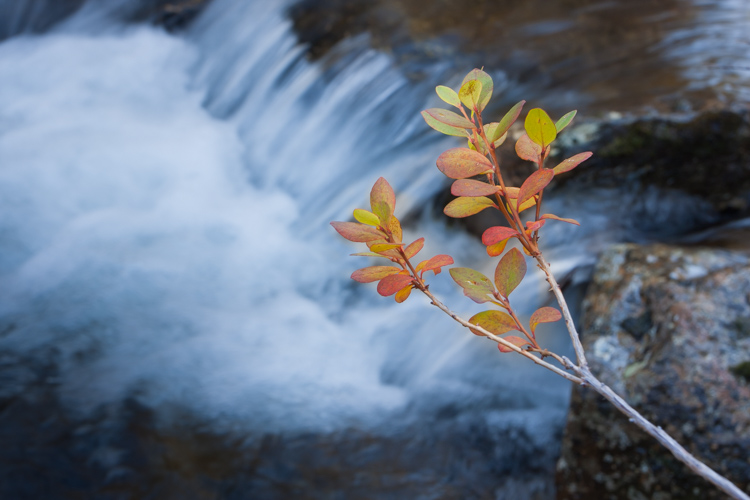
Water strikes most people as a cool substance, and often it looks better when a White Balance with more blue-tone is selected. I made this image on a day with broken clouds, in autumn, in a small mountain range north of my home in Alaska. Tiny patches of the sun were penetrating the yellow, shrubby willows which surrounded this small creek. The yellow leaves and the partially overcast sky gave the scene a notably warm tone which you can see in the top image, set to 4600K (as selected by my camera’s Auto White Balance setting). I think it’s too warm, so just a subtle push to the blue range (4100K) was enough to retain the warm tone in the single yellow leaf but sufficient enough to cool the water.
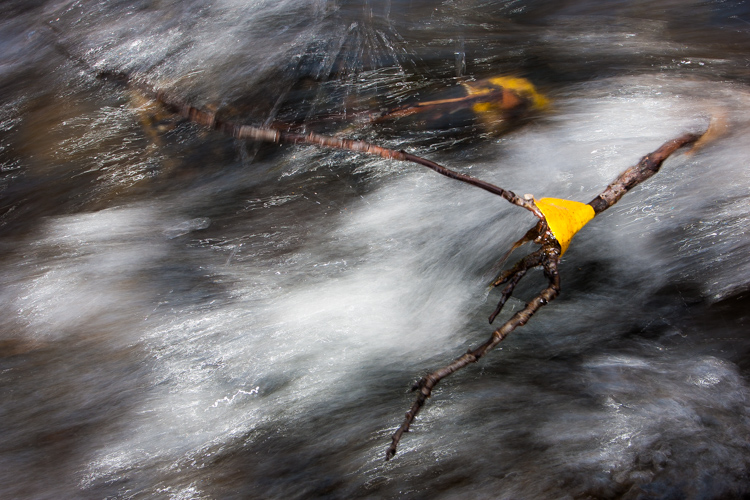
White Balance 4600K as chosen by the camera using AWB.
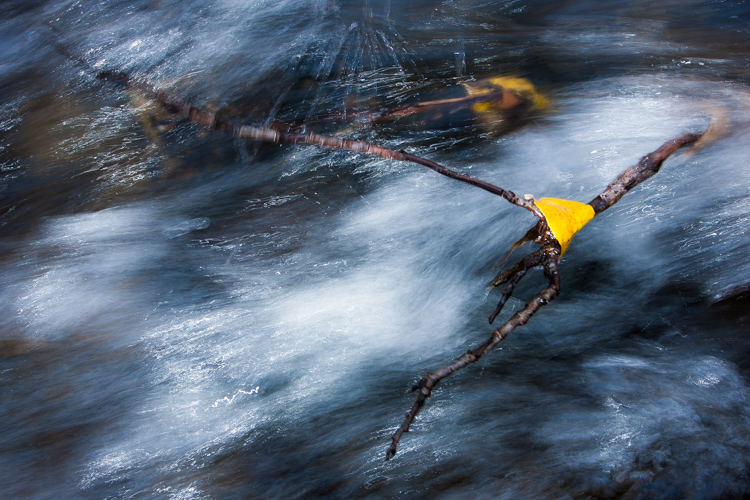
White Balance adjusted to 4600K in post-processing makes the water feel much cooler.
Sunsets
Sunsets too can benefit from a little creative tweaking of the White Balance. From the bluff above a beach in Homer, Alaska, I made the image below. The cooler-toned toned image was shot using Auto White Balance (4600K), while the second I warmed up to 6000K in processing. I like both versions. So you can see that selecting a White Balance is very much a matter of taste, and how you want your image to come across to your audience. Which version do you prefer?
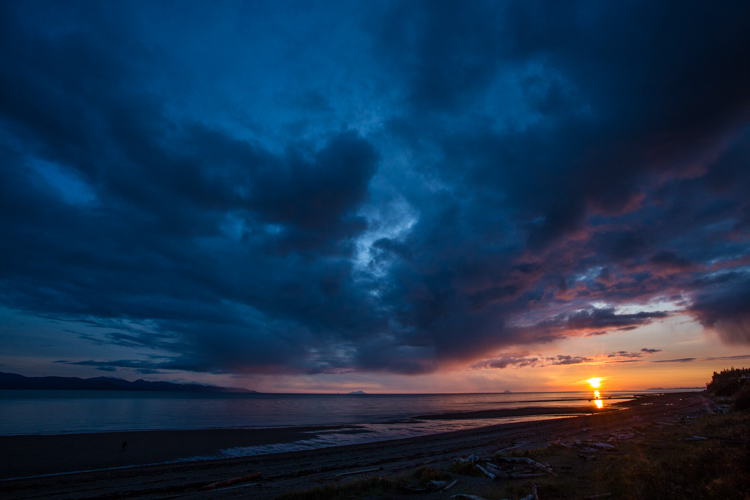
White Balance 4600K as shot using AWB.
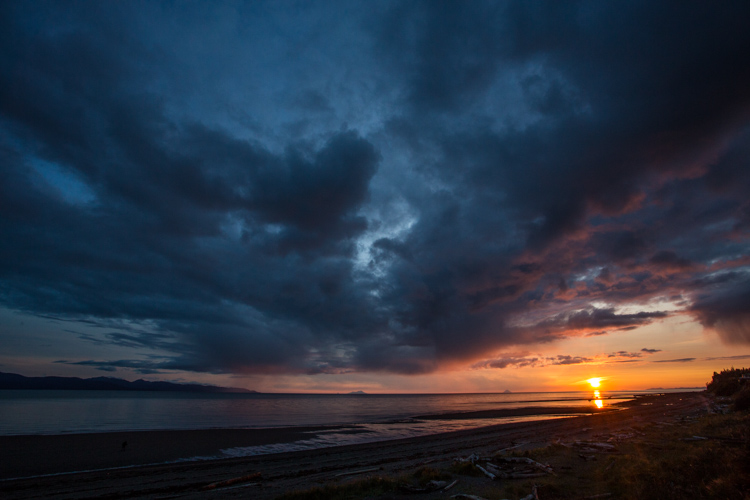
White Balance adjusted to 6000K in post-processing.
Selective Changes to White Balance
The great part about digital post-processing is that you don’t have to choose one White Balance or another, you can mix and match. My choice of software, Adobe Lightroom, allows you to use the Adjustment Brush to grab certain parts of your frame, and independently adjust them from the rest of the image.
The photo below was made around the same time as the leaf in the stream I discussed earlier. In this case, a global (over the entire image) adjustment made the sprig of autumn colors look too cool and weird, even though the water was about right. So I cooled the whole image off to 3700K, then selected the sprig and bumped the Temperature setting to +35 using the Adjustment Brush.
As I was playing with the snowy mountain image I discussed early, I realized I liked neither the blue nor the overly warm version. I thought some combination might work well. So I set the overall tone slightly blue to 5100K and selected just the mountain, where the hint of sunlight was shedding some warmer light and gave that a boost to +23. The result works.
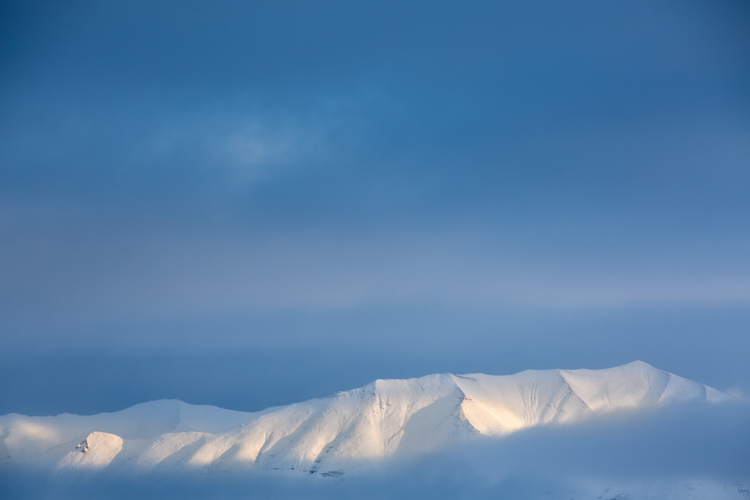
White Balance set to 5100K overall with warmth added to the top of the mountains using the Adjustment Brush.

Compare this version which is at 5000K with no extra adjustments on the mountains. See how subtle the difference is? But the version above feels little warmer in the sunlit areas.
White Balance in Black and White
We think of White Balance as strictly related to color, but in fact, it can play an important role in black and white as well. The White Balance used in your final image can impact cont st, and the way different shades of gray are presented in the final image.
To get the full impact, you need to use that White Balance slider in a big way. That means doing big pushes from warm to cool, not little subtle shifts of a few hundred or thousand Kelvin.
Examples
I was on the Alaska Ferry making images on a very gray and rainy winter day when we passed this small speck of an island with a few wind-blown spruce trees growing on it. I knew it was a black and white kind of scene, so I quickly removed the color using Lightroom. When I moved the White Balance to one side or the other it created a big change in the contrast and overall brightness of the photo. The top image is set well to the blue range (3700K) while the second is way over in the warm range (32,700K). You can see how the warm setting removed some contrast and brightened the photo.
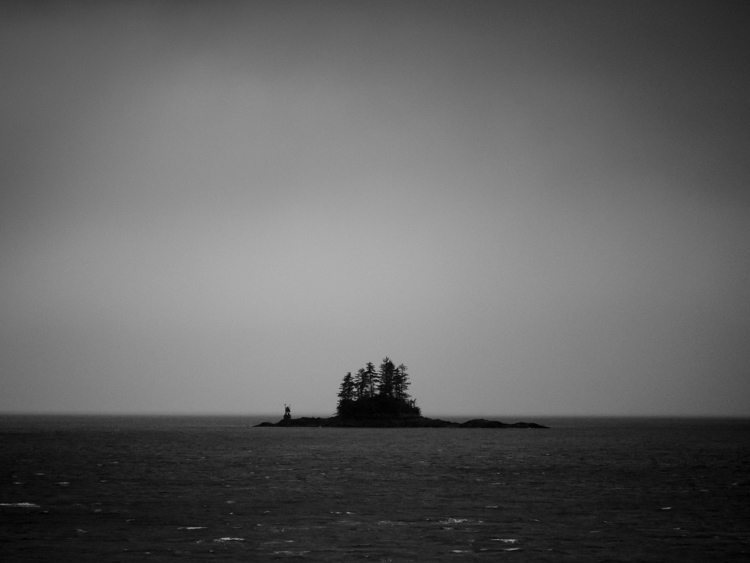
3700K
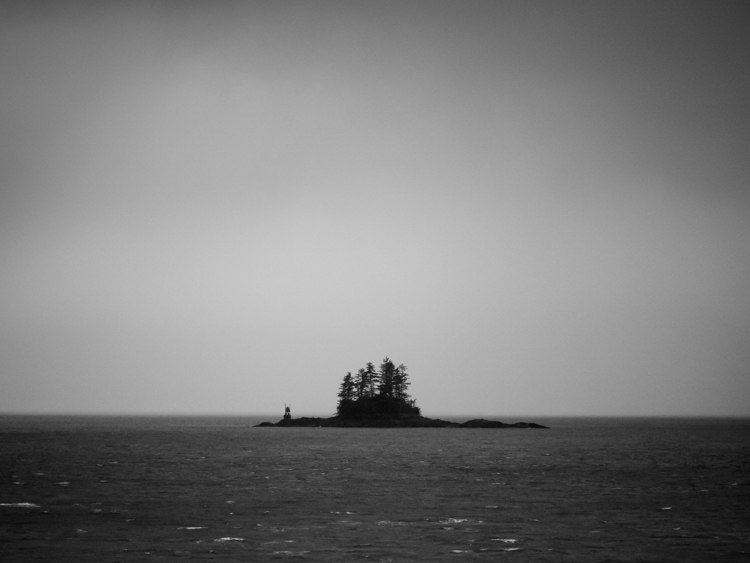
32,700K
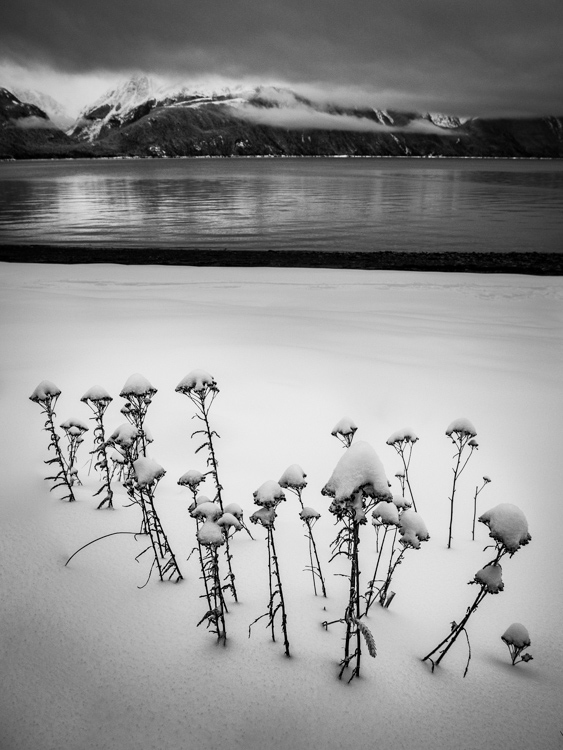
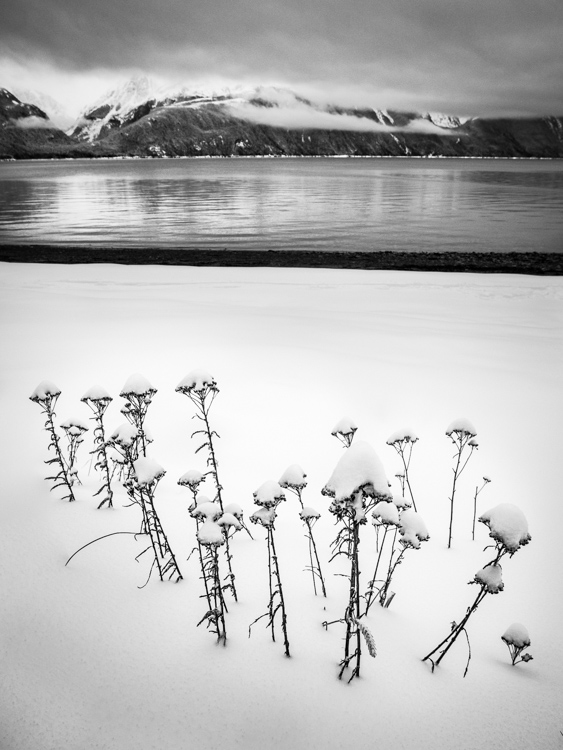
A snowy landscape image on a beach near Haines, Alaska provided another chance to explore how White Balance impacts a black and white scene. The left image is set to 3700K, the right to 35,000K.
3700K |
35,000K |
Lastly, is this simple composition of a dew-covered spider web. The top image has high contrast, is dark overall, with clean white dew drops and is set 2000K, (as cool as Lightroom will allow). The second is much grayer, with substantially less contrast, and is as high as Lightroom will allow at 50,000K. There is no question, I prefer the first version. But many images, such as the two examples above depend more on personal taste.

2000K

50,000K
Conclusion
It is time to stop thinking of White Balance as strictly a way to accurately present color, and instead, embrace it as a creative tool. Whether it is for dramatic impact, subtle changes, selective adjustments, or even (counter-intuitively) using it in black and white photography – White Balance can play an important part in the outcome of your images. Consider it, use it. Embrace White Balance as more than just a setting.
The post How to Use White Balance as a Creative Tool by David Shaw appeared first on Digital Photography School.
5 Surprising Habits That Will Make You a Better Photographer
01
Jun
When you’re learning photography, it seems natural to pay the most attention to the gear and techniques you use to create images. You’ve probably received advice about developing great habits like photographing every day, carrying your camera everywhere you go, trying different compositions, learning processing skills, and backing up your photos. These things are important, no doubt! But there is more to becoming a better photographer than that.
Getting the shot often comes down to being there at the right time, so these tips have to do with getting out in the field and staying out in the field. If you cultivate these surprising habits, you’ll surely become a better photographer.

#1 – Research Locations
Before you set off on your photo shoot, doing a little research can go a long way to making better images. First, think about what potential subjects are available. I like to create a Pinterest board and start collecting images I like from the location. Once you get an idea of what is there, how can you create images that are different from what you have seen? Is there a different perspective you want to check out? Or maybe a night shot? Don’t forget to take note of the direction of light in the images you see. Imagine what it would look like at a different time of day.
Once you get an idea of what is there, how can you create images that are different from what you have seen? Is there a different perspective you want to check out? Or maybe a night shot? Don’t forget to take note of the direction of light in the images you’ve seen. Imagine what it would look like at a different time of day.
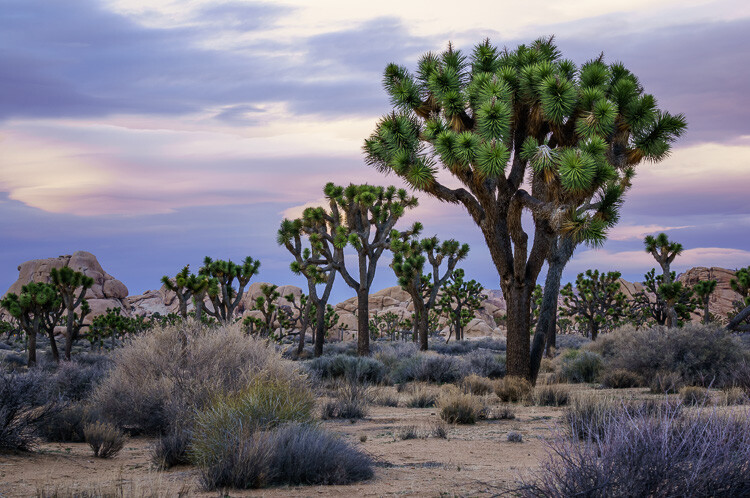
This is the location where the Joshua Trees are the densest in Joshua Tree National Park, California.
The second part of your research should be looking at maps and figuring out where exactly the best subjects are located and how to get there. Is the location close to the road or will you have to hike there? How long will it take?
#2 – Watch the Weather
Keeping a close eye on the weather forecast will dramatically affect your photos. Remember, bad weather is usually a good thing for photography! Storms bring the potential for seeing dramatic clouds, wet leaves, and even rainbows. You’ll get photos with fewer people in them too.
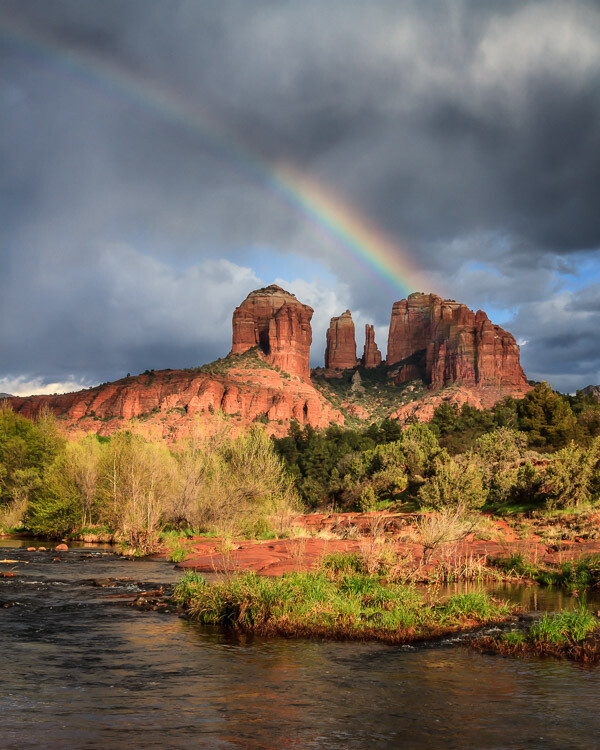
Waiting for a break in the weather resulted in this rainbow at Cathedral Rock, Arizona.
When I was visiting Cathedral Rock in Sedona, Arizona, I noticed that there were a lot of people around and it was difficult to get a photo without a lot of tourists in it. Then it started to rain and everyone left. I waited in my truck for 45 minutes during the downpour. Mine was the only vehicle in the parking lot, and when the rain began to die down, I headed out and was rewarded with a beautiful rainbow. I had the location all to myself.
If a clear sky is in your forecast, instead of photographing your scene with a plain blue sky, you might have the potential for a great night shot.
While you’re at it, don’t forget to check when the sun rises and sets and when the moon rises and sets. If you’re going to be on the beach, tides are also important.
#3 – Carry Less Stuff
Whether you choose to go out with your camera and only one or two lenses or switch your whole system to a lightweight mirrorless system, you’ll undoubtedly find that you can hike farther and get to more remote locations with less weight on your shoulders. The potential for finding unique subjects and unique compositions increases the farther away you get from the beaten track.
I don’t think I would have made it this far up the hill if I had carried all of my heavy gear.
#4 – Don’t Forget the Comfort Essentials
Despite the last tip about carrying less stuff, it’s equally essential that you carry the right stuff to allow you to stay out there longer. Anything that makes you uncomfortable in the field will probably cause you to leave earlier than otherwise.
Thirst, hunger, being cold or wet, getting bitten by bugs and looming darkness are just a few things that can make you leave a location too soon. A few things on my “always carry” list are food, water, rain jacket, sweater, bug spray, and a headlamp. These items will get you more potential shots than that extra lens.
I probably wouldn’t have this photo if it were not for my trusty headlamp that I used to make my way back through the cacti in the dark.
#5 – Hike With a GPS
Getting lost is one of my fears when I’m out exploring, so I have started hiking with a handheld GPS. It took me awhile to get used to it because it’s not the fancy kind with built-in maps. All I do is mark a waypoint where I park my truck and then it tracks me as I walk. No cell signal or internet required. I can always figure out the direction to get back to my waypoint, or even follow my tracks to go back using the exact route I took to go out. It’s worth it to carry a couple of extra batteries for it too.
Now that I have the GPS, I am more willing to go off the trail and explore new things. It’s a whole new level of freedom!

At Bisti Badlands, New Mexico, it is very easy to get lost with no trails and strange rock formations in every direction. My GPS was a lifesaver.
Conclusion
These tips should help you figure out where to go when to get there and make sure you are comfortable in the field so you can stay as long as you like to get that special shot. Sometimes photography is a waiting game, but if you are comfortable you can be patient and wait for the magic moment to happen.
The post 5 Surprising Habits That Will Make You a Better Photographer by Anne McKinnell appeared first on Digital Photography School.
Manual Mode or Exposure Compensation – Which is Best?
01
Jun
As you may know, cameras often get exposure wrong. The question is, what do you do when you realize that the exposure settings suggested by your camera are not right?
You have two options. One is to switch to Manual mode and set the ISO, aperture, and shutter speed yourself. The other is to use exposure compensation (and Aperture or Shutter Priority mode).
The best solution depends on the situation in which you find yourself, plus the configuration of your camera’s dials. For example, with a Canon EOS digital SLR it’s easy to apply exposure compensation by moving the Quick control dial on the back of the camera. It’s so simple you don’t need to take your eye away from the viewfinder.
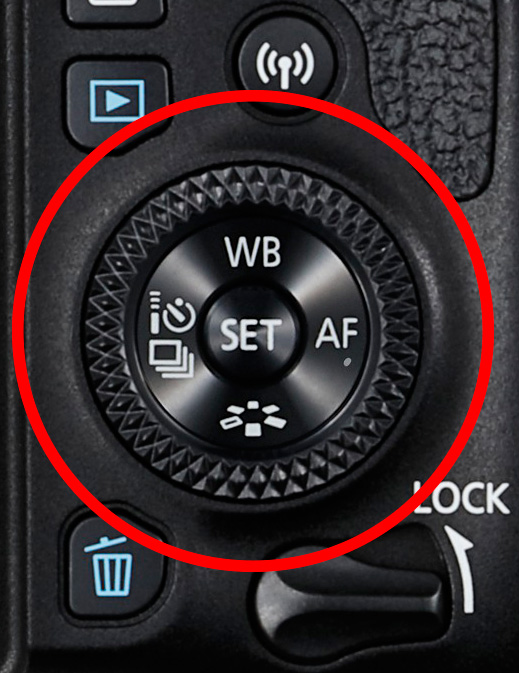
The Quick control dial on the EOS 77D.
On my Fujifilm X-T1, the exposure compensation dial is on top of the camera. It’s harder to get at and nearly impossible to adjust without taking your eye away from the viewfinder. But the aperture ring on the lens makes it easy to go to Manual mode and adjust exposure by changing the aperture. An optional live histogram in the viewfinder helps you see if exposure is accurate before pressing the shutter (an advantage of some mirrorless cameras).
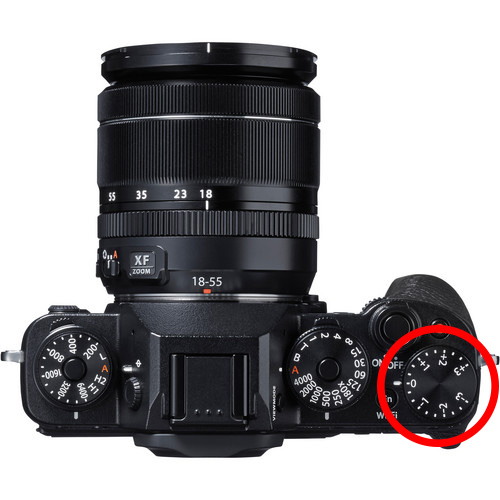
The exposure compensation dial on the Fujifilm X-T1 is much harder to reach.
These are good examples of how hardware can push you in one direction or another. My Canon SLRs pushed me towards exposure compensation, and my Fujifilm X-T1 pushes me towards using Manual mode.
Using Manual mode
Let’s look at Manual mode first. In Manual, you set the ISO, aperture, and shutter speed yourself. There are certain situations when using Manual mode (as opposed to Programmed Auto, Aperture Priority or Shutter Priority with exposure compensation) is beneficial. Let’s look at a few.
1. Shoot in Manual when the light level is constant
If the ambient light level is steady, you don’t need to change the exposure settings once you have decided which ones to use. Automatic exposure modes are influenced by the reflectivity of the subject and the exposure reading can change even if the light levels don’t.
That makes Manual mode ideal for this kind of situation. Once you’ve set the exposure you don’t need to change it. I like to use Manual mode when making portraits in natural light. Once I’ve set the exposure I’m free to concentrate on directing the model.
2. Shoot in Manual when you’re photographing landscapes and using a tripod
In this situation, you have plenty of time to assess exposure. Manual mode is ideal because you can set a low ISO (for image quality), a small aperture (for depth of field) and change the shutter speed to suit the light levels. It’s also easy to make adjustments to allow for any polarizing, neutral density or graduated neutral density filters you may be using.
If you’re shooting landscapes at dusk, while the light is fading, Manual mode also works well. After you take a photo, just check the histogram. As it moves to the left, which it will as the light fades, dial in a slower shutter speed to compensate.
3. Use Manual Mode when you’re using manual flash
If you’re using a flash set to manual the output from the flash is the same every time. In that situation, it’s best to adjust the camera settings manually so the exposure is consistent from frame to frame.
To create the portrait below, I worked with both the camera and flash set to manual. Setting your flash to manual only works when the flash to subject distance doesn’t change.
4. Use Manual mode for long exposure photography
If you’re doing long exposure landscape photography and your shutter speed (exposure time) is longer than 30 seconds then you need to use Bulb mode. This is another form of Manual mode. Except that rather than telling the camera what shutter speed you want it to use, you do so by using the camera’s bulb setting and a remote release.
I used Bulb mode to make this landscape photo with a shutter speed (exposure time) of 82 seconds.
Using Exposure Compensation
The alternative to Manual mode is to set your camera to an automatic exposure mode and use exposure compensation to override the camera’s settings.
The three best automatic exposure modes to use are Aperture Priority, Shutter Priority or Programmed auto. Other exposure modes, such as Landscape and Portrait, don’t give you enough control. On some cameras (such as Canon EOS) you can’t adjust exposure compensation when using one of these modes.
These are some of the situations where exposure compensation may be better than Manual mode.
1. Use Exposure Compensation for street and travel photography
If you are taking photos of people in the street the required exposures can vary wildly. One moment you may take a photo of something in the sun, the next you may photograph something in the shade. The sun may also be going in and out between the clouds.
In this situation, you want to concentrate on finding interesting things to photograph and creating a good composition. If you have to stop and think about exposure, then you may miss the shot. Automatic exposure modes help greatly.
2. Use Exposure Compensation when you are using on-camera flash in an automatic mode (TTL)
If you have the on-camera flash set to an automatic mode, then the camera needs to be set to evaluative or matrix metering, the camera’s most advanced metering mode, to take full advantage of that. The camera and flash work together to calculate the correct exposure.
Setting your flash to automatic (TTL or E-TTL) works best when the subject to flash distance is constantly changing. Using automatic means your camera can adjust the output of the flash as it needs to.
3. Use Exposure Compensation when shooting sports or wildlife
This is another situation where the light level is likely to change frequently and you need to concentrate on tracking the action and capturing important moments. You don’t want to be thinking about exposure when trying to capture the peak of the action in sports or photographing fast-moving wildlife. Let your camera do the work, and use exposure compensation if you have to.
Conclusion
Everybody works differently, so the points in this article should be taken as suggestions only. The more experienced you become as a photographer the more you will learn to judge whether you should use Manual mode or Exposure Compensation to take control of your exposure.
It may make it easier to think of it in terms of time. If you have more time to think about your camera settings, then use Manual mode. If you have less thinking time and need to be ready to react quickly to capture the action, then use an automatic exposure mode and Exposure Compensation.
Do you prefer to use Manual mode or an automatic exposure mode with exposure compensation? Please let me know in the comments below,
Want to learn how to get perfect exposure on your digital camera? Then check out my new ebook Mastering Exposure and say goodbye to all your exposure problems!
The post Manual Mode or Exposure Compensation – Which is Best? by Andrew S. Gibson appeared first on Digital Photography School.
Avoid These 5 Common Camera Setting Mistakes Made By Beginners
31
May
Over the years, I’ve taught many new photographers and observed how they used their cameras. I have noticed a handful of common mistakes that many of them make. While there is a lot more to learn about photography, if you can avoid or fix these issues alone, you will find that your photographs will be much sharper and of much better quality.

1. Not raising the ISO high enough
It used to be commonly taught that you always needed to go as low as possible with the ISO for digital cameras. This was because early digital cameras had horrible noise at higher ISOs. These days, that has completely changed. Newer digital cameras can shoot with incredible quality at ISO 800, 1600, 3200, and even 6400 for higher end cameras. The noise is much less noticeable than it used to be, and it is much more pleasant looking.

This has changed how we can shoot. While your ISO should still be as low as possible when the camera is on a tripod when you’re shooting handheld you will often want to raise your ISO up much higher. Unless I am purposely shooting with a very large aperture such as f/2.8, I typically keep my ISO at 400 in sunlight, 800-1600 in light to dark shade, and 3200 and 6400 when handheld at dusk or at night. This allows me to use a faster shutter speed to offset handheld camera shake or motion in subjects, along with a decent depth of field. My shots are much sharper because of this.
Unless you are shooting in Manual Mode, I suggest taking your camera off of auto-ISO. You never want to let your camera choose two of the three settings (shutter, aperture, and ISO) because it will mess up your photographs a lot of the time. The camera should only be choosing one of those three settings for optimal use.
2. Using a shutter speed that’s too slow

To offset the handheld camera shake, the shutter speed always needs to be ONE over the focal length of your lens. So if you are shooting with a 50mm lens, your camera will need to be at 1/50th of a second (or faster) to make sure the image is sharp. This comes even more into play with a zoom lens because a 300mm lens will need a 1/300th of a second shutter speed in order for the image to not look blurry. This is because slight vibrations are much more noticeable when you magnify a small area in the distance. This is also why I will often raise my ISO when zooming at far distances.
For subjects in motion, you will need a fast enough shutter speed to freeze them. I prefer a minimum of 1/250th of a second to freeze people walking. You will need an even faster shutter speed as you get to subjects such as cars.
3. Not using exposure compensation (+/-) or the right meter mode

If you are using Aperture or Shutter Priority mode, Exposure Compensation is your best friend, particularly in scenes with tricky lighting. Your camera’s light meter is not creative – it wants to make everything look a neutral gray, but that is problematic in images with lots of dark or bright tones. Maybe you want those tones to look gray for creative purposes, but most likely, you will want them to be true to the scene. This is where Exposure Compensation (+/-) comes into play.
For instance, in scenes with lots of bright snow or a bright sky, this could trick the camera into thinking that it needs to overly darken the image to make those white areas look gray. Or if you are shooting at night, or in a dark alleyway, the camera’s light meter will try to make those dark tones look like a lighter gray, thus brightening the image too much. Similar problems can also appear when shooting in areas with both bright highlights and dark shadows, or if your subject is backlit.
On a related note, many photographers keep their camera on the wrong metering mode. There are three main metering modes; Evaluative, Center-weighted, and Spot metering. Evaluative will expose for the entire scene, Center-weighted will expose based on the spot that you focus on and an expanded area around it, and Spot metering will measure the light based on only the spot that you point to. I personally find Evaluative to be too broad and Spot to be too focused, so I mostly use Center-weighted metering mode.
Read more here: Cheat Sheet: Understand Metering Modes On Your Camera
4. Not getting the focus point right

Some photographers leave their focusing completely up to the camera. This is a terrible idea as the camera will often focus on the wrong point, ultimately ruining your image. You need to be in control of your focusing and put the focus on the most important subject in the image.
On a similar note, it is common for photographers to get that new 50mm f/1.8 or f/1.4 lens and immediately think that they need to shoot everything at f/1.4 because they can. Some situations will be good for f/1.4, but it’s important to realize how shallow the depth of field is at that aperture.
If you are shooting with a really shallow depth of field, the focus needs to be perfect and exactly right on the most important subject. If you are photographing a person and you put the focus point on the person’s ear or nose instead of their eyes, it will be noticeable and it will mess up the photograph. Often, I prefer to shoot portraits like this at f/4 instead of f/1.8 or f/2.8. There is still a beautiful background with bokeh, yet more of the person is in focus. This minimizes any focusing mistakes as well.
5. Using image stabilization when using a tripod
The image stabilizer in your lens or camera will make your photographs sharper when handheld. However, it can also create minor vibrations while keeping the camera steadier, and these vibrations can actually backfire when you are on a tripod. Sometimes they will introduce blur. So always make sure to turn the image stabilizer off when you are using a tripod. If you ever notice your photographs on a tripod are slightly blurry, this issue and wind are the most likely culprits.
Conclusion
There you have it. The bottom line is that if you can learn to conquer and avoid these five common beginner mistakes, you’ll be on your way to better photography.
The post Avoid These 5 Common Camera Setting Mistakes Made By Beginners by James Maher appeared first on Digital Photography School.
How to Remove Objects and Add Punch to Your Images with Photoshop
31
May
In this article, we’ll look at an image I reprocessed after my initial edit. I’ll also share with you some tips on how to use Photoshop to remove objects from your scene that are unwanted and add some punch to your image.
Original processed version
Have you ever created an image, processed it, shared it with the world, and then decided it wasn’t quite finished? I have! In fact, I do it more often than I’d like to admit. A while back, I created a video tutorial for On1 Software showing how I used that software to process an image I took at Queen’s Bath on the island of Kauai. I was super excited to share the image because it was an incredible sunset, at an incredible location, shot during some incredible conditions, with a completely random and unscripted local in the scene to top it all off. Here’s a look at the image after processing it and creating the initial video.

After watching the video and looking at the final image, I decided I wasn’t 100% satisfied with the edit. I’ve used On1 Software for nearly a decade now, and still use it in my everyday workflow. It wasn’t any fault of On1, I just felt the image could be taken up another notch so decided to take it over into Photoshop to give it another go. I decided the image needed two adjustments…
#1 Remove the local at the bottom climbing up the rocks.
- Queen’s Bath is notorious for the massive waves that crash against the shore in the winter. Nearly 30 people have drowned at this location from being washed out to sea and this guy was close to being added to the list! I decided to remove him because his movements caused him to become blurred and I felt he ended up being more of a distraction in the image than a complementary part of it.
#2 Add a bit more contrast and punch to the overall image.
- I felt the sky and rocks were still a bit too washed out and needed a very subtle boost to bring it all together.
Second edited version completed in Photoshop
After a few minutes in Photoshop, I came up with this final (really this time!) result.

After working extensively in Photoshop over the past decade, I’ve developed a few tricks along the way. I’m not sure how mainstream some of them are, so I like to share them in hopes that they’ll help you as well. One of those tricks is how I remove objects that are up against other objects(as opposed to being out in the open). To do this, I use a combination of the Quick Selection Tool, Masking, and the Clone Stamp. Adding contrast and punch to the image is a bit more basic in this case, but still advanced if you aren’t super familiar with masking and brush techniques.
Here’s the video where I walk through the process step-by-step.
Let me know what you think and if you have any questions please put them in the comments section below.
Get James’ video course POST II where he walks through his entire workflow in Lightroom, Photoshop, and more from start to finish with 10 of his favorite portfolio images. Be sure to use coupon code DPS25 at checkout for an exclusive DPS discount!
The post How to Remove Objects and Add Punch to Your Images with Photoshop by James Brandon appeared first on Digital Photography School.
Thoughts and Field Test of the Sigma 12-24mm F4 DG HSM Art Lens
31
May
In November 2016, Sigma introduced the world to its widest zoom lens offering to date: the Sigma 12-24mm f/4 DG HSM Art lens. This is actually Sigma’s third version of the 12-24mm DG (full frame) lens, but it is the first to have the “Art” designation and a constant aperture. Previous lens versions share the same focal length but differ in maximum aperture, weight, size, and price.
Priced at $ 1,600, this isn’t the cheapest lens, but it is a steal compared to Canon’s EF 11-24mm f/4L USM, which runs just under $ 2,700. Here are some more details on the Sigma 12-24mm lens and reasons why it may or may not be for you.


Sigma 12-24mm mounted on a Canon 6D.
Specs of the Sigma 12-24mm
- 12-24mm focal length
- Maximum aperture of f/4
- Minimum focusing of 0.24 m (9.45″)
- Available in Canon EF, Nikon F (FX) and Sigma mounts
- Ring-type hypersonic motor
- Item dimensions of 3.3 x 4.7 x 3.3 inches
- Item weight of 1.5 lbs
- Weather sealing, dust and splash proof
- Comes with a solid lens cap and a zippered carrying case with shoulder strap

A phenomenal lens for architecture and interiors. Shot at 12mm.
Pros of the Sigma 12-24mm
Solid build quality
The build quality of the Sigma 12-24mm is impeccable. Constructed mostly of metal and glass, this is a solid and rather heavy lens. It takes up quite a bit of space in your bag and can make it difficult to travel with (more on that below). On the plus side, I would expect it to hold up well over time. Also, it is dust and splash proof as well as being weather sealed.

Excellent distortion control
Ultra-wide angle lenses often suffer from distortion, where straight lines may appear more curved, and proportions may seem off. This can often be corrected in post-processing. Shots that were taken with my previous wide-angle lens, the Canon 16-35mm f/2.8, often needed quite a bit of Photoshop post-processing to straighten lines and correct distortion. The Sigma 12-24mm, however, does an outstanding job of keeping photo subjects pretty free of distortion, no matter what focal length you’re using.

Interior image shot at 12mm.

Same photo subject from above, but shot from a slightly closer angle at 24mm.
Things to consider
Not for everyday shooting situations
Shooting with an ultra-wide angle lens takes a certain eye for composition. Not everything will photograph well at 12mm due to perspective distortion. People, for example, may end up with body parts that appear much larger or longer than they should be when they are photographed at wide focal lengths. Thus, it’s important to manage your expectations with a wide-angle lens and realize that not everything will photograph well with it. Generally speaking, ultra-wide angle lenses suit the needs of architecture and landscape photographers. Portrait and product photographers, not so much.

Not a great image due to poor composition and distortion of shooting at 12mm.

With better composition and positioning, 12mm can work in certain situations, like landscape or cityscape photos.
Curved front lens element
The Sigma 12-24mm f/4 has a bulbous, curved front lens element that makes it impossible to use standard, threaded filters. This might be a hindrance to landscape photographers needing to use circular polarizers and neutral density filters, or the average photographer who likes to stick a UV filter on for added lens protection. There are other filter solutions such as slip-in rear gel filters, but those can be quite large and cumbersome to deal with.
Heavy lens
While a solid lens is great in terms of being reliably built, the weight and bulk of this lens are undeniable. Combined with the aforementioned con of not being able to add a protective filter to the glass, the Sigma 12-24mm becomes very unfriendly as a travel lens. If you do travel with it, you’d need to be extremely careful to avoid damaging the glass.

Other Lens Options
Since this is the third iteration of Sigma’s 12-24mm lens, there are two previous models to consider if you are looking for alternatives.
- Sigma 12-24mm f/4.5-5.6 EX DG HSM lens (version 1)
- Sigma 12-24mm f/4.5-5.6 DG II HSM lens (version 2)
This Sigma lens is also going up against the Canon EF 11-24mm f/4L USM lens ($ 2699), the Nikon 14-24mm f/2.8G ($ 1899), and Tamron 15-30mm f/2.8 ($ 1199). Focal lengths, apertures, and prices all vary, so it really depends on which features are most important to you.
In Conclusion
In terms of image quality, I found the Sigma 12-24mm to be incredible for shooting architecture and interiors in particular. However, its weight and fragile, bulbous lens make it tricky to travel with.
Would you pull the trigger on investing in this lens? Let me know in the comments below!
The post Thoughts and Field Test of the Sigma 12-24mm F4 DG HSM Art Lens by Suzi Pratt appeared first on Digital Photography School.
The dPS Ultimate Guide to Photography for Beginners
31
May
Photography can be a fun and rewarding thing to learn, but where do you start? How should you set up your camera, what skills should you work on first, how should you be processing your photographs? This in-depth guide for photography beginners aims to answer those questions and help you create a foundation for success as you pick up this exciting new hobby of photography.

Setting up Your First Camera
When you unpack your first camera you may be intimidated with the various menus, settings, and options for customization. The camera user manual, while it does contain valuable information, is often dry and technical which only compounds the issues of learning this new technology.

While you could embrace the good old “play with it” method of learning it can lead to frustration if your early results don’t live up to expectations. This method can also lead to learning less than optimal ways of using your camera making it more difficult to fix bad habits later on.
Each camera manufacturer has its own design, terminology, and specifications. So, it’s difficult to provide you with an exact guide for setting up your specific camera. As a result, for detailed instructions about your camera, I suggest searching YouTube or specific guides found on the internet. Just Google the brand and model of your camera to find more specific help.
Regardless of manufacturer, there are a few important steps you should take to make sure your camera is set up to your liking. Let’s go through those individually.
Image Quality
Determining what image quality to capture your photographs in can be a confusing task when you’re first starting out. What is JPEG, NEF (RAW), JPEG+RAW?

The simplest route to take is to save your photographs in the highest quality JPEG option your camera offers. This will allow you to focus on learning how to take photographs while allowing the camera to handle the bulk of the image processing. You’ll still have the ability to add some minor touchups if you want to later, but you won’t have to process your images on your computer.
As you progress and become more comfortable with your camera and the techniques you’ll learn in the rest of this article, you may want to switch this setting to capture your images in a RAW format. The advantage of RAW format is that your images are left unprocessed by the camera, allowing you to choose the processing that reflects the image you saw when you captured it, not the preset processing that your camera performs when saving a JPEG (sharpening, contrast and saturation levels).
Due to this unprocessed nature of a RAW file, it turns out to be a much larger file. Depending on the size of your camera’s sensor this could be more than 10 times larger than your JPEG images. This means you’ll notice that the number of images you can capture on your SD card will drop substantially, so you may need to purchase additional or larger memory cards.
File Naming
Determining a file naming system for images is something that most people gloss over, but choosing this early on will help you start an organizational system that works for you.
This setting is primarily going to rest on your personal taste. You could save the image file with the date the image was captured. Or you could save images with a sequential numbering system. There’s no wrong way to set this up, it depends on whether you prefer to keep track of the dates of your shoots or the number of photographs you’ve taken.
Time and Date

Even if you don’t save your images by date, you’ll still want to set the time and date of your camera. This information will be recorded in the metadata (hidden in the properties of the file) of each image, which will allow you to search and find images based on date even if you don’t name them as such. However, if the date and time are set incorrectly, it could become very difficult to match up your events with the dates your camera thinks they were taken (although you can correct this in most photo editing software).
Metadata

With each photograph, you take your camera records a lot of information about that exposure. This information is known as the metadata of the image. When you are setting your camera up, you can customize this to some extent. For example, you can embed your copyright information right into the metadata of every image you take.
Reading the metadata later can be a little confusing, but it can also tell you a great deal about the photographs you’ve taken. If you ever want to go back and try to reproduce it later or troubleshoot ones that went wrong, this data can be very useful.
Inside a program like Lightroom, the metadata is displayed and you can even add to it if you so choose. Lightroom will even let you search your library based on this information so if you want to see all photographs taken at 18mm, or shot using f/2.8, you can do that!

If you’re not using any software to process your photography, you can still view your metadata. The process is similar on both Windows and Mac. Find your image file and right click on it. On Mac you’ll want to navigate to “Get Info” and inside the window that pops up will be all the data attached to this image. Windows works in the same manner, but they call it “Properties” instead, and you navigate to the “Details Tab”.
As mentioned earlier, for more information on getting your specific camera set up, YouTube is a great place to start. You’ll be able to find walkthroughs of all the various menus, what they mean, and how to customize them.
For more on setting up your new camera read:
- Top 10 Things to do When Your New Camera Arrives
- Getting to Know Your New Camera
Understanding How Your Camera Works
Now that your camera is set up, it’s time to understand a bit about how it actually works. When you take a photograph, what exactly is happening inside the camera that allows the scene to be saved to your SD card?
A camera is a simple device which is really only comprised of a few key parts. For standard DSLRs, there is the camera body with a lens attached. Your camera body contains everything needed to capture and process an image, while the lens is what focuses your image onto the sensor inside the camera.
The way these two components (the camera and the lens) work together is as follows. Light comes through the opening in your lens. When you are not shooting there is a mirror inside that reflects that light up through a prism (think periscope) and through the eyepiece, so you can view the image as seen exactly by the lens. When you press the shutter button to take a picture, the mirror flips up out of the way, and the lens adjusts to the chosen aperture (opening in the lens, more on that later). The shutter in the back of the camera then opens, allowing light to hit the sensor, creating your image. The camera saves the image to your memory card, the mirror returns to its original place and it’s all reset ready for you to shoot again. This all happens in less than the blink of an eye.


If you have a Mirrorless camera they work a little differently. They do not have a moving mirror system. Instead, what you see in the viewfinder is a live feed of exactly what the image sensor is processing. This allows you to see things like Depth Of Field, the exposure, White Balance, and more before you even take the photograph. When you press the button of a Mirrorless camera, the lens adjusts to the chosen aperture, the shutter opens, and the image file is saved to your card.

Mirrorless camera (top) versus a DSLR (bottom) as a size comparison.
Your First Skills as a Photographer
Now that you have a basic understanding of how your camera captures a photograph, it’s time to start developing your skills as a photographer. There are three major concepts that you’ll need to develop; technical skills, artistic skills, and personality. These three skills break down in a number of ways, this guide will try to give you a place to start with each of them.
Technical Skills
The technical skills of a photographer revolve around what settings you choose to take the photo. That includes: just knowing how to use the camera and change settings, getting a good exposure, focusing a sharp image, getting the right color, etc. These are the things you need to learn to understand how to make your photographs sharp and properly exposed.
The Exposure Triangle
As you may guess by the name, the exposure triangle is made up of three components. These three components are; the aperture, the shutter speed, and the ISO. Learning to control these three settings is vital to achieving a properly exposed photograph.

Aperture
The aperture is simply the opening in your lens. Just like the pupil of your eye, it opens and closes to adjust the amount of light coming through the lens, and hitting the sensor. If your scene is dark, you can open it to let more light through the lens. When your scene is bright, you might make the aperture smaller to let less light pass through to the sensor

The aperture inside the lens opens and closes to control the amount of light entering through the lens.
The aperture not only allows you to control the amount of light passing through the lens, but it also affects the depth of field (amount of your image that is in sharp focus). You will learn more about this later just keep it in the back of your mind for now.

Shot at f/16. A small opening that provides lots of depth of field (in focus area of the image).

Shot at f/10.

Shot a f/5.6.

Shot at f.2/8.

Shot at f/1.8, a very large aperture which has a shallow depth of field. You can see how little of this image is sharp.
Shutter Speed
The amount of time that the shutter is opened allowing the imaging sensor is exposed to light is called your shutter speed.
Typically the shutter speed is measured in fractions of a second, for example, 1/200th or 1/8th of a second. However, there are cases where you may even allow your shutter speed to be open for seconds at a time. Extremely low light photography, shooting light trails, or capturing photographs of the stars are examples of where this might be the case. Make note that most cameras display two seconds like this – 2”.

A shutter speed of 1/4000th of a second is needed to freeze fast moving subjects like this moth.

Shutter speed 1/3rd of a second.

Shutter speed 1/13th of a second.

Shutter speed 1/50th of a second.
ISO
The final leg of the triangle is often the most confusing to new photographers primarily because it’s not as easy to visualize as the other two. With aperture, you can picture the opening in the lens and with shutter speed, you can picture it moving faster or slower. ISO on the other hand – is a measure of sensitivity to light.
When you increase the ISO on your camera what essentially happens is that you are telling the image sensor to be more sensitive to light. This means that for the same size opening (aperture), and the same amount of exposure time (shutter speed), you capture more light, and thus achieve a brighter image.
The trade-off is that with a higher sensitivity you also get a great chance of generating more noise (unwanted grain or speckles) in your images. Camera manufacturers have come a long way in improving this, though, and many new cameras are capable of shooting at very high ISOs with minimal noise.

Shot with a low ISO.

Shot with a high ISO.

Shot at ISO 100.

ISO 100 at 100% crop.

Shot at ISO 5000.

ISO 5000 at 100% crop. Notice the presence of heavy noise (grain) in this image compared to the one at ISO 100.
For more information on the technical skills you need to learn, check out the following articles:
- Mastering the Exposure Triangle for Newbies
- Understand Exposure in Under 10 Minutes
- The Exposure Triangle Visualised: Cheat Sheet
- How to Read and Use Histograms
- How to Understand the Mysteries of ISO for Beginners
- 6 Tips for Using ISO Effectively With Your Camera
- Seeing in Depth of Field: A Simple Understanding of Aperture
- Getting off Auto; Manual, Aperture and Shutter Priority modes explained
- Demystifying Shutter Speed
- An Exercise to Learn and Practice Shutter Speed at Home
- 6 Ways to Use Shutter Speed Creatively
You may also want to have a look at our dPS beginner course Photo Nuts and Bolts – Know your camera, take incredible photos.
Putting it Together
It’s easy to talk about each of these elements individually, but when you’re in the field taking a photograph, it’s not good enough to only know about one of them. The key is to learn how each one affects the other two, and how they work together to allow you to capture the images you want. There are also a few other key settings you’ll want to know. Let’s look at them.
White Balance
The white balance of your photograph relates to both the color temperature and the tint of your image. The color temperature will affect the yellow to the blue (warm to cold) color of your images, while tint will affect the green to magenta of your images. Your camera has different white balance settings for you to choose from including an auto option as well as several presets.
 All light sources and types of light have a color. Think about fluorescent light bulbs; you can get them in cool white, natural, or warm light – each having a slightly different hue. Other light sources are the same. For example, daylight and flash are fairly neutral, tungsten or incandescent bulbs are quite orange, shade is bluer, fluorescent is often a bit green. What the white balance setting in your camera attempts to do is to neutralize any tint from the light source so that your subject is rendered accurately.
So if you are shooting under tungsten lighting (incandescent or regular light bulbs) which is very orange – when you select the Tungsten White Balance preset the camera adds a blue filter which is the opposite color, to neutralize the orange tint. You can also use White balance creatively to add color such as in the case of shooting a sunset if you want it more orange choose the Shade preset on your camera.
The good thing about white balance is that it is consistent and predictable, so as a new photographer Auto White Balance is a good place to start. If you choose to shoot RAW format you’ll actually have a lot of control over the white balance of your images in post-production allowing you to make corrections should you need to later on. If you shoot JPG you need to make sure you get the white balance right in-camera.

White balance as shot in camera.

White balance adjusted to cloudy in post-processing.

White balance adjusted to daylight in post-processing.

White balance adjusted to custom in post-processing.
Learn more about White Balance here:
- Demystifying White Balance
- How Auto White Balance Can Hinder Your Photography
- Setting The Mood By Adjusting Your White Balance
- Guide to Creative White Balance for Landscape Photography
Learning How to Focus
In addition to learning how to properly expose your photographs, you’ll need to learn how to achieve the proper focus. Achieving sharp focus may be even more important than the perfect exposure simply because software is still unable to truly correct for soft focus.
Focus Modes
Your camera allows you to tailor the type of focusing it will do, to the subjects you want to photograph. Each manufacturer picks their own way to describe these modes, but they work in the same manner on all cameras.
- Single Focus Mode: AF-S(Nikon) / One Shot (Canon) – When you specify this mode the camera assumes that your subject is not moving. When you press the shutter button half way down the camera will snap into focus and lock onto the subject. You can then recompose your image while holding the shutter button part way down to maintain this focus. Once you depress the shutter button fully your image will be captured.
- Continuous Focus Mode: AF-C (Nikon) / AI Servo (Canon) – This is a continuous shooting mode which automatically tracks your initial focus point as the subject or camera moves. Use this mode for photographing active children, pets, sport, or other action related subjects.
- Auto Mode: AF-A (Nikon) AI-Focus (Canon) – This option tries to guess which of the above two options is right for the situation you are currently photographing. While this may seem easier and more intuitive to use, it can also be frustrating as your camera starts doing one thing. It also has the chance of getting it wrong.
Focus Points

Focus points with the center one selected. This is where your camera will focus.
Your camera is also capable of focusing on a single point within your viewfinder’s frame or by using multiple points within that frame. In most cases you when your subjects are slow moving or stationary you’ll want to use single point focus mode. You’ll switch to a multiple focus point mode when you’re photographing action such as birds in flight or sports.
Learn more about focusing your camera here:
- Getting Sharper Images; an Understanding of Focus Modes
- 5 Beginner Tips for More Autofocus Success
- How to Avoid Blurry Photos by Choosing the Right Autofocus Mode
- 9 Mistakes That Can Cause Blurry Photos
- Understanding Normal and Cross-Type Focusing Points
- 4 Tips for Using for Live View to Get Sharper and More Creative Images
The Shutter Speed Rule
It’s simply a matter of physics, you can only hold a camera still for so long without the motion of your hands (camera shake) being detectable in the image you’ve captured. When this happens your image will look blurry. Nine times of out ten with newbie photographers a blurry image is caused by a slow shutter speed, not improper focus. The good news is that there’s a very easy formula to remember which will allow you to rarely worry about this dreaded issue.
Take the focal length of your lens and that becomes the shutter speed you cannot go below. For example, if you’re photographing at 50mm, your minimum shutter speed is 1/50th of a second. If you’re photographing at 200mm your minimum shutter speed is 1/200th of a second or faster.

A couple of notes about this rule: These numbers are for 35mm equivalent focal lengths so if you are using a crop sensor camera (one which is not full frame) multiply by that first, and then apply the shutter speed rule (Nikon’s is 1.5x so if you’re shooting with a 200mm lens on a Nikon crop factor camera body go with 200 x 1.5 = 300 or 1/300th as your minimum shutter speed.)
Also, this rule tends to break down at the extreme end. For example, 1/20th may be too slow of a shutter speed even if you’re photographing at 20mm. The same goes for 1/500th with a 500mm lens because the weight and sensitivity to movement are so magnified at this end that you’ll probably need to shoot even faster – or use a tripod.
Many modern lenses have a setting called VR or IS. This stands for Vibration Reduction or Image Stabilization and they essentially do the same thing, try to minimize camera shake at slow shutter speeds when hand holding. High-quality systems may let you get away with even slower shutter speeds.
All this said, because everyone’s different, the best thing to do is to try to find your own personal shutter speed limits by taking test shots. If your photographs are soft or blurry, odds are good that it’s not the lens’s fault, but rather, that you’re not able to hold the lens still enough to capture a sharp image.
Proper Tripod Use
Investing in a sturdy tripod is important, but that’s only half the battle. You also need to learn how to use the tripod effectively in order to ensure you get sharp photographs.
There are situations when you’ll absolutely need a tripod. For example, if you want to create silky waterfall photographs, shoot photographs of the stars, or do any sort of light painting a tripod will be your new best friend.

Some common errors many new photographers make are; extending the legs from the thin segments first. The thicker upper segments will provide more support so use those first, then use the thinner segments if you need more height. Only as a last resort should you extend the center column as it is the least stable piece of your tripod and any instability can result in camera shake, or worse, a damaged camera.
Another common mistake made with tripods is not balancing the center of gravity. A good quality tripod will allow you to adjust each leg’s angle independent of the others. By doing this you can negotiate difficult terrain. It might look awkward to have one leg at 45 degrees and the other two at 20 and 30 degrees, but if that’s what it takes to get the camera’s center of gravity straight down the middle then make sure that’s what you’re doing.

Use a High ISO When Necessary
There is a lot of fear among some photographer in using higher ISO settings. This may be the result of a hold-over from the days when digital cameras first made their appearance and high ISO settings were truly terrible. But today’s cameras are substantially more improved, meaning that you can get very usable images well above ISO 1000 on even most entry-level DSLRs.
This means that if you are in a low light situation or if you are trying to freeze fast motion and need a faster shutter speed, don’t be afraid to bump the ISO. Even if you do get a little bit of noise in the photograph, post-production software has gotten very good at removing and smoothing out noise that it probably will be recoverable in the end.
The moral of the story is that sharp photographs don’t require expensive lenses, but rather a solid understanding of the fundamentals of what causes blur in the first place. Know your camera’s focus settings and options, use the minimum shutter speed when hand holding and use a tripod properly when needed.

11mm lens, ISO 1250, f/2.8, 30 seconds.
More on using a high ISO here:
- How I Learned to Stop Worrying and Love Auto ISO
- Reasons to Shoot High ISO Images
- Use a High ISO to Create Grainy Shots
- Three Uses for High ISO you Might Not Know
Artistic Skills
While technical skills will allow your images to be sharp and well exposed, they won’t help you to capture interesting photographs. This is where your artistic skills will come into play. Things like composition, subject matter, and creating drama with light all play a role in determining the interest level of the photographs you capture.
Composition
There are a number of techniques you can use for composing your photographs and it is important that every new photographer learns at least a solid foundation in composition theory.
The composition of your photograph is arguably more important than the subject itself. After all, interesting subjects can be made to appear boring, while boring subjects, can be made to look quite interesting, all due to the way the photographer has chosen to compose the photograph.
The first rule of composition you will want to learn is the rule of thirds. This rule is one that is talked about over and over again. It’s such a fundamental part of photography that your camera manufacturer has more than likely provided a grid (that looks like a tic-tac-toe board) in your viewfinder to enable you to quickly compose images using this rule.
The basic concept of the rule of thirds is to place your subject, or your primary area of focus, (basically where you want your viewer to look) on one of the four cross sections of the grid in your viewfinder.


A Couple of Key Things to Note
Leave room in front of your subject, not behind. In most cases, you will want to leave room in front of (i.e. where your subject is looking or leaning) rather than behind it.
Use one-third of your image for providing structure or grounding your viewer to the scene that you are presenting, and two-thirds to showcase the reason for photographing the scene.

There are many more advanced composition techniques but get really comfortable with this rule before you venture out to more complex techniques. Plus, there are a number of composition tools that you can use within just this one technique. You will learn about those next.
Composition tools are what you use within your frame to drive your overall composition. These tools can be elements within your scene, or it can be the absence of these elements that drives the composition. It’s all about how you use them to your advantage when you compose a scene.
Leading Lines
Leading lines is a tool that you can use to pull your viewer into and through your photograph. On the most basic level, a leading line is simply a line within your photograph that leads the viewer to something interesting. The last word in that sentence is what’s important.
Important note: You cannot just photograph leading lines – they are just a compositional tool, not the subject of the photograph.

To compose with leading lines you’ll first want to find a good subject, anything that interests you. Next time you raise your camera to photograph first stop and ask yourself, “Is there something within this scene that I can use to lead my viewer towards this subject?”. Remember, the person viewing the photograph doesn’t have all the context that you had while you were on this scene. Therefore, any additional help you can provide to the viewer about what it was that caught your eye and made you take the photograph will help make the image more interesting.
Curves
Curves are similar to leading lines in a way but rather than straight, they are rounded. The great thing about curved lines is that they can meander through a photograph allowing you to hit upon multiple interesting elements across the entire frame. Curved lines work really well in landscape photographs as a result. This allows you to capture both interesting foreground elements and distant background elements while tying it all together.

Symmetry
When you have a symmetrical subject, odds are good that you’ll want to use this tool in your photograph. Reflections are a great way to fill your scene with interesting elements. You can have a sunset reflected in a river, which leads toward the sunset itself for example.

For more on composition read:
- Five Ways to Improve Your Composition Skills
- Tips for Using Natural Framing to Improve Your Composition
- How to Improve Composition by Placing your Subject Off-Center
- 10 Ideas to Instantly Improve Your Photography Composition
- 6 Advanced Composition Techniques to Improve Your Photos
- 4 Steps to Creating Images With More Meaningful Composition
- How to Create Strong Compositions Using Color Contrast
- How to Use Leading Lines Effectively in Landscape Photography
Your First Time Post-Processing Photographs
Your post-production skills are what can take a great photograph to the next level, but processing does not create great photographs. A great photograph is created the moment the shutter is released, not on within a computer, hours or days later. Therefore it is important for you to have at least a fundamental understanding of post=production as you begin taking you first photographs.
Software Choices

There are a number of free image processing tools available and if money is extremely tight these options might be where you’ll want to start learning. However, if you can afford to invest in post-production software, I would highly recommend Adobe’s Creative Cloud package for photographers. This gives you access to both Lightroom and Photoshop CC which will allow you to process photographs with the same tools the pros use for roughly the same cost as a Netflix subscription. Considering the costs associated with lenses and cameras it is truly one of the best deals you will find in photography.
Post-production 101
No matter what software you end up choosing the initial learning experience will often result in a lot of experimentation. At the deepest level, post-production is a form of art. It is where you are able to add your own flavor to the images you’ve captured and make them your own.
While you can learn tricks and tips on how to process images and mimic these things in your own photographs, the best advice I can give you about processing is to experiment fearlessly. You will find that some experiments fail miserably, while others are truly magnificent. But because each photograph is different, learning high-level concepts of how the various sliders, buttons, and drop-down menus affect your image is more important than remembering +33 Exposure, -14 Shadows, etc.

Image before processing, right out of the camera.

Image after processing.
For more on post-processing images read these dPS articles:
- Post-Processing Tips for Beginners
- Understanding the Difference Between Photoshop and Lightroom
- Photoshop Versus Lightroom Which is Right for You?
- Post-Processing Tips for Overcoming Beginners Acts of Omission
- The dPS Ultimate Guide to Getting Started in Lightroom for Beginners
- 5 Common Post-Processing Mistakes to Avoid
- 5 Easy Photoshop Tips for Beginners
- 10 Things Photoshop Beginners Want to Know How to Do
- The Beginners Guide to Lightroom Presets
- 6 Photoshop Tools Every Newbie Should Learn
- 5 Practical Lightroom Tips for Newbies
For more in-depth learning check out our dPS course: Lightroom Mastery.
What Makes a Great Photograph
Understanding the concepts explained earlier is a great starting point. But great photographers, and ultimately great photographs rely on more than just the ideas and concepts. It’s about how these all interact with one another.
Great photography relies on a thoughtful composition. This means that you as the photographer are choosing the right composition for the specific subject you’re photographing. Just because The Rule Of Thirds is a great type of composition, it doesn’t mean that it’s the right one to use for every photograph.

The same can be said about other aspects of photography. Finding the right way to tell the story, the right way to expose the scene, the right way to process the final image – these all affect the final outcome. It takes a lot of practice, time, and energy to do these things as second nature, but that’s part of the reason you learn something new.
Finally – Never Stop Learning
Remember, photography is truly fun and can be extremely rewarding to learn as a skill, but it is a skill that can take a long time to develop. Over time you’ll find yourself asking questions about your composition or the exposure that you’ve chosen for a particular photograph. You’ll start to hear yourself analyzing the light in a scene as you’re walking down the street with friends. Photography can change the way you see the world if you let it.
Over the next several months if you continue to work at improving the skills mentioned in this article you should see improvement in your photography. Remember to compare your photographs with those that you’ve taken in the past and not against other photographers, even if they are starting at the same time as you are. We all learn at different speeds, so all you need to focus on is improving your own images.

The final suggestion is for you to join a photography community. Whether it’s a Facebook Group, an online forum, or a local club, the support and encouragement you will get from other photographers will be priceless as you build upon these basic skills with more advanced techniques. Join us at the dPS Facebook group here, there’s usually a good discussion happening and lots of image sharing.
The best way to improve your photography is through developing a solid foundation of skills that you can build upon. This beginner’s guide was designed in a way that hopefully achieves that and as a result, we’ve made it into a printable PDF download which you can get here for free.
The post The dPS Ultimate Guide to Photography for Beginners by John Davenport appeared first on Digital Photography School.
25 Things I Learned as a Photography Newbie
30
May
It seems photography should be easy, buy a camera and take photos, right? Except it’s not just a camera you need, there are other accessories and things you need to know as a photography newbie. Which lens do you buy and why? What do you shoot? How do you set the camera up correctly? What is the best way to process RAW files?

Walk into a good camera shop and there are walls covered in bags, cabinets full of lenses, banks of accessories, and tripods arranged in an artistic installation on the floor somewhere. It can be hard to know what extra things you really need versus what the salesperson tells you to buy. The internet offers lots of options for research in advance, but sometimes you just have to find things out the hard way.
Plus the salesperson can’t help you once you walk out the door, get your camera home, and you try to make sense of the camera’s user manual for the first time. Suddenly you are on your own with so much possibility and opportunity in front of you, but not really sure how to tackle it.

These are the top 25 things I learned as a photography newbie
Gear related things
- Buy at least one spare battery and memory card, two if you can afford it. Remember to keep those spares charged!
- Check your camera gear and settings before you leave the house – preferably the day before (so you can charge batteries). Realizing you left your memory card plugged into your computer, and your battery on the charger an hour into your trip is less than ideal.
- The perfect camera bag is like the Holy Grail. You will go through several bags trying to find the best compromise for your requirements.
- New gear doesn’t make you a better photographer. Many people are under the impression that buying a fancy expensive DSLR body somehow guarantees their images will be amazing. A new lens might enable you to shoot subjects in a better way (e.g. a macro lens lets you get close to small things, a long zoom makes it easier to photograph birds or animals) but these things are a tool that you, the photographer, has to make work.
- Buy a good tripod and get comfortable using it.

A tripod is an absolute necessity for shooting in the dark, especially when it’s a long exposure as well
Gear isn’t just about cameras and lenses
- Going out in the dark? Get a headlamp or torch, preferably one on a swivel mount so you can point it at the ground while walking in the dark. This is vital for not slipping and breaking an ankle on rocks or broken ground, and finding things in your bag.
- Invest in good footwear. Take a hat, sunscreen, water and insect repellent. Also, carry an extra layer of clothing just in case.
- Have proper cold weather gear. Nothing is worse than being outside with cold wet feet and numb fingers. If you live in areas that get properly cold, have good footwear suitable for the kind of terrain you will be out in. Clothing technology has advanced a lot in recent years, there are many options for the base, middle and shell layers, gloves, hats, and socks that are thin, light and easy to wear. Good quality gear can be expensive, but it usually lasts and is worth the investment.
- Get proper camera insurance. Camera gear is expensive and is often a target for thieves (don’t leave it in your car overnight). Accidents happen, a sudden large ocean wave can wipe you and your tripod out without warning. Tripod heads can fail and cause your camera and lens fall five feet straight onto a concrete floor. All sorts of mishaps can happen, so protect your investment with insurance, it is a lot cheaper than having to replace the gear yourself.
Making better images

I saw this scene in my rear view mirror, a quick handheld capture that was well worth the extra stop.
- Look behind you, above, and side to side. Sometimes the best view isn’t the obvious one directly in front of you. This applies especially if you are shooting a well-known and frequently photographed location. Put some effort into making your image something different. Exert yourself to break away from the crowd.
- It takes some time to get past the beginner stages of photography and to show improvement. It takes even longer to develop proficiency and “get good at it”.
- Composition is critical and will make or break any image. This is the one subject I personally recommend people invest time in researching and learning. There are loads of articles about composition online, take the time to read them and then practice, trying to see different composition options when shooting. Many people stand and shoot as their only option. Getting down at ground level or eye level can make for an entirely different image. Setting the camera in portrait or landscape mode can make a real difference. Learning composition is one of the most powerful tools you have as a photographer.
- The best sunrise or sunset is the one you stayed at home for. You can go out every morning for months and get nothing good, that one day you stay home and sleep in? Guaranteed to be a stunner.

My second sunset was well worth getting out of bed for.
- It’s all about the light that you have right at that very moment. Sometimes you have the option to walk away and come back, sometimes you don’t. So it’s important to learn how to see the light you have and know your options for capturing the best image possible with the available light.
- Take your camera out as often as you can and practice as much as you can. However, there are times when you might prefer to be in the moment, enjoying the action (a concert or party or event) and that is okay too.
- Check the edges of your frame before you shoot. Run your eye around the edge of the image in the viewfinder. Are there any branches, grass or trees poking out in awkward ways? Does your portrait subject have a lamp post coming out of the top of their head? Is everyone fully within the frame – there are no chopped off hands or feet or tops of heads?

White clover shot with 100mm macro lens.
Camera settings
- Muscle memory – learn what the buttons on your camera do, and where they are. Learn it so well you can find them by feel, in the dark. When responding to changing situations, it’s important that you can adapt quickly and without thinking too long about it.
- Manual mode is just another setting on your camera. There are no rules that say you have to use it all the time, although there are plenty of opinions on the subject. If shooting in manual makes your heart sing, then good for you. If the thought makes you really nervous and uncertain, that is okay, there are other options available.
- Back Button Focus is the preferred option for many wildlife and bird photographers. It is faster to use once you get used to the change.

This guy stuck his head into the frame as I was composing, had to react quickly to get the shot, and it is not 100% sharp as a result. Knowing your camera inside and out will help you get shots when time is of the essence.
Workflow and image processing
- Develop your own process and workflow. There is no right or wrong way to do things and there might be more efficient or different ways to achieve an outcome. Find one that works for you.
- Printing your work is surprisingly complicated. There’s calibration of the monitor, color profiles of the printer and paper, soft proofing, and so many different paper options and finishes. Even getting the professionals to do it for you can be challenging. Be prepared to spend a bit of money experimenting and finding out a way that gets you quality prints.
- Data storage and backup are a priority. If you are not particularly interested in computer technology, this can be a bit challenging. If you shoot in RAW format which outputs large image files, eventually you will have to address the requirement to store your data. Usually, at the point your first hard drive fails, backing up your data also becomes a consideration.
- Learn to crop and don’t be afraid to use it. Creative use of a crop can be a powerful composition tool, either improving the shot or fixing it (maybe you chopped people’s feet off). Be aware that cropping your image removes pixels and data from the file size, and that can limit how big final prints can be.

The weather was dreadful, a friend stood over me with an umbrella while shooting this, but converted to BW makes all the difference. Shoot with the light you have and know what you can do with it.

Still life studio with reflector, lenses, still life props and a cat asleep in his favorite spot.
Advancing your work
- Share your work and invite discussion. Places like Facebook, Instagram, Twitter and various gallery sites online are easy avenues for sharing images. Start a blog and share your learning journey, the blogging community can be very supportive and friendly. Join your local camera club for some face-to-face interaction. Getting critiques can be valuable, but a thick skin is also necessary, as not everyone will be a fan. Some people will be nice and some people will not be and that can be difficult to hear.
- Push your boundaries. Some styles of photography will be easy for you, more enjoyable and fun. It’s good to spend time in that space and improve your craft. However, trying new styles can be a powerful learning tool as well. Don’t be afraid to try something new, remember it can take a while to get the hang of it, so don’t expect instant success.

Flat out on my stomach in the dirt was the only way to get this intimate composition.

The sky was heavily overcast and the light was dull, but the cygnets were adorable.

Sleeping ducklings, so fuzzy and cute. Taken flat out on my stomach with a long lens to keep my distance and not disturb them.
Summary
Like every new hobby, once you get started and scratch the surface, there is lots more to learn than you expected. Some lessons can only be learned the hard way, via personal experience. Making mistakes is a powerful learning experience provided you and your camera gear survive the experience.
Since starting photography in 2007 there have been many mistakes made, and hopefully, lessons learned along the way. I offer up my experiences so you can hopefully save yourself some time, money and hardship and not do some of the silly things that were the reasons for the above list.
Good luck and happy shooting. Be safe and have fun.
The post 25 Things I Learned as a Photography Newbie by Stacey Hill appeared first on Digital Photography School.
You must be logged in to post a comment.