RSS
 

Archive for the ‘Photography’ Category

Improve Your Composition by Changing Your Point of View

03 Nov

There are many rules, guidelines, suggestions, and ideas around what makes a good photographic composition. Every person has their own particular aesthetic and way of seeing, and it can be difficult to find your way through all the information to a concept that works for you.

Improve Your Composition by Changing Your Point of View

However, there is one simple tip that may be the easiest and quickest way for you to improve your images. It’s free and doesn’t usually require you to buy anything. All you need to do is stop, think, and make a different choice. What is that choice? The choice of changing your point of view.

The vast majority of images are taken from a standing position, looking out at, or down onto the subject. So, instead of doing what everyone else does, why not try something different?

Change Your Point of View

#1 – Go Low

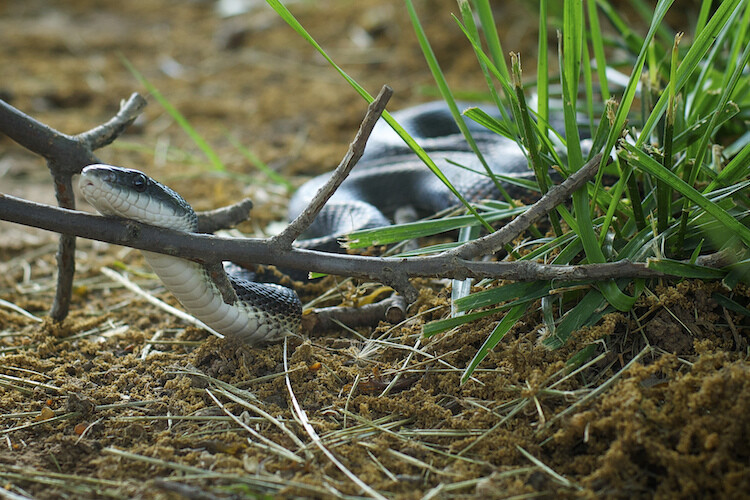
Get down on the ground as low as you can get (depending on your physical capabilities or what might be in the way). This can give you a much more intimate connection with any creature you might be shooting – being at eye level with the subject is always ideal.

Being on the same plane as a ground-based subject is unexpected. Too often we view the world from a standing position so this viewpoint challenges us.

Improve Your Composition by Changing Your Point of View

I crouched as low as I could get without scaring this curious bandicoot.

Improve Your Composition by Changing Your Point of View

Lying flat on the damp sand at 6 am on a tropical island isn’t a bad way to start the day.

Improve Your Composition by Changing Your Point of View

I spent a couple of hours crawling around on my hands and knees on the edge of a cemetery, capturing these Fly Agaric in full bloom.

2. Go High

Climb onto a fence, up some stairs, a tree, or a ladder and use that height to better effect. Looking straight down on your subject is a very alien view for most people. This is a big part of why drone photography is so popular, it allows us to see our world in an entirely different way.

Improve Your Composition by Changing Your Point of View

3. See from a different angle

How many times do you point the camera straight or straight down? Most people rarely look immediately up above themselves, so that is quite a different image. If you combine adding height with looking down you can be very creative as it is unexpected by viewers who normally have their feet planted firmly on the ground.

Improve Your Composition by Changing Your Point of View

Vertical flat lay overhead still life shot.

Improve Your Composition by Changing Your Point of View

Pointing the camera directly down the stairwell from the top floor provides a unique angle.

Improve Your Composition by Changing Your Point of View

Stalactites in a limestone cave right above my head.

4. Make a Different Lens Choice

Changing from your standard lens to a different one can also make a big difference.

Try using a macro lens, or an ultra wide-angle. Even better, don’t use them conservatively. Use the ultra-wide to take macro shots, and use the macro lens to take portraits.

Get a cheap vintage lens, one that has all sorts of interesting visual effects inside the glass (they usually need to be focused manually). Play with a Lensbaby or another specialty type lens. Don’t be afraid to experiment. After all, whats the worst that could happen?

Improve Your Composition by Changing Your Point of View

The only way to fit this really wide piece of farm equipment into the frame was to shoot up close with an ultra-wide-angle lens. It also allowed the creative choice of including all the wonderful clouds in the sky as well.

Improve Your Composition by Changing Your Point of View

Macro lenses offer a window into a world we cannot normally see with standard eyesight. Fascinating tiny details become visible.

Improve Your Composition by Changing Your Point of View

Shot with an antique Russian lens, it has a lot of circular distortion around the edges, which when used creatively can be effective. The bonus is that these lenses are very cheap and easy to find in antique shops. Usually manual to operate though.

5. Shoot Tight

Stick that lens right up close to your subject, get in tight. Fill the frame with the subject, as much as you can. Go completely abstract if you like, but push yourself out of your comfort zone. Get in as close as you can, and then go closer still.

Improve Your Composition by Changing Your Point of View

Improve Your Composition by Changing Your Point of View

6. Take Your Time

Long exposures can be a lot of fun and give you a very different image. Soft flowing water effects are nice, but what about a really long exposure where the water looks like smoke and mist? Night shots of fire dancers making patterns in the darkness? Playing with light painting? ICM or Intentional Camera Movement? Slowing down the action and capturing it can offer a lot of creative fun.

Low light or night time photography offers lots of opportunities for using long exposures in creative ways. Astrophotography is very popular at the moment and requires you to use a tripod and take often several long exposure frames. Light trails from traffic on busy city streets or a car climbing its way up a mountain road in the distance.

These kinds of images take time to make, which requires you to think about and plan it in advance. It can be frustrating to have to wait to achieve them but the pay off for creating an image under difficult conditions is very rewarding.

Fire dancers on the beach

Fire dancer using a colored light bar and taken with a longer exposure to capture the spinning movement

A tree draped in strands of lights becomes a very different image when Intentional Camera Movement is applied. Just a slightly longer exposure time and a wiggle of the wrist and you get this.

7.  Be Abstract

Going really close to a subject or selecting just a part of it to include in the frame is a great way to bring abstract concepts into your work. You tease the viewer with just enough of the subject that they wonder what it is. This often makes them engage longer with the image as they think more about what it could be.

There is a fine line between enough and too abstract, depending on your subject. Of course, you may want to go all the way into very abstract which is perfectly valid, although might challenge your audience and lose engagement.

This is the very battered toes of a pair of ballet pointe shoes

Summary

Putting some effort and thought into the way you use your camera gear is one of the most effective ways to improve your images in my opinion. Strong and eye-catching compositions can be achieved with any kind of camera provided you put some thought and time into making it.

Yes, for some kinds of shots you might need special gear, like a macro lens for those really good close-ups. In general, though, you can still see a noticeable improvement in your images by just taking the time to stop and think BEFORE you shoot. Ask yourself the following questions before you press the button:

  • What is the obvious angle here?
  • What other options could I use instead?
  • Do I have time to experiment?
  • Is there space and opportunity for me to physically move to a different viewpoint?
  • Is it safe/legal?
  • Will I do any damage to property or environment by changing position?

Learning to see in a different way was a critical step in my photography path. By expanding my options and developing new styles, my work was noticed and commented on much more. This prompted me to experiment even more and really challenge my own preconceived boundaries.

Having the ability to shoot in many different ways adds flexibility and depth to your skillset. Cold rainy day? Break out the macro lens and raid the pantry for something different to shoot. Pick a flower from the garden and bring it inside. Wander the city streets looking for the small interesting details and focus on them. Be abstract, tell a story from your point of view. Get shots of people’s feet crossing a zebra crossing or panning shots of a cyclist dodging traffic.

Your turn

Take your time to look and see what is around you, then think about how you can frame it up. Be creative. Don’t be afraid to try something new. It might take a few goes to get the hang of it or you might fall in love with seeing the world around you in an entirely different way immediately.

Challenge yourself to grow and improve. And please share your thoughts and experiences in the comments below.

The post Improve Your Composition by Changing Your Point of View by Stacey Hill appeared first on Digital Photography School.


Digital Photography School

 
Comments Off on Improve Your Composition by Changing Your Point of View

Posted in Photography


7 Ideas for Low-Cost Printing and Framing Options for Your Images

03 Nov

Photography has changed an awful lot over the last 100 years. Heck, it’s changed immensely over the last 20 years. Who am I kidding? With the rise of the cell phone, digital photography and social media have changed the industry in countless ways.

Images matter

I would argue that one thing in photography hasn’t changed. Everyone loves looking at pictures whether it’s scanning images on Instagram or flipping through old photo albums, something is mesmerizing about viewing an image. This simple fact will never change. Everyone loves looking at pictures.

My kids will sit for an hour and check out an old photo album. They learn about their family and their history from those images. They like to share their lives through images on social media. Humans are obsessed with the visual.

“Photography is a way of feeling, of touching, of loving. What you have caught on film is captured forever… It remembers little things, long after you have forgotten everything.” — Aaron Siskind

7 Ideas for Low Cost Printing and Framing Options for Your Images

If this image had not been printed I would have forgotten just how much my son has grown in 9 years. It doesn’t matter that it’s a little soft. It’s the memories involved that matter.

So let’s get them off the computer

What could be better than a visual record or our lives? So why then are people so hesitant to print those images and display them? In the days of film, people used to take photos and leave the rolls lying around for years. Today we take photos on our phone and leave them there. Sure they get shared on Facebook or Instagram, but then we forget about them. Why? Why do we do this?

One excuse I’ve heard is, “It’s expensive to print and frame images.” Well okay, that’s valid. It can be pricey, I agree, but with a little ingenuity you can print out those images and share them easily. There’s something wonderful about handling a printed photograph. We shouldn’t lose that part of the industry. We should always print our photographs.

So without further ado here are some tips and tricks for printing and framing photographs in a way that doesn’t cost an arm and a leg.

1) Print in bulk

Every print company gives discounts for mass amounts of printing. Save up a whole bunch of images and print them all at once. You can drag and drop your favorite images into a folder and then when you have enough to meet their bulk prices you can upload and save (try Shutterfly). Just remember to print all the images at the same size. Even for large art prints, you can find savings by printing in bulk.

If you use an online lab, the shipping can be a real burden, but you can save money on shipping by ordering a lot at once. The larger the package, the cheaper it can be to get it shipped. A lot of companies also offer free shipping over a certain price. Take advantage of these offers and get your prints delivered in a cost-efficient manner.

2) Buy frames in bulk

If you’re like me and you love to fill your walls with images of your family, then it’s time you started buying frames in bulk. Go to your local framing store and talk to them about purchasing large quantities. Most stores will give a discount if you buy five frames of the same size.

Even for custom built frames, you can get a good discount by ordering several of the same size and style at one time. I use this strategy for framing art for galleries. I will print five images the same size and then frame them in the same way. It saves me a great deal of money, and the work looks very cohesive hanging on the gallery wall.

You can also check out online framing supply stores. Sites like Matshop offer great prices on frames, free shipping on orders over a specific amount and the ability to buy frames in bulk. You can also purchase bulk mat kits which are very useful. Purchase frames from your local framing store or pick them up at flea markets and add your mats and images.

7 Ideas for Low Cost Printing and Framing Options for Your Images

Here’s a collection of the frames and mats I purchased through bulk ordering.

3) Recycle old frames

For that crafty look visit garage sales or flea markets and pick up some old frames. Pop your matted images into these frames, and you’ve got a truly unique look for your work. It’s easy to find old frames for a few dollars if you know where to look.

4) Create magazines or photo books

It’s easy to upload your photos and use online printing services like Blurb to make photo books. Lightroom comes equipped with an interface for creating photo books and ordering from Blurb. It’s not very hard to create them and it’s very cost-effective.  Plus you get to maintain some of the nostalgia of flipping through photo albums. Remember those days?

7 Ideas for Low Cost Printing and Framing Options for Your Images

A printed book to show off family pictures from a trip to Iceland. My boys take it off the shelf and read it occasionally.

5) Buy a cork board

No seriously, purchase a few cork boards and pin prints to them. When you get tired of the images you’ve displayed, print out a few more and pin them up. You’ll get lots of comments from friends and family. They often stop to look at my corkboard. Sometimes I get comments like, “You know this is a cheap way of showing off pics. I need to do something like this.”

I usually switch up my images every season. The prints might be curled a little at the end of four months, but I put them in a labeled box, and I will recycle images pulling a few from an old box each season. It’s completely random which images end up on the corkboard.

7 Ideas for Low Cost Printing and Framing Options for Your Images

This cork board sits in my kitchen. I change the images up every few weeks.

6) Subscribe to printing company newsletters

I know it’s annoying to receive promotional emails, but honestly, most companies send out promo codes in their newsletters, and these codes can save you loads of money. Take advantage of 40% off codes to print out large canvases of your travel images.

Sites like Posterjack and 44 Wide often have sales that reduce the cost of printing. It means you can get a 100$ canvas for 60$ . That makes for a cost-effective gift idea for a family member.

7) Turn them into coloring pages

My kids love it when I take their photos and turn them into something they can contribute to. There’s a very simple process using Photoshop that allows you to create outlines of your images. If you own Topaz you can use that plugin to create line drawings. There are lots of options available, give the process a try.

Print them out and let your kids decorate the fridge. You will always have the digital print you can use for more serious purposes. So let your kids go crazy, they can give Grandma orange hair or make your dress polka dotted. The images will become stronger memories when they can be seen on a daily basis.

7 Ideas for Low Cost Printing and Framing Options for Your Images

It only takes a few minutes to turn photos into coloring pages and then print them out at 8.5 x 11 size. Perfect for artistic renditions.

Conclusion

There are lots of amazing and cost-effective ways to print and display your photographs. Be creative, think a little outside the box and try a few ways to incorporate your images into your daily life.

It doesn’t have to be expensive or time-consuming. If you’ve got little kids, you can even find fun ways to create an art project involving photographs. We’d love to hear your tips and tricks for printing images. Please share your ideas with us in the comments below.

Let’s all get into the habit of putting photographs on our walls not just our Facebook page.

The post 7 Ideas for Low-Cost Printing and Framing Options for Your Images by Erin Fitzgibbon appeared first on Digital Photography School.


Digital Photography School

 
Comments Off on 7 Ideas for Low-Cost Printing and Framing Options for Your Images

Posted in Photography


7 Benefits of Printing Photographs

02 Nov

Digital sharing of photos may have reduced the urge to print a photograph after taking a shot with your digital camera. But printing photos offers you a lot of benefits as a photographer. Here are some of the reasons why you should consider buying a photo printer and start enjoying the benefits of photo printing. 1. Improve Your Photography Skills Continue Reading

The post 7 Benefits of Printing Photographs appeared first on Photodoto.


Photodoto

 
Comments Off on 7 Benefits of Printing Photographs

Posted in Photography


7 Tips to Get More Creative Photos of Well-Known Landmarks

02 Nov

Photographing landmark buildings when you visit a new place, or even places closer to home is a great way to get stand out photos. Often the architectural beauty of the natural or man-made landmark will make the image dramatic, you simply need to compose the photo well.

In this article, you’re going to see the standard photo, and then how to make more creative images of well-known landmarks. You’ll see a case study of how to shoot one particular landmark in many different ways.

7 Tips to Get More Creative Photos of Well-Known Landmarks

This photo was taken from the Trader’s Hotel in Kuala Lumpur. It shows the Petronas Twin Towers.

1 – The standard photo

Ahead of photographing more creative images of landmarks the aim is to make the best standard photograph you can. Chances are that a quick search on a photo sharing site like 500px.com will reveal this, so there is no need to re-invent the wheel here.

Once you know which landmark you want to photograph, the next step is to find out where that photo was taken from, if the same image has been taken many times there will likely be a viewing platform.

Once you are in position it’s time to compose your photo. It’s better if you can use a slightly different composition to those used before, perhaps try a vertical shot.

The last step is to ensure you have good images to process once you return home. Bracketing your images when the sky is brighter than the foreground will allow you to use creative post-processing techniques like digital blending. Alternatively, you can use graduated neutral density filters, and get your photograph exposed correctly in camera, with a single frame.

2 – Paint with light for creative images of landmarks

7 Tips to Get More Creative Photos of Well-Known Landmarks

This photo shows how light painting can be used to create your own image.

One of the most creative things you can do in photography is light painting. There are several forms of this technique and each can give you dramatic results.

This is innovative in that the results will be your own, and difficult for someone else to replicate. Let’s take a look at the different forms of light painting that you could try.

  • Light painting – Most people know light painting as writing their name with a torch (flashlight) in front of the camera. How about light painting around a landmark to add a creative edge? Those really interested in should look into buying the pixelstick.
  • Kinetic light painting – This refers to moving the camera, as opposed to moving the light source. Examples of kinetic light painting are camera rotation and zoom bursts.
  • Lighting up an object – You can light up a landmark using a strong flashlight, providing it’s not too far away. Using lights to brighten a landmark can make it stand out even more in the frame.
7 Tips to Get More Creative Photos of Well-Known Landmarks

Camera rotation is a good way to make a creative image of a landmark.

3 – Infrared photos of landmarks

Make creative images of landmarks by using infrared photography! There are several avenues to achieving this look, and you have a choice of in-camera or post-processing.

The classic infrared photos show lots of foliage, sky, and usually a water element. The effect creates a dreamscape image by turning the sky black, and the foliage white. Infrared photography is best done on a clear sunny day, with a few clouds to create more interest.

The following are the three avenues open to you to create these photos when shooting with a digital camera.

  • Take a normal photo, and use post-processing to give the image the look of an infrared photo.
  • Add an infrared filter to the front of your lens. To get the infrared look you will need to take your file and process it on the computer.
  • Convert your camera body so that it’s usable for infrared photography, again further processing will be required.
7 Tips to Get More Creative Photos of Well-Known Landmarks

Though this photo uses the same composition of a previous one above, the mood is changed by using an infrared technique.

4 – Get those detail photos!

It’s always a good idea to take some detail photos of a landmark, these are texture images that often use repeating patterns. When photographing a landmark building, whether it’s old or new, you can use bricks or glass windows to create these texture photos.

Photos of natural formations will also have good details. Cliff faces may, for instance, have good lines and textures in them. The aim with this type of photo is to show detail, but at the same time make it obvious which landmark you are photographing. This could be structures that are unique to that particular landmark.

When shooting glass windows, is there a reflection in those windows that will give the photo context? When photographing landmarks always try to get detail photos to add more variety to the set of photos.

7 Tips to Get More Creative Photos of Well-Known Landmarks

Creative images of landscapes can be achieved using detail photos. The metallic structure of the tower and the Malaysian flag lend context.

5 – See another world with refraction

An alternative way of producing a unique landscape image is through using refraction. A transparent spherical object will be needed for this, there are several options available. The best objects for producing this effect are a wine glass filled with water, a crystal ball, or perhaps a clear marble.

This is a great way of capturing a large area of your scene, with the effect in the refracting object being similar to a fish-eye lens. The image inside the ball will be upside down, so managing this aspect of the photo is important. This technique is a lot of fun, though the need to carry around a heavy glass ball can be taxing.

7 Tips to Get More Creative Photos of Well-Known Landmarks

Refraction is a great method of producing a unique image, this one also shows a reflection.

6 – Long exposure for artistic effect

A great way to produce creative images of landmarks is to play around with long exposures. This is a variable that can be used in different ways to great artistic effect. It’s more common to carry out long exposure at dusk, or during the night; however using an ND filter will allow you to take long exposures during the day.

Here are three ways you can use long exposures:

  • Car light trails – This is a form of light painting. In this case, the car headlights will paint their way through your frame, along the road you’re photographing.
  • Cloud movement – If there are clouds in the sky, and they’re moving fast enough, you can use a long exposure to capture this motion.
  • Moving water – Similar to the above cloud movement, but with water! The main subject is, of course, your landmark, but if that landmark has water near it, then use that to your advantage.

All good landscape photographers carry a tripod, and anyone planning this type of photo will need one. Your exposures will be anywhere from one second to several minutes long.

7 Tips to Get More Creative Photos of Well-Known Landmarks

Long exposure photos of car light trails are a staple of photography. Here the road leads up to the Petronas towers on the horizon.

7 – Change your vantage point

The angle that you photograph a landmark at can have a dramatic effect on the type of photo taken. Today the sky literally is the limit, as drones allow for the overhead photos that were previously out of reach.

But a drone is not the only way to achieve a good photo by changing your vantage point. The standard photo is that at street (eye) level, so any variant on that changes the type of photo.

  • Bird’s eye view – This type of photo is taken from a high vantage point, where you will photograph downwards. The most extreme example would be a drone, or perhaps an airplane.
  • Worm’s eye view – The opposite of a bird’s eye view, this is taken from street level looking upwards. You will need to be close to the landmark you are photographing.

The challenge with this is finding a good location that allows a view of your landmark. In the city, this will mean getting access to a rooftop, or viewing platform. In a more rural setting, it means climbing a mountain!

7 Tips to Get More Creative Photos of Well-Known Landmarks

A worm’s eye view can give you a different style of photo.

How will you make creative images of landmarks?

There are many ways to photograph a famous landmark in your own unique way. How do you go about putting your own stamp on a location that has been photographed many times before?

Have you tried any of the above suggestions? Can you revisit one of your previous photo locations, and photograph it totally differently? We’d love to see the results of your work past and present, please share with the community in the comments area below.

7 Tips to Get More Creative Photos of Well-Known Landmarks

The Petronas Towers in Kuala Lumpur has been photographed many times. It can be a challenge to find a unique photo.

The post 7 Tips to Get More Creative Photos of Well-Known Landmarks by Simon Bond appeared first on Digital Photography School.


Digital Photography School

 
Comments Off on 7 Tips to Get More Creative Photos of Well-Known Landmarks

Posted in Photography


How to Show a Sense of Scale in Your Photography

02 Nov

Picture this: You’re standing in front of an awe-inspiring natural wonder, a giant mountain or an extraordinary monument. Eagerly, you raise your camera to your eye and *click* you snap a shot.

There, on the LCD screen on the back of your camera, you see that all the majesty of the scene has disappeared.

How to Show a Sense of Scale in Your Photography

A photo of Skogafoss waterfall in Iceland, taken to show the scale and majesty of the scene.

In its transition from reality to the screen on your camera, your subject has lost its grandeur and sense of scale – there’s no true representation of how impressive the scene is. Has this happened to you?

Photography works with only two dimensions, for the most part. The world, on the other hand, is viewed in three dimensions. Missing that extra dimension can be a big deal.

Without giving a bit of thought to your composition, you can lose a lot of the sense of scale – making even the most remarkable subject matter look completely unremarkable on camera.

Understanding lens distortion

A camera doesn’t necessarily see the same thing our eyes do. Depending on your type of lens, and how much zoom you are using, there can be quite a difference between the image and reality.

Wide-angle lenses can make a real mess of perspective, making objects close to the camera seem significantly bigger than ones farther off. This can be used to your advantage for creative shots, but it will completely ruin the sense of scale.

How to Show a Sense of Scale in Your Photography - gnome

From up close and seen with a wide-angle lens of 17mm, this gigantic-looking gnome looms over the fence it is sitting on.

A gnome photographed from a distance to show how lens distortion influences scale

A gnome photographed from a distance to show how lens distortion influences scale.

A gnome telephoto - How to Show a Sense of Scale in Your Photography

At a focal length of 55mm, the sense of scale is restored and we can see that the gnome is actually quite small compared to the fence.

The more you zoom in (use a longer focal length), the less distorted your object will appear. Unfortunately, if you are taking pictures of large buildings or natural wonders, this has fairly limited application. It isn’t always possible to jog several hundred meters down the road in order to have room to zoom into 200mm when photography a tall building.

If we want to get the entire object in the frame, we’ll need to make some compromises with lens distortion, which leads us to our next trick for properly showing scale.

Provide a reference

So how can we tell if something is big?

Well, it’s not usually a problem in real life to know if an object is big or not. But in photography, we don’t always have the same opportunity to glance around and get a sense of proportion. This bothersome little detail can mean that even a huge, incredible wonder in real life can look insignificant.

How to Show a Sense of Scale in Your Photography

A photo of a mountain, with a reference point of a village below to show scale.

So how can we make sure that immense size is properly appreciated? Provide a familiar reference point to define scale. By including people or common objects in a scene, the viewer can quickly understand the scale.

Skip giving that reference point and your mighty mountains could just as well be macro shots of pebbles, for all your viewer knows.

An image showing the scale of the Gullfoss waterfall - How to Show a Sense of Scale in Your Photography

This is the incredible Gullfoss in Iceland, but without a clear point of reference, we don’t have a strong idea of its scale.

Image showing hikers on the Gullfoss waterfall - How to Show a Sense of Scale in Your Photography

Use of a longer lens helps us to see that those tiny specks on the rock are actually hikers – and helps us to understand that this waterfall is massive!

Showing Distance

How can we tell if something is far away?

Again, it isn’t difficult to recognize distance in real life. Once again, two-dimensional pictures have a habit of looking extremely flat without paying a bit of attention to what is included in the frame.

Well, for starters, you can use depth-of-field to provide a sense of depth. When the background drops off into a blur, it helps the viewer to more easily recognize distance.

Depth-of-field refers to the amount of area that is in focus in a picture. You can make sure that the background falls out of focus by using one or combining multiple of the following methods:

  • Selecting a wide lens aperture
  • Zooming in on your subject
  • By having a significant distance to the background behind your subject
How to Show a Sense of Scale in Your Photography

A man exploring the mountain photographed to show a narrow depth of field.

But you’ll need to do more than just shoot with a wide aperture if you want a mountain range to look imposing.

Another good technique you can use is to layer your background elements. This is easiest to recognize with mountains.

A man taking a photograph in a mountain range - How to Show a Sense of Scale in Your Photography

Including the whole scene

Sometimes showing the true scale of a scene requires a bit of give and take – you need to make a few compromises.

Zooming in and capturing expressions or the human element can cause you to lose the sense of scale. On the other hand, zooming out can cause your image to lose any interaction or interest.

A man sitting in the rocks on the edge of a mountain - How to Show a Sense of Scale in Your Photography

The hiker is sitting on the edge of a cliff – but without zooming back the viewer has no idea how big the drop is.

The best way to account for this is to simply be aware of it as you set up your shot. Balance the objects in the frame and decide what is the priority and purpose of the shot. If you want to show the scale of a scene, you probably won’t be able to take a tight shot that shows reactions or emotions.

A hiker in the mountains, photographed to show the scale of the cliffs - How to Show a Sense of Scale in Your Photography

By pulling back a bit, we can see the entire cliff – but now we can’t see the hiker’s expression!

Changing up your perspective

Sometimes capturing the majesty of a scene requires a creative perspective. Many photographers forget to explore the potential that comes from mixing up the camera’s point of view.

Taking a low shot can help add emphasis or might to a scene.

 How to Show a Sense of Scale in Your Photography

A low angle shot of a waterfall, showing its grandeur

Using a drone to cruise overhead and look down over an area can also be a fun way to show scale. The bird’s eye view perspective can be used to discover new angles of looking at otherwise familiar landscapes.

How to Show a Sense of Scale in Your Photography

Drone – image by dPS author Suzi Pratt.

Using Lines

Lines have always been an important element of any composition. They give an image a sense of movement and can direct the viewer’s eye around a shot, especially when they all tend towards a single vanishing point on the horizon.

A group of hikers photographed using leading lines to show distance - How to Show a Sense of Scale in Your Photography

The strong lines in this image help us to understand the size of this mountain trip.

Using leading lines is also a way to provide a sense of depth and show distance. You get a quick comparison of the distance between objects in the frame, giving you a quick point of reference to work with for the rest of the picture.

Recognizing and using natural lines in a scene is a surefire way to create a dynamic and interesting composition.

A deliberate approach to photography

By having the different techniques that can be used to show a sense of scale top of mind when you are out exploring with your camera, you can increase your chance of coming back with some real keepers.

It’s a common complaint of beginner or casual photographers that they can’t quite seem to make their pictures look as impressive as real life. But with a bit of practice, you can shoot pictures that leave your audience in awe!

The post How to Show a Sense of Scale in Your Photography by Frank Myrland appeared first on Digital Photography School.


Digital Photography School

 
Comments Off on How to Show a Sense of Scale in Your Photography

Posted in Photography


How to Make the Most of Your Camera Gear and Skills

01 Nov

Several years ago as I was just getting serious about photography, my only pieces of gear were a Nikon D200 and a 50mm lens. I was instantly enamored with the lens and almost overnight I stopped taking photos of my family and friends with a pocket camera. Instead, I preferred to bring my large DSLR setup with me everywhere because the resulting images were so good.

However, the more I used it the more I became aware of its limitations and I once told my friend Ryan, one of two people who were instrumental in getting me started on my path as a photographer, that I liked the lens but it wasn’t very well suited to wildlife photography.

He took umbrage with that assessment, and quite rightly so because that lens can be ideal for wildlife photography!

How to Make the Most of Your Camera Gear and Skills

As I slowly reversed my position over the years I started to realize that the same principle holds true for all sorts of photography types. The camera gear you have, combined with the skills you possess, can work just fine if you simply adjust your perspective a bit.

Whether you like to shoot portraits, sports, wildlife, astrophotography, nature, still life, or any other kind of images you can probably find a way to make it happen with the gear already on your shelf. The first steps involve some mental adjustments that can be somewhat difficult to wrap your head around but make all the difference in the end.

Here are some tips to help you.

Define your terms

When I made that regretful statement about a 50mm lens not being suited for wildlife photography it was partly out of ignorance because I was a new photographer. But mostly it was because I didn’t understand what was meant by the term wildlife photography.

What I had in mind were images of lions, tigers, and bears set against sweeping African vistas. There was simply no way I could get shots like that with a 50mm lens while living in a small town in the middle of Oklahoma. What I realized over the years was that wildlife photography can mean many things, and I didn’t need to put that term in such a small, limiting box.

How to Make the Most of Your Camera Gear and Skills

Would you consider a turtle sitting on a rock at the edge of a college campus pond to be wildlife? At first, I did not, but now I most certainly do.

Instead, I decided to expand it to include animals I would encounter in my normal everyday routine and even bugs and insects that were literally in my very own backyard. The simple act of re-defining what I considered to be wildlife photography made all the difference in the world to me and has helped me get shots of which I am quite proud and now find great joy in pursuing.

What does it mean to you?

The question for other photographers in a similar situation then becomes: what does [insert type of photography] mean to you? If you want to start photographing people do you mean close-up headshots? Full-body pictures? Street photography? Parties and weddings?

You can even break this down further by looking at sub-genres and defining those terms to be what you want. When you think of a headshot your first mental image might be that of a magazine cover. But headshots can be any number of things and people can be photographed in infinite ways.

The same thing goes for other types of photography as well. You might think sports photography means prize-winning shots of soccer players scoring a goal. But it might also mean shooting an archery competition or even a chess match. And those require very different skills and equipment compared to a football match.

In short, don’t let your pursuit of a specific type of photography be defined by what you think it should mean or, even worse, what other people say. Let it be what you want it to be, then go out and pursue it.

How to Make the Most of Your Camera Gear and Skills

Can wildlife photography mean shooting a spider on the side of your house? Of course! There’s no rule that says it can’t.

Know what you’re working with

Along with knowledge of your own perceptions of a certain type of photography, it helps to have a solid understanding of the gear you own and the skills you possess. That way you can play to the strengths of what is available to you while also understanding areas in which you could improve.

As I started using my 50mm lens for more wildlife photography I developed a much clearer idea of what the lens could do and its limitations. That helped me understand the types of animal images I could get with it.

For example, instead of zooming in on animals that were far away I learned to be patient and find ways of physically getting closer to animals. That wasn’t always an easy task, but it taught me a lot about myself and my willingness to get the shot I wanted. It also helped me understand that my humble little 50mm lens was capable of a lot more than I initially gave it credit for.

How to Make the Most of Your Camera Gear and Skills

The best camera is the one you have with you

Every now and then I would get lucky and have an animal cross my path. Then almost as if it were aware of what I was doing, it would pause and wait for a picture. Of course, this type of scenario is only possible if you have your camera with you instead of sitting on a shelf at home.

No matter what type of pictures you are pursuing, by not practicing and not having your camera with you it will not help you advance. I also learned to conquer some of my fears and do what it takes to get the shot even if it makes me uncomfortable.

I made this image of a snake after seeing it crawl across the street and into my front yard. Not knowing whether the snake was venomous or not (turns out it wasn’t) I made sure to keep my distance and have an escape plan ready. But I wasn’t about to let an interesting photo opportunity pass me by.

How to Make the Most of Your Camera Gear and Skills

You’ll learn what gear you need

Several years ago I took the following picture of a spider outside my house and thought it was decent. But it was not nearly as good as it could have been because my lens would not focus any closer. (Are you seeing a theme here? You don’t need to go far to take wildlife photos!)

There were also problems with the picture from a compositional standpoint: the light is too harsh, the subject is somewhat unclear, and it’s not all that obvious exactly what is happening.

How to Make the Most of Your Camera Gear and Skills

One of my earlier photos of a spider eating on an evening snack. Much like the grasshopper, this picture clearly has some problems.

As I learned more about my gear while refining my skills I realized that I simply didn’t have what I needed to take close-up shots of bugs and insects. So I bought a set of close-up filters for about $ 35 that allowed me and 50mm lens to get much closer to subjects than before.

I also spent time studying light, composition, mood, emotion, and other principles of photography because I knew I had a lot to learn in those areas. The result is a similar image that I took recently which, in my opinion, is far superior to its earlier counterpart.

How to Make the Most of Your Camera Gear and Skills

It took several years and hundreds of shots before I was able to get a photo I was happy with.

Use what you have to its potential

The lesson here is that you don’t necessarily need to buy new equipment to get the kinds of shots you want. But you do need to know how to use what you’ve got and what you know.

Are you shooting with the kit lens that came with your camera? That’s fine! Those lenses are great for wide-angle shots and short telephoto images, and you can get fantastic shots especially if you have plenty of light.

Your camera might even have features you don’t know about, like fast autofocus or good high ISO capabilities that would make it well suited for sports or nighttime photography. The more you learn about what you have, the more photographic possibilities you will see open up right in front of your eyes.

Manage your expectations

No matter what type of photography you want to pursue it is essential that you have your expectations in line with the reality of what you are attempting to do.

If you want to take amazing poster-worthy images of basketball players going for a slam dunk, by all means, go for it! Are you looking to capture some brilliant wedding photos and fun memories from the reception afterward? Or maybe you want to do like I did and get into photographing animals and wildlife.

Have patience

Whatever type of photography you want to pursue, know that you won’t get from here to there overnight. Getting the pictures you want takes years of practice, education, and an intimate knowledge of what your photography gear can and can’t do.

Pursuing those photos is certainly a lofty and admirable goal and one that is obtainable given enough time and effort. But when you start out your photos will almost certainly not look like what you might be picturing in your mind.

How to Make the Most of Your Camera Gear and Skills

Be like this cottonwood borer beetle and reach for the stars! Just know that it might take a little while to get there.

Even if you can clearly define what you mean by portrait, sports, wedding, wildlife, landscape, real estate, or family photography and you have a solid understanding of your camera gear and your own abilities, your initial pictures will probably fall short of your expectations.

That’s perfectly fine, and it’s all part of the process of growing as a photographer. As long as you don’t let your initial shots get you down. Go into it with an understanding that you have time and room to grow. In the meantime, don’t let anyone tell you your pictures aren’t good enough, you don’t have the right gear, or you aren’t as skilled as you need to be.

This photo represents my White Whale: a goal I have been pursuing but always seems out of reach. I always seem to end up with images like this which are almost there…but not quite. Someday I would really like to get a shot of a bee drinking nectar from a flower, and I will keep at it until I finally get it.

Conclusion

What are some of your photography goals, and what are you doing to make those goals happen? Is there a type or style of photography you have always wanted to try but never thought you could do? Leave your thoughts in the comments below–I’d love to hear from the DPS community on this and hopefully help others find some encouragement and inspiration on their photographic journey.

The post How to Make the Most of Your Camera Gear and Skills by Simon Ringsmuth appeared first on Digital Photography School.


Digital Photography School

 
Comments Off on How to Make the Most of Your Camera Gear and Skills

Posted in Photography


How to use Macphun’s Luminar for Beginners

31 Oct

If you haven’t used it before, your first question might be what exactly is Luminar? Simply put, it’s photo editing software designed by Macphun (available soon for Windows – download the beta version to try it here).

It might differ a little bit from other photo editing software that you’ve used because it is a photo editor only – it does not include an image cataloging component. It is also a one-time purchase rather than a subscription-based product. Luminar’s workflow focuses on very easy-to-use presets that literally enable you to press one button and completely process your image, ideal for beginners.

Luminar for beginners - white hibiscus

Cropped and edited in Luminar using Mild Image Enhancer Preset at 85 opacity, plus a white balance adjustment.

In this article, I’ll upload some images and take a whirl around the user interface so that you can understand where all the tools are, and what they do. After that, we’ll dive in with some basic editing techniques. In just a few paragraphs, you’ll have some great ideas on how to use Luminar to edit your own photos.

Starting in Luminar Stand-Alone

To start, click on the Luminar icon. The initial screen asks you to Open Image. Click the blue button to open a Finder  (or Explorer) window, navigate to your chosen image, select it, and click open. Your image opens in Luminar.

Luminar for Beginners - Start

Opening in Luminar from Lightroom

If you prefer to start in Lightroom, right-click on your image, select Export > Luminar > Open Original Image. Your image opens in Luminar. Note: you can also select Edit in > Luminar.

Luminar for Beginners - Lightroom

If you made adjustments to your image in Lightroom such as lens corrections, cropping, straightening, spot removal or noise reduction – instead of choosing Open Original Image, choose “Use .TIFF with Lightroom Adjusters”. Or select Edit in > Luminar and choose “Edit a copy with Lightroom adjustments” from the options.

The Top Toolbar

Let’s take a quick look at the top toolbar inside Luminar. We’ll discuss where everything is and what they do but, just in case something doesn’t make sense, and you’re not sure what each icon does, hover your cursor over it. A tiny pop-up will appear and you can confirm that you’re looking at the right tool.

Luminar for Beginners - top toolbar

Luminar’s top toolbar.

Side Panel

Starting in the far right corner of the Top Toolbar is an icon that allows you to open and close the Side Panel, which is where you add Layers and Filters to make adjustments to your image. I prefer to work with the Side Panel open but if you need to see a larger version of your image, click this icon to toggle it off and give yourself a larger workspace. Click it again to toggle it on.

Luminar for Beginners - Side panel open

Here the Luminar workspace has the Side Panel toggled on. Note that if the icon is white, it is toggled off; if an icon is orange, it is toggled on.

Preset Panel

The icon for the Preset Panel is one to the left of the Side Panel one. Again, click the icon to toggle this panel on and off.

Luminar for Beginners - Preset Panel

When activated, the Preset Panel runs along the bottom of the Luminar workspace, giving you a preview of what each will when applied to your image.

Layers and Histogram

The next icon is the Layers panel. It looks like two sheets of paper in a stack. Because the focus of this article is on beginning techniques, we’re not going to talk about layers here. Just make a quick note of where this icon is so that when you’re ready to give it a go, you know how to find it.

To the left of the Layers icon is the Histogram icon.

Luminar for Beginners - histogram icon

The Histogram icon is highlighted here in red, the Layers one is just to the right of it. Currently, Layers are turned off so it is gray.

The Histogram itself has two triangles that can be clicked on and off as well. Solid orange triangles indicate this feature is on. When these alerts are on the triangles indicate if your image has any blown highlights/whites or blocked up shadows/blacks. If it does, they’ll be called out in red or blue respectively on the image.

Luminar for Beginners - highlight alert

The bit of red “paint” on the petal all the way to the left indicates blown-out whites.

History

Click the little clock icon to pull up the history of all the changes you’ve made to your image. If you’re not sure you like what you’ve done, click on any of the previous steps to get back to a point that you do like.

Luminar for Beginners - History Icon

Undo

The curved arrow to the left of the History icon will undo the last step that you’ve made.

Compare

Possibly one of my favorite Luminar features, Compare is the little icon just to the right of the eyeball. Once you activate the comparison frame, you can slide the before/after line back and forth over the image to see how your adjustments are affecting it.

Luminar for beginners - compare icon

Preview

The eyeball icon can be toggled on and off to quickly show you your original versus your edited image.

Luminar for beginners - preview icon

Zooming Icons

There are four zooming icons. You can toggle between 100% and Fit to Screen or make incremental size changes by using the + (plus) and – (minus) icons.

Luminar for beginners - zoom icons

Side Toolbar

Running down the right-hand side is a list of tools that are mostly more advanced so we won’t be addressing them gere. However, the Crop Tool, a scissors icon, is part of almost every workflow.

Luminar for beginners - crop tool

Luminar for beginners - pink hibiscusCropped to a square and processed using Quick and Awesome Workspace in Luminar.

Filters

Now that you know where all the tools are, let’s talk about how to use them to make adjustments to your image.

Luminar calls each set of adjustments a Filter.  For example, the Tone Filter contains sliders that adjust Exposure, Contrast, Whites, Blacks, etc. Some filters, like the Polarizing filter, contain only one adjustment.

Luminar for beginners - filter panel

To add additional Filters to your image, click the + (plus) sign to open the flyout menu, scroll through it, select the filter you need and then adjust the slider.

Luminar for beginners - Filter flyout menu

Note: if you click the name of the filter it will be added and the flyout menu will close. But if you want to add more than one filter just click the little + at the end of the filter name and it will add that filter and keep the menu open so you can add more.

Workspaces

Luminar offers quite a few different Filters and as you are learning the program you may not know which is the best set of Filters to add to your image. One of the ways that Luminar helps you narrow things down is by giving you Workspace options. For example, let’s say your image is monochrome (or you want it to be). You can choose the B&W Workspace as a starting point. If it’s a landscape, choose the Landscape Workspace.

Luminar for Beginners - Landscape workspace

Luminar’s workspaces make it simple to use.

The Filters included in each Workspace have been selected to enhance just the type of image you’re working on. The adjustment of each slider is left to your discretion.

Luminar for beginners - wild horses

Cropped and edited in Luminar using the Landscape Workspace.

If you haven’t used Luminar before (or have, but not successfully), start with the Quick and Awesome Workspace. With some images, applying the Accent-AI Filter is all you may need to do. Activate the Compare feature so that as you adjust this Filter, you can see what it is doing. Add Saturation, Clarity, and Vibrance as needed. How do things look? Do you still need additional adjustments but are not sure which ones to apply? Now is the time to try Presets.

Presets

Presets are similar to Workspaces because in each Preset includes a select group of Filters. However, in Presets Luminar adjusts the sliders (or pre-sets them, get it?) to create a unique look. Usually the name of the Preset will give you a good idea of the look that Preset will create.

Luminar for beginners - preset applied

One of my favorite parts about Luminar Presets is that I can adjust the Opacity of them. In the photo below, the Image Enhancer Preset looks just a tad too strong. Dragging the Opacity Slider to reduce it to 65 was a perfect – and easy – solution.

Luminar for beginners - wild horses

Cropped and edited in Luminar using the Image Enhancer preset at 65 opacity, with no other changes.

Four favorite Presets

If you’re not sure where to start, or which Preset to choose, here are four of my favorites:

  • Happy Memories in the Travel set.
  • Warm Sunset in the Travel set.
  • Bright Day in the Outdoor set.
  • Mild Image Enhancer in the Basic set.

To locate the Presets, click the Preset Menu icon in the lower right corner of the interface then click through the choices in each category. Once you find yourself using the same Presets over and over, add it to Favorites so that you can locate it faster. Just click the star on the preset to add it to your Favorites list.

Luminar for Beginners - preset menu

Applying Presets using Compare

To choose the right Preset for your image, scroll through them with the Compare preview panel turned on. As you click on each one, you’ll see both your original image and how it will look after applying the Preset at 100%. That will help you learn how each Preset affects your image and eventually, you’ll find your own favorites.

Luminar for beginners - bright day preset

Fine-tuning Presets

If the Preset you chose for your image looks good but not perfect, remember they can be used as just a starting point. Once you apply them you can decrease the opacity. You can also adjust individual sliders or add and delete Filters in the Side Panel.

Luminar for Beginners - St Johns NL

Cropped and edited in Luminar using the Bright Day Preset at Opacity 80, Vignette adjusted to -25, Blacks adjusted to +10.

Saving your image

If you started in Luminar, have completed work on your image, and want to create a JPG, Select File > Export to image then select the correct folder and rename the file as appropriate.

If you plan to continue to work on the image, or might want to make changes in the future, select File > Save As to create a native Luminar file, then select the correct folder and rename the file as appropriate. That will retain any Layers if you used that feature as well as the History.

Saving your image to your Lightroom Catalog

If you started in Lightroom, it’s a snap to save your image. After you finish processing your image in Luminar, click the Apply button in the upper left corner of the interface. This saves your image and also catalogs it in Lightroom in the same folder as your original image.

Your Turn

Hopefully, you’ve been following along and processing a few images in Luminar as you were reading. Now take a minute to upload your best image for the dPS community and tell us about how you created it in Luminar. Which are your favorite Luminar presets?

Disclaimer: Macphun is a dPS advertising partner.

The post How to use Macphun’s Luminar for Beginners by Lara Joy Brynildssen appeared first on Digital Photography School.


Digital Photography School

 
Comments Off on How to use Macphun’s Luminar for Beginners

Posted in Photography


First Look: Phottix Juno

31 Oct

A value-priced, all-manual flash with a built-in radio and a real warranty? Yeah, I'm interested.

Today, a first look at the new Phottix Juno. Read more »
Strobist

 
Comments Off on First Look: Phottix Juno

Posted in Photography


6 Tips To Help You Shoot In Low Light Without a Tripod

31 Oct

Most photographers will tell you that a tripod is invaluable and is usually the favorite accessory that they carry with them. While a tripod remains an essential piece of equipment, especially for low light photography, it is also usually the one piece of camera equipment that draws the most amount of attention.

In some scenarios and places, you won’t be allowed to use a tripod so you have to find other ways of utilizing your camera to take the photo you want. Here are six tips to help you capture photos in low light without a tripod.

6 Tips To Help You Shoot In Low Light Without a Tripod

#1 – Raise the ISO

The first option that most people will turn to is to raise the ISO setting in the camera. Principally, the ISO is the sensitivity of the camera’s sensor to light. The higher the ISO the more “sensitive” the sensor becomes to light which in turn means you can capture more detail in low light conditions. In simple terms, the darker your scene is, the higher you need your ISO. But before you start whacking your ISO up to 25,600, beware that raising the ISO also has a detrimental effect on the image.

The higher your ISO setting, the more noise you’ll see in your photo. Too much noise and your photo will begin to start looking soft. The key to being able to use ISO effectively is to balance it with other elements such as shutter speed and depth of field to be able to capture the shot you want.

Always aim to have your ISO as low as possible. Also, make sure you test your camera at different ISO settings before you use it for an actual photograph you intend to take.

Taken at ISO 4000. It was the only way that I was able to capture a photo in this dark tunnel.

#2 – Use Mirror Lock-Up and Live View Mode

Have you ever taken a photo with a tripod, with good depth of field, at a slow shutter speed only to see the final photo on your computer is slightly blurred? This is one question that has often baffled novice photographers but there is a simple solution.

When you press the button to take a photo, the mirror inside the camera flips up out of the way. This mechanical process can mean that there is a slight movement in the camera, which in turn causes a small shake, hence the blurred photo. To get around this problem, you can set your camera to Live View mode (when you get a live picture on the display of your camera) which essentially flips the mirror up permanently (until you switch off Live View mode) and means that when you take the photo you don’t get the movement the camera. Some cameras also allow you to “lock the mirror” without using the live view mode (so using your viewfinder).

This issue would be the same when photographing without a tripod in low light conditions. So in this scenario, set your camera to Live View mode/mirror lock-up to avoid that small, unwanted camera shake.

6 Tips To Help You Shoot In Low Light Without a Tripod

#3 – Use High-Speed Burst Mode

One of the great innovations of modern DSLR cameras is how much faster you can now take photos in burst mode. Using a high-speed burst mode is a really good trick to capturing decent photos in low light. But this only works when your shutter speed is just below the threshold of you shooting handheld.

For example, if you can hold your camera steady enough to take a sharp photo at 1/60th, you may be able to get away with using high-speed burst mode and using 1/45th or even 1/30th of a second. This is because with high-speed burst mode you have less time in between photos for the camera to move and often you’ll find one or two photos sharp enough for use in the middle of the burst.

Just remember to use high-speed burst as some cameras also offer low-speed burst option and aim for a good number of photos. You’ll also be well advised to try out this trick a few times to find out what your threshold is before you use it in a real-life situation.

6 Tips To Help You Shoot In Low Light Without a Tripod

#4 – Find a Ledge or Wall

Often your best bet for capturing photos in low light is to find a ledge or wall that you can rest your camera on. Not only does this mean you can have your settings at pretty much exactly what you would with a tripod, but you can also often find interesting camera angles which are different to traditional photos you’d see taken with a tripod.

One thing to be aware of is that you may need to raise your lens up slightly. Otherwise, you may see the ledge/wall in the foreground of your photo. You can use anything you can find or have with you to slightly tilt the lens upward.

6 Tips To Help You Shoot In Low Light Without a Tripod

I found a small ledge in this old church that I was able to rest the camera on to take this photo.

#5 – Use Your Bag

Over time you’ll begin to pick up tricks and techniques that you will use in your photography. One of the most useful that I have found has been to simply use my backpack. Put it on the floor and put your camera on top and you have a quick tripod without all the attention that a tripod brings.

This trick has been really useful in buildings and places where tripods are not allowed like museums or galleries. You can put your bag on benches and even rest it on a branch of a tree (as I did once).

6 Tips To Help You Shoot In Low Light Without a Tripod

#6 – Train Yourself

Like anything else photography is something that you can improve your skills. This is also true of actually being able to hold the camera steady. So start by practicing your stance and make sure that you are holding the camera as securely and comfortably as you can.

Work on your composure and try to teach yourself to relax when you are going to take the photo. By practicing over and over again you may find that you actually can hold the camera at slightly slower speeds than you were able to before.

6 Tips To Help You Shoot In Low Light Without a Tripod

Conclusion

There’s no question that if you want to capture the best possible photos at the best quality in low light conditions, then a tripod will give you the best results. But in situations when that might not be possible, using the tips and tricks above might help you capture the shots you need.

Anything else? What tricks do you use to capture photos in low light conditions without a tripod?

The post 6 Tips To Help You Shoot In Low Light Without a Tripod by Kav Dadfar appeared first on Digital Photography School.


Digital Photography School

 
Comments Off on 6 Tips To Help You Shoot In Low Light Without a Tripod

Posted in Photography


How to Plan and Take Killer Sunset Photos on Your Next Vacation

31 Oct

Who doesn’t love a good sunset photo? There’s something about that colorful, ethereal time of day that strikes a cord with just about every person. But as appealing and ordinary as sunsets are, the ability to capture that magical time of day as a photo can be surprisingly difficult.

Sunset Photos

Photo by Martin Genev

Yes, gear and camera settings are important. However, the ability to be in the right place at the right time of day is arguably the most important factor to photographing a sunset. Below, I’ll highlight several tips for planning

Yes, gear and camera settings are important. However, the ability to be in the right place at the right time of day is arguably the most important factor to photographing a sunset. Below, I’ll highlight several tips for planning

Find the best sunset location

How to Plan and Take Killer Sunset Photos on Your Next Vacation

If you’re visiting a new town and searching for an ideal sunset spot, your best bet is to do some online searches. Do a Google image search for “[location] sunset” and see what pops up. Better yet, visit stock image sites and enter similar search queries.

In most cases, you’ll see sunset photos taken from one or two popular locations. It might take some digging to find out exactly where those spots are, but once you have the answer, you’ll know where to shoot.

What time is the sunset?

A simple Google search will tell you exactly when sunset happens in the location of your choice. Keep in mind, however, that the hour or so before sunset is the ideal time of day for most photographers, so you’ll want to show up at your chosen sunset location closer to Golden Hour.

To really hone in the ideal times of day to shoot in a new location, the PhotoPills app is a handy tool. It’s packed full of information that can help you plan and execute outdoor photo shoots.

PhotoPills Sunset Planner - How to Plan and Take Killer Sunset Photos on Your Next Vacation

Image courtesy of PhotoPills

Camera settings for sunset photos

Your ideal camera settings for shooting a sunset depend on a variety of factors, but generally speaking, these are some rules to go by.

Shoot in RAW

When it comes to shooting the sunset, one of the biggest challenges is making sure your camera captures the same warmth and vibrancy that your eyes are seeing. You can typically make White Balance and Picture Style tweaks in camera (more on those below). But just in case, it’s also a good idea to shoot in RAW to give you greater creative control when you post-process the image.

Set White Balance

Leaving your camera White Balance set to Auto might suffice. However, if the color cast of your image is looking too cool or slightly off, try setting your White Balance to Daylight or Cloudy to warm up your shot.

Shoot in Aperture Priority

What shooting mode you should use is certainly debatable, but Aperture Priority will give you greater control over the depth of field. Shooting with a small aperture (f-step of f/16 or higher) will give you a large depth of field. This is ideal if you want more of your scene in focus.

How to Plan and Take Killer Sunset Photos on Your Next Vacation

Keep ISO Low

To avoid excessive noise in your image, maintain the lowest possible ISO for the amount of light you have available. If it happens to be a cloudy sunset or you’re shooting a scene with lots of shadows, you might have to increase your ISO unless you use a tripod.

Composition tips for unique sunset photos

After you’ve got your ideal sunset spot secured, it’s time to start thinking about what kind of sunset image you want to capture.

Keep this in mind: the way that most people photograph a sunset is to whip out their camera at hand, point it directly at the sunset and start snapping away. There’s nothing wrong with capturing the sunset this way, but it doesn’t always make for unique images.

If you’re trying to think outside of the box and get an interesting sunset photo, try some of these tips.

Zoom in

How to Plan and Take Killer Sunset Photos on Your Next Vacation

For most spontaneous sunset photographers, the camera at hand is their point and shoot or cell phone. These cameras are usually equipped with wide-angle lenses. Set yourself apart from the crowd by picking an interesting feature and zooming in.

Shoot away from the sun

Instead of shooting directly into the sun, consider pointing your lens in the opposite direction. The bright and often vibrant colors generated by the sunset can make the scene in the opposite direction equally alluring, without having to compensate for shooting directly into bright light.

Wait for Blue Hour

Every photographer has heard about Golden Hour, that magical time of day just before sunset. Lesser known is Blue Hour, that brief time of day that begins roughly 10 minutes after the sun has set (and before it has risen at dawn).

Blue Hour Photography - How to Plan and Take Killer Sunset Photos on Your Next Vacation

This image was taken just after sunset during Blue Hour.

The sky isn’t as obviously colorful during Blue Hour as it is during sunset or Golden Hour. However, Blue Hour still offers a window of time when it can be best to shoot cityscapes or landscapes with deep blue tones in the sky. You will almost certainly need a tripod to shoot during Blue Hour as it is significantly darker without the sun. But the lesson here is that many more photo opportunities exist even after sunset.

Over to You

Do you have any tips for shooting sunset photos? Share your photos and tips below!

The post How to Plan and Take Killer Sunset Photos on Your Next Vacation by Suzi Pratt appeared first on Digital Photography School.


Digital Photography School

 
Comments Off on How to Plan and Take Killer Sunset Photos on Your Next Vacation

Posted in Photography