RSS
 

Archive for the ‘Photography’ Category

Why Every Photographer Needs a 70-200mm Lens

07 Nov

As photographers, some pieces of advice are universal; the same can also be said for some camera gear. The 70-200mm lens is a staple for a reason, found in pretty much every pro’s camera bag around the world, they are trusted on location from portrait studios to the heart of the Amazon.

So here is why you need one in your kit.

Nikon 70-200mm lens review must have

Optical Performance

Let’s start with the big reason, optical performance. The 70-200mm is a professional lens and features the latest in optical design and quality.

Perfected over the last 30 years they have an excellent edge to edge sharpness, both wide open and stopped down. Featuring the ED elements and the latest lens coatings, they fend off chromatic aberrations and flare very well and produce stunning sharp, contrasty images shoot after shoot.

Focal Length

Short telephotos and wide-angle lenses are fantastic for getting up close into the action or taking the wider view, however, they can often be problematic. If you are trying to photograph wildlife, candid portraits, or anything that you can’t get close to, the 70-200mm lens will come in handy.

Nikon 70-200mm lens review environmental portraits

The reach of the 70-200mm is perfect for so many situations, allowing you to focus in on key subject areas, crop out distracting areas or elements in your frame and just get closer to the action.

The focal length allows you to also give your subject space to move without you having to be right up in their face, while still giving you the scope for those tight shots. It also allows you to be creative in new ways, giving you options to focus on small details within a composition or landscape, all the while not needing to move your feet.

Nikon 70-200mm lens review details

Large Maximum Aperture

The 70-200mm f/2.8 is a fast lens, with the wide aperture being a key reason why so many pros love it. This gives you a number of benefits for shooting on location, once again making this a top quality lens in which to invest.

Benefits

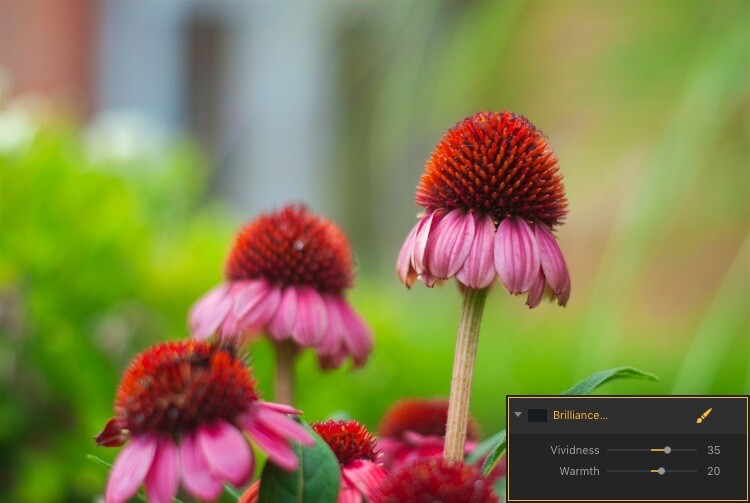
The first benefit is the bokeh (or out of focus areas). The fast f/2.8 aperture means depth of field wide open is very limited. This results in much of the background and foreground dropping into mushy out of focus goodness, helping to keep the viewer’s attention on your main subject.

The large aperture, combined with the telephoto reach of the lens, really allows for the rendering of wonderful out of focus elements. This gives a truly dreamy quality and feeling to the images produced with the 70-200mm lens.

A second benefit of the wide open aperture is that of the low light performance. Having a fast f/2.8 aperture means the lens lets in far more light than slower alternatives. This, in turn, means the camera has more light to work with. So, when the light starts to fade you can still get sharp shots with reasonable shutter speeds without the need to stretch your ISO capabilities.

Another benefit of the fast aperture is the brightness it brings to the viewfinder. If you haven’t used fast lenses before you’ll soon fall in love with the brighter viewfinder experience that comes with the 70-200mm f/2.8. This might not sound like a big deal, but being able to see your composition better allows you to be more focused on selecting what you want in and out of the frame, helping you to hone your compositional skills for better images.

Speed

When working with fast paced action, speed is imperative, and the 70-200mm lens doesn’t disappoint. As a pro spec lens, the 70-200mm offers brilliant AF speed that is a huge benefit when working with erratic subjects on fast paced shoots.

Nikon 70-200mm lens review blazing fast focus

The autofocus, aided by the fast aperture, locks onto subjects quickly and focuses through the range in the blink of an eye (something that certainly can’t be said for all telephoto lenses). The speed of the focus reduces frustration when trying to pick up moving subjects, helping you to focus on composing your shots rather than the frustration of your lens not focusing.

Size and Weight

Some people think the 70-200mm is a large lens, however, that weight and size also have their advantages. The physical length of the lens itself, being around 25cm, provides for good placement of the controls, with the large zoom and focus rings being well spaced on the lens’s barrel.

The length also allows for the inclusion of a tripod mount (collar). This is handy for working with a tripod for better balance and for lowering the stress on the bayonet mount between the camera and lens.

Nikon 70-200mm lens review 01

The size also lends itself to being comfortable for handholding. The wider barrel fits well in the hand, with the weight of the lens balancing well with medium to large camera bodies. The lens is also a little front heavy that means when attached to the camera it helps equal out the balance to a comfortable feel.

Of course, modern versions of the 70-200mm f/2.8 also include the implementation of image stabilization (VR, IS, or OS) helping to once again improve the abilities of this lens when working handheld. The optical stabilization systems help to reduce camera shake by up to 4-stops, meaning even when the light gets low you can work handheld with sharp results. That is something that can really come into its own when on location on a fast moving shoot.

Nikon 70-200mm lens review Close focusing

Build Quality

The 70-200mmm f/2.8 is designed to be used by pros, and it’s constructed like a tank. Metal construction and weather sealing mean it’s built to last while being taken out and abused day in and day out.

Nikon 70-200mm lens review compressing landscapes

My 70-200mm has been everywhere with me and is built to withstand the elements.

The 70-200mm lens is also a fantastic addition to the kit bag for those nature photographers who also have a passion for landscape photography. The focal length is excellent for giving you the reach to pick out sections of a landscape, details within a scene or for compressing layers for flattering images. The 70-200mm offers flexibility for composing, with the telephoto reach helping to compress a scene for flattering perspectives that might not work with a wider focal length.

I’ve had my 70-200mm lens for many years and worked with it in the rain, snow, freezing conditions, as well as the jungle and it’s never skipped a beat. Rugged and reliable, just as you want a working tool to be!

Teleconverters

This lens was also designed with the ability to work with teleconverters in mind. These small optical devices fit between the camera and lens, helping to magnify the image for a greater telephoto effect.

That means that the 70-200mm, when paired with a 1.4x teleconverter, becomes a 105-300mm equivalent or a 140-400mm when paired with a 2.0x converter. This can be very handy if you need some extra reach but don’t want to invest in a super telephoto or you just can’t fit it into your bag.

Nikon 70-200mm lens review reach portraits

Shot at about 280mm using the 1.4x teleconverter.

Going the other way you can also add extension tubes to the 70-200mm to reduce the minimum focusing distance. That results in the ability to get ultra close for some semi-macro images, once again showing the scope for the versatility of this stable lens.

Conclusion

The 70-200mm lens is truly a worthy lens to be part of every photographer’s kit bag. Offering top optics, a fast aperture, excellent speed, ergonomics, and weatherproofing. They are built to last and perform day in, day out.

They are expensive, but as a long-term investment, the 70-200mm f/2.8 is certainly one that every keen photographer should think about making. You certainly won’t regret it.

The post Why Every Photographer Needs a 70-200mm Lens by Tom Mason appeared first on Digital Photography School.


Digital Photography School

 
Comments Off on Why Every Photographer Needs a 70-200mm Lens

Posted in Photography


How to use Filter Masks in Luminar for Powerful Local Adjustments

07 Nov

Luminar is a powerful, full-featured photo editor, with a massive array of features and editing tools. A great deal of its workflow is built around the fairly simple concept of applying filters. It’s much like the way you might edit a photo in Instagram or other similar programs – but you get much more power and control with Luminar.. You can use Luminar to add one or more filters to a picture in order to change properties like color, brightness, saturation, or even add fog effects or convert it to black and white.

However, this is where the similarities between Luminar and simple phone-based editing tools stops. Luminar’s filters are far more than just surface-level adjustments. They can be combined, layered, and customized in infinite combinations for photo editing far beyond what you might be used to in other programs. Add to that the use of filter masks to selectively choose where the edits to a filter are applied, and you have the recipe for a program that can become a very important part of your photography workflow.

How to use Filter Masks in Luminar for Powerful Local Adjustments

Understanding Filters

Luminar is built on a foundation of powerful editing algorithms that let you tweak every aspect of your photos. But unlike some other image editors on the market, it is extraordinarily simple to use the tools available to you. Rather than hundreds of confusing options, tiny buttons, and labyrinthine menus, many of the editing options in Luminar are available within a few clicks as Filters. Or you can access them by opening an image and clicking the “Add Filters” button on the upper-right portion of the user interface.

How to use Filter Masks in Luminar for Powerful Local Adjustments

Clicking “Add Filters” opens a menu that allows you to select from dozens of filters such as Clarity, Color Balance, Soft Focus, Tone, Vignette, and many others. If you’re unsure as to what all these filters actually do, just hover your cursor over one. A brief description will pop up along with a small sample image illustrating the type of editing that filter will do.

How to use Filter Masks in Luminar for Powerful Local Adjustments

The easiest way to apply one of these is to simply click it and adjust any of the parameters available for that filter. For example, if you click on Brilliance/Warmth, you can adjust two different aspects of the filter; Vividness and Warmth.

How to use Filter Masks in Luminar for Powerful Local Adjustments

A few quick adjustments with a single filter made this bland RAW file go from ho-hum to frame-worthy.

Using Multiple Filters

You can combine as many filters as you want. You can even use layers, just as in Photoshop, to apply one or many filters. Then you can edit all of them at once with options like layer masking, which shows and hides everything on a single layer, and layer opacity.

It may sound complicated, but in actual use, the process is very simple: Load an image, add a filter, adjust the filter, and you’re done. The procedure only starts to get complicated if you want it to, at which point Luminar has a deep enough feature set to accommodate even the most highly demanding photographers.

Controlling the Effects with Filter Masks

Filters are all well and good, but the ace in Luminar’s sleeve is in the way it lets you apply them selectively with filter masks. If you have ever used a filter on Instagram you know that all your edits are applied across the entire image. That can be good but can also be quite frustrating if you only want to edit specific portions of the photo.

That’s where the simplicity and brilliance of Luminar’s approach really shine because you can control exactly where your edits are applied when you use a filter. To illustrate how this process works, I started with this photo (below) of a squirrel that was clearly in need of some editing.

I shot it in RAW in order to give myself the most amount of flexibility when editing the image, but Luminar works fine with JPG files too. Just know that you won’t have quite the same degree of control when editing JPG compared to RAW files.

How to use Filter Masks in Luminar for Powerful Local Adjustments

Apply Global Edits First

Before I started doing selective editing with filter masks, the first thing I did was to use two filters on the entire image. I used the Brightness/Contrast filter to make the picture brighter and then used Highlights/Shadows to lower the highlights a bit.

How to use Filter Masks in Luminar for Powerful Local Adjustments

So far so good, but I wanted to really make the squirrel stand out from the fountain in the background. Next, I added a Color Temperature filter but here I used the Brush icon in the top corner of the filter control box to apply it only to the squirrel.

Add Local Adjustments

This lets you literally paint in the filter adjustment in the same way you might use the Adjustment Brush tool in Lightroom to selectively edit an image. As you’re painting, you can use the toolbar at the top left of your screen to control the size, softness, and opacity of your brush as well as other settings that will feel right at home to most photographers.

How to use Filter Masks in Luminar for Powerful Local Adjustments

Click the Show Mask icon in the top left corner of the Luminar interface to show where you are applying (painting) a filter to the image.

By far, the most useful option here is Show Mask which you can select by clicking the eye icon in the top left, or by pressing the / key on your keyboard. This lets you see exactly where you are applying your adjustments in real-time while you paint. It is highly useful for making sure your edits are only applied where you want them to show up.

You can use the scroll wheel on your mouse to zoom into the image while brushing your filter adjustments. This allows you to fine-tune your editing to be exactly where you want it applied.

How to use Filter Masks in Luminar for Powerful Local Adjustments

With Show Mask enabled your filter adjustments show as red markings on the photo.

Add a Vignette on the Bottom Only

After editing the color temperature of the squirrel I used the Vignette filter. But instead of applying it to the whole picture I brushed it in just on the bottom corners (something users of Apple’s now-defunct image editing program Aperture might remember doing years ago).

How to use Filter Masks in Luminar for Powerful Local Adjustments

The icon in the top left corner of the filter window shows a black-and-white preview of where the mask has been applied. White reveals, black conceals – just like Photoshop. So anything shown in white is where that filter will be showing.

The ability to brush on filter adjustments is a huge game-changer for anyone who is used to the limited brushing options in Lightroom or overwhelmed by the prospect of doing this type of granular editing in Photoshop. And I say this as someone who uses both Lightroom and Photoshop!

Sometimes I just need a quick and simple editing workflow and the more I use Luminar the more it has replaced much of the work I do in those and other programs. To add a bit of icing to the editing cake, Luminar ships with full plugin support for many popular image editing programs including Photoshop and Lightroom. So you can still use those for your traditional workflow while simply hopping over to Luminar if you want to make use of that program as well.

Filter Mask Options

While my favorite aspect of filter making is the ability to brush adjustments precisely where I want them. But there are two other options that can be quite useful depending on the type of editing you want to do. In addition to a brush, you also have the option of applying Luminar filters with a Radial Mask, Gradient Mask, or Luminosity Mask.

Radial Mask

This applies the filter in a circular pattern which can be rotated, expanded, and contracted. It allows you to apply a filter in an even and controlled fashion. It works almost exactly like the Radial Filter in Lightroom. But instead of only letting you adjust the basic exposure, color, sharpness, and noise you can use it to apply any of Luminar’s dozens of filters.

Think of it like the Lightroom Radial Filter but much more powerful and customizable.

How to use Filter Masks in Luminar for Powerful Local Adjustments

The Radial Mask in Luminar can be used with any of its powerful Filters.

Gradient Mask

Similar to the Radial Mask, the Gradient Mask lets you apply a filter smoothly across an entire image while gradually changing the degree to which it is applied. Once again it works just like its Lightroom counterpart but for filters. Once you have either of the Radial or Gradient masks applied you can choose several additional options such as Disable, Invert, Density, and Feather.

How to use Filter Masks in Luminar for Powerful Local Adjustments

Luminosity Mask

This is an option that is somewhat unique to Luminar. Even though you can re-create this type of mask in Photoshop and other programs I have never seen it implemented so easily and smoothly as it is here.

When you enable a filter and click on the brush icon you have the option of creating a mask that applies the filter only to the brightest portions of the image. This is incredibly useful if you want to make changes and edits quickly without zooming in and painstakingly brushing in your adjustments at a granular level.

This feature is especially useful for landscape photographers who frequently have images with a lot of contrast between the lightest and darkest parts of the image. They often need to edit the sky separately from the rest of the image.

Luminosity Mask in Action

As an example of how this works, I have used the following image of a sunrise that I took in Nebraska one chilly winter morning.

How to use Filter Masks in Luminar for Powerful Local Adjustments

I wanted to make adjustments to the sky while also brightening the dark portions, but not have my edits interfere with each other.

The first step was to add a Brilliance/Warmth filter and then generate a Luminosity Mask. That would make sure any changes would be made just to the sky and not the foreground. I confirmed this by showing the Mask Overlay which gave me a clear idea of where the mask was being applied.

How to use Filter Masks in Luminar for Powerful Local Adjustments

I edited the values of the Brightness/Warmth slider to get the sky looking just right, then added a Highlight/Shadow filter to brighten up the foreground. After that, I finished with a Color Temperature filter which I applied only to the ground by using an inverted Luminosity Mask. That ensured it would apply only to the shadows and not the highlights.

The final image gave me a result that would have been much trickier to create in Lightroom, and require a lot of complicated selection editing and layer adjustments in Photoshop.

Note: the new version of Lightroom (Classic) that Adobe just released now has the ability to add a Luminosity mask to local adjustments as well. 

How to use Filter Masks in Luminar for Powerful Local Adjustments

Simply Powerful Editing

The real advantage for me when using Luminar’s Filter Masking is that it’s a way for me to do creative, complex edits to my images in a simple and efficient manner. Some people have asked me if it’s better than Photoshop and Lightroom, and my answer is a rather vague. “it depends”.

I think there is room for all three programs in a photographer’s workflow depending on that person’s individual needs. But there certainly is a lot to be said for how Luminar gives you access to such powerful and highly customizable image filters while making the adjustment process so easy to use.

If you just want to click a few filters and save your image, as you would in Instagram, then you can be on your way in seconds. However, if you want more fine-grain control over which parts of your photos that those filters are editing, then using Filter Masks in Luminar might be the answer you’ve been looking for.

Have you tried Luminar’s filter masking feature? I’m curious to know about your experience and any tips or tricks you might have uncovered. If you have not yet given these tools a chance you might be surprised at the results you can achieve.

Disclaimer: Macphun is a dPS advertising partner.

The post How to use Filter Masks in Luminar for Powerful Local Adjustments by Simon Ringsmuth appeared first on Digital Photography School.


Digital Photography School

 
Comments Off on How to use Filter Masks in Luminar for Powerful Local Adjustments

Posted in Photography


How to Take Interesting Photos in Uninteresting Places

07 Nov

Having spent the past several months traveling extensively to some pretty exciting places, coming back home to small-town suburbia was a rude awakening for me to say the least. I was so used to having interesting subjects – be it people, landscapes, flora and fauna – at my doorstep everyday. I didn’t have to think much about what I wanted to photograph, I could just step outside and find something new and interesting every time.

But once I got home and settled into my routine, I started to experience PW (photographer withdrawal). There really was nothing for me to photograph, right? How many times can I photograph the same bush, the same tree, the same pond and the same ducks?

You see being smack-dab in the middle of American suburbia, this is the extent of my daily views. But then I realized that there are some simple ways to make an uninteresting location a bit more interesting! Here are six tips to help you do that.

#1 Change the way you look at things

Sometimes it’s just about changing perspective. Literally. Let’s say you have pine trees in your neighborhood. Nothing fancy – simple pine trees that are quite abundant in most areas.

Have you ever tried to look at one through a macro lens? Maybe you can capture individual blades of pine needles. How does the tree look when it snows? Can you isolate the snow on the pine needles? How do pine cones look under a macro lens? All of these things provide a potential for interesting photographs. Just change your perspective a complete 360 from what you normally do!

Get in close

Try looking at the same boring thing with a new or different lens. A macro lens or even a close-up filter is a nice way to get up close and personal to an otherwise boring subject.

Pine Tree in ice rain winter - How to Take Interesting Photos in Uninteresting Places

The image on the left is the neighborhood pond in winter. Nothing exciting ever happens there. But this past winter we had an ice storm and the pine tree was covered in ice. It made for some interesting compositions and also very cool macro shots!

Try wide-angle

The opposite of close is to try something that encompasses the whole scene. Using a wide-angle or ultra-wide angle lens to change your perspective of the scene in front of you.

Pine Tree in ice - How to Take Interesting Photos in Uninteresting Places

Here I used a wider angle to try and encompass the whole extent of ice on the tree. I quite like how the ice is hanging off the branches. I almost got frostbite from being outside in this cold but quite worth the shot, don’t you think?

Get the details/textures

Textures are a wonderful way to look at the details in and around an object. The play of color, age and grain make for great abstract imagery.

How to Take Interesting Photos in Uninteresting Places

#2 Experiment with different light

Light is one of the most important elements in photography. Sometimes boring doesn’t have anything to do with the location, but with the quality of the light at the time that you are shooting. If you feel that what you have around you is really uninteresting, try photographing the scene or subject in lighting that is different from what you usually do.

Get your tripod out and try photographing at night with a flash or a long exposure (slow shutter speed) combined with some light painting. Try early morning or golden hour light when the light is softer and the shadows are longer. Or go completely against the norm and try photographing in the harsh midday sun and embrace the play of light and shadows.

How to Take Interesting Photos in Uninteresting Places

Sometimes when the light is just right, I don’t have a model handy, so my dog is the one who poses for me. I just loved the way he was sitting in the light basking in the warmth of the setting sun.

Portraits in shadows - How to Take Interesting Photos in Uninteresting Places

This was a little bit more staged but she just happened to be sitting there when the setting sun entered the house from the left. I positioned her a bit so she was half in the light and half in the shade. No props needed at all – just a willing model and looking for the right or different kind of light.

photos of the setting sun - How to Take Interesting Photos in Uninteresting Places

Sunsets and sunrises are perfect to spruce up your boring location. You just need get outside and photograph that great light!

#3 Simple special effects

This ties into the point above. Using simple tools like a tripod, off-camera flash, gels, etc., can add an element of interest and change to your otherwise boring images.

Some other ideas to try are motion-blur with a really low shutter speed and a fast-moving subject, intentionally missing focus to create an artistic image, panning while tracking a moving object, double exposures, free-lensing, etc.

double exposure photography - How to Take Interesting Photos in Uninteresting Places

I absolutely love double exposures. When all else fails and there is nothing of interest to photograph, I try to combine nature and portraits to create some cool double exposure effect. More often than not, my pet is the only willing and able model!!

How to Take Interesting Photos in Uninteresting Places

#4 Break photography composition rules

We all know the basic rules of compositions such as; the rule of thirds, filling the frame, cropping effectively without cutting body parts, using leading lines and shapes, symmetry and patterns, pay attention to the background, etc. But sometimes when you are not quite feeling motivated and inspired or when you are dealing with an uninteresting background, try breaking some or all these rules to add some interest and drama to your images.

Dramatic Light Food Photos - How to Take Interesting Photos in Uninteresting Places

Most food photographs are always in perfect light on perfect white backdrops. I decided to break some rules and photograph my morning smoothie in the hard afternoon light that was streaming through my kitchen window to get some shadows in the frame and also give a more imperfect look to the blackberries.

How to Take Interesting Photos in Uninteresting Places

I loved the way my neighbor’s tree burst into flowers over the spring. So after much coercion and bribing, my daughter agreed to pose – but she refused to look at the camera. So I covered her eyes, cropped off her arms and create a different kind of portrait with the florals that I loved.

#5 Try some street photography

Street photography is an interesting genre of photography because it involves people and people watching is always fun and entertaining, no matter where you are.

#6 Experiment in post-processing

If none of these ideas inspire you, try to create something fun and interesting in post-processing. My post-processing software of choice is Lightroom. Perhaps you want to try HDR processing for your images, or a black and white theme. You can also use selective blur, gradient filters, and other tools to try sprucing up your images to create something interesting and fun.

How to Take Interesting Photos in Uninteresting Places

If you have been following my work for a while, you know that my style is very light, bright and airy. My images are clean and give a sense of freshness even in my processing. The image on the left is more of my normal style. But for this article and also to show that experimenting with post-processing is another way to overcome boredom, I edited all the images in a more dark and moody style throughout.

How to Take Interesting Photos in Uninteresting Places

Left is how I would normally process this image, and the image on the right is just experimenting with darker, moodier tones. I quite like them both and spend hours playing around with editing styles for this article.

Your turn

I hope these ideas get your creative juices flowing in terms of things to try and experiment with in your photography when you feel your location is uninteresting and boring. Remember, memorable images don’t always happen in cool, popular places – they happen when something simple or mundane tells an interesting story.

The post How to Take Interesting Photos in Uninteresting Places by Karthika Gupta appeared first on Digital Photography School.


Digital Photography School

 
Comments Off on How to Take Interesting Photos in Uninteresting Places

Posted in Photography


Simple Tips for Positioning Your Portrait Subject to Leverage Natural Light

06 Nov

When I’m on a photo shoot, I always carry two flash guns with me. However, when it’s a family outing or holiday, the flash guns are left behind in favor of kiddie stuff I need to lug around and I shoot using purely natural light, without even a reflector to help. It does help that I carry a prime lens that opens up to f/1.4 should I need or want to shoot indoors.

Here are my tips for making portraits using purely natural light.

On a sunny day, there is so much light that it makes it quite hard to take portraits, contrary to what many would think. I generally don’t like taking portraits with the sun directly hitting the face of my subject, so that makes the job even harder on such a bright day.

Simple Tips for Positioning Your Portrait Subject to Leverage Natural Light

The first thing to be mindful of is the direction of light – is it coming from overhead, at an angle of 45 degrees or higher or lower? As you cannot physically move the sun, you are going to have to move your subject instead. Think of positioning your subject as leveraging natural light to make a pleasing portrait.

Outdoors

Here are some outdoor scenarios where you can position your subject and avoid direct bright sunlight.

In the shade

My go-to (and easiest) spot is a shaded or sheltered area. Ideally, find a large enough shaded area so that your entire subject is covered in shade. You don’t want dappled light or parts of the body overexposed by being in the sun while the rest of the person is in the shade.

Areas of shade could be under a tree or in the shadow of a tall structure such as the wall of a building as in the photo on the left below. This gives you even lighting over a large area and even exposure too with no hard shadows.

Compare the left photo to the right one where the subject is wearing a hat. I metered on her face and because she was furthered shadowed by the hat, the exposure increased a tad and the rest of the image then got brighter. This can be evened out quite easily in post-production by adding a soft vignette.

Simple Tips for Positioning Your Portrait Subject to Leverage Natural Light

With a very bright backlight

Sometimes you find yourself at a location that doesn’t offer enough shade or there is a lack of large structures to provide shelter. You would end up shooting in a bright wide-open space and your only option is to shoot backlit or at least provide shade to your subject’s face.

The difficulty with shooting backlit is that you would need to have ample fill light to compensate for the very strong backlight. You can either use your camera’s built-in flash or use some kind of reflector. That could be a light-colored piece of cardboard or a natural reflector in the vicinity, such as a bright path or wall that reflects strong sunlight back onto your subject’s face.

Shooting in an open or semi-open space, like the black and white photo above, where the backlight is a lot stronger than the light illuminating the subject it gets complicated. Unless you are using a flash to counteract the backlight, the background will be blown out. Even if you shoot with a small aperture, the difference in the amount of light between the subject and the background will be too great to get an even exposure without using a fill flash.

Natural reflectors

In the photo below, this was not taken in a fully open space but the shade there was weaker. The hat provided more shade to her face and you can see the left side is a little darker than the right. That makes for a nice gradation of light and shadow as opposed to a flatly-lit portrait.

I leveraged a natural reflector here which was just to camera right – a light colored parasol which reflected the sun onto the girl’s face. You can also see that the background was a lot brighter and more washed out compared to the first photo above left. But it is showing some foliage compared to the photo above right, hence there is more detail rather than just a white blown out sky.

When I find myself in situations like these, I make sure my main focus is the subject’s face and I don’t mind the background being blown or washed out. After all, I am after a portrait of the subject.

Simple Tips for Positioning Your Portrait Subject to Leverage Natural Light

Light from above

Compare the two photos below. The left photo is shot with fairly flat lighting on the face. I made sure the subject was in full shade and the light coming from both the right and left sides was even.

The photo on the right is different in that I asked her to look up a little, thus using the light coming from above and creating a slight gradation of shadow on the right side of her face. Simple positioning of the face in relation to the light source makes a big difference in how your photos look.

Simple Tips for Positioning Your Portrait Subject to Leverage Natural Light

Indoor lighting

In comparison to outdoors, there is usually only a fraction of the amount of light indoors, even with a window present. However, this works to your advantage. The light source is usually one-directional unless you have many windows, and therefore you can use this it to sculpt your subject’s face as it were, choosing where the shadows will fall and creating a moody portrait.

The light in the photo below left was coming from a big window, high up at about 30 – 45 degrees to the subject. You can see the shadow falling on the opposite side of her nose and cheeks creating a darker, moodier feel to the image compared to the photo on the right shot outdoors. Even with just a single light source indoors, you have enough light to play with and create the ambiance you want to portray.

Simple Tips for Positioning Your Portrait Subject to Leverage Natural Light

Over to you

Whether indoors or outdoors, it is always important to be mindful of where the light is coming from, how much light there is, and if there is any contrast of light and shade in the space. Knowing how to leverage the natural light allows you to create the type of mood you are after in your portrait.

Understanding this and practicing how to use available light will make you a better photographer.

The post Simple Tips for Positioning Your Portrait Subject to Leverage Natural Light by Lily Sawyer appeared first on Digital Photography School.


Digital Photography School

 
Comments Off on Simple Tips for Positioning Your Portrait Subject to Leverage Natural Light

Posted in Photography


5 Lighting Setups You Can Do Using an Octabox

06 Nov

Choosing a lighting modifier is always tough because it’s inherently limiting. Do you go for a large soft source or something with a little more contrast? Or something that plays well with the modifiers you already own? One modifier that appears limiting is the Octabox, because generally, they’re a pretty large source.

You could literally point them anywhere in the region of your subject and get an acceptable photo. I’ve even heard them referred to as “idiot lighting” because they work so well, you don’t have to be clever to use them. It’s not really an insult, it’s more of a reflection of how easy they are to use.

But that doesn’t mean that you can’t use them more subtly though. That’s what we’re going to look at in this article. Your first setup will be the default one most beginners use with lighting. This is a good thing. It gives you a good handle on what the light looks like. But before you begin, let’s talk about the quality of light.

Quality of Light

Generally, when you refer to the quality of light, you’re referring to how hard or soft is the light source.

There are two parts to it though. First, there’s the actual size of the light. A large source is softer, like your typical 4-5 foot Octabox, while a small source, like a 7″ reflector is quite hard.

Soft light

Second, you have the distance to the source. An Octabox placed far from your subject will appear as a smaller source, and become quite hard looking. It’ll also need more power to reach the subject because the light will fall off. This brings us to the concept the f relative size of the light source.

Relative Size of a Light Source

The larger the source of light is in relation to your subject (you may be lighting a still life), the softer your light will appear. A medium source close to your subject will appear softer than a large one further away. So how do you make a larger source softer? Easy, bring it as close to your subject as you can without it appearing in the frame.

Which Octabox?

I currently own three Octaboxes. An Elinchrom 135cm (53″), a Godox 120cm (47″) and an Elinchrom Deep Octa 70cm. For this article, I’m using the more expensive, but really versatile 135cm. You could use the much cheaper Godox. It’s not as soft, but still more than useable.

Setup #1: Light Position to the Front and Side

How to do 5 Lighting Setups Using an Octabox

The Octabox lights both the face and the background in this position.

This is the basic one-light setup. It’s the typical light at 45º to your subject arrangement. Put the light in front of your subject and off to the side (either side, though I opted for the right side for my example).

Your subject can be straight on, or face either direction and still be lit acceptably. You could use a meter aimed towards the light to determine your aperture, but as it’s one light, you could just look at the back of the camera to determine your preferred exposure.

Depending on your preference, anywhere from f/4 to f/11 will work fine, just set the light power to match what you want. The larger aperture of f/4 will give you a softer look overall, while f/11 will have much more in focus.

It should go without saying, but you should always focus on the eye that’s nearest the camera for the most pleasing look.

How to do 5 Lighting Setups Using an Octabox

A behind the scenes image, shot from the side.

How to do 5 Lighting Setups Using an Octabox

Setup #2: Light Position to the Back and Side

How to do 5 Lighting Setups Using an Octabox

With the octabox moved around, the light on the subject is more dramatic. Because it’s no longer aimed at the background, the background goes dark.

For this setup, you just move the light 90º towards the background. This time you have to be more careful about your subject position. They’ll need to be turned towards the light more.

This gives us a short lighting pattern, which is more dramatic. You’ve seen this look before if you’ve read my article about lighting positions. It’s a really slimming look that adds more drama to a portrait.

You’ll also notice that compared to the previous setup, the background is much darker. Because the light is now angled away from the back wall, less of it is lit by your light, rendering it much darker. In the case of these two shots, the subject hasn’t moved, just the light.

How to do 5 Lighting Setups Using an Octabox

How to do 5 Lighting Setups Using an Octabox

Setup #3: Lighting From Behind (Backlight)

How to do 5 Lighting Setups Using an Octabox
This a little more exotic, as you’re letting the light wrap around the subject. Your subject will need to be right against the Octabox for this. Allow the light to wrap around and expose for the subject’s face.

How to do 5 Lighting Setups Using an Octabox

Behind the scenes shot.

How to do 5 Lighting Setups Using an Octabox

Bonus Tip:

You can also add a second light to create a high-key portrait here. Technically high-key has all tones above middle grey, so really, you’re just using the Octabox to create a white background.

Move the subject away from the Octabox a little bit. Make sure that the light from the back isn’t flaring over the shoulders to lose definition. If you use a light meter, make sure the aperture reading aimed at the Octabox is the same or lower than the one aimed at your front light.

How to do 5 Lighting Setups Using an Octabox

Adding a second light will create the white background look that’s currently popular. Technically with high-key, all the elements are above zero, so the black in the dress means this isn’t actually a high key shot, though this lighting can provide that look.

How to do 5 Lighting Setups Using an Octabox

How to do 5 Lighting Setups Using an Octabox

Two lights and one reflector used here.

Setup #4: The Tabletop

How to do 5 Lighting Setups Using an Octabox

This is a very popular look with fashion and editorial portraits. The front of the Octabox should be parallel to the floor above your subject.

The subject should be placed at the edge of the octa, even back from it slightly. This allows the light to wrap down and around the body. A reflector should be used to aim light back into the face as well to fill in shadows.

How to do 5 Lighting Setups Using an Octabox

How to do 5 Lighting Setups Using an Octabox

Setup #5: Lighting From the Front with No Diffuser

For a much edgier look, pull off the front diffusion panel. As I’m using an Elinchrom, I’ve swapped my inner diffusion panel for the white deflector that comes with the 135cm. You can just use the inner diffusion panel. With the Godox, just remove the diffusion panel.

How to do 5 Lighting Setups Using an Octabox

Stand in front of the Octabox and make sure your body or head is blocking the center of the light to minimize any hotspots from the light. Because you’ve allowed the silver part of the Octa to be visible, you get way more contrast in the light.

It’s still a large light source, but you get more highlights on the skin from this look. It also acts like a huge ring light, so you get diffuse shadows all around the subject, for a very cool look.


How to do 5 Lighting Setups Using an Octabox

Get Shooting

Even if you’re just running with a speedlight and a Godox, you’ll still be able to get more options from your light using these five setups.

Remember to keep the center of your light above the subject’s face where possible. Have fun and feel free to post your octabox shots in the comments below!

An Octabox can be used on location as well.

The post 5 Lighting Setups You Can Do Using an Octabox by Sean McCormack appeared first on Digital Photography School.


Digital Photography School

 
Comments Off on 5 Lighting Setups You Can Do Using an Octabox

Posted in Photography


9 of the Best Apps to Help You Do Awesome Mobile Phone Photography

05 Nov

They say the best camera is the one that you have with you. Even though I love my digital SLR, quite frequently, I shoot with my smartphone. This is why mobile phone photography is so popular.

There is a collection of stunning oak trees near where I live. Each time I go there, the trees look different based on the weather and time of year. Did I need an expensive $ 5,000 camera to get these pictures? No, because I know some tricks for shooting with my smartphone.

9 of the Best Apps to Help You Do Awesome Phone Photography

For these types of images, it doesn’t matter what type of camera you have. If you’ve got a camera, the inspiration, and the time, you can create some great images with your smartphone. Great images come from a good eye and a basic knowledge of composition and light. If you practice with these elements, you can take awesome pictures with any device even if it’s a phone camera. In this article, I will give you some of my favorite apps that will inspire you to have some fun with the camera that is always with you.

Is the era of the compact camera coming to a close?

9 of the Best Apps to Help You Do Awesome Mobile Phone Photography

Either people shoot with their smartphones or they use an advanced digital SLR.  There’s not much in between. Why is this happening?

For the general public, smartphones have more capacity and are easier to use than the current lower-end point and shoot cameras on the market. People are getting better results with less effort. When someone asks for a recommendation on a camera and they only have a couple hundred dollars to spend, I usually recommend that they use their cellphone.

As a photography educator, I find my iPhone to be easier to use and more consistent across multiple models. Some Android models work differently and don’t have the same capabilities as other phones. Some apps don’t work on all Androids, so please take that into account when trying out the apps mentioned in this article.

Smartphone-workshop 9 of the Best Apps to Help You Do Awesome Mobile Phone Photography

The current compact cameras are more menu-driven than most people can handle. And if their photography skills are not up to snuff, it is hard to get past the automatic modes on those cameras. I have had clients in my classes with these lower-end compact cameras where the manual modes do not work at all. These little gadgets are almost as complicated as the advanced digital SLRs, but without the quality results. The only things that are of benefit are their size and price point, but even then it means a smaller lens, a smaller sensor and diminished results.

Smartphone photography

I discovered smartphone photography after attending a professional photographic trade show. I took a little seminar on an app called Hipstamatic for iPhone and I was hooked. I was no longer a photo snob! All of a sudden, I realized I could create stunning photos in moments that would take hours in Photoshop.

Over the next year or so, I shot thousands of pictures on my smartphone and I got really familiar with the ins and outs of this type of photography.

San Simeon Hipstamatic - 9 of the Best Apps to Help You Do Awesome Mobile Phone Photography

I also realized this was the future of social media and photography for the general public. You could create little masterpieces that were appreciated online. They were not high resolution and the use of these images was limited, but that works just fine for most people. As a photographer, you don’t want to post images that can be stolen and easily used somewhere else, so the smartphone low-resolution image size is perfect.

I knew then there was a huge future in this art form for the general public. I continued to research new apps, reading everything I could and staying updated. Here are some of my favorite apps for mobile phone photography.

Shooting apps

Camera+Camera+ for IOS

This app allows you to control separate focus and exposure points, one of the secrets to good mobile phone photography. You can also use additional features such as selective focus, exposure compensation, and exposure lock. I use Camera+ on every picture I take.

Unfortunately, Camera+ is not available for Android.

Big Sur-iPhone  9 of the Best Apps to Help You Do Awesome Mobile Phone Photography

ProshotProShot – for IOS and Android

This app has all of the auto, program and manual modes that Camera+ has and is available for both IOS and Android (as well as Windows phones). With ProShot you have full manual control over exposure, ISO, and shutter speed. The most important aspect here is the ability to separate focus and exposure like you can with the Camera+ app.

My go-to editing app

Snapseed

Snapseed

This app is a must for both IOS and Android users! Snapseed is a go-to app for processing photos. It has such an easy interface, that you can make it part of your normal workflow and literally do your editing in seconds when taking a shot with your mobile phone. There are so many options in this app, but my favorite is the selective contrast and exposure settings. It allows you to go into the image and change exposure, contrast, and saturation in specific parts of your picture. Other settings such as grunge, HDR and Retroux let you create a variety of special effects.

Snapseed is available for both iPhone and Android.

Graphic Apps

wordswagWordswag – for IOS and Android

Are you looking for a simple text app where you can create text overlay or a watermark? Wordswag will help you create professional looking graphics like this in just seconds!

wordswag 9 of the Best Apps to Help You Do Awesome Mobile Phone Photography

Retro Apps

HipstamaticHipstamatic –  for IOS

This app allows you to select “film” and “lenses” in the “classic mode” before you shoot to create the perfect effect. Hipstamatic also added a modern interface with the ability to change your “lenses” and “filters” after you have taken the shot. Find one combination you like to create your own shooting style.

Hipstamatic - 9 of the Best Apps to Help You Do Awesome Mobile Phone Photography

Retro Camera – for Android

Retro

With Retro Camera you can take Hipstamatic-style images with five cameras, five sets of vintage vignetting, film scratch and cross-processing options.

Creative art apps

 Prisma – for IOS and Android

Prisma

Here’s a fun app that will turn your images into works of art in seconds. Lots of different options to create in this app. Each option in Prisma is preset and instant with very little custom editing needed.

9 of the Best Apps to Help You Do Awesome Mobile Phone Photography

Diana

 Diana – for IOS and Android

This app is an easy way to create double-exposure images in seconds. You can create images by selecting specific photos to combine, or you can randomly let Diana select for you. It works better if you have a vision in mind before working with this app, but sometimes a random selection works as well!

Diana app - 9 of the Best Apps to Help You Do Awesome Mobile Phone Photography

Waterlogue – for IOS and Windows 10 devices

Waterlogue

Create beautiful watercolor style images with Waterlogue. Select from a number of different styles to create your own masterpiece!

waterlogue

Conclusion

The beautiful thing about photography with the smartphone is that it expands your creativity and can even help with your Digital SLR photography. You can use more than one app to create even more customized effects. Take each image through a series of apps before getting the final look you want. You never know where you’re going to end up, and you might just like that.

What are your favorite Smartphone apps? Has it changed the way you shoot with your Digital SLR? Which of these apps is going to become a regular part of your smartphone photography workflow?

The post 9 of the Best Apps to Help You Do Awesome Mobile Phone Photography by Holly Higbee-Jansen appeared first on Digital Photography School.


Digital Photography School

 
Comments Off on 9 of the Best Apps to Help You Do Awesome Mobile Phone Photography

Posted in Photography


Why it’s a Good Idea to Take Lots of Photos

05 Nov

Take lots of photos. Lots and lots of photos. Make mistakes. Lots of them. The more photos you take and the more mistakes you make, the better the photographer you will become.

I’m not encouraging you to blaze away with your camera like you’ve got a machine gun and are an actor in a B-grade action movie, you won’t improve your photography doing that. You need to carefully consider many aspects of what you are doing and make sure every frame you shoot is different than the previous one.

Why it's a Good Idea to Take Lots of Photos

Increase your odds

Whether you’re photographing your kid’s birthday party, a street protest, graduation portrait or studio product shot for your website, there’s always a multitude of variables. Taking minimal photos is going to reduce your chances of success.

Varying the composition, timing, and exposure for each picture you take will give you more options when you come to edit your photos and choose the best of them.

Vary the composition and move around

Even the slightest changes in composition can produce significantly different photos. So if you only take one or two frames without moving your camera you might be missing the best angle.

Why it's a Good Idea to Take Lots of Photos

Small variations in composition can make a significant difference.

Moving your position from side to side and up and down, even just slightly, or adjusting the focal length when you are shooting a static subject will provide you with a series of different images.

Then later, when you’re editing, you will have the benefit of multiple different photos to choose from.

Moving subjects

Why it's a Good Idea to Take Lots of Photos

Taking a series of photos when one or more elements in your composition are moving gives different results.

When photographing a moving subject it’s always best to take lots of photos. As the location of your subject changes the dynamic of the photo can be varied in many ways. The relationship of your subject to the background will alter, for better or for worse.

The distance between your subject and your camera may change, possibly resulting in an out of focus photo. When your subject is moving, their position within your frame will be different from moment to moment. So it makes good sense to take a series of images, rather than just one or two.

Timing the moments you choose to make an exposure has a major impact on the outcome of your photo, especially when you have more than one element in your composition that’s moving. If you limit the number of photos you make you will risk the missing the best opportunity.

Continuous shooting mode

Why it's a Good Idea to Take Lots of Photos

In many situations, holding the shutter release button down with your camera set to continuous shooting (burst) mode will not often give you the best results unless you carefully consider your actions.

If you are observant and know your subject, taking time to track the action and choosing the moments you make your exposures will give you better results. Use continuous shooting mode carefully when you need it, otherwise, you will be trying to choose your best photos later from a myriad of exposures with insignificant differences.

Exposure variations

Why it's a Good Idea to Take Lots of Photos

Experiment with exposure settings.

Experimenting with different exposure setting is another good way to produce an interesting variety of images of the same subject, especially if the contrast range in your composition is broad.

If you prefer making photos using one of your camera’s auto modes, make a few exposures like that, then switch to Manual mode. Make more photos, adjusting the exposure slightly for each one.

By taking exposure meter readings from different locations with your camera’s spot meter and adjusting your settings accordingly, it can give you a range of more diverse photos than you would have if you only use an automatic exposure mode.

It’s all in the details

Why it's a Good Idea to Take Lots of Photos

Recomposing slightly avoided the bright line connecting with the flower.

Paying attention to detail when you are photographing can make the biggest difference in achieving fabulous photos or just mediocre ones. Taking your time to carefully observe the elements within your frame as you line up your camera to take a photo is essential.

Watch for changes to the light that will affect your exposure. Watch for movement and make deliberate adjustments to your composition. These are all ways that will add depth and an extra dynamic to your photography. However, if you are simply not taking enough photos you are truly limiting your opportunities to be making your best photographs.

Oftentimes the first angle you think of and photograph will not be the best. And, if you only make one or two exposures, you will not get the best photograph. The second composition you choose may be smarter, but all the smart people will do the same. The third step you make with your camera angle, composition, timing, etc., will likely give you a more pleasing, unique result and even lead to more inspired choices for subsequent frames.

Why it's a Good Idea to Take Lots of Photos

Over to you

By taking your time, observing carefully, and considering the various options of how you can set your exposure and frame your subject – it will give you an opportunity to get a diverse range of photos.

Time your exposures so the action is at its peak and your composition works. Then making variations on your choices will return you considerably more options of good photos to choose from. If you just make one or two exposures without making any changes it’s highly possible you will be missing out on making the best photographs possible. So always take lots of photos.

The post Why it’s a Good Idea to Take Lots of Photos by Kevin Landwer-Johan appeared first on Digital Photography School.


Digital Photography School

 
Comments Off on Why it’s a Good Idea to Take Lots of Photos

Posted in Photography


How to Create a Beautiful Online Gallery with Lightroom Classic CC and Adobe Portfolio in 15 Minutes

04 Nov

One of the common questions I hear from photographers is regarding a way to link Lightroom to a photography portfolio website. It usually comes from photographers who don’t like the design options in the LR Web module. The perfect solution doesn’t exist, perhaps the closest (until recently) is Koken, a free plugin that I wrote about some time ago that uses Lightroom’s Publish Collections to update your online portfolio.

But, the good news is that Adobe has just made creating a portfolio website a whole lot easier with its latest update to Adobe Portfolio.

Adobe Portfolio Lightroom

What is Adobe Portfolio?

Adobe Portfolio is exactly what it sounds like – an online gallery of photos. The benefit of using Adobe Portfolio is that it’s very easy (no web design or coding skills required). It also integrates with your Lightroom Collections (this is the update I just referenced).

That means all you have to do is set up some Collections containing the photos you want to include in your gallery and synchronize them with Adobe Portfolio. Then it’s just a matter of choosing a layout, tweaking the design, and making the website live. You can do all of this in less than 15 minutes.

The only caveat is that you need to be an Adobe Creative Cloud Photography Plan subscriber. Just like Lightroom mobile and Lightroom web, it isn’t available to photographers who use a standalone (purchased) version of Lightroom.

Curious? You can check out a portfolio website I created for myself using Adobe Portfolio here to see what it’s capable of.

Adobe Portfolio Lightroom

Step-by-Step Guide to Adobe Portfolio

The first step – and probably the hardest – is to decide what photos you want to include in your portfolio. Once you’ve made your mind up about that, the rest is easy.

  1. Create a Collection Set in the Library module called Portfolio.
  2. Create several Collections inside this Collection Set, one for each gallery you want to include on your portfolio website.
  3. Add photos to the Collections.
  4. Arrange the photos in the order in which they are to be displayed online.
  5. Synchronize the photos in the Collections by ticking the boxes to the left of the Collection name (marked below).

My portfolio website (link above) has four galleries; Black & White, Portraits, Spain, and Devon. Each gallery corresponds to a Collection in Lightroom with the same name (seen below).

Adobe Portfolio Lightroom

Register

Go to www.myportfolio.com and sign in with your Adobe ID. If you haven’t created a portfolio yet click the button that says Get Started Free. Otherwise, click the button that says Edit Your Portfolio.

Adobe Portfolio Lightroom

Choose a design for your gallery

Now it’s time to choose a layout. Start by clicking the Switch layouts icon (marked below).

Adobe Portfolio Lightroom

Adobe Portfolio gives you eight layouts from which to choose. All the layouts are fully mobile responsive, which means they work and look professional on mobile phones and tablets as well as desktop computers. Decide which one you want to use and click the Use this layout button.

Adobe Portfolio Lightroom

It may be difficult to visualize which one works best when populated with your photos. Don’t worry about that at this stage – you can change the layout afterward if you want to.

Settings

Next, click the Edit your settings icon (marked below).

Adobe Portfolio Lightroom

Go to Site Options and click the Lightbox for Images tab. Tick the “Enable lightbox for images on my pages” box and click Done (see below). This is important as it lets people view the photos on your portfolio website. If you don’t tick it all they will be able to see are thumbnails.

Adobe Portfolio Lightroom

Add images to your gallery

Click the Manage content icon (marked below).

Adobe Portfolio Lightroom

Go to the Integrations tab and Click the Add Collections button. The website opens a window that displays all your synchronized Lightroom Collections. Pick the ones you want to include in your portfolio and click the Import Selected button (see button below lower-right).

Adobe Portfolio Lightroom

Go to Adobe Portfolio, click on the Manage content icon again and go to the Website Pages tab. Make sure the switch is set to the On position for each Collection you want to display on your portfolio website.

Adobe Portfolio Lightroom

Choose cover photos

Now it’s time to tidy up the gallery cover photos. You’ll need to do this once for each gallery. Start by clicking the pencil icon next to the gallery cover photo (see below).

Adobe Portfolio Lightroom

Pick Edit Cover Image from the menu to edit the cover photo. At the moment this feature is a little limited – the website automatically picks the photo that appears on the cover and it’s not easy to change it.

The only way currently is to click Upload a new image and upload a photo you’ve exported from Lightroom – there’s no way to select another photo from the Collection. But you can zoom the photo and adjust the crop. Click Done when you’re finished and repeat for the other gallery cover photos.

Adobe Portfolio Lightroom

Setup the domain name

Click the Edit your settings icon again and click Domain Name. You can select a URL for your portfolio in the form yourname.portfolio.com. This is the easiest option. Alternatively, if you have a domain or a subdomain you can follow the instructions to use that.

Adobe Portfolio Lightroom

Preview your portfolio gallery

Click the gray Preview button to see a preview of your portfolio website. Happy with what you see? Click Update Live Site to publish your portfolio to your chosen URL. Congratulations – your brand new portfolio website is now live!

Adobe Portfolio Lightroom

Customizing the design

So far I’ve shown you how to get your portfolio website online as quickly as possible. The hardest part, as I said, is deciding which photos to include in your gallery. That can take hours, days, or even weeks. But, once the decision is made, you can get your portfolio online in under 15 minutes. It really is that quick.

If you’re happy with the default settings of your layout you can stop there, your job is done. But it’s worth spending some time looking at both the page and global settings. You can customize things such as fonts, colors and the number of columns on your front page. There is an option to add pages (for instance an About page) and links to other websites. You have a lot of options and it’s worth exploring them to see how you can individualize your portfolio website.

You can even change the layout by clicking on the Switch layouts icon. Adobe portfolio remembers your customizations, which gives you peace of mind as it means you won’t lose your customizations when you switch from one layout to another.

When you are finished, remember to click the green Update Live Site button. None of your customizations are published until you click that button.

How to update the photos

Portfolios are fluid and as time goes by you will add and remove photos from the Collections you created. You may also add more Collections as your photo collection grows. There are two steps to updating your portfolio website.

1. Update your Lightroom Collections and make sure Lightroom has had time to synchronize the changes.

2. Go to Adobe Portfolio, click on the Manage content icon and go to the Website Pages tab. Click on the Cog icon next to the Collection that you want to update and select Reset from Lightroom to update your portfolio gallery.

Adobe Portfolio Lightroom

3. Finish by clicking the green Update Live Site button to publish the updates to your portfolio website.

Next steps

With the recent update that lets you integrate Lightroom Collections, Adobe Portfolio has become the easiest way to create a portfolio website using Lightroom Collections. The only downside, as mentioned earlier, is that you need to be a Creative Photography Plan subscriber to use this feature.

If you are not, then look at Koken as an alternative. Don’t dismiss the Web module out of hand either, it has some very useful features and doesn’t require a CC subscription to use.


You can learn more about all aspects of Lightroom with my bestselling Mastering Lightroom ebooks.

The post How to Create a Beautiful Online Gallery with Lightroom Classic CC and Adobe Portfolio in 15 Minutes by Andrew S. Gibson appeared first on Digital Photography School.


Digital Photography School

 
Comments Off on How to Create a Beautiful Online Gallery with Lightroom Classic CC and Adobe Portfolio in 15 Minutes

Posted in Photography


Weekly Photography Challenge – Play with Your Food

04 Nov

Your mother may have told  you not to play with your food, but this week you have our permission.

Shot I did in New Orleans – very famous coffee and donuts.

I recently shared some video tutorials with food photography tips – check those out if you need help.

Here are some other dPS articles on the topic if you want more tips and ideas:

  • 4 Tips for Beginners to Food Photography
  • The Secret to Finding the Hero Angle in Food Photography
  • 8 Tips for Food Photography Newbies
  • How to Take Cool Food Photos in Your Refrigerator
  • Household Items to Bring to Your Next Food Photography Shoot
  • 5 Tips for More Professional-Looking Food Photography
  • 5 Tips That Will Make Your Food Photos Stand out from the Crowd
  • Using Focus Creatively with Food Photography

I used to do food photography commercially – a long, long, time ago! Here are some of my tips:

Don’t forget your fruit and veggies – even still in the tree or on the vine.

Food in its raw form including still on the tree works!

Not quite on the tree. I added the hands here to add interest and show scale, as well as the inside of this nut.

Add a human element or photograph the preparation of the food as well as the finished product.

The making of the iced coffee.

Add a human element for interest. Yes I did drink it and yes it was amazing!

Get the light right. The most common placement or direction of light with food photography is to have the light actually coming from behind the food. It makes it look shiny and more appetizing that way. Like this Colombian ajiaco soup.

Play with angles, light, and composition. Don’t just take one shot.

I wanted to show how full the table was here so I used this overhead angle. This is shot I did for a hotel in Nicaragua showcasing the breakfast they serve.

I took a lower camera angle here to show the setting of where the breakfast is served.

Here I added the human element and motion with the juice pour.

Now it’s your turn!

Weekly Photography Challenge – Food

Simply upload your shot into the comment field (look for the little camera icon in the Disqus comments section) and they’ll get embedded for us all to see or if you’d prefer, upload them to your favorite photo-sharing site and leave the link to them. Show me your best images in this week’s challenge. Sometimes it takes a while for an image to appear so be patient and try not to post the same image twice.

Share in the dPS Facebook Group

You can also share your images on the dPS Facebook group as the challenge is posted there each week as well.

The post Weekly Photography Challenge – Play with Your Food by Darlene Hildebrandt appeared first on Digital Photography School.


Digital Photography School

 
Comments Off on Weekly Photography Challenge – Play with Your Food

Posted in Photography


Video Tips for Better Food Photography

03 Nov

Food photography has become more and more popular. In fact, many restaurants complain that their patrons don’t eat the food before it starts to get cold because they’re too busy taking photos of it for Instagram and Facebook.

Whatever you’re eating, and wherever you’re sharing your food photos – here are some tips to help you take better, more appetizing food shots.

#1 – Lighting tips with Andrew Scrivani

In this video, you will get some really good tips for creating good lighting for food photography. Then see how he applies it in an example photo shoot.

#2 – 5 tips for better food photography composition

Composition is just as important in food photography as lighting. In this video, see 5 different ways to do food composition. Notice his first tip is to use a tripod!

#3 – Tips from a food blogger

Food blogger and author, Izy, has some really practical tips you can use for your food photography in this short video.

Learn about:

  • Light: Using natural light for food and diffusion
  • Camera angles: Which are the best for food
  • Styling: Tips for props and how to make the photo interesting
  • Camera settings: What are the optimal settings for food and why
  • Editing: Why you want to shoot raw file format

Give those a try when you’re doing your next food photography shoot.

The post Video Tips for Better Food Photography by Darlene Hildebrandt appeared first on Digital Photography School.


Digital Photography School

 
Comments Off on Video Tips for Better Food Photography

Posted in Photography