RSS
 

Archive for the ‘Photography’ Category

4 Great Pieces of Camera Equipment to Help You Get Creative

08 Jan

A great way to broaden your horizons in photography is to try out something new. In some cases, that will be a different technique, and in others, this will be using new gear. In this article, you will see four different kinds of camera equipment to help you get creative.

The obvious new gear for you as a photographer is a new lens. But there are other options though, and these will be explored in this article. Of course, it’s not the best idea to get new equipment until you have thoroughly mastered what you already own. But there comes a time when further growth needs some investment. Luckily there are options for all budgets, and there are so many items to explore.

4 Great Pieces of Camera Equipment to Help You Get Creative

The tripod is my number one pick for camera equipment to get creative.

1 – Is the tripod the best camera equipment to get creative?

What the best purchase you’ll ever make as a photographer? If you were to say a tripod you’d not be far off, as bang for your buck this is the best value piece of equipment you can buy. Once you have learned to properly master the various techniques that a tripod opens up for you, it will be a permanent fixture in your bag.

With such an important item it’s worth spending a little more money to get good quality one, and it’s still great value for the creativity this will then offer. So what kind of photographic opportunities does having a tripod open up?

4 Great Pieces of Camera Equipment to Help You Get Creative

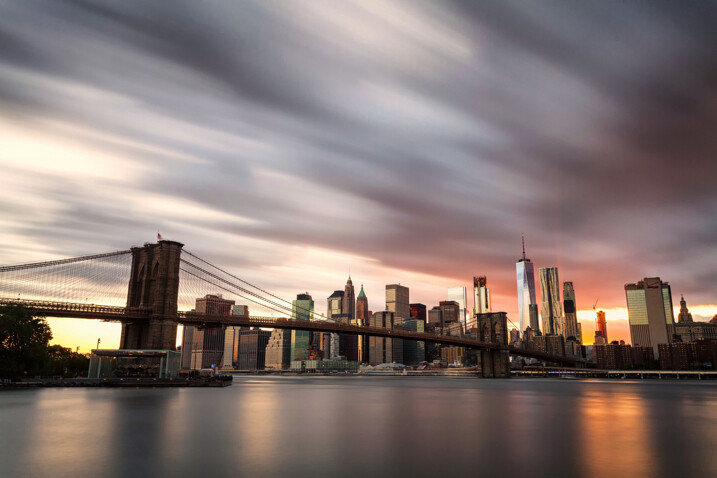
For this photo, I used an ND1000 filter, which allowed long enough exposure to capture motion in the sky.

  • Self-portrait – If you want professional level portraits, ditch the selfie stick and use a tripod. This will allow you to join group photos with your friends. Setting the camera on a tripod, and using the camera’s self-timer will allow you to put yourself in the frame.
  • Bracketing your photos – This means setting your camera up to take three or more photos in rapid fire. These photos will usually be one exposure value apart, so typically -1, 0 and +1 EV. This will allow you to experiment with HDR photography or the more advanced skill of digital blending.
  • Long exposure – Any kind of long exposure needs a good quality tripod. There are so many options available to you once you are exposing for one second or longer. Long exposure is the subject of multiple articles, examples of the types of photographs you can take are; Infrared, Astro-photography, light painting and long exposures of moving water.
  • A light stand – A tripod can double as a light stand when using strobes. Using off-camera flash is great for portrait photography, so this is yet another use for a tripod.

2 – Light up your world

4 Great Pieces of Camera Equipment to Help You Get Creative

A strobe combined with a radio trigger is a great creative tool.

As photography is the art of using light to create images, so the strobe is a very good piece of camera equipment to help you be creative. Take care to make sure the strobe is compatible with your camera, the wrong brand can fry the electronics in your camera.

If you are wishing for the best value you can look at the second-hand market, as getting more than one strobe will give you many more options. The title here is lighting gear, as a strobe on its own won’t give you maximum creativity. The purchase of radio triggers and receivers, for doing off-camera flash is also a great idea.

4 Great Pieces of Camera Equipment to Help You Get Creative

The use of color gels in this photo adds more interest to this portrait.

Tips for using flash

  • Enhance those details – Use a strobe (speedlight) to light a surface such as bank notes, or a brick wall. With the light coming in from the side you will get a lot more texture and detail in your photo.
  • Throw shadows – Use your strobe to throw scary shadows, for the night is dark and full of terrors! Alternatively, you could make a heart shape from a ring, by placing it on a book.
  • See the world in color – The addition of color gels to the front of your flash can make for some nice creative photography. How about experimenting with complementary (opposite) colors? This can work nicely for portrait photos, or you can use the gels to color a background wall.
  • Studio level photos – This is an entire genre and whether you’re interested in portrait photos, or still life photography you could do a lot worse than checking out the strobist.

Do you want something to go with your lighting gear that’s travel size? The Rogue Flashbender is a great off-camera lighting accessory that works both as a soft-box, and as a snoot.

3 – Get that creative filter on

4 Great Pieces of Camera Equipment to Help You Get Creative

There are so many filters to choose from, and they are among the most affordable pieces of camera gear.

Prior to Instagram adding a filter to your photo meant adding something to the front of your lens.  This is really camera gear to get creative with. Let’s take a look at some of the most important lens filters you can use in photography.

  • Circular Polarizing Filter – This is often referred to as a CPL. This has the effect of polarizing the light, so only light from one direction enters the camera. This can be used to either enhance reflections or eliminate them from reflective surfaces such as water. The CPL will also give color images more punch, and on cloudy days you can adjust the filter by rotating it and see the clouds pop out of the frame.
  • Neutral Density Filters – As above, these are commonly referred to in shorthand as ND filters. They have the effect of reducing the amount of light coming into the camera. This is useful when you wish to use a large aperture on a bright sunny day. The filters come in gradients, typically ND2, ND4, and ND8. ND2 is the weakest of these filters. At the more extreme end of the scale are filters like the ND110, or even the ND1000 (10-stops). These more extreme filters are used by landscape photographers for daytime long exposures.
  • Graduated filters – The most common of these are the graduated ND filters, used by landscape photographers to balance the light across the frame. The next most common in this category are sunset filters, that color half the sky in a specific color such as orange or red.
  • The best of the rest – Black and white film photographers will often use red, orange, or yellow filters to enhance the contrast in their scene. Another popular type of filter is the starburst, that makes light sources appear like stars.
4 Great Pieces of Camera Equipment to Help You Get Creative

Infrared photography can be great fun to experiment with.

4 – Specialist camera equipment

In addition to the above, there is some very good niche specific camera equipment to get creative with. These will allow you to take outstanding images, with the effect produced in camera.

  • The Pixelstick – This is a great tool for light painting that will take your photos to a different level. This allows you to fully control the light that’s emitted, and even program in your own patterns. The cheaper variant is to use a glow stick, or fairy lights attached to a stick. The ability to fully program the light source though makes the pixelstick a creative beast.
  • A glass ball – A personal favorite of mine is the glass ball. This can be used for refraction photography and could be referred to as an external lens optic that you carry around with you. If you think of this as a lens, it’s, without a doubt, the cheapest lens you’ll ever buy. Those that want to learn more can read my previous article on this, or perhaps follow the links in my bio below.
  • The dripkit – Have you ever tried your hand and water drop photography? If you haven’t you really should, it’s a ton of fun. The next level up here is the dripkit, which allows you to control every aspect of these types of photo. With the dripkit, you can now create some out of this world splash photography. Truly this is a camera equipment accessory to get creative.
4 Great Pieces of Camera Equipment to Help You Get Creative

This photo of Boston was taken through a glass ball.

Which gear is most interesting to you?

There are so many choices when it comes to camera equipment to help you get creative. The choice of gear you use is down to personal taste.

Here at dPS, we would love to hear your experiences. Have you tried any of the above pieces of equipment? Is there any other gear you’ve used that’s not mentioned here, something that really took your photography in a new direction? Let’s hear from you whether you’ve already tried any of these, or if you are thinking about taking the plunge.

This photo was taken in a single frame. The strobe was used to throw a self-portrait shadow on the wall. The tripod was used as this is a long exposure, also freeing me up to both light paint, and be in the frame. Finally, the light painting was produced using a pixelstick.

The post 4 Great Pieces of Camera Equipment to Help You Get Creative by Simon Bond appeared first on Digital Photography School.


Digital Photography School

 
Comments Off on 4 Great Pieces of Camera Equipment to Help You Get Creative

Posted in Photography


5 Ways to Ensure That You Stay Ahead of the Travel Photography “Game”

07 Jan

There’s no doubt about it, the business of travel photography has never been tougher. More competition, an oversaturated market, falling license fees and limited client budgets mean that travel photographers have had to work harder and change their business models. Here are five ways to ensure that you stay ahead of the travel photography “game”.

5 Ways to Ensure That You Stay Ahead of the Travel Photography “Game”

1- Embrace Social Media

It’s hard believe that there was a time before social media. While some of us remember that time and have fond memories, there’s no doubt that social media has become a necessity for any business wanting to market itself. The opportunities to be able to speak to such a huge audience has meant that any brand that hasn’t embraced social media has been left behind.

Like a lot of other people, I was skeptical at first and didn’t really see the point or need for the likes of Instagram and Twitter. But slowly I have come to realize that it really isn’t an option and every photographer needs to embrace social media and maximize its potential.

So if you haven’t already started to do so, begin to learn about how to maximize the different social media channels available. It is integral to the success of your business.

5 Ways to Ensure That You Stay Ahead of the Travel Photography “Game”

2 – Think About ROI

One of the things that I always find interesting when I speak to people wanting to break into travel photography is their expectations of the industry versus the reality. Unfortunately, travel photography is an incredibly oversaturated market. That means there are more photos available than buyers actually need.

This, coupled with a few big stock agencies reducing prices over the years, has meant that the fee paid to photographers for a stock image is lower than it has ever been. The knock-on effect of this has also meant that the majority of clients who previously might have commissioned photographers are now turning to stock photos as it’s cheaper than hiring a photographer.

This means that as a travel photographer, you now have to really evaluate if a destination is worth the investment required. For example, a few years ago I headed to the Orkney Islands off Scotland (somewhere that had been on my bucket list for a while) and captured some great photos. But to this day I have not made enough sales from that trip to cover the cost of it, whereas somewhere like Abu Dhabi has paid for the cost of the trip a few times over. Clearly, a location like Abu Dhabi is a much more popular destination and so it is also more likely to be in demand for photos.

5 Ways to Ensure That You Stay Ahead of the Travel Photography “Game”

Obviously, this doesn’t mean you should never go anywhere like the Orkney Islands. But if you are building your business around those far-flung destinations you may find that you are simply not selling as many photos as you need to cover the cost.

3 – Expand Your Skills

DSLRs changed photography forever. Then smartphones came along and changed the whole industry. The explosion in digital photography has also meant that there is now, even more, an opportunity for unique photographs, but also more competition than ever.

So as a travel photographer, you have to be looking for ways to always expand your skills and repertoire. These days that might be by branching out into video, time lapse, or even drone photography. Whether we like it or not, these new innovations offer a completely new way of looking at the world and if you want to stay ahead of the game you need to try and expand your skills accordingly.

5 Ways to Ensure That You Stay Ahead of the Travel Photography “Game”

4 – Move With The Current Trend

Like most things, photography styles and trends move with the times. While it’s important to always keep your own style if you want to earn a living from photography you also need to ensure that you sell photos.

For example, these days more and more picture editors are looking for travel images that convey an experience or story rather than just a generic tourist type photo. In fact, I recently spoke to one of the stock agencies I work with and they said that their clients are now looking for more lifestyle type of travel shots that almost look like they have been taken with a smartphone rather than in a studio.

The key, as in any other industry, is to stay up to date with the current trends. Sign-up to newsletters, look at magazines and read industry news to ensure you know what is going on and where the trends are going.

5 Ways to Ensure That You Stay Ahead of the Travel Photography “Game”

5 – Re-evaluate Your Business Model

The biggest difference that amateur photographers notice when then move to being a professional is that they have to start treating photography as a business where every dollar is accountable. Like any business, every few years you need to evaluate where you are and where you want the business to go.

That means you might have to change your strategy, your marketing, and even as mentioned above your offering as a business (like video or time-lapse). No business can ever survive forever without changing with the times and photography is no different.

So if you haven’t done so already, think about your business and where it is and where it needs to go to to stay in the game.

5 Ways to Ensure That You Stay Ahead of the Travel Photography “Game”

Photographers are often some of the most creative people in the world. But very few often evaluate and relaunch their business to move with the times. Whether we like it or not, change is constantly happening in every industry and photography is no different. Unless you are willing to ensure your photography business can and will evolve, you might be left behind.

The post 5 Ways to Ensure That You Stay Ahead of the Travel Photography “Game” by Kav Dadfar appeared first on Digital Photography School.


Digital Photography School

 
Comments Off on 5 Ways to Ensure That You Stay Ahead of the Travel Photography “Game”

Posted in Photography


How to Create Realistic Bokeh and Blur Effects using Photoshop

07 Jan

Perhaps you want to creatively improve your image, already taken with a depth of field and bokeh or create this effect from scratch for a specific composition. In this article, you will learn how to work with new and old filters and their features, creatively apply textures, even create a bokeh texture from scratch.

Also, you’ll learn some small secrets and useful features of digital artists. Described techniques and features will be available depending on Photoshop versions, which I will mention in the process. You can use these techniques on any image and get surprising results, I just want to show you the principles and workflow.

Everything is about the creative approach, so do not hesitate and experiment!

How to Create Realistic Bokeh and Blur Effects using Photoshop

Shallow Depth of Field and Bokeh

A shallow depth of field (DOF) is when the desired object (focus point) appears sharp and everything else is blurred. Under certain shooting conditions on a blurry background, there may appear some beautiful circles or blurred highlights – that is called bokeh.

This effect can be done during the shooting process or synthetically added in post-processing. You can use this as an artistic style, to pay attention to a certain object or interesting composition. It’s very handy to use such effects if you want to hide some flaws or unsuccessful or empty parts of the composition.

Also, it is often used to create lighting and foreground effects, additional details that help to immerse the viewer in the atmosphere of the scene much more. Areas for using this technique and the creative possibilities are huge, so I suggest that you start with a practice.

How to Create Realistic Bokeh and Blur Effects using Photoshop

Blur Gallery – Field Blur

So, let’s start with the most interesting and powerful features of Photoshop CC – the Blur Gallery and Field Blur filter. Blur Gallery is available in the filter menu, starting with Photoshop CC 2014, and has five blur effects with additional features, such as Motion Effects, Noise, and Bokeh. Note that this does not work in older versions of Photoshop!

Open the image, to which you want to apply the effect in Photoshop via File > Open or use Cmd/Ctrl+O shortcut or just drag and drop the image from your file explorer into Photoshop.

Next, on the Layers panel, right-click on a layer and choose “Convert to Smart Object” (Layer > Smart Object > Convert to Smart Object). Go to Filter > Blur Gallery > Field Blur. Your workspace has been changed to the Blur Gallery dialog box and you are shown a control pin in the center of the image (if there are no pins visible, try Cmd/Ctrl+H or go to View > Extras, to hides/shows guides, controls, etc.).

How to Create Realistic Bokeh and Blur Effects using Photoshop

Setting Your Blur Effects

So, for a pin in the center, set the Blur value to 0px and move it to the place in your image that should stay in sharp focus. Begin to apply a blur from the edges of the image and in problem areas that you want to hide by clicking on the place where you want to add pins or drag and drop existing pins to the desired place.

Adjust the blur intensity or remove it on the Blur Tools panel or use the blur handle around the pin itself. For the edges of the image, start with larger Blur values, and then reduce it, if necessary. Also, I used several pins with a smaller Blur values near the area in focus in order to create a softer transition from blurred to sharp areas. If you want to remove any of the pins, select it and press Delete on the keyboard.

How to Create Realistic Bokeh and Blur Effects using Photoshop

Creating Bokeh

Now let’s set the settings for the bokeh. Start adding a bokeh by setting Light Bokeh to 100. Next work with the Light Range sliders and start moving white, then black, until finding the optimal ratio of values.

You can slightly reduce Light Bokeh values so you do not get large overexposed areas. At this stage, you need to be careful and change the blur settings along with others to get the best possible, most realistic result.

Adjust Color Bokeh values to vary the texture with a color and add unexpected shades. Just do not make this value too big, otherwise, it will increase saturation or a lot of additional shades will reveal themselves.

How to Create Realistic Bokeh and Blur Effects using Photoshop

Iris Blur and Tilt-Shift

The following filter, which we will consider is Iris Blur. The principle of this filter is the same, but now you are working with the focus field. You see the white circle frame, that you can deform and rotate, four small points around it to control blur distribution (shape), pulling by a square you can specify the focus area. You can still use several pins but blur values are the same for all of them.

This filter is very convenient if you want to highlight a specific area. In the previous example, you could specify exactly which areas of the image stayed in sharp focus and had more flexibility to work with the form, here you have less control over the details.

How to Create Realistic Bokeh and Blur Effects using Photoshop

Top image – Iris Blur. Bottom image – Tilt-Shift.

Tilt-Shift is very popular for the fact that it creates the impression of a miniature scene. It is especially good for photos of architecture and everything that is at a distance.

As an artist, I use it when I want to emphasize dynamism and distortion (especially, in abstract artworks) or to create a background when I work with portraits.

Path and Spin Blur

Path Blur is very useful if you decide to add motion to your composition or emphasize it. Unlike the Motion Blur filter, you can control the effect and set the most unusual directions for blur. Unfortunately, this filter does not have the ability to add a bokeh to the blur, but Motion Effects are available.

How to Create Realistic Bokeh and Blur Effects using Photoshop

Top image – Path Blur. Bottom image – Spin Blur.

Spin Blur, also a motion blur, but in a radial form. With it, you can turn your photos into a painterly image and if you add color effects, it will turn out very well. I use this filter for various artistic techniques, mostly when I work with very abstract creations. With this filter, you can create a very simple simulation of long exposure photography.

The Blur Gallery

You can apply several filters from the Blur Gallery at once. Just checkmark desired filters, adjust their settings and click Ok to apply. Depending on the image size and performance of your computer, it may take time to render a preview of the effect and after once you apply the desired settings, so be patient.

Also, you can edit the settings of the applied filter if you convert the layer into a Smart Object and add the filter on it. It’s automatically a Smart Filter, so just double-click on the name of the filter and edit the settings. This is a non-destructive way of editing photos and creating artworks.

The advantage of a Smart Object is that you can go back and make changes to the filter or adjustment, apply it several times, even delete it if something went wrong and keep the original image intact.

How to Create Realistic Bokeh and Blur Effects using Photoshop

Lens Blur Filter

Now let’s look at another powerful and fast solution for adding blur effects. The Lens Blur filter first appeared in Photoshop CS. So whatever version you use, CS or CC, this filter will be available for you. Take into account that this filter will not work on Smart Objects, so you can’t edit and apply this filter as a Smart Filter.

Again, open the desired image. Duplicate the original image layer (Layer > Duplicate layer or use the shortcut Cmd/Ctrl+J) to work non-destructively. In order to only apply an effect to a specific object or area, I made a selection with Quick Selection Tool (W) and added a layer mask to it (Layer > Layer Mask > Reveal Selection or use “Add layer mask” icon at the bottom of Layers panel).

How to Create Realistic Bokeh and Blur Effects using Photoshop

To achieve a more realistic effect, blur the layer mask or its edge a bit because the hard edges of the mask can spoil everything. You can use Gaussian Blur filter (Filter > Blur > Gaussian Blur) or Feather option on Properties panel (Window > Properties) with the settings to your taste.

Lens Blur Settings

Highlight the layer thumbnail and go to Filter > Blur > Lens Blur… In the window that appears, first set Preview to Faster because this filter sometimes takes a long time to process changes. Next, in the Depth Map section, you can set Source to a Layer Mask to not apply a blur to a masked area, or leave this parameter at None to blur an entire image.

Checkmark Invert if only the selection from a layer mask is blurred and adjust Blur Focal Distance for more accurate blur distribution. If Lens Blur effect does not appear on a layer, just delete a layer mask (right click on a layer mask > Delete Layer Mask).

How to Create Realistic Bokeh and Blur Effects using Photoshop

In the Shape drop-down menu, you can choose a form of bokeh. In this example, I will use a triangle because this is a rather unusual form, but shapes like Octagon produce more normal blurred results. Radius value controls the size of that shape and the amount of blur that is applied. Blade Curvature quite creatively changes the form and makes the shape more circular. Rotation sets the angle (direction) of the bokeh shape.

How to Create Realistic Bokeh and Blur Effects using Photoshop

To control where the bokeh will appear, change the settings in the Specular Highlights section. Brightness increases the strength of the highlights within the blurred area.

Threshold controls which tonal range (pixels) need to be affected to create bokeh. This means that pixels brighter than a Threshold value can be used for creating a bokeh effect. Do not overdo with these two values, otherwise, bokeh shapes can merge into a single mass or even fill a part with white.

Adding Texture or Bokeh Overlays

You can always use additional textures in your artwork, created digitally or by using a camera. Open your image in Photoshop and go to File > Place Embedded (File > Place in older versions), then choose the desired texture. In my case, I made some photos with bokeh on a black background (to separate the bokeh).

How to Create Realistic Bokeh and Blur Effects using Photoshop

Next start to experiment with the different layer Blending Modes, such as Screen, Linear Dodge (Add), Color Dodge, etc. You can always reduce the effect of the texture by reducing the layer Fill or adding a contrast to the texture with a Levels adjustment or adjustment layer to add more Blacks and greys, to make it more like “transparent”.

Or if you like texture but don’t like a color in it, then use a Hue/Saturation or Color Balance adjustment to change the hue or remove the color completely. Sometimes in different artworks, I use a bokeh layer with some blurred objects (mostly invisible).

How to Create Realistic Bokeh and Blur Effects using Photoshop

Create Your Own Bokeh

This makes artwork more interesting and adds texture and details. There are a lot of opportunities for creativity with layers, and it’s simply impossible to describe them all in this article. But now I will show you one more interesting trick for creating bokeh texture from scratch using only Photoshop filters. If you like to experiment with filters and settings, then this is a very interesting direction, with a lot of options and discoveries in the process.

Create a new layer at the top of all layers by using the shortcut Cmd/Ctrl+Shift+N or going to Layer > New > Layer. In the dialog box that appears set Mode to Screen and checkmark “Fill with Screen-neutral color (black)”. Next, go to Filter > Noise > Add Noise and set following settings – Amount: 15%, Distribution: Gaussian and click Ok. If you want black and white texture, checkmark the Monochromatic option.

How to Create Realistic Bokeh and Blur Effects using Photoshop

Next apply Mezzotint filter from Filter > Pixelate > Mezzotint with Type: Coarse Dots. This filter is needed to make noise texture sharper and add highlights to it. Now you need to soften the texture and blend colors. Apply Gaussian Blur filter (Filter > Blur > Gaussian Blur) with a radius 2.0 pixels.

How to Create Realistic Bokeh and Blur Effects using Photoshop

Go to Filter > Other > Maximum and set Radius: 20pixels, Preserve: Roundness. Depending on Radius value and size of your working document, the texture becomes larger or smaller. Apply a Levels adjustment (Image > Adjustments > Levels or use Cmd/Ctrl+L) and move the Blacks until you are satisfied with the result.

Play around and experiment with values of each of these filters and you can find a lot of interesting options.

How to Create Realistic Bokeh and Blur Effects using Photoshop

You can add more details to bokeh texture if you want, by using the Unsharp Mask or Find Edge filters. And if you repeat this technique again, but instead of using Mezzotint and Gaussian Blur, apply a Pointillize filter (Filter > Pixelate > Pointillize) with Cell Size: 35 you will get a completely different kind of bokeh texture. So do not hesitate to experiment!

On the internet, there are a lot of paid and free plugins available for Photoshop to create similar effects, for example, the Nik Collection. It’s a free and powerful addition to Photoshop CS4 through CC 2015 with a lot of interesting tools for photographers and artists. There also is the blur, depth of field and bokeh effects produced by Analog Efex Pro 2. In the image below you can see the work of this filter.

How to Create Realistic Bokeh and Blur Effects using Photoshop

Conclusion

And at the end some pieces of advice for you.

More is not always better! Sometimes too many effects (unfortunately any) can give the opposite effect and hide the beauty of the original image or idea. Therefore, try to achieve harmony in color, composition and use these techniques with an intention. If you decided to experiment, then embody the idea entirely, do not hesitate! Do so as you like it.

Bokeh is a lighting effect, use it carefully, so as not to overexpose the overall image. This effect can add excessive brightness to highlights (the right part of the histogram), unwanted light peaks, or increase the overall brightness of the image. It’s important, for example, if you decide to share the picture on the internet or print your image.

The more contrast that is applied with a clear, not overexposed bokeh, the better it looks. So keep your eye on the histogram (you can find it in Window > Histogram).

How to Create Realistic Bokeh and Blur Effects using Photoshop

Also, your bokeh should not be underexposed as well. This is important, by the fact that very often people try to remove unnecessary brightness incorrectly, so get a pale, not realistic bokeh. In exceptional artistic cases, this is permissible, but it is better not to do this.

Pay attention to where you have located or placed bokeh textures and where are the focus and blurred areas in your image, in order to express it more realistically and logically, through a visual image (in photo or artwork).

I will be glad to see your creative inventions, discoveries, and final results. If you have questions, please use the comments section below.

The post How to Create Realistic Bokeh and Blur Effects using Photoshop by Maria Semelevich appeared first on Digital Photography School.


Digital Photography School

 
Comments Off on How to Create Realistic Bokeh and Blur Effects using Photoshop

Posted in Photography


How to Make Storytelling Landscape Photos – 4 Steps

07 Jan

When we think of storytelling images, we immediately think of people doing something in a documentary type of photograph. After all, people make the most interesting stories. But landscapes have stories too.

As a landscape photographer, you can create a collection of images that tell a story about a place without having people as the main focal point in the image.

Salton Sea, California by Anne McKinnell - How to Make Storytelling Landscape Photos

The following steps will help you pull the story out of the landscape and convey it to your viewers.

1. What is the story?

The first thing you need to do is to spend some time thinking about what exactly is the story. Often we go to a place and start making images based on compositional elements in the scene without thinking about what is important to the story first.

Salton Sea California by Anne McKinnell - How to Make Storytelling Landscape Photos - 4 Steps

When I go to a new place, I often do a scouting trip first just to have a general look around and get a feel for it. Then I do some research to find an interesting story. If the place is a park, why is it a park? Who made it a park? What is the history? What interesting things happen there now and in the past? Do any animals live there, and if so which ones?

Once you have some background, you can pick a story to wrap your photographs around.

Egret at Salton Sea, California by Anne McKinnell - How to Make Storytelling Landscape Photos - 4 Steps

2. The first photo shoot – using different focal lengths

Your first photo shoot will help you bring your plan together. Go back to the places that had the most photographic potential from your scouting trip and while there look for elements in the scene that relate to the story you have chosen.

I usually start out with a wide-angle image that takes in the whole scene. Often I don’t end up using this photo in the final collection, but it helps me in my process of making the collection. When you have your photo that takes in everything, think about what are the most interesting things in the scene. Try to pick at least three things and then get closer to each one of them in turn.

Gulls Flying over Pelicans by Anne McKinnell - How to Make Storytelling Landscape Photos - 4 Steps

White pelicans by Anne McKinnell - How to Make Storytelling Landscape Photos - 4 Steps

Example

For example, when I went to the Salton Sea in California (a stunningly beautiful location that was created as a result of a man-made disaster) one feature that is most interesting is a layer of dead fish. But how do you make a good photograph of dead fish?

I started by making an image that took in the whole scene. Then I changed lenses to use a mid-range focal length and then a long focal length from where I was standing. Then I started to get closer and closer to the dead fish looking for elements of design such as lines and shapes along the way.

Salton Sea Tilapia by Anne McKinnell - How to Make Storytelling Landscape Photos - 4 Steps

Dead Tilapia at Salton Sea, California by Anne McKinnell - How to Make Storytelling Landscape Photos - 4 Steps

When I found something interesting, again I tried to use different focal lengths to see how I could convey the feeling of the place in an image.

Make sure you photograph the details of the scene as well as the overall feeling. Finally, when you find a really interesting detail, get really close to it using your wide-angle lens so you have an image with an interesting detail in the foreground that also takes the whole scene into the frame.

3. The second shoot – using the best light

The next step is to pick out your favorite images from your first shoot and think about what kind of light could make them better. Is there a subject with a great shape that would make an interesting silhouette? Is it transparent and might glow with some backlight?

Would it create interesting shadows at a certain time of day? Would it look best with warm light during the golden hour? Does it need a dramatic sky?

Sunset at Corvina Beach, Salton Sea, California - How to Make Storytelling Landscape Photos - 4 Steps

Whatever it is, plan to revisit the location when you have the best chance of getting the conditions you need to make your ideal shot. You may need to go back a number of times, if possible before you get all the shots you want.

4. Putting it together

Whether you are putting the images into a collection display on your wall, using them in a blog post, displaying them on your website, selling them to a magazine (along with your story of course), or simply showing your friends. Having an interesting set of images that are storytelling will always create a larger impact than random photos of a place that are not connected.

Salton Sea Collage by Anne McKinnell

The post How to Make Storytelling Landscape Photos – 4 Steps by Anne McKinnell appeared first on Digital Photography School.


Digital Photography School

 
Comments Off on How to Make Storytelling Landscape Photos – 4 Steps

Posted in Photography


2 Video Tutorials – Tips for Better Winter Photography

06 Jan

If you live in the Northern Hemisphere you may be in a snow-covered land at this time of year. So here are some videos to help you get out and do some winter photography and make some stunning images.

15 Winter Photography Ideas

Don’t know what to photograph in the winter? Here are 15 ideas to help you get started.

5 Winter Photography Tips and Hacks

Now that you have some ideas of what to photograph in the winter, here are some tips on how to go about it including:

  1. How to properly expose for snow.
  2. Eliminating the blue cast.
  3. Use a tripod.
  4. Be careful with Chromatic Aberration.
  5. Freeze the snowflakes and make sure the scene is sharp.

The post 2 Video Tutorials – Tips for Better Winter Photography by Darlene Hildebrandt appeared first on Digital Photography School.


Digital Photography School

 
Comments Off on 2 Video Tutorials – Tips for Better Winter Photography

Posted in Photography


Weekly Photography Challenge – Winter

06 Jan

If you have already gotten some ideas and tips for how to do winter photography here – then you’re ready to go on this week’s photography challenge.

Photo by dPS writer Holly Higbee-Jansen

Weekly Photography Challenge – Winter

If you need more tips try these dPS articles:

  • 4 Tips for Low Light Photography During the Winter
  • Tips for Winter Landscape Photography on the Prairie
  • Shooting in the Cold – Tips for Winter Photography
  • Tips for Processing Winter Landscapes in Lightroom
  • 10 Tips for Taking Stunning Winter Portraits of Your Kids
  • How to Take Care of Your Camera in Cold Weather

Simply upload your shot into the comment field (look for the little camera icon in the Disqus comments section) and they’ll get embedded for us all to see or if you’d prefer, upload them to your favorite photo-sharing site and leave the link to them. Show me your best images in this week’s challenge. Sometimes it takes a while for an image to appear so be patient and try not to post the same image twice.

Share in the dPS Facebook Group

You can also share your images in the dPS Facebook group as the challenge is posted there each week as well.

The post Weekly Photography Challenge – Winter by Darlene Hildebrandt appeared first on Digital Photography School.


Digital Photography School

 
Comments Off on Weekly Photography Challenge – Winter

Posted in Photography


How to Photograph Crockery and Cutlery

05 Jan

In 1928, Andre Kertész took an iconic photo of a fork resting on a bowl. It’s called “La Fourchette”. Despite its simplicity, or maybe because of it, the photo is striking. The separate parts of the composition are banal—a bowl, a fork, and a table—but the photo is a superb study in light and form. Bold shadows emphasize shape and create a visual intrigue that holds the viewer’s attention.

How to Photograph Crockery and Cutlery

With Kertész’s photo forever lodged in my mind, I’ve taken many photos of crockery and cutlery over the years. Stopping for something to eat or drink is a reason to take the camera out rather than put it away. Although I have a modest collection of antique knives, forks, and spoons at home, eating out while finding new tableware to photograph is part of the fun.

How to Photograph Crockery and Cutlery

Cameras and lenses

You can use any camera to photograph tableware, obviously, but some close-up capability is useful. Smartphones and compact cameras are ideal, as they allow extreme close-ups with lots of depth of field. Cameras with bigger sensors effectively give less depth of field, and often you’ll want lots of it. Also, a small camera is easier to use discreetly at a restaurant table.

Working with shadows

To imitate the Kertész fork photo you need directional light. If you’re taking photos at an eatery, look for lighting opportunities before choosing a table. Window light is directional on a sunny day if there are no net curtains or frosted glass installed.

Bare, clear-glass bulbs create bolder shadows than a fluorescent bulb or shaded light. A table lamp with a tapered coolie shade makes a good makeshift studio light if you move it close to your subject, as it forces its strongest light downwards.

How to Photograph Crockery and Cutlery

Once you’ve identified a suitable light source for creating shadows, how do you make the most of it? Adjusting the position and distance of the light, if possible, will alter the intensity of the shadow. Look at the Kertész photo and you’ll see there is very little mid-tone detail—it’s a high-contrast photo that emphasizes shape.

How to Photograph Crockery and Cutlery

Aside from the depth and definition of the shadow, its angle also plays a significant role. A fork or other utensil resting on the edge of a concave bowl or plate creates an elongated shadow. This distorted shape contrasts with the realistic outline that is cast onto a flat surface with the light at a right angle to the subject.

Looking at form

Not by accident did Kertész choose a fork for his tabletop photo. No other piece of cutlery is as intriguingly formed. However, many types of tableware are elegantly designed, so it’s worth looking closely for photo opportunities. Intricate details often make good photos. As well, you can combine multiple items to make the composition more appealing. The graceful lines of several stacked spoons make a good photo, for instance.

How to Photograph Crockery and Cutlery

Making the most of reflections

When you take photos of shiny silverware, glassware, or cups filled with tea and other beverages, inevitably you’ll see some reflections. Some of these are to be avoided, but you don’t usually want a reflection of yourself in the photo.

On the other hand, the success of the photo might hinge on a good reflection of other cutlery items or perhaps an ornate window or furnishing nearby. This is always worth watching out for one way or another.

How to Photograph Crockery and Cutlery

Whether through shadows or reflections, look for interplay between the different items on the table. At home, try using a mirrored surface to create intriguing cutlery compositions. Place items carefully so that they harmonize rather than merely obstruct each other.

How to Photograph Crockery and Cutlery

Tabletops and backdrops

Whenever a tabletop forms part of your composition, you must make sure that it doesn’t detract from the photo. Just like any background, it has the power to make or break the whole image.

Don’t include it at all if it has a distracting pattern or texture. Look closely at any grain or joins to make sure nothing works against the flow of the photo. In some cases, a well-lit or interesting table surface may play a strong role in the picture. If that isn’t so, it should be low-key.

How to Photograph Crockery and Cutlery

Fancy silverware

Once you’ve exhausted photo possibilities based on light and form, it’s always worth examining the little design flourishes found on a lot of fancy tableware. For this minute examination of detail, you definitely need a macro lens or the close-up facility of a cell phone or compact camera.

How to Photograph Crockery and Cutlery

Armed with close-up capability, you’ll see all kinds of photo chances at a micro-level. Look for little twists and turns in the metal, hallmarks, or even blemishes. These small details often look great when gathered together in a book or printed as a triptych, for example.

How to Photograph Crockery and Cutlery

Dessert

I hope this article inspires you to take great photos at mealtimes, though you must be careful not to spoil the enjoyment of those around you. Take your photos quickly and discreetly. You’ll see cafes and diners in a whole new light. Bonne dégustation.

The post How to Photograph Crockery and Cutlery by Glenn Harper appeared first on Digital Photography School.


Digital Photography School

 
Comments Off on How to Photograph Crockery and Cutlery

Posted in Photography


How to Add a Rainbow to Your Images Using Photoshop

04 Jan

A rainbow is a meteorological phenomenon that needs many specific conditions to come together in order to appear, which is why they are not that easy to come across. They are, however, a beautiful and evocative sight, and they are associated with different cultural and even religious meanings.

For all these reasons you might want to have a rainbow in your image even when there isn’t one, not to worry though, here’s an easy way to create them in Photoshop.

Rainbow landscape

Choosing the right image

Because of its significance and symbolism, you can incorporate a rainbow into almost any scene. However, if you want it to look natural it’s important that you choose a scenario in which it would be possible to see a rainbow in real life. To do so, you first need to understand how rainbows are formed.

When sunlight passes through a droplet of water it gets refracted and what we originally perceived as white light is now spread out into a band of colors called spectrum. Once it’s dispersed, we are able to perceive seven different colors in that light: red, orange, yellow, green, blue, indigo, and violet. This is what we call a rainbow.

Rainbow with reflection

Because it needs sunlight and water drops in the air, a common place to find a rainbow is near a fountain or a waterfall. This is what I’ll use to show you how to do it in Photoshop.

Getting started in Photoshop

Once you have your image opened in Photoshop, add a new empty layer by going to the top Menu > Layer > New Layer. A window will pop-up, you can name it “rainbow” just to keep things organized and then Click OK.

New Rainbow Layer

Then select the Gradient tool from the tools panel and a set of settings appear on the top bar as part of the options to adjust the gradient. On the left side of that top bar there is the Gradient Editor; if you open the menu for that by clicking on the down arrow, another window will pop-up with different gradient colors and styles. On the right of it, there is a gear icon that you can click on for more settings. From that menu, you need to choose the one called Special Effects.

Special Effects - rainbow photoshop

Creating the rainbow

A window appears to ask you if you want to replace current gradients with those from Special Effects. You need to agree to it so that a new set of gradients appears.

Replace Gradients - rainbow

From those select Russell’s Rainbow and adjust the width of each color to your liking with the slider.

Russell Rainbow

Shape the rainbow

A rainbow is theoretically a circle. However, it’s almost impossible to see it complete, only in rare circumstances from a plane. Usually, we see only a part of a rainbow and maximum the top half. In any case, you need to give it curviness. To achieve this just select the Radial Gradient from the top menu.

Curve rainbow photoshop

Then you can use any of the tools from the Menu > Edit > Transform options to rotate, distort or scale the rainbow.

Transform rainbow

Blend it to look more natural

Finally, to incorporate the rainbow into the image naturally, you can change the Layer Blend Mode from the drop-down menu you’ll find on top of the layers window. Select the Screen mode and move the slider to control the opacity.

You can also soften the edges to make it more believable by going to Menu> Filters > Blur > Gaussian Blur and move the Radius slider until you are satisfied with the result.

Blur rainbow

Then you just have to erase (hide) the parts that are overlapping the landscape by adding a layer mask and using the eraser tool. Note: make sure you are erasing on the mask, not the actual layer.

Erase rainbow

Conclusion

There you have it, a perfectly natural rainbow that can appear anytime when the sunlight passes through raindrops. It’s frequently seen after showers and rainstorms or near a fountain or waterfall. As long as you are looking opposite the sun and are at a low altitude angle.

Splash Rainbow

If you are more interested in the symbolic sense of the rainbow, you don’t have to worry so much about it looking natural. According to different cultures and periods in time, rainbows have been associated with different things.

For Christians, it’s found in the Bible after the big flooding as a covenant from God that water will no longer kill mankind, as a symbol of love. A different interpretation originated in ancient Europe as a legend that says that a leprechaun can be found at the end of the rainbow and if you can stare at it long enough, it will tell you where its pot of gold is hidden. And in contemporary cultures, a rainbow has been picked for the flag of the LGBT community as a sign of pride and symbolism of diversity.

Rainbow in the rain

In this case, I used it with this purpose by adding a rainbow to this photo from an Amsterdam’s Gay Pride Parade where it conveniently was raining so it would have been possible to see one. And you, how are you going to use this technique? Please share with us in the comment section below.

The post How to Add a Rainbow to Your Images Using Photoshop by Ana Mireles appeared first on Digital Photography School.


Digital Photography School

 
Comments Off on How to Add a Rainbow to Your Images Using Photoshop

Posted in Photography


5 Tips to Getting the Most out of a Photography Conference

04 Jan

One of the best ways to rapidly improve your photography skills and broaden your photographic community is to attend a photography conference. But, if you’ve never been to a conference before, just the idea of going can be intimidating. The rewards are great though, so read on for five tips that will help you select the right photography conference for your needs plus get the absolute most out of it once you get there.

Tip #1: Know your goals

Before you plunk down your deposit, evaluate your own specific goals for attending the photography conference. First, think about what you want to learn when you are at the conference. Obviously, if you’re a wildlife photographer and the conference focuses solely on street photography, it’s probably not right for you. But, if the conference offers many different learning options, you’ll need to do some investigating before you decide whether or not to attend.

Photography Conference Tips - northern Nevada landscape

I’m primarily a wildlife and nature photographer so when I evaluate a conference, I look for courses that will support my goals. I want to become a better landscape photographer too so I look for classes that will help me do that as well. Canon 7D Mark II, 24-105 II @ 70mm, f/11, 1/400th, ISO 100, handheld, stylized in Lightroom.

The instructors

Start by checking out the bios and websites of the instructors. Ask yourself if they are making images that inspire you. Do their images look like the images that you aspire to make yourself? Read their blogs and watch their videos too to get a good idea of whether their teaching style suits your learning style. If you find a few instructors that are simpatico, check out their courses at the conference.

Photography Conference Tips Instructors

I signed up for a Photoshop course at AdobeMax with Glyn Dewis but, since I didn’t know much about him, I looked up his website and read his About page first. Turns out he was an excellent instructor.

The course offerings

Now, review the course offerings. Is there content that you need to learn? Most photographers want to improve their existing skill set, whether that’s learning how to make better-exposed images or how to mask in Photoshop.

Does the conference offer courses at the right skill level for you? If you’re not sure, reach out to either the instructors or the conference organizers.

Photography Conference Tips - Course description

I use Lightroom and Photoshop in my work often so discovering how two different photographers use these tools felt like a course that would teach me a great deal. Plus, Julieanne Kost is my photography hero!

Learning new things

Learning new things is important too so look at courses that are completely out of the box for you.

If you’re a wildlife life photographer and you invest your time in a 90-minute course on street photography, you might be surprised at how that affects your work the next time you head out on an African safari. It can help you get “unstuck” if you’re mired in a creative rut.

After the class, you might even be inspired to continue learning street photography.

Photography Conference Tips - Schedule

When I attend a photography conference, my goal is to improve skills I already have but also to learn new things. At AdobeMax I did a bit of both, with courses on public speaking and Photoshop.

Tip #2: Networking

A huge reason to go to a photography conference is to expand your photography community. One thing I really love is that I can connect with people I’ve only ever met online. Meeting “live” at a conference is almost like a reunion. Of course, you can make new friends too, plus you can meet expert instructors in person.

Big conferences versus small ones

When you’re evaluating a conference, if networking is a big part of why you’re attending, definitely reach out to past conference attendees to gauge their experiences. At a 12,000-person conference like AdobeMax, it’s not as easy to hob knob and make new friends.

At a smaller, 400-person conference like Out of Chicago, making new friends is a snap. You’ll be in the same courses with the same people over and over. You’ll probably be best friends and be planning a photography trip together before the weekend even ends.

Photography Conference Tips - OOC community

The Out of Chicago Community page has over 1000 members. That makes it easy to reach out to people to ask if the conference would be a good fit for you. Most photography conferences have similar social media community pages.

Instructor accessibility

Likewise, at a huge conference, the instructors might not be so accessible for you to chat with, except at special times. And at those special times, since 12,000 people are waiting to speak with them, it will be a mob scene rather than a cozy tête-à-tête.

At a smaller conference, your instructors will probably be eating lunch right next to you. Bigger conferences draw bigger names though. So while you might not make as many personal one-on-one connections, it might be worth it if you’re going to learn from someone you hold in extremely high esteem.

Tip #3: Take advantage of every opportunity

In addition to seminars and hands-on courses, most photography conferences offer opening and closing keynote speeches. Big-name photographers or well-known industry experts usually give these talks. You might think of these things as “free” – just regular stuff included in your conference that everyone gets – but don’t  think that way.

Often the keynote speeches are the best parts of the conference. The opening keynote sets the stage for the week and lays out all of your opportunities for learning. The closing keynote caps the week with a review of what you did learn, and a reminder to go out and practice it.

Photography Conference Tips - Photowalk

AdobeMax didn’t offer any photo walks while I was there. So instead, I photographed the expo hall one morning while the light was amazing. Canon 5DIV, 24-105 II @ 31mm. 1/100, f/14, ISO 640, handheld, stylized in Lightroom.

Photo Walks

Another great add-on is photo walks. They help combine learning and networking into one fun outing. As you can imagine though, these are more prevalent in smaller conferences than large ones. Herding 12,000 attendees with cameras around the Vegas Strip doesn’t typically make for very good picture-taking.

On the other hand, 400 attendees walking through the Chicago Loop is a drop in the bucket. If photo walks are important to you, check into smaller, regional conferences. Either way, don’t skip these if they’re offered at the conference you’re attending.

Vendors

Every conference has a vendor or exhibition area where you can check out the latest and greatest gear and technology. Make sure you plan time into your schedule to visit this area. I usually grab a quick lunch on the go and use the 90-minute lunch period checking out all the different booths.

Photography Conference Tips - Interactive

Just outside the AdobeMax vendor area, there were lots of interactive activities for creatives, like this “chalkboard.” Canon 5DIV, 24-105 II @ 24mm, f/6.3, 1/100th, ISO 640, handheld, stylized in Lightroom.

At small conferences, you’re more likely to be able to rent a piece of gear for the day and test it out on a photo walk. Sometimes vendors offer discounts and even have product on hand that you can buy and take home with you.

At a large conference, you probably won’t be able to do more than review the gear at the vendor booth and talk to the rep. However, at a large conference, the vendor area often has a carnival-like feel to it, with interactive creative and technology exhibits set up to draw you in.

Tip #4: Conference bonuses

There will almost always be a party and often that party will include free food, drinks, and entertainment so go! It’s a bonus. Don’t skip it. Remember, if you’re goal is to network, the party is where you’ll meet fellow photographers and instructors.

Bring your camera

Photography Conference - Party

While night-time concert photography isn’t even remotely one of my fortes, I had a blast photographing this band at the AdobeMax Bash. Canon 5DIV, 24-105 II @ 105mm, f/5, 1/320th, ISO 8000, handheld, stylized in Lightroom.

That party – and probably a good bit of the conference – will be a blast to photograph so bring your camera. A lot of people won’t. Some people will bring them, but will never take them out of their camera bags. You, on the other hand, should keep your camera in hand and happily shoot away.

Even if you’re a wildlife photographer, and the images won’t go into your portfolio, making images of the conference will help you solidify everything you’ve learned over the course of the weekend.

Photograpjy Conference Tips - dragon's breath

Serving up dragon’s breath dessert at the Adobe Max Bash. Canon 5DIV, 24-105 II @ 24mm, f/4.5, 1/320th, ISO 10,000, handheld, stylized in Lightroom.

Swag

Hopefully, it doesn’t surprise you that you will get swag (free stuff!) at a photography conference. There might be a raffle or contest where you can win big door prizes – like lenses, tablets, and cameras. There will surely be a bag of goodies handed to you when you check in.

Most often you’ll get a reusable bag containing a sample pack of printer paper, a tee shirt, stickers, magnets, lens cleaning cloths, candy, water bottles, and lots of flyers. Now I know it’s tempting to just pitch most of it but before you do, review it all. There will be coupons and promo codes and it’s possible that there might be one for 20% off the business cards you always order or a BOGO (buy one get one) for your favorite ink or fine art paper.

Photography Conference Tips - Swag

A notebook and pen, courtesy of Adobe, in my AdobeMax swag bag.

Tip #5: Maximizing your trip

This is pretty much my favorite part of going to a photography conference. Most of them are only three or four days but there’s no rule that you can’t play hooky from work a bit longer. I recommend that you pick a conference near a cool destination. After the conference ends, stay in the area a few more days and put everything you learned to practice.

Wild horses couldn’t drag me away

Photography Conference Tips - wild horses

Wild mare and foal in the Onaqui Mountains in Utah. Canon 5DIV, 100-400 II @ 400mm, f/10, 1/60th, ISO 200, handheld, stylized in Lightroom.

After the AdobeMax conference in Vegas this past October, I headed off on a week-long wild horse photography road trip. I drove through Nevada, all the way to Utah, meeting half a dozen friends along the way, and flew home from Salt Lake City.

No surprise that for me that maximizing the conference was about heading off to photograph wild horses! For you, it might be photographing the Vegas Strip at night, or creating panoramas of the nearby Grand Canyon.

Which photography conferences are your favorites?

While AdobeMax was pretty amazing, my favorite is still the Out of Chicago Summer Conference. Of course, I’m biased since the conference is run by some of my good friends.

Photography Conference Tips - Chicago

Chicago has so much beautiful architecture, it’s perfect for magical photo walks. Canon 5DIII with 24-105 @ 24mm, f/8, 1/125th, ISO 250, handheld, stylized in Lightroom.

Which photography conferences are your favorites? Please take a minute and list the conference name in the comment section, and why you recommend it so that other photographers can benefit from your experience.

The post 5 Tips to Getting the Most out of a Photography Conference by Lara Joy Brynildssen appeared first on Digital Photography School.


Digital Photography School

 
Comments Off on 5 Tips to Getting the Most out of a Photography Conference

Posted in Photography


How to Reboot Your Creativity with 15-Minute Exercises

03 Jan

Here are four steps to rebooting your creativity and desire to do more photography with some 15-minute simple exercises.

Have you lost your photography mojo?

I get it, you’ve been at work all day, and it’s been stressful. Maybe there are kids to look after and dinner to cook as well. Perhaps a dog to take for a run or a family dinner to attend. There are all kinds of reasons why you don’t have the time or energy to pick up your camera and shoot.

How to Reboot Your Creativity with 15-Minute Exercises

When we don’t want to do something, we focus on all the reasons why it’s too hard – it takes too long to drive somewhere, the light is wrong, it’s raining, the battery is flat and so on. It’s easy to tell ourselves a story that allows us to talk our way out of doing something, especially when there aren’t any major consequences. Don’t get up early in the morning and miss the spectacular sunrise? Life goes on.

How to Reboot Your Creativity with 15-Minute Exercises

But the longer you leave your camera sitting in its bag gathering dust, the easier it becomes to talk yourself out of picking it up again. Months or even years go by. Maybe you think about it now and then and feel a niggling guilt or just sad.

Well, there is good news. With a small amount of effort, you can take steps to reboot your creativity and enthusiasm for photography again.

How to Reboot Your Creativity with 15-Minute Exercises

A shiny copper coin on a piece of black cardboard and a macro lens. Simple as (of course I have a macro lens!) can be.

Four Simple Steps

So here are the four simple steps I promised earlier.

Step One – PREPARE

Get your gear out, clean it, and charge the batteries. Check that it’s all still working and present. Wipe the memory cards clean.

Do everything you need to do in order to have your gear in peak working condition so you can grab it and go. The trick here is to remove the first mental block stopping you from shooting. If your gear is all prepped, then you don’t have anything stopping you there.

How to Reboot Your Creativity with 15-Minute Exercises

A marble I found walking on the beach on a piece of white fabric. Shot on a craft table in my spare room with natural window light.

Step Two – ASSEMBLE

Keep it simple and find some space at home where you can shoot. Work with objects you have at hand. Put together a small still life studio, maybe using window light or a flash, whatever you have nearby.

How to Reboot Your Creativity with 15-Minute Exercises

An assortment of props that I have assembled for my still life photography. Note the neutral color tones and mostly matte finish. That piece of slate gets used a lot.

By keeping it close to home and working with what you have close at hand, this removes the mental block about having to go out, needing to take the time, or spending more money. Making a small still life studio doesn’t need much, a neutral background and a base surface, some light and shadow and you are done.

How to Reboot Your Creativity with 15-Minute Exercises

A bunch of white stock, wrapped in white fabric, with a window draped in a white curtain in the background. Simple and cheap and you can use white fabric for so many things.

Having something quick and easy to put together (maybe a couple of sheets of white cardboard or foam core) that you can easily store out of the way reduces the resistance to setting up a shoot. Even better if you can leave it set up for a few days while working on this project.

How to Reboot Your Creativity with 15-Minute Exercises

My studio is a craft table, covered in white cotton, a window draped in white fabric, and neutral walls.

Step Three – TAKE 15 minutes

No one has enough time in the day, there are always things to do, places to be, demands on our time. However, for this exercise, I challenge you to give yourself a calendar appointment every day for a week. When you get home from work, instead of sitting down in front of the TV, or immersing yourself in social media or whatever it is you do to chill out, instead make a date with your camera.

If you have done Step One and Two, you have everything you need in place but the hardest is Step Three. Give yourself permission to take just 15 minutes out of your day and shoot. This length of time is long enough to be able to create some images but not so long it will interfere with your day too much. Let’s face it, by the time you make yourself a coffee and drink it, that probably takes just as long.

How to Reboot Your Creativity with 15-Minute Exercises

A wooden board and scoop and some chocolate chips. Yum!

Here is the really critical thing – IT DOESN’T HAVE TO BE PERFECT!  In fact, it will be really hard for the first couple of days. The point of this exercise is for you to have your camera in your hands again, and to get you shooting something, anything.

How to Reboot Your Creativity with 15-Minute Exercises

Half a lemon on a wooden board and a macro lens. Simple and clean and vibrant yellow.

Step Four – PERSEVERE

If it has been a while since you’ve done any photography, you will probably find this quite hard. Shooting still life isn’t everyone’s cup of tea either but it is the simplest combination of factors to get you up and going. Maybe you decide to shoot the same item in different ways or using different lighting. It doesn’t matter. No one else needs to ever see these images, you just need to do it.

How to Reboot Your Creativity with 15-Minute Exercises

Pomegranate on my favorite slate slab. Gorgeous color, via the window in my studio. My studio is a spare bedroom.

Maybe you decide to shoot all the different kinds of cutlery and utensils in the house. You could do close-ups of labels on wine bottles. Maybe you have some smooth white eggs and one brown freckled one. Or maybe you make up a bowl of ice cream and pour chocolate sauce and sprinkles on it.

Your cat or dog is asleep in the sun and you do close-ups of their noses or paws. Maybe your kids are building something random with Lego. Maybe there are some flowers in the garden or some stones found on the footpath. If you have a macro lens or setting you can experiment with things up close and abstract. Maybe you go for a walk around the block or to the park instead.

How to Reboot Your Creativity with 15-Minute Exercises

Eggs in a crate with a feather that came along for the ride on a table draped in white linen.

Whatever it is, it doesn’t matter so long as you take the time to point your camera at it and take time to do it every day for a week – seven days.

By setting yourself both an achievable goal and a reasonable limit, it is easier to trick your brain into saying, “Okay we can do this” instead of thinking,”Oh this is just too hard”.

How to Reboot Your Creativity with 15-Minute Exercises

I found this gorgeous lime green viburnum out on a walk. The house owner kindly let me pick a bunch to take home when I asked nicely.

Summary

The point of this exercise is simple, get your camera in your hands and get in the habit of shooting again. More importantly, it also helps overcome the mental blocks you put in place when you think something is too hard or will take too long. This puts some structure in place and makes it easy for you to allocate a small achievable time slot every day to just shoot, and not care about the outcome. Just the fact you are shooting is what’s really important.

It doesn’t really matter if you follow the framework laid out here, or do something completely different, so long as you take some time every day for a period and commit to picking up your camera and shooting.

How to Reboot Your Creativity with 15-Minute Exercises

Perhaps it helps you to share your process with a friend or via social media. You might choose to set a goal of posting one image a day for a week and let your friends know so that if you miss a day they can hold you accountable.

However you do it, in whatever way works for you, go through the steps, and set yourself up to be as prepared as possible. Make the commitment in your mind of “just 15 minutes” and see what happens…I bet you spend a lot longer and have more fun than you expect.

Once you overcome the inertia of sitting on the sofa, the challenge and fun of creating a composition in a small time frame begins to bubble up again.

How to Reboot Your Creativity with 15-Minute Exercises

A couple of years ago I undertook a 21 Days of Creativity course, which laid out steps to remove distractions from our lives, prepare both our physical and mental spaces, clean out the cobwebs and make creating a fun and easy thing to do, rather than a chore. This “15 Minutes A Day” exercise was the most valuable step I got out of the course. I shot every day for a month, as after the first week I was enjoying the challenge too much to let it go. Plus the added bonus of making some really good and fun images, several of which I have included in this article.

Once you have done the preparation, got your gear sorted, and a space to work in, the only thing you have to do, is pick up your camera and shoot. Just for 15 minutes.

Go on, give it a try, I dare you.

I shot dandelions for about two weeks. Every day I had the challenge of shooting the same tiny subject in new and interesting ways.

The post How to Reboot Your Creativity with 15-Minute Exercises by Stacey Hill appeared first on Digital Photography School.


Digital Photography School

 
Comments Off on How to Reboot Your Creativity with 15-Minute Exercises

Posted in Photography