RSS
 

Archive for the ‘Photography’ Category

Top 10 Ways to Improve Flickr for 2018

28 Apr

Having spent thousands of hours on Flickr over the past 15 years or so, on a personal level I’ve become fairly invested in the site. To date I’ve published over 140,000 of my photographs there. I publish 40 or so new photos there every single day. It’s my primary archive of my photography work on the internet. I’ve also been actively involved in groups over the years which have led to many personal friendships for me. I’ve favorited over 720,000 photos that I’ve browsed over the years. I blog about it. I search it for photos to map as I’m going about my project of documenting America. It’s my favorite site on the internet.

That said there are some significant ways that Flickr can improve and given the new recent ownership change I thought now would be a good time to write about some of the ways Flickr can improve from here. Jef Poskanzer another early Flickr user also made his own excellent to do list for Flickr here.

The power of Flickr in my opinion has always been the community. I think there are ways that Flickr can recapture some of the community spirit that it did have in years past and grow to become the primary community for photographers on the web going forward. This will take work but will be worth it in the end for the community, it’s users and now SmugMug.

Flicker Meetup, 7-7-2005, #3
Flickr Meet Up, Crossroads Cafe, 2005.

1. Community. In the earliest days of Flickr when a new user would join co-founder Caterina Fake would greet them personally on the site and welcome them — not a bot or a script, but Caterina herself. While this would not scale today, I think the original founders of Flickr realized how important community development was in the early success of the site. I remember shortly after I joined Flickr going to some of my first photo meetups in San Francisco at a local coffeehouse. Flickr’s other co-founder Stewart Butterfield would show up and so would Cal Henderson and many of the other early Flickr staff and engineers. They eventually brought Heather Champ on as Community Manager and her sole focus was in managing this new community that was growing at Flickr.

Stewart and the Skatepods
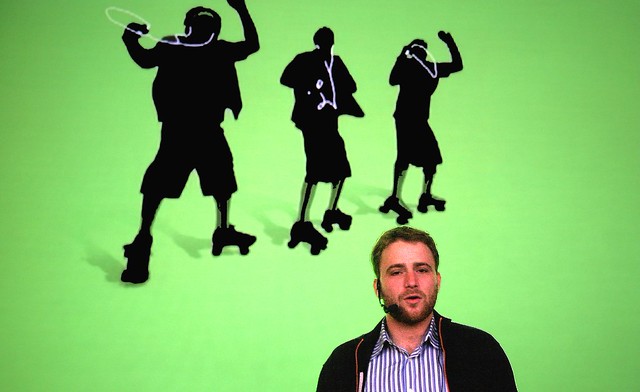
Flickr Co-Founder Stewart Butterfield introducing Flickr Photographers at a group show at the Apple Store, 2005.

Back in those early days Heather organized an event at the San Francisco Apple Store where some Flickr photographers shared their photos on the giant large screen upstairs in the old Apple Store off Market Street. There was a show where Flickr photographers from all over the world sent in a photo and Flickr printed them all for a group gallery show at 111 Minna. There were active meetups and drinkups and photowalks and even a giant party hosted by Flickr once a year. Flickr Fiesta, Flickr Turns 2, Flickr Turns 3…

I think what Flickr realized early on was that getting users to connect personally offline after first meeting online could be a powerful thing. Friendships were created. A group I was in started doing phototrips together. We did a trip to Miami, a trip to Detroit, a trip to Las Vegas a trip to Toronto. These trips would originate and be planned out in groups on Flickr. When out of town Flickr friends came to town you’d meet up and go shooting together. Meeting Mr. Chalk for the first time in person was fantastic! Because Flickr was the online community bringing all of these people together, it became a very beloved site for so many early Flickr users.

The challenge now is to try and restore much of that sense of community that over the years has been lost in my opinion. I think SmugMug should invest in this aspect of Flickr more than any other. They should hire perhaps a few community managers. They should host events. They should engage directly with the most active users on the site and promote Flickr evangelists from their user base who work to build and maintain that photography community at Flickr. I think Don MacAskill (SmugMug’s CEO) is the type of guy who will be good at this. It was good to see him engaging publicly about the acquisition on Hacker News shortly after the purchase. Management most of all has a role in actively engaging with the users of the site following the early example of Caterina Fake.

2. Groups. Much of Flickr’s early success was built around groups. More than just places to post a photo about a certain topic the group threads were vibrant conversations. Conversations about photography and Flickr itself sure, but also conversations about politics, about popular movies and television, about really anything and everything. Through some redesign over the years group discussions lost ground to the photos themselves. Discussions became harder and harder to track and follow. Facebook showed up and many people moved conversations over there, etc.

There are some significant ways that Flickr could rebuild group conversations.

The single most significant thing Flickr could do to improve group discussions would be to allow users to subscribe to individual discussion threads and then give them a central page where those conversations are bumped as activity/conversations happens in those threads. These are the conversations that I care the most about.

Many Flickr users belong to many different groups. Having to go to each individual group discussion page one by one just does not work for monitoring all of the conversations you are a part of. I may really care about a conversation about William Eggleston’s photography, but if there is only one new update to that conversation a week, as much as I care about it, I may not be checking it as regularly as I should. What’s more, the best time to see a conversation is as quickly after it happens as possible because that’s when others in that conversation still might be online. If I reply to a conversation 10 minutes after it happens that generates much more activity than if I reply 1 day after it happens. Giving users the ability to track all of the conversations they are interested in across the site would be a powerful tool.

Conversation begets more conversation. Activity begets activity. Give users the tool to track all of the group conversations across Flickr that they care about. This thread subscription page should be easily accessed in the mobile app as well.

After building conversation subscriptions, Flickr should also allow users to hide conversations in groups. Groups can get very noisy at times. The most recent group discussion is bumped to the top of the discussion page. If I don’t care about Game of Thrones, but that is the conversation that is repeatedly being bumped to the top of the threads I should allowed to hide it and make it disappear for me.

Flickr should identify 50 or so of the most active groups and have their community managers personally be involved in those groups and conversations. People should know that they can interact with management there. Flickr’s help forum is a bit like this, but the help forum is really only about Flickr help which can be boring at times. Flickr should promote these groups across the site and do everything that they can to make them as active as possible. If the discussions are not active in a group people stop coming. If the discussions are active it becomes a wonderful watering hole where people will spend hours online engaging with each other.

In the early days of Flickr Stewart Butterfield was active in Flickr Central threads. He’d frequently chime in and interact with the community there. This was a great thing.

I should also be able to mute certain users in a group. Inevitably trolls can/will invade groups and while some trolls can be charming and funny, others can be destructive. Allowing me to mute certain people gives me a bit of control over these conversations.

Groups should have photo pools, but these should really be secondary to the discussion threads and the groups pages should be designed to reflect this.

Flickr Explore
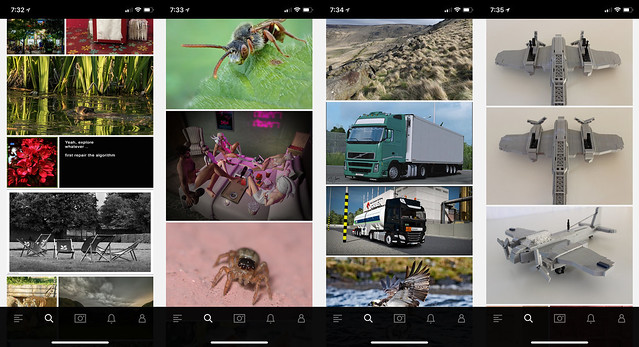
Some sample photos from yesterday’s Flickr Explore page.

3. Explore is so broken. There are so many bad photos regularly in Explore. The algorithm screens out more active users (like myself and many others). I looked at Explore for the first time in months yesterday and what do I see? Exactly the type of photos I don’t want to see on Flickr. Macro photos of insects. Lots of photos with signatures and watermarks. Three photos in a row of a LEGO airplane. Some screengrab of some user mocking Explore. Photos of big trucks and other transport. I don’t mind great train shots actually, but shots of boring city busses and big trucks that some Flickr transport fans collect are less interesting to me.

As much as I dislike Instagram and their world of ads, of all things, Instagram is doing a great job with their version of Explore. When I click on the search bar on Instagram it populates their version. What do I see there? Lots of photos of neon signs. Interesting analog photography. Great architecture.

The problem is that everyone sees the exact same version of Explore. In today’s world of AI Flickr should be smart enough to look at the photos I’m favoriting and serve me up my own customized version of Explore. Photos that I might be interested in based on what it knows about me.

Do I never favorite the classic bee on a flower shot? Then don’t show more to me. Someone who favorites 10,000 Second Life screengrabs might like to see more of them that they don’t know about on the site. I don’t. I love neon signs. Show me the most kickass photos of neon signs that I haven’t seen yet on the site from the past 24 hours. If I hate watermarked photos and never favorite them, don’t show them to me. If someone else watermarks their own photos and only favorites watermarked photos, show lots of them to them.

4. Maps. Although Stig’s excellent Flickr Fixr already fixes this, put a link to the Google Maps location under the map of a geotagged photo on Flickr. Google’s maps are the best in the world — and while it may be too expensive to actually license the maps to embed themselves, put a link there so users can go actually find the place. As it is now the Flickr maps are worthless. They won’t show you where something is. They will provide you the general vicinity of where something is, but they won’t show you exactly where it is.

If I am going on a trip and want to research a new city on Flickr, I want to know EXACTLY where things are so I can build a Google Map to go see and photograph those things myself.

5. Fix the Yahoo Log In. This is probably easy to do and from what I’ve read Don MacAskill is already on this one as a first priority. The Yahoo Login system (and especially for those using old legacy AT&T, PacBell, etc, versions of the login) is much too difficult to use. Pre-yahoo Flickr had a very simple user name / password log in that you set yourself. Users should be given an easy option to have that again and to get back into their Yahoo accounts that so many seem to be locked out of.

6. Fix the jumpy problem in photos from your contacts. Jef Poskanzer mentioned this one in his post as well. For years now whenever you browse photos by your contacts, right before you are about to favorite a photo on that page Flickr will inexplicably jolt and jump to some other random area on the page making you lose your place. Worse, right when you press the favorite button, because the page has suddenly jolted somewhere else you will accidently click on a photo which will take you away from that page and you have to press the browser back bar to get back and reload your contact’s photos page from the beginning. It’s a frustrating user experience and something that has been broken for YEARS now. It is time to fix it. Photos from your contacts is a very popular page and it is a problem that your most active users are having.

Flickr No Connection Issue

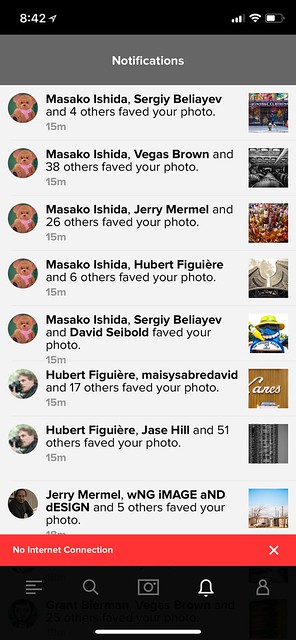
7. Flickr app connection issues. The Flickr photo app has a connection problem that other apps don’t. Just about every single day at some point you get a red “no internet connection” message at the bottom of the app. Even if you are connected to the internet and even if all your other apps work just fine. Flickr will not work. The only way to make the Flickr app work again is to quit the app and relaunch it. I think what may be happening is that at some point the Flickr app loses internet connection and isn’t smart enough to try and re-establish connection. So the app is dead and the only way to re-establish the connection is to quit it and relaunch it.

Searching Pennsylvania by Interestingness

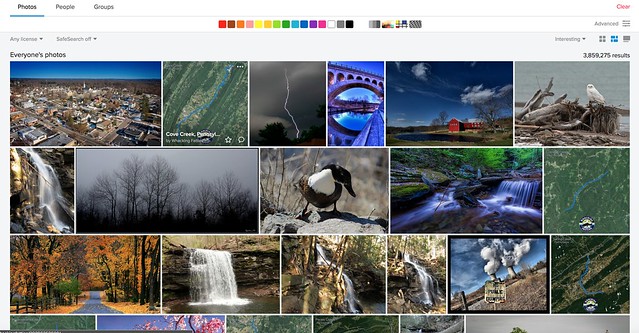
8. Fix search. I’ve got a trip to Pennsylvania planned in a few months. Why when I search “Pennsylvania” (over 3.5 million photos on Flickr by the way) and sort by interestingness is the 2nd most interesting photo on all of Flickr a dumb aerial map screengrab with a squiggly blue line with a “whacking fatties” watermark? The photo has zero faves, zero comments and only 11 views. In fact there are four “whacking fatties” screengrabs in the top 20 most interesting of the millions of photos of Pennsylvania. This is dumb. If Flickr’s interestingness algorithm is so broken that it puts this photo as the 2nd most interesting photo in all of Pennsylvania at least give me the option to sort the photos by favorites. If I sort the photos by favorites chances are that some of the most favorited photos might be better and more interesting photos. While favorites alone might not be the best indicator of what photos are most interesting, at least give me that option. Alternatively, stop showing photos with low faves, comments, views on the first page of search results by interestingness.

9. Fix recent activity. The recent activity page is the most important page on Flickr. I load it more than any other page. For me (and many others) recently it stopped loading. It times out the majority of the time and returns a server error. I can get around this error by changing my recent activity settings from “since the beginning” to “in the last month” but I shouldn’t have to. I should be able to get it to load reliably 100% of the time since the beginning. Your most active users are users are your most valuable users. This should be fixed.

10. Let users favorite multi photo batches from the Flickr homepage. At present if I go to the main flickr homepage at flickr.com and I hover over a single photo there I’m given an option to favorite that photo by pressing a little star. This is great. But if I hover over a batch of photos that a user has uploaded I am not given this option. The only way there I can favorite a photo is to click through on the photo and leave a favorite. Flickr should treat all photos whether individual or batch on that page the same giving me a hover over star to favorite the photos.

Bonus: The “taken on” date on a photo’s photo page, really should be a hyperlink that you can click that will take you to that date in your camera roll.

That’s all for now. Much more later. See you on Flickr.

You can find me on Flickr here. ?


Thomas Hawk Digital Connection

 
Comments Off on Top 10 Ways to Improve Flickr for 2018

Posted in Photography


Tips for Selecting What Gear to Take Along for Travel Photography

28 Apr

Travel photography is exciting. There’s always this sense of finding new and exotic places to capture. Of course, if you work hard you can find new and exotic places to photograph right near home. But there’s something about travel that truly sparks the imagination.  It’s really about capturing the look and feel of a place that isn’t your home.

Tips for Packing for Travel Photography

I used a 70-200mm lens here to compress the space between the sheep and the village beyond.

The thing is that it’s difficult to travel with camera gear, especially large DSLRs and their rather bulky lenses. Then there’s the expense. You could potentially be traveling with some very expensive equipment.

If you’re a hobbyist photographer, the loss of that gear could be devastating. I’ve known several individuals who have lost their gear while out traveling and have found that their insurance didn’t cover the whole loss. For these hobbyists, it was a blow from which they couldn’t recover.

So while travel photography with a DSLR can be exciting, it can also be stressful. That’s why every professional travel photographer will tell you all about the importance of packing wisely when traveling with your DSLR.

So without further ado let’s take a look at some helpful tips for traveling the world with your DSLR.

Be economical in choosing lenses

Weight is a factor if you don’t want to pay the fees for extra baggage. So when packing for travel photography, it’s best to economize your lenses. Instead of taking every lens you own, consider packing ones that give you a full range of focal lengths without doubling up.

If you have a 70-200mm lens why pack the 85 mm prime? Instead, a wise decision may be to take your zoom lenses. Choose a wide angle like the Canon 16-35mm. Granted the lens is heavy. The 70-200mm isn’t a lightweight either, but if you are only going to take two lenses then it’s not such a big issue.

Tips for Packing for Travel Photography - truck in a driveway

Shot with a wide angle lens. This image was taken from the rooftop of a hotel.

Choose lightweight lenses

Prime lenses aren’t a bad idea for travel either. They usually have a wider aperture which is great for low light, and if you’re visiting a dark castle somewhere in Europe that can be really useful. Primes are much lighter than their zoom counterparts, and with a little practice, you can get used to shooting with just prime lenses.

It takes a little more thought than zooming in and out but you can capture amazing images with prime lenses. If you’re going to pack a general set of lenses for travel your bag might include the following, a 24mm for wide angles, the 50mm for general shots and an 85 mm for a little more range.

Tips for Packing for Travel Photography - gnarly tree branches

I had to use a zoom lens for this shot. The tree just wasn’t accessible from up close and I wouldn’t have been able to shoot at this level if I were closer. The telephoto was essential for this shot.

Choose lenses for a purpose

The lenses you choose to take with you might also be determined by the type of photography you’re planning on doing while you’re traveling. Perhaps you’re going on safari to Kenya. If that’s the case, you’re going to be focused on capturing wildlife, so your longer telephoto lens is going to be essential, and you might choose to take something in the 100-400mm range. I would argue that adding a nice light 50mm prime to your bag might be all that you need in that situation.

I recently visited the city of Havana, Cuba. I knew I wasn’t going to be going outside of the city and that my focus was on shooting architecture and street scenes. So, in that case, I left my telephoto lenses at home. On the busy streets, it would have been difficult to pull out my 100-400mm and shoot comfortably. So I chose to pack a wide-angle lens and my nifty 50mm. That was all I needed within the cramped streets of Havana.

This is in contrast to a trip I took last month to Wales. I was going to shoot both landscapes as well as city scenes, and I was hoping to capture some images of birds as well. So I chose to pack a little more weight. I chose to leave my prime lenses at home and took three zoom lenses; the 16-35mm, the 70-200mm and the 100-400mm.

Tips for Packing for Travel Photography - garbage can in an alley with graffiti

Shot with a prime lens. Graffiti alley in Toronto is a great place to use a mid-range focal length.

Just use your phone

I know a number of travel photographers who challenge themselves to shoot just one trip a year using nothing but their phones. The results are truly beautiful and they love the ease of traveling with just a phone.

Many smartphones have fantastic cameras and can capture huge RAW images. So it’s definitely worth a try. Limit yourself to your phone and see what kinds of images you can capture.

Tips for Packing for Travel Photography - city scene

I took this shot using my phone. It’s 5000 px on the long edge, a large file. I could never have gotten this with the gear I had with me that day.

Embrace the excitement

Travel photography is exciting. Taking your camera to places that are new and different from home can truly raise adrenaline levels. It’s a lot of fun, and I highly recommend you get out there to visit other places and explore with your camera.

Embrace the challenges of packing for the trip as well. It’s part of the excitement. You’ll be challenged to shoot great images with a limited amount of gear. There’s nothing wrong with that. Take the challenge by the horns, pack wisely, and push yourself to try and capture great images of far-off places with just a few simple tools.

Tips for Packing for Travel Photography - forest shot

This would have been impossible to capture without my wide angle lens. We were just too close to the falls for anything mid-range.

The post Tips for Selecting What Gear to Take Along for Travel Photography appeared first on Digital Photography School.


Digital Photography School

 
Comments Off on Tips for Selecting What Gear to Take Along for Travel Photography

Posted in Photography


Weekly Photography Challenge – Spring

28 Apr

It must be nice enough in your area to get out shooting again – so this week’s photography challenge is to go and photograph spring. What does it mean to you?

Spring is a good time to try a new technique or practice something you want to perfect or improve. Here are a few spring photography ideas to get you started:

  • Tips for Taking Better Flower Photos
  • How to Use Natural Light for Macro Photography
  • Intentional Blur- How to Create it and Why it’s Awesome
  • Tips for Better Forest Photography

Try some intentional camera movement.

Or practice with a depth of field exercise or shooting some macro photography.

Weekly Photography Challenge – Spring

Simply upload your shot into the comment field (look for the little camera icon in the Disqus comments section) and they’ll get embedded for us all to see or if you’d prefer, upload them to your favorite photo-sharing site and leave the link to them. Show me your best images in this week’s challenge. Sometimes it takes a while for an image to appear so be patient and try not to post the same image twice.

Share in the dPS Facebook Group

You can also share your images in the dPS Facebook group as the challenge is posted there each week as well.

The post Weekly Photography Challenge – Spring appeared first on Digital Photography School.


Digital Photography School

 
Comments Off on Weekly Photography Challenge – Spring

Posted in Photography


Two Videos With Photography Ideas to do at Home and Outdoors

27 Apr

Whether the temperature outside is not cooperating and you’re stuck at home, or it’s warm enough to get outside to shoot – here are some photography ideas for both occasions. We got you covered with these two video tips!

Get outdoors

Time to get outside with these creative photography ideas.

Stuck inside?

Never fear, here are seven ideas of what to shoot when you’re stuck at home.

Do you have any other creative photography ideas you can share with us? Please tell us in the comments below.

The post Two Videos With Photography Ideas to do at Home and Outdoors appeared first on Digital Photography School.


Digital Photography School

 
Comments Off on Two Videos With Photography Ideas to do at Home and Outdoors

Posted in Photography


New 2018 dPS Reader Survey – Tell Us More About You

27 Apr

At dPS we value you, our readers, above all else. We want to help you take better pictures.

By doing this survey you will be helping dPS serve you better. By knowing what kinds of things are you struggling with, and the types of articles you want to see we can work toward providing more of what you need to move your photography forward.

We value your time, and you, as our regular reader and always strive to improve – you will help us by completing this form, for which we will be especially grateful.

Click on this link, or the image below to start the survey.

dPS-annual-reader-survey

Thank you for your continued support and being a dPS reader. We wish you all the success on your photography journey.

The dPS Team

The post New 2018 dPS Reader Survey – Tell Us More About You appeared first on Digital Photography School.


Digital Photography School

 
Comments Off on New 2018 dPS Reader Survey – Tell Us More About You

Posted in Photography


How to Create a Dynamic Light Painting Portrait

27 Apr

Do you want a bit of action and dynamism in your portrait photography? Using your strobe to light your model in a portrait, while combining this with medium to long exposure can give you amazing results! A light painting portrait is a fun technique that you can play around with, and the equipment you need does not have to be too advanced. An entry-level DSLR camera will work well for this type of photography.

So in this article, I’ll break it down for you, explain what it is and how to do it.

How to Create a Dynamic Light Painting Portrait

Why not create your light painting portrait with some steel wool!? NOTE: Please take safety precautions when doing fire spinning!

What is light painting?

Light painting is the movement of light within your scene, captured using a long exposure. Broadly speaking, there are three types of light painting.

  1. Light painting with light trails – This means the camera stays still, and you move the light around in front of the camera during a long exposure. Photographing traffic light trails is a form of light painting, but the traffic is moving for you.
  2. Light painting an object – In this case, you’re not pointing your light source at the camera, rather you’re going to light up an object by shining a flashlight at it during a long exposure.
  3. Kinetic light painting – This type of light painting uses a light source that doesn’t move, and you move your camera to create the light painting. Examples of this type of light painting are the zoom burst or camera rotation.
How to Create a Dynamic Light Painting Portrait

The zoom burst can make for a dramatic portrait when used in the right place.

Using your flash in conjunction with light painting

So if light painting involves moving the light source or moving the camera during a long exposure, how will you be able to get a sharp portrait? The answer is you’re going to be using a two-part exposure.

A flash will be used for the portrait, and the second part will be a long exposure involving some form of light painting. Your light painting portrait can be achieved in a single exposure or frame. There are times when using more than one exposure is better, and blending the images in post-processing. However, for this guide, we are looking at doing this in a single exposure.

  1. Adjust your camera to full manual mode.
  2. The ambient light in the room you are in must allow you to expose for half a second or longer (it should be dim).
  3. The background should contain a light source, or you can’t light paint.
  4. Adjust your shutter speed to the amount of time you will need for light painting. This will depend on the type of light painting you intend to do.
  5. Now use your aperture to adjust the exposure value to be at around -1.
  6. Have your flash set to manual mode as well. The strength of your flash unit will determine how much power you will need to use to get the correct light, so adjust depending on your unit. The proximity of your model to the flash will also be a factor in setting the strength. The aim is to freeze them, without blowing out (overexposing) their face.
  7. Now that you’re ready with your settings you can take your photo. Check your results and vary the strength of the strobe, and the length of the exposure accordingly.
How to Create a Dynamic Light Painting Portrait

Make some magic with your light painting portrait! The desert in Mongolia was pitch black, this was ideal as there was no ambient light.

Different light painting techniques

As mentioned above, there are several different types of light painting. Now you’re going to see how those can be applied to a light painting portrait.

  • Camera rotation – This means rotating the camera after you have used flash to “freeze” the model. In order for you to get a good effect aim for around half a second exposure. Unless you have the equipment to mount your camera on a pivot this will be done handheld, so you will need a smooth motion.
  • Zoom burst – In order to make this effect, you will need a lens that is capable of changing focal length manually. The technique is similar in that you will expose for around half a second after the initial flash. Using a tripod isn’t necessary, but it will improve your results as the light lines will be straight. Typically you will want to zoom out during the exposure, though you can experiment with zooming in as well.
  • Camera shake – Once again an exposure of around half a second is best for this. After the flash has fired, move the camera around in a random way to make a more dynamic background. This technique can work well at a nightclub to give a sense of energy to the photo.
  • Light painting – In this type of photo, the camera must be mounted on a tripod, and you’ll likely expose for one second or even longer. Avoid area’s where there is a lot of ambient light, especially if that shines onto your model. Your model will need to stay completely motionless throughout the exposure, as you light paint through the scene. The longer the exposure the more difficult it will be to keep the model sharp, so avoid overly long exposure.

This light painting used a pixelstick to create the light.

Now go out and try a light painting portrait yourself!

So there you have it, this is how to make a dynamic light painting portrait! This is a fun technique to use while on a night out, or you can use it in a much more staged setting. Your friends will likely be impressed by the results, as it shows them in a vibrant energetic photo.

Have you ever tried to take light painting portraits like this? What was your experience? Please share your photos and experience both past and present in the comments section below. As always it’s great to get community engagement.

This was a stage portrait, using apartment building lights in the background for the zoomed light.

This can be a great technique to use in a night club, as it will add energy.

This photo used some camera rotation to achieve the result.

The post How to Create a Dynamic Light Painting Portrait appeared first on Digital Photography School.


Digital Photography School

 
Comments Off on How to Create a Dynamic Light Painting Portrait

Posted in Photography


How to Practice Your Photography Skills by Getting Creative in the Kitchen

26 Apr

Do you ever get trapped in the marketing frenzy? Is the lack of professional equipment or fancy subjects preventing you from improving your photography? It’s easy to make excuses, but it’s better to get creative.

Keep reading to see that you don’t need to go any further than your own kitchen to practice and level up your photography skills. In this article, I’ll show you some tips and tricks to improve your shooting and lighting using things you find in the kitchen.

Improve photography skills creative food photography tutorial

Exposure settings: f/22, 1/60, ISO 4000, focal length 55m.

The basic knowledge you need to understand and master in photography is exposure. This refers to finding the correct amount of light for your photograph. There are three variables that you need to take into account when making a photograph. They are known as the exposure triangle as they are always connected; they are the aperture, shutter speed, and the ISO.

Since they are linked, when you are adjusting one leg of the triangle you have to compensate with one of the others. Having said this, you can also do the exercises I’m proposing even if you are not yet familiar with shooting in Manual Mode.

Aperture and Depth of Field

As I was saying, the correct exposure depends on three related factors, I’m going to start with aperture, but keep in mind that whatever you move here you need to compensate equally with one of the others.

If you’re not confident yet doing this manually, you can set your camera to Aperture Priority Mode (A or Av) and that way your camera will decide the correct settings to fit the aperture you want.

Aperture refers to a hole in your lens through which the rays of light come together and pass towards the sensor. Obviously, the bigger the hole the more light goes in and vice versa.

However, it also has an impact on the depth of field so you need to learn and practice how to control it.

Improve photography skills creative food photography tutorial depth of field

Left image: f/2.8, 1/2500th, ISO 1600, 55mm
Right image: f/11, 1/125th, ISO 1600, 55mm.

When you are closing the aperture, the f-number goes up (like f/16, f/11) which results in a bigger depth of field. As you can see in the examples.

Improve photography skills creative food photography tutorial depth of field aperture

Left image: f/2.8, 1/1000th, ISO 1600, 55mm.
Right: f/11, 1/60th, ISO 1600, 55mm.

Remember that the distance between the camera and the subject as well as the focal length also impact the depth of field, so try out different settings and keep practicing.

Improve photography skills creative food photography tutorial depth of field fstop

Exposure: f/2.8, 1/250th, ISO 1600, 55mm.

Exercise to practice

Try shooting different objects in your kitchen using different aperture settings. See how it looks at f/2.8 or wide open, compared to using a smaller aperture of f/11 or f/16. You may need a tripod to keep the camera steady.

Shooter Speed and Motion

Another factor is the shutter speed. As its name indicates, it’s the speed at which the shutter opens and closes when you take your photograph. This is more straight-forward to understand than the aperture. The more time the shutter remains open, the more trajectory from the moving object will be captured resulting in a blur. The faster you set your shutter speed, the moving object will be sharper as it will appear frozen.

Improve photography skills creative food photography tutorial shutter speed motion

Left: f/11, 1/640th, ISO 5000, 50mm.
Right: f/11, 1/80th, ISO 400, 50mm.

If you’re not confident shooting in Manual Mode, you can set your camera to Shutter Priority (Tv or S). This way your camera will decide the correct settings to fit the shutter speed of your choice.

Improve photography skills creative food photography tutorial shutter speed

Exposure: f/8, 1/125th, ISO 1600, 50mm.

Exercise to practice

Try finding some moving objects in your kitchen; flowing water out of the tap, have a friend pour a liquid into a cup for you, a fan blowing, etc. Shoot it at all kinds of different shutter speeds and see what it looks like at 1/30th versus 1/2000th. Remember to stabilize the camera when using a shutter speed less than your focal length to maintain sharpness.

The last exercises are about controlling the resulting image with the light that you have to work with, but the next step to level up your photography is about manipulating the light. That’s the idea for the next activities.

Quality of light: Hard versus soft

Depending on the distance and size of the light source, as well as the type of bulb or accessories (light modifiers) that you use with it you can have either hard or soft light in your scene.

Hard light is created by direct sunlight, for example. Or if you’re talking about artificial light it refers to small light bulbs with no light modifiers that are placed farther from your subject. It results in dark shadows with clearly defined edges as well as contrasted colors. It’s not necessarily flattering for portraits, but in still life scenes, it can create a very special mood.

Improve photography skills creative food photography tutorial hard light

Exposure: f/8, 1/30th, ISO 400, 50mm. Notice the hard, well-defined shadows of the kitchen tools here. This is hard lighting.

Soft light is therefor the opposite. It casts diffused shadows that fade away gradually instead of having a defined edge. When you’re working with natural light this is what you get on a cloudy day because the clouds work as a giant diffuser.

However, when you are working with artificial light there are many different ways to soften it. You can move the light closer to the subject or use a bigger light source (or modifier). But talking about hacks you can do in your kitchen, you can simply put a sheet of oven paper (also known as baking paper) in front of your light like I did here to spread out the light (diffuse it) and make it softer.

Improve photography skills creative food photography tutorial soft light

Exposure: f/8, 1/15th, ISO 400, 50mm. Notice the lack of well-defined shadows here, this is soft lighting.

Exercise to practice

Pick a subject in your kitchen and photograph it using both hard and soft light. Window light through curtains or which is not direct sunlight is a good source for soft light. A flashlight or bare light bulb can make for a hard light source – try both.

Lighting style – high key

While on this subject, there is a particular style of lighting with soft light called high key. These are images with mostly light colors and white with soft or no shadows in the image. You can also overexpose the white background a bit to enhance the effect.

A quick trick from your kitchen to achieve this look is to use the light from the extractor hood above your stove. Most stoves have one and it usually gives a diffused gentle light. I find this very useful to do high key images:

Improve photography skills creative food photography tutorial high key lighting

Exposure: f/22, 1/125th, ISO 100, 167mm.

Try creating a high key look at home with items in your kitchen.

Reflection

Another way of diffusing light is by using reflectors, however, they can also serve other purposes. In this case, I was using the natural light from the window coming in from behind the bottle and placed a chopping board as a black background, this brings out the contours of glass objects.

The problem was that the lime wasn’t getting much light and this flattened the entire image. By using an aluminum BBQ-oven cooking tray I bounced the light back into the front of the lime and gave the final result that subtle, but needed punch. Look at this before and after.

Improve photography skills creative food photography tutorial reflector

Left: f/8, 1/30th, ISO 400, 50mm.
Right: f/8, 1/30th, ISO 400, 50mm.

Try it at home

So try a few of these in your own kitchen and see what you can learn by playing around and practicing.

As you can see you don’t need any professional equipment or even cooking skills, you only need to be creative! These are just some examples of what you can do but you can also work on your composition, cropping, colors, contrast and much more.

Share any other kitchen hacks or exercises that help you improve your photography in the comments section below.

The post How to Practice Your Photography Skills by Getting Creative in the Kitchen appeared first on Digital Photography School.


Digital Photography School

 
Comments Off on How to Practice Your Photography Skills by Getting Creative in the Kitchen

Posted in Photography


What to Do When You Forget Your Tripod (or You Don’t Have One)

26 Apr
What to Do When You Forget Your Tripod (or You Don’t Have One)

This shot was taken during my DPS Night Photography class using a bridge railing to stabilize the camera.

I suspect we’ve all been there. You are headed out on non-photography business, but you grab your camera on the way out the door – just in case. Well, wouldn’t you know it, “just in case” turned into a reality? A beautiful scene unfolds before your eyes. The trouble is that it is a low-light scene, and you didn’t grab your tripod. Uh oh. What do you do?

The worst option, of course, is to do nothing and miss the shot. Even if you try and fail you are no worse off than if you do nothing. So you might as well give it a go, even with no tripod.

There is no magic to a tripod

The main thing to remember is that a tripod is just a glorified shelf. That is, it is just a place to prop your camera. Granted, there are a lot of controls that make it a very convenient and easy to use support for your camera, but it is still just a shelf. With that in mind, look around for something else you might use.

Speaking of shelves, they work great and they often provide a nice high vantage point for your scene. If you are near civilization (not out in the woods somewhere), tables and chairs work great as make-shift tripods. Scoot one around to where you want to shoot and place your camera on it.

When placing your camera on something, you will find that the weight of your lens will cause the camera to tip forward. To remedy that, just place something under the front of the lens. If there is nothing available, dig through your bag and see what you can find. I have used lens hoods, filter cases, and even spare batteries. Is that the ideal situation? Not by a long shot. But they work in a pinch.

No tripod – no problem

Let me show you a recent example of this. This is a shot I took of a night scene in Oklahoma City.

What to Do When You Forget Your Tripod (or You Don’t Have One)

Shutter Speed: 30 seconds; Aperture: f/8; ISO 100 (with NO tripod).

I was visiting that city and staying in a hotel. My wife and I were sitting in the bar on the top floor and as it got dark I thought it was a nice scene that I would like to photograph. As I really had no prior plans to photograph, while I did have my camera, I had no tripod or remote shutter release.

This picture required a shutter speed of 30 seconds (I could have gone shorter, but I wanted the light trails on the road). Without a tripod, I had to muddle through. I pushed a cocktail table up to the edge of the balcony to get the angle I wanted. Then I used an ashtray that was laying around to prop up my lens.

That still leaves the issue of avoiding touching the camera during the shot. If you are without your tripod, odds are you will be without your remote shutter release as well.  You can still take shots without touching the camera by using the camera’s built-in timer.

For the shot above, I used the 2-second timer to get the image. Even if you have set the camera to take bracketed exposures, it will take all the shots in the bracket when the timer goes off (note: this only applies to some camera models). It is actually so handy that I find myself using a remote shutter release less and less.

Adding a touch of stabilization

Other times you don’t really need to set your camera down anywhere, you just need a little stabilization. How do you know if you need stabilization? Through something called the Reciprocal Rule. This rule says that your shutter speed should be at least the reciprocal of your focal length.

To make it simple, it just means that if you are shooting at 50mm your shutter speed should be 1/50th or faster. If your focal length is 16mm your shutter speed should be 1/16th or faster. As you can see, the more wide-angle you shoot, the slower the shutter speed you can get away with.

Shoot wide

So that’s another tip. Shoot wide-angle in low light scenes where you don’t have a tripod. That won’t always work, of course, because sometimes your compositions just demand longer focal lengths. But as you are walking around without a tripod, think wide-angle.

What to Do When You Forget Your Tripod (or You Don’t Have One)

Sometimes you just go places where tripods are not allowed. I couldn’t even bring my tripod up to this location (Reunion Tower in Dallas). So I braced my camera on the perimeter fencing to stabilize it a bit. Shutter Speed: 1/8th second; Aperture f/8; ISO 800.

Lens stabilization

You might have image stabilization/vibration reduction in your lens as well. If so, this will buy you a few stops of light. What that means in this context is that you can set your shutter speed a few stops slower than you could otherwise.

For example, if you have 3-stops of image stabilization in your lens (different lenses are rated differently), and you are shooting with a focal length of 50mm, you might now be able to get away with a shutter speed of 1/6th of a second. (Remember that a stop is a doubling of light, so if you start at 1/50th of a second, then one stop is 1/25th, two stops go to 1/12th, and three stops takes you to 1/6th.

These numbers are EFL though (Effective Focal Length) so if you are shooting with a camera with a smaller sensor than full frame you will need to account for that.

Other forms of stabilization

When you run afoul of the Reciprocal Rule, you will need to stabilize your camera, often only a little bit. Let’s say for example that you are shooting at 24mm, and a proper exposure (using the ISO and aperture settings you want) requires a shutter speed of 1/10th second. What to do? Just stabilize the camera a bit by propping it against something.

Use a wall or a doorway if you are inside. Use a tree or a light post if you are outside. Those things are stable, and by propping the camera against them you are borrowing some of that stability. You will be less likely to move the camera during the exposure. If you cannot prop your camera against them, even leaning against these items while you shoot will help a little bit.

What to Do When You Forget Your Tripod (or You Don’t Have One)

For this shot, I was actually inside the Louvre (shooting through a window).  Therefore, I didn’t have a tripod. I used a door frame to stabilize my camera and took several shots in the hopes that one would be sharp. Shutter Speed: 1/8th second; Aperture f/4 (wide open on this lens); ISO 3200.

Shoot many frames

Don’t just take one picture though. Give yourself the opportunity to get a sharp one by taking several. Even if you think you got it right the first time, it is hard to tell on those little LCD screens (you can zoom in to check). There is nothing worse than getting home and discovering that a picture you thought was sharp is actually blurry. Remember that it is free to take pictures with digital, so make good use of that and take lots to be sure.

Finally, don’t be afraid to crank up the ISO. Doing so will allow you to use a much faster shutter speed. Of course, that also leads to an increase in digital noise, but don’t worry about that so much.

First of all, cameras keep getting better and better at handling digital noise, and it isn’t as much of a problem as it used to be. In any case, it can usually be fixed in post-processing pretty easily and without much loss of detail in your picture. Remember it is easy to fix digital noise, but very hard or impossible to fix blur (from a slow shutter speed).

What to Do When You Forget Your Tripod (or You Don’t Have One)

I ran into this staircase while on a business trip and was able to use my exposure settings to ensure a sharp shot. I raised the ISO to 1600 and opened the aperture all the way (to f/4). That allowed me to use a shutter speed of 1/25th second. Since I was using a focal length of 19mm, I complied with the Reciprocal Rule and I could expect the shot to be reasonably sharp.

Putting it into practice

None of this is to say that you don’t need a tripod or that you shouldn’t carry one with you. If you do landscapes, city scenes, or other types of outdoor photography, having and using a tripod is super important.

But when you find yourself without one, all is not lost. You might be able to get the shot anyway.

The post What to Do When You Forget Your Tripod (or You Don’t Have One) appeared first on Digital Photography School.


Digital Photography School

 
Comments Off on What to Do When You Forget Your Tripod (or You Don’t Have One)

Posted in Photography


4 of the Most Common Composition Mistakes In Photography

26 Apr

Common composition mistakes in photography

I’ve seen photographers make lots of mistakes when it comes to composition. That’s not a criticism – we all get things wrong from time to time. But recognizing mistakes and putting them right is a key part of improving your composition skills. In that spirit then, here are the most common composition mistakes and errors that I’ve seen photographers make.

Mistake #1: Learning the rule of thirds – and nothing else

The rule of thirds is basic composition theory and it’s important to understand it. But the mistake some photographers make is never trying to learn anything else about composition.

For example, take a look at the photo below. The tree is located on an intersection created by dividing the frame into three, according to the rule of thirds.

Common composition mistakes in photography

But is the rule of thirds the only principle of composition used in this photo? No, it isn’t. Let’s look at the other factors.

  • There is negative space around the tree. It gives the subject room to breathe and creates a sense of space.
  • The tree is the main focal point and there is nothing to compete with it.
  • The hills in the background are faded due to the weather conditions (it was raining when I made the photo), adding a sense of depth.
  • I used a long exposure (125 seconds) to blur the water and the leaves of the tree, adding a sense of motion or time passing to the photo.
  • I converted the photo to black and white to create drama.

As you can see there’s much more happening in this photo, from the point of view of composition, than simply placing the tree on a third. Once you understand how these ideas work you can use them in other photos and improve your composition skills at the same time.

Mistake #2: Not including foreground interest

This is a common mistake in landscape photography and some documentary photography. That’s because photographers in these genres often use wide-angle lenses, which usually include lots of foreground detail in the composition.

The idea of foreground interest can be a hard concept to grasp at first but it makes sense when you start to think about it.

For example, I made the following photo with a 14mm lens (a wide-angle on my APS-C camera). I wanted to tell a story about the couple in the market. Using a wide-angle lens helped me include context – the piles of vegetables in the foreground that the couple was selling. The vegetables provide foreground interest and support the story.

Common composition mistakes in photography

The same idea also applies to landscapes made with wide-angle lenses. In the photo below the ruins is the main subject. The flowers in the foreground add interest in the bottom half of the frame.

Common composition mistakes in photography

Mistake #3: Not paying enough attention to the background

Sharp backgrounds are common in documentary styles of photography and can help tell a story about the main subject. For example, in the photo below the main subject is the three men in the photo – the barber, his customer, and the man looking directly at the camera.

Common composition mistakes in photography

The detail in the background supports the main subject and helps tell its story. We can see every detail, from the wall behind the men to the barber’s tools and products. These details are an interesting and important part of the photo.

Sometimes the opposite approach is required and you need to blur the background out to remove distractions. Part of the skill of being a photographer is knowing when to blur the background and when to keep it sharp. In some portraits (like the one below, made with an aperture of f/1.8) you can use a wide aperture to blur the background and remove details that might distract from the model.

Common composition mistakes in photography

The mistake I see photographers make is not thinking about these things and taking enough care to make sure the background suits the subject.

Mistake #4: Not working the subject

The final common composition mistake I see photographers make is failing to work the subject. This means that you take as many photos as you can until you’ve exhausted all the creative possibilities. Sometimes you only need to take three or four photos for this to happen. At other times you may take 20 or 30. Either way, the idea is to explore different viewpoints and compositional possibilities.

The reason this works is that the first point of view you use is not necessarily the best one. If you have the opportunity, it’s a good idea to try different points of view, different focal lengths, and maybe even different aperture and shutter speed settings.

This is where you can think through some of the concepts discussed earlier in the article. A good question to ask yourself is, “How can I make the photo more interesting?”

Perhaps you need to pay more attention to the background. Maybe you need to include some interesting foreground detail. Perhaps the photo would benefit from including some negative space or using a slower shutter speed to blur parts of it. The answers depend on the subject and how much time you have to explore it.

Example of working the scene

Here’s an example. Below you can see four photos I made of an interesting building, each one utilizing a different point of view and composition. They were part of a sequence of 25 photos I made before I felt there was nothing else I could do.

Common composition mistakes in photography

Common composition mistakes in photography

Common composition mistakes in photography

Common composition mistakes in photography

Conclusion

There are many mistakes that it’s possible to make when it comes to the composition in photography, but these are the most common that I’ve seen. What composition mistakes have you seen people make, or are you guilty of making yourself? Please let us know in the comments below.


Mastering Composition Book Two

Want to learn more about composition? Then check out my wildly popular ebook Mastering Composition Book Two. It contains 20 lessons that will help you get better at composition, no matter what your skill level! Use the code DPS20 for a 20% discount on your first order.

The post 4 of the Most Common Composition Mistakes In Photography appeared first on Digital Photography School.


Digital Photography School

 
Comments Off on 4 of the Most Common Composition Mistakes In Photography

Posted in Photography


Review of Metabones Adapter Mark V – Canon EF to Sony E-Mount

25 Apr

For Canon shooters thinking about switching to Sony mirrorless cameras, the Metabones adapter is often suggested to help with the transition. Lens mount adapters are often frowned upon as they historically have had limited functionality, such as no autofocus and simply not working well or consistently.

But this latest generation of lens adapters is pretty impressive, offering nearly all of the same features that you would get with a native Sony lens. Here’s my take on the Metabones Adapter Mark V, as used with select Canon EF lenses and a Sony A7rIII and Sony a6300.

Review of Metabones Adapter Mark V - Canon EF to Sony E-Mount

Product Specifications

The Metabones Canon EF to Sony E Mount Smart Adapter Mark V officially debuted in July 2017. It’s all black and made of metal. Compared to previous generation adapters, the Mark V adds three key features:

  1. A dedicated on/off switch for SteadyShot (IBIS)
  2. Rubber gasket weather seals to protect the E-mount connection
  3. An indicator light for basic/advanced modes

Other features offered by the Metabones V include:

  • Fast contrast-detection and phase-detect autofocus
  • Eye autofocus (!!)
  • Powered by camera body (no external power source needed)
  • Support of image stabilization lenses
  • Auto “APS-C Size Capture” on full-frame cameras

Currently, theMetabones Adapter Mark V can be purchased for $ 399 USD.

Review of Metabones Adapter Mark V - Canon EF to Sony E-Mount

Here you see the adapter mounting a Canon EF lens onto a Sony body.

Metabones V Compatibility

Since there are lots of different cameras and lenses out there, so it’s difficult to verify that the Metabones V adapter will work in every case. The Metabones website has a long list of cameras and lenses that should be compatible with this adapter. In this case, the Metabones V adapter worked with the following setups:

  • Sony A7rIII and Sony A6300 camera bodies
  • Canon 70-200mm f/2.8 II
  • Canon 24-70mm f/2.8 II
  • Canon 16-35mm f/1.8 II
  • Canon 50mm f/1.8
  • Canon 35mm f/1.4
  • Canon 85mm f/1.8
  • Canon 100mm f/2.8 macro

Metabones V Canon EF Sony E-Mount adapter

What works well

It works as advertised

I tested the Metabones V adapter primarily with the Sony A7rIII and Canon 24-70mm f/2.8 II, as this is my preferred shooting setup. For comparison with how autofocus would function on a native Sony lens, I also shot with the Zeiss 55mm f/1.8 and Sony 24-240mm lenses.

While testing the adapter, I was blown away by the autofocus system’s speed and accuracy when using my Canon 24-70mm. Not only could I use most of the autofocus settings on the camera (with the exception of Zone area focus), but eye autofocus also worked extremely well. Even when shooting in continuous burst mode at 10 frames per second, there was no lag when using a Canon lens and the adapter.

Metabones V Canon EF Sony E-Mount adapter - 70-200mm lens mounted

Generally speaking, it felt nearly the same as using a native Sony lens on the A7rIII. The same can’t be said for the cheaper FotodioX lens adapter that I was using previously. This other adapter worked with only half of my lenses and had inconsistent and slow autofocus. In that sense, you truly get what you pay for when it comes to camera gear (the FotodioX is $ 99 compared to the Metabones at $ 399).

Small and compact

Weighing in at 5.3 ounces (150g) and measuring 2.6 x 1.4 x 3 inches (6.6 x 3.6 x 7.6 cm), this slick adapter is compact and easy to stash in a camera bag. It feels about equivalent in size to the Canon 1.4X EF Extender. The Metabones V adapter comes in a plastic box that can you use for long-term storage, but unfortunately, there is no carrying case.

Metabones V Adapter

You can easily receive firmware updates

Besides a couple of buttons and indicator lights, there’s also a micro-USB port that can connect the adapter to a computer for firmware upgrades.

Metabones V Canon EF Sony E-Mount adapter

What needs improving

For all of the excellent qualities of the Metabones V adapter, there are two shortcomings worth mentioning.

First is the occasional freezing of the camera screen while trying to autofocus. You can fix the problem by simply turning the camera off and on. However, this lag slows down your workflow and makes you question reliability. This problem happens sporadically, mostly with my Canon 24-70mm f/2.8 II, but it never happens when using native Sony lenses.

Another shortcoming is the loss of touchscreen autofocus when using a Canon lens and the Metabones V adapter. One of the biggest selling points of new Sony cameras such as the A7rIII is touchscreen autofocus. While it’s a bit laggy and imperfect even when using Sony lenses, touchscreen autofocus seems to disappear altogether when using adapted lenses. Hopefully, this will be fixed with future a firmware update.

In conclusion

If you’re transitioning from Canon to Sony, the Metabones Adapter Mark V is a must-have addition to your photography kit. It’s not perfect, but it is a solution that seems to get better over time. At $ 399, the Metabones V adapter isn’t cheap, but it seems to work more consistently than cheaper options such as the Sigma MC-11.

Have you tried the Metabones lens adapter before? What was your experience like? Let me know in the comments below!

Sample Photos Taken with Sony A7rIII, Metabones V adapter, and Canon lenses:

Metabones V Canon EF Sony E-Mount adapter

Metabones V Canon EF Sony E-Mount adapter

Metabones V Canon EF Sony E-Mount adapter

Metabones V Canon EF Sony E-Mount adapter

Metabones V Canon EF Sony E-Mount adapter

The post Review of Metabones Adapter Mark V – Canon EF to Sony E-Mount appeared first on Digital Photography School.


Digital Photography School

 
Comments Off on Review of Metabones Adapter Mark V – Canon EF to Sony E-Mount

Posted in Photography