RSS
 

Archive for the ‘Photography’ Category

6 Essential Steps in any Post-Processing Workflow

26 May

We live in a digital age, a time when a post-processing workflow is an increasingly essential aspect of our photography. Cameras produce images with the expectation that they will be altered later, will be corrected, sharpened, tinted, etc.

What this means is that post-processing isn’t something that can be easily bypassed, especially if you shoot in RAW, which I recommend.

That isn’t to say that every photographer today has to love post-processing. Some photographers, I consider myself to be among them, greatly prefer working in the field to working on the computer. But while it’s possible to shorten one’s post-processing workflow, a minimum amount of editing is necessary to keep up with today’s artistic and technological standards.

macro photography abstract winter ice - Post-Processing Workflow

In this article, I will discuss that minimum and explain the six essential steps in any post-processing workflow. My examples are done in Lightroom, but this applies to all photographers, no matter what software you use.

Once you’ve gone through these steps, you may declare your images complete, and that’s okay. Or you may choose to work on them further, which is okay, too. The point here is only to suggest the six core elements that all post-processing workflows should includeafter that, the choice is yours.


1. Crop (and straighten)

The first thing that I do as soon as I have opened my images in Lightroom is to crop and straighten them.

While it’s best to compose properly in camera, sometimes you see a slightly better composition when your image comes up on the screen. However, it isn’t good to rely on this too heavily. Cropping heavily reduces image resolution while also magnifying image imperfections.

Furthermore, when hand-holding your camera, it’s easy to take a slightly crooked image. This isn’t a problem, as long as you remember to straighten it out later.

daisy abstract macro photography flower - Post-Processing Workflow

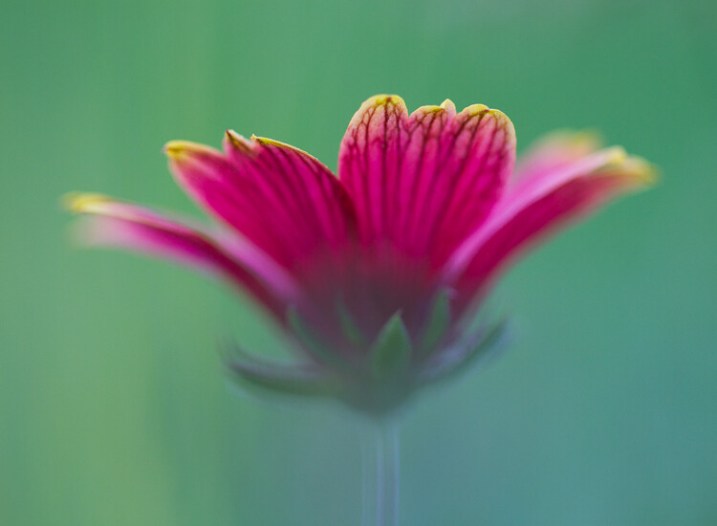
Notice the slight change from original (right) to cropped and straightened (left) – look at the stem.

daisy abstract macro photography flower - Post-Processing Workflow

This image required a slight amount of cropping and straightening in order to balance out the frame. This is especially important when images have clear lines, as this one does (i.e., the daisy stem).

A word of warning: especially if you are a wildlife or bird photographer, you will be tempted to use cropping to compensate for a distant subject. Resist this temptation and focus on your stalking skills instead. If you find yourself consistently cropping a significant amount, recognize that you should probably make some changes while you’re in the field (get closer or use a longer lens).

2. Check the White Balance

I shoot in RAW. Thus, when I’m in the field, I leave my camera’s White Balance on Auto. Because the RAW file format allows for you to change the image temperature without any image degradation, this is perfectly acceptable (though it does mean slightly more time behind the computer).

snowy intimate landscape photography - Post-Processing Workflow

The left (final) image is after some adjustment; the right is adjusted in the other (warmer) direction.

snowy intimate landscape photography - Post-Processing Workflow

A cooler (bluer) color temperature was necessary to recreate a snowy, cold feeling for this image.

Use the Temp and Tint sliders to adjust the White Balance.

Sometimes the goal is to reproduce the color temperature that you saw in the field. Other times, you might be trying to achieve an artistic look. Higher temperatures (high degrees K) make for a warmer image and counteract colder light, whereas lower temperatures (low K) make for a cooler image and balance out a warmer color cast.

macro photography flower abstract sunset - Post-Processing Workflow

The left image is what I ultimately decided on; the one on right is an exaggeratedly cool version of the same image.

macro photography flower abstract sunset - Post-Processing Workflow

Taken at sunset, this image required a higher color temperature to match what I saw at the moment of capture.

3. Check the exposure

After adjusting the White Balance, I generally turn to the exposure. This is an aspect of a post-processing workflow that is often forgotten. Yet you should scrutinize your image carefully before moving on. Is it too bright? Too dark? Just right?

This is where the histogram is your friend. It’s to your benefit to learn to read it. Look for blown out highlights or crushed blacks as peaks pressing up against either end of the graph, as well as gaps that indicate a lack of darker or lighter tones in your image.

The histogram can tell you a lot about your image. This one says the image it represents is slightly overexposed. There are no blacks (it’s not touching the left-side of the graph). An Exposure adjustment and the Black slider will solve this issue.

macro photography flower abstract - Post-Processing Workflow

This situation was unique: While the right image isn’t underexposed, I was interested in a slightly brighter one with more contrast. So I altered the exposure in Lightroom and ultimately chose the left image.

macro photography flower abstract - Post-Processing Workflow

A darker image can be corrected in post-processing (this is easier to do with RAW files).

While it is ideal to expose perfectly while in the field, post-processing allows for a bit of leeway here. For instance, you can use the general Exposure slider in Lightroom to correct small exposure mistakes. And if you want to take this further, you can also work with the more narrowly focused Highlights, Shadows, Whites and Blacks sliders.

4. Check the Vibrance and Saturation

Saturation allows you to increase the intensity of all colors in the image, and Vibrance allows you to increase the intensity of the less saturated colors only. In most photo-editing programs, these are easy to change.

macro photography flower yellow abstract - Post-Processing Workflow

Notice the slightly more intense yellows in the left (more saturated) image.

macro photography flower yellow abstract - Post-Processing Workflow

A bit of saturation gave this image more punch.

Saturation and Vibrance can provide a slight punch to your images when done subtly. These are also quite easy to overdo, so be careful. You don’t want to slam the viewer with so much saturation that they are forced to look away!

5. Check for noise

Next, be sure to check the noise levels in your image. This is especially important if you’re working with a long exposure or an image that was shot at a high ISO. Increasing the exposure in post-processing may also introduce unintended noise.

macro photography abstract yellow - Post-Processing Workflow

This image required a slight amount of noise reduction.

macro photography abstract yellow - Post-Processing Workflow

While the difference is subtle, a crop of the final image (with noise reduction applied in Lightroom) is on the left.

If you find unpleasant levels of noise, you can generally use noise reduction software to remove it. Removing noise does decrease the overall image sharpness (if removing luminance noise) and saturation (if removing color noise). So, once again, this is a correction that should be used minimally.

6. Check the sharpness

Finally, I like to end my basic post-processing workflow by considering the complement of noise – sharpness. If working with a program such as Lightroom, this often needs little adjustment. With a good lens and good camera technique, your images will be rendered sharp simply by the photo-conversion presets.

For example, I rarely alter Lightroom’s Amount: 25 Sharpening preset. If your image is slightly soft, you may want to work with overall sharpness. You might also consider a second round of carefully applied sharpening in order to enhance specific features like the faces of birds, the center of flowers, etc.

autumn intimate landscape photography - Post-Processing Workflow

It is imperative that an image like this have a pin sharp subject.

autumn intimate landscape photography - Post-Processing Workflow

A crop of the final image (left) with sharpening applied in Lightroom.

However, even once you’ve sharpened for your original image, the sharpening work isn’t over. Before you export for printing or web viewing, you will likely need to sharpen again. Otherwise, you’ll find that your new image is slightly soft.

Lightroom has a neat little way of completing this post-processing step. Upon exporting files, you have the option to choose a level of sharpening. I generally choose Low or Standard.

macro photography abstract flower yellow - Post-Processing Workflow

Conclusion

These tips should give you an idea of what a very minimalist post-processing workflow looks like. If you follow this guide closelyeven if you do nothing else to your imagesyou’ll find that your images reach a higher standard.

What is your post-processing workflow like? Please feel free to share in the comments area below.


dahlia macro photography flower

Flower Abstract Macro Photography

The post 6 Essential Steps in any Post-Processing Workflow appeared first on Digital Photography School.


Digital Photography School

 
Comments Off on 6 Essential Steps in any Post-Processing Workflow

Posted in Photography


Tips for Using On-Camera Flash for Beginners

26 May

Flash is a challenging subject and can be confusing if you’ve never used it. These two videos will give you an overview of some flash basics you need to know, and how to take the next step when using flash – bouncing it for better lighting.

On-Camera Flash Basics

In this video, Chris from The Camera Store gives you a crash course in some on-camera flash basics. He covers what you need to know to get your flash photos looking better and more natural so you don’t have subjects with deer in the headlights looks or black cavernous backgrounds with no light.

?

Flash for new users

?

Next, this video from Mark Goodin of RealWorld will walk you through understanding some of the settings on your flash and how to use it to make better light on your subject. He even gives a couple tips for diffusing your on-camera flash (the built-in one that pops up) so it isn’t so harsh.

Want more?

If you want more flash photography tips, try these dPS articles:

  • A Quick Guide to Using Bounce Flash for More Natural-Looking Photos
  • How to use Off-Camera Flash to Create Dramatic Images with Cross Lighting
  • What is a Flash Bracket and Why Do You Need One?
  • How to Understand the Difference Between TTL Versus Manual Flash Modes
  • Flash Shopping Guide – 5 Things to Consider When Buying a Speedlight
  • Tips for Using Speedlights to Create the Right Lighting for Outdoor Portraits

The post Tips for Using On-Camera Flash for Beginners appeared first on Digital Photography School.


Digital Photography School

 
Comments Off on Tips for Using On-Camera Flash for Beginners

Posted in Photography


SLC-0L-02: Shiny Object, Using an iPhone and the Sun

26 May

Whether photographing people or objects, how you approach your lighting is far more important than what camera and lighting gear you use.

To illustrate, today we are going to photograph a complex, mirrored surface—an alto saxophone—using just an iPhone for our camera and the sun as our light source. Read more »
Strobist

 
Comments Off on SLC-0L-02: Shiny Object, Using an iPhone and the Sun

Posted in Photography


Weekly Photography Challenge: Sunsets – With Prizes from ViewBug

26 May

Who doesn’t love a good sunset? It’s colorful and makes you feel all warm and fuzzy inside, right?

Think you can take a great sunset photo? It’s not as easy as just pointing your camera at the sun. In this week’s photography challenge it’s time to get out and shoot some sunsets and share your images with us.

Need some tips? Try these dPS articles:

  • 5 Reasons Why Your Sunrise or Sunset Photos Don’t Look So Stunning
  • How to Take Better Sunset Photos
  • How to Plan and Take Killer Sunset Photos on Your Next Vacation
  • How to Shoot Stunning Photos at Sunrise and Sunset
  • Tips for Location Scouting to Get the Perfect Sunset Photograph
  • Tips for Doing More Spectacular Sunset Photography

Weekly Photography Challenge – Sunsets

Simply upload your shot into the comment field (look for the little camera icon in the Disqus comments section) and they’ll get embedded for us all to see or if you’d prefer, upload them to your favorite photo-sharing site and leave the link to them. Show me your best images in this week’s challenge. Sometimes it takes a while for an image to appear so be patient and try not to post the same image twice.

Share in the dPS Facebook Group

You can also share your images in the dPS Facebook group as the challenge is posted there each week as well.

Win Prizes from ViewBug

We’re excited to introduce a sponsor and prizes for this week’s challenge. ViewBug is the World’s biggest photo contest community with over 70 contests always open for submissions. Win prizes, exposure, and the bragging rights. It’s FREE to join! This week, ViewBug will be awarding three winners prizes!

One Challenge winner will receive 1 year of ViewBug PRO ($ 139 value) plus a free photography logo bundle ($ 59 value). Two Runners Up will receive a 1 year of ViewBug Premium ($ 59 value) plus a free photography logo bundle ($ 59 value).

To Enter

Participate in the challenge as you normally would (as described above) by posting your photo. To be considered for a prize you just need to complete the entry form below (or via this link) and submit your photo.

The Contest is open continuously from 05:00 am Australian Eastern Standard Time (“AEST”) on May 26, 2018 (03:00 pm United States Eastern Daylight Time (“EDT”) on May 25, 2018), through June 2nd 2018, 04:59am AEST (June 1st, 2018, 02:59pm EDT) (the “Contest Promotion Period”).

Full Terms and Conditions Digital Photography School Weekly Challenge Sunset – ViewBug T&C

Winners are announced on the Weekly Challenge Winners page on 9th of June.

Loading…

The post Weekly Photography Challenge: Sunsets – With Prizes from ViewBug appeared first on Digital Photography School.


Digital Photography School

 
Comments Off on Weekly Photography Challenge: Sunsets – With Prizes from ViewBug

Posted in Photography


How To Get Bitcoins Without Mining

25 May

Why am I talking about Bitcoin here? Because everyone is? Not exactly. For one, you can now exchange bitcoin into dollars and that can buy some nice photo gear. If only there was a way to get bitcoin without spending thousands of dollars building a rig that sounds like an airport runway in your basement and destroys your electric bill. Continue Reading

The post How To Get Bitcoins Without Mining appeared first on Photodoto.


Photodoto

 
Comments Off on How To Get Bitcoins Without Mining

Posted in Photography


Real Estate Photography Tips For Beginners

25 May

Some amateurs think that photographing real estate is as easy as walking into a room and taking a photo. Unfortunately, that’s not how it works. It’s a skill you must practice so you can master it. That is if you want to succeed in this competitive field.  In real estate photography, one of the questions asked by amateurs is the Continue Reading

The post Real Estate Photography Tips For Beginners appeared first on Photodoto.


Photodoto

 
Comments Off on Real Estate Photography Tips For Beginners

Posted in Photography


Product Photography: The Ultimate Guide

25 May

Product photography is one of the more technical types of photography. Whether I decide to shoot natural light or create in my studio, I need to be aware of and control everything in the area. Lighting, product position, depth of field, image stabilization, and the brand itself all come together in a product shoot. So what are the first things Continue Reading

The post Product Photography: The Ultimate Guide appeared first on Photodoto.


Photodoto

 
Comments Off on Product Photography: The Ultimate Guide

Posted in Photography


How To Take Good Photos If You Wear Glasses

25 May

Taking beautiful photos should not be a problem for those who wear eyeglasses. When you take pictures, it’s obvious that the photographer gets as close as possible to the viewfinder to get the best view as possible. However, people with eyeglasses have a problem in doing so. If you are using eyeglasses,  this problem can be solved if you follow Continue Reading

The post How To Take Good Photos If You Wear Glasses appeared first on Photodoto.


Photodoto

 
Comments Off on How To Take Good Photos If You Wear Glasses

Posted in Photography


Do’s And Don’ts Of A Corporate Photo Shoot

25 May

Whether it’s a newly minted company or a well-established one, companies want their brand to stand out. One of the best ways to do so is with highly professional, well-executed corporate photography. Every business can benefit greatly from professional photographs. With the online marketplace continuously expanding its reach, the quality of your photographs will make all the difference. After all, Continue Reading

The post Do’s And Don’ts Of A Corporate Photo Shoot appeared first on Photodoto.


Photodoto

 
Comments Off on Do’s And Don’ts Of A Corporate Photo Shoot

Posted in Photography


Working with Overlays and Actions

25 May

Since my childhood, I’ve been dreaming about inventing two things.  The first is a teleporter.  Yes, you read it right, but please imagine teleporting from the ‘Star Trek’ movie not from the horror movie ‘The Fly’!   With teleport, people could forget about long queues, tedious trips and expensive taxis.  The second thing I have been dreaming about is a Continue Reading

The post Working with Overlays and Actions appeared first on Photodoto.


Photodoto

 
Comments Off on Working with Overlays and Actions

Posted in Photography