Category: Photography

  • How to Make an Awesome Pop-Up Card with your Photos

    The post How to Make an Awesome Pop-Up Card with your Photos appeared first on Digital Photography School. It was authored by Ana Mireles.

    If you can cut and fold a piece of paper to make a pop-up, why can’t you make it to an image? A photograph translates our three-dimensional world into a two-dimensional representation. With a pop-up card, you can present it with tridimensionality. Here are some ideas to bring your photos to life by turning them into an awesome pop-up card!

    How-to-Make-an-Awesome-Pop-Up-Card-with-your-Photos

    From paper crafting to paper engineering, this creative practice can be as complex as you want. I will show you two basic techniques that you can apply to your own images. Keep in mind that each image will need specific measures and some testing before you get it right, so be patient!

    What you need to make your awesome pop-up card

    I recommend you print some copies of the photo in black and white on a cheap paper so you can do your testing without spending much. Then get scissors, a precision cutter, ruler or measuring tape, double-sided tape, and a cutting board.

    How-to-Make-an-Awesome-Pop-Up-Card-with-your-Photos

    1.Single image pop-up card

    Choose the right image

    Because you want to give it a third dimension, images that have a clear separation of elements will work best. For some guidelines on this check out the article How to Use Figure to Ground Art Theory in Photography. Print your image at least two times, and one for each layer you want to add.

    Foreground and Background are separated for a better pop-up card

    Layers and more layers

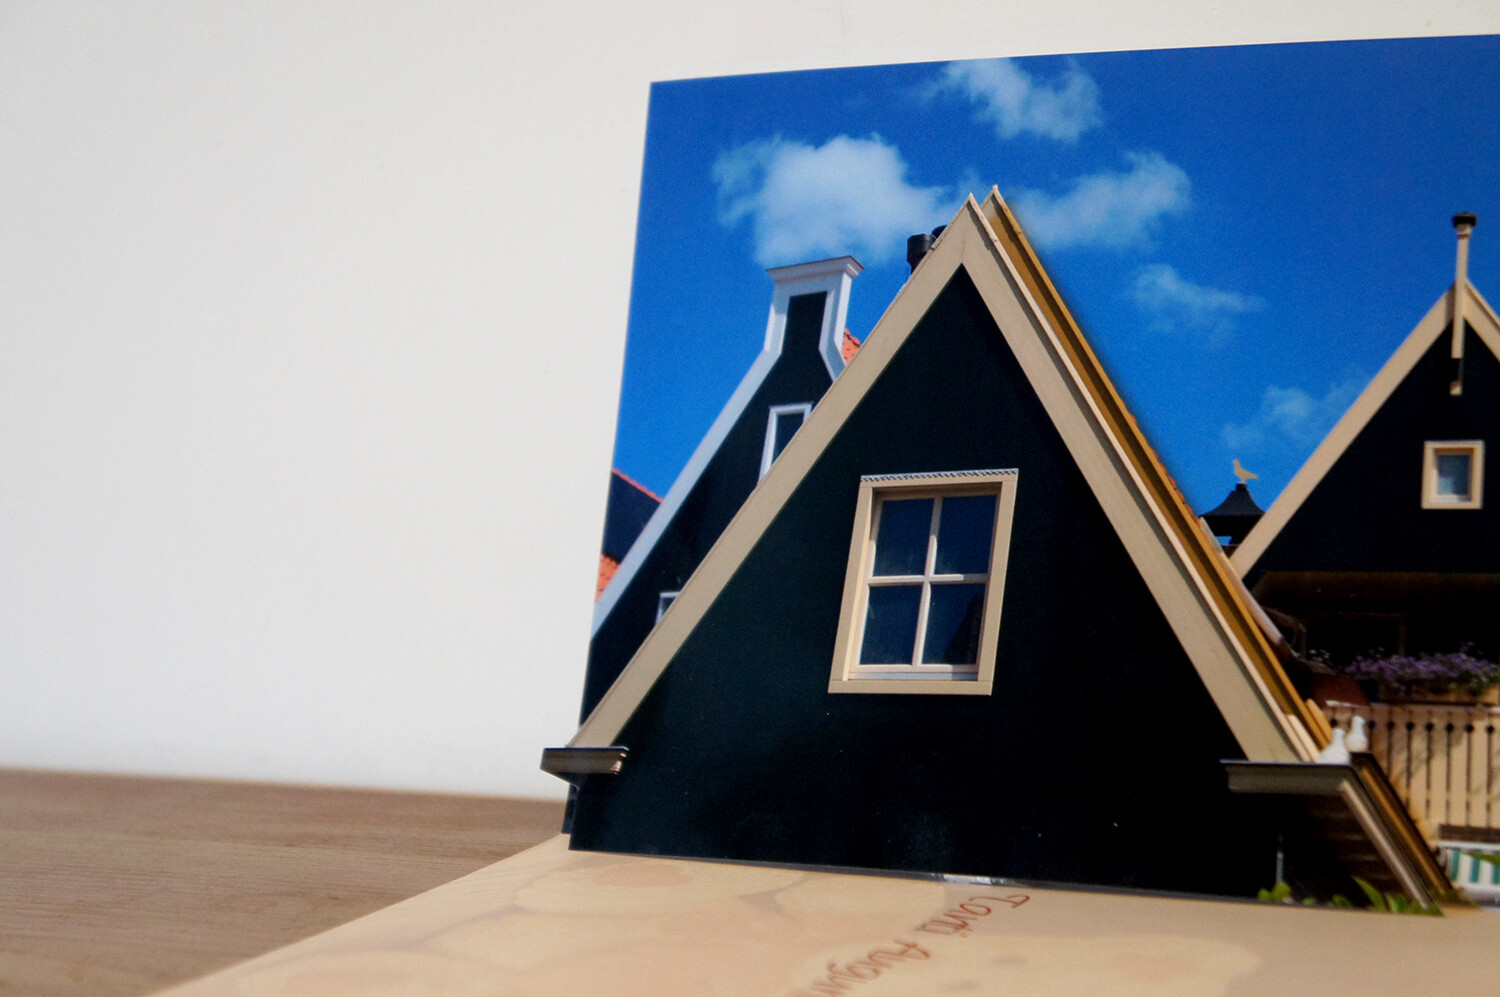
    The more elements you separate into layers, the more interesting and elaborate your card will look. I promised to keep it simple so I’ll just add one layer to show you the process, then just repeat it as many times as you want. Cut out the element of the layer that will pop up. In this case, I’ll cut the house in the front.

    How-to-Make-an-Awesome-Pop-Up-Card-with-your-Photos

    Cut also a stripe of paper, either from the photo or any other thick paper that will hold the layer up. The longer you make it, the bigger the separation to the background.

    Fold and paste

    Now paste the background to the card which can be store-bought or just a piece of colored paper folded in two that you can later write your message on. Place the base of the photo on the crease where the card folds.

    paste background into card

    Fold the paper stripe into a square. Then paste one side to the background and one to the bottom side of the card. This will serve as support to the pop-up cutout.

    piece of paper to hold the pop-up piece

    Paste the other side of the square to the background, and the bottom part to the card. Making sure the cutout matches the original image when you position it. That’s it. Do the same for any elements you want popping out.
    How-to-Make-an-Awesome-Pop-Up-Card-with-your-Photos

    2. Multiple image pop-up card

    This technique is great when you want to showcase many images. For example, an anniversary or a birthday where you want to sum up the highlights of the year. It’s also useful when you want to make a themed card to communicate a concept.

    Create the layout

    The first thing you want to do is choose your images. Then arrange your images in a grid. To automatize this process you can use Lightroom. If you need some direction just follow the instructions of How to Create Contact Sheets in Lightroom. Set it to the size of the card you’re going to use: for me is an A3 so 4 columns and 3 rows should look nice, but this is entirely up to you.

    Print thumbnail images to use

    Note that the outer images of the middle row will get folded in half, so use images that fit this crease, or leave it black.

    Fold

    Fold the paper vertically in half, and then each side again in half towards the opposite direction. As a result, you will have an accordion where the folds separate the columns.

    Fold contact sheet as accordion

    Cut

    Unfold the accordion and just leave it in half. If you do it in a way that the images are towards the outside, you won’t have to measure and just guide yourself by the images. Cut horizontally between rows reaching the middle of the outer image. Then fold inwards the piece you just cut.

    How-to-Make-an-Awesome-Pop-Up-Card-with-your-Photos

    Paste

    Now put some double-sided tape into the side edges and fix it to the card. Make sure the fold in the middle of the accordion coincides with the fold of the card.

    pop-up card with accordion photo album

    I hope you enjoyed reading How to Make an Awesome Pop-Up Card with your Photos and that you enjoy making pop-up cards yourself! For future occasions, if you want to go deeper into this craft side of photography I’ll leave you some links to check out.

    Additional reading

    If you’re feeling creative and want to do other types of cards, check out these amazing tutorials:

    • How to Make Your Own Postcards: Cheap!
    • Greeting Card Templates in PS or PSE
    • How to Make Great Photo Invitations in Photoshop


    How-to-Make-an-Awesome-Pop-Up-Card-with-your-Photos

    The post How to Make an Awesome Pop-Up Card with your Photos appeared first on Digital Photography School. It was authored by Ana Mireles.


    Digital Photography School

  • The Canon 90D Unveiled Through Leaked Promo Video

    The post The Canon 90D Unveiled Through Leaked Promo Video appeared first on Digital Photography School. It was authored by Jaymes Dempsey.

    After months of rumors and speculation surrounding Canon’s new DSLR offerings, we finally have something certain to report:

    The specs of the Canon 90D, as indicated by a promotional video leaked from Canon.

    The Canon 90D Unveiled Through Leaked Promo Video

    If you’re a Canon user, you’re going to want to pay attention. Because the Canon 90D is a seriously impressive piece of kit, one that seems to be a combination of the Canon 80D line and the Canon 7D line, and one that will carry on many of the best features from both camera lineups.

    Here’s the promotional video in full:

    ?


    Now, what’s so special about the Canon 90D?

    First, the resolution is bound to impress: The 90D is slated to have a 32.5-megapixel sensor, which is a huge step up from both the Canon 80D (at 24.2 MP) and the Canon 7D Mark II (at 20.2 MP). The increased megapixel count means increased crop capabilities and an increased potential for large prints.

    High megapixel counts usually result in slower continuous shooting. But not for the 90D, which fires off 10 frames per second. This is enough for any type of action photography: sports, wildlife, bird, and more. Plus, the Canon 90D features 45 autofocus points, all of which are cross-type. Together, these features should be a potent combination in the hands of a dedicated photographer.

    Add to this 100% viewfinder coverage, impressive battery life of 1300 photos, and an articulating screen, and you’ve got yourself a winner. You should also remember that the Canon 90D will offer dual pixel autofocus, which practically guarantees fast and efficient focus while using Live View.

    Who should get the Canon 90D?

    I’d recommend grabbing the Canon 90D if you’re a hobbyist or semi-professional photographer. Better yet, you should be interested in action photography of any kind. The strong autofocus and 10-fps continuous shooting is too impressive not to pass up.

    Plus, if you’re looking for a bit of a megapixel boost compared to an older Canon, the 90D is the way to go.

    Now I’d like to ask you:

    What do you think of the Canon 90D? Will you be looking to purchase it? And what are your favorite Canon 90D features?

    Let me know in the comments!

    The post The Canon 90D Unveiled Through Leaked Promo Video appeared first on Digital Photography School. It was authored by Jaymes Dempsey.


    Digital Photography School

  • How to Photograph Architecture as Sculpture

    The post How to Photograph Architecture as Sculpture appeared first on Digital Photography School. It was authored by Herb Paynter.

    Architects design buildings based on form as much as functionality. Many of these creative structures serve as works of art as well as mere brick and mortar buildings. Viewing subjects for their form as well as their function, and capturing that beauty with creative eyes and a little careful planning, can deliver stunning results. In this article, you’ll learn how you can photograph architecture as sculpture.

    Photograph-Architecture-as-Sculpture

    A statue of Wilbur Wright stands in front of the Student Union building on the campus of Embry Riddle Aeronautical University in Daytona Beach, Florida.

    Rule One: Observe before you shoot

    Too often we are struck with the initial appearance of a subject and immediately start shooting. However, this knee-jerk snapshot approach rarely provides the kind of result that it could if we took our time. Take the time to walk around the subject and observe it from several different angles. Those angles will provide different vantage points, reflections, and shadows that will change and influence the framing you use for each shot.

    Investigate the uniqueness that each structure presents and appreciate the visual statements the architect is making. Structures are more than a collection of connected boxes with passageways and windows. They are the physical housing of the community. We should study the features that make each structure unique. Throughout time, architects have designed structures that reflect social attitudes and serve the full spectrum of cultures from very conservative and business-like to modern and avant-garde.

    Image: London’s amazing architecture along the Thames.

    London’s amazing architecture along the Thames.

    If you carry optional lenses in your bag, consider how each will render the scene. Don’t hesitate to stop long enough to find out. Lenses not only provide a distance variable, but they also change the dynamics of dimension. Longer lenses tend to compact the range much more than wider lenses.

    Remember, backgrounds play a large role in the process. It is easy to get carried away with the subject and not see the effect that items in the foreground and background have on the final result. You can shorten major post-production chores, and even eliminate, by carefully seeing and shaping the background.

    Rule Two: Think before you shoot

    Digital cameras tend to override the cardinal rules of photography by allowing us to haphazardly capture dozens of shots without thinking them through. Remember, photography is a discipline and technical science as much as it is a process of documentation. Don’t allow yourself to excuse sloppy shooting.

    The basic tradeoffs of exposure should run through your mental checklist as you think through each shot. Here’s where “Auto” settings can work against you as a photographer.

    Briefly weigh the big three factors behind correct exposures before you click the shutter: Shutter speed, ISO, and Aperture each contribute to the shot, and each affects the result.

    Photograph-Architecture-as-Sculpture

    Interior of Student Union at Embry Riddle University

    The most important of these three variables in architectural photography is the aperture. Aperture controls the depth of field (DOF), particularly in long lenses. Since buildings rarely move around and daytime outdoor lighting is usually ample, shutter speed is of little consequence in the final analysis. As is ISO, but your choice of framing and DOF will make all the difference.

    Rule Three: Plan your shot before you shoot

    Make it a point to develop specific intent for each shot and develop at least a mental shot list of the project. Without this exercise, you’ll end up with a multitude of lookalike shots that you’ll have to cull through. Ask yourself if you want to capture the entire scene or just highlight a particular aspect of the scene?

    Image: The 19th century stone structure of the Chicago Water Tower stands in contrast to the gleamin...

    The 19th century stone structure of the Chicago Water Tower stands in contrast to the gleaming metal surface of the Trump Tower, also in Chicago.

    Rule Four: Account for Keystoning

    Buildings are always taller than the camera lens and thus always distort the parallel nature of the vertical lines. The only way to avoid this is to keep the camera axis parallel to the horizon. The moment you shift the lens skyward, the vertical lines will keystone. This is both normal to the human eye and advantageous to adding drama to tall buildings, but the camera lens can exaggerate it.

    If you’re fortunate, and a bit creative, you can shoot the building from the inside (or atop) another structure. This will allow you to keep the vertical surfaces parallel.

    Image: Seeing this domed rooftop from an adjoining property delivered a unique view. If I’d ca...

    Seeing this domed rooftop from an adjoining property delivered a unique view. If I’d captured this dome from the ground, the actual shapes and features would have been distorted.

    The other option, and the one most utilized, is to adjust these angles in post-production. Almost all imaging software provides the ability to straighten the lines by either automatically or manually stretching the image using the software’s Transform function. However, be aware that every time you distort an image’s shape, you reassign pixel values which can affect the sharpness of your image.

    Rule Five: Assess White Balance

    The general assumption is that you should capture outside photos in Daylight mode. But this isn’t always the case. Outdoor lighting changes constantly. Images captured either in the shade or in mixed lighting (dusk with street lighting, windows illuminated with tungsten lighting, or interior shots that include sunlight coming from outside) can create problems. The best way to address this issue is to capture your images in RAW mode. Doing so, allows you the latitude to experiment with the color temperature during post-production.

    Photograph-Architecture-as-Sculpture

    Even after extensive damage suffered in World War II, Dresden, Germany still hosts a great number of historical and cultural buildings.

    Rule Six: Carry a tripod

    There are many good reasons to carry a travel tripod when shooting architecture. Exposures can vary greatly, and a tripod eliminates the possibility of camera shake during longer exposures or shooting to match precise angles of structures.

    Since buildings don’t move much, a tripod allows you to lock down the focus and the steady the camera even at strange angles. Tripods also allow you to use your camera’s timer for hands-free exposures.

    Image: Genoa Archway

    Genoa Archway

    Rule Seven: Choose the right lens for the shot

    Wider-angle lenses allow you to capture larger buildings in areas of limited access. However, extreme wide-angle lenses (both zoom and non-flat field) can also introduce undesirable issues like barrel distortions that bow straight lines. Moderately wide-angle lenses and reasonable distances from the subject will most times address these issues.

    Rule Eight: Pay attention to textures and geometry

    The array of interesting textures, colors, fixtures, and surfaces used in building materials is quite diverse and makes for very interesting detail shots. Textures are the fabric of life and vary wildly both inside and outside modern architecture.

    Architects are perfection artists who love geometry, and good geometry is the foundation of good structure.

    From the earliest days of piling and arranging huge stones into pyramid shapes to today’s massive sports arenas, you can see the mathematical beauty of creative geometry everywhere. Look for geometric design in the biggest and smallest elements of architectural structures.

    Photograph-Architecture-as-Sculpture

    The Interior of the Frauenkirche cathedral in Dresden, Germany is graceful in structure and beautifully finished in pastel colors.

    Rule Nine: Break the rules

    Don’t be scared to see your subject from very strange vantage points. This includes looking both straight up from the floor and straight down from balconies. You may look a little silly to passersby, but chances are you’ll never see those people again, and they may well marvel at the photos you produce. The result of your creative vantage point will let your viewers see life from a fresh angle.

    Almost everybody takes pictures from eye height (which is quite boring), and most of us are between five and six feet tall, so this means that most photos appear…average and “normal.” Get un-normal and show people life from a fresh viewpoint.

    Image: Many of the European cultural and government buildings include beautiful cultural symbols and...

    Many of the European cultural and government buildings include beautiful cultural symbols and statues sculpted with old-world craftsmanship.

    Rule Ten: Look for contrast and balance

    This applies to subjects as well as tone curves. Today’s buildings are focused on issues that reflect environmental and social issues. Pay attention to the juxtaposition of natural and human-made elements that are designed to coexist in total harmony. Colors and textures emphasize cooperation between human achievement and nature. The balance of the practical and artistic aspects of modern engineering reflect a renewed sense of respect between progress and responsibility in today’s world.

    Conclusion

    Most of all, take the time to appreciate the marvel and beauty of human creativity. The more you look, the more you’ll appreciate the ingenuity and genius of today’s architectural masterpieces.

    Don’t rush through this process. Exercise the same level of care and skill that you observe in the design and structure of the buildings and interiors that you capture, and you’ll produce some amazing pictures. Shoot inspired.


    photograph-architecture-as-sculpture

    The post How to Photograph Architecture as Sculpture appeared first on Digital Photography School. It was authored by Herb Paynter.


    Digital Photography School

  • Weekly Photography Challenge – Hands

    The post Weekly Photography Challenge – Hands appeared first on Digital Photography School. It was authored by Caz Nowaczyk.

    This week’s photography challenge topic is HANDS!

    Weekly Photography Challenge – Hands

    Perry Grone

    Hands can say so much about a person! So go out and take some fab photos of hands! They can be wrinkly, newborn, working, dirty, or clean. They can be color, black and white, moody or bright. Just so long as they include hands! You get the picture! Have fun, and I look forward to seeing what you come up with!

    Image: Quino Al

    Quino Al

    Weekly Photography Challenge – Hands

    Akira Hojo

    Image: Liv Bruce

    Liv Bruce

    Check out some of the articles below that give you tips on this week’s challenge.

    Tips for Shooting HANDS

    6 Tips for Posing Hands in Wedding and Portrait Photography

    26 Expressive Images of Hands

    Handiwork: How to Pose Hands

    How to Pose Hands in Portraits

    Black and White Portraits a Set of Images to Admire

    How to Photograph Close-Up Details of Newborns and Infants

    Weekly Photography Challenge – HANDS

    Simply upload your shot into the comment field (look for the little camera icon in the Disqus comments section) and they’ll get embedded for us all to see or if you’d prefer, upload them to your favorite photo-sharing site and leave the link to them. Show me your best images in this week’s challenge.

    Share in the dPS Facebook Group

    You can also share your images in the dPS Facebook group as the challenge is posted there each week as well.

    If you tag your photos on Flickr, Instagram, Twitter or other sites – tag them as #DPShands to help others find them. Linking back to this page might also help others know what you’re doing so that they can share in the fun.

    The post Weekly Photography Challenge – Hands appeared first on Digital Photography School. It was authored by Caz Nowaczyk.


    Digital Photography School

  • How To Take Better Headshots: The Complete Guide

    Headshot photography is a huge sub genre of portrait photography right now and is becoming bigger and bigger as time passes. So many people need to get headshots done and they should be going to you for this service! I want to talk about how we can all make our headshot photography so much better and thus provide our clients Continue Reading

    The post How To Take Better Headshots: The Complete Guide appeared first on Photodoto.


    Photodoto

  • Equipment and Camera Settings You’ll Need for Better Moon Photography

    The post Equipment and Camera Settings You’ll Need for Better Moon Photography appeared first on Digital Photography School. It was authored by Jeremy Flint.

    better-moon-photography

    Super Moon, Oxford, England

    As the brightest object in the night sky, the Moon has captivated people around the world for centuries. The Moon is simply fascinating, particularly with the recent 50th anniversary of the first humans landing on the Moon. It is also one of the most incredible subjects to learn to photograph. Everyone loves to observe the Moon, but have you ever looked up to the sky at night and thought, “how can I capture this magnificent phenomenon?” Well, as photographing the Moon can be a challenging undertaking, I have highlighted some information about the Moon and recommendations regarding equipment and camera settings you’ll need to consider to achieve better moon photography.

    It is initially worth considering what the Moon actually is. Well, in general, the term “moon” denotes an object that orbits something other than the star in a solar system. Earth’s Moon is an astronomical body that orbits the planet and acts as its only permanent natural satellite, orbiting the Earth every 27.3 days. It is the fifth-largest Moon in the Solar System and is an average of 384403 kilometers (238857 miles) from Earth.

    When you look up at the night sky to view the peaceful and tranquil Moon, you might notice that the Moon looks a little different each night. This is due to our Moon’s many phases and types.

    Phases of the moon

    better-moon-photography

    Partial lunar eclipse, England

    The amount of sunlight that reflects on the Moon’s surface that we can see from our point of view on Earth varies every day, and this is what we refer to as a Moon phase.

    Moon phases change during the lunar month from a New Moon (which occurs the moment the Sun and Moon are aligned, with the Sun and Earth on opposite sides of the Moon) to a Waxing Crescent moon (when a thin sliver of the Moon becomes visible after a New Moon), First Quarter Moon (the moment the Moon has reached the first quarter of its orbit around Earth), Waxing Gibbous Moon, Full Moon, Waning Gibbous Moon, Third Quarter Moon and Waning Crescent Moon.

    Different types of full moons

    Moon photography 02

    Super Blue Blood Moon, Oxford

    full moon occurs when the side of the Moon facing Earth is fully lit up by the Sun. There are several types of unusual full moons that look different in color and size due to its position to the Sun and Earth. These include blood moons (that appears reddish and occur during a total lunar eclipse, when Earth lines up between the Moon and the Sun); Supermoons (a moon that appears larger because it is closer to Earth), Blue Moons (the “extra” Moon in a season with four Full Moons or the second Full Moon in a calendar month) and Harvest Moons (the full, bright Moon that occurs closest to the start of Autumn), for example.

    The equipment

    When photographing the full moon or different phases of the moon, you will need some essential pieces of equipment. I recommend you use a tripod for stability. Whilst you may get away with hand-holding your camera, you will get better results by mounting your camera on a tripod and avoiding camera shake. In addition, a remote shutter release cable is a useful bit of kit to help prevent camera shake. It is not essential as you can use your cameras self-timer function.

    Which lens to use

    Moon photography 03

    Moon over the landscape, Dartmoor, England

    The type of lens you use largely depends on whether you would like to capture the moon in the landscape, or as a detailed close-up. Wide-angle lenses are great to photograph the moon as it moves over an interesting landscape. Alternatively, a telephoto lens is a great choice for getting closer to the moon to reveal its surface details. Consider using a long focal length lens with a range of 300-400mm.

    Which camera settings to use

    better-moon-photography

    Moonrise, England

    Once you have chosen a lens and set your camera on a tripod, you will need to select your settings. Firstly, I would recommend setting your ISO to 100 to prevent noise and grain in your images. Next, select an aperture in the region of f/8 – f/16 to achieve clearer and cleaner shots. In terms of shutter speed, 1/60th to 1/125th should be a great starting point.

    Focus on the moon

    Moon photography 05

    Moon and sky, England

    When you have applied the settings, all you now need to do is set the focus of your camera. I like to use my cameras manual focus to focus on the Moon. Once the focusing distance to the Moon looks sharp using manual focus, you are ready to shoot the Moon.

    In my experience, manual focus works better than autofocus as the Moon’s surface is sometimes too dark to be recognized by the camera’s autofocus and I find manual focus to be more reliable in obtaining sharper shots in low light. By using manual focus, if you’re camera settings aren’t spot-on for any reason, you will still have reasonably sharp photos that you can recover in your editing software.

    If you apply all of these tips, you’ll achieve better Moon photography and be equipped to photograph the Moon at the best time.

    Conclusion

    In summary, photographing the Moon is one of the most enjoyable subjects any photographer can learn. To achieve better photos of the different phases and types of the Moon, be sure to use a tripod. Also, consider a remote cable release, choose a wide-angle or telephoto lens, get your settings right, and focus your camera on the Moon manually.

    Do you have any other tips for better Moon photography? Alternatively, share your pictures of the Earth’s natural satellite or the Moon shining brightly over your chosen scene with us below.


    better-moon-photography


    The post Equipment and Camera Settings You’ll Need for Better Moon Photography appeared first on Digital Photography School. It was authored by Jeremy Flint.


    Digital Photography School

  • Stunning Capture of Kingfisher Catching a Fish – Behind The Shot

    The post Stunning Capture of Kingfisher Catching a Fish – Behind The Shot appeared first on Digital Photography School. It was authored by Caz Nowaczyk.

    Stunning-Capture-of-Kingfisher-Catching-a-Fish-janet-smith

    Do you want to know how to photograph a Kingfisher catching a fish? Then read on!

    About this stunning capture of Kingfisher catching a fish

    Photographer: Janet Smith

    Camera Settings: 80mm focal distance, auto ISO, f5.6, 1/1200th. Camera set to manual and continuous silent shooting.

    Camera equipment: Canon 5D mark IV, Canon 70-200mm f2.8, Neweer remote trigger, Manfrotto tripod, and black bin bag as a rain cover.

    Where and when was the shot taken?

    Shropshire Photography hides, Market Drayton near Shropshire and Staffordshire borders, 6 July 2019, around 3:30 pm.

    What is the background behind getting the shot?

    This is my bucket list shot – a shot that I thought I’d never be able to take because I could not afford to buy a fast lens which I was told is required in this type of shot.

    Then almost a year ago, Brendan Van Son gifted me his old Canon 70-200mm f2.8 lens after learning I’ve wanted one but could not afford it. Having the lens opened up a whole new world for me. I saved and booked a hide day at Shropshire Photography Hides that got canceled three times because of bad weather and Minks decimating the Kingfisher nest and killing all the birds.

    On the 6th of July, I finally managed to get to the hide. The day was overcast, drizzly, and windy. I set up the camera at water level and wrapped in a black bin bag to keep it dry. Then I set the camera to manual, f5.6, auto ISO and 1/1200th, set up the remote trigger and waited.

    It took nearly six hours of waiting and shooting before I got this shot. I could not get the timing right, and this bird was super-fast. The light was also very low, and the drizzle persisted.

    I ended up with more misses than hits, but it was well worth it. One thing I learned is patience and determination pays off. And maybe nicer weather would have helped as well.

    What method or technique did you use to achieve the shot?

    I prefocused on the area where the bird was likely to enter the water with the camera set on silent continuous shooting to minimize noise.

    Describe any post-processing, including tools and techniques used

    There was very minimal post-processing. I did a close crop to show more of the water movement and the bird. Also, I lightened-up the shadows +25 on the photoshop slider, pulled up the vibrance to +15, and exposure to +5.

    What are your tips for others wanting to achieve a shot like this?

    My tip is to be patient, ask for advice from seasoned bird photographers and observe the bird’s behavior. I learned that this bird would move three paces either left or right and bob it’s head down before diving. As soon as it does that, I pressed the remote and continue pressing until it was back on the branch.

    You may also like:

    • 10 Must-Use Bird Photography Camera Settings for Beginners
    • 10 Common Bird Photography Mistakes and Their Solutions
    • 10 Surefire Tips for Photographing Birds in Flight
    • 5 Unforgiving Post-Processing Mistakes Every Bird Photographer Must Avoid
    • Review of the Nikon D500 for Wildlife and Bird Photography
    • 5 Secrets for Stunning Creative Bird Photography
    • 5 Tips for Better Forest Bird Photography
    • A Guide to Photographing Birds and Wildlife in a Wetland Area


    Stunning-Capture-of-Kingfisher-Catching-a-Fish-janet-smith

    The post Stunning Capture of Kingfisher Catching a Fish – Behind The Shot appeared first on Digital Photography School. It was authored by Caz Nowaczyk.


    Digital Photography School

  • 5 DIY Macro Photography Hacks for Stunning Macro Photos (on a Budget)

    The post 5 DIY Macro Photography Hacks for Stunning Macro Photos (on a Budget) appeared first on Digital Photography School. It was authored by Jaymes Dempsey.

    Do you want to take stunning macro photos…

    …on a budget?

    In this article, I’m going to show you exactly how you can capture amazing macro photos (without breaking the bank). You’ll discover 5 DIY macro photography hacks which you can use for consistently gorgeous images.

    5 DIY Macro Photography Hacks for Stunning Macro Photos (on a Budget)

    Sound good?

    Let’s dive right in, starting with:

    1. Use a board for a stunning macro photography background

    First things first:

    In macro photography, the background matters almost as much as your main subject. Because the background is what makes your main subject stand out.

    One of my favorite backgrounds is a solid, uniform color:

    Dark black.

    Black backgrounds allow you to capture somber, moodier macro photography. Like this:

    5 DIY Macro Photography Hacks for Stunning Macro Photos (on a Budget)

    Now, achieving a natural black background in nature can be tough. Which is why this DIY hack is so valuable. Because you can use it to create a deep black background in all of your macro photos.

    Here’s what you do:

    Step 1: Go to your local hardware store and purchase a plywood board. I’d suggest something ultra-thin (because wood can get heavy, fast). I’d also go for a decent size: at least two feet on all sides.

    Step 2: Purchase black paint and primer. I recommend getting a sample paint pot (one should be more than enough). These are cheap and work just fine. The primer is to prevent the wood from tainting the color.

    Step 3: Add the primer and paint the board. I’d recommend two coats of black paint for that ultra-dark look.

    Step 4: Let the board dry.

    Now comes the fun part:

    Actually taking the photos!

    You should choose a main subject that’s fairly light (e.g., yellow and white flowers). Position your main subject so that it’s in the sun, with the black board in the shade, a foot or so behind it. You want to create as much contrast as possible between the board and your subject. That is, you want a light subject on a dark board.

    DIY-macro-photography-hacks

    The goal is to lose absolutely all detail in the background. If you don’t fully achieve this in-camera, you can use an editing program to drop the blacks in your images.

    You can still make this work with diffused (i.e., cloudy) light. But you’ll need to do a bit more work in post-processing to bring down the blacks.

    Bottom line?

    You can work some serious magic with just a board and some paint.

    Try it yourself! And watch as you capture amazing macro images.

    2. Use a lightbox for a stunning high-key, transparent look

    Have you ever wanted to capture macro photos that look bright and high-key? Maybe even transparent?

    With this DIY hack, you can!

    All you need is a basic lightbox, often used by artists for tracing. You can purchase one for around 20 dollars on Amazon. While a bigger lightbox is generally better, anything A4 and above should work fine.

    Once you have your lightbox, you’ll need to choose a main subject. Flowers with translucent petals work best. And the flatter the flower, the better.

    You’ll want to work in a room that has only diffused ambient light. You want your flowers to have a soft, even look.

    Then turn on the lightboard, and place your flowers on top of it.

    DIY-macro-photography-hacks

    I recommend shooting parallel to the lightbox from above. While you can do everything handheld, I don’t recommend this, especially if your flowers are more three dimensional. Instead, mount your camera on a tripod and use a narrow aperture (i.e., f/8 and above) to ensure perfect sharpness.

    Once you have your shots, you’ll probably need to do a bit of post-processing. I recommend increasing the whites, to give a slightly brighter, airier look.

    3. Shoot with one flower in a vase for powerful compositions

    There’s no doubt about it:

    The way that flowers are positioned can make a macro shot look amazing…or terrible. If several flowers are overlapping, your photo may fall flat.

    But if you can isolate a single flower…

    …that’s when things start to look really compelling.

    Now, when you’re shooting in nature, you don’t have much control over this. You have to work with what you’ve got.

    But if you use this DIY macro photography hack, you can capture a gorgeous set of macro flower photos.

    Guaranteed.

    Here’s how it works:

    Go to your local grocery store, and purchase a bouquet of your favorite flowers. I like to work with tulips, but you can really use anything!

    When you get home, check over the flowers for blemishes and other issues. Find the biggest, best-looking flowers of the bunch.

    And then put them all in separate vases (or cups).

    5 DIY Macro Photography Hacks for Stunning Macro Photos (on a Budget)

    Note: You want the flowers to extend pretty far over the top of the vase, which is why I suggest you avoid taller vases.

    The next time the light is good, take all the vases outside. Place them in front of a gorgeous background.

    (I often use an orange sky at sunset.)

    And then photograph all the flowers, individually. Because they’re in separate vases, they’ll all be perfectly isolated. And this will allow you to easily capture powerful compositions.

    Try it.

    You’ll love the final product.

    5 DIY Macro Photography Hacks for Stunning Macro Photos (on a Budget)

    4. Detach your lens for an artistic macro look

    If you’re bored of getting the same macro look over and over again, then this DIY macro photography hack is for you.

    It’ll help you capture photos with brilliant light leaks, like this:

    macro-photography-DIY-hacks

    If you’re familiar with the concept of freelensing, it’s like that, but with a twist.

    Here’s how you do it:

    Choose a backup camera body and a cheap camera lens in the 50mm range. (There’s a slight risk of exposing your camera sensor to dirt.)

    Focus your lens to infinity.

    Then turn off your camera, and detach the lens.

    Next, turn the camera back on, and pull the lens just slightly away from the camera (it should still be detached!).

    This will actually magnify your subject, while often giving you some amazingly artistic light leaks.

    DIY-macro-photography-hacks

    And while the technique may require a bit of experimentation, you’ll get the hang of it pretty quick, and you’ll capture some gorgeous macro photos.

    5. Use fairy lights for amazing background bokeh

    Here’s your final DIY macro photography hack (and it’s one of my favorites):

    Use fairy lights for gorgeous macro backgrounds. They’ll get you photos like this:

    DIY-macro-photography-hacks

    To start, grab a set of fairy lights on Amazon (for around 10 dollars). I recommend a neutral or warmer color.

    Go out to shoot around dusk, when the light is really starting to fade.

    Find a nice subject, and position the fairy lights directly behind it. You can dangle them from surrounding vegetation, or you can hold them with your left hand.

    Now, you don’t want to position the fairy lights too close, or else you’ll capture the wiring in your photos. Instead, you want them to show some nice bright light without being prominently featured.

    You should also make sure to use a shallow aperture, in the area of f/2.8 to f/5.6. That way, the fairy lights will be fully blurred, creating some stunning bokeh.

    The trick is an easy one, but it’ll get you amazing macro photos!

    DIY-macro-photography-hacks

    DIY macro photography hacks for stunning macro images: Conclusion

    You’ve now discovered five DIY macro photography hacks.

    And you can use them for stunning macro photos all the time.

    So go ahead and start. Make your black board. Grab yourself some fairy lights.

    And take some amazing macro photos!

    Do you have any DIY hacks of your own for beautiful macro shots? Share them in the comments!


    DIY-macro-photography-hacks

    The post 5 DIY Macro Photography Hacks for Stunning Macro Photos (on a Budget) appeared first on Digital Photography School. It was authored by Jaymes Dempsey.


    Digital Photography School

  • What is the Essential Underwater Photography Equipment for Beginners?

    Photography is a very appealing hobby and  many people will be tempted to capture their holidays and all the places they’ve visited. This is one of the best opportunities to bring your camera underwater and do some unique photography with amazing results.  With underwater equipment, you can capture reefs, go snorkeling, get pictures of fish, capture shipwrecks, and so on. Continue Reading

    The post What is the Essential Underwater Photography Equipment for Beginners? appeared first on Photodoto.


    Photodoto

  • 3 Easy Tips for Photographing Details in a Scene

    The post 3 Easy Tips for Photographing Details in a Scene appeared first on Digital Photography School. It was authored by Lily Sawyer.

    Regardless of the type of event I photograph, I ALWAYS photograph details. Why? Because details help tell the story of an event that nothing else can. Details aid the recollection of memories: words and conversations, scents and aromas, spoken and unspoken emotions. Details also help cement these memories in our brains.

    photographing-details-in-a-scene-lily-sawyer

    Newborns grow so fast and often parents are exhausted beyond belief. Photographing details helps them remember the sweet moments, especially of those first days. The first tuft of hair, the tiniest fingers, milk spots, windy smiles, hospital tags, first baby hats, and mittens. Captured in details, these moments can be cherished more often and for much longer.

    Wedding days go in a total haze for many a couple. All the weeks and hours they have put into planning the decorations and color scheme down to the minutest detail and they don’t even have a moment to fully appreciate them on the wedding day. I carve out time to capture hundreds of detail photos during a wedding. They are just as important as all the other photojournalistic and documentary captures of people and events unfolding on the day.

    dps-3-tips-capturing-details-lily-sawyer-photo

    You don’t need to have an expensive kit to take some good, solid photos. All the photos in this article were intentional snapshots taken during a day trip with me as a tourist. No flashes, just a camera, a 60mm fixed lens and an observant eye looking for details.

    Here are 3 tips I find helpful when photographing details:

    1. Storytelling

    Photographs are no doubt one of the most visually exciting ways to tell a story, so tell it well using photographs of details.

    Let’s consider the five elements of a story to help us communicate it effectively: setting, characters, plot, conflict, resolution.

    Below is a series of photographs I shot with intent to tell a simple short story (real captures and not staged) with the above elements in mind.

    Setting

    photographing-details-in-a-scene-lily-sawyer

    Conflict

    photographing-details-in-a-scene-lily-sawyer

    Characters and Plot

    photographing-details-in-a-scene-lily-sawyer

    Resolution

    photographing-details-in-a-scene-lily-sawyer

    This is just a simplistic way of showing you how a story can be captured beautifully in details. The setting is in Copenhagen on a soaking wet and cold day. It had been heavily raining for a good while. Droplets have collected on the bridge adorned with love locks. It’s summer (as seen on the date in the newspaper), and the map is sodden. Somewhere nice and cozy to dry off and relax would be welcome. A girl wrapped in a thick blanket browses the menu. Hot cocoas put a big smile on the children’s faces. It’s a happy summer once again.

    2. Composition

    a. Rule of Thirds

    The rule of thirds is probably the most well-known and popular composition techniques. It is also my favourite and the easiest that comes to me. The frame is divided into thirds horizontally and vertically. Where the sections intersect are the strongest points where your main image or interest in the image should be placed.

    dps-3-tips-capturing-details-lily-sawyer-photo

    This is illustrated above left where the yellow building occupies two-thirds of the space and one third on the left is the overcast sky. In the above right image, the two buildings intersect on a third of the frame. The point of the small tower is positioned about a third from the bottom of the image and a third from the left.

    Plain snapshots like these look stronger with this rule of thirds composition.

    dps-3-tips-capturing-details-lily-sawyer-photo

    Can you see how these two images above use the rule of thirds composition?

    b. Symmetry/centred

    Another favorite of mine is symmetry; where the main point of interest in the image is placed at the center of the frame. A central composition accentuates the importance of the subject and emphasizes its superiority.

    dps-3-tips-capturing-details-lily-sawyer-photo

    The image above shows the fish at the center and two symmetrical areas on either side of it. More symmetry – the tables and chairs and the windows on either side – strengthens this image further. You can feel the solidity of the structure because of the centered composition.

    c. Fill the Frame

    As with the above, filling the frame strengthens composition and makes the viewer focus intensely on the subject without unnecessary distractions. The viewer can explore details that otherwise would be lost had the image not filled the frame and cropped distractions. Filling the frame is an effective way of highlighting a point of interest and telling its story from much closer.

    dps-3-tips-capturing-details-lily-sawyer-photo

    d. Depth and foreground interest

    Photographs are two dimensional in nature. Many images only show the subject and background. Including foreground adds a third dimension to the space. It increases its depth and makes the viewer feel as if they are on the outside looking in. I use this technique for anything and everything: portraits, objects, or action.

    A foreground interest also invites the viewer to explore other elements in the image and look deeper into the other areas of the frame, not just first thing that meets their eye. Because you are inviting the viewer’s eye to move around the image, you make your image more dynamic.

    dps-3-tips-capturing-details-lily-sawyer-photodps-3-tips-capturing-details-lily-sawyer-photo

    3. Angles

    Change your point of view

    We see virtually everything at eye level. We often walk around with our faces looking forward not upwards, downwards or sideways. So whenever we change our point of view into a bird’s eye view or worm’s eye view or perspective, we find ourselves seeing new interesting things in common and familiar objects. It’s something I always try to remind myself when shooting: look up, look down, look right, and look left.

    In the image below, you can see I’ve also combined this bird’s eye view with the symmetrical composition and the rule of thirds.

    dps-3-tips-capturing-details-lily-sawyer-photo

    Perspective and leading lines

    Something as mundane as a bird on a bench can be captured with a touch more interest by moving a few steps sideways and photographing it from a perspective viewpoint. Doing this is making use of the line of the bench to lead the viewer’s eye to the bird – the focal point of the image.

    I didn’t want to get too close lest I scared it away. It caught my eye because I thought it was a crow. Then I noticed it was wearing some white feathers like a cardigan on its black body. Look out for leading lines, whether they be straight like benches, rails and fences, or curvy like windy paths, a stream of water or patterned tiles on pavements.

    dps-3-tips-capturing-details-lily-sawyer-photo

    Conclusion

    I find photographing details exciting, mentally challenging, and thoroughly enjoyable. It keeps me on my toes, especially when I try to tell a story. I feel a sense of achievement when I’m happy with the results. I hope you try it sometime if you haven’t yet.

    If you have any tips for photographing details, do share them in the comments below.


    photographing-details-in-a-scene

    The post 3 Easy Tips for Photographing Details in a Scene appeared first on Digital Photography School. It was authored by Lily Sawyer.


    Digital Photography School