RSS
 

Archive for the ‘Photography’ Category

How to Use Exposure Compensation and When You Should Use It

27 Feb

The post How to Use Exposure Compensation and When You Should Use It appeared first on Digital Photography School. It was authored by Mat Coker.

how-to-use-exposure-compensation

Sometimes, no matter what you do, your photos seem to keep coming out too dark or too bright. If only there were a simple way to tell your camera to make them a bit brighter or a bit darker. Well, there is! In this tutorial, I’ll show you how to use exposure compensation so you’ll never have to struggle with stubborn brightness levels again.

how to use exposure compensation

Take control over the whole look of your photo with the exposure compensation button.

Using exposure compensation is perfect for people who love aperture or shutter mode but want more control over the brightness of their photos without having to overthink settings. If you aren’t ready for manual mode yet or prefer not to use it, then you’ll love the exposure compensation feature.

underexposed photo

Exposure compensation can help you to refine your landscape photos. ISO 250, f/4.3, 1/500 sec.


how to use exposure compensation

This is the exposure I was hoping for. I didn’t need to think about ISO, aperture or shutter speed. I merely need to use the +/- button and the camera did the work. ISO 800, f/4.3, 1/500 sec.

The point of exposure compensation

If you’re shooting in auto mode, then your camera makes all the decisions about how bright your photo will be. You know from experience that you’re often unhappy with how your photos turn out in auto mode.

Even if you’re using a partial-auto mode such as Aperture or Shutter Priority, then your camera still makes the final decision about how bright your photo will be.

If you’re frustrated that your pictures keep coming out too bright or too dark, then you should use exposure compensation. It tells your camera to make the picture a little brighter or a little darker than it thinks it should be.

Suppose you take a picture that turns out too dark, simply use the “+” part of the button to make the next photo brighter.

underexposed photo

The first photo was underexposed, so I used exposure compensation to increase the overall brightness of the next photo I took.

If your pictures are coming out too bright, simply use the “-” part of the button to make the next photos darker.

using exposure compensation for overexposed photos

The first photo happened to come out overexposed. So I decreased the exposure compensation for a better exposure.

How to use exposure compensation

It’s the little +/- button on your camera that controls exposure compensation. If you need help locating it, just search your camera model and “exposure compensation” on Youtube. You’ll find a tutorial showing you where it is and how it works on your camera.

exposure compensation button

You’ll need to press this button to activate exposure compensation. Search Youtube for tutorials on how to use it with your camera.

That little button will help you take better pictures, save time editing, and feel more competent as a photographer.

Exposure compensation may not work in auto mode. You may or may not be able to use it in scene mode. It may not be compatible with auto ISO too.

If you’re working in full manual mode, then you don’t need exposure compensation since you’ve already taken full control of your camera.

Begin by choosing either Aperture or Shutter Priority mode.

aperture mode

Aperture Priority mode.


shutter mode

Shutter Priority mode.

If you’re using Aperture or Shutter modes, the exposure compensation button will allow you to adjust the look of your photo without getting confused about the other settings. It’s like a secret shortcut to manual mode without having to actually be in manual mode.

If you are already using manual mode a lot but find yourself getting frustrated with constantly adjusting ISO, aperture, and shutter speed, then exposure compensation will simplify everything for you and reduces the need for full manual mode.

Using exposure compensation to solve exposure problems

Use exposure compensation as a problem solver or to refine your photos.

Overexposed photo

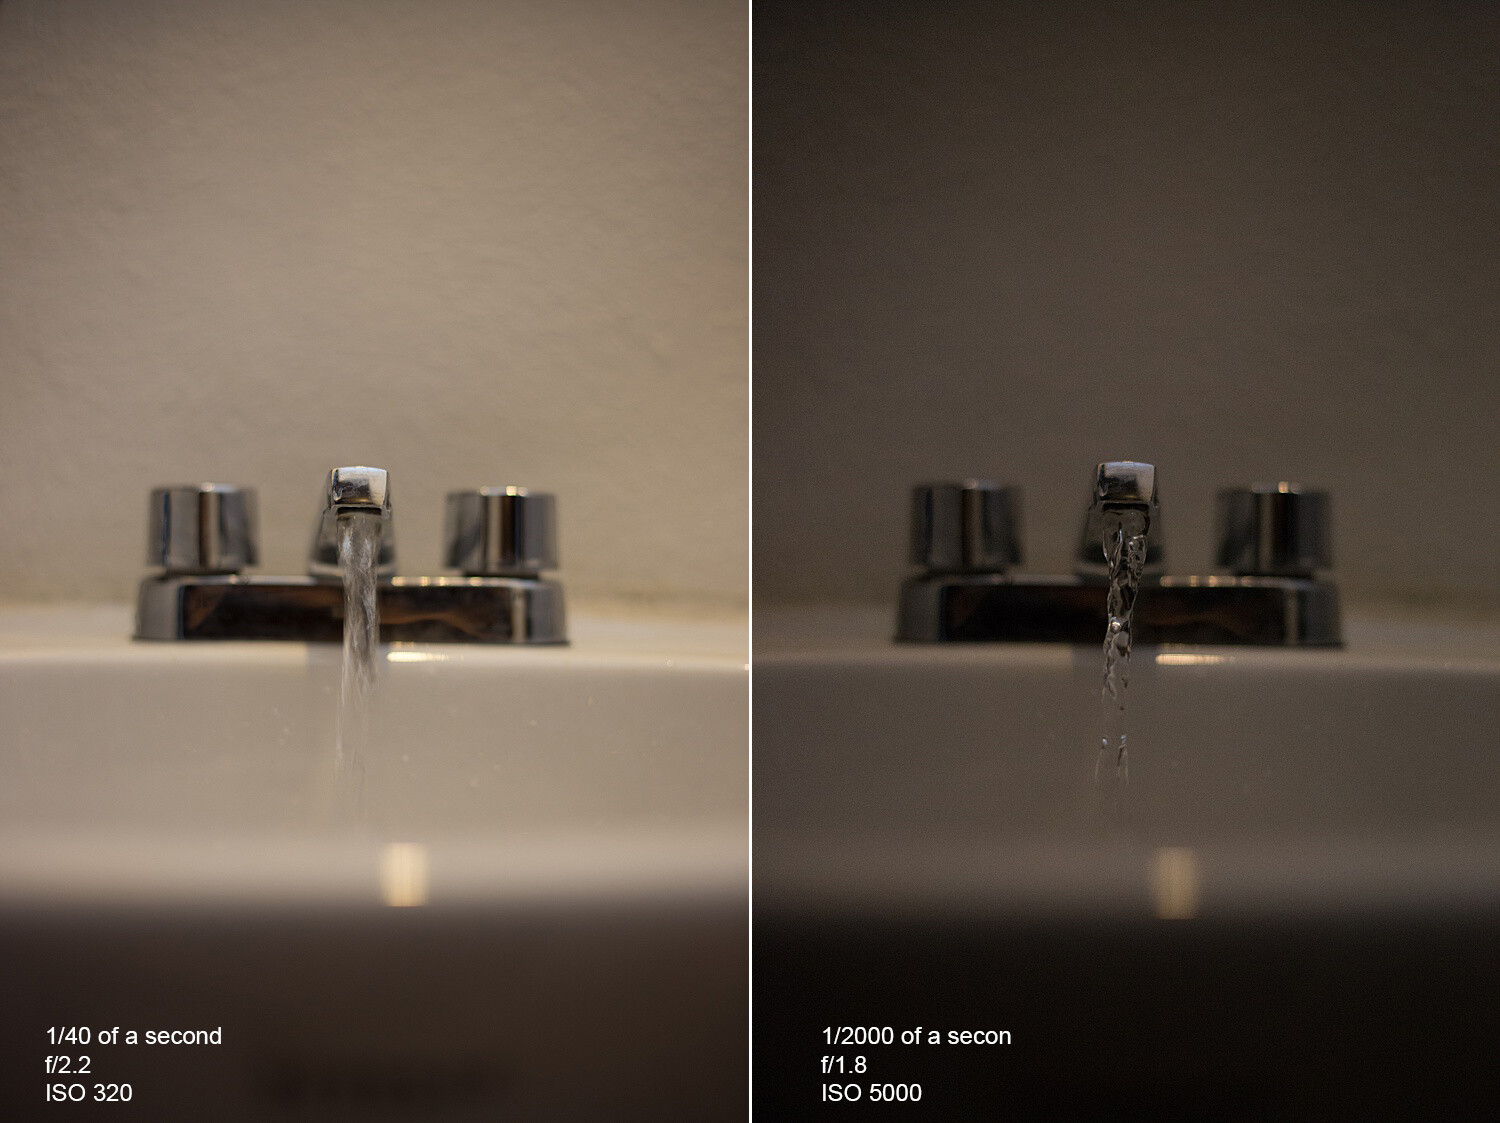
This photo was taken at dusk. Even though the scene looked right to my eye, the camera’s eye saw the scene as much darker and naturally wanted to brighten up the photo for me. Unfortunately, it was quite overexposed. This happens to me all the time at dusk. ISO 6400, f/1.8, 1/60 sec.


how to use exposure compensation

This photo is now properly exposed. Yes, the photo looks a little dark, but it really was this dark in reality. ISO 6400, f/1.8, 1/320 sec.

When your camera always seems to under/overexpose your photos, try exposure compensation. My Olympus Tough TG-6 always overexposes the photos, so I always have exposure compensation activated to darken the photo. My Nikons and Fuji’s always underexpose the photos, so I’ve always got exposure compensation activated to brighten the exposure.

how to use exposure compensation

This white blanket appeared very bright to the camera, so it naturally darkened the exposure for me. ISO 1600, f/2.4, 1/500 sec.


properly exposed photo

I increased the exposure compensation to get a better exposure. ISO 1600, f/2.4, 1/125 sec.

Using exposure compensation for creative effect

Exposure compensation works well to help achieve or avoid silhouette photos.

silhouette exposure compensation

When you photograph somebody against a bright background, you are almost sure to get a silhouette. I used exposure compensation to make this silhouette even darker. ISO 100, f/5.6, 1/500 sec.


how to use exposure compensation

You can increase the exposure compensation to force a brighter exposure and avoid the silhouette look. ISO 400, f/5.6, 1/250 sec.

Exposure compensation is great for a technique called “exposing for the highlights.” It’s when most of your photo looks dark, but the highlights are bright and stand out.

exposing for the highlights

This is a nicely-exposed photo, but I had wanted something more dramatic looking. ISO 800, f/3.5, 1/150 sec.


how to use exposure compensation

I used exposure compensation to darken this next photo. Now, just the highlights are shining. ISO 100, f/5.6, 1/500 sec.


how to use exposure compensation

This photo was exposed so that the highlights would look just right while the rest of the leaf falls into darkness.


water exposed for the highlights

This photo was exposed to capture the highlights on the water while letting everything else fall into darkness. The person in the foreground turns this into a silhouette as well.

Most photographers would rather think about the creative elements of the photo rather than camera settings (although camera settings do contribute to the creative look of the photo).

Using exposure compensation lets you focus more on creativity and less on settings. Save brainpower – don’t think about settings and creativity

how to use exposure compensation

I knew that I wanted the sunlight properly exposed, and I wanted her traced in highlights. A combination of composition and exposure compensation helped me achieve that quickly.

As you can see, exposure compensation can help solve a lot of problems when you’re taking pictures. You’ll be amazed at how your photos look better with a little exposure adjustment. And in time, you’ll find it easier to discern when you prefer to use manual mode or exposure compensation.

Checklist

Now that you know how to use exposure compensation, keep this checklist in mind. Exposure compensation works:

  • To achieve better exposure in your photos
  • While in aperture and shutter mode
  • To achieve or avoid silhouettes
  • For creative effects like exposing for the highlights

Once you know how to use exposure compensation (and when is the best time to use it), you’ll simplify your process as a photographer. Simplicity is good because it helps you get back to what you really love doing; taking pictures.

The post How to Use Exposure Compensation and When You Should Use It appeared first on Digital Photography School. It was authored by Mat Coker.


Digital Photography School

 
Comments Off on How to Use Exposure Compensation and When You Should Use It

Posted in Photography


Canon EOS R5 Is Being Developed, But Don’t Forget About the R1

27 Feb

The post Canon EOS R5 Is Being Developed, But Don’t Forget About the R1 appeared first on Digital Photography School. It was authored by Jaymes Dempsey.

news-canon-eos-r5-development

The Canon EOS R5 hasn’t yet hit the shelves, but the rumors keep coming regarding Canon’s full-frame mirrorless line.

Rumors which promise something even more exciting (for those of us who can be patient, that is!).

Now, the Canon EOS R5 is plenty thrilling in its own right. It was officially announced by Canon earlier this month and is positioned to correct a number of the much-criticized flaws of the Canon EOS R and EOS RP, Canon’s two major full-frame mirrorless offerings.

In particular, the R5 promises to feature some form of in-body image stabilization, which is considered by many to be a defining aspect of mirrorless technology.

The R5 will also offer dual card slots, 20 frames-per-second continuous shooting with the electronic shutter (this drops to 12 frames per second with the mechanical shutter), and an incredible 8K video recording capability. The R5 is rumored to begin shipping sometime this July.

Canon is calling the R5 its “most advanced full-frame mirrorless camera ever,” and they’re undoubtedly right, though some might claim the EOS R/RP duo set a low bar.

That said, Canon seems determined to push their mirrorless lineups to greater heights. According to Canon Rumors, the R5 is “definitely not the ‘professional’ EOS R mirrorless camera” that Canon is developing, in reference to an action-focused mirrorless camera teased by Canon, one that would potentially rival the Sony a9 Mark II, as well as the Nikon D6 and the Canon 1D X Mark III.

Canon Rumors states that the “professional” camera, dubbed the “EOS R1,” should appear in 2021, and suggests that there may be a reveal in the final months of 2020.

In a sense, this Canon EOS R1 is only interesting as a marvel of innovation. We all want to see Canon push its mirrorless development to the next level (though advanced features do have a tendency to trickle down to lower models). But the EOS R1 will almost certainly be prohibitively expensive, and it won’t be the type of camera the average photographer wants or needs. Instead, it’ll be like its potential competitors, the 1D X Mark III, and the D6: interesting in concept, but relevant only for a niche audience.

The EOS R5, on the other hand, may be positioned much like the Canon 5D Mark IV. The 5D Mark IV is an impressive camera, and while it’s not Canon’s “true” professional option, it’s a body used by plenty of professionals. Many of these photographers hoped to see an upgrade in the form of the Canon EOS R and were disappointed by its lack of IBIS and single card slot.

So maybe, with the EOS R5, Canon will finally produce what was hoped for over a year ago.

What do you think? Are you excited about the EOS R5? How about the R1? If so, why? Let me know in the comments!

The post Canon EOS R5 Is Being Developed, But Don’t Forget About the R1 appeared first on Digital Photography School. It was authored by Jaymes Dempsey.


Digital Photography School

 
Comments Off on Canon EOS R5 Is Being Developed, But Don’t Forget About the R1

Posted in Photography


Making Sense of the Exposure Triangle – ISO, Aperture, and Shutterspeed Made Simple

26 Feb

The post Making Sense of the Exposure Triangle – ISO, Aperture, and Shutterspeed Made Simple appeared first on Digital Photography School. It was authored by Jackie Lamas.

making-sense-of-the-exposure-triangle

Ever hear other photographers talking about shooting in manual mode, and using terms like ISO, aperture, and shutter speed and have no idea what they’re talking about? Then this article is for you. While making sense of the Exposure Triangle may seem overwhelming, you’ll learn everything there is to know so that you can get shooting in manual mode quicker!

Image: Canon 6D, 28mm, f/5.6, 1/250, ISO 400

Canon 6D, 28mm, f/5.6, 1/250, ISO 400

Everything in photography has to do with light

All three settings, ISO, aperture and shutter speed are collectively called the Exposure Triangle. They work together to allow more or less light to enter the camera depending on the light that you see with your eye in a given situation.

making-sense-of-the-exposure-triangle

For example, the brighter the light outside, the less you need to enter your camera to record the image. The less light around you, the more light you’ll need the camera to capture in order to make the image visible.

Each part of the Exposure Triangle works together to create a good exposure while controlling the camera fully to suit your creative direction.

What is ISO?

When making sense of the exposure triangle, you first need to understand ISO. ISO is the light sensitivity of the camera’s sensor.

So, think of this as your eye. When it’s really bright outside, your eyes tend to be less sensitive and need to strain less to focus, see, and look at the world around.

Image: When it’s particularly bright outside, like in this photo, use a lower number ISO.  Cam...

When it’s particularly bright outside, like in this photo, use a lower number ISO.  Camera settings: f/5.0, 1/800, ISO 200, 85mm shot on Canon 6D.

On the other hand, when you’re in a dark location with little to no light, your eyes strain and become more sensitive to any lights in the scene, helping you see better at night as well.

The same thing happens to a camera’s sensor. The more sensitive, the more light you’ll be able to pick up. The less sensitive, less light will enter the camera.

making-sense-of-the-exposure-triangle

ISO is measured in numbers ranging from 50 to 25,600 on some models. There is usually a button on your camera that is labeled ISO. This is where you’ll be able to change the ISO depending on the lighting situation.

Image: Here, we used auto mode to get an idea of the exposure we would need to take a photo of these...

Here, we used auto mode to get an idea of the exposure we would need to take a photo of these stuffed animals setting the ISO at 100.

The ISO also affects the quality of the image, so be careful when you’re using higher ISO numbers. They tend to record a lot of digital noise (or grain points) that you see when zoomed in.

Image: As you can see in this photo, using a high ISO added more light than we needed.

As you can see in this photo, using a high ISO added more light than we needed.

Using a higher ISO can help you in low light situations when you want to keep a relatively fast shutter speed to avoid camera shake. However, you need that boost in light to help expose correctly.

Image: When you use a high ISO, your camera is more sensitive to light and causes digital noise – li...

When you use a high ISO, your camera is more sensitive to light and causes digital noise – little points on your image that make it look grainy.

Aperture

When making sense of the exposure triangle, you need to understand aperture next. Aperture, is the opening and closing of the lens. Measured in F-numbers, it affects both the amount of light entering the camera, and the depth of field in your image.

making-sense-of-the-exposure-triangle

Camera settings f/2.5, 1/100, IS0 400, 50mm. In order to get the baby’s hand in focus and nothing else, we had to use an open aperture of f/2.5.

The depth of field is how much is in focus from foreground to background. A lower f-number will open your lens and let more light in, but it will also give you a narrower focus range (a shallow, or small depth of field). While a higher f-number will close your lens, and lessen the light entering, it will give you a wider focus range (a wide, or large depth of field).

making-sense-of-the-exposure-triangle

This is especially important to keep in mind when taking portraits so that you can determine how much you want in focus.

For an individual portrait, any f-number between f/2.8 and f/5.6 works great. You still have your subject in focus but you do get some bokeh (blurry background due to a low f/number).

making-sense-of-the-exposure-triangle

Here we have a more open aperture and therefore less is in focus.

For groups of people, you’ll want a high f-number like f/8 or f/11 because, at a lower f/number, you have less depth of field. This means your plane of focus is narrower. If you have people standing outside the plane of focus, they will be blurry. Therefore, in order to have everyone in focus, a high f/number is best because it gives you a wider plane of focus.

making-sense-of-the-exposure-triangle

Here we are using a closed aperture, allowing more to be in focus.

Again, opening and closing of the lens affects how much light enters the camera. Eventually, in manual, you’ll have to compensate with one of the other two settings to make up for the lack of light or excess of light entering your camera.

Image: To capture the bird and the landscape surrounding it, we used an aperture of f/9. Other camer...

To capture the bird and the landscape surrounding it, we used an aperture of f/9. Other camera settings are ISO 400, 1/250, at 28mm.

Use Av or A mode on your camera to play with aperture. The camera will set the shutter speed for you to maintain correct exposure. However, you’ll be able to see a noticeable difference in your depth of field and in light entering your camera.

Shutter speed

When making sense of the exposure triangle, shutter speed is the next thing you need to know. Shutter speed dictates the length of time that the shutter is open.

Image: To get a silhouette, you’ll need a fast shutter speed. This image has a shutter speed o...

To get a silhouette, you’ll need a fast shutter speed. This image has a shutter speed of 1/1000, f/16, ISO 400, 28mm.

Shutter speed is measured from seconds to fractions of a second (slow to fast shutter speeds). The slower the shutter speed, the longer it stays open to capture light. The faster it opens and closes, the less light is captured to make your photo.

making-sense-of-the-exposure-triangle

For example, on a really bright afternoon, use faster shutter speed in order to create a good exposure. In a low light situation, like a nighttime scene or a dark cafe, a slower shutter speed can help capture enough light to make the photo.

making-sense-of-the-exposure-triangle

In these two photos, we only changed the shutter speed and kept the other camera settings the same. You can see a significant difference in light.

Keep in mind, the slower the shutter speed, the more chance of camera shake occurring. Camera shake is an accidental blur due to the camera shaking, either in your hands, or due to some other force.

At slower shutter speeds, usually 1/125th of second or slower you are more likely to get camera shake. At faster shutter speeds this isn’t a problem as the camera opens and closes too quickly to register the shake.

making-sense-of-the-exposure-triangle

Using a slow shutter speed can give you interesting images with movement. Camera settings f/6.3, 1/13, ISO 400, 50mm.

Shutter speed also allows you to show movement in your photos or freezes moments. Slow shutter speed will show more movement, for example, a child running or playing. While a faster shutter speed will freeze the moment or action that you’re capturing.

Manual Mode

Manual mode is where you have to set all three adjustments manually, therefore, giving you complete control of the light and look of your photo.

Think of these three as a pulley system, all working together. When one is moved, one or both of the other settings must also adjust and compensate.

making-sense-of-the-exposure-triangle

The photo on the left has a slow shutter speed, an open aperture, and low ISO. The slow shutter speed and open aperture help light enter. It also allows the camera to pick up the movement of the water.

In the photo on the right, we get more of an action shot of the water. This is because we have now changed the ISO to 1/2000 sec – a pretty fast shutter speed. With this fast shutter speed, we had to compensate for the loss of light from the fast shutter speed. So, we added light by using a higher ISO and a more open aperture. Even so, it wasn’t enough to get a correct exposure as the photo is a little dark.

The best way to get started in manual mode is to think about what kind of photo you want to make. Are you shooting still life? Is there enough light? Do you want to control your focus range? Is this a portrait? All of these things can help you to determine where to start.

making-sense-of-the-exposure-triangle

For example, you’re taking photos of your kid’s soccer game in the early evening, and there is still a lot of light left, but it’s not harsh. You want to freeze the action of the game, and so you’d start by setting a fast shutter speed first.

If you’re taking a portrait of someone, then you’d start with the aperture in order to control your depth of field. Then you’d adjust the other two settings accordingly.

Image: Camera settings f/5.6, 1/100, IS0 400, 53mm.

Camera settings f/5.6, 1/100, IS0 400, 53mm.

For landscapes, you’d likely start with aperture and shutter speed. You may need a small aperture (eg f/11) to capture a wide plane of focus. Depending on whether there is water in your landscape, you may want to freeze the water or give it a silky look by slowing your shutter speed right down.

Knowing what you’re shooting and type of light will give you a starting point

Also, in manual mode, there is a built-in light meter. This meter looks like a tiny ruler either at the bottom of the live view or inside the viewfinder. It helps you determine if your photo is too bright (metering to the right), or too dark (metering to the left).

When the line is in the middle, or at zero, you’ve got what the camera considers a perfectly-exposed photo.

making-sense-of-the-exposure-triangle

The ruler at the bottom of the live view, or through the viewfinder, can help you expose your photos correctly. To the right of the ruler your photo will be brighter, and to the left, it will be darker.

Aim to keep it in the middle as you practice in manual mode. Sett one of the adjustments and then move the other two to add or take away light accordingly until the meter is in the middle.

It’s all about practice and really getting to know what each setting does on its own before switching to full manual. This can feel overwhelming, so try using one of the other modes, like Tv/S or Av/A modes first. Doing so may give you a better understanding of the settings and more control over your photos.

making-sense-of-the-exposure-triangle

Camera settings f/22, 30 seconds, ISO 200, 28mm.


Image: Camera settings f/10, 1/640, ISO 400, 50mm.

Camera settings f/10, 1/640, ISO 400, 50mm.

Conclusion

The technical side of photography can sometimes seem overwhelming and it seems like there is always something new to learn before feeling confident. Making sense of the exposure triangle will set your creativity free and give you full control of your camera.

The post Making Sense of the Exposure Triangle – ISO, Aperture, and Shutterspeed Made Simple appeared first on Digital Photography School. It was authored by Jackie Lamas.


Digital Photography School

 
Comments Off on Making Sense of the Exposure Triangle – ISO, Aperture, and Shutterspeed Made Simple

Posted in Photography


Viewing Images in Lightroom – What Are The Options?

26 Feb

The post Viewing Images in Lightroom – What Are The Options? appeared first on Digital Photography School. It was authored by Kevin Landwer-Johan.

viewing-images-in-lightroom-options

Digital photographers can tend to take tons of photos. Viewing images in Lightroom can be a tedious and time-consuming task if you are not familiar with the various tools available to you. In this article, I’ll outline some techniques and tools to help improve your post-processing workflow.

Lightroom Grid View - Viewing Images in Lightroom

Viewing many images in Lightroom

The most common way of viewing images in Lightroom is by using the Grid View option. You can also use the Filmstrip option.

In Grid View, your main panel in Lightroom is populated with the thumbnails of photos stored in the folder you have open. To select the folder with images you’d like to view, open the left module panels. To do this, you can press F7 on your keyboard, or click on the triangle to the left of your main panel. Then navigate in the Folders tab to the folder you want to open.

Alternatively, you can use the Filmstrip. This shows up below your main panel when you press F6 or click the triangle at the bottom. Using the Filmstrip module, you are limited to viewing the thumbnails at only one size.

In Grid view, you are able to alter the size of the thumbnails. Three ways you can do this are by:

  1. Using the Zoom slider below the main panel and to the right
  2. Using the + and – keys
  3. Holding down the Ctrl key (cmd on Mac) and scrolling your mouse wheel.

Below the main panel, you will also find the option for choosing how Lightroom sorts your images. By default, it uses Capture Time, but you might find it more convenient at times to change this. There are lots of options including File Name, File Type or Label Color.

Lightroom Grid View Options

You can customize the way your Grid View looks.

To do this, go to View in the top menu then click on View Options. Alternatively, you can press Ctrl+J (or cmd+J on a Mac). Here you have a lot of control over how the information about your photos is displayed. It may seem overwhelming if you are new to viewing images in Lightroom, but keep in mind these options. They will be good to visit again later when you are more familiar with the software.

Selecting and viewing more than one image in Lightroom

There are various options for ways to view images in Lightroom when you want to compare images. To select the photos you want to compare, click on one, and then, while holding down the Ctrl (Cmd on Mac) key, click on the other photos you want to select.

When you have selected more than two photos, you can press the “N” key. This will bring you into Survey View, where you will only see the photos you have selected. I use this feature often when I am initially culling my photos. Being able to view a limited number of images helps compare them and then select the best one.

Compare viewing images in Lightroom

If you select only two images, you can use the “C” key to bring you into Compare View. This can help you see the differences between two very similar photos. You can view the images side-by-side, full size, and you can zoom in. When you are zoomed, you can use the hand tool to drag around and view different parts of the photos. Both images will move together when you do this. You are also able to change the Candidate image using the arrow keys at the bottom right.

Viewing images with Loupe View

Viewing images in Lightroom using Loupe View allows you to see them much larger. Loupe View gets its name from the magnifying loupe used to view slides and negatives on an old fashioned lightbox. To switch to Loupe View from Grid View, use the “E” key or the spacebar.

Old Fashion Loupe and Lightbox

When you are in this mode, you can view other images in Lightroom by using:

  • The arrow keys
  • The scroll wheel on your mouse (when you are not zoomed in)
  • Or the film strip panel

You can zoom in on an image using the slider under the main panel. Or you can hold down Ctrl (Cmd on a Mac) and use the scroll wheel on your mouse. Once you are zoomed in, you can use the hand tool to move the image around.

You can also choose to show a Grid overlay on your images in Loupe View. This option is at the bottom right. If you cannot see one of these options, click on the triangle to the lower right to bring up the panel to display the available tools.

Viewing images in Lightroom Develop Module

The Lightroom Develop Module is where you make adjustments to the way your photographs look. In this module, it’s’ good to be familiar with some of the ways you can view your photos.

One of the functions I use the most in the Develop Module is the “\” key. Hitting this backslash key will show you what your original image looked like prior to you making any adjustments. This helps you see what you are doing and guide you towards further steps you might take.

Another similar option is to use the “Y” key. When you’ve made some changes in the Develop Module, hitting the “Y” key will bring up your original image alongside one with the changes you have made. Once again, when you are zoomed in, you can move the images around in tandem using the hand tool.

Before and After Viewing images in Lightroom

Viewing image information

One more handy tip is to use the “I” key to bring up a display of image information about the photo you are currently viewing. This will show you EXIF data from the image.

You can control and change what you see. To do this, go to View in the top menu and then click on View Options. In either the Loupe View or Develop option panel, check the boxed for the information you’d like displayed.

options for viewing images in Lightroom

Conclusion

I hope you’ve picked up at least two or three useful tips from this article. I’m sure there are many more ways of viewing images in Lightroom. Please share some of the techniques you employ in your regular Lightroom workflow.

The post Viewing Images in Lightroom – What Are The Options? appeared first on Digital Photography School. It was authored by Kevin Landwer-Johan.


Digital Photography School

 
Comments Off on Viewing Images in Lightroom – What Are The Options?

Posted in Photography


Laowa 65mm f2.8 2X Ultra-Macro APO Lens Review

26 Feb

The post Laowa 65mm f2.8 2X Ultra-Macro APO Lens Review appeared first on Digital Photography School. It was authored by Matt Murray.

Laowa-65mm-f2.8-2X-Ultra-Macro-APO-lens-review

When I was offered the chance to review the Laowa 65mm f2.8 2X Ultra-Macro APO lens, I must admit I wondered what all the fuss was about. From a quick look, it appeared roughly the same size and price as the Fujifilm 60mm f2.4 R macro lens – but it is a manual focus lens.

Then I realized I had misread the specs – this is not a 1:2 macro like the Fujifilm XF 60mm f2.4 R lens, where objects appear half their size on the sensor. Nor is it a true 1:1 macro like the Fujifilm XF 80mm f2.8 R LM OIS WR lens, where objects appear their actual size. The Laowa Ultra Macro lens boasts 2:1 magnification. That’s right! It can take photos where objects appear up to twice their actual size.

Laowa-65mm-f2.8-2X-Ultra-Macro-APO-lens-review

The Laowa 65mm f/2.8 2x Ultra Macro APO lens mounted on my Fujifilm X-T2.

In this gear review, I put the Laowa 65mm f2.8 2x Ultra Macro APO lens through its paces on my Fujifilm X-T2. If you’re not a Fujifilm shooter, keep reading anyway, Laowa has released lenses for many full-frame and APS-C mount systems.

Background

Venus Optics has made Laowa lenses in China since 2013. Most of the lenses they’ve created so far have been for full-frame cameras. Their line-up boasts an impressive range of lenses, including fisheye (fancy a 4mm f2.8 lens?), probe, ultra-wide, and ultra-macro lenses for a variety of camera systems.

Laowa-65mm-f2.8-2X-Ultra-Macro-APO-lens-review

These flowers are tiny, measuring less than 10mm (3/8 inch) across. I found the bokeh of the lens to be very pleasant. Fujifilm X-T2 with Laowa 65mm f2.8 2X Ultra-Macro APO lens.


The Laowa 65mm f2.8 2X macro APO is the first macro lens that Venus Optics has launched for non full-frame cameras. While this review is for the Fujifilm X-Series mount lens, it’s also available for two other mirrorless camera systems: the Sony E-mount and Canon M-mount.

Laowa specs

Let’s take a look at the specs for this lens, the Laowa 65mm f2.8 2x Ultra Macro APO.

  • The focal length is 65mm, which is approximately 97.5mm in a full-frame equivalent when you take into account the 1.5 crop factor of APS-C cameras.
Image: A light blue soldier crab on the beach. It’s a wonder I managed to get a shot like this, thes...

A light blue soldier crab on the beach. It’s a wonder I managed to get a shot like this, these little guys move so fast, and they don’t like people! I had to prefocus before the crab came into view. Adults measure 25mm (1 inch). Fujifilm X-T2 with Laowa 65mm f2.8 2X Ultra-Macro APO lens.

  • 2x Ultra Macro refers to the magnification of this lens – it’s possible to take images where objects appear twice as large on the sensor as real life.
  • Typically, a macro lens is considered a true macro when it achieves 1:1 magnification. So with double that magnification, it seems the Laowa offering is worthy of the title “ultra macro.”
  • APO stands for apochromatic optical design. The lens has 14 elements in 10 groups, including three extra-low dispersion glasses to minimize chromatic aberrations across the frame.
  • Apertures range from f/2.8 to f/22, which you control via the aperture ring on the lens. It focusses from 17cm (2X life-size) to infinity.
Image: Close up of the peeling paintwork on a boat. Even when shooting at f/16, you won’t be able to...

Close up of the peeling paintwork on a boat. Even when shooting at f/16, you won’t be able to achieve a wide depth of field at such a short working distance with macro lenses. Fujifilm X-T2 with Laowa 65mm f2.8 2X Ultra-Macro APO lens.


The Laowa is slightly bigger in size and weight to Fujifilm’s 60mm macro lens, but is still very compact. It measures 57mm in diameter, 100 mm long, and weighs 335g. It takes 52mm filters.

What’s in the box

The lens comes attractively packaged in a sturdy box. Rather oddly, the lens seems to have two different names. On the website, it’s the Laowa 65mm f2.8 2X Ultra-Macro APO lens. On the packaging and on the lens itself, it’s the CF 65mm F2.8 CA-Dreamer Macro 2X.

Laowa-65mm-f2.8-2X-Ultra-Macro-APO-lens-review

The lens is attractively packaged and is all metal, apart from the plastic lens cap.

Removing the sleeve from the box, there’s an illustration of the lens on the lid. Inside the box, there’s plenty of foam to protect the lens, which comes wrapped up in a plastic bag with a drawstring.

Build quality

The build quality of the lens – especially at this price point – is excellent. Unlike many other lenses at this price point that are plastic, this lens is an all-metal construction. Even the lens hood is metal, with only the lens cap being plastic.

Using the lens

The Laowa 65mm f2.8 2X macro APO is a manual focus lens – there’s no communication between the lens and the camera body. You achieve focus by rotating the lens until the subject comes into focus.

Given that the lens has quite a wide range of magnification (from infinity to 2x life-size), sometimes it feels like you are twisting the barrel quite a lot to get your subject in focus at different distances.

Laowa-65mm-f2.8-2X-Ultra-Macro-APO-lens-review

Select your aperture on the lens and twist the barrel to achieve focus.

If you’re new to manual lenses, don’t be put off. A lot of macro photography work is done using manual focus, anyway.

At first, I did find it difficult to determine exactly what was in focus and what wasn’t, but this is more due to my eyesight more than anything else. As soon as I turned on focus peaking on my X-T2, things became much easier. I did find that at very close distances, focus peaking didn’t seem to work at all.

When using the lens, remember to check the barrel to see which aperture you’re using. As there’s no communication between the lens and the camera body, this won’t show up in your viewfinder display.

You may also want to keep notes on which apertures were used for your images, as these won’t record in the metadata either.

The lens has a nice click as you change aperture across the range. My only issue is that the settings for f/16 and f/22 do look a little alike at first glance due to the design of the indicators.

Depth of field at even the narrowest aperture of f/22 is very shallow when shooting up close. You may want to consider focus stacking to get a sharp image across the frame.

There are some stunning sample images on Laowa’s website, but I’d guess they achieved them with both focus stacking and possibly even extension tubes.

Image: Boats on the beach. I’m really happy with the sharpness, colors, and contrast of the images t...

Boats on the beach. I’m really happy with the sharpness, colors, and contrast of the images taken with this lens. Fujifilm X-T2 with Laowa 65mm f2.8 2X Ultra-Macro APO lens.

Image quality

I’m really impressed with the image quality of photos taken with this lens. As well as being sharp, they display good color and contrast.

I took the lens down to my local beach and took a lot of images of boats, items on the beach, as well as very fast-moving soldier crabs. I took the images of the boats handheld but shot the close-up images using a tripod and remote release. These two items are essential when working at such close distances, where shutter speeds may be slower than 1/60 second, and where any tiny movement may blur the shot or change focus.

Laowa-65mm-f2.8-2X-Ultra-Macro-APO-lens-review

Boat close-up shot. Fujifilm X-T2 with Laowa 65mm f2.8 2X Ultra-Macro APO lens.

Laowa-65mm-f2.8-2X-Ultra-Macro-APO-lens-review

Rope detail. For this second shot, I moved my tripod to the minimum focus distance to get this shot. Fujifilm X-T2 with Laowa 65mm f2.8 2X Ultra-Macro APO lens.

Value for money

The lens sells for around $ 399 USD. This is very good value considering the image quality, and build quality, and the fact that you’re unable to achieve this magnification with any other lens available at present.

Conclusion

The Laowa 65mm f2.8 2X Ultra-Macro APO lens boasts some impressive specifications. The most impressive, of course, is its ability to produce images of objects that are up to twice their actual size.

Image quality is very good, I’m happy with the results the lens gave me on my Fujifilm X-T2. Photos were sharp and displayed good color and contrast.

The lens is light and compact, has an excellent build quality, and is competitively priced.

Although I’m not a specialist macro photographer, I really enjoyed using the lens. If you enjoy shooting macro images, I’d recommend giving it a go. It’s certainly a great lens for flora and fauna enthusiasts, keen to get up close to the action.

Image: I took the lens down to my local beach to see what I could photograph up close. Pine cone on...

I took the lens down to my local beach to see what I could photograph up close. Pine cone on the beach. I was impressed with the results from this lens. Fujifilm X-T2 with Laowa 65mm f2.8 2X Ultra-Macro APO lens.

You may also like:

  • Review: Laowa 17mm f1.8 Lens with Micro-Four-Thirds Mount
  • Review of the Venus Laowa 15mm F/4 Wide Angle Lens for Landscape Photographers


The post Laowa 65mm f2.8 2X Ultra-Macro APO Lens Review appeared first on Digital Photography School. It was authored by Matt Murray.


Digital Photography School

 
Comments Off on Laowa 65mm f2.8 2X Ultra-Macro APO Lens Review

Posted in Photography


Learning to See, Read, and Interpret Light for Better Photography

26 Feb

The post Learning to See, Read, and Interpret Light for Better Photography appeared first on Digital Photography School. It was authored by Herb Paynter.

interpret-light-for-better-photography

In the game of photography, lighting conditions occasionally throw your camera a curveball. In the game of baseball, the pitcher and catcher must coordinate and communicate their actions precisely through a series of gestures or signs. By learning to read the signs that a scene tells you about the existing light, you will be able to capture the light exactly the way your eyes perceive it.

Image: The catcher must know exactly what kind of pitch the pitcher is going to throw so he knows ex...

The catcher must know exactly what kind of pitch the pitcher is going to throw so he knows exactly where to position his mitt.

Interpret light for better photography

To learn to see, read, and interpret light, let’s first take a look at some typical lighting conditions that are best captured by certain photographic settings.

Golden lighting

When you take outdoor pictures (especially nature), try to schedule them during the golden hours, usually between 7-9 am and between 5-7 pm. This is when the lighting is at its richest intensity for photography. During morning and afternoon/evening hours, the light is warmer in color and more flattering to all colors of skin.

Image: Even this faded wood fence took on a golden color during “golden hour.” f-4.5, 1/4000, ISO 16...

Even this faded wood fence took on a golden color during “golden hour.” f-4.5, 1/4000, ISO 1600, 35mm.

Conversely, try to avoid taking pictures of people when the Sun is directly overhead as the shadows it creates are very harsh and unflattering to facial features.

Mid-day sunlight

The light from direct sunlight is more intense than your camera’s image sensor can deal with.

Typically, your camera’s metering system caters to the brightest light in the scene. When this happens, the darkest parts of the image lose definition!

interpret-light-for-better-photography

Despite the Sun providing ample light, the use of a fill flash illuminated the shadows caused by the noonday light. f-4.8, 1/500, ISO 200, 82mm.

Fill flash

Believe it or not, it is usually a good idea to use a flash during the brightest hours of the day. Simply interpret light and keep your subjects from displaying too much contrast.

Your flash won’t affect the lightest parts of the photograph, but it will shed some much-needed light in the darkest parts of the image. Unless you take preventative measures (using either a fill flash or a carefully positioned reflective surface), these “shadow” tones will print too dark!

Lighting and people

If you are outside, try to keep the Sun behind you and off to the side. This way, the light will illuminate their faces and create good definition and shading.

But watch out for your own shadow in the picture.

interpret-light-for-better-photography

Outdoor pictures provide only a single light source. Be very careful about that big lights’ position. f-2.2, 1/1900, ISO 25, 29mm.

If you are inside during daylight hours and want to interpret light without a flash, set the camera’s white balance (WB) to Shade and brace yourself for a longer exposure.

If there is not enough available light for a good exposure, set the WB to Daylight and let the camera’s flash take care of the lighting.

Manual flash

If you must take a picture of people outside with the Sun in front of you instead of behind you, remember these two things:

  1. Keep direct sunlight from entering the lens, and
  2. Manually direct your camera to use the flash.

If you set your camera flash to fire “automatically,” it may misread the overall lighting and not fire the flash at all. Unless you are looking for a good silhouette, you won’t be pleased with the result.

The use of a flash inside requires you to pay close attention to distance. Standing too close to your subject (less than four feet) may put too much light on the subject’s face and wash out the skin color.

Alternatively, standing too far away (more than 25 feet), the flash could fail to light the skin tones correctly.

Skin is very picky about the light it likes. Light that is either too strong or too weak just doesn’t look natural.

interpret-light-for-better-photography

Shooting indoors under mixed, existing light is best captured with the camera set to AWB (automatic white balance). This sets the camera to seek the most neutral color in the scene and to record balanced gray light. f.1.8, 1/35, ISO 320, 24mm

Light shaping

Your digital camera measures the brightest light, compares it with the darkest areas, and determines how to interpret the light and expose the picture based on an average of the two readings.

Always keep extremely bright light from entering the camera through the lens. And that includes camera flash lighting reflecting from shiny surfaces, like glass and mirrors.

Beware of specular light of any kind reflecting from any surface, as it influences these meter readings.

Cloudy and overcast lighting

Some of the very best lighting for color happens on cloudy and overcast days. Overcast days allow your camera to capture much more of the natural light and, therefore, provides a much more natural feel to your photos.

Image: Softbox lighting softens harsh shadows even when used as a single light source in close proxi...

Softbox lighting softens harsh shadows even when used as a single light source in close proximity to the subject.

Softboxes

Professional photographers in the controlled setting of a photo studio use special lighting enclosures called “soft boxes” to limit the contrast created by their bright studio lights.

Direct lighting from studio flash units (called strobe lights) can be so strong and brilliant that it creates very harsh shadows.

To avoid these shadows, these lights are either enclosed in softbox tents or bounced off special photographic umbrellas to disperse the intense light.

Made from material similar to an umbrella, these enclosures are translucent and absolutely neutral white in color.

Nature’s softbox

An overcast day serves the same purpose outdoors as the tents and diffusers used in studios. The clouds soften and diffuse the direct Sun’s harsh light.

On an overcast day, the light is so evenly diffused that you can position your subject in almost any direction.

Since the clouds tend to make the scene color slightly bluish, your camera’s Overcast Mode setting interprets light with a slightly warm tone that neutralizes the bluish cast.

Image: Cloud cover softens the harsh lighting of direct sunlight and allows the full tonality and sa...

Cloud cover softens the harsh lighting of direct sunlight and allows the full tonality and saturation to show without either plugged shadows or blown-out highlights. f-4.5, 1/250, ISO 200, 105mm.

The three major outdoor lighting modes are:

  1. Daylight,
  2. Shade, and
  3. Overcast (or Cloudy).

Daylight WB allows the natural coloring of the existing light to expose the shot.

Shade provides a slightly yellow cast to the scene.

Overcast WB applies an even more intense yellow cast.

All three WB settings attempt to record whites, grays, and blacks in the scene as completely neutral in color.

If you want to capture the natural lighting mood of any daylight color temperature, leave the WB setting on Daylight.

Low-key vs. high-key lighting

Photographs generally get divided into three groups: full range, high key, and low key.

Full range photos are the most common since they display a full range of tones from dark to light.

High-key photos contain more light tones than dark tones, while low-key photographs display a near absence of light tones.

Image: High-key images contain more highlights than mid-tones and shadows, while low-key images cont...

High-key images contain more highlights than mid-tones and shadows, while low-key images contain more shadow tones than mid-tones and highlights. The most important challenge with either type of image is to maintain the distinction of detail in each.


Generally speaking, to properly interpret the light and record low-key pictures, set the camera’s Exposure Value (or EV) compensation to a minus setting.

Alternatively, to compensate for the lighting of high-key pictures, set this EV compensation to a plus setting. These adjustments will override the camera meter’s intent to expose all subjects as middle tones.

With shooting either high or low-key lighting, great care must be taken to preserve the minor presence of highlight tones in low-key scenes and the minimal shadow detail in high-key situations.

But as a general rule, the absolute extremes of pure black and pure white should be avoided unless the drama of the scene requires that level of contrast.

The post Learning to See, Read, and Interpret Light for Better Photography appeared first on Digital Photography School. It was authored by Herb Paynter.


Digital Photography School

 
Comments Off on Learning to See, Read, and Interpret Light for Better Photography

Posted in Photography


Laowa and Yongnuo to Support Micro Four Thirds Standard

25 Feb

The post Laowa and Yongnuo to Support Micro Four Thirds Standard appeared first on Digital Photography School. It was authored by Jaymes Dempsey.

laowa-yongnuo-micro-four-thirds-standard

The Micro Four Thirds standard will see official support from three additional companies.

Last Thursday, Panasonic and Olympus declared that several manufacturers would be joining them in the production of Micro Four Thirds equipment, including Yongnuo and Venus Optics.

You may be familiar with Yongnuo already; in addition to products such as their popular budget flashes (e.g., the YN560 IV) Yongnuo is working on a mirrorless Micro Four Thirds camera, one that sports Android software and features a Canon EF compatible lens mount.

Venus Optics is another company that already produces Micro Four Thirds products, though under the brand name Laowa. You can grab several Laowa MFT lenses, including a budget 17mm f/1.8 prime.

But the announcement from Olympus and Panasonic suggests that we should see a number of additional Micro Four Thirds products coming from both Yongnuo and Venus Optics, potentially bolstering both the MFT lens and camera lineup.

The Micro Four Thirds standard was first unveiled in 2008 when Olympus and Panasonic jointly declared their interest in working “toward commercial production of significantly lighter and more compact interchangeable lens type digital camera systems.”

Since then, we’ve seen the steady production of Micro Four Thirds bodies and lenses from Olympus and Panasonic, including the well-regarded Olympus OM-D series, as well as the Panasonic Lumix DMC-G line. Various other manufacturers have also engaged in MFT production, though in recent years the Micro Four Thirds system has been overshadowed by the rise of ultra-portable smartphone cameras, as well as compact APS-C and full-frame mirrorless bodies.

That said, smartphone manufacturers still have a lot of work to do if they’re ever going to match the quality of an MFT camera. And while mirrorless producers do offer MFT-sized cameras, their lenses struggle to compete with the small sizes and weights of MFT offerings. That’s where the Micro Four Thirds system shines; it includes high-quality camera-lens setups that are more compact than anything offered by the competition.

And given this announcement from Olympus and Panasonic, it’s clear that the Micro Four Thirds standard is alive and well, at least for now.

How do you feel about the expansion of the Micro Four Thirds lineup? Would you consider using a Yongnuo or Laowa camera/lens? Share your thoughts in the comments!

The post Laowa and Yongnuo to Support Micro Four Thirds Standard appeared first on Digital Photography School. It was authored by Jaymes Dempsey.


Digital Photography School

 
Comments Off on Laowa and Yongnuo to Support Micro Four Thirds Standard

Posted in Photography


Top Ten Tools for Quality Commercial Beverage Photography

24 Feb

The post Top Ten Tools for Quality Commercial Beverage Photography appeared first on Digital Photography School. It was authored by Darina Kopcok.

beverage-photography

Beverage photography is a challenging and exciting niche in photography, often shot by photographers that specialize in food photography. The reflective nature of glassware makes it difficult to shoot. Moreover, photographing cocktails to look cold and icy, means having a few tricks up your sleeve.

Having the right tools in your toolbox can go a long way in helping you get the look that you want. Items like a cocktail shaker, stir stick, and brushes are some basic items that you need. Read on for suggestions on the items that commercial food shooters have in their beverage photography arsenal.

The top ten tools for commercial beverage photography

1. Razor blades

Commercial beverage photography involves shooting a lot of liquor bottles. This means you have to take off the back label. When you light bottles, you light them from behind. The back label will cast a big black shadow that will ruin the image. To remove the labels you need a good razor blade.

Gently scrape the label off using the razor blade in a downward motion to remove it. If this doesn’t work, you’ll need to soak the label by lying the bottle in a pan of warm water, shallow enough to not get the front label wet. The label should come off a lot more easily after five or ten minutes of soaking.

Keep a couple of razor blades in your kit and keep them clean.

beverage photography

2. Goof off

Goof Off is a solvent that is able to dissolve tough adhesives quickly.

Once you have removed your label, most likely there will be some glue left behind on the bottle. You need to get every last trace of it off and make sure the bottle is as pristine as possible. Any marks will show on the image and can be a nightmare to retouch.

The heavy-duty remover in the spray bottle should do the trick. Good Off is safe for a variety of surfaces and is an important item in your beverage photography kit.

3. Glassware

The single most important item you can have in your beverage photography toolkit is good quality glassware. If you’re going to be doing a lot of beverage photography, this is a worthy area to invest in.

The quality of glassware easily becomes apparent when it’s shot, particularly with stemmed glassware. If you gently rotate the glass, you’ll find that the cheap stuff will not sit perfectly even. This will show in the way the liquid sits in the glass.

Remember that in beverage photography, your cocktail or drink is the “hero,” the focus of your shot, so it has to look heroic.

Get a variety of good glasses for different types of drinks. As long as you don’t break them, they will last you many, many years.

beverage photography

4. Fake ice cubes and shards

Another essential item for commercial beverage photography is fake ice cubes and shards. Real ice looks more organic and works well for editorial photography. However, in high-level commercial photography, where consistency is often required, fake ice is necessary.

As with glassware, any old plastic ice cubes won’t do. Fake ice used in high-end commercial photography needs to be high quality and is very expensive.

beverage photography-fake ice

The most popular supplier of high-quality, fake ice cubes and shards in the U.S. is Trengrove Studios in New York. But regardless of where you live, fake ice can also be bought online by various suppliers.

Be sure to get acrylic or plexiglass fake ice and stay away from plastic. Cheap fake ice can be useful as filler ice, perhaps blurred out in the background or in another glass that isn’t the main subject.

Fake ice and ice shards can cost $ 60 to $ 300 apiece, so start with one or two cubes and slowly add to your collection over time.

5. Ice powder and crystals

Ice powder and crystals are most commonly used on the outside of beer bottles and glasses to give a cool and frosty look.

They are used less for cocktails but are great to make slushy drinks like margaritas. Real ice slush is a nightmare to work with because it melts so fast, but crystal ice and powder allows you to shoot all day.

6. Glycerine

Glycerine is an inexpensive item that you can find in most drug stores in the beauty section. It is used extensively in food and beverage photography. Mixed with water, you can spray it on produce items to create a misted look with evaporating.

Similarly, in beverage photography, it’s used to add condensation to a glass that stays put.

beverage photography

7. Atomizers

Buy a few atomizer bottles in different sizes. This will be for your glycerine and water mixtures.

Different bottles will offer a different amount of water droplets, so it’s good to have a variety on hand to choose from, depending on what kind of drink you’re shooting.

You can often buy these at the drug store as well. For example, you can buy empty atomizers meant for travel use. You can also choose from a wide variety on Amazon.

beverage photography-atomizers

8. Cotton gloves

You can purchase cotton gloves at the drug store and they should be worn whenever you are handling any glassware that will appear in the shot. The smallest fingerprint will show up and it will be impossible to retouch well in Photoshop.

Clean the glass with a good glass cleaner and then handle it with gloves

9. Tweezers

Tweezers are an indispensable item in beverage photography. You can use them for moving very small pieces of garnish like herbs or small ice shards.

When you shoot beverage photography, every small detail is very important, so having tweezers on hand can help you make small adjustments. If you can find some with a long handle, that would be extra helpful.

beverage photography-tweezers

10. Canned air

Canned air or air duster is an item that can be found in hardware stores and may seem like a strange item to have in your beverage photography toolkit. It’s used to blow any dust off your surfaces and set.

Remember, with commercial beverage photography, a pristine, polished image is super important so you don’t want any dust or blemishes on your subject or set. Of course, you can retouch these out to a certain extent, by why spend the time if you don’t need to. Canned air will help you with that.

Conclusion

Commercial beverage photography can be a very challenging genre to shoot. However, having the right tools on hand can make your job much easier and go a long way in helping you get that hero shot.

These are my top ten suggestions for your toolkit, but there are other items that can be useful. Chime in in the comments below if you have any suggestions.


The post Top Ten Tools for Quality Commercial Beverage Photography appeared first on Digital Photography School. It was authored by Darina Kopcok.


Digital Photography School

 
Comments Off on Top Ten Tools for Quality Commercial Beverage Photography

Posted in Photography


Luminar vs Lightroom: Three Reasons Luminar is Better (and Two Reasons It’s Not)

24 Feb

The post Luminar vs Lightroom: Three Reasons Luminar is Better (and Two Reasons It’s Not) appeared first on Digital Photography School. It was authored by Jaymes Dempsey.

luminar-vs-lightroom

Are you struggling to decide whether you should be working in Luminar vs Lightroom? Do you want to know how these two post-processing powerhouses match up?

You’ve come to the right place.

Luminar vs Lightroom

Because this article will give you three ways Luminar excels over Lightroom, followed by two areas where Lightroom dominates.

And it’ll help you decide which option is best for your needs.

Let’s dive right in, starting with the biggest reason to choose Luminar:

1. Luminar offers one-click features for quick edits

When dealing with the question of Luminar vs Lightroom, I always recommend you take a look at the biggest feature Luminar offers:

One-click editing.

You see, Luminar offers a modern approach to editing, where you tap a few buttons and the software does most of the editing for you. This is ideal for photographers who don’t feel comfortable doing advanced edits in a program like Lightroom, or who simply don’t have time to carefully edit every photo.

These one-click options include the Orton Effect (which gives your photos a soft glow), to the Sunrays tool (which adds surprisingly realistic sun rays to your photos), to the Fog tool (which adds, well, fog).

Luminar vs Lightroom: Three Reasons Luminar is Better (and Two Reasons It's Not)

Even more impressive, some of Luminar’s best editing features are powered by artificial intelligence.

For instance, Luminar’s AI Enhance tool offers an AI Accent slider that often looks quite good; it makes your photo pop with some carefully applied color and tonal adjustments, among others.

And the Luminar AI Sky Replacement is nothing short of amazing. With a couple of clicks, you can take a boring sky and turn it into something eye-catching (an edit that could previously only be pulled off by a Photoshop expert).

Luminar vs Lightroom AI sky replacement tool

So if quick editing is your thing, then Luminar is a great choice.

2. Luminar offers useful layer-based editing

If you’ve ever used Photoshop, then you’ll know that one of its most powerful features is layer-based edits.

Because with layers, you can stack edits on top of one another, selectively delete edits, mask out certain edits, and more.

And while Lightroom doesn’t offer layer-based editing…

…Luminar does.

In Luminar, you can make adjustments on different layers. Then you can selectively apply these adjustments by masking out different areas of the layer, ensuring that only part of the photo is enhanced by a slider or corrected by a tool.

Luminar vs Lightroom layer editing

You can also use Luminar’s Luminosity Mask tool to selectively adjust areas of your photos based on their underlying brightness.

Now, Lightroom does offer some similar features, though they don’t technically use layers. Features such as the Adjustment Brush.

But these aren’t quite as useful as true layer-based editing, not least because you can only apply some edits via the Adjustment Brush, whereas Luminar allows for almost every slider to be separated into a different layer and masked out (if you so choose).

Personally, I’m a huge fan of layer-based editing, and I love that Skylum included it in their software.

On the other hand, layer-based editing can be a bit complex for newcomers. Fortunately, as discussed in the section above, Luminar also has a handle on basic editing tools.

So you have a choice:

Do more complex, layer-based editing.

Or work with the one-click edits.

(Or both!)

Very cool.

3. The Luminar editing interface is incredibly easy to work with

Here’s the third big area where Luminar dominates Lightroom in the Luminar vs Lightroom question:

The Luminar interface is streamlined, simple, and ridiculously easy to use.

Open up Luminar, and you can immediately tell that it’s great for beginners. There’s a toolbar at the top that lets you access basic options, no matter the module you’re in, and the tool panels on the right are simple and uncluttered.

To do some quick editing, all you have to do is tap the Looks icon at the top, and a handy image carousel pops up:

Luminar vs Lightroom interface

Lightroom, on the other hand, is far less sleek, and a little bit messy.

Take a look at the Lightroom interface:

Luminar vs Lightroom: Three Reasons Luminar is Better (and Two Reasons It's Not)

Sure, it’s workable, but it’s not exactly simple, and it can feel overwhelming at times. There’s a huge number of editing panels, quite a few modules, and many sliders.

So while a professional probably wouldn’t balk at the Lightroom display, a beginner may feel far too out of their depth.

Which is why Luminar is worth a look.

4. Lightroom offers far superior image organization options

Now it’s time to look at areas where Lightroom excels over Luminar, starting with Lightroom’s digital asset management capabilities.

You see, Lightroom is carefully designed to catalog, group, and label your photos. It has ultra-useful collection options and a huge number of ways to filter your images (in case you’re after an elusive image buried somewhere deep in your catalog).

image organization Luminar vs Lightroom

I love Lightroom’s organization features, and I still use my Lightroom catalogs to keep track of all my images, even when I’m doing editing in Luminar.

You see, Luminar’s photo organization options are far less powerful compared to Lightroom’s. Luminar does offer a Library feature, which gives you the option to group your photos into Albums.

But Albums don’t offer much in the way of functionality; for instance, you can’t group one album under another, nor can you sort them into a meaningful hierarchy.

Hence, when it comes to Luminar vs Lightroom in photo organization capabilities, Lightroom is the winner. Hands down.

Lightroom features a set of powerful, complex tools for precise editing

One other gripe that I have with Luminar compared to Lightroom:

It’s just not as precise.

Even though Lightroom has a complex interface, there’s a lot of options within that interface. Whereas Luminar’s editing tools are often a bit too simple.

For instance, look at Lightroom’s Split Toning panel:

Luminar vs Lightroom: Three Reasons Luminar is Better (and Two Reasons It's Not)

You can drag around a point on the color display, and your photo will respond.

Then compare this to Luminar’s Split Toning tool, where you’re stuck dragging sliders in a far less helpful way:

Luminar vs Lightroom luminar split toning

The same is true of Lightroom’s HSL/Color editing panel. You have basic HSL options, which allow you to modify colors according to hue:

Luminar vs Lightroom: Three Reasons Luminar is Better (and Two Reasons It's Not)

But then you also have a more targeted color adjustment tool, where you can click and drag to edit particular colors of your photos.

This is in contrast to Luminar’s Color tool, where you have the basic HSL options, and that’s all:

Luminar vs Lightroom Luminar color tool

Now, for a beginner, this may not be a big deal. You may not be interested in more complex editing tools.

But more experienced editors want this sort of thing, and so you should be aware that you can’t find it in Luminar.

Luminar vs Lightroom: Conclusion

Lightroom and Luminar are both excellent for post-processing, just in different ways.

Luminar offers fantastic one-click editing, along with powerful AI options.

Whereas Lightroom features superior image organizational features and complex editing tools.

So which is better, Luminar vs Lightroom?

In the end, the choice is yours!

The post Luminar vs Lightroom: Three Reasons Luminar is Better (and Two Reasons It’s Not) appeared first on Digital Photography School. It was authored by Jaymes Dempsey.


Digital Photography School

 
Comments Off on Luminar vs Lightroom: Three Reasons Luminar is Better (and Two Reasons It’s Not)

Posted in Photography


Moving to Manual Mode: Which Setting Should You Adjust First?

23 Feb

The post Moving to Manual Mode: Which Setting Should You Adjust First? appeared first on Digital Photography School. It was authored by Kevin Landwer-Johan.

moving-to-manual-mode-photography

Moving to manual mode is often considered too difficult by many beginner photographers. In reality, learning manual mode is not so hard to do. Sure, it’s not for everyone. Many photographers are content to let their camera sort out the exposure settings.

One of the most common questions I get asked by people I am teaching to use manual mode is “which setting should I adjust first?” Unfortunately, there is no set answer to this question. It depends on what you are photographing.

motion and DOF control, moving to manual mode, ballet dancer

© Kevin Landwer-Johan

Moving to manual mode

Shifting your mindset is the most important aspect of moving to manual mode. Are you comfortable using any of the auto or semi-auto exposure modes on your camera? Then you need to make some changes to the way you think.

First, it rarely matters if it takes you a little longer to set your camera. Very few memorable photos are taken as snaps on the spur of the moment. Slow down.

Understand the basics of how you can set the exposure manually, then practice. Once you commit to moving to manual mode, you will find it’s not difficult to manage.

There are only three settings you need to work with to manually control your exposure – shutter speed, aperture, and ISO. These regulate the exposure.

The exposure meter, also known as the light meter, guides your decision making. With many cameras, you can also use the rear monitor to gauge your exposure. With mirrorless cameras, you can typically see the effect of adjustments you make to exposure in the viewfinder.

Woman Photographer at the Shopping Mall, moving to manual mode

© Kevin Landwer-Johan

Balancing these three settings will result in a well-exposed subject. Each setting can also affect your photos in different ways. These are important to understand to be in control of how you want your photos to look.

When you are first moving to manual mode, you may not know where to start in setting your exposure. There are many variations on how to set your camera.

Each photographer may use a different method. I base my choices on what I am photographing.

Here are the answers I give my workshop participants about which setting to change first.

When to adjust your shutter speed first

Photographing a moving subject means you need to consider your shutter speed first. If your shutter speed is too slow, your moving subject may appear blurred.

At times you will want this effect. Often you will want your subject to be sharp, without any motion blur or camera shake fuzziness.

Young woman standing in a busy market. Shot using a slow shutter speed to get the movement of the people blurred. Moving to manual mode

Shutter speed was 1/2 a second. My model stood very still © Kevin Landwer-Johan

You need to consider how fast your subject is moving to know an appropriate shutter speed to use. The faster the movement, the faster the shutter speed you’ll need to use to freeze the action.

Making use of motion blur in your photos also requires you to think about how fast your subject is moving. If you set your shutter speed too slow, you’ll see too much blur, and your subject may not be recognizable.

Alternatively, if your shutter speed is a bit too fast, your subject may only blur a little. This often looks like a mistake has been made.

To capture a person walking and have them look sharp, you’ll need to use a shutter speed of 1/250th of a second or faster. If you want them to blur a little and still be recognizable, you’ll need to set your shutter speed at around 1/10 of a second or a little slower.

Low light may mean your shutter speed needs to be slow. It’s important not to choose a speed that’s so slow you’ll get blurring from camera shake. This happens when you are hand-holding your camera and move it slightly during the exposure. I’ll address this more in the section about ISO setting.

Once you have adjusted your shutter speed, you will then need to set your aperture and ISO. This is what your exposure meter, monitor, or viewfinder can guide you to do.

Image: I used a shutter speed of 1/1250th of a second to ‘freeze’ the flying water © Kev...

I used a shutter speed of 1/1250th of a second to ‘freeze’ the flying water © Kevin Landwer-Johan

When to adjust your aperture setting first

Aperture, among other things, allows you to control the depth of field in your photographs. This is the amount of your photo that is sufficiently sharp. The wider aperture you choose (lower f/stop number), the less you’ll have in focus in your picture.

Choosing to adjust the aperture first is a decision based on how much of your composition you want in focus.

At times, you might want to render as much of your composition in focus as possible. This is a common choice when photographing landscapes.

Setting your aperture to a higher f/stop number (i.e., f/8-f/22) will give you more depth of field. Understanding hyperfocal distance will help you make better choices about getting a deep depth of field.

Isolating your subject by blurring the background requires you use a lower f/stop number (i.e., f/1.2 to f4). Doing so means more light will enter your lens. You’ll need to adjust your shutter speed and/or ISO to make sure your subject is well exposed.

Manipulating the aperture setting first is something I often do when I have a static subject. This is because the shutter speed I use is not so significant as it is when my subject is moving.

Moving to manual mode to photograph a Thai dancer

I used an aperture of f/2 on an 85mm lens to control the depth of field. © Kevin Landwer-Johan

When to adjust your ISO setting first

I treat my ISO setting as the foundation of my exposure. I only alter it when I need to. Unlike shutter speed and aperture settings, ISO has no creative influence. However, it does have an effect on the technical quality of your images.

Changing your ISO first is a good idea when you have moved from one location to another, and the light is significantly different. If you’re outside photographing in the bright sun and move inside, you will most likely need to adjust your ISO. Likewise, if you’re photographing in a dark place, and then want to take photos somewhere that’s well illuminated, you may need to change your ISO.

When you are having to set a slow shutter speed to get a good exposure, you need to consider changing your ISO setting. This is more vital when you are hand-holding your camera, because of the risk of camera shake. When your shutter speed is slow, and your aperture is wide open, increasing your ISO will allow you to also increase your shutter speed.

My rule of thumb is to keep the ISO setting as low as possible. This will ensure the best technical quality. As camera sensors have improved over the years, quality problems at high ISO settings have diminished. I still find keeping my ISO low is a good way of managing my settings.

Monks Lighting Candles at night

I used an ISO setting of 3200 © Kevin Landwer-Johan

Manual mode balancing act

Obtaining a well-exposed subject using manual mode is not very difficult. It’s a matter of balancing your shutter speed, aperture, and ISO settings. The key to managing to do this well is practice.

Moving to manual mode may seem like a big step, especially if you’ve been comfortable letting your camera control the exposure. Once you do make the decision to take control of your camera you will need to stick with it.

Switch back to an auto mode only when you need to. Otherwise, you will never learn how to take charge of your manual exposure settings properly.


The post Moving to Manual Mode: Which Setting Should You Adjust First? appeared first on Digital Photography School. It was authored by Kevin Landwer-Johan.


Digital Photography School

 
Comments Off on Moving to Manual Mode: Which Setting Should You Adjust First?

Posted in Photography