
I love it when you’re shy, originally uploaded by hitkaiser.
Taken in Reading (UK).
This coming Saturday I’m honored to be presenting in Utah at the Professional Outdoor Media Association conference on the topic of mobile applications publishing. If you’re a JMG-Galleries blog subscriber and will be there, do say hello. I look forward to meeting you.
After that if all goes well I’ll be aiming to re-explore Montana’s Glacier National Park during a very small window of time. Any chance I can get to visit Glacier I take. It’s one of the most amazing locations and a source of great inspiration.

I’ll blog as I can, but there is a good chance I’ll be off-line for much of next week.
.gif)
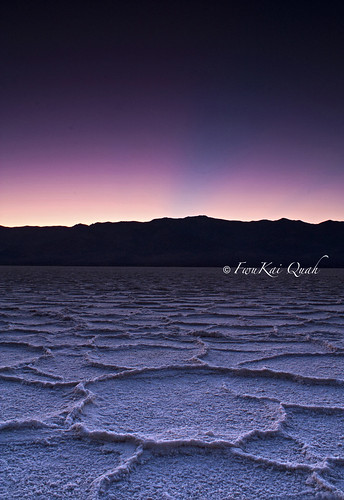
Copyright Jim M. Goldstein, All Rights Reserved
Off to Beautiful Utah and Perhaps Montana
![]()
JMG-Galleries – Jim M. Goldstein Photography

 Petra ist 25, wohnt und studiert in Cottbus und schreibt fleißig an ihrer Masterarbeit, wodurch die Fotografie gerade etwas zurück stecken muss. Wenn sie gerade keine Selfs macht, dann fotografiert sie gern andere liebe Menschen, Stillleben und alles was ihr sonst noch so vor die Linse kommt. Die meisten ihrer Bilder findet man auf Flickr.
Viele haben wohl schon mal ihre Hand oder ihr Gesicht auf einen Kopierer gelegt und geschaut, was als Ergebnis dabei herauskommt. Eine ähnliche Grundidee steckt auch in meinen Scans. Ein weiterer Gedanke war es, mal eine Alternative zur „normalen“ Fotografie auszuprobieren. Begonnen hat es dann mit ein paar Scans zum Spaß. Einfach um zu schauen, was dabei so herauskommt.
Das Prinzip der „Scan-o-grafie“ ist eigentlich ganz einfach: Man stellt den Scanner mit einem Vorschaumodus ein und scannt zunächst einmal seine Hand oder Ähnliches. Im nächsten Schritt arrangiert man zum Beispiel, wie im Bild mit der Blüte, seine Hände zusammen mit einem Objekt. Nur scannt man jetzt nicht mehr im Vorschaumodus.
Ob das Bild etwas geworden ist, sieht man dann allerdings nach dem kompletten Scan. Am Anfang braucht es einige Versuche. Bei meinen Scans war der Raum sehr dunkel, so habe ich auch einen relativ gleichmäßigen und dunklen Hintergrund auf meinen Bildern bekommen.

Es gibt aber auch Beispiele für Scannerbilder (mit weißem Hintergrund, wie die Arbeiten von Andrea Fleischer
Der Raum muss für einen weißen Hintergrund sehr hell sein, am besten noch extra beleuchtet. Man kann auch direkt darüber ein weißes Blatt als Hintergrund halten, allerdings würde ich das Blatt auch zusätzlich beleuchten, damit der Hintergrund so hell wie möglich wird. Der Rest ist dann ein bisschen Photoshop.

Foto: Andrea Fleischer
Zu guter Letzt muss ich aber auch gestehen, dass es wohl ein bisschen vom Scanner und der jeweiligen Auflösung abhängt, wie „sauber“ und klar das Ergebnis letztendlich wird. Ich selbst habe meine Bilder mit dem Canon 8600f gescannt.
Ich nutze es selbst inzwischen als eine Art der Fotografie. Ich mag die „besondere“ Wirkung der Bilder, weil ich es bisher nicht geschafft habe, fotografisch eine ähnliche Darstellung zu erzielen. Die Lichtsetzung spielt dabei sicherlich auch eine entscheidende Rolle. Am liebsten scanne ich meine Hände zusammen mit kleinen Objekten, wie Blüten, Blätter, Federn.
Eine andere Idee war es, Fotos von meiner Familie auf diese Weise neu zu inszenieren und so eine sichtbarere Verbindung zwischen den einzelnen Bildern zu schaffen.

Es gibt aber noch zahlreiche weitere Ideen und die einzige Grenze besteht wohl in der Größe der Auflagefläche des Scanners. Auf Flickr gibt es auch ein paar Gruppen zu diesem Thema: hier und hier.
KWERFELDEIN | Fotografie Magazin
All2Convert – A fast way to convert videos from Youtube– a popular video sharing site.
Any Video Converter – Any Video converter provides support for conversion of almost all video file tyes like AVI, DivX, FLV, RM and more. Users are also provided with transfer options to devices like iPod and PSP.
Apple iPod Video Converter – Apple’s DVD2iPod allows users to convert DVD files to iPod, WMV, AVI and MPEG files.
AVS Video – A quality converter for DVD and VCD file formats.
Cellsea – Cellsea is an online video editor converting video files from desktop or online locations. It provides video conversion support for sites like Break.com, iFilm.com, Youtube.com, Metacafe.com, Google Video to name a few.
Convert Tube – Convert Tube is a quick online video converter for conversion to MP3, MP4, MOV and 3GP.
Easy Video Converter – A powerful utility for converting between video file formats like AVI, Realmedia, WMV/ASF, Quicktime, 3GP, MP4, FLV etc.
Flvix.com – An online free video converter for converting YouTube, Googlevideos into format compatible with PC, Mobile, iPod etc.
Hey Watch! – Hey Watch! Is an online video conversion utility for iPod like devices.
Koyote – Koyote can convert FLV,DIVX and other video formats into an iPod ready video format.
Media Convert – A cool media conversion utility which enables the users with various options for videos.
MediaConverter – A web-based video conversion utility including conversion from sites like YouTube.
SOSTV.de – A Weblog about German Cable and Pay TV, Films and addictive Series.
Movavi – Movavi allows users to convert video files to formats like AVI, Mpeg, iPod, PSP video, 3gp etc.
Reganam – 3GP Converter – A 3GP converter with support for conversion for various video files like MP3, QuickTime, AVI, Real Media and MPEG.
Tubefish – Tubefish video converter is a powerful video conversion service for converting videos to MPEG, AVI, MOV, 3GP and Divx.
Vconvert – Vconvert is an online converter for flv file format and YouTube videos. It converts videos to compatible formats for iPod/iPhone and mobile phone.
VIDEO4IPOD.ORG – A video and movie conversion utility for Apple’s Video iPod.
Video codezone – Simply enter the video URL which needs to be converted and choose the file format like iPod, 3GP, Quicktime, FLV, m4, AVI, mp3.
Vixy – A conversion utility allowing users to convert web-based Flash application to other video formats.
Xconv – Xconv offers free file conversion support for multiple file formats: word, wmv, PowerPoint, real audio, jpeg etc.
You convert it – A multi-purpose conversion utility with conversion support for images, audio, video and units.
Zune Online Audio-Video Converter – An online file converter with support for Zune compatible formats in audio and video.
Enjoy converting your videos online and drop us a line if one of the services listed above i not working anymore. Sometimes the servers are running out of traffic and the services are stopped until the end of the month. The Video converters are free of charge at the time we wrote this article. If a video conversion service changed to charging money for the video conversion please write a note in our comments. We do not remove the Video Converters but we want to mark them as commercial service.
Any suggestions, ideas? Feel free to comment on this article!
Back to Top
Es vergeht kaum ein Freitag, an dem ich nicht TGIF (thank god it’s friday) in großen Buchstaben bei Facebook oder sonstwo poste. Wie wohl die meisten liebe ich das Wochenende. Zeit zum Entspannen. Zeit, sein Ding zu machen.

Doch zu einem Wochenende gehört logischerweise auch der Sonntag. Ich kann gar nicht beschreiben warum, aber ich mag Sonntage nicht. Besonders, wenn ich allein bin, der Sommer, wie seit Wochen auf sich warten lässt und irgendwie so eine stille Tristheit über der Stadt liegt. Mich lähmt diese Stimmung immer etwas.

Kriss Kristofferson hat darüber mal einen wunderbaren Song geschrieben, der dieses Gefühl ziemlich genau beschreibt.
On The Sunday Morning Sidewalk,
Wishing, Lord, That I Was Stoned.
‘Cos There’s Something In A Sunday,
Makes A Body Feel Alone.
And There’s Nothin’ Short Of Dyin’,
Half As Lonesome As The Sound,
On The Sleepin’ City Sidewalks:
Sunday Mornin’ Comin’ Down.
Auch letzten Sonntag saß ich wieder bei mir zu Hause und fragte mich: Was machste denn jetzt? Die Hoffnung, dass es warm werden würde, hatte ich aufgegeben. Warm würde mir ja schon reichen, denn eigentlich könnte man ja im August damit rechnen, dass es heiß werden würde, sodass man entspannt am Rheinstrand liegen könnte, um ein wenig Urlaub zu spielen.

So war ich also schon zufrieden, dass es nicht regnete. Ich guckte bei Facebook vorbei und antwortete auf den Post eines befreundeten Fotografen “Wird mal wieder Zeit für eine Herausforderung” mit “Fotografier’ was anderes”.

Und da dachte ich mir: Genau, fotografier doch mal was anderes. Am Freitag vorher war ich abends im Belgischen Viertel unterwegs. Ein Viertel in Köln, in dem eigentlich immer viel los ist. Ein Viertel, in dem sich das Nachtleben teilweise mehr auf der Straße abspielt als in irgendwelchen Bars oder Clubs.
Nicht umsonst steht der Brüsseler Platz mittlerweile als abendlicher Tipp in Touristenführern. Ich dachte mir, da könnte man doch diesen Kontrast zwischen pulsierendem Stadtleben und betäubendem Sonntagsgefühl am besten erleben.

Ich lag richtig mit meiner Vermutung. Als ich so durch die Straßen schlenderte, sah ich die Reste, die das Partyfolk hier und da hatte rumliegen lassen. Die Besucher in den Cafés schauten ziemlich verkatert aus der Wäsche und irgendwie fing ich an, die Stimmung zu genießen.

Diese Ruhe, die mich sonst so betäubt, gab mir die Zeit, genauer hinzusehen und das eine oder andere Motiv zu entdecken, das ich sonst vielleicht übersehen hätte. Und da ich es immer schon interessant fand, im Häaalichen das Schöne zu entdecken, konzentrierte ich mich auf die “schön versifften” Ecken. Am Ende war ich froh, dass ich mich aufgerafft hatte und aus meiner irgendwie doch negativen Grundstimmung etwas Positives zu ziehen.

Um das Ganze hier abzurunden, schließe ich mit einem weiteren Zitat von Kris Kristofferson:
If You Don’t Want To Join The Devil,
You Gotta Beat Him.
I Ain’t Saying I Beat The Devil,
But I Drank His Beer For Nothing
Und Dann Hab Ich Seine Fotos Geklaut… 😉
KWERFELDEIN | Fotografie Magazin
In this tutorial, we’ll learn the basics of making and using simple repeating patterns in Photoshop. We’re just going to cover the essential steps here to get things started, but once you understand how repeating patterns work and how easy they are to create, you’ll quickly discover on your own that there’s virtually no limit to their creative potential in your designs, whether you’re building a simple background for a scrapbook or web page or using them as part of a more complex effect.
This tutorial will cover the three main parts to working with repeating patterns. First, we’ll design a single tile which will eventually become our repeating pattern. Next, we’ll learn how to save the tile as an actual pattern in Photoshop. Finally, with our new pattern created, we’ll learn how to select the pattern and make it repeat across an entire layer! In the next set of tutorials, we’ll take repeating patterns further by adding colors and gradients, using blend modes to blend multiple patterns together, creating patterns from custom shapes, and more!
I’ll be using Photoshop CS5 here, but the steps apply to any recent version of Photoshop.
Step 1: Create A New Document
Let’s begin by creating a single tile for the pattern. For that, we need a new blank document, so go up to the File menu in the Menu Bar along the top of the screen and choose New:

Go to File > New.
This opens the New Document dialog box. Enter 100 pixels for both the Width and Height. The document’s size will determine the size of the tile, which will affect how often the pattern repeats in the document (since a smaller tile will need more repetitions to fill the same amount of space than a larger tile would). In this case we’ll be creating a 100 px x 100 px tile. You’ll want to experiment with different sizes when creating your own patterns later. I’ll leave my Resolution value set to 72 pixels/inch. Set the Background Contents to Transparent so our new document will have a transparent background:

Enter the width and height of your document and make sure Background Contents is set to Transparent.
Click OK when you’re done to close out of the dialog box. The new document appears on your screen. The checkerboard pattern filling the document is Photoshop’s way of telling us that the background is transparent. Since the document is rather small at only 100 px x 100 px, I’ll zoom in on it by holding down my Ctrl (Win) / Command (Mac) key and pressing the plus sign ( + ) a few times. Here, the document is zoomed in to 500%:
![]()
The new blank document, zoomed in to 500%.
Step 2: Add Guides Through The Center Of The Document
We need to know the exact center of our document, and we can find it using Photoshop’s guides. Go up to the View menu at the top of the screen and choose New Guide:

Go to View > New Guide.
This opens the New Guide dialog box. Select Horizontal for the Orientation, then enter 50% for the Position. Click OK to close out of the dialog box, and you’ll see a horizontal guide appear through the center of the document:

Select Horizontal and enter 50% for the Position.
Go back up to the View menu and once again choose New Guide. This time in the New Guide dialog box, select Vertical for the Orientation and again enter 50% for the Position:

Select Vertical and enter 50% for the Position.

A vertical and horizontal guide runs through the center of the document.
Changing The Guide Color (Optional)
If you’re having trouble seeing the guides because of their light color, you can change their color in Photoshop’s Preferences. On a PC, go up to the Edit menu, choose Preferences, then choose Guides, Grid & Slices. On a Mac, go up to the Photoshop menu, choose Preferences, then choose Guides, Grid & Slices:

Select the Guides, Grid and Slices Preferences.
This opens Photoshop’s Preferences dialog box set to the Guides, Grid & Slices options. The very first option at the top of the list is Guide Color. As I mentioned, it’s set to Cyan by default. Click on the word Cyan and choose a different color from the list. You’ll see a preview of the color in the document window. I’ll change mine to Light Red:

Selecting Light Red as the new color for the guides.
Click OK when you’re done to close out of the Preferences dialog box. The guides in the document window now appear in the new color (note that Photoshop will continue to display guides in this new color until you go back to the Preferences and change the color back to Cyan or choose a different color):

The guides now appear in the new color, making them easier to see.
Step 3: Draw A Shape In The Center Of The Document
You can create very complex patterns in Photoshop, or they can be as simple as, say, a repeating dot or circle. Let’s draw a circle in the center of the document. First, select the Elliptical Marquee Tool from the Tools panel. By default, it’s hiding behind the Rectangular Marquee Tool, so click on the Rectangular Marquee Tool and hold your mouse button down for a second or two until a fly-out menu appears, then select the Elliptical Marquee Tool from the list:

Click and hold on the Rectangular Marquee Tool, then select the Elliptical Marquee Tool.
With the Elliptical Marquee Tool selected, move the crosshair directly over the intersection point of the guides in the center of the document. Hold down Shift+Alt (Win) / Shift+Option (Mac), click in the center of the document, then with your mouse button still held down, drag out a circular selection. Holding the Shift key as you drag will force the shape of the selection into a perfect circle, while the Alt (Win) / Option (Mac) key tells Photoshop to draw the selection outline from the center. When you’re done, your selection outline should look similar to this (don’t worry about the exact size as long as it’s close):

Hold down Shift+Alt (Win) / Shift+Option (Mac) and drag out a circular selection outline from the center.
Step 4: Fill The Selection With Black
Go up to the Edit menu at the top of the screen and choose Fill:

Go to Edit > Fill.
This opens the Fill dialog box, where we can choose a color to fill the selection with. Set the Use option at the top of the dialog box to Black:

Set the Use option to Black.
Click OK to close out of the dialog box. Photoshop fills the circular selection with black. Press Ctrl+D (Win) / Command+D (Mac) to quickly remove the selection outline from around the shape (you could also go up to the Select menu at the top of the screen and choose Deselect, but the keyboard shortcut is faster). Keep in mind that my document is still zoomed in to 500%, which is why the edges of the circle appear blocky:

The selection has been filled with black.
Step 5: Duplicate The Layer
With just this one circle added in the center of the tile, we could save the tile as a pattern, but let’s make it look a bit more interesting before we do that. First, make a copy of the layer by going up to the Layer menu at the top of the screen, choosing New, then choosing Layer via Copy. Or, if you prefer keyboard shortcuts, press Ctrl+J (Win) / Command+J (Mac):

Go to Layer > New > Layer via Copy.
Nothing will happen yet in the document window, but a copy of the layer, which Photoshop names “Layer 1 copy”, appears above the original in the Layers panel:

The Layers panel showing a copy of Layer 1 above the original.
Step 6: Apply The Offset Filter
When designing tiles to use as repeating patterns, there’s one filter you’ll use almost every time, and that’s Offset, which you can get to by going up to the Filter menu at the top of the screen, choosing Other, then choosing Offset:

Go to Filter > Other > Offset.
This opens the Offset filter dialog box. The Offset filter moves, or offsets, the contents of a layer by a specified number of pixels either horizontally, vertically, or both. When creating simple repeating patterns like the one we’re designing here, you’ll want to enter half the width of your document into the Horizontal input box and half the height of your document into the Vertical input box. In our case, we’re working with a 100 px x 100 px document, so set the Horizontal option to 50 pixels and the Vertical option also to 50 pixels. At the bottom of the dialog box, in the Undefined Areas section, make sure Wrap Around is selected:

Set the Horizontal and Vertical options to half the dimensions of the document and make sure Wrap Around is checked.
Click OK to close out of the dialog box. In the document window, we see that the Offset filter has taken the copy of the circle we made in the previous step and split it into four equal parts, placing them in the corners of the document. The circle remaining in the center is the original circle we drew on Layer 1:

The image after running the Offset filter.
Step 7: Define The Tile As A Pattern
With the tile designed, let’s save it as an actual pattern, a process Photoshop refers to as “defining a pattern”. Go up to the Edit menu at the top of the screen and choose Define Pattern:

Go to Edit > Define Pattern.
Photoshop will pop open a dialog box asking you to name the new pattern. It’s a good idea to include the dimensions of the tile in the name of the pattern in case you design several similar tiles at different sizes. In this case, name the tile “Circles 100×100″. Click OK when you’re done to close out of the dialog box. The tile is now saved as a pattern!

Name the pattern “Circles 100×100″.
Step 8: Create A New Document
We’ve designed our tile and defined it as a pattern, which means we can now use it to fill an entire layer! Let’s create a new document to work in. Just as we did back in Step 1, go up to the File menu and choose New. When the New Document dialog box appears, enter 1000 pixels for both the Width and Height. Leave the Resolution set to 72 pixels/inch, and this time, set the Background Contents to White so the background of the new document is filled with solid white. Click OK when you’re done to close out of the dialog box. The new document will appear on your screen:

Create a new 1000 px x 1000 px document with a white background.
Step 9: Add A New Layer
We could simply fill the document’s Background layer with our pattern, but that would seriously limit what we can do with it. As we’ll see in the next tutorial when we look at adding colors and gradients to patterns, a much better way to work is to place the repeating pattern on its own layer. Click on the New Layer icon at the bottom of the Layers panel:

Click on the New Layer icon.
A new blank layer named “Layer 1″ appears above the Background layer:

The new layer appears.
Step 10: Fill The New Layer With The Pattern
With our new layer added, let’s fill it with our pattern! Go up to the Edit menu and choose Fill:

Go to Edit > Fill.
Normally, Photoshop’s Fill command is used to fill a layer or selection with a solid color, just as we did back in Step 4 when we used it to fill the circular selection with black. But we can also use the Fill command to fill something with a pattern, and we do that by first setting the Use option at the top of the dialog box to Pattern:

Change the Use option to Pattern.
With Pattern selected, a second option, Custom Pattern, appears directly below it, which is where we choose the pattern we want to use. Click on the pattern preview thumbnail:

Click directly on the Custom Pattern thumbnail.
This opens the Pattern Picker, which displays small thumbnails of all the patterns we currently have to choose from. The circle pattern we just created will be the last thumbnail in the list. If you have Tool Tips enabled in Photoshop’s Preferences (they’re enabled by default), the name of the pattern will appear when your hover your cursor over the thumbnail. Double-click on it to select it and exit out of the Pattern Picker:

Select the “Circles 100×100″ pattern in the Pattern Picker.
Once you’ve selected the pattern, all that’s left to do is click OK to close out of the Fill dialog box. Photoshop fills the blank layer in the document with the circle pattern, repeating the tile as many times as needed:

Layer 1 is now filled with the repeating circle pattern.
And that’s really all there is to it! Obviously our black and white circle pattern won’t win us many awards, but the important things to take away from this first tutorial are the steps we used to create it, designing a single tile, defining the tile as a pattern, then using Photoshop’s Fill command to fill an entire layer with the pattern.
Any suggestions, ideas? Feel free to comment on this article!
Back to Top

You must be logged in to post a comment.