Earlier this year I had quite the late night adventure driving the Big Sur coastline and photographing the stars on a moonless night. I had some time to enjoy the vastness of the night sky as I was shooting a time-lapse. While laying there in the dark, the combination of hearing crashing waves and watching the stars provided an interesting juxtaposition. Visually I could get lost scanning the stars, but the ocean seemed to keep me anchored so as to not completely escape into the ether. While I’ve photographed the Milky Way atop tall mountains, volcanos and the desert photographing it on the coast has been the most surreal simply because the role the ocean plays breaking the silence.
Copyright Jim M. Goldstein, All Rights Reserved
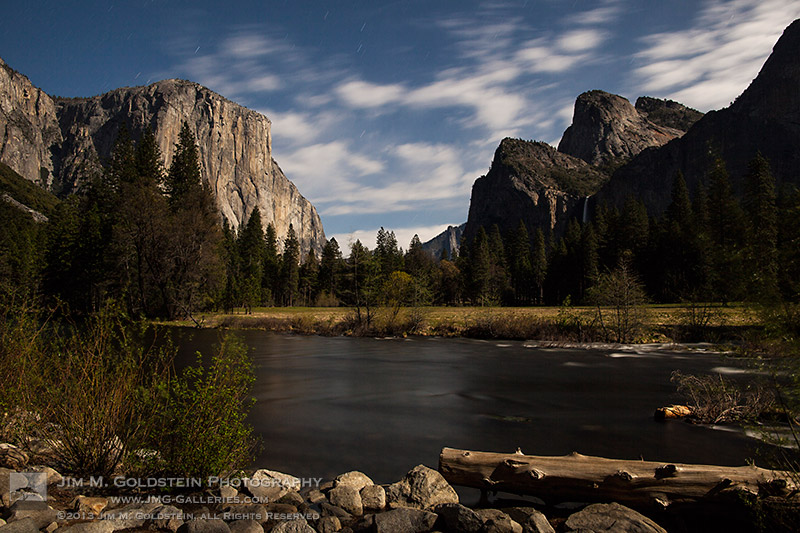
Big Sur Stars
The post Big Sur Stars appeared first on JMG-Galleries – Landscape, Nature & Travel Photography.
Related Stories
Milky Way Over Half Dome, Yosemite National Park
Milky Way Over Half Dome, Yosemite National Park – Enclosure
All That Glitters – Milky Way Above Yosemite Forest
I have become a huge fan of Kickstarter and every so often you find a real gem of a project. Sometime ago I stumbled on to the CTRL+Console app (download link) and loved the idea. If you’re unfamiliar with the project check out CTRL+Console Kickstarter page, but note it is no longer active. In short the app acts as a GUI to a variety of shortcuts in Adobe Premiere Pro, Final Cut Pro, Quicktime and soon for Lightroom.
CTRL+Console – Adobe Premiere Pro Editor
While a lot of Kickstarter projects feel or look like a do it yourself project this one is quite polished. The app was released yesterday on the Apple iTunes store and is now public. It is free to download with the Quicktime console being accessible out of the gate, but you’ll need to purchase/unlock additional editors with in the app. For the app to communicate with the programs on your computer you do need to download a program, but it’s of minimal effort to set up. Overall I think its a great concept and has been extremely well executed. To ground expectations though it did just come out and there are a couple of bugs for Windows users I hear, but they’re being tackled quickly.
One of the nicer touches that was included in the app for those that took part in funding the project was this very nice Thank You page in the app. Much to my surprise I actually found my name listed pretty quickly. A nice touch by Jeff Chow who made the app!
CTRL+Console – Thank You Page, That’s Me
Copyright Jim M. Goldstein, All Rights Reserved
CTRL+Console: One Cool Video & Photo Editing App
The post CTRL+Console: One Cool Video & Photo Editing App appeared first on JMG-Galleries – Landscape, Nature & Travel Photography.
Comments
By: Open Your Creative Eye » CTRL+Console: One Cool Video & Photo Editing App » Page: 1 | Open Your Creative Eye by Open Your Creative Eye » CTRL+Console: One Cool Video & Photo Editing App » Page: 1 | Open Your Creative Eye
Related Stories
CTRL+Console: One Cool Video & Photo Editing App – Enclosure
These days it is pretty easy to lose myself in the stars with so many great images coming from NASA, the International Space Agency and others. It’s tough to resist day dreaming about what’s in the heavens and as a result become jaded with what is before us every day. While amazed by the constant flow of space photos it’s grounding to take a walk and appreciate what makes our oasis in the stars so special. This photo of springtime blossoms is a perfect example of the beauty and colorful universe right under our nose.
“We’re made of star-stuff.” – Carl Sagan
Photo Details:
Canon 5D Mark II, Canon 50mm f/1.0, f/1.0, 1/5000 sec, ISO 50
Copyright Jim M. Goldstein, All Rights Reserved
Life As We Know It
The post Life As We Know It appeared first on JMG-Galleries – Landscape, Nature & Travel Photography.
Related Stories
Primitive Coast IV
Primitive Coast IV – Enclosure
Transformation: Sunset Rainbow over Yosemite National Park
Blue waters of Lake Tahoe, California on a cool winter day
Lake Tahoe, the largest alpine lake in California and North America, is also the second deepest behind Crater Lake in Oregon. The depth of the water is what provides its iconic deep blue color. Adding to the beauty of the lake is its crown of peaks surrounding it. Personally I find Lake Tahoe to be even more beautiful with snow on the ground.
Lake Tahoe and Crater Lake are both amazing locations simply because the blue color of the lake is insanely intense. The bluer the sky the bluer the water. It’s an amazing thing to witness and a fascinating phenomenon tied to such incredibly deep alpine lakes.
Copyright Jim M. Goldstein, All Rights Reserved
Lake Tahoe Blue
The post Lake Tahoe Blue appeared first on JMG-Galleries – Landscape, Nature & Travel Photography.
Comments
Very nice Jim. I hope to make my first visit to Tahoe this year. by Richard Wong
nice colours!!…. the trees made a natural window for the … by Ideas_R_Bulletproof
Summer days are here! With the sun setting so late, there are more phone calls, Instagrams, texts, and all sorts of things that give your phone a good ol’ workout.
What’s that? Your phone is buzzing in your pocket for some relief! After a long, long day, it deserves some rest. Pamper your phone with a swanky charger dock made from your favorite antique camera!
Plugging it in and leaving it on the table is such a lonely way to relax. In this project, you’ll be making a super retro dock from a camera to charge your phone in style. You get to work with your hands and some rockin’ power tools, and by the end of it your phone will be thanking you for its sweet new digs.
Be careful though — your phone is gonna look so awesome in its new dock that you might not want to take it out for the next summer adventure!
Make a Phone Dock Out of a Camera
p.s. We’re hiring for an amazing opening at Photojojo. We’re looking to re-invent what/how/where we publish online, and we’re seeking one amazing somebody to lead the charge as Editorial & Community Lead.
WHY IT’S COOL:
Remember that camera you once loved but broke somewhere along your many escapades? Instead of letting it collect dust or throwing it away (gasp!), this tutorial will help you turn it into a beautiful charger for your phone! It’s like, the coolest way to recycle. Besides, all your friends will be totally jealous.
Fact: phones are better propped up. Friends texting you? Now you don’t have to crane your head to read ‘em – cause your phone is already standing up.
This project might seem kinda scary and complicated, but it’s not! If you can hold something steady for 10 seconds, then you can definitely do this. It’s only a few steps and at the end of it you’ll be an absolute pro at turning anything (that can be drilled) into charger docks. That way, you can make ‘em for all those friends you made jealous.
By the way, this project was inspired by Roberto Altieri and his Etsy shop. His craftsmanship is top notch, so take a look around. Thanks, Roberto!
Ingredients
Old camera that doesn’t work*
Phone charger cable
Power drill with the proper drill bits (varies depending on the size of the opening)
Gorilla glue
Metal file
*We used an old Kodak Instamatic and an iPhone USB Lightning Cable. We recommend a camera that’s made mostly of plastic, because metal parts can’t be drilled into/are difficult to drill into. Make sure the area you’re drilling into is all plastic.
PREP MAKES PERFECT:
The most complicated (and it’s not! Really!) part is to figure out where you wanna drill. We used a plastic camera, and so that was as simple as finding a spot that didn’t have a ton of metal in it. We recommend a camera that’s more plastic-y, that way it’ll be easier on you!
Figure out how you want the camera to sit on your desk when you’re done. Think about where you want the phone to be, and where that cable will come out of the camera! The back of cameras, where the film goes, is the easiest place to drill into because it’s just an empty space. part of your cord will live in here! Also, think about where the cable comes out! We did ours on the side, where the door is.
When it comes to the phone charger cord, you can get an extra cord from Amazon or your local gadget store if you don’t want to use the cord you already have.
STEP ONE: DRILL ONCE
See your phone charger cord? Pick out a drill bit that matches the width of the part that plugs into your phone. If you don’t have a drill bit that exact size, remember that smaller is better than bigger! Be very, very careful (watch those fingers!) and drill the first hole. Make sure you’re drilling completely through, the cord’s gotta go somewhere!
STEP TWO: DRILL TWICE
Now, connector parts are usually ovals, and drill bits are circles. Unless you have some sort of space-age-can-drill-whatever-shape-you-want drill, the workaround is like this: 2 circles next to each other = 1 oval!
Drill a second hole next to (slightly overlapping) the first hole. We’re doing this directly alongside the first hole so that the opening is wide enough for the connector port.
STEP THREE: FILE THOSE EDGES!
Get your metal file and file away at the hole where the cord will come out. Careful! The goal is to make it the shape of your connector, but not too big! Check that your connector bit fits snugly into the opening.
STEP FOUR: KEEP UP THE STELLAR FILING!
This is a continuation of Step Four; file the inside part of the hole you drilled. It can be wider here, doesn’t have to be as snug as the opening. The goal is to get your cable through without snags.
STEP FIVE: GET GLUING!
Push the connector port through the drilled hole. After you’re sure that’s where it wants to be, place a dab of glue and wait for it to dry (depends from glue to glue!).
STEP SIX: MAKING A FASHIONABLE EXIT
Now we are gonna figure out where the cable comes out! When that’s figured out, drill a hole that is the width of your cable. Ours comes out the side of the camera where the door closes, and we recommend this.
STEP SEVEN: CHARGE IT!
Now you have the exit hole, place the cable through and there we go! Close the back of the camera, make sure the cable isn’t being pinched (ow!) and charge your phone to your vintage heart’s content.
TAKE IT FURTHER:
Although we made a phone dock, you can make a dock for just about anything that uses a cord to charge. Tablets, game systems, camera batteries, anything!
Make a dock out of different things! Old radios, televisions, and to be extra ironic, an old telephone!
Related posts:
How to Turn Your Phone Into a DIY Photo Projector for $ 1 Extra photos for bloggers: 1, 2, 3 Slide projectors are…
DIY: Turn Phone Photos into Mural-Sized Prints! Extra photos for bloggers: 1, 2, 3 What’s on every…
How To Make Your Cell Phone Look Like Your Favorite Camera! Extra photos for bloggers: 1, 2, 3 Photographers. We’re a…
Die Landschaftsfotografie setzt sich seit ihrem Beginn mit dem Abbild der Umwelt des Menschen auseinander. Ihr Ziel war und ist es teilweise bis heute, eine ästhetische und eine von menschlicher Hand weitgehend unberührte Landschaft und Natur darzustellen.
Das World Wide Web stellt fest: „Landschaften sind für Hobbyfotografen ebenso wie für Profis regelrechte Objekte der Begierde. Sie sprechen unseren Wunsch nach Romantik und Harmonie an und geben Stimmungen auf besonders eindrucksvolle Weise wieder.“
Unüberschaubare Tipps für die richtige Kamera, die richtige Blendenwahl und die Must-Haves führen zum perfekten Landschaftsbild, aber möglichst ohne menschlichen Fußabdruck.
Also gut – ich habe mich umgesehen.
Ich habe festgestellt: Es ist nicht einfach, ein Stück unberührter Landschaft auszumachen. Ich habe mich gefragt: Wie sieht die Landschaft, die Natur aus, wenn man ihr einen Spiegel vorhält?
Wäre es nicht auch spannend, das von der Kamera gezeigte Bild mit dem Dahinter zu verbinden? Ich habe mir einen Spiegel besorgt und bin losgezogen.
Die ersten Fotos, in der Umgebung von Wien aufgenommen, erstaunten mich selbst. Das Medium Spiegel zeigt nicht nur das Abbild des Dahinter, sondern reflektiert auch eine völlig gegenteilige Lichtsituation.
Durch das Bild im Bild entsteht eine surreale, eine beinahe künstliche Welt. Allein durch die Platzierung eines Spiegels, irgendwo – entlang des Sonntagsspazierweges, auf der Liegewiese oder im Gestrüpp der Donauauen – entsteht eine neue Sicht auf die uns umgebende Natur.
Die Fotografien entstanden von September 2012 bis Mai 2013. Aufgenommen wurden die Bilder in Wien, in Oberösterreich und an der Grenze zu Tschechien. Die Fotografien sind alle mit Hilfe eines realen Spiegels in der Größe von 50×120 cm entstanden und sind keine Fotomontagen. Die fotografische Nachbearbeitung beschränkt sich auf minimale Korrekturen.
Auf Letzteres muss ich hinweisen, weil viele, die die Fotos zum ersten Mal zu sehen bekamen, in der Regel und meist ganz selbstverständlich davon ausgingen, dass es sich angesichts der Bilder um reine Photoshop-Basteleien handelt.
Diese Erfahrung war für mich interessant, aber auch nachvollziehbar. Wir haben uns daran gewöhnt, „hinters Licht“ geführt zu werden. Der Spiegel ermöglicht uns nicht nur die Betrachtung des eigenen Selbst, er macht auch die dem Betrachter beziehungsweise dem Fotografen abgewandte Seite sichtbar.
Das heile Bild der Landschaft wird durch die unmittelbar ersichtliche Rück-Sicht aufgehoben.
Mit meinem Projekt versuche ich, die Dinge ans „Licht“ zu bringen.
Als Psychotherapeutin, Kreativtrainerin und Malerin war es klar, dass es mich irgendwann auch zur Fotografie ziehen würde. Die erste Zeit der digitalen Methodik ließ ich relativ bald zugunsten der analogen Fotografie hinter mir und begann, mit der Holga und Rollfilm zu arbeiten.
Die Fotos sind vorwiegend schwarzweiß (nicht zuletzt wegen der Entwicklung mit Caffenol) und zeigen Landschaften, Bauwerke oder auch Objekte, manchmal Doppel- oder Mehrfachbelichtungen. Die Holga ist immer noch ein Liebling von mir, aber meine Kreativität läuft in Phasen ab. Derzeit fasziniert mich die Sofortbildfotografie.
Eher durch Zufall verliebte ich mich in das Design der Sofortbildkamera Polaroid SX-70, einer faltbaren Spiegelreflexkamera aus den 1970er Jahren. Die musste ich haben.
Zunächst experimentierte ich mit Landschaftsaufnahmen, aber bald (nicht zuletzt auch wegen des vom „The Impossible Project“ neu produzierten monochromen Sofortbildfilms) wendete ich mich mehr und mehr dem Stillleben und, nach anfänglichem Zögern, auch der Gestaltung von Selbstportraits, und der Kombination der beiden Genres, zu.
Wie auch in der Malerei liebe ich es, Traumbilder zu kreieren, auch wenn ich dafür reale Dinge, Blumen oder Körperteile, verwende. Hierbei entstehen Einzelbilder oder auch Bilderserien, die surreale Geschichten erzählen oder Stillleben wie aus einer anderen Zeit.
Stillleben haben etwas Magisches. Sie erklären Dinge, sie bringen den Betrachter zum Nachdenken und wecken den Wunsch, zu interagieren. Oft sind die Elemente der Fotografien eher lose zusammengefügt, einem Assoziationsprozess oder Träumen gleichend.
Ich bevorzuge monochromen Sofortbildfilm, weil mir Form, Komposition und eine gewisse Reduktion wichtig sind. Ganz anders als in digitaler Fotografie besitzen Sofortbilder weniger Bildschärfe und gerade diese Qualität schätze ich für meine Arbeiten ganz besonders.
Die Art des „Sofort“-Bildes hat den Vorteil, dass man sofort ein berührbares Foto-Objekt in den Händen hält. Außerdem ist jedes Foto ein Einzelstück und dank der zeitweiligen Unvorhersagbarkeit des Filmes auch nur sehr schwer reproduzierbar. Das macht es besonders wertvoll und hebt sich für mich von der digitalen Produktion von Fotos ab.
Seit Kurzem experimentiere ich auch mit Sofortbild und Collage sowie der Emulsionslift-Technik. Ich konnte meine Arbeiten schon in mehreren Ausstellungen (in Wien un Italien) zeigen und für September 2013 ist eine weitere Ausstellung meiner Sofortbild-Stillleben geplant.
Meine Sofortbildfotografie ähnelt meinem Zugang zur Malerei, die ebenfalls monochrome und in der Motivwahl reduzierte Einzelstücke hervorbringt. Manchmal sind es sogar die gleichen Motive, wie zum Beispiel ein Vogelschädel, den ich von den Shetland Islands mitgebracht habe.


 Extra photos for bloggers: 1, 2, 3
 Remember that camera you once loved but broke somewhere along your many escapades? Instead of letting it collect dust or throwing it away (gasp!), this tutorial will help you turn it into a beautiful charger for your phone! It’s like, the coolest way to recycle. Besides, all your friends will be totally jealous.
 The most complicated (and it’s not! Really!) part is to figure out where you wanna drill. We used a plastic camera, and so that was as simple as finding a spot that didn’t have a ton of metal in it. We recommend a camera that’s more plastic-y, that way it’ll be easier on you!
  See your phone charger cord? Pick out a drill bit that matches the width of the part that plugs into your phone. If you don’t have a drill bit that exact size, remember that smaller is better than bigger! Be very, very careful (watch those fingers!) and drill the first hole. Make sure you’re drilling completely through, the cord’s gotta go somewhere!
  Now, connector parts are usually ovals, and drill bits are circles. Unless you have some sort of space-age-can-drill-whatever-shape-you-want drill, the workaround is like this: 2 circles next to each other = 1 oval!
  Get your metal file and file away at the hole where the cord will come out. Careful! The goal is to make it the shape of your connector, but not too big! Check that your connector bit fits snugly into the opening.
 This is a continuation of Step Four; file the inside part of the hole you drilled. It can be wider here, doesn’t have to be as snug as the opening. The goal is to get your cable through without snags.
 Push the connector port through the drilled hole. After you’re sure that’s where it wants to be, place a dab of glue and wait for it to dry (depends from glue to glue!).
 Now we are gonna figure out where the cable comes out! When that’s figured out, drill a hole that is the width of your cable. Ours comes out the side of the camera where the door closes, and we recommend this.
 Now you have the exit hole, place the cable through and there we go! Close the back of the camera, make sure the cable isn’t being pinched (ow!) and charge your phone to your vintage heart’s content.


You must be logged in to post a comment.