RSS
 

Posts Tagged ‘Soft’

Soft Proofing in Lightroom: The Essential Guide

03 Feb

The post Soft Proofing in Lightroom: The Essential Guide appeared first on Digital Photography School. It was authored by Charlie Moss.

soft proofing in Lightroom

If you’ve ever printed without first soft proofing in Lightroom, you might have been surprised to find that your print didn’t match the image that you saw on your screen. Your print may have included inaccurate colors or incorrect tones.

All because you didn’t soft proof!

But don’t worry. It’s not a complicated process to soft proof your photos.

And I guarantee:

If you start soft proofing images before printing them, you won’t end up with prints that turn out different from how you expect them to look.

So let’s discover all the key features of soft proofing, and how you can use it to get your prints looking beautiful.

What is soft proofing in Lightroom?

Soft proofing is the process of previewing an image prior to printing – in order to get a better idea of what that image might look like when actually printed. Soft proofing gives you the opportunity to make changes before sending along the digital file to be printed.

The result, after soft proofing in Lightroom, is that your print will match the image you created on your computer.

Taking this extra proofing step is the key to getting top-quality printed images.

Why is soft proofing important?

Without soft proofing, it’s almost impossible to tell what your printed photograph is going to look like.

Why?

Because every printer and printing surface will interact in a different way, meaning that your results will vary wildly from printer to printer and from printing medium to printing medium.

Now, if you consistently order from the same print lab or you have your own printer at home, you may learn to predict the adjustments you need to get your images looking right. But this will only come from experience with particular printer and printing surface combinations.

And as you can imagine, gaining this experience can be expensive, especially when you’re ordering premium prints and products!

Why you need a calibrated display

First things first:

Before you do any soft proofing at all, you need a calibrated display.

A calibrated display is essential if you want your prints to match the photographs you see on your computer monitor.

By calibrating your display, you ensure that the colors are accurate. Most monitors will not have perfect color reproduction out of the box (not even the expensive ones!). Monitors are often too blue or too magenta, too light or too dark.

Also, monitors don’t hold their color calibration for long periods of time – you need to keep calibrating them every three to four weeks.

What is a printer profile?

An ICC printer profile is a file that describes how a printing machine and paper will interact.

A printer has to convert your image file into instructions for how to put ink on the paper, and each printer will do this slightly differently.

Soft Proofing in Lightroom printer profiles

But ICC printer profiles give you a way to predict how the printer will turn your digital file into a physical print.

In fact, a good print lab will offer custom ICC printer profiles for you to download on your own computer. This lets you soft proof your digital photographs before sending them to be printed.

How to load printer profiles into Lightroom

Soft proofing begins with downloading printer profiles.

Once you have downloaded the necessary printer profiles from your favorite print lab’s website, you’ll need to add them to your computer so that software such as Adobe Lightroom and Photoshop can find them.

Fortunately, this is very simple. You just move the files to the correct operating system folder as follows:

  • Mac: Library/ColorSync/Profiles/
  • Windows: Windows\system32\spool\drivers\color

Now the different profiles will be ready for use when you start soft proofing in Lightroom.

How to soft proof in Lightroom

Once a file is ready for printing (i.e., you’ve edited it to your heart’s content), head over to the Lightroom Develop module.

There, in the bottom left-hand corner of the main window, you’ll find an option labeled Soft Proofing. Tick that box.

the Lightroom soft proofing process

Once you’ve activated the soft proofing option, you’ll find that your photograph moves onto a white background and some new options appear in the top right-hand corner of the screen (as indicated above).

If you click the Profile option in the new Soft Proofing panel, you’ll find a list of profiles to choose from. If your new ICC printer profiles haven’t yet appeared on the list, then select Other at the bottom of the dropdown menu.

A window will pop up, and you can select from the different ICC print profiles that are installed on your computer. Each option you pick will appear in Adobe Lightroom for soft proofing.

choosing a profile when soft proofing

Once you’ve selected your profiles and closed the window, pick the profile you want to use and make sure the Simulate Paper & Ink box is checked.

Soft proofing challenges

The challenge with soft proofing is that, as you can see below, the image won’t look the same as the original file once you’ve applied the soft proofing ICC print profile.

In the example below, I’ve applied a profile for a metallic flex paper, and you can see that the image on the right is quite a bit darker than the original image. This means the print will likely be darker than we intended.

To fix this problem, hit the button labeled Create Proof Copy:

Soft Proofing in Lightroom proof preview

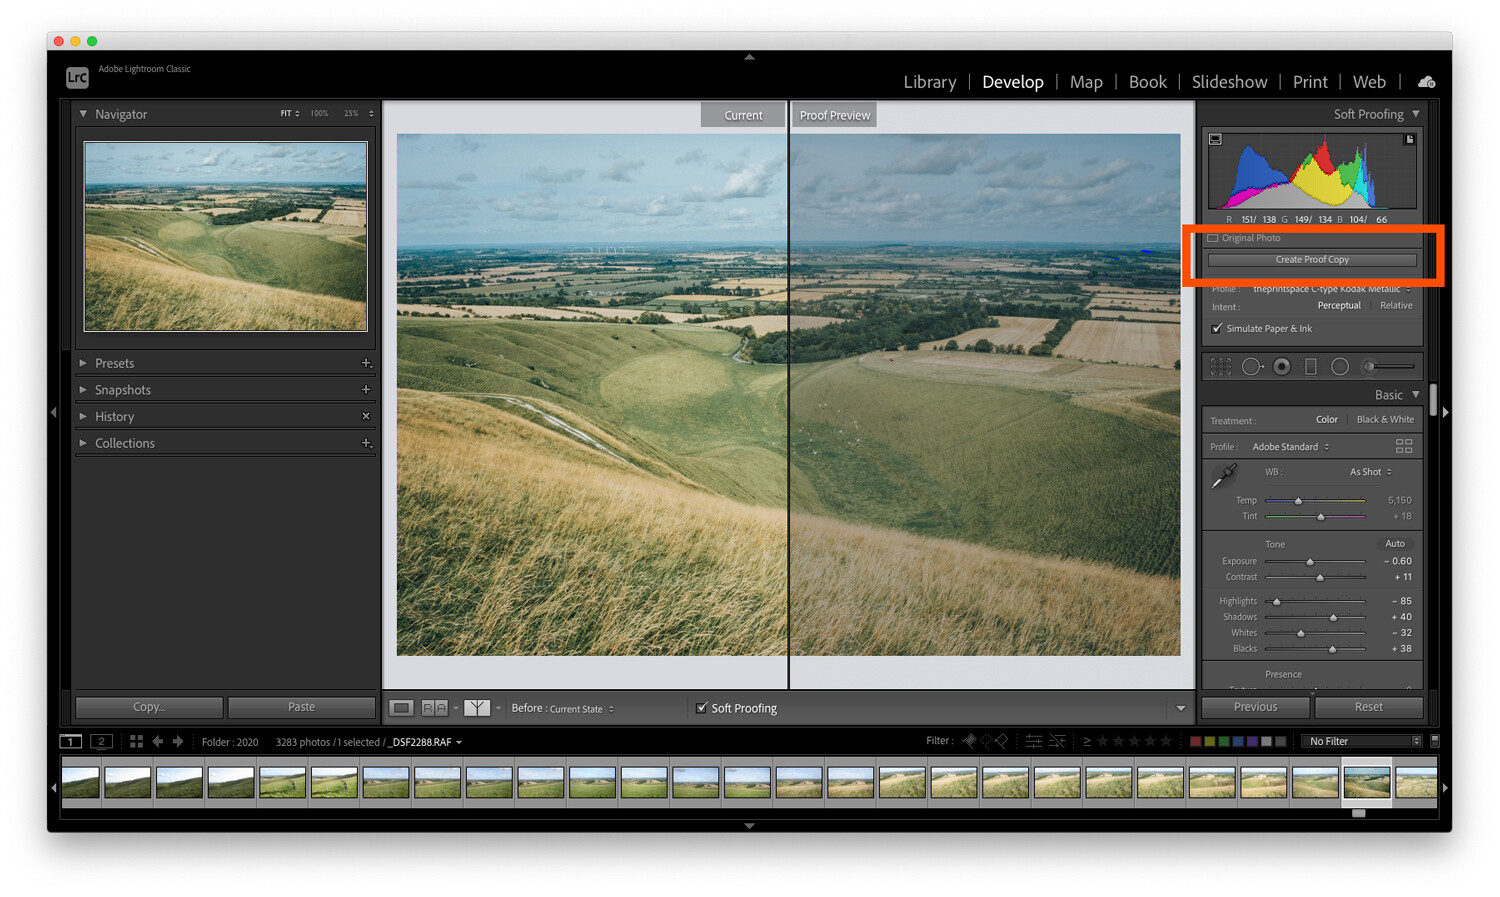
This will create a duplicate image with your print profile embedded so you can make adjustments for printing. By creating a proof copy first, Lightroom will leave your finished image unchanged – even as you make adjustments to your file for printing.

You see, on this new copy of the image, you can make adjustments while still in soft proofing mode. That way, you can ensure that what gets printed is exactly what you intended.

So simply make adjustments to the proof preview using the Lightroom sliders until you like the result!

Here’s one final technical check worth running:

The gamut warning feature.

In the left-hand corner of the histogram is a button that looks like a computer screen:

clipping check when soft proofing

If you toggle this setting on, your image may gain some striking blocks of color.

The colors are simply warning you which areas of the image will not reproduce properly when you go to print. To get the best quality print, you should do your best to reduce (and ideally remove) all of these problem areas.

To get rid of the warnings, try adjusting the saturation and exposure of your image.

Soft proofing in Lightroom: Conclusion

Many people see soft proofing for printing as unnecessary. They may get acceptable results already when printing, and they may have even learned to compensate while editing their photos to get the best prints.

However, if your prints don’t match the images you’re seeing on the screen, it’s because you haven’t done any soft proofing. With enough experience, you’ll learn the adjustments to make for perfect print results. But this is a process, one where you have to learn by making mistakes – so don’t be discouraged if things don’t work out the first time.

When you make your next print, give soft proofing in Lightroom a try. Calibrate your monitor, then soft proof your images with the correct ICC print profiles.

I guarantee it will improve the quality of your print!

Now over to you:

Have you ever tried soft proofing your prints? How did it go? Do you think you’ll start soft proofing before printing, now that you’ve read this article? Share your thoughts in the comments below!

The post Soft Proofing in Lightroom: The Essential Guide appeared first on Digital Photography School. It was authored by Charlie Moss.


Digital Photography School

 
Comments Off on Soft Proofing in Lightroom: The Essential Guide

Posted in Photography


Android smartphones can become soft bricked if you use the wrong photo for a wallpaper

05 Jun

A number of Android smartphones are at risk of suffering a fatal system error if the user sets a specific image as their wallpaper. The discovery was first publicized by popular Twitter account Ice Universe and has since been confirmed by users who tested the warning for themselves. The issue, it turns out, is the image’s color space and Android’s current inability to deal with it.

There’s nothing inherently malicious about the image shared by Ice Universe; it shows an idyllic landscape complete with water, mountains and clouds. The problem, investigators have discovered, is that its color space is incompatible with Android, which currently doesn’t have a method in place to detect this incompatibility and convert the image to color space it supports.

Setting the image as an Android wallpaper will cause the phone to crash; it will reboot, but soon crash again, in most cases doing this too quickly for the user to change their wallpaper to something else. As a result, the user is forced to factory reset the device, losing any images and other data that wasn’t backed up beforehand.

As expected, this issue isn’t limited to only this particular image — any non-sRGB image may potentially cause the same crash. Android Authority recently spoke with a developer who shed light on the problem with a long, technical answer for those who are interested. Put simply: Android can only deal with sRGB images as wallpapers and doesn’t currently know how to handle certain non-sRGB images, triggering an infinite loop of fatal errors that forces the user to factory reset their device.

As noted by multiple Android developers, as well as 9to5Google, not all Android phones are vulnerable to this bug, though many major ones are, including older Google Pixel phones, Samsung smartphones and more. 9to5Google‘s Dylan Roussel reports that the Pixel 4 XL running Android 11 doesn’t not crash from this image while the Pixel 3 XL on Android 10 does.

In Android 11, the system will detect if the wallpaper’s color space isn’t supported and will convert it to something it does support. Though Android 10 doesn’t have this same capability, it seems Google is already working on a fix for this problem, which means older Android phones that don’t update to Android 11 will eventually be protected from the bug, as well.

Until that happens, however, there’s a big problem for Android users: now that the bug has been widely publicized, there will no doubt be some people who deliberately seed these problematic images to mobile wallpaper websites in an effort to crash devices.

Though the bug doesn’t totally brick the device, it does often force a factory reset; many users report being unable to resolve the issue in Safe Mode. This means that many users who aren’t careful may end up losing some of their data.

Ice Universe notes that when the image is uploaded to other social media websites, it is converted and becomes safe to use with Android; only the image uploaded to Twitter retains its problematic color space.

To protect one’s self, Android users can avoid publically offered wallpapers until the Android 11 update arrives, they can limit their wallpapers to their own images or official manufacturer theme stores or there’s always the option of manually checking that an image is compatible before setting it as one’s Android wallpaper.

Articles: Digital Photography Review (dpreview.com)

 
Comments Off on Android smartphones can become soft bricked if you use the wrong photo for a wallpaper

Posted in Uncategorized


The FlyJacket soft exoskeleton turns your body into a drone controller

19 Apr

Researchers with Switzerland’s École Polytechnique Fédérale de Lausanne (EPFL) have developed a soft exoskeleton that enables its wearer to control a drone using their upper body. Called FlyJacket, the exoskeleton is a human-robot interface (HRI) that offers “natural and intuitive control of drones,” according to the university, enabling inexperienced individuals to operate them.

Typical drone controls involve a touchscreen and/or joysticks, which researchers say are “neither natural nor intuitive” for operators. As an alternative, FlyJacket places motion sensors on the operator’s body, requiring them to spread their arms like wings (with supports to prevent fatigue) and move their upper body as if they’re flying to control the drone, while a VR headset provides a first-person perspective from the UAV’s camera.

Explaining the usefulness of the technology, the research paper states:

The development of more intuitive control interfaces could improve flight efficiency, reduce errors, and allow users to shift their attention from the task of control to the evaluation of the information provided by the drone. Human-robot interfaces could be improved by focusing on natural human gestures captured by wearable sensors. Indeed, the use of wearable devices, such as exoskeletons, has been shown to enhance control intuitiveness and immersion.

The team has tested FlyJacket using a Parrot Bebop 2 quadcopter. A smart glove expands the user’s abilities by recognizing certain finger gestures to trigger actions. Touching the thumb to the middle finger, for example, triggers the system to set a point of interest, which could be useful during search and rescue missions. The researchers are working to add additional controls to FlyJacket, including the ability to adjust the drone’s speed, according to IEEE Spectrum.

A paper detailing the technology is available from EPFL here.

Articles: Digital Photography Review (dpreview.com)

 
Comments Off on The FlyJacket soft exoskeleton turns your body into a drone controller

Posted in Uncategorized


How to Use Soft Light Blend Mode in Photoshop to Improve Exposure and Contrast

19 Oct

Do you have an overexposed sunny side and an underexposed shadow on the other side of your image? Or maybe a well-exposed photo that needs more vibrancy? There’s a tool so versatile that can help you fix any of these problems and more: the Soft Light Blend Mode.

What are Layers?

Imagine your photo as a printed one. Then you take a sheet of acetate and draw on it. Then you take another sheet and you put it on top of the others and obscure a part of it; and so on, and so forward. Each acetate sheet is a layer and you can make as many alterations as you want on top of your original this way.

To create layers in Photoshop you need to go to Menu > Layers > New. A pop-up window will appear where you can name your layer, choose the color, the blending mode and the opacity. When you click OK the new layer will appear on the Layers panel window on top of the background, which is the original image.

Layers - How to Use Soft Light Blend Mode to Improve Exposure and Contrast

What is the Blend Mode?

The default setting of a new layer is normal blending mode. This covers the background or the layer underneath. However, Photoshop gives you the option of choosing a different Blend Mode, which changes the way your edit affects the pixels. You can change it in the pop-up window of the new layer.

Blending Modes - How to Use Soft Light Blend Mode to Improve Exposure and Contrast

In the case of the Soft Light blending mode it is similar to using the dodge or burn tool. In other words, every color that is lighter than 50% grey will get even lighter, like it would if you shine a soft spotlight to it. In the same way, every color darker than 50% grey will get even darker. However it will never reach pure black.

So, why not use dodge and burn instead?

First of all, when you work in layers you don’t lose any information. You can always discard the layer and start over because there is no damage to the original image.

With layers, you can change the opacity or transparency of each one, which allows you to control how evident your edit is in the final image. You will find the opacity tool on the Layers panel with a slider that goes from 0 to 100 %.

Note that there is another slider next to it called Fill. There are 8 blending modes in which these two sliders make a difference, however, Soft Light is not part of these “special 8” so the Fill opacity and Standard opacity have the same result when using this Blend Mode.

Opacity - How to Use Soft Light Blend Mode to Improve Exposure and Contrast

Another advantage is that you can change the blending mode of each of the layers. In this article, we are exploring the use of Soft Blend, however, each mode offers different possibilities. One blending mode can have different uses, here are three of them.

3 ways to use Soft Light Blending Mode

1. Add punch to your image

Increase the contrast and saturation to have more vivid colors and give a punch to your image. You can do this by duplicating the background layer: Menu > Layer > Duplicate Layer and changing the blending mode from normal to Soft Light. Finally adjust the opacity until you are happy with the result.

Duplicate Layer - How to Use Soft Light Blend Mode to Improve Exposure and Contrast

BeforeSoftLight - How to Use Soft Light Blend Mode to Improve Exposure and Contrast

AfterSoftLight - How to Use Soft Light Blend Mode to Improve Exposure and Contrast

2. Gradient tool to balance the lighting

If you have an image that is underexposed on one side and overexposed in the other you can easily even it out with a Soft Light blend layer. First go to Menu > Layer > New Layer. Pick the Gradient tool and draw a line from the brightest side to the darkest one. The gradient will look like this:

Gradient How to Use Soft Light Blend Mode to Improve Exposure and Contrast

Then change the layer blending mode to Soft Light and lower the opacity to find the best results.

Before Gradient - How to Use Soft Light Blend Mode to Improve Exposure and Contrast

Before gradient

After Gradient - How to Use Soft Light Blend Mode to Improve Exposure and Contrast

After gradient

3. Dodging and burning with a Soft Light layer

The past workflows altered the entire image, however, if you need to do a more precise job you can also do that using Soft Light. First, add a new layer with Soft Light blending mode like you did in the previous procedure. Only this time instead of the gradient tool, you are going to use the brush tool. When you select it you can choose the size of the brush on the top menu and the color on the bottom.

Brush How to Use Soft Light Blend Mode to Improve Exposure and Contrast

If you paint with black you will darken the image:

Darken - How to Use Soft Light Blend Mode to Improve Exposure and Contrast

Painting with white will lighten certain areas, and with different shades of grey, you can also control tones of your image.

Painting - How to Use Soft Light Blend Mode to Improve Exposure and Contrast

Keep going until you are happy with the contrast and exposure of your image.

Before Painting - How to Use Soft Light Blend Mode to Improve Exposure and Contrast

After Painting - How to Use Soft Light Blend Mode to Improve Exposure and Contrast

Conclusion

Now you know that blending modes have a lot of potential, so keep exploring. How do you use Soft Light Blend Mode? Please share your ideas and tips in the comments below.

The post How to Use Soft Light Blend Mode in Photoshop to Improve Exposure and Contrast by Ana Mireles appeared first on Digital Photography School.


Digital Photography School

 
Comments Off on How to Use Soft Light Blend Mode in Photoshop to Improve Exposure and Contrast

Posted in Photography


Inflatable Interventions: Soft Spikes Bring Roofless Ruins Back to Life

16 Aug

[ By WebUrbanist in Art & Installation & Sound. ]

A series of architectural installations in Scotland contrast sharply with the centuries-old stone architecture and natural landscapes, featuring spiky white inflatables filling in aged cracks and gaps.

Titled XXX, these designs by Steven Messam add movement to Mellerstain’s House and the surrounding gardens — they are the first part of a series of contemporary exhibitions planned for the Borders Sculpture Park on this historic estate. The white inflatables refer abstractly to old marble sculptures that were originally to adorn the grounds.

“Pointed” emerges from an old gatehouse; “Scattered” is spread across the lake, comprised of floating bubbles; and “Towered” pokes out of an aged laundry column. Each one invites interaction and exploration of the site.

“In the use of historical buildings and the designed landscape, XXX draws on the architectural significance” of the estate, says Messam. “As interventions, the sculptures speak the language of scale – all three are bigger than a house. As studies in scale and form, these artworks have to be directly experienced in the environment to be fully appreciated, so i hope they will encourage even more people to visit this wonderful architectural gem in the Scottish borders.”

Share on Facebook


[ By WebUrbanist in Art & Installation & Sound. ]

[ WebUrbanist | Archives | Galleries | Privacy | TOS ]


WebUrbanist

 
Comments Off on Inflatable Interventions: Soft Spikes Bring Roofless Ruins Back to Life

Posted in Creativity


Think Tank launches Signature series of soft shoulder bags

11 Feb

Camera bag manufacturer Think Tank has announced a new range of shoulder bags designed to look good as well as protect your equipment. The company says its new Signature range is made from a polyester/nylon blend that feels as soft as fine wool even though it has a water repellent coating.

The bags come in two sizes and are aimed at those with smaller interchangeable lens system bodies rather than full-blown DSLR kits. Think Tank says the bags are suitable for one body and three to four lenses, while the larger of the bags, the 13, can also accommodate a 13″ laptop.

The straps of the bags are made from leather while metal clasps keep it fastened shut. A waterproofing layer coats the base of the bags to protect them when they are placed on wet surfaces.

The Think Tank Signature 10 and 13 bags cost $ 249 and $ 279 and will be available in Slate Gray or Dusty Olive. For more information see the Think Tank website.

Manufacturer information

Signature Series

The Signature Series from Think Tank is a modernized version of the classic shoulder bag. Whether you are a young urban professional or corporate photographer, the Signature shoulder bag is as fashionable as it is functional. Hand sewn advanced fabrics blend weather protection and durability with the classic feel of fine wool.
Genuine leather detailing and metal hardware adds character and stands up to the rigors of a photographer’s daily use.

KEY FEATURES

  • Modern wool-like fabric that is soft to the touch and stands-up to everyday use
  • Full-grain leather bottom and detailing, plus antique finished metal hardware
  • Zippered flap provides full closure and security to the main compartment, or tucks away when not in use
  • Dedicated laptop/tablet compartment: Signature 13 fits a 13” laptop

Additional Features

  • Secure clasps on front flap with one handed operation
  • Soft look and feel with clothing-safe materials and design
  • Dedicated phone pocket fits up to an iPhone 6s+ or S7 Edge
  • Wide handle pass-through for attaching to rolling luggage
  • Large front pocket for an extra strobe, rain cover or small book
  • Long, cushioned neoprene shoulder pad positions easily when worn cross-body
  • Zippered front pocket provides security for small items and includes a built-in organizer for pens and business cards
  • Quilted velex dividers can be customized to fit your gear
  • Shorter dividers can be made into shelves to stack shorter lenses and primes
  • Dividers and bottom foam can be removed for a completely collapsible bag
  • Although the bag’s outer fabric is treated with water resistant coating, a seam-sealed rain cover is included for downpour conditions

What Fits
1 standard-size DSLR with mid-range zoom attached plus 2–3 additional lenses
13” laptop fits inside a dedicated compartment

Specifications
Internal Dimensions:
13.3” W x 9.1” H x 5.1” D (34 x 23 x 13 cm)
Exterior Dimensions:
14.6” W x 10.4” H x 6.3” D (37 x 26.5 x 16 cm)
Laptop/Tablet Pocket:
13” W x 9.1” H x 1.2” D (33 x 23 x 3 cm)
Weight:
3.1 lbs. (1.4 kg)

Materials
Exterior:
Durable water-repellant (DWR) coating
Polyurethane coating
240D wool-like 195G nylon/poly blend
Full-grain leather
YKK® RC Fuse (abrasion-resistant) zippers
Antique-plated metal hardware
550D polyspun
Nylon seatbelt webbing
Neoprene
3-ply bonded nylon thread

Interior:
High-density closed cell foam dividers
210D silver-toned nylon lining
Polyurethane backed velex liner & dividers
2x polyurethane coated nylon 210T seam-sealed rain cover
Nylon binding
3-ply bonded nylon thread

Articles: Digital Photography Review (dpreview.com)

 
Comments Off on Think Tank launches Signature series of soft shoulder bags

Posted in Uncategorized


How to Add a Soft Focus Look to Your Images for a Unique Style

21 Aug

Soft focus photographs present themselves with a tranquil and almost dream-like effect. They have become quite popular, and can be found to some extent in many genres of photography, from portraits to landscapes.

In reality, what many of us think of as soft focus photos, aren’t actually soft focus at all. The more accurate term is soft contrast. Soft focus is essentially the blurring of an image, which is not exactly the same as soft contrast. The softening effect can be achieved a number of ways using softening filters mounted in front of your lens, or in post-processing. With the powerful digital editing tools we have today, a soft contrast effect is both easily achieved, and infinitely adjustable.

Before and After

In this example, you will see at a step-by-step workflow for applying a soft focus, or soft contrast, look to a photograph in Photoshop using our old friend the High Pass Filter. You might be familiar with using the High Pass for sharpening, but in this case it will be used on the opposite end of the spectrum. We will begin with a RAW image file and work our way to a finished product ready for publishing.

Don’t worry. All these edits are incredibly easy, fast, and will give your images a little creative boost if used correctly. Let’s get started!

Here have the RAW file or as I affectionately call it the “Genesis Image”.

Raw

Make basic edits first

We will begin with some basic edits in Adobe Lightroom, then transfer the image to Photoshop to apply the soft contrast magic. It’s best to perform your core processing first, before beginning the soft contrast process. I like using Lightroom because it makes for a super simple transfer, for working in tandem with Photoshop.

For this photo I performed some global exposure adjustments, as well as made some selective adjustments. I also made use of the HSL panel to bring the color saturation and luminance closer to my visualization.

LR Adjustments

Open in Photoshop and duplicate the background layer

Once you’ve finished the foundational processing it’s time to bring your image into Photoshop. Right click it in Lightroom and choose “Edit in Photoshop”.

Now that you have your file open in Photoshop, you can begin the easy process of applying the soft contrast effect. To begin, you need to duplicate the base layer. Do this by right clicking the base layer and selecting Duplicate Layer, or by pressing control+J (command+J for Mac).

Duplicate Layer

Apply the High Pass Filter

Next, select the High Pass Filter. To do this, select from the top menu: Filter > Other > High Pass. The image before you will transform into a garbled mass of gray muck.

High Pass Filter Select

You will be given the option of adjusting the radius of the High Pass. I have found that for most images, a radius of 10-20 pixels is appropriate, but in the end it will be up to you and your creativity to decide. After you’ve selected the radius, click OK.

Next, go to: Image > Adjustments > Invert. You can save some some time by using the keyboard shortcut Ctrl+I (Command+I for Mac).

High Pass Invert

Change the layer blend mode

And vola! Wait…the photo still looks like a moldy piece of bread. Everything is okay, though! The next step is one of the most important, and it will make all the difference. In your layers panel, change the blending mode to Softlight.

High Pass Softlight

Boom!

High Pass Softlight Effect

The image looks like a photo again. The soft contrast effect has now been applied to every part of the image. If you like how everything looks, great, you’re completely finished and can go on your way. Most often though, additional fine tuning will be needed to bring out the best of your photograph. This is the real power of Photoshop, because you can now selectively choose what areas will benefit most from the softening. To do this you need to add another layer mask, but don’t let this intimidate you.

Add a layer mask to refine the effect

At the very bottom of the layers panel you will see a small row of icons. The layer mask icon is the white rectangular box with the gray dot inside, click that. A layer mask will be added to your adjustment layer. This way, you can choose exactly where you want your effect to be applied using the brush tool.

Add Mask

Now I can really get creative. I want to leave the softening effect on some areas, but remove it from some of the key points of the composition; namely the rock face and the ground surrounding the waterfall. Use the brush tool (paint brush icon) and a layer mask to show or hide your edit. Be sure the two black and white squares at the far left bottom of the tool panel show the black square above the white one (hit D on your keyboard to set them to default and X to swap the colors). This means you are hiding the effect from the image by masking it.

If you click the two sided arrows above the squares (switch to put white on top – or click X on your keyboard to do this) you will be able to paint back in the effect, in the case you remove too much (using a mask is non-destructive editing, you are not removing pixels just hiding or showing parts of one layer). Also, remember the the brush tool is completely customizable as far as size, flow, and opacity are concerned.

Layer Mask Adjustments

Final edits back in Lightroom

In the case of this photo, I save and close it in Photoshop, and it will automatically import back into Lightroom where I will finish up some minute details. The final edits include mainly selective sharpening and a slight vignette.

Final Adjustments

And it’s done! In what amounts to a few short minutes, I have gone from a RAW file, to an image that artistically captures what I saw when I clicked the shutter.

Before and After

As with any type of post-processing, it’s important to remember that less is often more. Be judicious with your edits and only go as far as you need, in order to reach the image you want to make.

Have a soft contrast or soft focus image you’ve edited in Photoshop? Feel free to share them in the comments below.

googletag.cmd.push(function() {
tablet_slots.push( googletag.defineSlot( “/1005424/_dPSv4_tab-all-article-bottom_(300×250)”, [300, 250], “pb-ad-78623” ).addService( googletag.pubads() ) ); } );

googletag.cmd.push(function() {
mobile_slots.push( googletag.defineSlot( “/1005424/_dPSv4_mob-all-article-bottom_(300×250)”, [300, 250], “pb-ad-78158” ).addService( googletag.pubads() ) ); } );

The post How to Add a Soft Focus Look to Your Images for a Unique Style by Adam Welch appeared first on Digital Photography School.


Digital Photography School

 
Comments Off on How to Add a Soft Focus Look to Your Images for a Unique Style

Posted in Photography


Lighting 102: Understanding Soft Light

02 Aug

So what is it that actually makes a light soft? And why is it a function of both size and distance?

In the portrait above, Dean is being bathed in soft umbrella light from camera right. But let's zoom in a little closer and place some waypoints on his forehead…Read more »
Strobist

 
Comments Off on Lighting 102: Understanding Soft Light

Posted in Photography


Rogue FlashBender 2 XL Pro Frank Doorhof Edition features ‘Super Soft Silver’ reflector

16 Jun

Rogue has introduced a new FlashBender 2 XL Pro reflector designed in collaboration with photographer Frank Doorhof. The reflector uses ‘Super Soft Silver’ fabric, a material that produces an effect that falls somewhere between the soft lighting created by white fabric and the harsher, more contrasty reflections of sliver fabric.

The FlashBender 2 XL Pro is the largest FlashBender model at 13in x 16in / 33cm x 41cm; it includes a belt and buckle for attachment to a flash, and an adjustable shape for altering the direction of light.

The Rogue FlashBender 2 XL Pro Super Soft Silver Reflector is available now from Rogue for $ 59.95.


Press release:

ExpoImaging, Inc., creator of the patented FlashBender shapeable light modifiers for off-camera flash photography, today announced availability of the new Rogue FlashBender 2 XL Pro Super Soft Silver Reflector, Frank Doorhof edition.

“Photographers looking for more contrast in their images while shooting flash on location will love this new Super Soft Silver FlashBender 2 XL Pro,” said Erik Sowder, ExpoImaging CEO. “Highly reflective shiny silver fabric is prone to hot spots and is often too bright and too contrasty for portraiture, especially in brighter light. Our custom Super Soft Silver fabric falls between harsh shiny silver and soft white fabrics. It is brighter and more “edgy” than white fabric while producing a softer and more even light than shiny silver fabric.”

Professional photographer and lighting instructor Frank Doorhof is a master of using edgy light and contrast to create remarkable images. “I love more edge in my images,” said Frank, so when he first saw Rogue’s Super Soft Silver fabric, he knew he wanted a version of the Rogue FlashBender 2 XL Pro Reflector incorporating the fabric. Thus, the Rogue FlashBender 2 XL Pro Super Soft Silver Reflector, Frank Doorhof edition was born.

Designed for portability to pack flat in most camera bags or laptop compartments, the 12” x 16” (30.5cm x 40.5cm) FlashBender 2 XL Pro reflector is the largest FlashBender. Building on the success of the popular Rogue FlashBender light modifiers for speedlights, FlashBender 2 reflectors can be shaped to control the direction of light from an accessory flash, and FlashBender 2’s improved belt and buckle design provides a faster and more secure attachment to your flash.
With the control, versatility and portability of all FlashBenders and a Super Soft Silver reflective surface, the Frank Doorhof edition FlashBender 2 XL Pro Reflector represents a unique new photographic tool to create spectacular images.

Pricing and Availability

The Rogue FlashBender 2 XL Pro Super Soft Silver Reflector is available from ExpoImaging’s distribution partners worldwide or online at RogueFlash.com. The Rogue FlashBender 2 XL Pro Super Soft Silver Reflector retails for $ 59.95.

About Rogue Photographic Design

Created by ExpoImaging, Rogue Photographic Design develops innovative lighting equipment for speedlight enthusiasts. Compact, versatile, and durable, patented Rogue light modifiers offer unparalleled lighting control in portable and light weight designs. More information about Rogue Photographic Design is available at RogueFlash.com, or ExpoImaging.com. Rogue FlashBenders are patented: see http://www.ExpoIP.us.

About ExpoImaging, Inc.

ExpoImaging, Inc. markets, designs, manufactures and distributes innovative camera accessories to the photographic market. ExpoImaging is the pioneer in white balance filters and manufactures ExpoDisc White Balance Filters, Rogue FlashBenders, Rogue Diffusion Panels, Rogue Grid, Rogue Flash Gels, and Rogue Safari. ExpoImaging is also the exclusive U.S. distributor of CapBuckle, and Ray Flash: The Ring Light Adapter. These unique products are available at select photography dealers worldwide or online at RogueFlash.com, or http://www.expoimaging.com.

Articles: Digital Photography Review (dpreview.com)

 
Comments Off on Rogue FlashBender 2 XL Pro Frank Doorhof Edition features ‘Super Soft Silver’ reflector

Posted in Uncategorized


How to Create and Use Hard and Soft Light in a Studio Setting

11 Oct

Hard light vs soft light craig wagner studio 3

When setting up your lights for studio photography, you first need to consider what lighting setup will create the look you are going for. Is your light going to fall into the category of hard light – or will it be soft? What’s the difference?

Let’s first look at the basic characteristics of hard and soft light sources, and the different feel each creates when shooting the same subject.

HARD LIGHT

Imac hard light example craig wagner

In general, a single-point light source, aimed from a distance is referred to as hard light, much like our sun on a clear day or a streetlight at night.

Hard light example levis jacket studio 3

This hard light source creates a high contrast look, where the transition between highlights and shadows is sharp and well-defined.

Keds shoes hard light example craig wagner

In some cases, this contrast can look harsh (and unwanted).

SOFT LIGHT

Imac soft light example craig wagner

On the other hand, a soft light source is a larger, broader, light placed relatively close to the subject. A cloud-covered or overcast day, where diffused sunlight reflects off a large concrete wall would be one example of a soft light source.

Breakfast oatmeal soft light example craig wagner

The light tends to be flatter in contrast, and the highlights hold more detail, with the shadow’s edges being soft and open.

Reverend nats hard cider soft light example studio 3

Generally this is a more pleasing light, but not necessarily the only light-source.

Many factors go into choosing light quality and the type of light source on set. One may be the direction given from an art director or client where you may be asked to match images from an existing campaign. They may want you to recreate a natural lighting condition (such as hot harsh desert sun on a pair of boots, or cool early morning light falling on a table setting).

The subject matter itself can also have a strong influence on your choice of light source. A highly reflective (like glass or chrome), or high-contrast product can be quite the challenge if you try lighting it with a hard light source. Fighting spectral highlights, or holding detail in the shadows and highlights, can be a pain if you have to use hard lighting alone.

If you’re lucky enough to be given creative freedom by the client, or working on a personal project, you might be illustrating a mood or an emotion and will use appropriate lighting needed to create it. Careful choice of lighting, and mixing your hard and soft light sources, will allow you to achieve that.

How to set up for a hard light shoot

Hard lighting setup diagram craig wagner

Imac hard light example craig wagnerFor the studio hard-light set, place the key (main) light (a strobe head with a 12” modifier) to the left and slightly behind the subject. The initial beam may be too broad, so to concentrate the light you can add a 35-degree grid to the modifier.

For this setup, final adjustments to the height and position of the key light were made, in order to modify the angle and length of the shadows on the table and floor, as well as to illuminate the edges of the computer screen in a pleasing manner. A 4’x8′ sheet of black foamcore was placed to the right of the set to deepen the shadows and remove unwanted reflections. Two smaller sheets of white foamcore were set low, in front and to either side, to control the amount of detail in the front edge of the table and legs.

A second strobe head with a 7” grid modifier was set high, and to the back of the set. Its angle was adjusted to illuminate the upper right corner of the background, which you can see in the photo (right).

How to set up for a soft light shoot

Soft lighting setup diagram craig wagnerImac soft light example craig wagnerTo create the soft-light look, the key light is set in the same place, but a 4’x4′ full diffusion panel is placed between the light and the subject, just out of the frame. Remove the grid from the key light to broaden the light. The black foamcore is replaced by a sheet of white to fill or open the shadows (but the two sheets out front remain). The background light is pulled back, the grid removed, and a diffusion disk added to soften the beam and cover the entire background. In this way the whole set appears bright and soft and with a lot of ambient light filling the image (left).

How to change a hard light source into a soft one

You may get into a situation where you’ve set up your light source and find you actually want to go the other direction with it. In this case, it is quite easy to change one type of light source into the other. You can diffuse a hard source into being soft, by placing diffusion material between the lighting and the subject, which allows you to control the angle and light gradient. You can also just attach a softbox to the light to soften the light and make it into a broader, even source. You can also take a soft source that you’ve set up and change its distance from the subject in order to make it a harder, more focused light. You can also bounce the light around more using reflectors, umbrellas, or a handy wall in order to soften it and make it less directional.

Combining hard and soft light

The ultimate tip for studio photography is to be flexible with your lighting setup regardless of your years of know-how. You may have an idea in mind for the final look you want for the photograph, but you may find that on set the product looks quite different under various lighting conditions. Be prepared to play around and try things – because often a mixture of both hard and soft light can show the product to its full advantage.

Stash tea flower teacups hard light example studio 3

Soft light example with a hard light rim (kicker or accent) light from behind. Notice the hard shadow on the table in front of the cups – that is created by the hard rim light.

Once you have a full understanding of hard and soft light sources, you can combine the two lighting techniques. For example, the set might have a general, overall softness to its light, but you might use a rim (or accent) light to give the shot more mood or dimension, or to accent certain elements of items in frame. Mastering both types of light allows you to have the ultimate control over your lighting, and the final image that comes out of the camera.

googletag.cmd.push(function() {
tablet_slots.push( googletag.defineSlot( “/1005424/_dPSv4_tab-all-article-bottom_(300×250)”, [300, 250], “pb-ad-78623” ).addService( googletag.pubads() ) ); } );

googletag.cmd.push(function() {
mobile_slots.push( googletag.defineSlot( “/1005424/_dPSv4_mob-all-article-bottom_(300×250)”, [300, 250], “pb-ad-78158” ).addService( googletag.pubads() ) ); } );

The post How to Create and Use Hard and Soft Light in a Studio Setting by Craig Wagner appeared first on Digital Photography School.


Digital Photography School

 
Comments Off on How to Create and Use Hard and Soft Light in a Studio Setting

Posted in Photography