RSS
 

Posts Tagged ‘Soft’

Choosing Soft Modifiers

03 Sep
Editor’s note: In 2011 I wrote a full post on my four favorite soft modifiers. No changes since then. These are still my go-to’s, for reasons explained below. So I am reprinting this in the gear selection module. -DH


With the gazillion or so soft light mods out there, it is easy to be overwhelmed by the choices available. And while I have probably shot with more of them that I would care to admit, there are four soft mods that I go back to again and again.

As it happens, these four are reasonably priced, too. (Which may well be what attracted me to them in the first place, of course.)
__________

Soft is Relative

So, which of the light sources above is the softest? The one in the back, right?

Not necessarily. The 60″ source in back is not as soft at 10 feet away from your subject as the 8×9″ source is at 10 inches away. A good rule of thumb to remember is that a light source is soft when it looks large to your subject. This nets out the two variables of size and distance.

Example: Even a bare speedlight looks soft to a subject only a couple inches away.

Long story short, if you want soft light you will have to consider the working distance at which you’ll be using it. The further back your light source, the larger your light mod will have to be.

So front to back, here is the straight dope on the four mods pictured above.

1. The LumiQuest Soft Box III

At 8×9″, the LumiQuest SB-III can be very soft — as long as you are working the light literally right up next to the subject. Case in point, this headshot of Ben I did for an ad for the SB-III when it first came out.

With a flat front edge, the light is easy to feather. This means you can work in the edges of the beam for more interesting (i.e. uneven) illumination.

Pros: The SB-III is small, and folds flat. This means it travels great, hiding in the back flap of my Domke F3 or just about anywhere else. It is also pretty reasonable, at under $ 50. (Especially considering the SB-III has a lifetime guarantee, unique on this list.)

Cons: It’s small size means it is literally soft in only in the knife-fight range. Back it up more than a couple of feet and it starts to get hard. Actually, I tend to use this to my advantage, making the light more versatile just by varying the distance. That is one of the reasons I use it so much.

And speaking of that, most of the time I use an SB-III, I will do so in combination with a fill light. (Example here.) This gives a combination of both shape and detail.

2. Beauty Dish

The next step up, size-wise, gets us to a beauty dish. A broad, shallow reflector, it throws a modestly soft light at portrait distances. There is nothing particularly “beautiful” about it. The dish just has good PR, I guess.

A light this size won’t wrap as much as a giant octa or umbrella when used at the same distance, which can be a good thing. So while some people may think of it as a beauty dish, I tend to think of it as a character dish.

Again, I almost always use it with fill. The shot above (more here) is a good example.

When used when a giant, on-axis fill light, as in this Martin Prihoda cover shoot, the beauty dish really starts to live up to its name. The shadows from a dish are distinct, and controlling their depth with another light source gives you a wide range of possibllity.

Pros: A dish gives you soft(ish) light that can stand up to a breeze. Soft boxes and (especially) umbrellas can turn into a sail in even a light wind. The beauty dish will hold up in a moderate wind — especially when sandbagged. Also, the fact that the dish is circular gives a signature shape on the face as compared to a rectangular soft box. Some people prefer this, but I find it kinda arbitrary.

Cons: Does not fold in any way, so travels like crap. Expect to have to buy a protective case for it. Which only adds to the next downside. Of the four sources listed here, the beauty dish is the most expensive.

I have a few dishes, including one that I got for free from Profoto in a promotion that would have cost me north of $ 300. I did not know which I wanted (silver or white) so I chose silver for more efficiency. In hindsight I should have chosen white, which I now use far more often.

But I was not gonna pony up for another full-price Profoto dish. So I ended up with the white FTX 22″ Beauty Dish ($ 105.00 – $ 130.00) shown above.

Being an aftermarket universal fit dish (one dish, many mounts) it can be a little quirky in some ways. But overall I have been happy with it. They also do a grid for the dish ($ 85.00). So if you are into controlling the beam of the light, the price difference (OEM vs aftermarket) may be even bigger.

3. Westcott Double-Fold 43″ Shoot-Through Umbrella
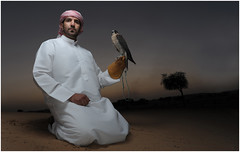
Usually recommended as the first soft light mod for a space-conscious photographer, the double-fold umbrella practically disappears in your bag. It collapses down to 15″. (Best of all, they are just silly cheap.)

I started out using it in typical fashion, 45 degrees up and over, as do most photographers. These days I am much more likely to fly it over the top of a subject, as in the falconer shot seen above (more here) or literally on the floor, as in this portrait.

Pros: Hello … dirt cheap. Also, travels extremely well. If you are into guerilla lighting, this is your mod. Also can be very powerful, used right up next to your subject. This is something you cannot do with a reflected umbrella because the shaft can get in the way.

Cons: They are pretty fragile. Between the double folding arms and the telescoping hollow shaft, expect them not to last too long. (A little breeze can get them, too.) Also, the light is hard to control — an umbrella spews out light like a frat boy puking at 2:30am after a party. Very little directional control. Raw light can spill past the edge, too.

But for under $ 20, who can complain? I usually grab a couple to be safe.

4. Photek 60″ Softlighter II


Combining the best features of a shoot-through umbrella and a large soft box, I like to think of the large Softlighter II as a poor man’s octa.

It is a convertible shoot-through umbrella that can double as a reflective one due to the removable black backing. And it comes with a very efficient diffuser screen, turning the umbrella into a wonderfully even light source. As a bonus, the umbrella shaft is segmented, so you can remove half of it after you open it. This makes it possible to use it in very close. It is large-octa light quality, for about $ 100.

Actually, I have a 47″ octa, and it gets very little use compared to the Softlighter. Friends usually ask to borrow the octa, which is fine with me — I’d rather have the Softlighter on hand. (If you are an Annie Leibovitz fan, she frequently uses them as her key light, as seen in this video.)

I own and use both the Softlighter II and the new Paul Buff 64″ PLM (with diffuser). The PLM is more efficient than the Softlighter because of its parabolic design, but that is lessened if you do not use the Paul Buff or Elinchrom mount. (They take advantage of perfect positioning.) For speedlights, I prefer the Softlighter, as it does not require a bare-bulb-type light source to be located at the focal point of the parabola. Just slap an umbrella swivel and a speedlight in there and you are good to go. If you primarily shoot WL or Elinchrom, I would suggest the PLM.

Or if you use big and small lights, maybe get both at under $ 100 ea. That is what I did, and frequently use both together (PLM as a key and the less efficient Softlighter as a fill.)

Pros: Way cheap, compared to the octa it largely replaces. Versatile as an umbrella, as described above. Gorgeous light with the diffuser. Very lightweight — easy to boom without expensive gear. Takes a speedlight well. (That’s how we lit the photo above, as detailed here.)

Cons: They are not as heavy-duty as an octa — but to be honest I have yet to kill one. Also, the front is not a clean light source like an octa. You can see the strobe unit. So if you are shooting reflective objects (glass, etc.) this may not be for you.
__________

So those are my Four Horsemen of soft light. You could choose four completely different different mods, but those are the ones I keep going back to. I highly recommend each, for the reasons above.

The main thing is to look at your working distance and see which light source will create the light you want at that distance. Fortunately, as you can see above, you don’t have to spend a ton of money to get versatile, soft light.

NEXT: Hard and Specialty Modifiers


Strobist

 
Comments Off on Choosing Soft Modifiers

Posted in Photography


19 January, 2014 – Hard Skills and Soft Skills

20 Jan


Alain Briot. Longtime contributor to Luminous-Landscape changes direction a bit in his essay Hard Skills and Soft Skills. This will be a new series in his essays. Hard skills are factual,technical and quantifiable. Soft skills on the other hand are subjective, artistic and difficult to quantify. Read on to see how these skills are part of the photographic creative process.


We have just published our newest video titled "The Rangefinder: Truth, Mystique & Practice – Leica M240"

In Our Store, do a search for ‘Rangefinder’. For those wishing to purchase it individually, the price is $ 12.50. It is without extra charge for our annual subscribers.


Explore The Land Of Polar Bear – Luminous-Landscape’s Svalbard Workshops this July.  This is a small group workshop and a truly special chance to photograph the Arctic wildlife, especially Polar Bears.


You can win an all-expenses paid photographic expedition to Antarctica, along with air fare from anywhere in the world. The value of this prize is $ 15,000.

The Luminous Landscape wants you to try any of our more than 60 training or travel videos and our new free video player. Each purchase is an entry, and an annual subscription that includes all previous as well as new videos counts as six entries. The winner of a free lifetime subscription is also chosen from each month’s entries.

FIND OUT MORE


The Luminous Landscape – What’s New

 
Comments Off on 19 January, 2014 – Hard Skills and Soft Skills

Posted in News


Soft Light: Weekly Photography Challenge

31 Aug

NewImageYour challenge this week is to take and share a photo on the theme of ‘Soft Light’.
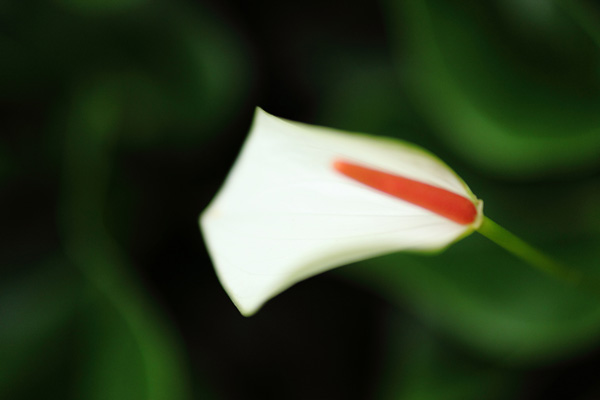
Earlier in the week Andrew Gibson wrote a post on the topic of using Soft Light in a variety of types of photos to create a magic feel in your images.

Using soft light is a technique that can be used in many types of photography including portraiture, landscapes, macro and much more so you can submit any type of photo – as long as it was taking in soft light.

Note: also check out our article this week on taking natural light portraits in the shade which will also produce ‘softer’ lit portraits even on a bright day.

Once you’ve taken your ‘Soft Light’ photos, upload your best ones to your favourite photo sharing site either share a link to them even better – embed them in the comments using the our new tool to do so.

If you tag your photos on Flickr, Instagram, Twitter or other sites with Tagging tag them as #DPSSOFTLIGHT to help others find them. Linking back to this page might also help others know what you’re doing so that they can share in the fun.

Also – don’t forget to check out some of the great shots posted in last weeks Negative Space challenge – there were some great shots submitted.

Post originally from: Digital Photography Tips.

Check out our more Photography Tips at Photography Tips for Beginners, Portrait Photography Tips and Wedding Photography Tips.

Soft Light: Weekly Photography Challenge


Digital Photography School

 
Comments Off on Soft Light: Weekly Photography Challenge

Posted in Photography


The Magic of Soft Light

27 Aug

Soft light photo

Soft light is beautiful. It is a gift from nature that helps you create interesting images using high quality light. You’ll find soft light in the shade on a sunny day, during twilight after the sun has set, or all around you on a cloudy day.

Soft light photo

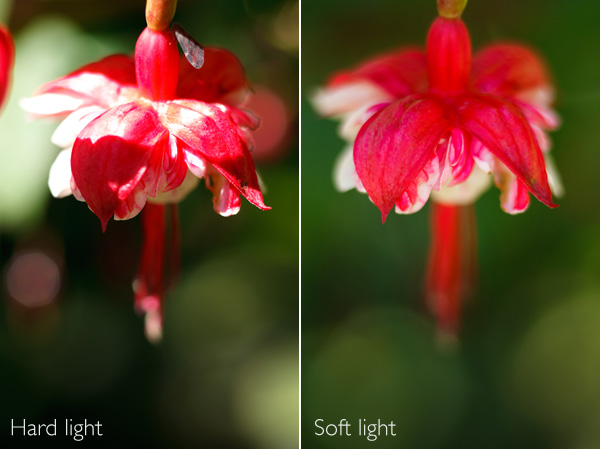
Let’s take a look at these two photos to see the difference between hard light and soft light. I took the first in direct sunlight in the afternoon. The light is hard and it’s not a good a photo. The contrast is too high – it’s not possible to get good detail in both highlights and shadows.

I resolved the problem by holding a reflector, still in its cover, between the flower and the sun. Actually, it doesn’t matter what I used, the purpose is to cast a shadow over the flower and the background. That means the flower is now lit by soft light, not hard light. Aesthetically, the photo is completely different. The even lighting means that the brightness range of the subject falls is reduced to something that my camera’s sensor can handle comfortably. There are no shadows. The flower is evenly lit, and that gives me nice deep colours. The quality of light has gone from hard and ugly to soft and beautiful.

That’s the power of soft light.

I’m not saying all hard light is bad, and that all soft light is good. What’s important is the match of subject to light. This flower needed to be photographed in soft light to bring out its beauty. Some subjects suit hard light better – I will explore those in a future article.

So, where else does soft light come in useful?

Soft light photo

If you’re shooting close-ups, soft light lets you capture colour and detail and avoids bright, distracting highlights or high contrast. Again, the quality of the light is beautiful and suits the subject.

Soft light photo

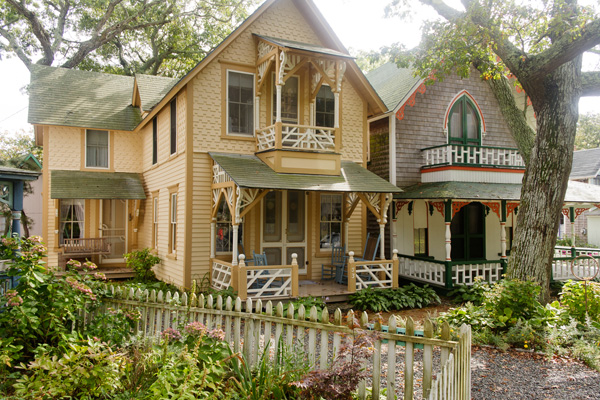
Soft light doesn’t have to be completely shadowless. Sometimes the sun is out, but the air is hazy and the light has a soft luminous quality. The light is hard enough to cast shadows, but they are not very deep. The light in this photo has that quality. See how the light is coming from behind the houses, but isn’t strong enough to create strong shadows. This kind of light seems to work well when the subject is backlit.

Soft light photo

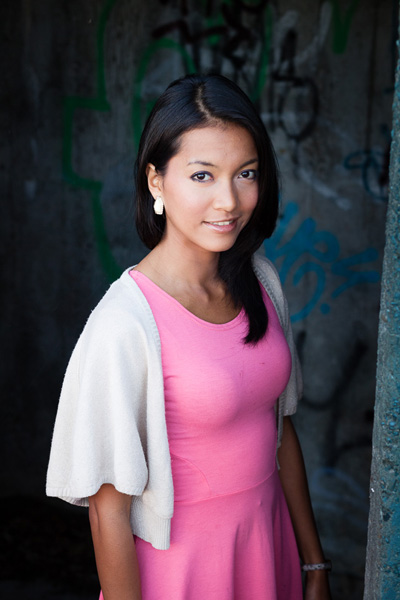
Finally, soft light is absolutely beautiful for portraits, especially of women. I’m a little surprised by how many people, photographers and models included, think that sunny conditions are ideal for taking photos of people. Not true! Especially if the sun is the only light source – admittedly the use of a reflector can help compensate for the hard light of direct sunlight. You can also get good results in direct sunlight by using flash to fill the shadows or even overpower the sun. But that’s another article.

If you are taking photos in natural light only, then head for the shade. On a sunny day, the light bounces off any surfaces lit by the sun and into the shadows. It’s like shooting with an enormous, and completely free, reflector. The light is soft and beautiful and creates amazing catchlights in the model’s eyes. The portrait above has these qualities in abundance.

Mastering Photography

Soft light photo

My latest ebook, Mastering Photography: A Beginner’s Guide to Using Digital Cameras introduces you to digital photography and helps you make the most out of your digital cameras. It covers concepts such as lighting and composition as well as the camera settings you need to master to take photos like the ones in this article.

Post originally from: Digital Photography Tips.

Check out our more Photography Tips at Photography Tips for Beginners, Portrait Photography Tips and Wedding Photography Tips.

The Magic of Soft Light


Digital Photography School

 
Comments Off on The Magic of Soft Light

Posted in Photography


Soft Flattering Color Portraits in Lightroom 4 and Lightroom 5

05 Aug

Introduction

The Following is an excerpt from the SLR Lounge Lightroom Preset System v5, a preset system designed to take you from Ordinary to Extraordinary photos in just a few seconds and clicks.

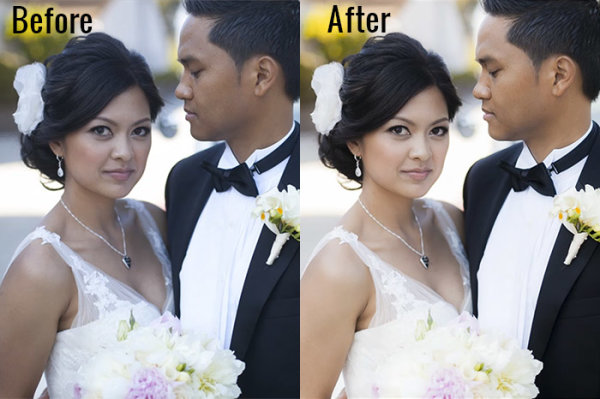
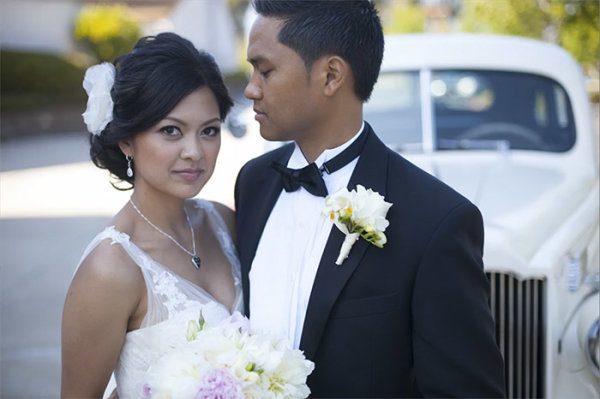
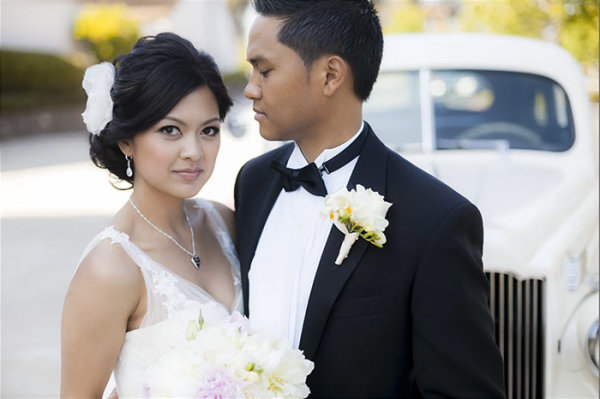
We have just launched the new Lightroom Preset System v5, and in this first tutorial we want to create a soft and flattering look for color portraits. We want to maintain good overall contrast, while flattening out highlights and smoothing out the details a bit for a more flattering look. Each one of you will probably have different preferences in regards to overall contrast and color temperature, but this Base preset and modification are pretty much our foundation for all of our color portraits within the Lin and Jirsa Photography studio. Here is what the photo looked like before and after the effect is applied.

beforeafter

Lightroom Preset System v5 Mixology Recipe

For those that own the SLR Lounge Lightroom Preset System v5, you can follow this two click recipe. If you like, you can save it as a new custom Mixology, however, since it is only a 1-click modification on our existing Base Preset, we will not be adding this to a new custom Mixology Preset.

Develop Mixology
1) 01-10 Base-Soft 11a. Extra Soft-Skin Desat
2) 03-40 Adjust Shadows Blacks 42. Darken-Medium -15, -30

Adjust Exposure, Temperature and Tint to taste.

Local Adjustments
We used the Graduated Filter and used the “04 Dodge (Brighten) +.5 stop” to brighten up the bottom left of the photo. To see exactly how it was applied, watch the video tutorial below.

Watch the Video Tutorial

If you would like to follow along with the Video Tutorial, watch the video blow.

Complete Written Tutorial

This written tutorial is meant for those who don’t have the SLR Lounge Lightroom Preset System v5. If you follow along you’ll be able to edit your photos with the same settings we used to edit this one. For any photo we edit we like to check the EXIF data by pressing “i”. This will show us exactly what camera the photo was taken one, what lens, and the settings. You can customize what EXIF data you want to see by pressing “CMD + J” or “CTRL + J”. This photo was taken on a 5D Mark II at 1/800 sec at f/2.0 ISO 100 with a 50mm lens.

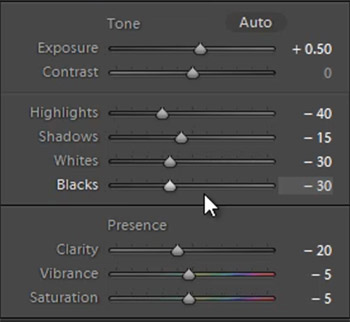
The first thing we did was go into our “01-10 Base – Soft” preset folder and applied the “11a. Extra Soft – Skin Desat preset”. This preset does most of our work for us, adjusting our exposure, highlights, shadows, whites, and blacks the way we would want them for a portrait like this. The clarity, vibrance, and saturation have all been dropped, giving us a nice soft portrait look. Here’s what our settings look like on the right side panel.

developsettings

Our “1) 01-10 Base-Soft 11a. Extra Soft-Skin Desat” preset lowered our Red and Orange levels, desaturating the skin and taking out the red and orange highlighting that can appear in shadows and highlight areas of our subjects skin.

  • Red: -20
  • Orange: -10

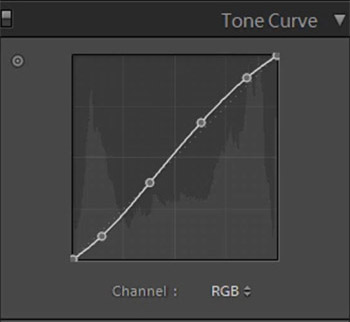
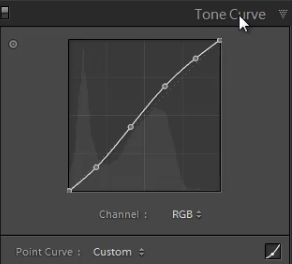
In the Tone Curve we have a standard “S” curve, giving us a subtle contrast boost by raising the highlights and dropping the shadows.

tonecurve

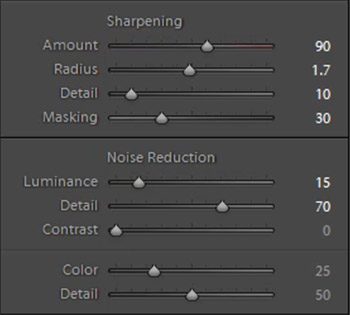
We add a bit of Noise Reduction Luminance in our portraits because it does a great job smoothing out the pores and making skin look great. We had to raise the sharpening a bit on this photo because it was shot at such a wide aperture, making the depth of field very shallow. Here are what our “Sharpening” and “Noise Reduction” settings look like.

sharpening

The vignetting in this photo underexposed her skin slightly in the corners of the photo. This is a great opportunity to use a graduated filer. You can simply go to the Graduated Filter and raise your exposure to “0.50″. Then raise the graduated filter from the bottom left of the photo and come up to the strap of her dress. Watch the video tutorial to see exactly where we put it. After the graduated filter we’re left with our final image, here’s a before and after.

Before

before

After

after

Conclusion and Learn More

We hope you all enjoyed this tutorial. If you are interested in learning more or purchasing the SLR Lounge Lightroom Preset System v5

Post originally from: Digital Photography Tips.

Check out our more Photography Tips at Photography Tips for Beginners, Portrait Photography Tips and Wedding Photography Tips.

Soft Flattering Color Portraits in Lightroom 4 and Lightroom 5


Digital Photography School

 
Comments Off on Soft Flattering Color Portraits in Lightroom 4 and Lightroom 5

Posted in Photography


How to Create a “Soft Portrait” Preset in Lightroom 4

20 Jun

Introduction

The following is an excerpt from the SLR Lounge Lightroom Workflow System Workshop on DVD, a system designed to increase your post production speed by 5 to 10 times! Click here to learn more.

A portrait image includes a subject (Usually their faces) as the primary focus. When we edit portraits, we do not want to sharpen fine details too much as this will of course enhance pores and blemishes on the skin. Instead, we want a soft, gentle look for our portrait images.

In this tutorial, we will show you how to create a “Soft Portrait” preset in Lightroom 4. This preset will make our portraits more flattering, because we will tell it to smooth out the highlights in our images, and reduce the appearance of imperfections on skin and other semi-smooth surfaces. This “Soft Portrait” preset is the same preset we use at Lin & Jirsa Photography to fit our needs for wedding and portrait photography, however you may want to change some of the settings to fit your own personal style. We hope that the tips in this tutorial will help you develop your own style of editing portrait images!

For this tutorial, we will use this standard portrait as our example.

origina 650

The Standard Import Preset Settings

For this tutorial, first select a basic standard portrait that you would typically shoot. Make sure that the portrait you choose is properly exposed with an accurate white balance, as an incorrectly exposed image will cause the preset to mis-represent the average photo you take.

Whenever you create a new preset for something specific such as protraits, we recommend that you start with another, standardized preset that has settings similar to what you’re going for in this image. So for example, we will select our original “Standard Import” preset to help us create the “Soft Portrait” preset.  For more information on how we created our “Standard Import” preset, click HERE.

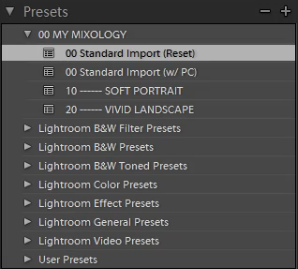
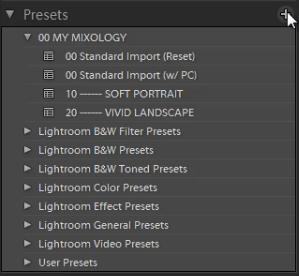
We will base the “Soft Portrait” Standard Color Preset off of the Standard Import Preset, so we have selected “00 Standard Import (Reset)” in our Presets Panel. The Presets Panel can be found on the left of the Lightroom Develop module.

02-ligthroom-4-standard-import-preset

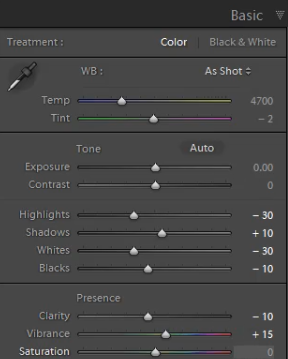
If you do not have the Standard Import Preset, these are the settings for it. Simply dial in these exact settings in the Basic Panel. To expand and collapse the Basic Panel, press “Ctrl + 1.”

03-lightroom-4-standard-import-preset-settings

Basic Panel Adjustments

Next we need to adjust the Basic panel settings to create the “Soft Portrait” look that we’re going for. Reduce the Highlights to -30. With the Shadows, bring them down to +10. Decrease the Whites to -30 and raise the Blacks to -10. These settings will smooth out the overall highlights in the portrait. Next, adjust the Clarity down to -10 to really smooth over the larger, harsher detail tones and to smooth out things like skin tones. Do not pull the Clarity down too much, because you will eventually lose important details in your portrait and create a “painted” or “smudged” look.

For Vibrance, we will leave it at +15. You can choose the amount of Vibrance to fit your own style, but we recommend not adding additional Vibrance if your portrait already has too much color in the skin. A high amount of Vibrance adds color to the skin which can make the portrait look unflattering, especially in mixed lighting!  Sometimes, if your images are too clear and crips, you may want to dial the Vibrance down as far as -10 or so.

Your Basic Panel adjustments should look similar to the settings below.

04-lightroom-4-soft-portrait-standard-color-preset-basic-panel-settings

Tone Curve Adjustments

Next, we are going to adjust the Tone Curve in the Tone Curve Panel. To expand and collapse the Tone Curve Panel, press “Ctrl + 2.” To boost the overall contrast in the portrait, create a slight S-Curve. We recommend having at least 4 points on the Tone Curve so that you can control every quadrant. From left to right, these points will provide secondary control of your Blacks, Midtone Shadows, Midtone Highlights and Whites.

To create the slight S-Curve, pull down the Blacks a little bit, then pull up the Midtone Shadows and the Midtone Highlights. Finally, pull the Whites slightly down and to the right. Your Tone Curve should look similar to the one below, but feel free to adjust these points to fit your style.

05-lightroom-4-tone-curve-adjustments

Detail Panel Adjustments

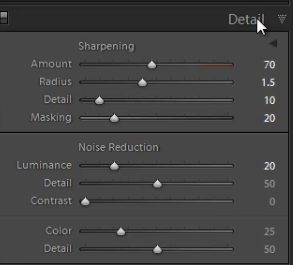
To expand and collapse the Detail Panel, press “Ctrl + 5.” The Sharpening settings from the Standard Import preset should be good enough for your portrait, but always zoom into the subject’s face to make sure everything looks fine. If you find that skin tone is a little too “crunchy”, consider dialing down the Detail slider before the actual Amount.

Next, adjust the Noise Reduction settings. Bring the Luminance up to 20. Do not bring up Luminance too high as this will once again kill detail in your image. However a conservative amount is helpful, even for images captured at your lowest ISO.

Setting Luminance to around 15-20 maximum creates a nice softening effect, especially over the pores of skin, while leaving major detail (such as eyelashes, etc.) intact. Even though the Luminance Noise Reduction is a minor adjustment, it plays a very important role in helping to smooth out the skin tones in a portrait.

(Of course if you’re shooting your portraits at higher ISO’s for whatever reason, you may need to increase this slider even higher!)

06-lightroom-4-detail-panel-adjustments

Lens Corrections Adjustments

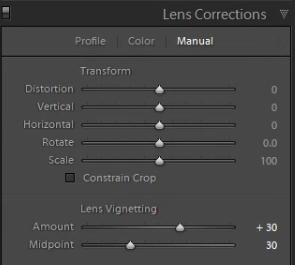
To expand and collapse the Lens Corrections Panel, press “Ctrl + 6.” After adjusting the Noise Reduction settings, we need to check the vignette of our portrait. The vignette refers to the darkness or brightness of the edges of an image. If you want to apply a faint amount of vignetting correction in general, we can leave the Lens Vignetting settings from the Standard Import Preset.  (Of course some photographers like to add vignetting to portraits, so this is going to be a subjective decision!)

07-lightroom-4-lens-vignetting-adjustments

Saving the “Soft Portrait” preset

Now that we have finished dialing in the settings for the “Soft Portrait” preset, we need to save this preset. First, click on the “+” sign in the Presets Panel.

08-lightroom-4-create-new-preset

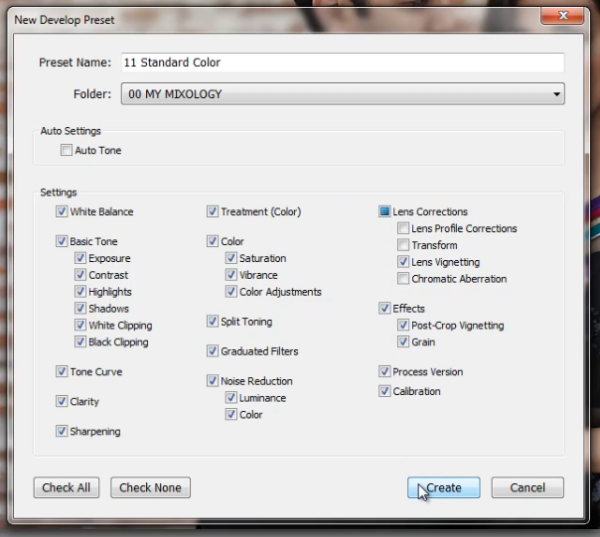
The New Develop Preset dialogue box will appear; name the preset “11 Standard Color.” Select “Check All” to select all the settings. However, make sure that “Auto Tone” has not been selected. Next, un-check “Lens Corrections,” “Lens Profile Corrections,” “Transform,” and “Chromatic Aberration” because we do not want to sync these specific settings across every portrait we have.  (We recommend creating separate presets to manage those settings.)

Press “Create” once you are done. Your New Develop Preset Dialogue Box should look like the one below!

09-lightroom-4-new-develop-preset-settings

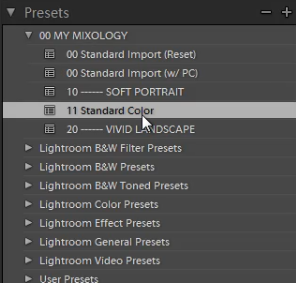
As you can see below, it may be a good idea to organize your presets by numbers, two or three digits is usually enough.  Either way, the goal is to have these default-related presets appear up towards the top.

10-lightroom-4-presets-panel-standard-color-soft-portrait-preset

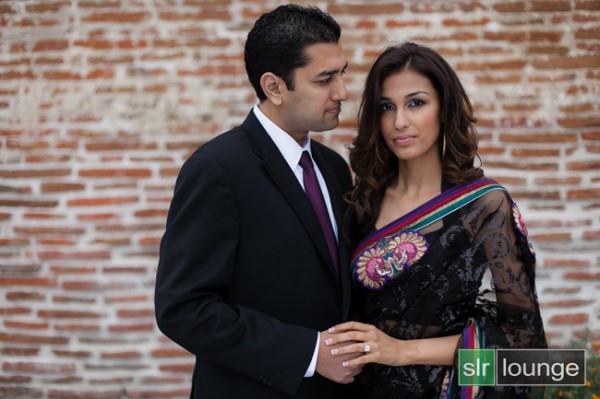
This is what our final image looks like with the “Soft Portrait” Standard Color Preset applied.

soft portrait 650

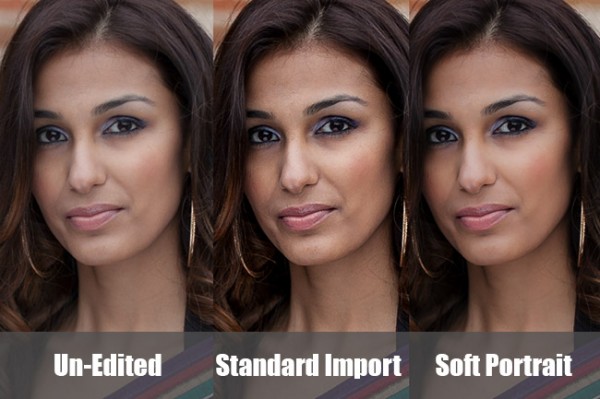
Below you can see a cropped comparison of the original un-edited image in it’s muted, RAW state, as well as the “Standard Import” and “Soft Portrait” presets for comparison:
side-by-side

Conclusion

Once again, the goal with creating a preset such as this is to minimize the amount of work we need to do on a per-image basis.  With a preset like this, in theory you should be able to breeze through a portrait session doing batch corrections to settings such as White Balance and Exposure, only pausing here and there to tweak other settings individually.

It will take time to fine-tune the preset to your own personal taste, however this general rule can help:  If you find yourself applying the same adjustment to more than 50-60% of your images from a certain type of photography, then that adjustment should be put into a preset!  It’s better to perform slight changes on 20-30% of your images than to perform major corrections to 70-80% of your images!

The SLR Lounge Workflow System Workshop on DVD

The SLR Lounge Workflow System Workshop on DVD takes everything that we taught in the Lightroom 4 A to Z Workshop on DVD and builds by teaching you how to maximize your shooting and post processing efficiency and workflow. This 7 hour DVD covers data safety procedures, file management, culling standards and overall develop techniques to increase your post production efficiency by up to 15x! In fact, using this Workflow System we can cull and edit over 1,500 images per hour! Don’t believe us, watch the teaser video! The Workflow System is also available as a part of the Lightroom 4 Workshop Collection. To learn more, click this link.

Post originally from: Digital Photography Tips.

Check out our more Photography Tips at Photography Tips for Beginners, Portrait Photography Tips and Wedding Photography Tips.

How to Create a “Soft Portrait” Preset in Lightroom 4


Digital Photography School

 
Comments Off on How to Create a “Soft Portrait” Preset in Lightroom 4

Posted in Photography


[HD] Soft Focus Wedding Photo Effect: Photoshop Tutorial!

19 Oct

Here is a great little effect that adds a whole lot of “mood” to an image by softening and increasing contrast and also features a vignette around the focal point of your choosing. The beauty of this technique is that by using adjustment layers we have full control over the final effect’s strength and color. This one is a great tip for Photographers of any type. If you enjoy the video please rate, comment, and subscribe! Check out www.tutvid.com for more great video tutorials! Check out the blog @ http Check this video out in Hi-Res here: www.tutvid.com

 
Comments Off on [HD] Soft Focus Wedding Photo Effect: Photoshop Tutorial!

Posted in Retouching in Photoshop


Photoshop CS4: Soft Skin [HD]

20 May

Follow me to find out about new tutorials: www.twitter.com This effect is used widely. Its a simple effect but with great results! www.youthintosh.com www.photoshopstar.com Downloadable version of this video here: Link coming soon!
Video Rating: 4 / 5

How to quickly edit a photo in Apple’s iPhoto program. Version 08. iPhoto comes installed on all new macs, and is very quick and easy to use. I just wanted to show that you don’t need Photoshop just to do a few simple things to a photo to make it look better. • Photos taken on a Canon G9. • Edited in iPhoto 08. • Intro music by Partners in Rhyme • Screencast created on an iMac 20″ with Screenium. • No post-production done. • Special thanks to Ms Koala for starring in this tutorial. She and her friends can be found at Wildlife World, Darling Harbour, Sydney, Australia. • Created by Livia for Chamelle Designs © 2009. • Blogged here: chamelledesigns.com .
Video Rating: 5 / 5


Microsoft PowerPoint 2010 – Fade an Image to the Background with a Soft Edge

03 Oct

Apply customizable soft edges to photos and clip-art inside PowerPoint 2010 presentations.

Instead of simply placing a picture inside a Microsoft PowerPoint 2010 presentation, one option for stylistic effect is to apply a soft edge. This makes the picture seem to fade to the background around the edges, a sometimes pleasing effect. See the below screenshot for an example.

1. Select an image to modify….

Read more at MalekTips.
New Computer and Technology Help and Tips – MalekTips.Com

 
Comments Off on Microsoft PowerPoint 2010 – Fade an Image to the Background with a Soft Edge

Posted in Technology