An overview detailing a stereoscopic 3D production about Arkaroola and the Flinders Ranges.
Video Rating: 4 / 5
An overview detailing a stereoscopic 3D production about Arkaroola and the Flinders Ranges.
Video Rating: 4 / 5
www.nobsphotosuccess.com Here’s the definitive technique for removing double chins using photoshop. Based on years of retouching using old fashion pencil and pastel techniques. More at www.nobsphotosuccess.com

This video explains into depth about Nikon’s autofocusing system in Nikon’s lenses and camera bodies – showing into depth about the settings to get your image crystal clear in focus. Enjoy. Music: Autumn Leaves by John Coltrane
Adorama Photography TV presents: In this episode Mark will show us some tips for becoming a better photographer using the basic elements of composition. Take a closer look at some of Mark’s photos, and explore related videos and articles here: www.adorama.com Visit www.adorama.com for more photography videos!
Video Rating: 4 / 5
The Aperture Foundation, the Photography Department at Parsons The New School for Design, and the Vera List Center for Art and Politics present a new season of panel discussions focusing on photography. Speakers including George Baker, Associate Professor of Modern and Contemporary Art and Vice-Chair of UCLA, Department of Art History; Andrea Geyer, artist and Assistant Professor of Fine Art, Parsons The New School for Design; and artists Paul Pfeiffer and Krzysztof Wodiczko, discuss projection and installation strategies many contemporary artists have used to create immersive and cinema-like experiences in their works and exhibitions. Contemporary artists have started departing from the large, tableau vivant treatments of the photograph, as seen in works by Jeff Wall, Andreas Gursky, Philip-Lorca diCorcia, and Gregory Crewdson. In recent years, they have employed a variety of projection devices to incorporate their photographs into temporal, audio-visual experiences, which recall cinematic contexts yet retain distinctly photographic qualities. On the surface, these works seem to meld experimental and structuralist filmmaking lineages and large-scale photographic practices prevalent in the past two decades. At the same time, the new practitioners of the projected photograph are expanding the definition of photography itself. The lecture series is presented with generous support from the Kettering Family Foundation and the Henry Nias Foundation. The program is made …
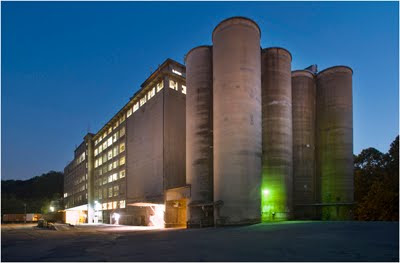
Last Friday I went out just before sunset to set up and shoot a lit photo of the Wilkins-Rogers flour mill in Ellicott City, MD. It’s a behemoth of a building (at least by our local industrial standards) and I was shooting a exterior for their new website.
My plan was to sculpt the building on the rear 45’s with flash. And to balance everything (flash, ambient dusk and interior lighting) for a cool, mixed image. At least that was the plan going in.
Instead, this post is about what happens when things head south quickly.
__________
A Brief Window
To appreciate the events that led up to my walking around the parking lot of this mill cursing like a sailor, it helps to understand just how tight the window is to make a three-variable photo. So let’s run that down first.
There are three light sources in a flash-lit, dusk shot of an interior-lit building. You have the flash, which is constant and controlled by the aperture (of, of course, ISO/power level/distance.) You have the inside ambient, which is constant and at a fairly low level. And you have the outside ambient which will be dropping — and very quickly — by the time all three come together.
Here’s how the three-way dance works. First, you choose an ISO/aperture combo that you can hit with your flash. Since my flashes (Profoto B600s) were to be ~100-300 feet away from the surfaces they were lighting, I went with ISO 800 at f/4. That ISO looks great on a D3, and combined with f/4 it gives me lots of range on the flash.
Once you have the ISO and f/stop, you’ll need a shutter speed that gives you your (constant) interior lights the way you want them. And that is your exposure setting. You shoot at that setting as the fast-declining sky / outdoor ambient passes through that exposure range and go with the best shot during the crossover.
It is not like shooting flash / sunset ambient mix, where you can shoot at a constant aperture and walk the shutter down to compensate for the sky. (More detailed post on that here.) Your exposure is determined by both the flash and the constant ambient level of the interior lights. And your post-sunset light is dropping fast. So the whole thing only works for a few minutes as they all come together.
You can start testing your flash as soon as the ambient light level hits the target ISO and aperture at a speed at which you can sync. Here is a building flash test (from the position of the first strobe) at ISO 800, f/4, 1/125th of a sec. This is telling me that I can easily paint the building with flash. And now I have a few minutes to adjust my second light before the ambient drops to a shutter speed in the multi-second range at which I will balance all three.

This was a welcome sight. I could evenly paint my end of the building at half power. I was good to go. I put a PocketWizard on the pack and started to walk to my shooting position, about 300 feet away. You can guess what happened next.
I tried a test pop at the shooting position to get the look of the subtle back/rim light I was creating.
Nothing.
I tried, repeatedly. Nothing. No pops. Fresh batts. Nothing. Swap PWs. Nothing. Curse a little. Nothing.
So I walked back towards the flash and the PW would not sync until I got about 50 feet from the flash. Even swapping out everything, I could not get the PW to best that 50 foot range.
This is not normal for a PW +II, by a long shot. They routinely give me lots more range than that. But that is the thing about radio. Every now and then the Radio Gods are going to look down at you and press the “smite” button. And tonight, they had the button pushed down and on repeat.
At this point I was walking around, muttering the same phrase to myself, more and more loudly. Suffice to say I sounded a lot like Sawyer from Lost [NSFW-audio].
Do as I Say, Not as I Do
Radio is a fickle lady. And occasionally it will get completely borked on you with no explanation whatsoever. I have learned to hedge my bets for really long-range remote syncing with multiple receivers and piggy-backed slaves. (Here is an example of both being used at extreme range.)
And in this case I could have easily mounted an SB-800 on camera and stuck another SB set to optically slave near the Profotos. The SU-4’d SB-800s are way more sensitive than the slaves in the Profotos (and most other slaves, truth be told.) But I only had one ‘800 with me, and even in the dark it would not trigger the Profoto slave at ~300 feet.
You’d think I would know to just keep a few extra ‘800s with me. Lord knows I use them enough. But they were at home in the gear closet. (Why would I bring speedlights to shoot a humongous building, amirite?)
Indeed.
Or, I could have bridged the PW receivers closer with a thick, 100-foot mini-to-mini sync cord (or a mini-extension cord) which I bought from Monoprice for under . That was sitting on the shelf in the gear closet about two feet from the SB-800s.
Or, I could have had an assistant at the Profoto pack and had him/her press the test pop button some time within the ~8-second final exposure. (No assistant tonight.)
In short, lots of easy but unavailable solutions. And since I had never been bitten before in this particular way, I was unprepared. And the clock was running fast. So I dropped back and punted.
Light it Later
At the last moment I decided to shoot it available light, with what can best be described as a poor man’s selective HDR. I shoot on RAW, which gives me the ability to alter the exposure after the fact. And in doing that, you can blend multiple exposures into one frame.

Here’s a straight .jpg (top) from the RAW shot as it came out of the camera, and my final image below. The top exposure was chosen to balance the building and the sky as best I could when the interior lights were glowing. And combining multiple versions of a photo shot in RAW is way easier than you might think if you have never done it before.
I bring the RAW image into Adobe Camera Raw and open it up to a brighter exposure before bringing it into Photoshop. Then, I bring in a darker version (say, for a better sky) and cut-and-paste it on top of the lighter version.
You now have two layers — dark on top and lighter underneath. With your eraser brush set to a low opacity (I like ~20%) you can slowly and selectively erase the darker building on top to the lighter version below. You can sculpt it almost as if you were lighting it. But you can only work two-dimensionally, which is never really as good as lighting.
Bear in mind that the straight .jpg up top of the duo is the compromise exposure. The imported dark version is darker and the light version is lighter. And going through a few rounds of this import-and-selective-erase process allows me to build a subtly toned exposure that is close to what I want — even without the flashes.
A Little Perspective
Because of the subject’s size and my shooting position, I had to shoot the building with my 18mm lens. Which is not great as far as barrel distortion goes. I got it as close as I could with the lens-distort filter.
Ditto the after-the-fact shift applied, too. Not perfect (the view camera folks will certainly look down their noses at it) but fine in this instance for how the photo will be used. I am strongly considering getting a 24mm tilt/shift lens, which is much straighter on the barrel distortion, too.
__________
For the record, I decided to throw this near train wreck out into the open to make three points:
1. I am not a purist when it comes to flash. Or anything, for that matter. Back me into a corner and I will bite, kick, throw sand — whatever I can do.
2. Things do not always go well for me. Nor will they always go well for you. See #1 above.
3. Be willing to drop back and punt. Even after multiple setbacks, you can often salvage a situation.
I am going back to shoot the interiors soon, and I am really excited about that. I love having a job that gives me the privilege of access to interesting people and places. Especially smaller, interior places where radios work great.
AndI fully expect that shoot to go off as planned. Or a lot closer than this one did, anyway.

Phase One has announced a guaranteed trade-in scheme for customers wishing to upgrade to newer products. Within 6 months of a new product being launched, existing customers can receive up to 90% of their original purchase price against digital backs and up to 50% against camera bodies and lenses.
News: Digital Photography Review (dpreview.com)
3d animation of Transformers Jetfire. Inspired by the movie “Transformers: Revenge Of The Fallen”. Created by Montri Polchai. Jetfire in his early years. Check out some of my digital paintings at montri.cgsociety.org
Create nice clouds in Photoshop! Digg it: digg.com Watch it on TutCast: www.tutcast.com Visit www.PhotoshopTalent.com for more tutorials, contests and more! Music Kevin MacLeod
Me and Friends Prank Calling Dell Customer Support at around 5am and Kinda …(drunk) and making an Ass out of ourselves …or the Dell Guy..you decide Music by DJ D3X www.myspace.com/cooldjd3x
Video Rating: 3 / 5
Photography & Art Direction by: N-Studio (Nada & Najwa Marafie) Model: Manal Makeup and Hairstyle: Firas Dandashi Producer: Najwa Marfie Very special thanx to the Head TV. Director of AL-Sahed TV: Hasan Al.Khadhaari for his help Gear: Nikon D3X & Fujifilm S5Pro Lens: 24-70 mm f/2.8 – 70-200mm f/2.8 – 14 mm f/2.8 N-Studio Official website: www.n-studio.com.kw © all rights Reserved 2010
Video Rating: 5 / 5