RSS
 

Kickstarter: Compact Reveni Labs Spot Meter uses unique two-eye aiming method

08 Feb

While digital photography is popular, film photography still has a dedicated following and beginner film photographers are popping up regularly. New products for analog photographers are popping up regularly to meet experienced and novice film photographers’ needs. Reveni Labs has launched a new Kickstarter campaign, which was funded within two hours, to deliver an extremely compact spot meter to film photographers.

A spot meter is a light meter designed to precisely measure only a small portion of the image area. Photographers can use a spot meter to check metering in different areas of the frame, especially one with a wide range of brightness, and make an informed decision about the exposure.

The Reveni Labs Spot Meter being used by creator Matt Bechberger. An electronics engineer, inventor and self-professed film camera nerd, Bechberger started Reveni Labs in March 2020 when launching the Reveni Labs Light Meter on Kickstarter. A few months later, he quit his job to run Reveni Labs full time.

Vintage spot meters can be challenging to find, and new spot meters can be expensive. Reveni Labs hopes to ‘find the middle ground with its spot meter to provide a spot meter that meets the needs of modern film camera users, with a lower price point and relevant feature set.’ To Reveni Labs, there are three major issues with the currently-available spot meters: They’re large and heavy, they’re complex, and they are expensive.

To help solve these issues, the Reveni Labs Spot Meter is very small and lightweight. It weighs 1.25 oz. (about 35g). The Spot Meter is 2.8″ (71mm) long, 1.2″ (30.5mm) wide, and 1.5″ (38mm) in height.

The Reveni Labs Spot Meter is also designed to be easy to use. It has a two-eye aiming method, features simple controls and an easy-to-use menu, and offers straightforward modes, including aperture or shutter priority modes. Further, the Spot Meter includes a bright internal OLED display.

The external design (left) of the Reveni Labs Spot Meter. On the right, you can see the internal display. Image credit: Reveni Labs on Kickstarter

The Spot Meter has a shutter speed range of 1 hour to 1/8,000s in one-stop increments. The aperture range is F0.7 to F1024, also in one-stop increments. The ISO range is 1-12,800. Reveni Labs states that the EV range is 2-20 in 0.1EV increments (at ISO 100). The spot meter is about a 1.5° (6″/15cm) circle at 20′ (6m).

On the top of the Reveni Labs Spot Meter are four buttons: right and left directional buttons, a menu/compare button, and the power/sample button. Beneath the sensing lens on the front of the spot meter is the battery compartment, which holds a pair of LR44 alkaline batteries to power the device. Through the viewing lens at the back, you see the OLED display, which shows shutter speed, current state, EV value, ISO, rounding remainder, aperture, and driving value arrow surrounding the central aiming reticle.

Reveni Labs Spot Meter optical design. Image credit: Reveni Labs on Kickstarter

The Reveni Labs Spot Meter utilizes a two-eye aiming method. One eye views the data in the spot meter while the other eye surveys the subject area. There is a close-focus rear lens in front of the OLED display inside the meter to allow the user to focus on the scene and display simultaneously. The internal components are aligned on a central axis.

This design is significantly different from a more typical spot meter. A traditional spot meter uses a viewing lens and requires the user to view the scene solely through the spot meter, closing their second eye. The Reveni Labs Spot Meter doesn’t have a viewing lens; the inside is just a dark screen, which is why it’s a binocular vision spot meter and why it’s possible for it to be so compact. You can see how the Reveni Labs Spot Meter varies from a typical spot meter in the hands-on video below, published by Mat Marrash.

You can see another review of the device from Todd Korol in his video below.

The Reveni Labs Spot Meter looks like an exciting product for film photographers. If you would like to back the project, you can do so for $ 225 CAD, which is a little under $ 180 USD at current currency conversion rates. The Reveni Labs Spot Meter comes with the meter, a neck lanyard, storage pouch and four LR44 batteries. Shipping is expected to commence in August. For more information and to back the project, visit Kickstarter.


Disclaimer: Remember to do your research with any crowdfunding project. DPReview does its best to share only the projects that look legitimate and come from reliable creators. Still, as with any crowdfunded campaign, there’s always the risk of the product or service never coming to fruition.

Articles: Digital Photography Review (dpreview.com)

 
Comments Off on Kickstarter: Compact Reveni Labs Spot Meter uses unique two-eye aiming method

Posted in Uncategorized


Is it Time to go Full Frame? Weigh These Pros and Cons Before You Decide

08 Feb

The post Is it Time to go Full Frame? Weigh These Pros and Cons Before You Decide appeared first on Digital Photography School. It was authored by Bruce Wunderlich.

Is it time to go full frame?

Has anyone ever said to you, “That’s a nice photo; you must have an expensive camera”?

According to photography legend Ansel Adams, “The single most important component of a camera is the twelve inches behind it!”

Your camera is simply a tool, one that you use to create your vision of the scene in front of you. A camera can only do what you tell it to, so it’s not going to capture that “nice photo” all by itself.

But what if a camera doesn’t perform up to your expectations? Then it may be time for an upgrade – from APS-C to full frame.

Full frame photo of a forest at sunset
Captured at ISO 6400 on a full-frame Nikon D750, this image shows great tonal range with acceptable noise levels.

I recently made the jump from a crop sensor camera to a full-frame body (a Nikon D750, used in all the images below). For this article, I am not going to get into a technical discussion about the differences between a crop sensor camera and a full-frame camera.

Instead, I want to talk about if and when upgrading to a full-frame camera is desirable, especially if you’re on the fence about purchasing a full-frame body.

Now let’s discuss some important full-frame pros and cons:

Advantages of full frame

  • Enhanced low-light performance: The larger sensor of a full-frame camera has bigger pixels, which create less digital noise at higher ISOs. In most cases, you will get a one- or two-stop improvement in high-ISO noise over crop sensor cameras, which allows you to shoot with faster shutter speeds in low light.
  • More control over depth of field: This is a commonly misunderstood benefit of full-frame cameras, because the larger sensor does not really affect the depth of field of an image. However, with the larger sensor of a full-frame camera, you can move closer to the subject while using an equivalent focal length, and this causes the depth of field to become narrower. Ultimately, you get smoother background bokeh.
  • Improved dynamic range and color depth: A full-frame sensor can record more tonal range within shadows and highlights. Detail and color are much improved at both ends of the spectrum.

Disadvantages of full frame

Great Blue Heron in flight
This heron in flight was captured at a high ISO to achieve the fast shutter speed needed to get a sharp wildlife image.
  • Expense: Not only is the cost of a full-frame DSLR or mirrorless camera higher than crop sensor alternatives, but you may also need to invest in full-frame lenses.
  • Size and weight: The overall size and weight of full-frame cameras is greater than their crop sensor counterparts. Full-frame lenses are also larger and heavier. This may not matter to many photographers, but if you frequently carry gear for long distances, it could be a factor to consider.
  • No crop factor: The telephoto reach of a full-frame camera is lessened by not having a crop sensor. A 200mm lens on a full-frame camera reaches to 200mm; a 200mm lens on a 1.5x crop sensor camera reaches to 300mm.

If you’ve made it this far and you still like the sound of a full-frame camera, it’s time to ask yourself a few key questions:

How much will it cost?

As mentioned above, the cost of buying a full-frame camera is significantly more expensive than a crop sensor one, plus you’ll likely need to purchase new lenses. There isn’t much use in changing to full frame if you are not going to use high-quality lenses designed for full-frame cameras. So if you plan to make the jump to full frame, you may want to begin by upgrading your lenses to those compatible with full-frame cameras.

What type of photography do you enjoy shooting?

Boys sitting by a waterfall
Choosing a smaller aperture of f/22 produced enough depth of field to keep both the boys and the waterfalls in focus when using my full-frame Nikon D750.

Full-frame sensors offer advantages and disadvantages for different types of photography.

  • Landscape: Enhanced low-light performance and more detail are both key advantages of full-frame cameras for landscape photography. The only possible drawback here is the effectively shallower depth of field, but this can be compensated for by using a smaller f-stop.
  • Portraits: The larger size of a full-frame sensor will result in a shallower depth of field. For portraiture, this means the backgrounds can feature more blur and make the subjects stand out better.
  • Wildlife: A full-frame camera loses the telephoto reach that a crop sensor camera offers. Nevertheless, a lot of wildlife photography is shot in low-light situations, where a full-frame sensor gives a significant advantage.
  • Sports: As with wildlife photography, high-ISO capabilities are helpful for sports photography. However, the loss of increased reach may be a problem.

To summarize:

If you are a portrait or landscape shooter, there are many reasons to switch to full frame. But if you’re a sports or wildlife shooter, you’ll need to consider more carefully.

Architecture at sunset
This scene was captured at 24mm on a full-frame Nikon D750. The white line shows how much of this image would be captured on a crop sensor camera from the same shooting location.
Bald Eagles in a nest
This image was captured at 600mm with a full-frame camera. The white line shows the reach advantage that a crop sensor camera would provide. Still, capturing this image in low-light conditions with an ISO of 2000 is possible thanks to my full-frame sensor.

Is your current camera holding you back?

Every camera has a limited number of shutter releases, so if your camera is nearing the end of its life cycle, it might be time to consider an upgrade. If your older crop sensor model is limiting your results in low light, and you are constantly frustrated by high levels of noise, you might benefit from an upgrade to full frame.

However, keep in mind that it’s convenient to blame a camera for taking poor images, but it may not be the camera that’s holding you back.

Many times, photographers don’t get the results they expect from high-end equipment simply because they struggle with more fundamental techniques. No matter what type of camera you shoot with, get to know it and how all of its features work before moving on to a different one.

Cityscape at sunset
This cityscape was captured with a full-frame camera in low light by increasing the ISO.

What is your level of photography experience?

A full-frame camera is probably not the best option for beginners.

So if you are a beginner, I’d recommend starting with an entry-level camera and working up to a full-frame model. In fact, if you are looking for a camera to take photos of family and friends, a crop-sensor model is a great choice.

Having a good handle on the exposure triangle (aperture, shutter speed, and ISO) and how its key components work together is essential if you’re going to take advantage of a full-frame sensor. You must also be comfortable shooting in Manual mode.

Do you make large prints?

A full-frame sensor has larger pixels, which will capture more light – and this results in high-quality large prints. If you never make any prints larger than 8×10″, then a full-frame model won’t help you much here.

Bare trees at sunrise
Captured with a full-frame Nikon D750, this sunrise image reveals a nice range of tones, without any of the digital noise in the shadows that is likely to be present with some crop-sensor cameras.

Will purchasing a full-frame camera make you a better photographer?

You may have heard this quote, “Skill in photography is acquired by practice, not by purchase.”

Do you need a full-frame camera to capture great images? No, of course not! Most new crop sensor cameras on the market today are engineered to take beautiful images!

But if you’re an experienced photographer, you may benefit from switching to full frame.

The bottom line

If you are thinking of upgrading from a crop sensor camera, be sure to consider the price, lens compatibility, and type of photography you do before you make the change to full frame. Jumping to a larger sensor can be intense – but if you’re ready for that big step, the results are often rewarding.

Now tell me:

Are you ready to go full frame? Please leave your answer in the comments below!

The post Is it Time to go Full Frame? Weigh These Pros and Cons Before You Decide appeared first on Digital Photography School. It was authored by Bruce Wunderlich.


Digital Photography School

 
Comments Off on Is it Time to go Full Frame? Weigh These Pros and Cons Before You Decide

Posted in Photography


When NOT to use a Polarizing Filter

08 Feb

The post When NOT to use a Polarizing Filter appeared first on Digital Photography School. It was authored by Gavin Hardcastle.

when not to use a polarizing filter

There are times when a using a polarizing filter is a bad idea.

Yes, I just blasphemed against the gods of landscape photography. Not using a polarizing filter for landscape shooting could be considered sacrilegious in some circles, and indeed, I myself have written ad nauseam about the importance of this simple yet powerful photographer’s tool.

When not to use your polarizer

However, today I’m going to selectively contradict myself.

Because while a circular polarizing filter can hugely improve your photographs in most outdoor photography situations, there are times when leaving that shady piece of glass off the lens can actually give better results.

And that’s what this article is all about!

So if you’re ready to learn all about the times you should keep your polarizer packed away…

…let’s get started.

What does a circular polarizer do?

Circular Polarizer Comparison

A polarizer reduces reflected light before it enters your lens.

Note that a polarizing filter can be turned by hand to engage or disengage the polarizing effect. This is useful for shooting reflective surfaces such as water, glass, wet rocks, and cars.

Most of the time, you want to control those reflective surfaces and reduce the glare of reflected light. But what if you like that super wet look and glare on certain surfaces?

Let me give you some examples where I felt that not using a polarizer actually made for a better image.

When the reflected light has color

When NOT to use a Polarizer for landscape photography sunset image

For the image above, I decided to remove my polarizer.

And here’s why:

Because the reflected light on the wet rocks in the foreground had a distinct red color, which I really liked.

Using a polarizer would have reduced this red reflected light and would have made for a less dramatic image.

When you want that super wet look

When not to use circular polarizers waterfalls on rock

When taking this image, I found that the wet rocks had lovely highlights that caused a soft glare from reflected sunlight.

Even though the highlights didn’t really have any dramatic color, I still felt that the wet look made for a better image, so I opted not to use the polarizer.

In very low light or when shooting totally shaded areas

Waterfall in the rainforest

This shot of a waterfall at Silver Falls State Park was a long exposure in very dim light, taken inside a canyon that had no direct sunlight at the time.

You see, when the sun has gone down and it’s starting to get dark, there’s little point in using a polarizer for a scene like this.

The only wet surfaces that could cause glare were the leaves in the foreground, and the light was so dim that there was no glare at all.

Night shooting

Full moon in the desert

When you’re photographing at night, you want to get as much light as possible into your lens.

A polarizer is going to reduce the amount of light and force you to use a longer shutter speed or a higher ISO setting.

So if you’re shooting in the dark, do yourself a favor and remove the polarizer.

When capturing the full moon shot above, the polarizer would only have served to slow down my shutter speed.

When you want reflections in water

Waterfall at Silver Falls State Park

Here’s where you want the best of both worlds.

Let’s say you like the look of your image with the polarizer on. Your colors are nicely saturated and all of the glare has been reduced from the surfaces, but you’re annoyed to see that the lovely reflections in the water have either vanished or diminished.

What do you do?

The simple answer is to take two shots – one with the polarizer engaged and another without the polarizer.

Then you can blend the two exposures in Photoshop and take the best elements from each.

For the shot above, I really enjoyed the look of the reflected waterfall in the pool, so I took two shots with different polarizer settings and then combined them.

When you want to shoot rainbows

Don't use a polarizer when shooting rainbows

I’m sure I’ll be corrected by our more well-educated readers, but from a polarizer’s standpoint, a rainbow is reflected light.

So if your polarizer is engaged, the rainbow will perform a disappearing act in your photo.

Disengage or remove the polarizer and – presto! – the rainbow will be back in your photograph.

But still don’t forget your polarizer!

As I mentioned at the start of this article, a polarizer is a key landscape photography tool.

In fact, if I leave the house and forget my polarizers, I’ll actually turn around and drive home; they’re that important.

At the same time, I urge you to learn when conditions call for the removal of your polarizer.

And I hope this article helps you identify those golden moments so that you can get the best possible shots!

Now over to you:

Do you use a polarizing filter? How often? Are there times when you prefer to go without it? Share your thoughts in the comments below!

The post When NOT to use a Polarizing Filter appeared first on Digital Photography School. It was authored by Gavin Hardcastle.


Digital Photography School

 
Comments Off on When NOT to use a Polarizing Filter

Posted in Photography


Weekly Photo Challenge – Flowers

06 Feb

The post Weekly Photo Challenge – Flowers appeared first on Digital Photography School. It was authored by Sime.

BEFORE you all rush to your archives to share that photo you’re thinking of, the ‘challenge’ part of our weekly challenges is that you get out and make a new photo for each challenge, and while we know that can be difficult, we would love to see you challenge yourselves and make a new, better than you’ve EVER done, image for the weekly challenges, rather than just grabbing one from the archives – if you can!

Need Inspo? Click Here or Here or Here

This week our theme is ‘Flowers‘ and while it has been done before, we want to see it done again, better than ever! From your garden, someone else’s garden, in the street, in the hills… What can you do with a simple flower? Work on your depth-of-field, eliminating distraction, or maybe make it part of a bigger scene, hidden beauty kind-of-thing.

Make sure you use the hashtag #dPSFlowers if you post your challenge entry on social media!

Weekly Photo Challenge – Flowers
Not Always Alive – #dPSFlowers

Don’t forget, you can go back and try ALL of our CHALLENGES over HERE!

Weekly Photo Challenge – Flowers
Fields of Gold #dPSFlowers

Great! Where do I upload my photos?

Simply upload your shot into the comments field (look for the little camera icon in the Disqus comments section) and they’ll get embedded for us all to see. Or, if you’d prefer, upload them to your favourite photo-sharing site and leave the link to them.

Weekly Photography Challenge – Looking Up

Share in the dPS Facebook Group

You can also share your images in the dPS Facebook group as the challenge is posted there each week as well.

The post Weekly Photo Challenge – Flowers appeared first on Digital Photography School. It was authored by Sime.


Digital Photography School

 
Comments Off on Weekly Photo Challenge – Flowers

Posted in Photography


Tips for Buying Used Camera Gear

05 Feb

The post Tips for Buying Used Camera Gear appeared first on Digital Photography School. It was authored by Tom Mason.

tips for buying used camera gear

If you’re shopping on a budget, then buying used camera gear is a great idea.

Modern digital cameras are updated on a regular basis, so the used market is full of cameras looking for a new home. Used cameras are a great way to upgrade your gear without breaking the bank (and they often offer fantastic value for the money, too).

But when looking at secondhand gear, not all of it will be up to scratch. Not everyone cares for their gear, so you must exercise consideration and caution.

Below are some pointers to make sure you get the best bang for your buck when buying used gear. That way, you can update your cameras, lenses, and accessories for a fraction of the original price!

buying used camera gear tips

Buying used cameras

Cameras are complex machines, so there are a few key indicators to look for when shopping for a secondhand body.

Shutter count

The shutter count of a camera is simply the number of times the shutter has been fired in its lifetime.

(The shutter count is also known as the number of shutter actuations.)

Generally, the shutter count will give you a great indication of the amount of use a camera has seen, similar to checking the mileage on a car. Cameras are rated for shutter durability, with enthusiast models often rated around the 150,000-shot mark, and professional models rated at 300,000 shots or higher.

When browsing, low shutter counts often indicate less heavily-used items. Fewer than 10,000 shots on a camera that is 2-5 years old is very low, with the normal amount being around 30,000-50,000.

If a camera has a very high count of 100,000 or more, it’s probably best avoided, especially because this number will also give you a little insight into the owner’s use of the camera. Higher-count cameras may have seen professional use (and a harder life), while lower counts indicate casual consumer use.

So how do you find out a camera’s shutter count?

The number is often provided when cameras are being sold secondhand. But if you’re not sure, you can find it out a few ways, depending on the model. Check out this article for guidance: Finding Your Camera’s Current Shutter Actuations.

Camera checks

When looking at a used camera, there are a few things you can check to get a better understanding of its condition.

First, remove the body cap and inspect the inside of the camera around the mirror, focusing screen, and lens contacts. Look for any signs of damage, oil, or gunk that has collected in these areas.

Inspect inside of body used camera gear
Inspect inside the camera, paying special attention to the mirror and focusing screen; look for any sign of oil or residue.

Oil can indicate that the mechanisms of the internal parts are not functioning correctly, sometimes due to the camera being bumped or dropped. Look for any oil around the sides of the internal section. A small flashlight can be a big help here.

Remember to hold the camera face-down as much as possible to reduce the risk of contamination from dust and dirt.

Hold downward used camera gear
When inspecting a camera, try to hold it face down.

If you have a lens on hand, it’s worth taking a test shot to look for any issues with the sensor.

Set the camera to f/16 to f/22, point it at a bright subject (a white wall or the sky), and shoot a frame. Play the image back and zoom in on the LCD screen to look for any marks and scratches.

Dust spots are not a huge problem, as a simple sensor clean can take care of them. But lines can be evidence of a scratch on the sensor (which means that the camera is best avoided).

example of sensor test shot
What to look for in the test shot.

General wear and tear

Of course, it’s also important to look for any external signs of damage. Small scratches, scuffs, and marks should be expected, but heavy blemishes can indicate that the camera has been dropped. Rubber grips often start to come off with heavy use, but these can be replaced at a low cost.

Body outside used camera gear
Outside grips often become worn and unglued. As long as there are no signs of a drop, these are a simple and cheap fix.
Check LCD used camera gear
Remove any protective screens or filters to look at the true body and lens in order to assess the damage.
Inspect external body when buying used camera gear
Look externally for any signs of bumps and scrapes. Often, cameras will have a few marks, but major dents may be evidence that the camera has been dropped.

Buying used lenses

Camera lenses are expensive, so secondhand options are a great alternative to buying new.

Once again, however, there are a few things to look for when making a purchase.

Lens blemishes

When inspecting a lens, you’ll want to check both the external and internal optics.

Externally, look for any scratches or chips on the glass. Tilting the lens toward the light can help you make sure the optics are in great condition.

Note that, even if a lens has a front filter, it may not be optically perfect. So unscrew the filter and check the true front element to be sure.

Lens wear tear used camera gear

Often, lenses will show signs of wear on their focus or zoom ring and the external barrel. Simple rubbing is normal and isn’t usually a concern.

Moving on, inspect internally for dust and mold. Shine a small light inside the lens and look for any particles. Most lenses will have small dust spots, but look for any large patches or seemingly smeared areas, as these will indicate whether the lens has any fogging or other internal issues.

Check lens optics when buying used camera gear
Look through the optics to ensure they are clear of dust and mold.
Dust lens used
Heavy dust and mold in a lens are to be avoided. The hundreds of particles inside this lens offer a perfect example of what not to buy.
Inspect the inside of the lens when buying used camera gear
Using a small flashlight, inspect inside the lens, paying particular attention to the aperture blades. Any evidence of oil may indicate the lens is functioning less than perfectly.

Aperture blades

On the rear of the lens, you’ll find a small lever that you can push to open the aperture blades. Do this, and check if the blades are snappy and without any stickiness that could be a sign of collected oil.

Check aperture
Using the lever, you can manually operate the aperture for a better sense of the lens’s functionality. Check that the aperture blades are snappy when they open and close.

Look through the lens with the iris fully open, once again checking for any particles or oil spots.

Open aperture of the lens
Open up the lens’s aperture to aid inspection.

Sharpness

Check the lens sharpness using a test chart. These patterned charts are easy to find online, and they can be stuck on a wall and used to quickly evaluate a lens.

Here’s how it works:

Mount the lens on a camera, then put the camera on a tripod. Focus on the test chart, then fire the camera using a remote release or the self-timer (to make sure you don’t create any camera shake).

Check the shots on your camera LCD (or, if you can, on the computer). Zoom into 100% to be sure of focus. Of course, some cameras and lenses will need fine in-camera adjustments for perfection, but any wildly unsharp tests may indicate a lens has been dropped or is out of alignment.

It’s also a good idea to test the full aperture range and look for sharpness from edge to edge. Even at f/2.8, the center of your test image should be relatively sharp.

Additionally, it’s a good idea to look for any external marks or blemishes when performing these tests, turning the focus and zoom rings to check for any stickiness or grating sounds.

With those checks done, you’ll have a good indication of whether the lens is up to scratch (and worth purchasing!).

lens test target
Here’s a lens sharpness target. You should use a large version of this type of chart to test a potential purchase.

Where to purchase used camera gear

If you’re struggling to find high-quality used camera gear, here are a few suggestions:

Camera shops

Lots of camera retailers offer some secondhand stock as well as new cameras. Buying from a dealer has its advantages, because items are often checked before being added to the inventory, plus they’re often serviced before they’re sold.

Also, most dealers will have a return policy, so if you find any faults, you can exchange the used gear for a full refund. Many of the better dealers offer warranties on used gear that range from three months to a year, which will give you excellent peace of mind when purchasing.

Of course, one of the downsides of buying from a dealer is the increased price. Used kit bought from outlets often costs more than gear bought from private sellers – so you must decide if it’s worth that added peace of mind!

Ebay and private sellers

Purchasing from private sellers directly offers the best chance to find a bargain. Some people sell their gear at far below the market value. If you know what to look for, and are confident about the quality and genuine nature of the sale, you can often get an excellent deal.

It pays to be wary when shopping for used camera gear, though. Be suspicious of any deal that looks too good to be true, or of buyers who will only accept cash in person. Using PayPal or PayPal alternatives offers an additional layer of protection (one that’s very important in online sales).

Of course, private sellers generally won’t offer a warranty, but that is a risk you take to get a bargain.

Buying used camera gear: Conclusion

Buying used camera gear is all about taking your time to search out a bargain. Carefully study the used gear you’re considering, whether it’s from a dealer or a private seller, and look out for the telltale signs of damage.

Assuming you use careful consideration and do a thorough inspection before buying, the used market is a fantastic way to trade up your gear at a fraction of the cost of buying new.

And this, in turn, gives you money to buy additional kit – or even better, a trip or two on which you can use it!

Now over to you:

Have you ever bought used camera gear? What was the experience like? Share your thoughts, as well as any tips or tricks for purchasing used gear, in the comments below!

The post Tips for Buying Used Camera Gear appeared first on Digital Photography School. It was authored by Tom Mason.


Digital Photography School

 
Comments Off on Tips for Buying Used Camera Gear

Posted in Photography


Video: Orbit around the moon for 4 hours in this real-time video

04 Feb

Seán Doran uses still images from organizations like NASA and JAXA to create stunning videos. His latest work is ‘MOON in Real Time I,’ which is the first video seen below. Doran denoised, graded, repaired and retimed footage from the JAXA/NHK Kaguya Orbiter archive.

The Kaguya spacecraft, officially known as SELENE, was first launched in September 2007 from the Tanegashima Space Center (TNSC). The Kaguya mission’s primary objective is to collect data to help scientists better understand the moon’s origin and evolutionary history. Kaguya comprises a primary orbiting satellite, which orbits at an altitude of just over 60 mi (100 km), and a pair of smaller satellites, the Relay Satellite and the VRAD Satellite. The smaller satellites are in polar orbit. The orbiters carry various instruments to investigate the moon, including spectrometers, imagers, altimeters and more.

Doran’s retooled and recompiled footage can be seen below. The video is four hours long and is almost hypnotic.

Doran has created a lot of space videos for his YouTube channel. He has hundreds of videos featuring Earth, the Moon, the Sun, Mars, Jupiter and more. I’ve selected a few to highlight, but if you’re interested in space, you must visit his YouTube channel.

The 8K video below features music by Phaeleh and follows the International Space Station from Central Africa to Japan in real-time. For this video, Doran converted still images into real-time video.

Sticking with Earth, using the ESRSU image archive, Seán Doran created the ‘Orbit’ trilogy. The first part is seen below. You can view the other parts at the following links: Part 2 and Part 3. Like the previous video, ‘Orbit’ is a journey around Earth using ISS time-lapse photography. Likewise, the video is backed by music from Phaeleh. The 4K video below is simply stunning.

‘Lúnasa^171– One Month of Sun’ is an 8K video that Doran built by repairing and processing 78,846 frames captured by NASA/SDO/AIA/EVE/HMI in August 2014. The video is accompanied by the song ‘Spirit of Fire’ by Jesse Gallagher.

The video below, ‘Mars in Color – Crater in Tyrrhena Terra,’ is compiled using media from NASA/JPL/University of Arizona. The data came from HiRISE, which we wrote about last month.

To view more from Seán Doran, be sure to visit his YouTube channel.

Articles: Digital Photography Review (dpreview.com)

 
Comments Off on Video: Orbit around the moon for 4 hours in this real-time video

Posted in Uncategorized


Frame Within a Frame Photography: A Guide

04 Feb

The post Frame Within a Frame Photography: A Guide appeared first on Digital Photography School. It was authored by Kevin Landwer-Johan.

frame within a frame photography

Frame within a frame photography is a creative technique that works in many genres of photography. But what is it, and how can you use it for amazing photos?

In this article, we’re going to take a look at this composition “rule” – which you can apply very obviously or even very subtly in your photographs.

So if you’re ready to create some unique images…

…then let’s get started!

woman framed by bus window
© Kevin Landwer-Johan

What is frame within a frame photography?

Frame within a frame photography is all about positioning your main subject so it’s framed by something else within the scene. 

You can use anything you like for this. For instance, you might use a full rectangular frame, like a door or a window. You could even use an actual picture frame.

But frame within a frame photography is not limited to structures that completely surround your subject. 

You can incorporate body parts and tree limbs as frames. Using rocks, plastic bags, or mannequins can be an effective way to add a frame within a frame. These things may occur naturally, or you can bring them in as props to include in your compositions.

Two mannequins and a girl for frame within a frame photography
© Kevin Landwer-Johan

Frames in front and behind

Typically, we think of a frame that surrounds a subject as being in front of it.

But it doesn’t need to be.

Because you can often effectively frame your subject with something that’s behind them.

Here are three examples to illustrate what I mean:

welder working in a round frame
© Kevin Landwer-Johan

In this first photo of the welder (above), I’ve used a hole cut in the steel to encircle the worker. There are also more holes in the panels behind him, though it’s the front hole that acts as the main frame.

Monks walking through a gate in Thailand
© Kevin Landwer-Johan

In this second shot, however, while the gate pillars do frame the young monks, the contrast of the shadow on the wall also helps to frame the main subject.

woman leaning on a window frame in a train for frame within a frame photography
© Kevin Landwer-Johan

Here’s a third example where I have used frames both in front of and behind my subject. By lining up the front and rear windows in the train carriage, I have managed to carefully frame the young woman.

Depth in frame within a frame photography

The woman on the train (above) is also an example of how using frames within a frame can help create an enhanced sense of depth in your compositions.

This becomes even more exaggerated when you use a shallow depth of field. Blurring the frame shows that the frame and the subject are at different distances from the camera (and it also helps draw the viewer’s eye to your subject!).

For instance, look at the photo below. The white pillars on either side of the dancer and the circular shape behind her head frame her well. And the shallow depth of field helps create actual depth in the image.

Thai dancer for frame within a frame photography
© Kevin Landwer-Johan

Note, however, that you can use frame within a frame photography in circumstances where you convey no sense of depth.

Sunset frames
© Kevin Landwer-Johan

Take a look at the photo above. Are the people walking in front of or behind the large palm trees? The trees create a nice frame, but because the key elements are silhouetted, there’s no visual information to reference depth.

Composing with existing and created frames

Some frames are more obvious than others. Unfortunately, more obvious frames tend to be a bit too common in photographic compositions – to the point that they become clichéd.

So instead of using obvious frames, access your imagination. Look for unusual elements you can incorporate into your compositions. These can sometimes create interesting frames around your subjects.

Frames don’t have to be physical; you can always use light and shadow as a frame. Look for areas of contrast that surround what you’re focusing on. Carefully position yourself and your subject to maximize the effect.

Out-of-focus elements can also be used to create frames. When you have an object in the foreground that doesn’t form a complete frame around your subject, simply choose a wide aperture setting and make sure the foreground object is close enough to your camera. You’ll get a rather abstract form that can frame the subject and help lead the viewer’s eye into your picture.

Take a look at the image below. Do you see how the blurred vegetation creates a frame around my subject?

Thai dancer framed
© Kevin Landwer-Johan

Making use of what’s around you to create a frame can be very effective. Here, I have used the model herself to make a frame within a frame:

woman making a frame with her fingers
© Kevin Landwer-Johan

Look for frames and you’ll find them

Practice looking for frames, and you’ll begin to see them everywhere. Study the work of other photographers and see how they work with frames. Do a quick image search online for examples, and you’ll soon see how imaginative some photographers are with frames!

Then go out with a camera. Like anything, the more you do frame within a frame photography, the easier it becomes. Set yourself the task of creating a frame within a frame every time you head out to shoot.

That way, you’ll begin to train yourself to see situations where you can incorporate this compositional technique into your work.

Frame within a frame photography: Final words

Frame within a frame compositions are a great way to focus the viewer’s eye on your subject – and a great way to add depth to your photos.

So make sure you get out and practice! As I explained, the more you practice, the sooner you’ll be creating stunning frame within a frame photos.

Now over to you:

Have you ever tried frame within a frame photography? Do you have any framing tips? What are your favorite frames? Share your thoughts in the comments below!

The post Frame Within a Frame Photography: A Guide appeared first on Digital Photography School. It was authored by Kevin Landwer-Johan.


Digital Photography School

 
Comments Off on Frame Within a Frame Photography: A Guide

Posted in Photography


Soft Proofing in Lightroom: The Essential Guide

03 Feb

The post Soft Proofing in Lightroom: The Essential Guide appeared first on Digital Photography School. It was authored by Charlie Moss.

soft proofing in Lightroom

If you’ve ever printed without first soft proofing in Lightroom, you might have been surprised to find that your print didn’t match the image that you saw on your screen. Your print may have included inaccurate colors or incorrect tones.

All because you didn’t soft proof!

But don’t worry. It’s not a complicated process to soft proof your photos.

And I guarantee:

If you start soft proofing images before printing them, you won’t end up with prints that turn out different from how you expect them to look.

So let’s discover all the key features of soft proofing, and how you can use it to get your prints looking beautiful.

What is soft proofing in Lightroom?

Soft proofing is the process of previewing an image prior to printing – in order to get a better idea of what that image might look like when actually printed. Soft proofing gives you the opportunity to make changes before sending along the digital file to be printed.

The result, after soft proofing in Lightroom, is that your print will match the image you created on your computer.

Taking this extra proofing step is the key to getting top-quality printed images.

Why is soft proofing important?

Without soft proofing, it’s almost impossible to tell what your printed photograph is going to look like.

Why?

Because every printer and printing surface will interact in a different way, meaning that your results will vary wildly from printer to printer and from printing medium to printing medium.

Now, if you consistently order from the same print lab or you have your own printer at home, you may learn to predict the adjustments you need to get your images looking right. But this will only come from experience with particular printer and printing surface combinations.

And as you can imagine, gaining this experience can be expensive, especially when you’re ordering premium prints and products!

Why you need a calibrated display

First things first:

Before you do any soft proofing at all, you need a calibrated display.

A calibrated display is essential if you want your prints to match the photographs you see on your computer monitor.

By calibrating your display, you ensure that the colors are accurate. Most monitors will not have perfect color reproduction out of the box (not even the expensive ones!). Monitors are often too blue or too magenta, too light or too dark.

Also, monitors don’t hold their color calibration for long periods of time – you need to keep calibrating them every three to four weeks.

What is a printer profile?

An ICC printer profile is a file that describes how a printing machine and paper will interact.

A printer has to convert your image file into instructions for how to put ink on the paper, and each printer will do this slightly differently.

Soft Proofing in Lightroom printer profiles

But ICC printer profiles give you a way to predict how the printer will turn your digital file into a physical print.

In fact, a good print lab will offer custom ICC printer profiles for you to download on your own computer. This lets you soft proof your digital photographs before sending them to be printed.

How to load printer profiles into Lightroom

Soft proofing begins with downloading printer profiles.

Once you have downloaded the necessary printer profiles from your favorite print lab’s website, you’ll need to add them to your computer so that software such as Adobe Lightroom and Photoshop can find them.

Fortunately, this is very simple. You just move the files to the correct operating system folder as follows:

  • Mac: Library/ColorSync/Profiles/
  • Windows: Windows\system32\spool\drivers\color

Now the different profiles will be ready for use when you start soft proofing in Lightroom.

How to soft proof in Lightroom

Once a file is ready for printing (i.e., you’ve edited it to your heart’s content), head over to the Lightroom Develop module.

There, in the bottom left-hand corner of the main window, you’ll find an option labeled Soft Proofing. Tick that box.

the Lightroom soft proofing process

Once you’ve activated the soft proofing option, you’ll find that your photograph moves onto a white background and some new options appear in the top right-hand corner of the screen (as indicated above).

If you click the Profile option in the new Soft Proofing panel, you’ll find a list of profiles to choose from. If your new ICC printer profiles haven’t yet appeared on the list, then select Other at the bottom of the dropdown menu.

A window will pop up, and you can select from the different ICC print profiles that are installed on your computer. Each option you pick will appear in Adobe Lightroom for soft proofing.

choosing a profile when soft proofing

Once you’ve selected your profiles and closed the window, pick the profile you want to use and make sure the Simulate Paper & Ink box is checked.

Soft proofing challenges

The challenge with soft proofing is that, as you can see below, the image won’t look the same as the original file once you’ve applied the soft proofing ICC print profile.

In the example below, I’ve applied a profile for a metallic flex paper, and you can see that the image on the right is quite a bit darker than the original image. This means the print will likely be darker than we intended.

To fix this problem, hit the button labeled Create Proof Copy:

Soft Proofing in Lightroom proof preview

This will create a duplicate image with your print profile embedded so you can make adjustments for printing. By creating a proof copy first, Lightroom will leave your finished image unchanged – even as you make adjustments to your file for printing.

You see, on this new copy of the image, you can make adjustments while still in soft proofing mode. That way, you can ensure that what gets printed is exactly what you intended.

So simply make adjustments to the proof preview using the Lightroom sliders until you like the result!

Here’s one final technical check worth running:

The gamut warning feature.

In the left-hand corner of the histogram is a button that looks like a computer screen:

clipping check when soft proofing

If you toggle this setting on, your image may gain some striking blocks of color.

The colors are simply warning you which areas of the image will not reproduce properly when you go to print. To get the best quality print, you should do your best to reduce (and ideally remove) all of these problem areas.

To get rid of the warnings, try adjusting the saturation and exposure of your image.

Soft proofing in Lightroom: Conclusion

Many people see soft proofing for printing as unnecessary. They may get acceptable results already when printing, and they may have even learned to compensate while editing their photos to get the best prints.

However, if your prints don’t match the images you’re seeing on the screen, it’s because you haven’t done any soft proofing. With enough experience, you’ll learn the adjustments to make for perfect print results. But this is a process, one where you have to learn by making mistakes – so don’t be discouraged if things don’t work out the first time.

When you make your next print, give soft proofing in Lightroom a try. Calibrate your monitor, then soft proof your images with the correct ICC print profiles.

I guarantee it will improve the quality of your print!

Now over to you:

Have you ever tried soft proofing your prints? How did it go? Do you think you’ll start soft proofing before printing, now that you’ve read this article? Share your thoughts in the comments below!

The post Soft Proofing in Lightroom: The Essential Guide appeared first on Digital Photography School. It was authored by Charlie Moss.


Digital Photography School

 
Comments Off on Soft Proofing in Lightroom: The Essential Guide

Posted in Photography


8 Ideas for Awesome Abstract Photography

02 Feb

The post 8 Ideas for Awesome Abstract Photography appeared first on Digital Photography School. It was authored by Anthony Epes.

8 ideas for abstract photos

In this article, I plan to share some inspiring abstract photography ideas.

Now, I would never describe myself as an abstract photographer, yet I seem to have shot countless abstract photographs. In fact, I try not to assign myself to any genre. To me, that feels like the opposite of what photography should be – which is a place to have fun, to be curious, to explore, and most importantly, to give your imagination free rein.

I start the article like this because I want to encourage you not to be intimidated by this genre. Don’t worry about getting it right. Abstract photography should be a place of complete freedom. 

And this is why the most important quality for abstract photography is imagination

broken down wall

What is abstract photography?

For me, abstraction is about removing what’s in the world around us from its familiar context. It involves playing with elements and subjects, moving them away from their usual settings and placing them into new situations – so that they become something else entirely.

I find that doing abstract photography brings us into that childlike realm of imagination and makes us often think, “What is that?” Or, “That reminds me of…” Then our minds go off into dreamlike worlds.

smashed vegetable abstract photography ideas

“Abstraction demands more from me than realism. Instead of reproducing something outside of me, now I go inward and use everything I’ve learned thus far in my life.” – Susan Avishai

Therefore, I like to approach this genre as a way for us to have fun with our photos, the world around us, and ourselves. I’ll share eight abstract photo ideas that I hope ignite your imagination, and get you excited about exploring abstract photography!

Let’s get started.

abstract photography ideas balloon

1. Use your imagination as much as possible

abstract photography ideas

“Abstraction allows man to see with his mind what he cannot see physically with his eyes…Abstract art enables the artist to perceive beyond the tangible, to extract the infinite out of the finite. It is the emancipation of the mind. It is an exploration into unknown areas.” – Arshile Gorky

Doing abstract photography feels like I am trying to detach myself from reality and delve into a space where everything around me is a new sight, a new sensation, or a new experience.

I look around and see elements, colors, shapes, lines, textures – each is almost separate from the other. I am looking for things that are connected, but in a different way to how my mind usually puts things together.

Then it’s my imagination that kicks in and starts creating all kinds of ideas about what things look like. To me, the photo above looks like something coming from the cosmos, the beginnings of a new world.

(In reality, it’s some slime floating around in water, which I played with in Lightroom.)

So use your imagination constantly. When doing abstract photography, don’t let “conventional” thinking get in the way!

haunting idea for abstract photography

2. Search for textures

Textures are a fascinating subject to explore. When you focus on textures, you capture a tactile quality in your photos. You make people want to lean in and touch something.

And you often give very ordinary things – water, brick, wires, or stone – an inviting feeling.

Today, we are often so disconnected from the ordinary (i.e., what we perceive as the boring world around us). We are so often lost in thought that we’re only jolted out of it when we see spectacular things – like beautiful views, intense sunsets, etc.

But all around us are terribly ordinary subjects that can be so very intriguing, if only we viewed them with our sense of wonder! So instead of capturing a snapshot of an intense sunset, try looking more closely at some “boring” subjects to see what textures you can find!

abstract photography ideas

3. Shoot the ordinary

“The longer you look at an object, the more abstract it becomes, and, ironically, the more real.” – Lucian Freud

I love to shoot random, day-to-day subjects that I find all around me. I challenge myself to make these subjects seem interesting.

For instance, I am always on the lookout for torn posters on a wall – especially when they are bathed in beautiful light – as well as weird things I find on the street at my feet.

In fact, starting with what you find at your feet is a great way to do abstract photography! 

abstract photography ideas

Here’s why:

Everything, when you pay attention to it, can reveal different qualities than what we first notice. And our challenge as photographers- as artists, no less – is to find the most interesting way to shoot whatever catches our attention.

Maybe you need to take a different perspective – lying on the floor, getting up high, or changing angles. Or maybe, by using the quality of the light, you can turn the subject from ordinary to fascinating. 

yellow on blue shapes

Or perhaps you could even use color to give boring, unoriginal subjects interest and depth:

tangled wires against a wall

4. Include mystery in your abstract photos

“Abstraction generally involves implication, suggestion and mystery, rather than obvious description.” – Robert Genn

The appeal of abstract photos for me is very much about mystery. Creating something that doesn’t look as it should, displacing your subject, mixing up reflections, creating contrasts and jarring juxtapositions – it’s all a fun part of making the world less real and more mysterious. 

You can combine shapes together to create something that makes no real sense, but still sparks ideas and thoughts in the mind of the viewer. 

abstract photography ideas

In the photo below, I captured this reflection of a man on what I like to think is a moon landscape inhabited by interesting-looking creatures.

abstract photography ideas

At least, that’s what I see when I look at the photo. What do you see? It might be completely different!

5. Aim to capture the feeling of your subject 

“Of all the arts, abstract painting is the most difficult. It demands that you know how to draw well, that you have a heightened sensitivity for composition and for colors, and that you be a true poet. This last is essential.” – Wassily Kandinsky

In my photo teaching, I talk a lot about having a heightened awareness and sensitivity to the world.

Because if you want to find incredible photos wherever you go, you must have the ability to see more of what’s around you than you can when you are lost in your thoughts.

Now, with that heightened sensitivity comes increased feelings and impressions of what you see.

And thinking about the feeling you have when you look at your subject is so important. If you aren’t feeling anything, you won’t be able to communicate anything in your photos.

But if you do feel something when you look at your subject…

…you can channel it into the photo for a beautiful result! 

stones in water abstract

I like the sensations I get when I look at the texture photos above. It’s perhaps a sense of awe at the water and the beautiful colored stones. I can almost feel the water, and that feeling is translated through the photo. 

In the photo below, perhaps I get a feeling of fun, thanks to some bright colors on what I remember to be a dull London day:

red and yellow road labels

6. Find subjects that stop you in your tracks 

I strongly urge you to cultivate a sense of wonder.

Why?

I think we often get so jaded by the world around us – that is, we are so busy with our lives and worries and things to do – that we stop finding things awe-inspiring. It takes more and more to make us stop in our tracks and say “Wow!”

But we photographers have a gift:

We are visual people.

We just have to make sure we’re always refreshing our vision and our sense of wonder at the world around us.

And we must go seek subjects that makes us feel awe. 

rocks on water with reflection

I believe that we don’t always need new subjects and exotic locations. We can be impressed by things that are right on our doorstep. Therefore, going out with the intention of finding something that makes you go “Wow!” or “Cool” or “Interesting!” is a great thing to do.

Work on always trying refresh your eyes, so that you can be impressed by mundane subjects (this also refreshes the spirit!).

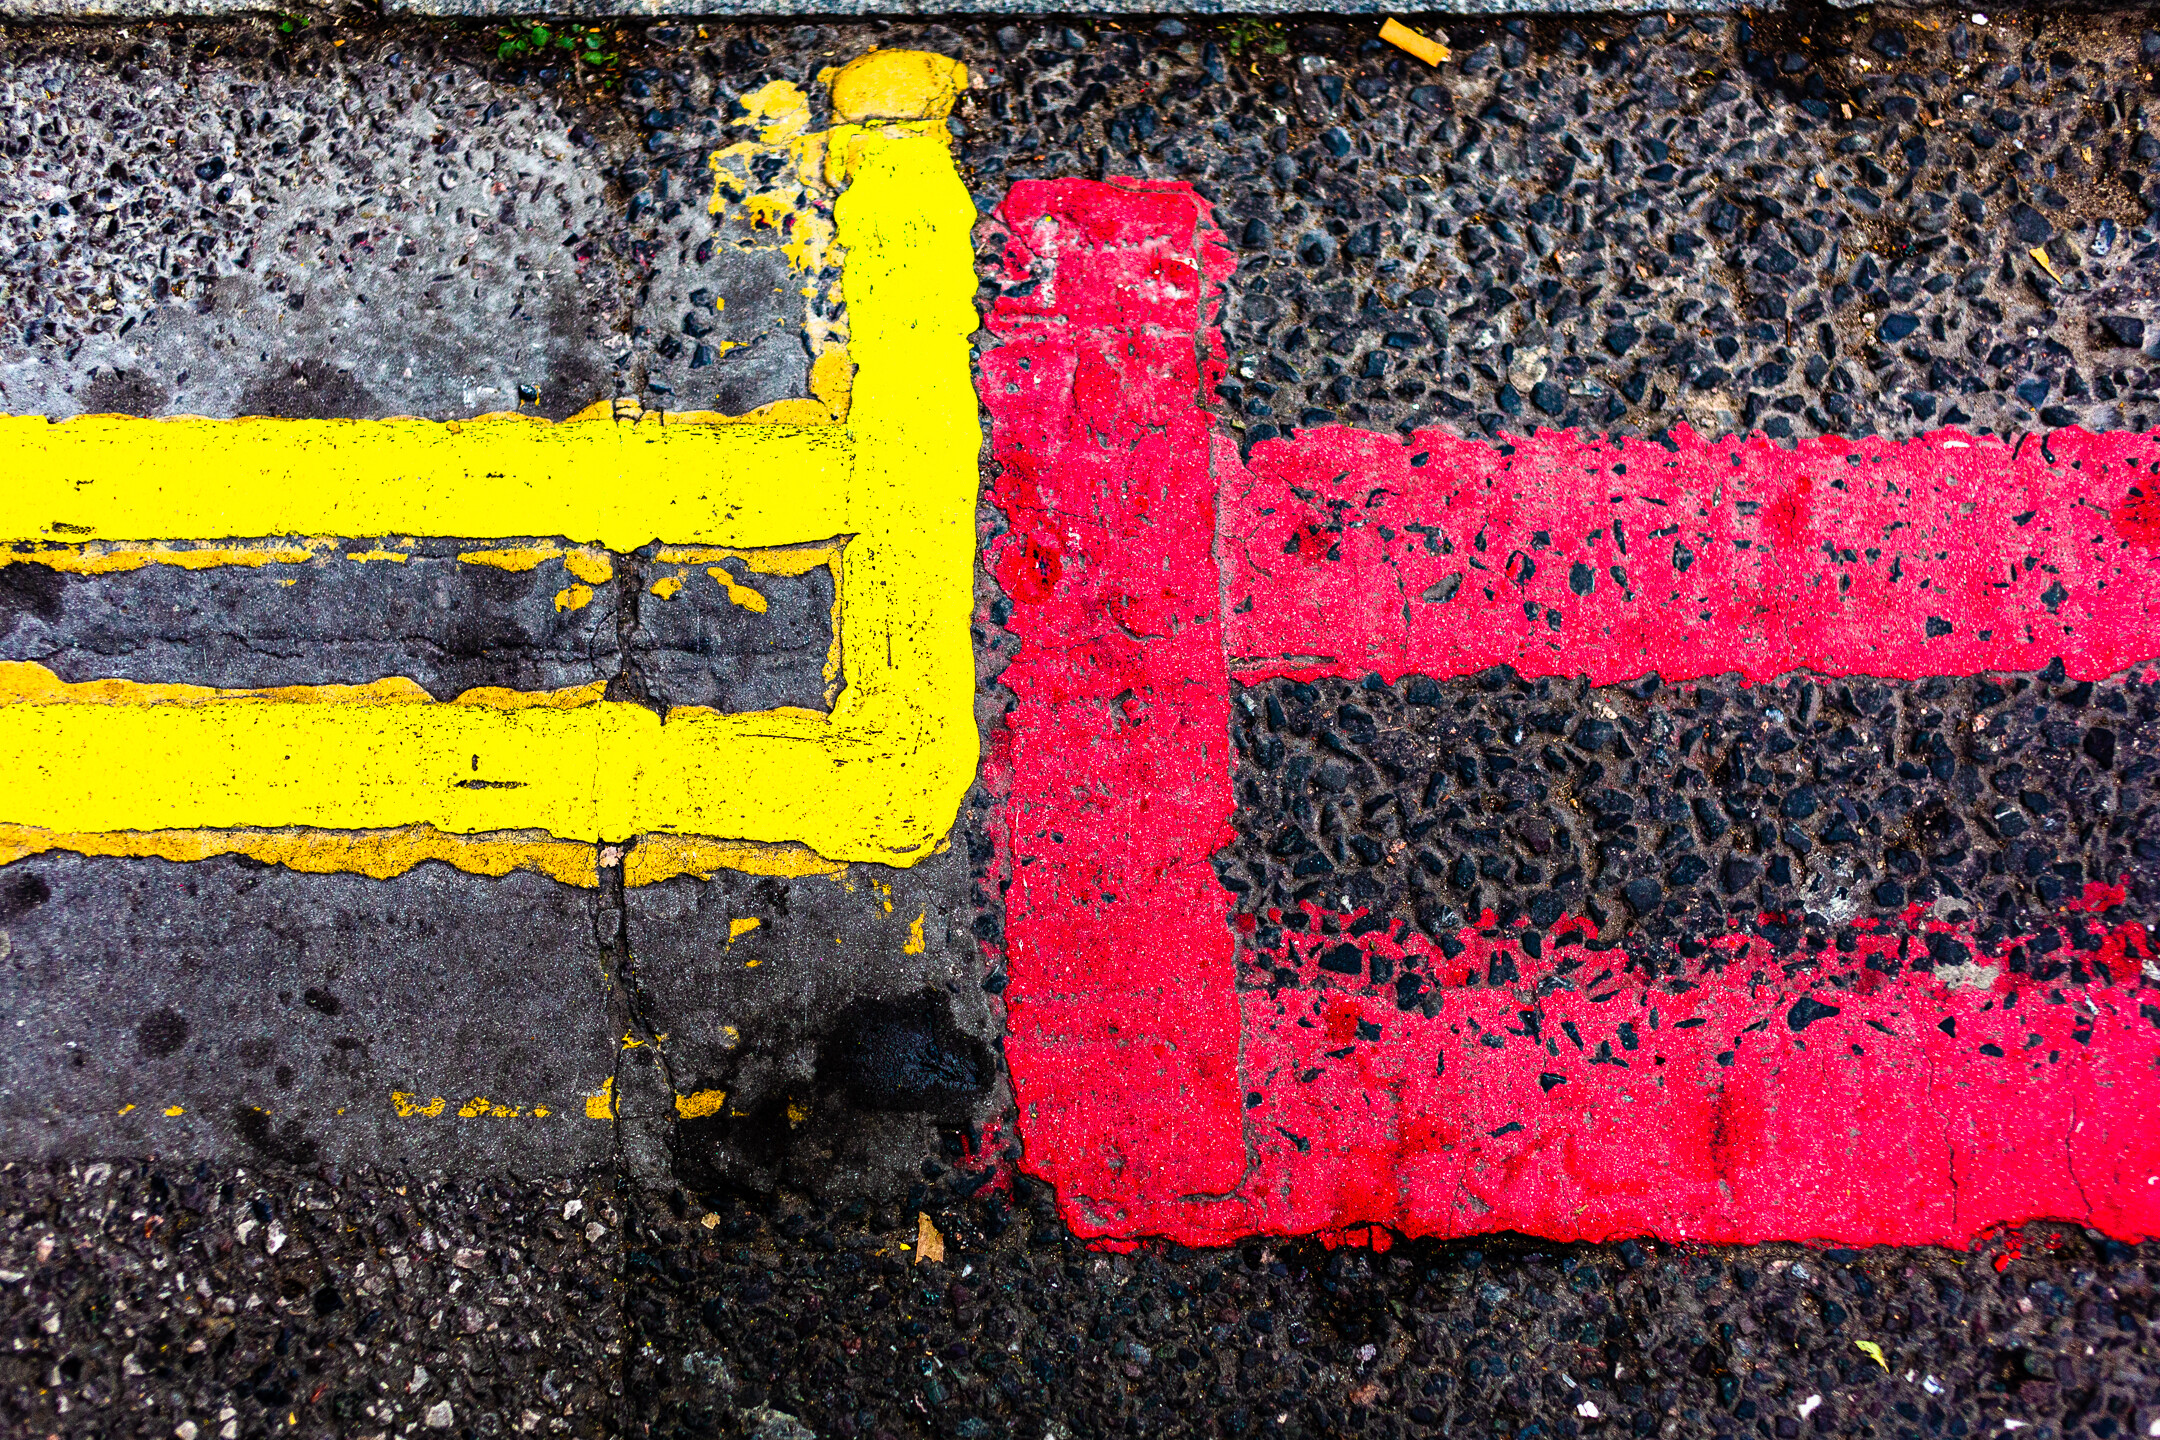
In the photo below, the faded street markings look like a sign in an unknown language. Maybe even a secret message.

abstract photography ideas

I find that the easiest way to refresh your eyes is to go out with the goal of having fun in your photography. Try to find something that makes you laugh. 

In this shot of gnarly wood below, I might have photographed a frog, or maybe an alien! 

tree trunk knots

That, for me, is the essence of abstract photography:

Creating a new world, a new vision, and a new experience from this very familiar (yet still awe-inspiring!) world around us. 

7. Use perspective for an unusual take on your subject

By changing perspective, you can create cool new images of otherwise dull subjects. 

building with sky reflection

By shooting upward and not focusing on the entire scene, I captured this image:

lights on the ceiling with surrounding windows

So make sure you don’t always shoot using the same boring, eye-level perspective.

Instead, mix things up a bit! Experiment with changing your vantage point or your angle.

Make sense?

8. Break down the world into elements 

In photography, you must learn how to see the world as a series of elements, and then learn to arrange these elements in pleasing and interesting ways.

Ultimately, you should be looking at the world as a series of elements, and not as a vast, interconnected whole. 

This is relevant to all genres of photography. Gaining a sense of control over the elements you place in your scene, what elements you use to support your subject, and what elements you remove from the composition is a great way to improve your abstract photos. 

abstract photography ideas

This idea of breaking the world down into elements is particularly useful when doing abstract shooting, because you are looking at the world afresh and trying to use your imagination to create something that is super interesting – and also super unique! 

Abstract photography ideas: Conclusion

Hopefully, you’ve found some exciting abstract photography ideas to try – and you’re ready to get out and start shooting!

So grab your camera and take some photos.

And make sure to have lots of fun while you’re at it!

Now over to you:

Have these abstract photography ideas helped you see what’s possible in your photography? Do you shoot abstracts, or will you now? Let me know in the comments below!

The post 8 Ideas for Awesome Abstract Photography appeared first on Digital Photography School. It was authored by Anthony Epes.


Digital Photography School

 
Comments Off on 8 Ideas for Awesome Abstract Photography

Posted in Photography


Canon unveils AI-powered automatic camera, the PowerShot PICK

01 Feb

Canon has launched a campaign on the Japanese crowdfunding site Makuake for an AI-powered camera, the PowerShot PICK. The campaign has proven to be highly successful, attracting nearly ¥100,000,000 in support. The goal was ¥1,000,000.

The experimental PowerShot PICK camera can analyze a scene, identify people, track their faces and then, using artificial intelligence, determine the ideal moment to capture a photo. In a rough translation, Canon refers to the PICK as an ‘automatic shooting camera.’ The PowerShot PICK combines Canon’s optical, video processing, and artificial intelligence technology.

In terms of design, the PowerShot PICK is a compact, modern-looking device. It has been designed to blend in, while Canon has also considered ways to give the PICK some character. You can also take the PICK with you when you leave the house, such as when going to a family gathering or an event. You can place the PICK on a tripod as well, and Canon is offering special Velbon tripods as part of the campaign.

The PowerShot PICK uses a 1/2.3-inch 12MP CMOS image sensor. The sensor is paired with a 19-57mm equivalent zoom lens with a maximum aperture of F2.8. The PICK includes built-in image stabilization. The PICK pans 170° in both directions and can tilt 110°. The PICK records to a microSD card and weighs a mere 170g. As you can see in the video above, the PICK is small, with a height of about 3.5″ (90mm) tall.

The Canon PowerShot PICK is a compact device. It has a 360° field of view and incorporates a 12MP image sensor. Image credit: Canon on Masuake

While the PICK is designed to take photos automatically in the background, which Canon believes will result in more authentic images and better mementos, the PowerShot PICK can also be manually controlled using keywords. A user says, ‘Hello PICK,’ followed by commands to take a photo, record video, change subjects and stop capturing.

The PICK will launch alongside a dedicated smartphone app, allowing you to view and share photos and videos captured by PICK. The app automatically recommends the best photos, although you can view all images.

The setup process promises to be easy. After pairing with your smartphone, which is required, you simply power on PICK and place it somewhere, depending on the situation. You could place it on a table at the center of a family meal, on a tripod near an event, on a bookshelf, etc. As mentioned, although PICK can operate automatically, it can be controlled using voice or by using the smartphone app.

The Canon PowerShot PICK is currently available only to backers on Makuake. The price for the PICK works out to just under $ 400. Given the campaign’s success, the only remaining units are for the PICK and charging cable. The tripod bundle has sold out. Canon intends to ship the PICK to backers this July. Canon hasn’t announced global or public release plans, so it’s unclear if the PowerShot PICK will be available outside of Japan. You can learn more about the PowerShot PICK by visiting Makuake.

Articles: Digital Photography Review (dpreview.com)

 
Comments Off on Canon unveils AI-powered automatic camera, the PowerShot PICK

Posted in Uncategorized