Blog

  • How to Create Memorable Family Albums Using the Lightroom Book Module

    There is little quite as delightful as going through family albums, reliving memories and watching how things have changed over the years. Having digital copies is great but nothing really beats the excitement of having them in print, holding all those memories in your hands and going through them at your leisure.

    It’s a sentiment I’ve especially grown to appreciate since the birth of my daughter. The rare times my hard drive starts giving me trouble and I begin to fear the loss of my digital files, I’m assured if anything, my favorite photographs with my loved ones are safe in their spot on my shelf. So, how do you go about creating such family albums?

    The Lightroom Book Module

    If you use Lightroom in your post-processing workflow (who doesn’t?), you’ll be delighted to know it helps you make beautiful albums even if your sense of design isn’t the best.

    It keeps you from looking for other software – where you’ll probably be re-uploading your photos, struggling with their size, cropping, and even brain storming for creative and appealing layouts.

    The Lightroom Book Module even goes a step further and gives you the option to send your photo book to Blurb for printing from within Lightroom!

    In case you don’t know, Blurb is a publishing company which prints quality books on-demand for people like you and me. They’re reasonably priced and could rival professional photo books. To sweeten the deal, they deliver your order right to your doorstep!

    How to Create Memorable Family Albums Using the Lightroom Book Module

    Of course, you still have the option to convert your photo book into a PDF or JPEG images. That way you can have them printed yourself or just save those layouts as collages. So, without further ado, let’s look into how you can make beautiful family albums!

    Step 1 – Make a Collection

    Before you start creating your book, you should make a Lightroom Collection of the photos you want in the book.

    Since I take a lot of photos of my daughter and they’re all in different folders, I’ve set up a Smart Collection which saves any picture I keyword with her name. This way, Lightroom automatically saves them to that Collection. Whenever I need to look at all her photos together, I just navigate to that folder and they’re all there.

    For this example, I’m making a photo book of my daughter’s first year. Once you’ve made your personal Collection, select it and head over to the Lightroom Book Module.

    Step 2 – Save your photo book

    In the Book module, you’ll immediately see all the photos of your Collection laid out in the form of open book pages. (Note this only happens automatically if you set that up in your Lightroom preferences).

    How to Create Memorable Family Albums Using the Lightroom Book Module

    Before you start anything, it’s a good idea to save the book so you don’t lose any changes you make. To do so, look for this button in the top-right: Create Saved Book.

    How to Create Memorable Family Albums Using the Lightroom Book Module

    After clicking that, you’ll be asked to name your book and choose where you want to keep it in Lightroom.

    How to Create Memorable Family Albums Using the Lightroom Book Module

    It’s preferable to keep it under the collection you’re working from so it’s always easily accessible. To do so, select the Inside checkbox, and in the drop-down menu select the collection you’re using. I’m using a collection with my daughter’s name. (Keep the other options ticked as they are by default).

    On the Collections panel, the photo book will appear under your collection.

    How to Create Memorable Family Albums Using the Lightroom Book Module

    Viewing your photo book

    You can choose how to view your photo book from the different “Views” options on the toolbar at the bottom.

    The default one is the Multi-Page View which shows your entire photo book. You can enlarge or shrink the size of the pages by using the Thumbnails slider on the bottom-right, the same way you do in the Library module.

    How to Create Memorable Family Albums Using the Lightroom Book Module

    Then there’s the Spread View, which shows how side-by-side pages will appear in the book. This is useful when you’re having a closer look at your photo book. You can shift through the pages using the arrow keys on the toolbar below.

    How to Create Memorable Family Albums Using the Lightroom Book Module

    Finally, there’s the Single Page View to get really up close and personal, for when you’re adding finer details.

    v

    Step 3 – Select Book Settings

    The first panel on the right-hand side is the Book Settings panel. Here, you can choose the format of the book between Blurb, PDF, and JPEG.

    Publishing with Blurb

    First, let’s look at the options you have if you choose to publish through Blurb.

    How to Create Memorable Family Albums Using the Lightroom Book Module

    Depending on your requirements, you can change the size of the book.

    How to Create Memorable Family Albums Using the Lightroom Book Module

    You also have the options to change the paper type and the book cover. An interesting thing to note is that at the bottom of the panel you’ll see a rough estimate of how much your book will cost. However, the price is only visible if you’re using the Blurb option (as seen above).

    As you change your options the price will also change. This helps you manage your photo book within your budget.

    Publish as a PDF or JPEG

    If you choose PDF or JPEG in the Book drop-down, the options will also change (shown below).

    How to Create Memorable Family Albums Using the Lightroom Book Module

    You still have the liberty of changing the book size and choosing the book cover, however, now you also have to look over other things like your image quality, resolution, etc.

    Step 4 – Layout

    Now that basics are out of the way it’s time to get to the good stuff!

    Right now, your photo book may have a lot of empty pages and it clearly doesn’t look like what you want. The appearance, or rather, the layout of the book can be changed in the Auto Layout panel.

    Notice that the Preset selected by default is Left Blank, Right One Photo, and that’s likely how you’re seeing your book right now: the left page is blank and the photo is on the right side of the spread.

    How to Create Memorable Family Albums Using the Lightroom Book Module

    If you want you can choose any of the other presets available to you, though you’ll find there’s little available.

    How to Create Memorable Family Albums Using the Lightroom Book Module

    To change everything to your liking, you’ll first need to hit the Clear Layout button in the Auto Layout panel.

    How to Create Memorable Family Albums Using the Lightroom Book Module

    This clears away everything and gives you a completely new canvas to work on.

    How to Create Memorable Family Albums Using the Lightroom Book Module

    Making your own Layout

    In the Preset drop-down, select Edit Auto Layout Preset.

    How to Create Memorable Family Albums Using the Lightroom Book Module

    This opens a dialog box where you can select how you want your pages to look.

    How to Create Memorable Family Albums Using the Lightroom Book Module

    You can see that the dialog box is divided in half to accommodate the design for the right and left pages. By default, the left page is blank. On the Left Pages drop-down, select Fixed Layout.

    How to Create Memorable Family Albums Using the Lightroom Book Module

    This will open a variety of layouts for you to choose from. You can scroll through them to see if anything catches your fancy.

    How to Create Memorable Family Albums Using the Lightroom Book Module

    The grey area in the template shows how much space the photo will take on the page. In the image above, the first sample (on the left-hand page) portrays an image having some space from the edges of the page, thus we can see the white border. The second template (on the right-hand page) shows an image being fit onto the entire page with no blank space at all.

    As you scroll down, you’ll see a number of different layouts, some of them with text as well.

    Your page might not be the same proportion as your photograph, so it’s a safe option to choose “Fill” from the Zoom Photos drop-down menu.

    How to Create Memorable Family Albums Using the Lightroom Book Module

    This makes sure that the final look is exactly as you see in the template, or you might be seeing more blank space than you were supposed to.

    You might have noticed that so far we’ve been working with “1 Photo: from the secondary drop-down that appeared after selecting Fixed Layout.

    How to Create Memorable Family Albums Using the Lightroom Book Module

    If you choose any of the other options from the dropdown, the templates will change accordingly.

    How to Create Memorable Family Albums Using the Lightroom Book Module

    Similarly, you can choose any template on the right-side pages. Don’t forget to choose “Fill: in the Zoom drop-down before you hit Save!

    One tip I offer is that you should choose templates where images have some space (white lines) between them. It gives a more elegant, classy look. In the end, though, it all depends on your personal preference.

    When you hit Save, the New Preset dialog will ask for a name. For convenience, name the Preset according to how you’ve selected the layout to look (see example below).

    How to Create Memorable Family Albums Using the Lightroom Book Module

    When you click Create, the Auto Layout panel will have the new preset selected. To apply it to your photo book, you just have to click the Auto Layout button.

    How to Create Memorable Family Albums Using the Lightroom Book Module

    If you don’t, you’ll find your book to still be in the default setup of “Left Blank, Right One Photo”. This is what my view looks like after clicking Auto Layout.

    How to Create Memorable Family Albums Using the Lightroom Book Module

    As you can see, Lightroom applied the selected layout (that we created) to the entire photo book.

    Step 5 – Changing Layout for Individual Pages

    For now, your entire photo book follows a single layout. But you can also change the layouts for individual pages too! Let’s check out the Page panel for that.

    Select the page where you want to change the layout by clicking on the little arrow on the Page panel.

    How to Create Memorable Family Albums Using the Lightroom Book Module

    You can also access these options directly by clicking on the little arrow below any page you select.

    How to Create Memorable Family Albums Using the Lightroom Book Module

    This allows you to choose from all the layouts available.

    Step 6 – Working on Individual Panels

    There’s still more tweaking you can do as well. If you think an image would look a bit better after a little bit of zooming in or out, you can select the image and a zoom slider will appear. Simply drag the marker as you see fit.

    How to Create Memorable Family Albums Using the Lightroom Book Module

    This sort of work is better done in Spread view since it shows you a larger view and is also easier on the eyes.

    You can also change the position of a photo by dragging it. It will move within the confines of its template. In the image below, you can see the photo has been dragged a little bit from left to right.

    How to Create Memorable Family Albums Using the Lightroom Book Module

    You should go through your entire photo book in the Spread View at least once to make sure everything looks good and no image is getting cut off in an unpleasant way.

    You can get really creative and make interesting sets of photos by using zoom and dragging the image to adjust its position.

    Step 7 – Changing Photos inside Panels

    Lightroom arranges all the photos automatically. So obviously there may be images which you want to see on another panel, or another page, or a certain set of images you wanted to keep together.

    You can change the photos inside panels pretty easily by dragging and dropping. Select the photo you want to move and drag it towards the panel you want it in. Once you drop it, the two photos will swap places.

    How to Create Memorable Family Albums Using the Lightroom Book Module

    You can also drag photos into the panels from the Filmstrip below.

    Removing a Page

    If you want to remove any page, right-click on the page and select Remove Page.

    How to Create Memorable Family Albums Using the Lightroom Book Module

    Step 8 – Adding Text to your photo book

    When you select any page or photo, a small button “Add Page Text” or “Add Photo Text” will appear near the bottom line.

    How to Create Memorable Family Albums Using the Lightroom Book Module

    Simply click this button if you want to add text and write whatever you want.

    Lightroom’s default font might not be very pleasing to the eye, so if you want to edit your text, select the text and look over at the Type panel.

    How to Create Memorable Family Albums Using the Lightroom Book Module

    The Type panel is pretty straightforward. Here you can change the font type, font color, font size, opacity, alignment, etc. By default, the font is set tightly against the photo.

    You can adjust this through the Text panel too.

    How to Create Memorable Family Albums Using the Lightroom Book Module

    The Offset slider on the Text panel helps you adjust how near or far you want to place the text from the photo.

    You can also adjust the text to sit Above, Over or Below the photo. If you want to remove the text, uncheck the Photo Text option in the Type panel.

    Step 9 – Adding Backgrounds to your photo book

    Our last stop is the Background panel. If you want to add images or some sort of design in the background, this is where you need to be.

    How to Create Memorable Family Albums Using the Lightroom Book Module

    Adding a Photo in the Background

    If you want to add an image as the background, simply drag it from the Filmstrip and drop it on “Drop Photo Here” in the Background Panel. It’ll appear as a faded background.

    How to Create Memorable Family Albums Using the Lightroom Book Module

    You can control its density with the Opacity slider near the bottom of the panel. It’s best to keep it at a low opacity like 20-30% so it doesn’t distract from the main image.

    Adding Background Color

    If you want to add a color to the background, you need to check the Background Color option. Then you can click on the color selector and pick a color, or add a HEX code to get your desired color.

    How to Create Memorable Family Albums Using the Lightroom Book Module

    Adding Graphics to Background

    Adding graphics is just as simple. Click on the arrow icon in the Background panel and it will open a side menu.

    How to Create Memorable Family Albums Using the Lightroom Book Module

    By default, “Photos” is selected. Change it to “Travel” or “Wedding: and you’ll see graphic images similar to the ones in the image above. Select the one you like and you’re good to go.

    How to Create Memorable Family Albums Using the Lightroom Book Module

    You can experiment with the Opacity slider using graphics too.

    Note: Any background effect that you apply will apply to only the selected page. If you want to apply it to the entire photo book, you’ll need to check the Apply Background Globally option.

    45

    Step 10 – Ready for Printing!

    Once you’ve worked out the finer details and are all set to see your photo book in print, select the Send to Blurb button at the bottom of the panels. In case you’re working with the PDF or the JPEG option, you’ll have Export Book to PDF/JPEG as the last step.

    How to Create Memorable Family Albums Using the Lightroom Book Module

    When you click Send Book to Blurb, you’ll get a Sign In window detailing the final look and price of your photo book.

    How to Create Memorable Family Albums Using the Lightroom Book Module

    If you want to get good quality prints at a good price and a professional looking photo book ready at your doorstep, I’d suggest making an account at Blurb and taking full advantage of it.

    Afterward, the only thing left to do is to wait for the memories to be given a form.

    I know for a fact that I’d love to look through this album of my daughter’s first year in the world, from time to time, even ten or twenty years later. At that point, who knows where my digital files will be.

    The post How to Create Memorable Family Albums Using the Lightroom Book Module appeared first on Digital Photography School.


    Digital Photography School

  • Blackmagic Design announces new Blackmagic RAW codec for video

    Blackmagic Design has announced the public beta of its new Blackmagic RAW video codec. The company says the new format combines the benefits of shooting Raw video with the ease of use and smaller file sizes usually associated with compressed, gamma-encoded video files.

    Raw video typically produces very large files and requires lots of processing power to edit when compared to compressed formats. Blackmagic says it has addressed this problem by moving part of the de-mosaic process into the camera, which is able to provide hardware-based acceleration. By performing this process in-camera, editing software like DaVinci Resolve won’t need to work nearly as hard to decode the files.

    Blackmagic RAW supports two types of compression: constant quality or constant bit rate, allowing users to prioritize image quality or file size based on what they’re shooting. Images are encoded using a non-linear 12-bit space designed to provide both high quality color data and dynamic range. According to Blackmagic, its new Raw format will also provide more accurate skin tones and color thanks to its Generation 4 Color Science. (All of this processing does make us wonder whether these Raw files are completely comparable to the Raw files we’re used to in the still imaging world.)

    The Blackmagic RAW public beta can be downloaded immediately for use on the URSA Mini Pro camera.

    The company says the new Raw format will also simplify media management by creating single files rather than directories of still images, as is the case with CinemaDNG. When files are edited in software like DaVinci Resolve a sidecar file will be created, similar to a Raw photo in Adobe Camera Raw.

    Speaking of DaVinci Resolve, Blackmagic has just released version 15.1, which includes full support for Blackmagic RAW. For users of Blackmagic cameras, this means it will be possible to shoot, edit, and color grade using the same files through the entire workflow.

    Blackmagic has released DaVinci Resolve 15.1, which fully supports its new Blackmagic RAW codec, and is available for download immediately.

    For users of other software platforms, Blackmagic has announced a Blackmagic RAW Developer SDK that will allow third party developers to add support for the new format in other applications.

    Users can download the public beta of Blackmagic RAW for use with the URSA Mini Pro through the Blackmagic Camera 6.0 Beta update, with the final version shipping in several weeks once testing is complete. DaVinci Resolve 15.1 is available for download immediately from the Blackmagic website. If you happen to be attending IBC 2018 in Amsterdam, you can stop by the Blackmagic booth for a demonstration.

    Press release:

    Blackmagic Design Announces Advanced New Blackmagic RAW Codec

    Revolutionary new and modern codec that’s easier to use and much better quality than popular video formats, but with all the benefits of RAW.

    IBC 2018, Amsterdam, Netherlands – September 14, 2018 – Blackmagic Design today announced the public beta of Blackmagic RAW, a new and very modern codec that combines the quality and benefits of RAW with the ease of use, speed and file sizes of traditional video formats. Blackmagic RAW is a more intelligent format that gives customers stunning images, incredible performance, cross platform support and a free developer SDK.

    The Blackmagic RAW public beta will be demonstrated on the Blackmagic Design IBC 2018 booth at #7.B45. Customers can download the public beta for use with URSA Mini Pro cameras via the Blackmagic Camera 6.0 Beta Update. In addition, DaVinci Resolve 15.1 Update, which includes support for Blackmagic RAW, is also available free of charge from the Blackmagic Design website.

    Blackmagic RAW has been in development for years and is a next generation codec that features multiple new technologies such as an advanced de?mosaic algorithm, extensive metadata support, highly optimized GPU and CPU accelerated processing and more. It can be used from acquisition throughout post production for editing and color grading, all from a single file.

    Traditional RAW codecs have large file sizes and are processor intensive, making them hard to work with. Video file formats are faster, but suffer quality problems due to the use of 4:2:2 video filters that reduce color resolution. Blackmagic RAW solves these problems with an intelligent design that moves part of the de-mosaic process into the camera where it can be hardware accelerated by the camera itself. This results in incredibly efficient encoding that gives customers the same quality, bit depth, dynamic range and controls as RAW, but with much better performance and smaller file sizes than most popular video codecs. Because the processor intensive partial de-mosaic is done by the camera hardware, software such as DaVinci Resolve doesn’t have to do as much work decoding the files. In addition, GPU and CPU acceleration make decoding of frames incredibly fast, so you get extremely smooth performance for editing and grading.

    Blackmagic RAW is much more than a simple RAW container format. Its intelligent design actually understands the camera and the sensor. This means the image data, along with the unique characteristics of the image sensor, are encoded and saved into the Blackmagic RAW file, giving customers much better image quality, even at higher compression settings, as well as total control over features such as ISO, white balance, exposure, contrast, saturation and more.

    In addition, Blackmagic RAW uses Blackmagic Design Generation 4 Color Science for superior imaging that results in reproducing extremely accurate skin tones and gorgeous, lifelike colors that rival those of cameras costing tens of thousands of dollars more. Images are encoded using a custom non-linear 12-bit space designed to provide the maximum amount of color data and dynamic range.

    Blackmagic RAW also makes it easy for any software developer to access all this technology. The free developer SDK lets any third party software application add Blackmagic RAW support on Mac, Windows and Linux. The Blackmagic RAW developer SDK automatically handles the embedded sensor profile metadata, along with Blackmagic Design color science, for predictable and accurate image rendering that yields consistent color throughout the entire pipeline.

    Blackmagic RAW features two types of file compression. Customers can choose either constant quality or constant bitrate encoding options, depending on the kind of work they are doing. This lets them prioritize image quality or file size. Constant quality uses variable bitrate encoding so complex frames are encoded at higher data rates to preserve detail and maintain the highest possible quality. Blackmagic RAW Q0 has minimum quantization and yields the highest quality, while Blackmagic RAW Q5 uses moderate quantization for more efficient encoding and a smaller file size. Blackmagic RAW 3:1, 5:1, 8:1 and 12:1 use constant bitrate encoding to give customers the best possible images with predictable and consistent file sizes. The ratios are based on the unprocessed file size of a single frame from the camera’s sensor, making it easy to understand the relative amount of compression being used.

    The pristine camera native quality of Blackmagic RAW Q0 and 3:1 are perfect for effects heavy feature film and commercial work. Blackmagic RAW Q5 and 5:1 are extremely high quality making them great for episodic television and independent films. Blackmagic RAW 8:1 and 12:1 offer high quality and speed, making it suitable for productions that wouldn’t normally consider shooting RAW. Now, more customers than ever will be able to use high quality RAW images in an incredibly efficient way that was impossible before.

    “Blackmagic RAW could entirely change the workflow going from camera through post production,” said Kees Van Oostrum, Director of Photography and President of the American Society of Cinematographers. “A superb image quality, fine detail and incredibly small file sizes could possibly make Blackmagic RAW the go to format for filmmakers. It will be an important change for post because the editorial team can work with the camera original files, which are fast enough to use for everyday editing. That means less confusion in regards to creative choices I make at the camera. The images can now travel throughout the entire workflow because we’re shooting, editing and grading with the same files! Blackmagic RAW could be a game changer in the way films, television shows and commercials are made.”

    Blackmagic RAW dramatically simplifies and speeds up post production workflows. DaVinci Resolve 15.1, which was also released today, includes full support for Blackmagic RAW. The performance of Blackmagic RAW is much faster in DaVinci Resolve than any other RAW format. This makes editing, color correction and visual effects incredibly fast. In addition, working with single files instead of folders full of still image sequences greatly simplifies media management. When the RAW settings are changed in DaVinci Resolve, a .sidecar file can be generated or updated if one already exists. When opened in other software applications that support Blackmagic RAW, the .sidecar file, which contains the RAW settings made in DaVinci Resolve, will be automatically used to display the image. If the .sidecar file is removed then the file will be displayed using the embedded metadata instead. This innovative new workflow gives customers a non-destructive way to change RAW settings while working between different applications.

    Featuring a fully scalable design and completely modern CPU and GPU acceleration, Blackmagic RAW is optimized for AVX, AVX2 and SSE4.1 enabled processors, multi-threaded, works across multiple CPU cores and is GPU accelerated with support for Apple Metal, CUDA and OpenCL. Frame decoding and image processing is extremely fast, making it super smooth for editing, color correction and visual effects in DaVinci Resolve. Another benefit of media being stored as single files, and not image sequences, is it makes media management easier and file copying much faster.

    The free Blackmagic RAW Developer SDK is available on Mac OS, Windows and Linux. This SDK takes care of all the work for developers, so adding support for Blackmagic RAW to third party software applications is easy and fast. Developers get access to GPU and CPU accelerated algorithms for decoding files, along with unique information about the camera’s image sensor so their applications can accurately decode and display the files. The SDK features highly descriptive and flexible metadata options designed to support today’s modern workflows. Metadata is embedded directly in the .braw file or it can be stored in a .sidecar file. Metadata is important because it contains the RAW settings along with information for the slate, iris, focus, focal length, white balance and a lot more. The metadata in .sidecar files can be used on top of the embedded metadata without overwriting it. Blackmagic RAW also supports frame based metadata so customers can access values, such as focus distance, that often change on a frame by frame basis.

    “Blackmagic RAW is the world’s only truly modern, high performance, professional RAW codec that is open, cross platform and free,” said Grant Petty, Blackmagic Design CEO. “It’s exciting because customers can get the visually lossless image quality of RAW with the speed of traditional video workflows. Best of all, there are no hidden licenses or ongoing fees. Blackmagic RAW has been designed to provide the industry with an open, elegant and standardized high quality image format that can be used across products and in customer workflows absolutely free!”

    Availability and Price

    Blackmagic RAW is available today as a public beta via the Blackmagic Camera 6.0 Beta Update for URSA Mini Pro. The final release of Blackmagic RAW is expected to ship in several weeks’ time once further testing is complete.

    The DaVinci Resolve 15.1 Update, which features support for Blackmagic RAW, has also been released and can be downloaded today free of charge from the Blackmagic Design website.

    Articles: Digital Photography Review (dpreview.com)

  • Konseen launches Photo Studio, a portable light box tent for portraits

    Konseen has launched Photo Studio, a new light box tent large enough to photograph people, in addition to smaller objects like clothing and jewelry. Photo Studio is offered in two sizes, one measuring 47 x 39 x 78in / 119 x 99 x 198cm with enough room for adults, the other 47 x 32 x 63in / 120 x 80 x 160cm, which is large enough for children. Both models include LED lights, a silver reflector, and multiple backgrounds.

    Features include three soft cloth backgrounds, as well as three PVC backgrounds

    The Konseen Photo Studio features a pipe-based frame with a tent cloth that zips over the structure. Users assemble the tent, which includes the option of attaching light panels to any of the frame pipes. The smaller Photo Studio model includes six light boards, each with 96 LEDs; the larger model includes 8 light boards, each also featuring 96 LEDs.

    Each light board includes its own dimmable AC adapter. Other features include three soft cloth backgrounds, as well as three PVC backgrounds in white, black, and blue colors. The light color temperature is 5500K and each board has a dimming range from 1- to 100-percent.

    The Photo Studio is priced at $ 280 USD (small model) and $ 340 USD (large model).

    Via: PetaPixel

    Articles: Digital Photography Review (dpreview.com)

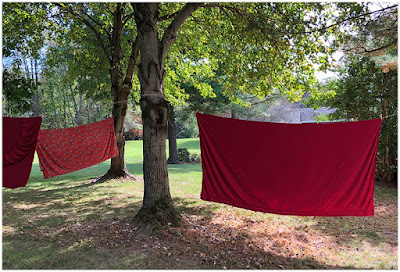
  • SCL-OE-04: Cheap, Portable Outdoor Light Source

    No matter how long you have been doing something, be it lighting or photography or, well, anything, you're never too old to be dumbstruck by a cool new idea.

    Take the linens drying on the line above, for example. In the right frame of mind they are essentially super-portable outdoor light sources.

    Read more »
    Strobist

  • Weekly Photography Challenge – Mellow Yellow

    In the last couple of week’s you’ve done blue and red as the photography challenge, so it’s only fitting to complete the triangle of primary colors with yellow this week.

    Photo by Boris Smokrovic on Unsplash

    Weekly Photography Challenge – Yellow

    Simply upload your shot into the comment field (look for the little camera icon in the Disqus comments section) and they’ll get embedded for us all to see or if you’d prefer, upload them to your favorite photo-sharing site and leave the link to them. Show me your best images in this week’s challenge. Sometimes it takes a while for an image to appear so be patient and try not to post the same image twice.

    Share in the dPS Facebook Group

    You can also share your images in the dPS Facebook group as the challenge is posted there each week as well.

    The post Weekly Photography Challenge – Mellow Yellow appeared first on Digital Photography School.


    Digital Photography School

  • Atomos Ninja V shipping at the end of the month, with new AtomX expansion modules

    The Atomos Ninja V external video recorder and monitor will be ready to ship at the end of this month. Announced in April this year, the 5.2in Ninja V is designed to provide a smaller option for those using more compact video cameras while still offering many of the features of the larger 7-inch models.

    The recorder can handle 4K 60p footage in 10-bit 4:2:2 over HDMI from the collection of recent cameras capable of producing it – such as the new Nikon Z7/Z6 and Canon EOS R mirrorless bodies as well as Fujifilm’s X-T3 and the existing Panasonic Lumix GH5 and GH5s.

    The recorder now comes with options for expansion modules to extend its feature-set. These modules are called AtomX, and the first will be the AtomX Ethernet/NDI that allows the cameras to stream broadcast quality footage and to network with multi-camera set-ups and for the Ninja V to receive NDI data from a range of sources.

    The AtomX modules will cost ‘less than $ 199’, while the Ninja V itself costs $ 695

    A second module, the Atomx Sync wirelessly handles and generates timecode to synchronise recordings from multiple devices. The AtomX modules will cost ‘less than $ 199’, while the Ninja V itself costs $ 695. For more information see the Atomos website.

    Press release:

    Atomos Ninja V ready to ship, innovative new AtomX Sync and AtomX Ethernet/NDI modules announced

    Atomos is delighted to announce that the highly anticipated Ninja V 4k HDR monitor/recorder is in mass production and on schedule to reach stores before the end of the month – fulfilling our commitment to deliver in Q3. The all new 5″ 4kp60 HDR monitor recorder has unrivalled features in a sleek, compact and extremely light form factor that is perfect for mirrorless cameras, DSLRs and gaming consoles.

    The 10-bit mirrorless revolution
    The timing of shipment coincides with the launch of several new mirrorless cameras with 4k 10-bit HDMI output and Log gammas that partner perfectly with the Ninja V. The new Canon EOS R, Nikon Z6 and Z7 and Fujifilm X-T3 now join the Panasonic GH5 and GH5S in taking full advantage of the Ninja V 4k 10-bit 422 recording to Apple ProRes or Avid DNxHR. The results from the Ninja V and these cameras are extraordinary, with billions of shades of color for smooth gradients and better grading in all NLEs.

    New AtomX modules under $ 199 – the most flexible ecosystem in Pro Video
    Modularity is at the heart of the Ninja V with a bi-directional high-speed expansion port breaking out connectivity for I/O of video, audio and power. Atomos created AtomX to ensure users could adapt and connect to any legacy or future wireless or wired video standard. The expansion system offers endless scalability and is demonstrated by the first of many modules – the AtomX Ethernet/NDI® $ 199 and the AtomX Sync $ 149 announced today. These dock into the AtomX port and instantly add important features like NDI® over ethernet and Wireless Sync and Bluetooth control to the Ninja V.

    Atomos are proud to expand their close partner program with Newtek for the NDI® module and Timecode Systems for Wireless and Bluetooth sync module.

    The AtomX Ethernet/NDI module has a wired ethernet (1 GigE) connector that makes it possible to deliver live broadcast-grade video over IP networks. Newtek’s NDI technology harnesses this – allowing for simple installation and control of multi-camera networks, replacing traditional SDI cabling. The AtomX Ethernet/NDI module has NDI input and output with encode, decode, control and sync, allowing Ninja V users to transmit, distribute or receive and monitor NDI from any NDI source. Simply power on the Ninja V with AtomX Ethernet/NDI module installed, plug in your network cable, and your source will be automatically discovered on the NDI network ready for production.

    The AtomX Sync module brings professional wireless timecode, genlock and Bluetooth control to Ninja V, perfect for enhancing DSLRs, mirrorless cameras or game recordings. You can sync and/or control literally thousands of Ninja V units equipped with AtomX Sync modules on the same network at ranges of up to 300m. Multi-cam shoots have never been so easy. AtomX modules bring broadcast level standards to any HDMI camera or source, making it easy to integrate large sensor consumer cameras easily into traditional live productions. AtomX Sync has a built-in battery extender that allows for continuous power when swapping batteries, ensuring uninterrupted operation of the Ninja V during a shoot.

    Class leading technology partnerships
    The beauty of licensing technology from Newtek and Timecode Systems is that all their products are fully compatible with the relevant AtomX modules – so large and small productions currently using NDI’s or Timecode Systems’ class leading products can effortlessly integrate Atomos devices. The simplest application with Newtek is integration with their famous TriCaster products. For Timecode systems the most basic use case is to sync a mirrorless camera to an appropriately equipped audio device for perfect automated sync sound – a huge benefit for anyone from vloggers through to Hollywood productions.

    New AtomOS 10 for easier operation
    To coincide with the Ninja V release Atomos have announced a major new update to the AtomOS operating system. AtomOS 10 has been redesigned from the ground up to offer simpler operation combined with fewer distractions when monitoring your shot. Operation is quick and intuitive, with extensive use of swipe commands. Redesigned icons have an emphasis on easier HDR production enhancing the creative process. The waveform monitor and audio level meters are clearer than ever. The result is the best monitoring experience available for your DSLR of mirrorless camera bar none.

    The perfect small monitor
    The near edge-to-edge high bright 5 inch screen has a stunning 1000nits of output coupled with an anti-reflection finish – allowing users to clearly see their images even in daylight. Use the color-accurate display with AtomHDR to see in High Dynamic Range, or load creative LUTs at the touch of a button. Ninja V gives you all the critical monitoring tools you need in SDR – Rec709 or HDR – HLG or PQ. False color, peaking, movable 1-1 and 2-1 pixel magnification, waveform, RGB parade, vectorscope, eight channel audio level meters and more are all available in AtomOS 10.

    HDR perfection every time
    The AtomHDR engine ensures simple and perfect exposures when shooting HDR every time. It delivers a stunning 10+ stops of dynamic range to the LCD in real time from Log/PQ/HLG camera signals. Playout Log as PQ or HLG to a larger HDR-compatible screen. The Ninja V display can be calibrated to maintain perfect color and brightness accuracy over time.

    Why external recording makes sense
    Camera manufacturers are already pushing their designs to the limits of computing, heat and power consumption, especially with the new, larger sensors. Despite these efforts, all DSLR and mirrorless cameras on the market are limited in what they can record internally.

    This necessitates compromises – limiting the bit depth, codecs used and the data rates used for internal recording. Recognizing that users want better quality and maximum flexibility the camera makers work with Atomos to optimize external recording at higher bit depth and higher bitrates, offering HDR and Post Production quality earlier.

    By moving recording to the Ninja V, DSLR and mirrorless cameras are freed of many of their key video limitations. Record time limits are lifted and easy-to-edit Apple ProRes or Avid DNx codecs recorded, instead of hard to edit H.264 or H.265.

    Affordable, reliable AtomX Media.
    When recording video with the Ninja V you can shoot to the new generation of Atomos AtomX SSDmini drives, as well as existing MasterCaddy 2 compatible media. These are developed with leading brands and offer high speed and high reliability in a compact metal chassis. Guard your video by recording to proven, economical SATA SSD media.

    Atomos CEO Jeromy Young said, “The Ninja V is the best monitor/recorder we’ve ever made and I’m delighted to ship it to our loyal customers on time. The new AtomX modules bring amazing flexibility to the Ninja V, allowing us to seamlessly integrate new technologies faster than ever. This is made possible only by working closely with partners like Newtek and Timecode Systems. I’m looking forward to bringing cutting edge innovation through AtomX into the future.”

    Come and see Ninja V and AtomX modules, plus all the other Atomos products on booth (11.D15 & 11.D25) at IBC2018.

    Ninja V: http://www.atomos.com/ninjav
    AtomX: http://www.atomos.com/AtomX

    Articles: Digital Photography Review (dpreview.com)

  • Inspiring Photography of the Waves and Oceans of Tahiti by Ben Thouard

    Ben Thouard is an award-winning ocean and surfing photographer living on Tahiti – an island in French Polynesia. His love of surfing and photography took him there at the age of 22, and he hasn’t looked back since.

    In this film by Roam, titled SURFACE, Thouard gives us a unique view of waves and surfing. The film documents how he works, and how his shots are captured – it’s a valuable look into the creative process of such an experienced photographer.

    Note: Watch it fullscreen, you’ll feel like you’re in the water with him!

    ?

    “Being in the water, moving with the waves and going with the flow… you feel the energy from the ocean,” says Thouard. “You feel very humble in front of all of that power.”

    Thouard discovered photography at the age of 15 and spent all of his time underwater trying to capture images of the ocean. Most of Thouard’s days are spent exploring and waiting for the perfect conditions, but when all of that comes together it makes for stunning photography.

    Thouard has now created a 184-page book, also titled SURFACE, documenting his work photographing waves and the ocean in beautiful imagery.

    Here’s a short trailer on the film above, if you want a more concise insight into his work:
    ?

    To see more of Thouard’s work, head over to his website.

    The post Inspiring Photography of the Waves and Oceans of Tahiti by Ben Thouard appeared first on Digital Photography School.

    Digital Photography School

  • What does the EOS R tell us about Canon and the RF mount’s future?

    Despite not being tremendously exciting, I believe Canon’s EOS R shows a more adventurous attitude, at least by Canon’s standards, than we’re used to seeing. Having shot with the camera, spoken to Canon and read the tea leaves, here’s what I think the EOS R tells us about Canon and the RF’s mount’s future.

    The RF mount

    Interestingly, both Canon and Nikon have settled on a similar solution: a short, wide lens mount and have both said it gives them greater design freedom when it comes to making lenses. Canon gave a little more detail about the ways in which it does so.

    Both Canon and Nikon have settled on a similar solution: a short and wide lens mount

    The shorter flange-back distance allows Canon to mount a large rear lens element much closer to the sensor, and the wide diameter means they can create lenses that don’t need to squeeze light through a narrow tunnel. Designing lenses that don’t have to make such dramatic adjustments to the course of the light passing through the lens allows lenses with fewer optical aberrations. It allows gives the option to use fewer elements, which can make some lenses lighter.

    I said I thought it was an uncharacteristically bold move by Nikon to step away from the F-mount and I think you could say the same for Canon. If someone were trying to be really cynical, they might suggest Canon and Nikon are making such a noise about the use of wide and short designs just so they can imply a design limitation in Sony’s narrower E mount. But having shot the 28-70mm F2 wide-open a little over the last few days, I’m more likely to believe there’s some benefit to what Nikon and Canon say they’re doing.

    But perhaps that’s where the comparisons with the Nikon should end.

    The quiet radical

    While Nikon tried to mimic its DSLR’s behavior as closely as possible, but primarily using its live-view AF modes, Canon seems to have taken a more open-minded approach. The general perception we see from our readers (and it’s one we have some sympathy for), is that Canon is a cautious company with a dominant market position that discourages the kinds of unexpected innovation we see from the likes of Fujifilm, Olympus, Panasonic and Sony.

    The EOS R has a number of interesting features, including the habit of stopping down its lens on shutdown. This lets the company close the mechanical shutter to reduce dust ingress, since it minimizes the risk of sunlight condensed by the lens warping the shutter blades.

    But that’s not true of the EOS R. For years we’e been calling on manufacturers to try to work from a blank sheet of paper, rather than just doing what’s always been done. And the more we’ve used the EOS R, the more it feels like Canon has at least tried to do that. Not to the extent of throwing everything away, but at least using this new system as an opportunity to think about which existing elements they want to maintain and where there’s room for something new. So not quite a blank sheet, but at least stopping to consider existing assumptions.

    It looks to me like a genuine attempt to create the best of both worlds

    More so than the Nikon Z cameras, Canon has taken some elements of its live view AF system: Face + AF Tracking mode, for instance, but then blended this with the way AF points work on its DSLRs. It looks to me like a genuine attempt to create the best of both worlds, rather than being completely constrained by trying to deliver what they think their existing customers will expect.

    The EOS R takes the Face + Tracking mode from its live view system but adds the custom option from its DSLRs that lets you choose whether to specify the starting subject or let the camera choose.

    There is a lot of continuity, though. For instance in continuous autofocus mode, Face + AF Tracking works, by default, analogously to Canon’s 61-point auto system: automatically picking a subject and following it. And, like on those DSLRs, there’s a menu option to change this behavior so that you specify the starting point and subject for the camera to track. It’s an interesting blend of the live view AF mode with DSLR behavior that I think says a lot about the approach Canon has taken.

    The EOS R feels like a ‘version 1’ product

    Oh course the down-side of starting afresh (relatively), is that you introduce new problems and bugs that you’d ironed-out of your existing interface. There are certainly aspects that make the EOS R feels like a ‘version 1’ product: something we don’t usually expect from Canon.

    Innovative touches (for better or worse)

    The EOS R also shows some innovative touches in its design, some more visible than others.

    The M-Fn Bar along the back of the camera can be customized to act as two buttons and a ‘swipeable’ control pad. None of us have been very impressed, so far.

    The funky ‘M-Fn Bar’ control strip along the back of the camera, for instance. To me it feels a touch gimmicky. I’ve yet to find anything I really want to assign to it, find it easy to inadvertently operate and have experienced the occasional glitch when I do intentionally use it (another very un-Canon-like experience).

    The M-Fn Bar will need to evolve into something useful or will die-out.

    It’s a fun idea and a very prominent display of original thinking, but it feels to me like the ‘Touchbar’ that Apple has added to its recent laptops: a device looking for a purpose and one that I think will need to evolve into something useful or will die-out in a couple of generations. Worse still, it occupies a prime location on the back of the camera and, while you can configure it to essentially just act as two buttons, there’s only a limited choice over what those two buttons do.

    We were all quite impressed with the clicking control dial on all the RF lenses. We were even more impressed that Canon has made an adapter ring that means you retain the capability when working with EF lenses.

    An idea I suspect will persist is the additional, clicking control ring on the RF lenses (whose function, cleverly, is duplicated on one of the EF-to-RF adapters Canon offers). It’s a cute move – one first tried by Samsung – that lets you quickly access another camera parameter without the body being overrun by dials. We’re also told Canon service centers will (for a fee), ‘de-click’ the dials on your lenses if you need smooth or silent operation for video work.

    The illusion of customization

    But there are also signs of Canon still being, well, Canon. A criticism we’ve leveled at Canon over the years is that, even when it does offer customization, it’s often very restrictive in how much change it lets you make. Sadly, while the EOS R initially appears to take some steps in the right direction: a large number of buttons are customizable and have an extensive set of custom options available (between 25 and 45, depending on the button), the reality is different. In many instances they’re not necessarily the custom options you might want, and you’ll still have to learn which features can be placed on which buttons before you can find your preferred setup. Or, at least, the closest to it that Canon allows.

    You still can’t always do everything you might want: despite lots of options about which dial controls what setting. There’s relatively little choice over which dial controls Exposure Compensation, for instance. And there’s no easy way to gain access to the Auto ISO threshold setting, without digging into the main menu. There’s also little access to drive mode or metering mode, meaning the EOS R is a camera that demands you use the Q.Menu, rather than letting you put everything at your fingertips.

    In perhaps the most un-Canon-like move imaginable, it’s said it will improve these cameras via firmware updates.

    However, in perhaps the most un-Canon-like move imaginable, the company has also said it will implement a new policy of improving these cameras via firmware updates. Fingers crossed.

    RF > EOS R

    What perhaps makes all of the positives harder to see is that the first camera, the EOS R, isn’t very exciting. The pre-launch rumors and use of the 5D IV’s sensor led a lot of people to expect an EOS 5D IV level camera, which it most certainly isn’t. But even as something more comparable to a 6D Mark II it’s still a little underwhelming.

    The pictures it takes are great, which shouldn’t come as a surprise for a camera with the 5D IV’s sensor. The dynamic range isn’t class-leading but it’s much closer to being competitive than Canon had previously been. It also feels superb when you first pick it up: solid, comfortable and with well-positioned controls, at least for the most part.

    After admiring the hand-feel of the camera, the second thing you’ll notice is the apparent lack of means of controlling the AF point. The touchpad mode, disabled by default, is the only sensible way to operate the EOS R.

    The rest of package is a little less impressive. Heavily cropped 4K video with visible rolling shutter isn’t the level of performance most other brands are offering (though the inclusion of Canon-Log and 10-bit output suggest the company wants to do video properly in these cameras). Separate exposure settings for video (which was part of what sounds like an anxiously-made decision to dispense with the conventional mode dial), and separate button custom settings for video are big steps forward.

    The EOS R’s burst rate (with AF at least) is also poor by contemporary standards, again suggesting a sensor or processor bottleneck.

    The bigger picture

    But while we’re not especially blown-away by the EOS R, I think we’re all quite impressed by the system it hints at. It should be pretty obvious that Canon didn’t develop a $ 3000 24-70mm F2 zoom or $ 2300 50mm F1.2 to be mounted on a $ 2300 mid-range full frame body. Nor does it seem likely that its engineers works away to produce a 24-105mm F4 with silent autofocus, 1/8th EV aperture control and extremely well controlled focus breathing for a camera whose 4K capture gives it a 40mm equivalent wide-angle field of view.

    Canon didn’t develop a $ 3000 24-70mm F2 zoom to be mounted on a mid-range body.

    Beyond the system, I also think that the EOS R shows Canon being more flexible and innovative than we’re used to seeing, whether it’s in the apparent approach to the UI development, the creation of the M-Fn Bar or its stated willingness to improve the camera via firmware updates. Just as I said of Nikon, I hope Canon will retain this more adaptable approach as the system continues to develop.

    If you’re a Canon DSLR shooter, it’s probably not yet time to begin the migration across to the RF system, but the work the company has already done and its apparent approach make us believe it’ll look increasingly compelling in the coming years. If that’s enough to stop you thinking about jumping-ship (with your existing lenses) to Sony, then I suspect Canon’s done what they were trying to achieve. It’ll be interesting to see what the RF series leads to.

    Articles: Digital Photography Review (dpreview.com)

  • Profoto launches compact 250Ws B10 studio flash

    $ (document).ready(function() { SampleGalleryV2({“containerId”:”embeddedSampleGallery_9794331079″,”galleryId”:”9794331079″,”isEmbeddedWidget”:true,”selectedImageIndex”:0,”isMobile”:false}) });

    After last week’s teaser, lighting manufacturer Profoto has announced its new ‘small big’ product. The B10 is designed to be used as studio flash head but in a very small body, and has a powerful continuous light source for videographers as well. The 250Ws unit is fully wireless with a removable lithium ion battery and output control via the company’s AirTTL system.

    The B10 can also be controlled via the Profoto smartphone app that allows users to adjust flash power as well as the continuous light’s brightness and color temperature. A new Creative Capture feature that lets users preview a scene through the smaertphone’s camera and adjust lights at the same time to achieve the desired effect. The picture can then be captured through the app so the results can be inspected to check exposure and light positioning. The app also offers users the means to download and update firmware as it becomes available.

    The lithium ion battery that powers the B10 can be charged while in use, and will provide up to 75 minutes of full power continuous lighting

    The continuous LED light has a maximum output of 2500 lm and can be dimmed between 10 and a 100%, with temperature changed between 3000-6500K. The lithium ion battery that powers the B10 can be charged while in use in the head, and will provide up to 75 minutes of full power continuous lighting or 400 full power flashes. It is said to charge in less than an hour and a half.

    The B10 measures 11cm / 4.3in wide, is 17.5 / 6.9in long and 10cm / 3.9in high – and it weighs 1.5 kg / 3.3 lbs including the battery. The stand clamp can be removed to fit the light on a tripod, and there are 12 OCF small light modifiers to fit the head, as well as 120 from the full-size range.

    The Profoto B10 is shipping now and costs £1175 / $ 1595. For more information see the Profoto website.

    Press release

    The power of small

    Profoto B10

    Size matters, it does. Because how much gear you have to carry matters. How much space you have to set up and work in matters. Being able to move fast, getting in, getting out and nailing the shot matters.

    Something else matters too; knowing that the equipment you have will push you forward rather than hold you back – that you’ll be inspired to grow and to express yourself creatively. To be you, at your best.

    That’s why when Profoto set out to create the Profoto B10, their brand new cordless off-camera flash, the company first considered size. Or rather, a lack of it. “We designed the B10 to be small,” said Göran Maren, Product Manager at Profoto. “Just a little bigger than a medium-sized zoom lens. That means you can fit it in your bag with the rest of your gear and because it’s cordless and lightweight, it’s easy to bring and set up anywhere. That said, this is in every way a Profoto light, so the power and quality of light is essential.”

    And while the B10 is small, it’s small without compromise. The B10 gives you five times more light than a speedlight; it’s a light that has a natural and beautiful soft fall off.

    But this is more than just a flash; it’s also a highly effective continuous light that you can use for both stills and video. And like all Profoto lights, it’s easy to use. A separate dial on the sleek B10 interface allows you to adjust both brightness and color temperature until it blends perfectly with the ambient light.

    The continuous light is just one example of the extreme flexibility contained within the B10. The stand mount and the battery are prime examples. The stand mount can be swiftly removed. As a result, you can mount the B10 on any camera tripod. It is just as quick to replace the battery too, and you can charge it while you’re using it.

    Göran Marén continues: “every part of the B10 has been designed to help the photographer to be more creative with light on location. We felt that the more flexibility we built in, the more an image creator can adapt to any issues or opportunities that a location might offer.”

    Better still, the possibilities don’t end there since your creativity can run riot with an enormous range of Profoto light shaping tools that are as flexible as the B10. There are a dozen light shapers in Profoto’s compact and lightweight OCF series to start with, and if they’re not enough, there are 120 more light shaping tools in the full Profoto range.

    Controlling the B10 off-camera is also easy. You can trigger and control the B10 wirelessly from any Profoto AirTTL remote or the Profoto A1. From up to 300metres/1000ft you can point and shoot with TTL or switch to manual control at any time. AirTTL Remotes are available for all major camera brands.

    To further capture the imagination, Profoto has added smart connectivity in the form of a unique and innovative smartphone app. With the B10 connected to the Profoto app you always have the latest B10 updates available at your fingertips. The app also gives you an ingenious remote control that lets you view and control all B10 settings from your smartphone screen.

    But the most exciting part of the app might be the unique smartphone camera that brings smartphone photography and the creative use of light closer together than ever before. Göran adds: “we wanted to inspire new ways of being creative with light, and to give photographers a glimpse into the future of photography.” Ultimately the B10 is a big light in a small package. And that means the possibilities are enormous.

    The final words belong to Göran. “It’s what we like to call, ‘the power of small.’ It’s the power to be creative with light in so many more ways. It’s the ability to take all those incredible images that live in your imagination – and make them real.”

    The Profoto B10 is light unleashed. Actually, it’s more than that – it’s you unleashed.

    Articles: Digital Photography Review (dpreview.com)

  • 5 Ways to Make Extraordinary Photographs of Ordinary Subjects

    How to Take Extraordinary Photographs of Ordinary Subjects - leaf in the snow

    How do you take extraordinary photographs of ordinary subjects? Many photographers think that this is impossible. They think that the best photography requires far-flung locations or sweeping landscapes. Yet creating beautiful photographs of everyday things is not only possible, it’s easy!

    In this tutorial, you will find five ways to make incredible photographs of ordinary subjects.

    5 Ways to Make Extraordinary Photographs of Ordinary Subjects - close up of a white flower

    1. Change your angle

    I’ll start with a simple but very useful trick, that is changing your camera angle. Many photographers often shoot from a standing position, and this can be a useful starting point.

    Yet when faced with an ordinary subject, it’s important to change things up. Otherwise, you’ll get a boring image that anybody could have taken.

    red leaves - 5 Ways to Make Extraordinary Photographs of Ordinary Subjects

    I stood underneath the leaves to get this image.

    Instead, you should be more creative. Try crouching down low, so that you’re shooting up at your subject. This will create a sense of drama and your subject will loom in the frame.

    I often lie on the ground, especially when shooting wildlife. Getting down on this level, even with the most ordinary of subjects, will give your images a sense of intimacy and draw the viewer right in.

    Another option is to shoot from up high. You can hold the camera above your head, and use the LCD to compose your photograph. Or you can find some way of elevating yourself by using a chair, a balcony, or some stairs.

    succulent plant - 5 Ways to Make Extraordinary Photographs of Ordinary Subjects

    Regardless of which method you use, by changing your angle, you’ll find that you can make even the most ordinary of subjects come to life.

    2. Photograph in dramatic light

    A second way to take extraordinary photographs is to use dramatic lighting. Dramatic lighting can significantly add to the feeling and mood of your images. Therefore, by using dramatic lighting, you can create powerful images of ordinary subjects.

    How do you create dramatic lighting?

    One of my favorite types of dramatic lighting is with direct backlight. By this, I am referring to situations where the sun is low in the sky and directly behind your subject.

    tree bark backlit - 5 Ways to Make Extraordinary Photographs of Ordinary Subjects

    The sun was setting just beside the tree in the background.

    Make sure that the sun itself is not in the image. You can either hide the sun behind the subject or photograph so the sun is just out of the frame.

    Direct backlighting can single-handedly save a lackluster image. It will make viewers stop in their tracks. They’ll be pulled in by the high contrast and the drama.

    Try it. I guarantee that you’ll see huge improvements in your photographs.

    3. Find abstract compositions

    A third way of taking extraordinary photographs of ordinary subjects is to look carefully for abstract compositions.

    Abstract compositions are ones that don’t view the subject merely as the subject. A good abstract image emphasizes lines, shapes, and colors over any identifiable real-world elements.

    dandelion - 5 Ways to Make Extraordinary Photographs of Ordinary Subjects

    Often, good abstract photographs can be made by zooming in close (perhaps with a macro lens). But you can take beautiful abstract photographs with any lens.

    How?

    The trick is to forget about the subject as you would normally think about it. Say you’re taking a picture of a rose. You must stop thinking about the rose as a flower. Start thinking about the rose in terms of its delicate lines, its solid color, and its curves.

    rose abstract - 5 Ways to Make Extraordinary Photographs of Ordinary Subjects

    Compose with these components in mind.

    Even if your subject is completely ordinary, being able to find abstract compositions will do wonders for your photographs of the most mundane subjects.

    4. Use creative photographic techniques

    By “creative photographic techniques,” I’m referring to tricks that professional photographers employ.

    These tricks will add a special touch to any photograph. By using these tricks, your everyday images will come to life.

    snow and ice - 5 Ways to Make Extraordinary Photographs of Ordinary Subjects

    I’ll share two with you today.

    The first technique is called “freelensing.” It involves detaching the lens from your camera and holding it manually in front of the camera body.

    By tilting the lens in different directions, you can change the area of the image that is in focus, resulting in some very creative effects.

    I use this technique quite often when photographing nature.

    red leaf on a tree - 5 Ways to Make Extraordinary Photographs of Ordinary Subjects

    I used freelensing to capture this photograph of autumn leaves.

    The second technique is called “intentional camera movement.” You simply set your shutter speed for a significant length of time (anywhere between 1/50th of a second and 2 seconds is a good place to start).

    Then, once you’ve pressed the shutter button, you intentionally move the camera during the exposure. You might try panning from left to right. Or you can bring the camera downward. Really, you can use any kind of motion, the possibilities are endless!

    This intentional camera movement technique will undoubtedly result in some stunning abstract images. So go ahead and experiment!

    camera movement - 5 Ways to Make Extraordinary Photographs of Ordinary Subjects

    5. Add a touch of editing

    Some photographers often skip post-processing, thinking it unnecessary. But while you don’t have to edit your images, even subtle editing can be used to accentuate certain aspects of a photograph. Editing can make a photograph moody, colorful, or dramatic.

    In short, a touch of editing can make your ordinary photographs extraordinary.

    One of my favorite tricks for editing a photograph of an ordinary subject is simple. Convert it to black and white.

    cute dog - 5 Ways to Make Extraordinary Photographs of Ordinary Subjects

    I liked the color version of this pet photograph, but I loved the drama of the black and white.

    That’s it. If you have Lightroom, go ahead and use one of their free presets.

    What’s so special about black and white?

    Black and white emphasizes the contrasting elements of a scene while stripping away all color. This makes your images far more artistic and dramatic.

    By lightly editing your photographs, you can make them pop off the screen. You can make them come to life. You’ll create images that you’ll be proud of, even years later.

    palm leaf backlighting - 5 Ways to Make Extraordinary Photographs of Ordinary Subjects

    In Conclusion

    By changing your angle, photographing in dramatic light, finding abstract compositions, using creative techniques, and by lightly editing your photographs, you’ll be able to take stunning images of even the most ordinary of subjects.

    abstract of a leaf - 5 Ways to Make Extraordinary Photographs of Ordinary Subjects

    So get out there and start shooting!

    Have another tip for taking great photographs of ordinary subjects? Share it in the comments!

    purple flower - 5 Ways to Make Extraordinary Photographs of Ordinary Subjects

    The post 5 Ways to Make Extraordinary Photographs of Ordinary Subjects appeared first on Digital Photography School.


    Digital Photography School