RSS
 

Major Facebook bug exposed private photos of 6.8 million users to third-party apps

15 Dec

On its developers blog today, Facebook disclosed a major photo API bug that left the private images of millions of users exposed to third-party apps. The bug, which has been fixed, was live from September 13, 2018 to September 25, 2018. During that time, some third-party apps may have had permission to access images uploaded to the service but not posted, as well as photos shared outside of the user’s timeline.

Facebook users can grant third-party apps permission to access images they’ve shared on the platform, but that permission is “usually” limited to photos the user published on their timeline, according to the company. The photo API bug may have given some third-party apps permission beyond timeline images, however, also including ones uploaded to the platform but not published, Facebook Stories content, and images shared on Marketplace.

As of its initial disclosure on December 14, Facebook said, ‘Currently, we believe this may have affected up to 6.8 million users and up to 1,500 apps built by 876 developers.’

Facebook plans to alert users who were potentially affected by the bug. A new Help Center page on Facebook’s support website provides a tool that shows users whether they have used any apps that potentially had access to their private images. As well, the company will provide app developers with a tool “early next week” that shows whether their apps were affected by the photo API bug.

“We are also recommending people log into any apps with which they have shared their Facebook photos to check which photos they have access to,” the company said in its disclosure.

The bug is the latest in a growing number of privacy debacles at Facebook. Earlier this year, the company suspended hundreds of third-party apps during its Cambridge Analytica scandal, which had revealed that data on 87 million Facebook users had been harvested and improperly used.

Articles: Digital Photography Review (dpreview.com)

 
Comments Off on Major Facebook bug exposed private photos of 6.8 million users to third-party apps

Posted in Uncategorized


Loupedeck adds Photoshop CC 2019 support to its latest editing console

15 Dec

Loupedeck has announced its Loupedeck+ editing console now supports Photoshop CC 2019. The new support is the result of feedback from Loupedeck customers, according to the company, and joins the Adobe Premiere Pro CC compatibility released in September. With this new support, Photoshop CC 2019 users can edit their images using the software and Loupedeck+ console.

The updated Loupedeck+ editing console was launched in June, adding support for Capture One and Aurora HDR in addition to hardware improvements. With this latest compatibility update, Loupedeck+ can be used with multiple Adobe Creative Suite products, including Lightroom Classic CC, Premiere Pro CC, and Photoshop CC 2019.

The new Photoshop support provides editors with direct access to the photo software’s tools and functions, as well as layer control, configurable buttons for custom actions, smart filter access, and more. Loupedeck+’s hardware controls include buttons, dials, and wheels.

Loupedeck+ is available now for $ 249 USD.

Loupedeck+ Announces First Integration with Adobe Photoshop

The photo & video editing console continues to evolve based on community feedback, now even more adaptable to photographers’ needs

HELSINKI, Finland – December 14, 2018 – Loupedeck, the custom photo & video editing console built with an intuitive design that makes editing faster and more creative, has announced its first integration with Adobe Photoshop CC 2019. This compatibility further expands the product’s utility for editing in several Adobe Creative Suite applications, including: Adobe Lightroom Classic CC and Adobe Premiere Pro CC.

After this year’s launch of the Loupedeck+, the decision to integrate with Photoshop is exclusively based on feedback from Loupedeck’s invested community, many of whom utilize the imaging and graphic design software in their editing workflow. The Loupedeck+ will permit more intuitive and faster editing, providing more accuracy on controlling Photoshop’s functions.

New Adobe Photoshop editing functionalities of the Loupedeck+ include:

  • Total flexibility with Photoshop CC, allowing image editors to configure Loupedeck+ to match their personal workflow
  • Intuitive features that make editing faster: swap between current and previous tools, reset blending or to fit image on screen by just a press of a button
  • Ability to focus on the image instead of navigating: minimize mouse pointing, list scrolling and target practicing with tiny icons
  • More direct access to tools, functions, layers and other Photoshop options to save time
  • Excellent layer control by moving, grouping, merging, adjusting opacity, fill, visibility or masking
  • Ability to run smart filter with Loupedeck+’s configurable buttons
  • Custom mode that gives even more possibilities for mapping different Photoshop functions on Loupedeck+
  • Ability to create your own actions and run them with Loupedeck+’s configurable buttons

“In our ongoing mission to make the editing processes of both professional and amateur photographers more intuitive and efficient, we continually work to integrate Loupedeck+ with the editing suites they utilize and cherish most in their workflows,” said Mikko Kesti, Founder and CEO of Loupedeck.

“Members of our dedicated user community emphasized their eagerness to use the console to edit with Photoshop and we listened. Following Loupedeck’s original integration with Adobe Lightroom and recent foray into video editing by way of Adobe Premiere Pro, this next stage of our partnership will continue to support photographers worldwide.”

In addition to its Adobe integrations, Loupedeck+ is compatible with Skylum Aurora HDR while future integrations with Skylum’s other products, including Skylum Luminar, are expected as well.

The device is available for purchase in the Loupedeck Online Store, B&H Photo and Amazon.com for $ 249. For more information visit www.loupedeck.com.

About Loupedeck

Loupedeck, the company behind the Loupedeck+, is the only editing console custom-built to improve the Adobe Lightroom, Adobe Premiere Pro CC, and Skylum Aurora HDR experience, with an intuitive design that makes editing faster and more creative. It allows both professional and amateur photographers to improve the ergonomics of editing, comfortably increasing output. Loupedeck’s hands-on and highly intuitive console minimizes the use the mouse and keyboard, and it works seamlessly with Apple and PC operating systems.

Headquartered in Helsinki, Finland, Loupedeck was founded in 2016 with a highly successful Indiegogo crowdfunding campaign that exceeded its original target by 488 percent. For more information, visit www.loupedeck.com.

Articles: Digital Photography Review (dpreview.com)

 
Comments Off on Loupedeck adds Photoshop CC 2019 support to its latest editing console

Posted in Uncategorized


Weekly Photography Challenge – Low Perspectives

15 Dec

The post Weekly Photography Challenge – Low Perspectives appeared first on Digital Photography School. It was authored by Caz Nowaczyk.

This week, the weekly photography challenge – low perspectives!

Matthew Henry

That’s right! Get down low and take photos from a low, interesting perspective. They can be of absolutely anything – they just have to be taken from an angle that is close to the ground.

It could be architecture, interiors, still life, landscapes, street photography, or people. It can be color, black and white, moody, bright or whatever you like!

I can’t wait to see your shots!

© Caz Nowaczyk


Some inspiration from some Instagrammers:


View this post on Instagram


A post shared by Sweety Sharma (@sweetysharmaphotography) on


View this post on Instagram


A post shared by Tales of Light (@talesoflightphotography) on


View this post on Instagram


A post shared by ericsweijen (@ericsweijen) on


View this post on Instagram


A post shared by Jeweleeanna Eagle (@j.d.e.photo) on


View this post on Instagram


A post shared by Ashar’s Captures (@asharscaptures) on


View this post on Instagram


A post shared by Roland Spilak (@roland.spilak) on

The following articles are helpful for the challenge:

How to Make Your Photos More Creative Using Camera Angles

Why Using Ant’s View Perspective Can Take Your Photography to the Next Level

Finding Fresh Angles to Shoot From – Digital Photography Composition Tip

How to Photograph Kids Playing, Running Around and Generally Being Kids


Weekly photography challenge – low perspectives

Simply upload your shot into the comment field (look for the little camera icon in the Disqus comments section) and they’ll be embedded for us all to see. Or if you’d prefer, upload them to your favorite photo-sharing site and leave the link to them. Show me your best images in this week’s challenge!

Share in the dPS Facebook Group

You can also share your images in the dPS Facebook group as the challenge is posted there each week as well.

If you tag your photos on Flickr, Instagram, Twitter or other sites – tag them as #DPSlowperspectives to help others find them. Linking back to this page might also help others know what you’re doing so that they can share in the fun.


The post Weekly Photography Challenge – Low Perspectives appeared first on Digital Photography School. It was authored by Caz Nowaczyk.


Digital Photography School

 
Comments Off on Weekly Photography Challenge – Low Perspectives

Posted in Photography


Photography gift ideas from $50 to 250

14 Dec

If you’re looking for a photography gift that’s a bit more substantial than a stocking stuffer, we’ve got some suggestions that should fit the bill.

Articles: Digital Photography Review (dpreview.com)

 
Comments Off on Photography gift ideas from $50 to 250

Posted in Uncategorized


Photography gift ideas for under $50

14 Dec

Shopping for a photographer? We’ve got some gift ideas for all budget sizes, but here you’ll find our budget-friendliest suggestions – just right for stockings.

Articles: Digital Photography Review (dpreview.com)

 
Comments Off on Photography gift ideas for under $50

Posted in Uncategorized


Kipon adds Nikon Z and Canon R mounts to medium format lens adapter range

14 Dec

Chinese optics manufacturer Kipon has added the Nikon Z and Canon R mounts to its range of medium format to full frame camera adapters. The company claims the adapters ‘virtually eliminate any crop factor’ by way of optics within the adapter that compensate for the difference in imaging areas of the full frame and medium format systems, and says the diagonal angle of view is maintained.

The eight Baveyes focal reducers use a five-element design and work with a number of popular medium format brands, namely Pentax, Mamiya and Hasselblad.

These adapters already exist for Sony full frame, Leica M and Leica SL cameras.
The new adapters will cost $ 695 and can be ordered from this week.
For more information see the Kipon website.

Press information

KIPON start to deliver 8 models new Baveyes/focal reducer for new Nikon Z mount & Canon R mount cameras

KIPON start to deliver 8 models new 0.7x Baveyes/focal reducer for new Nikon Z mount & Canon R mount cameras, increased Baveyes lineup for using medium format lenses on full frame cameras from 24 to 32 models.

  • Baveyes Pentax645-Nikon Z 0.7x
  • Baveyes Pentax67-Nikon Z 0.7x
  • Baveyes MAMIYA645-Nikon Z 0.7x
  • Baveyes Hasselblad V-Nikon Z 0.7x
  • Baveyes Hasselblad V-EOS R 0.7
  • Baveyes MAMIYA645-EOS R 0.7x
  • Baveyes Pentax67-EOS R 0.7x
  • Baveyes Pentax645-EOS R 0.7x

KIPON Baveyes introduces a line-up of the world’s first lens adapters that bring the famous medium format optics to Sony E, Leica SL and Leica M, Nikon Z, Canon R 35mm full frame cameras, virtually eliminating any crop factor image loss and maintaining diagonal angle of view.

The transformation results in a 0.7x factor to the original lens focal length with a gain of one stop in lens speed. Foremost in the advanced adapters, is the custom designed five element multicoated formula by German optics research institution, with the ability to use full frame SLR lenses on crop sensor camera bodies and mirrorless cameras.

Many medium format lenses are legendary for contrast, flare resistance, color saturation, bokeh and are in a class of their own compared to even the best 35mm format glass. And the Sony, Leica, Nikon, Canon image sensors, in the heart of their robust camera bodies, give new life to these medium format legendary lenses.

The retailer price for these optic focal reducer is 695USD,can order from Amazon Japan and Tmall China and Ebay factory shop from this week.

Articles: Digital Photography Review (dpreview.com)

 
Comments Off on Kipon adds Nikon Z and Canon R mounts to medium format lens adapter range

Posted in Uncategorized


Meyer Optik Görlitz brand lives on under a new owner

14 Dec

A few months ago NetSE, the German company behind the Meyer Optik Görlitz, Emil Busch A.G. Rathenau, Oprema Jena, C.P. Goerz, Ihagee Elbaflex and A. Schacht brands filed for bankruptcy, leaving many consumers who had backed the company’s brands on Kickstarter and other crowdfunding platforms out of pocket and without a product.

It looked like NetSE’s iconic brands would vanish for eternity but now it appears at least the Meyer Optik Görlitz brand will survive. Another German company, OPC Optics (Precision Components Europe GmbH), announced it has acquired the trademark rights to Meyer Optik Görlitz at the insolvency procedure of NetSE in Koblenz.

OPC Optics, a manufacturer of prototypes and small series of spherical and aspherical lenses, is planning to use the brand as a vehicle to enter consumer markets. The company says it will streamline the current Meyer Optik Görlitz lens portfolio and market lenses through traditional sales channels, so no more crowdfunding or pre-ordering.

In a press release the company also says that unfortunately it can’t take on any of NetSE’s obligations which means if NetSE hasn’t delivered your crowdfunded lens, OPC won’t do so either. It’s good to see a traditional live on but given all the negative news around Meyer Optik Görlitz in recent months, OPC’s move could be a risky one.

Articles: Digital Photography Review (dpreview.com)

 
Comments Off on Meyer Optik Görlitz brand lives on under a new owner

Posted in Uncategorized


How to Make Creative Photos with Prism Photography

14 Dec

The post How to Make Creative Photos with Prism Photography appeared first on Digital Photography School. It was authored by Simon Bond.

1 - How to Make Creative Photos with Prism Photography

This image is a creative street photo. The overpasses lead the eye towards the image within the prism.

Taking photos has many facets to it, and getting these right gives you a successful photo. A key element is how you use the light, and in this article, you’re going to learn how to split the light! Using a prism in your photography can give you new possibilities, and is another way of utilizing refraction in your photography. So, read on to find out about prism photography, how to make rainbows, and create beautiful photos that look like multiple exposures!

What does a prism do to the light?

A prism is a glass object and is therefore subject to the effect of refraction. The light is bent as it passes through the prism, creating several effects that you can use in photography. You can’t use it in the same way as a crystal ball, which works like an external lens optic and inverts the background image within the ball. However, there are two ways you can use the prism.

  • Project a rainbow – The prism, and it’s triangular shape, acts to split the light, and reveals the different wavelengths of light in the form of a rainbow. That means you can use a prism to create a rainbow, that you can photograph within your scene.
  • Redirect the light – Light can get dramatically redirected as it passes through the prism. That means when you look through the prism it’s possible to see the scene that’s at a 90-degree angle to the side of you. This factor gives the possibility of creating double exposure like images with a single frame.
2 - How to Make Creative Photos with Prism Photography

You can clearly see the rainbow light from the Prism. Also visible are the shards of light emitted from different angles to the direction of the sun.

Prism photography for making rainbows

An excellent way for you to use the prism is making rainbows. The larger the prism you have, the larger the rainbow becomes. The other way to increase the size is by increasing the distance between the prism, and the surface you are projecting the rainbow onto. The catch with increasing the distance is the rainbow light becomes more diffused and less intense. You also need to pay attention to how high the sun is in the sky. This is because the angle the sunlight hits the prism effects the angle of the projected rainbow. It is easier to project the rainbow onto the ground during midday when the sun is high in the sky. To project the rainbow more horizontally aim to photograph when the sun is lower in the sky, after sunrise, and before sunset.

The rainbow as a detail photo

Rainbow light is colorful, and when projected onto a surface this can make for a beautiful photo. Look for a surface that has a neutral color such as gray or white. A surface that has some nice surface texture may add more interest to your photo. Now twist the prism until you’re able to see the rainbow projected onto the surface you’re photographing. It’s possible to take the photo while holding both the prism and the camera. If you have a friend to help hold the prism, your results can be improved. As this is a detail photo, using a macro lens for this type of photo is better, but you may find other interesting compositions by using another lens.

3 - How to Make Creative Photos with Prism Photography

It’s possible to create your own rainbow using a prism.

The rainbow with portrait photography

Undoubtedly one of the most popular forms of prism photography involves projecting a rainbow onto someone’s face. The rainbow you project won’t be large, and it would be best if another person held the prism. The small size of the rainbow means a head shot would work well. A play on David Bowie’s ‘Ziggy Stardust’ portrait is a good starting place in which to start. You’ll want to set this up as a standard portrait, so use a prime lens for this photo. Ideally, you’ll want to blur the background through the use of a large aperture.

Three images in one frame

The other way to use the prism bares similarities to using a glass ball. This time you’ll be shooting through the glass, at images that appear inside it. Hold up the prism, and twist it. You’ll notice how you can see images inside this glass. These images are not those directly ahead of you though. Also, depending on how you twist the glass, you may see one or two images. It’s these images you can work with to make a unique multi-exposure type image, with a single click of the shutter.

The choice of lens

The best lenses for prism photography are a wide-angle lens and a macro lens. Unless you’re lucky and have a friend to hold the prism, you need to hold the prism and photograph through it at the same time.

  • Wide-angle lens – Allows you to bring the background image more into the photo. However, the prism edge becomes more prominent in the frame. It won’t be as easy to blur out with the aperture available on most wide angle lenses.
  • Macro lens – The majority of prism photography is carried out using a macro lens. This lens lets you focus close to the prism, allowing you to avoid capturing your hand in the frame. The transition from background to the image within the prism is also harder to spot.
4 - How to Make Creative Photos with Prism Photography

This image uses a macro lens with the prism, and looks like an optical illusion

Aperture for prism photography

The aperture you use for these type of photos are mostly dependent on what you want to do with the background, and how sharp you want the image within the prism. A large aperture of f/2.8 or bigger certainly works to blur out the background. The majority of photos need that background though, to achieve the multiple exposure feel. That means an aperture of around f/8 is the right balance between a background with detail and avoiding the prism having too sharp a line in transition to the background.

The background image

A prism has a fairly small width, and even with a macro lens, the background is a high proportion of the frame. So what works as a background for this type of photo? Primarily, you’re looking to avoid it being too busy.

  • Leading lines – A background that draws attention to the images inside the prism is an effective use of the background. This might be a tunnel, or perhaps a road disappearing to infinity.
  • Texture background – More of a blank canvas for the images within the prism to sit against. It might be a brick wall, or perhaps leaves and flowers.
  • Symmetry – As your image gets split down the middle by the prism, using symmetry either side of this split is an effective strategy.
5 - How to Make Creative Photos with Prism Photography

The use of background symmetry can be effective with a prism.

The image in the glass

Now the tricky part – getting a good image within the prism. The images from the prism can be at 90-degrees to the way you’re facing, or perhaps 60-degrees and to the side and front of where you’re standing. Incorporating this into your composed background is the challenging aspect of prism photography.

  • Composition – You already have a good composition for your background. You now need to keep that good background composition, while simultaneously adding a point of interest that’s well composed within the prism. Use trial and error. Twist and change the angle of the prism. You can also walk backward and forward to compose the image within the prism.
  • Adding a model – An easier way to add interest to the image in the prism is to make this a portrait photo. The advantage here is you can ask the model to stand in the exact position from which refracted light is coming through the prism.
6 - How to Make Creative Photos with Prism Photography

Adding a model to this image made for an interesting cherry blossom portrait photo.

Using fractals

Fractals are yet another item that uses refraction in photography. They produce prism-like effects but aren’t in themselves a triangular-shaped prism. Working as a handheld filter, you can photograph through them without worrying about images being at 90-degrees to you. It’s often used to make creative portrait photos with soft edges. It can equally be used to make a more abstract looking photo.

Time to go and split the light!

If you are looking to try something different with your photography, you’ll love the prism. It’s a little challenging to photograph with, but that’s what makes it fun. Have you ever tried prism photography? We’d love to hear your thoughts, and see your photos in the comments section below. So, now it’s time to get hold of a prism, and go out and experiment with it!

The post How to Make Creative Photos with Prism Photography appeared first on Digital Photography School. It was authored by Simon Bond.


Digital Photography School

 
Comments Off on How to Make Creative Photos with Prism Photography

Posted in Photography


Palette update brings its physical editing interface to Capture One on MacOS

14 Dec

Palette, a modular collection of buttons, dials and sliders designed to give photo editing a more tactile experience, has received an update making it compatible with Capture One 11 and 12 on MacOS computers.

The new support, which comes in the form of a software update to the proprietary PaletteApp, gives ‘access to hundreds of Capture One function items.’ Like their Adobe counterparts, Capture One users can now use the modular sliders, dials and buttons to adjust nearly every detail of an image with a more tactile approach.

On its FAQ page, Palette Gear addresses the lack of Windows support saying, ‘Simply put, the macOS release of Capture One offers developer tools that the Windows release does not. Our aim is full Capture One support on both platforms; we don’t play favourites. After careful consideration, we made the decision to offer Capture One support for macOS users while continuing to advocate for Windows support.’

Palette Gear also points out that while Palette does has ‘limited support’ on Capture One 9.3 and 10, it recommends using Capture One 11 or 12 for the best possible experience. Below is a list of Capture One functions Palette includes ‘comprehensive support’ for as well as the hundreds of other functions:

• Tonal adjustments: exposure, white balance, levels, high dynamic range, and more
• Detail adjustments: clarity, sharpening & noise reduction, grain, and more
• Tagging and rating: Assign a specific tag or rating with a single button press; Increment ratings and cycle through color tags
• Universal control: Use a single Palette dial to adjust any C1 slider, simply by hovering over it
• Slider module support: Palette sliders can now be assigned to C1 functions; Set custom range for each slider
• Multi-function dial support: Press and turn for coarse control, press to reset

In addition to a software update to bring Capture One compatibility to older Palette kits, Palette Gear has also created a new Capture One Kit that includes one core with a color screen, four buttons, four dials, and two sliders. Like other kits, it’s entirely plug-and-play via Micro USB. It’s currently priced at $ 349.99 and will eventually get bumped hip to $ 409.96, according to Palette Gear’s product page.

For more information on the update, head over to Palette Gear’s dedicated Capture One product page.

Articles: Digital Photography Review (dpreview.com)

 
Comments Off on Palette update brings its physical editing interface to Capture One on MacOS

Posted in Uncategorized


5 Tips for Photographing Flowers with Impact

14 Dec

The post 5 Tips for Photographing Flowers with Impact appeared first on Digital Photography School. It was authored by Megan Kennedy.

1 - 5 Tips for Photographing Flowers with Impact

If like me, you live in the southern hemisphere, you’ll be well amongst the season of spring. Although this can mean the onset of the dreaded hay fever season, it’s a great time of the year for photographers to capture an amazing diversity of flowers that bloom in the warmer months.

Flowers make beautiful subjects for photography. In fact, they’re probably one of the most photographed subjects in history. An abundance of colors, species, and sizes means that flowers provide an endless array of photographic opportunities.

2 - 5 Tips for Photographing Flowers with Impact

However, floral photography isn’t limited to spring either. If you aren’t currently living it up in the southern hemisphere, now is a great time to show some self-love and buy yourself a beautiful bouquet of flowers…because you deserve it! And for photography purposes, of course.

No matter if you are in the thralls of spring or living vicariously through this post, this quick list is a great way to load up on ideas for that next floral shoot.
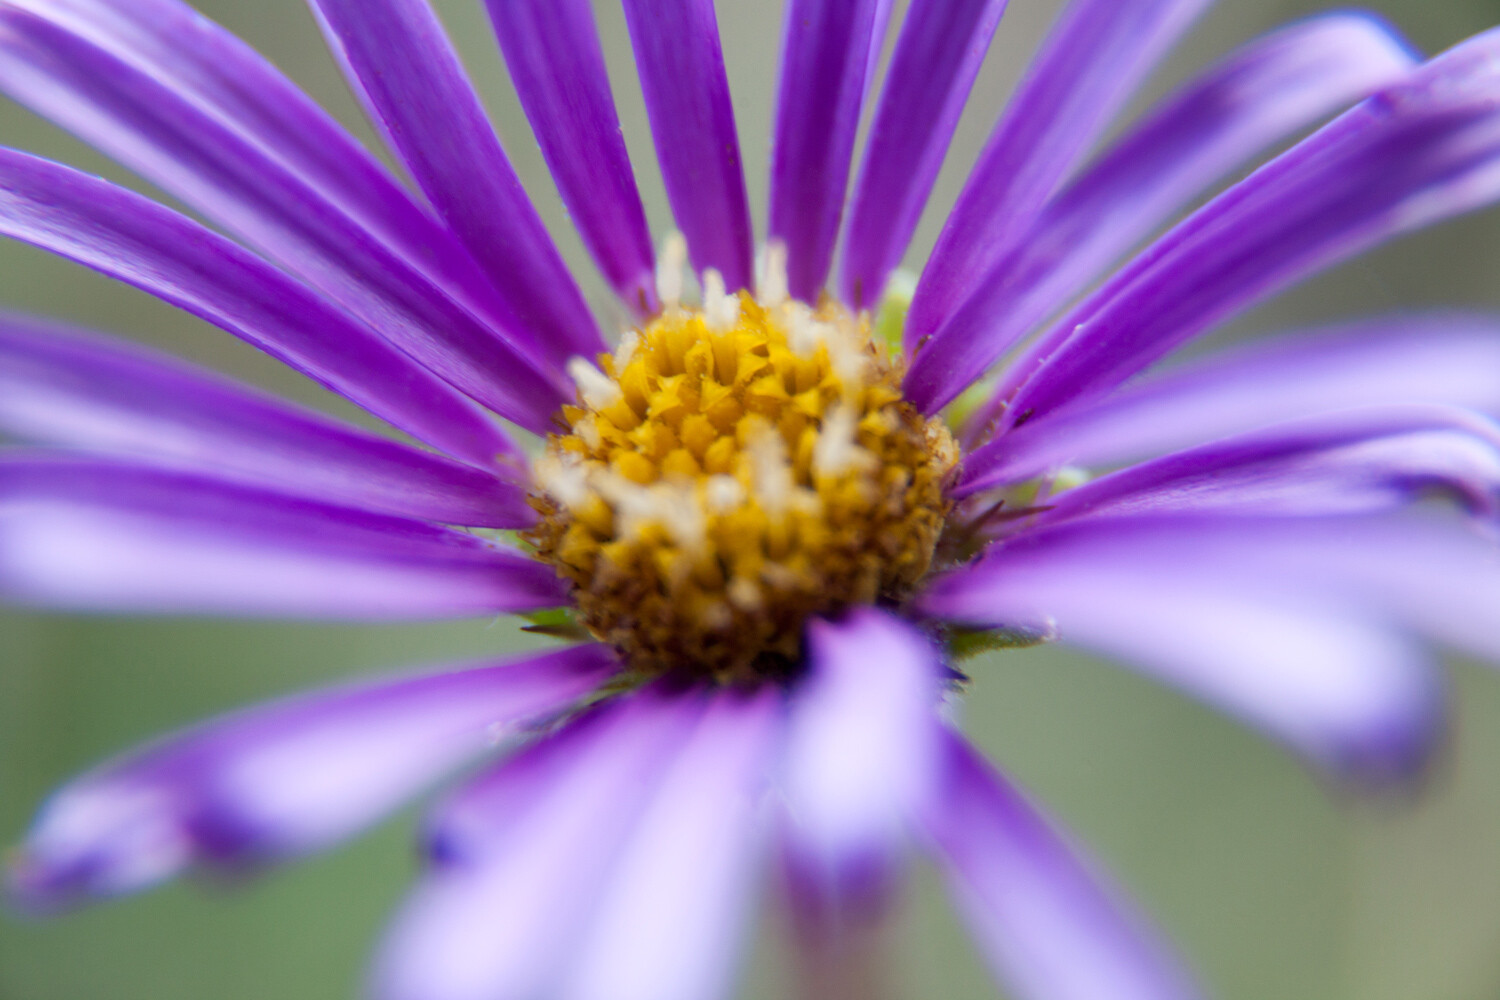
3 - 5 Tips for Photographing Flowers with Impact

Macro photography

Macro photography is the photographic reproduction of small subjects at a size that is larger than real life. Through macro photography, a photographer can take extreme close-up photographs of small subjects, reproducing them at a much larger size. Macro photography is often used to photograph flowers because it reveals attributes that can’t be seen by the naked eye. It’s easy to observe a flower in passing. But it takes a photographer to reveal the hidden details of a flower’s complex shape and structure.

A variety of dedicated macro lenses, as well as extension tubes and filters, mean that macro photography gear is becoming more and more accessible. For my macro flower photography, I use a set of extension tubes. They’re simple, don’t break the budget and they produce lovely results.

4 - 5 Tips for Photographing Flowers with Impact

5 - 5 Tips for Photographing Flowers with Impact

Abstraction

Abstract photography itself is a little hard to describe. Wikipedia defines abstract photography as “…a means of depicting a visual image that does not have an immediate association with the object world”. Abstract photography relies on compositional aspects like form, shape, color, line, and texture without worrying too much about depicting identifiable subject matter.

It’s a complicated subject, but flower photography is a great excuse to explore abstract photography for yourself. Try focusing on the details that make up the network of organic shapes in a flower, or home in on the subtle lines that form the flower’s shape. Don’t worry too much about the bigger picture. Go for it – it’s a lot of fun!

6 - 5 Tips for Photographing Flowers with Impact

In this abstract image, the flowing lines and natural color lend the impression of an organic subject

Color

Focusing on a colorful subject matter is a great way to form a dialogue between a photograph and viewer. Flowers are known for their abundance of color and variety. Their beautiful and sometimes surprising hues make them wonderfully diverse photographic subjects.

For vibrant color in your floral photography, you want to photograph a well-lit subject. If you are photographing outside, aim to shoot on a day with a good amount of sunlight. If you are inside or shooting on a particularly cloudy day, try incorporating on-camera flash into your photography. Direct flash will usually blow out a subject, so try using a diffuser or bouncing your flash for a softer effect that will lift a flower’s color without washing it out.

7 - 5 Tips for Photographing Flowers with Impact

Taking advantage of the color in floral subjects will allow you to build up a body of diverse botanical photography by relying on the natural features of the flower

Black and White

Of course, not all flower photography has to be in color. Color photography can have the drawback of directing attention away from the subject itself. Black and white photography, on the other hand, enhances form and texture by minimizing distraction.  And because flowers are associated with color, black and white photography also lends a timeless, surreal angle to your floral imagery.

To photograph flowers in black and white, you can set your camera to shoot in monochrome mode. Or, you can convert your images to black and white in post-production with programs like Photoshop or Lightroom. Either way, black and white photography is a great way to add a unique perspective to your flower photography.

8 - 5 Tips for Photographing Flowers with Impact

This photograph of was taken using a process called Scanography. The black and white scheme accentuates the subtle details in the subject

Perspective

Perspective dictates the way a viewer places themselves in a photograph. As a basic example, a high perspective can remove the viewer from the scene, inviting them to asses a photographic environment clinically. It introduces a sense of unease, as height is considered innately dangerous. A low perspective amplifies the height of subjects, lending a sense of grandeur to an environment. At the same time, it can also instill a feeling of ‘smallness’ in the viewer, as if they were an ant inspecting an impossibly tall building.

Viewers get drawn to images that are out of the ordinary. Creatively utilizing your camera’s point of view challenges the way a viewer sees their surroundings. For a unique twist on perspective, try photographing floral subjects down at their level. It’s amazing how much a subject can be transformed with a quick change in perspective.

9 - 5 Tips for Photographing Flowers with Impact

Conclusion

Focusing on color, black and white, perspective, macro, and abstract photography are only some of the ways to approach flower photography. Even the smallest flower poking its head through the cracks in a path can bring a smile to someone’s face. So, combining photography and flowers is sure a sure-fire way to create beautiful imagery. I’d love to see your results below!

The post 5 Tips for Photographing Flowers with Impact appeared first on Digital Photography School. It was authored by Megan Kennedy.


Digital Photography School

 
Comments Off on 5 Tips for Photographing Flowers with Impact

Posted in Photography