Blog

  • Guide: How to get the most out of Sony’s autofocus technologies

    Getting the most out of Sony’s autofocus technologies

    After years of development, Sony’s mirrorless interchangeable lens cameras offer among the most advanced autofocus technologies on the market, allowing photographers to create pictures that simply wouldn’t be possible with other systems.

    Sony was among the first manufacturers to add phase-detection autofocus pixels onto a camera’s main imaging sensor, which allows for ultra-precise focus. A wide spread of AF points and intelligent scene recognition algorithms are standard in Sony’s market-leading a6000-series, a7-series and a9 cameras, allowing for powerful and accurate subject tracking. While these technologies are obviously useful for shooting fast-paced sports and action, features like face detection, Eye-AF and Direct Manual Focus (DMF) can also be employed for portraiture, landscape photography and video work.

    In this article, we’ll be outlining some key use-cases and recommending how to set up your Sony camera’s autofocus system to get the best results.

    Sports and action

    Because, unlike a DSLR, there’s no mirror in the way, the millions of pixels-worth of data from the image sensors in mirrorless cameras can be used to feed the cameras’ autofocus and metering systems in real time. This allows for sophisticated object recognition and tracking. Autofocus data is also taken from the main imaging sensor itself, which means that AF is inherently more accurate than conventional DSLR systems.

    The flagship sports-oriented Sony a9 for example features 693 phase detection autofocus points offering 93% coverage across the image area (illustrated above). Having so many AF points – and such a wide spread – makes it possible for the camera to accurately track action right out to the edges of the frame – something that isn’t always possible with other full-frame cameras. Here are our recommended settings for shooting sports and action:

    Recommended AF settings for sports and action:

    • Focus Mode: AF-C
    • Focus Area: Lock-on AF: Flexible Spot M

    How to use: Frame your composition so the AF point is over your subject, then half-depress the shutter to start tracking it. At this point you can recompose the scene however you want, and your subject will continue to be tracked. To switch subjects, simply release the shutter, reframe to place the AF point over your new subject, and half-depress the shutter again.

    Notes / Tips: This AF setup is also useful for more general photography: if you identify your subject by placing the AF point over it and engaging AF, the camera will keep track of it for you, making sure it’s perfectly focused when you take your shot.

    For some types of fast-action photography, like birds-in-flight, air shows, or any situation where your subject is the nearest object in the scene or well isolated against distant objects, you can often trust the camera to automatically identify the subject and focus on it. This avoids the need for you to reframe and place the AF point over your subject before initiating AF, saving you time and helping you capture the moment faster. To try this way of working, switch the camera’s Focus Area to ‘Wide’, or use ‘Recall Custom Hold’* to assign a custom button to this focus mode so you can instantly activate it in fast-paced situations.


    *Only available on A9, a7R III and a7III Alpha cameras.

    Portraits

    For the serious portrait photographer, Eye AF is fantastic, letting you focus more on posing and expression and leaving the camera to do the rest. With Eye AF enabled, a Sony camera will continue to track your subject’s eye, even when firing away at fast frame rates, which makes it a great option for catching just the right expression.

    Sony’s Eye AF system is very ‘sticky’ in that once it’s been set to track a subject it rarely jumps off to someone else in the scene, even if your subject moves or momentarily turns away from the camera. And because of the wide AF area coverage, Eye AF will track your subject right out to the edges of the frame – this is useful for off-center compositions or erratic subjects like kids.

    Recommended AF settings for portraits:

    • Focus Mode: AF-C
    • Focus Area: Flexible Spot M (or L)
    • Button Assignment: Assign Eye AF to AF-ON

    How to use: If you have multiple people in the frame and are using any AF area other than ‘Wide,’ you can place that AF area over one of your subjects, and when you initiate Eye AF, it will track that person’s eye. To switch subjects, release the Eye AF button, place your AF area over the other person, and re-initiate. If you simply want to focus on a person yourself, just place your AF point over the desired portion of your subject, and half-press the shutter to focus.

    Notes / Tips: If you only have a single person in the scene, or you’re happy to let the camera choose a face to focus on on its own (usually the nearest), switch Focus Area to ‘Wide’, then just press the Eye AF button.


    Note that while we recommend assigning Eye AF to AF-ON for ease of use, you may wish to assign it to the AEL button if you prefer to use the AF-ON button for back-button focus.

    Travel and general photography

    As well as offering powerful autofocus features designed for portraiture and capturing fast-moving sports and action, Sony cameras are incredibly versatile when it comes to day-to-day photography. For general everyday and travel photography with Sony’s mirrorless cameras , we recommend the following autofocus settings:

    Recommended AF settings for general photography:

    • Focus Mode: AF-S
    • Focus Area: Wide (Face Priority in AF: On)

    How to use: For general photography, we recommend you simply let the camera choose what to focus on. It will focus on faces in the scene, and prioritize nearer subjects over further ones.

    Notes / Tips: If you wish to take control, just assign a button – like a central press of the AF joystick – to ‘Recall Custom Hold’* and set its options to activate AF-S Focus Mode and Center Focus Area, with AF activation. That will allow you to quickly revert to the tried-and-true ‘focus and recompose’ method if necessary.


    *Only available on A9, a7R III and a7III Alpha cameras.

    Landscape photography

    Traditionally, landscape photography has been the domain of manual focus, but even with static subjects, autofocus can be a huge time-saver. Here’s how we recommend you set your Sony camera’s AF for shooting landscapes.

    Recommended AF settings for landscape photography:

    • Focus Mode: DMF
    • Focus Area: Flexible Spot: M (or L)
    • Button Assignment: Assign a custom button to focus magnifier

    How to use: Compose your scene, then place the AF point over a portion of the scene you want focused. Use the focus magnifier to zoom into that region, then half-press the shutter to focus. While the shutter button remains half-pressed, you can turn the focus ring on the lens to fine-tune focus, then take your shot.

    Notes / Tips: Using this technique, autofocus quickly gets you close to where you need to be, then it can be fine-tuned to achieve the correct balance of foreground and background sharpness for expansive scenes.

    Video

    Advanced HD and, more recently, 4K video features have been included in Sony’s E-mount mirrorless cameras from the very beginning, and Sony’s E-mount lenses are optimized for movie autofocus requirements as well as stills photography. Traditionally, a lot of filmmakers would rely on manual focus when shooting video, but Sony’s mirrorless cameras’ hybrid on-sensor autofocus systems function just as well (and in exactly the same way) when shooting stills and video, making AF useful and practical for videography.

    Here are our recommended settings for video:

    Recommended AF settings for video:

    • Focus Mode: AF-C
    • Focus Area: Wide (Face Priority in AF: On)
    • Center Lock-on AF: On

    How to use: On their own, Sony cameras are capable of intelligently focusing in video, prioritizing faces and nearer objects, and smoothly racking focus when switching between subjects to focus on. If you turn ‘Center Lock-on AF’ on in the menus, you can choose which subject the camera should track (even if it moves around the frame) by simply tapping on it on the LCD. If your camera has a touch-sensitive screen, to switch to a different subject, you can just tap on it.

    Notes / Tips: You can even customize how quickly the camera refocuses on your subject. In the menu, ‘AF Track Sensitivity’ tells the camera how responsive it should be subject movement, with the ‘Responsive’ setting best used for constantly and rapidly moving subjects. ‘AF Drive Speed’ controls how quickly the camera drives the lens focus element: ‘Slow’ yields the smoothest results, but ‘Fast’ is great for rapidly moving subjects and run-and-gun videography.

    Note: Remember to turn Center Lock-on AF ‘Off’ before returning to stills shooting, or set up a separate Memory Bank for video shooting so its settings don’t interfere with your stills settings.


    This is sponsored content, presented by Sony. What does this mean?

    Articles: Digital Photography Review (dpreview.com)

  • Cocktails with Don Draper, Dinner and Drinks at Oakland’s New Mid-Century Modern, Bardo Lounge and Supper Club

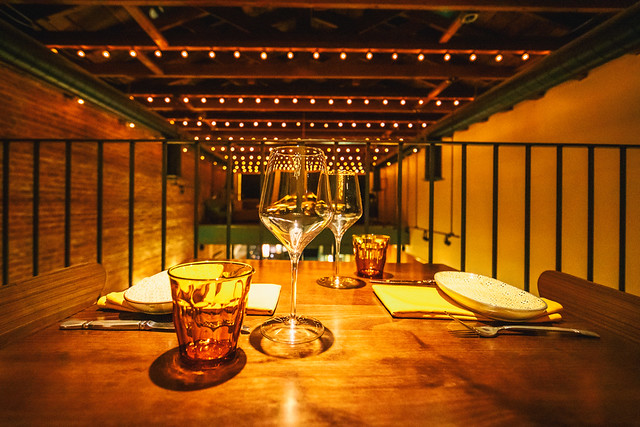
    Bardo Lounge and Supper Club, Oakland, California

    If, like me, you are a fan of all things mid-century modern, then you won’t want to miss Oakland’s newest Lakeshore addition, Bardo Lounge and Supper Club. Like a vintage trip with Don Draper back in time, you’ll enjoy all the little touches that make for a perfect night out for some excellent cocktails along with lounge or supper service to go with them.

    With Bardo, owners Seth and Jenni Bregman have transformed the former Michel Bistro space on Lakeshore into a sort of museum of great taste and design from our favorite wayback era — with some seriously good tunes spinning all night long.

    Along with the lush 60s feel, Bardo serves up swingin’ cocktails with lounge service downstairs (no reservations required) and supper service upstairs (reservations required). The downstairs lounge features a lounge and bar where you can order “lounge fare” and some of the items off of the larger tasting menu from supper service upstairs.

    Last night Mrs. TH and I tried the lounge service at the bar. In terms of the booze, I opted for the “Walk in the Orchard” cocktail, a well balanced craft cocktail with High West Double Rye, Cynar 70, Apple Cider, Fresh Lime Juice, White Pepper Thyme Maple and Angostura Bitters. Mrs. TH chose the equally delicious “Pilot Maxine,” Blackberry-Washed Gordon’s Gin, Top Hat East India Tonic, Fresh Lime Juice and Fee Brother’s Rhubarb Bitters.

    From the menu I’d highlight the devilishly delicious deviled duck eggs, the super rich foie gras cacio e pepe pasta, and most definitely the broccolini casserole — the toasted shallot and almonds on top of the casserole were just perfect. That casserole would win any neighborhood bake off hands down.

    Bardo’s Lounge is open from 5pm to Late Wednesday-Sunday and supper is served upstairs 5:30-10pm Thursday-Saturday and 5:30-9:30pm on Sunday. I’d recommend getting there as early as you can for lounge service. We had no problem getting a spot at the bar at 5:30pm last night, but it filled up quickly with a line as it got later. Bonus tip, go catch an epic sunset, with your old school film camera of course, for an early winter sunset over Lake Merritt and just walk on over for dinner afterwards.

    More photos here.

    3343 Lakeshore Avenue, Oakland, CA 94610

    Bardo Lounge and Supper Club, Oakland, California
    Bardo’s upstairs supper service

    Bardo Lounge and Supper Club, Oakland, California
    Walk in the Orchard: fall aromas and flavors in a glass. High West Double Rye, Cynar 70, Apple Cider, Fresh Lime Juice, White Pepper Thyme Maple, Angostura Bitters

    Bardo Lounge and Supper Club, Oakland, California
    Pilot Maxine: refreshing and light with berry notes. Blackberry-Washed Gordon’s Gin, Top Hat East India Tonic, Fresh Lime Juice, Fee Brother’s Rhubarb Bitters

    Bardo Lounge and Supper Club, Oakland, California
    Deviled Duck Eggs: Spiced red wine jus, scallions, duck skins

    Bardo Lounge and Supper Club, Oakland, California
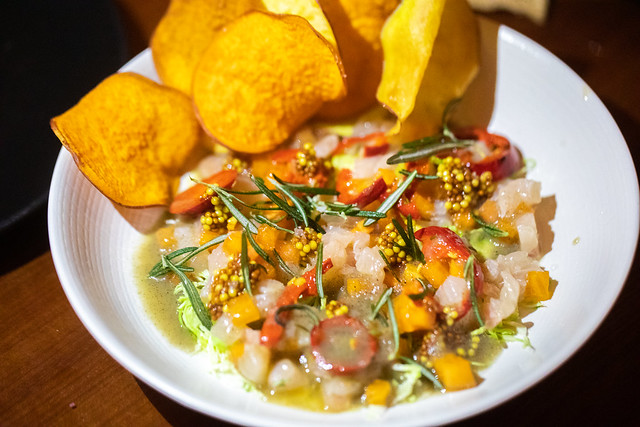
    Kanapachi tartare: persimmon, Calabrian pepper, brussel sprouts, charred vegetable broth, yam chips

    Bardo Lounge and Supper Club, Oakland, California
    Foie gras cacio e pepe, beemster, duck jerky

    Bardo Lounge and Supper Club, Oakland, California
    Broccolini Casserole: Brown mustard, gruyere, almond, shallot

    Bardo Lounge and Supper Club, Oakland, California
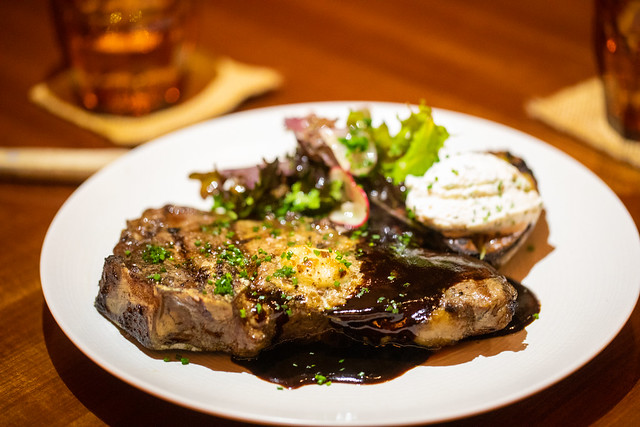
    14 oz Dry Aged Prime New York: Bone-in, grilled and loaded baked potato, greens, B1 Sauce

    Bardo Lounge and Supper Club, Oakland, California
    Ice Cream Sandwich: Banana semifreddo, double chocolate cookie.

    Bardo Lounge and Supper Club, Oakland, California


    Thomas Hawk Digital Connection

  • Improve Your Photography by Learning How To Use Exif Data

    The post Improve Your Photography by Learning How To Use Exif Data appeared first on Digital Photography School. It was authored by Kevin Landwer-Johan.

    Whenever a photo is taken with a digital camera, data relating to that photo gets stored with the image in what’s known as the Exchange image file format (Exif).

    Knowing how to use that Exif data can help you gain insight into the camera settings of both your own and other people’s photos. Seeing what settings worked well together in a great photo (or didn’t work well in a bad one) can help you improve your photography skills.

    Improve Your Photography by Learning How To Use EXIF Data Hmong Girl

    © Kevin Landwer-Johan

    Data About Data

    The Exif data is what’s called metadata (data about data). Some data is more significant and useful than the rest. Within it you’ll find the information you probably know already – camera make and model, image dimensions, copyright information, etc. But you’ll also find information about the exposure, whether or not the flash fired, metering mode, distance to subject, and plenty more.

    You can view the Exif data on your camera, on your computer, and on photo sharing sites such as Flickr and 500PX.

    Here’s a screenshot of the Exif data being displayed in Adobe Photoshop after choosing ‘File Info...’ from the ‘File’ menu.

    Improve your photography by learning how to use Exif data

    To view this information in Windows right-click on the image file and select ‘Properties,’ then select the ‘Details’ tab.

    If you’re using a Mac, open the image file in Preview, then select ‘Show Inspector’ from the ‘Tools’  menu and select the ‘Exif’ tab.

    Note: Adobe programs create a file with the same name as the image but with the extension ‘xmp’. This stands for Extensible Metadata Platform and contains the Exif data for the image.

    Improve Your Photography by Learning How To Use EXIF Data File Explorer Data View

    As you can see, the EXIF data includes all the information about the exposure. My camera was set to manual mode. My shutter speed was 1/320 sec, the aperture was f/2.8, the ISO was 100, and I used my spot meter. It also shows that my flash fired.

    In these examples, we’re looking at data from the RAW file. But the data is also stored in other file types such as JPEG and TIFF.

    About the only thing it doesn’t tell you is whether a photo has been manipulated during post-processing.

    How Is This Information Useful to Beginner Photographers?

    When you first start out, and you’re still getting used to your first camera, the Exif data can help you learn. If you took a photo that didn’t turn out the way you thought it would, the data may show you why.

    Improve Your Photography by Learning How To Use EXIF Data 105 one fourth

    © Kevin Landwer-Johan

    For example, seeing that the shutter speed was 1/4th sec will help you understand why your photo was blurred. To shoot at such a slow speed you need to use a tripod to avoid camera shake.

    And seeing an aperture setting of f/16 will help you understand why so much of your image is in focus. You could then look at the Exif data of an image where more of the composition is out of focus to see what its aperture setting was.

    Improve Your Photography by Learning How To Use EXIF Data Three at f16

    © Kevin Landwer-Johan

    Use Exif Data To Make Comparisons

    The Exif data can also help you compare images you’ve made. Looking at the lens data can help you understand when it’s best to use that lens. Compare the same aperture setting on two different lenses. It will help you learn more about depth of field.

    Comparing the same image shot with two different focal lengths is also a useful exercise. These three photos were taken using different lenses (as shown in the Exif data).

    Improve Your Photography by Learning How To Use EXIF Data EXIF-f4

    © Kevin Landwer-Johan

    Analyze and Anticipate

    Analyzing the Exif data of your photos can help you plan and improve future photo sessions of the same subject or situation. Studying the data on photos from an annual event will give you insights into what you did well and where you can improve.

    The Hmong people in Thailand, Laos, Vietnam and other countries (including the US and France,) hold awesome New Year festivals. The celebrations include various sporting competitions such as kart racing, crossbow shooting and top spinning, which can all be challenging to photograph.

    So before I go to the festival each year I look back at photos I’ve made previously. The Exif data from these images reminds me of the settings I’ve used in the past. When I arrive I know which lens will give me the best photos for each competition, and what shutter speed I’ll need to capture sharp action in the kart racing.

    Improve Your Photography by Learning How To Use EXIF Data Kart

    © Kevin Landwer-Johan

    Analyzing data from photos of subjects you don’t photograph can also be helpful. On websites such as Flickr and 500px the Exif data is often displayed alongside the photos, and so you can use it as a reference. When you’re photographing new subjects, especially ones that require special camera settings, look at the Exif data of other people’s photos. It could save you a lot of time and stress.

    Conclusion

    Making the most of the tools you have will help you become a better photographer. Next time you wonder why a photo worked (or didn’t work) so well, take a look at the Exif data. You may be surprised what you can learn.

    Do you use the Exif in other ways? I’d love to hear about it in the comments.

    The post Improve Your Photography by Learning How To Use Exif Data appeared first on Digital Photography School. It was authored by Kevin Landwer-Johan.


    Digital Photography School

  • Our favorite gear, rewarded: DPReview Awards 2018

    DPReview Awards 2018

    This year was a busy one for DPReview and the camera industry as a whole. 2018 saw the launch of two new full frame mirrorless systems from Canon and Nikon, a brace of excellent lenses, and the development announcement of even more goodies due to be released in early 2019.

    With so many great products to choose from, there’s never been a better time to be a photo enthusiast, but the amount of gear out there can be overwhelming. Every year in December we get together as a team to recognize the standout products of the past 12 months in our annual DPReview Awards. Click through the slides above to find out which products made our list of the best gear of 2018!

    Best photography accessory

    Shortlist:

    • Adobe Lightroom CC 2.0
    • Canon Speedlite 470EX-AI
    • Wandrd Prvke 21L Backpack
    • Western Digital My Passport Wireless SSD

    Runner up: Western Digital My Passport Wireless SSD

    Photography accessories come in all shapes and sizes and this year’s shortlist includes four products that are as different as can be. But something they all share is the potential to help streamline the photographic process, whether that means improving the experience of transporting gear from A to B, or simply creating a better way to back up files on the go.

    The Western Digital My Passport Wireless SSD falls into the later category. It’s a solid state version of the company’s already popular wireless drive with a shock resistant construction. Core features include a built-in SD 3.0 card reader, USB 3.0 connectivity, Wi-Fi connectivity for reviewing media on a device, a built-in 6,700mAh battery for charging other devices over USB (and to power Wi-Fi), and preview support for Raw files. It’s available in 250gb, 500gb, 1Tb and 2TB capacities.

    Read more about the WD MyPassport Wireless SSD

    Winner: Wandrd Prvke 21L Backpack

    The right camera backpack is a frustratingly elusive thing to find. No bag is going to be perfect for every photographer. But wouldn’t be nice if one came close? Meet the Wandrd Prvke 21L. It might have a weird name (it’s pronounced ‘wandered provoke’), but it’s awesome to use. So awesome, in fact, that it’s our favorite camera backpack on the market and our pick for photographic accessory of the year.

    The Wandrd Prvke 21 provides an impressive balance of intelligent, rugged design with outstanding weight distribution and comfort. It’s also incredibly versatile: a roll-top provides an additional 4L of storage and the internal ‘Camera Cube’ can be completely removed. There’s also plenty of external storage pockets and even loops to attach bulky gear, like a sleeping bag, to the bottom of the pack. In short, this bag looks good, handles well, is super versatile and can carry a ton of gear. As such, it’s a worthy winner of our award this year for best photo accessory.

    Read our review of the Wandrd Prvke 21L camera backpack

    Best video accessory

    Shortlist:

    • Atomos Ninja V
    • Blackmagic DaVinci Resolve 15
    • DJI Ronin-S
    • Sigma Cine 28mm / 40mm / 105mm T1.5 FF

    Runner up: Atomos Ninja V

    Video capabilities continue to improve every year, and it’s common these days to find advanced features such as oversampled 4K, 10-bit recording, and Log gamma profiles on many cameras. While it’s possible to shoot amazing footage with just a camera and a lens, specialized video accessories can make your shoot easier or take your production quality up a notch or two.

    The Atomos Ninja V is a tool that lets you take complete advantage of your camera’s video capabilities, some of which may only be fully realized when using an off-camera recorder. With features such as 4K/60p recording, support for Apple ProRes and Avid DNxHR, a 5″ daylight viewable screen, anamorphic de-squeeze, and HDR monitoring there’s a lot to like, and it does so in a compact size that’s a perfect match for DSLR or mirrorless cameras. If you want to squeeze every bit of quality out of your camera’s video, or just have a more enjoyable shooting experience, this is an easy way to do it.

    Read more about the Atomos Ninja V

    Winner: DJI Ronin-S

    It’s easy to get stable video when using a tripod, or even when shooting a relatively simple shot using a camera’s image stabilization, but sometimes the key to great video is camera movement. Unfortunately, that’s where many in-camera or in-lens stabilization systems just aren’t quite good enough for things like run-and-gun documentary or narrative filmmaking.

    Enter the DJI Ronin-S. It’s not the first one-handed camera gimbal, but it’s our current favorite thanks to its effective operation and ease of use. Setup is a breeze, thanks to its auto-tune feature for gimbal calibration, and the 3-axis motorized gimbal has some of the strongest motors DJI has ever put in a gimbal, allowing the Ronin-S to compensate for slight changes in balance when using zoom lenses. It’s also possible to save three distinct groups of settings and toggle between them at the press of a button – ideal for filmmakers who need to quickly react to changing conditions.

    Other great features include an offset roll axis that’s cleverly designed to avoid blocking the screen while shooting, configuration using a smartphone app, and a 12-hour battery that will outlast your arm. It even supports remote camera operation including remote start/stop and a very precise remote follow focus knob.

    Read our DJI Ronin-S review

    Best smartphone camera

    Shortlist:

    • Apple iPhone XS
    • Google Pixel 3
    • Huawei Mate 20 Pro
    • Samsung Galaxy S9+
    • Sony Xperia XZ3

    Runner up: Google Pixel 3

    The Pixel 3 is the first smartphone camera to truly rival traditional dedicated cameras, surpassing 1″-type and rivaling cameras with Four Thirds sensors in ‘Night Sight’ mode.* It does this by improving upon the Pixel 2’s already class-leading HDR+ multi-frame fusion technique, now capturing even more frames and merging them using a super resolution algorithm to extract more detail, reduce noise, and remove the need for demosaicing. A new learning-based white balance approach in this mode also renders pleasing colors even in challenging light.

    Portrait Mode has been improved using machine learning to understand a variety of depth cues, rendering the most pleasing subject isolation and blur of any smartphone we’ve tested. ‘Synthetic fill flash’ uses learning-based segmentation to identify and re-light faces. ‘Top Shot’ captures perfect moments you may have missed before hitting the shutter button. The Pixel 3 outputs Raw, but these Raw files have image quality that far surpasses what you’d expect from such a small sensor, since they’re the result of stacking and merging up to 15 rapidly captured frames. To sum up: it’s the best smartphone camera for stills we’ve ever seen.

    Read more about the Google Pixel 3


    *Despite the name, you can use Night Sight mode any time of day to get its benefits, with the only downside being a positive shutter lag.

    Winner: Apple iPhone XS

    The iPhone XS faced fierce competition from the Google Pixel 3 this year, and from a pure still image quality standpoint the Pixel 3 wins hands down. But the iPhone XS takes the top spot overall thanks to a more rounded feature set that includes class-leading video, reliable AF, wide color capture and HDR display of imagery, plus a range of improvements over the original iPhone X.

    New in the XS is a larger image sensor in the main camera for better dynamic range and low light performance, and a refined Portrait Mode. In a snub to traditional cameras, the XS allows you to choose your aperture after you shoot – all the way from F1.4 to F16. Cleverly, Apple has modeled the optical properties of real full-frame portrait lenses to accurately – and attractively – simulate ‘real’ bokeh.

    Perhaps the biggest improvement though is Apple’s new ‘Smart HDR’ feature, which takes advantage of the faster processing capabilities of the phone to capture wider dynamic scenes in stills, panoramas, and even in video up to 4K/30p, making the HEVC 4K footage the best we’ve seen from a smartphone. Pair all this with improved contrast on one of the best displays on the market, with accurate color management under the hood so you get the benefits of the wide gamut display without a loss in color accuracy, and you have one of the best smartphones available today.

    Read more about the Apple iPhone XS

    Best prosumer camera drone

    Shortlist:

    • DJI Mavic 2 Pro
    • DJI Mavic Air
    • Parrot ANAFI
    • Skydio R1

    Runner-up: DJI Mavic Air

    Drones have quickly become one of the most exciting new areas of photography, allowing anyone to capture stunning photos or video that previously required a helicopter or cable-cam.

    The DJI Mavic Air is an ultra-compact, foldable quadcopter that’s small enough to be a true ‘take anywhere’ drone. Its 1/2.3″ CMOS sensor records 4K/30p or 1080/120p video at up to 100 Mbps, captures 12MP Raw photos, and ‘QuickShots’ modes make it easy to get cinematic looking footage even if you’re a beginner. It even includes DJI’s Advanced Pilot Assistance System (APAS), which uses numerous sensors to detect and go around obstacles so you can continue following your subject.

    Read more about the DJI Mavic Air

    Winner: DJI Mavic 2 Pro

    The Mavic 2 Pro is the model that drone enthusiasts had been asking DJI to create, and in 2018 DJI delivered. It has all the great features of the original Mavic Pro, including a small, foldable form factor, but adds a camera built around a larger 1″-type sensor with Hasselblad branding. It’s the perfect match for the person who values exceptional photo and video quality in a compact package.

    The Mavic 2 Pro’s standout features don’t stop with the larger camera, however. It’s capable of recording 4K/30p at up to 100 Mbps, supports both H.264 and H.265 codecs, offers 10-bit recording with DJI’s DLog-M gamma profile, and uses DJI’s OcuSync 2.0 video transmission system for reliable transmission over long distances. It also includes APAS for obstacle avoidance using 10 sensors that provide omnidirectional coverage around the aircraft and numerous intelligent flight modes for cinematic shots.

    Read more about the DJI Mavic 2 Pro

    Best zoom lens

    Shortlist:

    • Canon RF 28-70mm F2
    • Canon RF 24-105mm F4
    • Tamron 28-75mm F2.8 Di III RXD
    • Tamron 70-210mm F4 Di VC USD

    Runner-up: Canon RF 28-70mm F2

    A lot of lenses get released every year, and it’s always a challenge to whittle the year’s releases down to a shortlist – let alone to pick a winner. That said, this year several lenses stood out from the pack.

    Canon’s impressive RF 28-70mm F2L is perhaps the clearest indication that despite the mid-level positioning of the EOS R, the RF system should be taken seriously by professionals. This durable, weather-sealed lens features super-advanced glass and coatings designed to keep aberrations to a minimum despite its ambitious continuous maximum aperture. The result is a fast zoom that offers stunning image quality throughout its range.

    Arguably falling into the category of ‘stunt lens’, the 28-70mm F2 is almost comically large and unbalanced on the R, but it’s clearly designed for a future – more professional – camera. We can’t wait.

    See some samples from the
    Canon RF 28-70mm F2

    Winner: Tamron 28-75mm F2.8 Di III RXD

    At the other end of the scale from Canon’s behemoth is the Tamron 28-75mm F2.8 Di III RXD. It might not be the widest or fastest (thanks to our runner-up), standard zoom of its kind, but it’s the smallest and lightest, and one of the best nonetheless.

    The Tamron 28-75mm F2.8 Di III RXD has the distinction of being the first third-party zoom lens designed from scratch to be compatible with Sony’s full-frame mirrorless cameras. It has seriously impressed us with its optical quality, close-up ability, relatively fast (and silent) autofocus, pleasant handling and excellent value for money. A perfect companion to Sony’s a7 III, we hope that the 28-75mm F2.8 Di III RXD is the first of many future mirrorless-oriented lenses from Tamron, which has really impressed us in the past couple of years with its range of high-quality Di prime and zoom.

    See our sample gallery shot with the
    Tamron 28-75mm F2.8 Di III RXD

    Best prime lens

    Shortlist:

    • Canon RF 50mm F1.2L USM
    • Sony FE 24mm F1.4 GM
    • Sony FE 400mm F2.8 GM
    • Sigma 56mm F1.4 DC DN

    Runner-up: Sigma 56mm F1.4 DC DN Contemporary

    The launch of several new mirrorless systems has helped 2018 become a bumper year for interesting prime lenses. The fact that after a lot of discussion, Canon’s ambitious (and super-sharp) RF 50mm F1.2L just missed out on an award gives a hint of how hotly-contested this category was.

    One of the lenses that really caught our eye this year was the Sigma 56mm F1.4 DC DN Contemporary. The 56mm F1.4 is the third in a set of affordable Sigma F1.4 lenses for Sony’s E-mount and the Micro Four Thirds system, and like the existing 30mm and 16mm lenses, the 56mm makes most sense on the APS-C format, where it’s equivalent to a classic 85mm portrait lens.

    The 56mm F1.4 DC DN is small, light and, with an MSRP under $ 500, very sensibly priced. More than this, though, it’s sharp, fast to focus and exhibits pleasant bokeh, as a portrait lens should. In our view this makes it a great addition to the otherwise slightly under-served Sony APS-C E-mount lineup. We only wish it were available for other mirrorless APS-C mounts.

    See our Sigma 56mm F1.4 DC DN
    sample gallery

    Winner: Sony FE 24mm F1.4 GM

    We’ve seen a lot of small, OK lenses this year, and a lot of very large, very good lenses, but it’s really nice when we see a manufacturer make a small excellent lens. The Sony FE 24mm F1.4 GM is exactly that.

    This medium-wide prime lens for Sony’s a7-series and a9 mirrorless cameras (it’s also a useful 36mm F2.1 equivalent on APS-C) is a great example of the lens-maker’s art. Superbly suited to landscape and astrophotography, the 24mm F1.4 is equally useful for low-light candid photography and portraiture. It’s uncannily sharp edge-to-edge wide open with little to no coma, bokeh is smooth, and longitudinal chromatic aberration – that purple and green fringing we loathe on many fast wide primes – is well controlled. Our decision this year was unanimous – the Sony FE 24mm F1.4 GM takes the well-deserved top spot in our award for best prime lens of 2018.

    Read more about the
    Sony FE 24mm F1.4 GM

    Best compact/fixed lens camera

    Shortlist:

    • Fujifilm XF10
    • Nikon Coolpix P1000
    • Panasonic Lumix DC-LX100 II
    • Sony Cyber-shot DSC-RX100 VI

    Runner up: Nikon Coolpix P1000

    This year was another relatively slow one for compact cameras, but the models in our shortlist all have something special to offer.

    Taking the runner-up spot this year is the Nikon Coolpix P1000, distinguished by its wonderfully bonkers lens, which covers an equivalent focal length range of 24-3000mm. This kind of zoom would be useless if the pictures were terrible, but the P1000’s lens is very impressive given its extraordinary range, and capable of everything from sweeping landscapes to sharp lunarscapes, thanks in part to a very effective effective image stabilization system. The bulky Coolpix P1000 might not be the ideal camera for everyone, but it has some unique tricks up its (very long) sleeve.

    Read our review of the
    Nikon Coolpix P1000

    Winner: Sony Cyber-shot DSC-RX100 VI

    Another year, another Sony Cyber-shot RX100-series compact camera. What will it be this time – a faster lens? Better 4K video? Boosted continuous shooting? Well, in fact the RX100 VI offers none of those things compared to its predecessor the RX100 V/A, but instead adds a more versatile 24-200mm zoom to the lineup, which trades brightness (and a built-in ND filter) for extra telephoto reach.

    The RX100 VI doesn’t replace the older RX100 V/A, but it does fill a gap in the established RX100-series lineup for a true ‘travel zoom’ camera, offering advanced video and stills features in a compact package, with a versatile zoom lens. Photographers have been asking Sony for a longer zoom in the RX100-series for a long time, and with the RX100 VI, Sony delivered, without compromising too much of what we love about the series as a whole. As such the Sony Cyber-shot RX100 VI takes our award for best compact / fixed-lens camera of 2018.

    Read our review of the
    Sony Cyber-shot RX100 VI

    Best consumer stills/video camera

    Shortlist:

    • Fujifilm X-H1
    • Fujifilm X-T3
    • Nikon Z6
    • Sony Alpha a7 III

    Runner up: Nikon Z6

    Once the shape of things to come, ‘hybrid’ cameras that offer high-quality video modes alongside stills photography features are now the norm. The new video standard of course is 4K, and all of this year’s shortlisted cameras offer excellent 4K video features alongside 24MP+ stills capture.

    Taking the runner-up spot this year is the Nikon Z6 – the companion model to the flagship Z7 in Nikon’s new Z-system lineup. The Z6 offers lower-resolution 24MP stills capture than the 46MP Z7, but cleaner, distortion-free 4K video, and slightly better autofocus sensitivity in low light, too. Coupled with effective in-body stabilization and a supremely adaptable lensmount, the Z6 is a highly attractive camera for hybrid stills and video shooting, and Nikon’s most convincing video camera yet.

    Learn more about the
    Nikon Z6

    Winner: Fujifilm X-T3

    Every year, there’s at least one DPReview Awards category where we struggle to reach a unanimous decision. After a lot of discussion we awarded first prize in this category to the Fujifilm X-T3.

    At first glance very similar to its direct predecessor the X-T2, this year’s model is in fact a major upgrade, offering a substantially improved set of video and stills features. In fact, despite its lack of IBIS, the 4K/60-capable X-T3 is arguably a better 4K video platform than the nominal video flagship of the X-series, the X-H1. Its ability to capture 4K/60p footage in 10-bit even puts it ahead of the latest models in Panasonic’s video-centric GH series.

    All of this is made more impressive by the fact that until quite recently, Fujifilm’s X-series lagged seriously behind its competition in terms of video. The X-T3 is the clearest indication yet that Fujifilm has well and truly joined the game.

    Read our review of the Fujifilm X-T3

    Best entry-level ILC

    Shortlist:

    • Canon EOS M50
    • Fujifilm X-T100
    • Nikon D3500
    • Olympus PEN E-PL9

    Runner-up: Nikon D3500

    Entry-level cameras are among the most important products in every manufacturer’s lineup. Once a new photographer has invested in a system, the hope is that they’ll stay loyal, growing their investment in lenses, accessories and – in the future – more advanced cameras.

    The Nikon D3500 is a modest upgrade to the last-generation D3400, but it still offers the excellent 24MP sensor of its predecessor, and despite its entry-level positioning the D3500 handles very nicely, thanks in part to a redesigned, deeper grip. For anyone looking for an inexpensive first camera to grow and learn with, the D3500 fits the bill nicely. As such, it takes the runner-up spot in this year’s DPReview Award for best entry-level ILC.

    Read more about the Nikon D3500

    Winner: Canon EOS M50

    Canon’s EF-M range occupies an awkward spot in Canon’s current product portfolio – based around the APS-C sensor format, but incompatible with the lenses from Canon’s newer, full-frame RF mirrorless mount. Nevertheless, the best EOS M cameras are really nice to use, and have a lot to offer the beginner and enthusiast photographer alike.

    The DSLR-styled EOS M50 is one of the standout cameras in the EF-M lineup, offering an attractive combination of pleasant handling, solid stills photography features, and usable 4K video in a small, lightweight package. As a beginners’ ILC, the M50 is easy to use, powerful, and un-intimidating. As such, it takes the winning spot in our award category this year for best entry-level ILC.

    Read our review of the
    Canon EOS M50

    Best midrange ILC

    Shortlist:

    • Canon EOS R
    • Fujifilm X-T3
    • Nikon Z6>
    • Sony Alpha a7 III

    Runner-up: Fujifilm X-T3

    This year, the mid-range interchangeable lens camera segment saw a lot of action. All of our shortlisted models are capable of excellent still image quality, and feature a range of powerful features. Three of the four are also capable of superb 4K video capture, making them true ‘hybrid’ cameras of the sort unthinkable just a few years ago.

    Runner-up in this competitive category is the Fujifilm X-T3, one of the most impressive cameras released in 2018. Despite its APS-C sensor, the X-T3’s image quality at low and medium ISO sensitivities gives a lot of full-frame cameras a run for their money, and its 4k video features are very competitive. The X-T3 is one of those rare cameras that is better than it probably needed to be, and this is reflected in the fact that it beat out several full-frame models to the runner-up spot in this years’ award for best midrange ILC.

    Read our review of the Fujifilm X-T3

    Winner: Sony Alpha a7 III

    One of the full-frame cameras that the X-T3 has to compete against is one of our favorite cameras released all year – the Sony Alpha a7 III, which takes the winning spot in this year’s DPR Awards category for best mid-range ILC. The a7 III won out thanks to its stabilized full-frame sensor, powerful autofocus system and excellent 4K video features. For anyone looking for a ‘do it all’ camera without spending a lot more money, the a7 III is hard to beat. For these reasons, it takes the top spot in this years’ DPReview award for best midrange ILC.

    Read our review of the Sony Alpha a7 III

    Best high-end ILC

    Shortlist:

    • Fujifilm GFX 50R
    • Nikon Z7
    • Panasonic Lumix DC-GH5S
    • Panasonic Lumix DC-G9

    Runner-up: Fujifilm GFX 50R

    The high-end ILC category saw some serious innovation this year, from Fujifilm’s slimmed-down medium format GFX 50R to Nikon’s all-new Z7. At the other end of the sensor size scale was the video-centric Panasonic Lumix DC-G9 and the ultra-rugged G9.

    This year’s runner-up spot is taken by the camera with the biggest sensor of all – the Fujifilm GFX 50R. Designed for active photographers, the 50R takes the best bits of the more costly 50S – including its most important feature – the excellent 50MP CMOS sensor – and packages them in a smaller, more affordable, rangefinder-style body. Medium-format has never looked more attractive.

    Read more about the Fujifilm GFX 50R

    Winner: Nikon Z7

    The Nikon Z7 marks the beginning of a new era for the stalwart Japanese camera manufacturer, debuting the new full-frame mirrorless Z mount. With a wider diameter than the 1950s-era F-mount and a shorter flange-back, the Z mount is designed to be futureproof, and the enthusiast-oriented Z7 is an appropriately bold camera to kick things off.

    In many respects akin to a mirrorless D850, the Z7 offers a proven 46MP sensor, traditional Nikon handling, deep customization and a powerful 4K video feature set with impressive video AF. While stills autofocus could be improved, the Z7 is a formidable camera signaling Nikon’s dedication to the future, and as such it takes the top spot in this year’s DPReview Award for best high-end ILC.

    Read our review of the Nikon Z7

    DPReview innovation award

    Shortlist:

    • Canon RF 28-70mm F2
    • Canon Speedlite 470EX-AI
    • DJI Mavic 2 Pro
    • Google Pixel 3

    Runner-up: Canon Speedlite 470EX-AI

    Innovations come in all shapes and sizes, but sometimes the simplest innovation can have the biggest impact on how you make photographs. Take for example the Canon Speedlite 470EX-AI, an on-camera flash that uses a simple technique to demystify the art of bouncing light.

    For years, hot shoe flashes have been able to measure distance to subject. Canon’s Speedlite 470EX-AI takes this simple action several steps further. By first measuring the distance to subject, followed by the distance to ceiling, the 470EX-AI can predict the optimal bounce angle and set itself there, automatically. Even cooler, it re-positions itself when switching from portrait to landscape orientation.

    Learn more about the Canon Speedlite 470EX-AI

    Winner: Google Pixel 3

    Every year brings new innovation in the camera industry, and this year was particularly busy with new entrants in the mirrorless and full-frame camera markets, and stellar new optics. Despite this competitive landscape, we unanimously picked the Google Pixel 3 for our ‘Innovation of the Year’ award.

    The Pixel 3 is the first smartphone camera to truly challenge traditional cameras from an image quality standpoint, surpassing 1″-type and rivaling cameras with Four Thirds sensors in ‘Night Sight’ mode. It does this by improving upon the Pixel 2’s already class-leading HDR+ multi-frame fusion technique, now capturing up to 15 frames and merging them using a super resolution algorithm to extract more detail, reduce noise, and remove the need for demosaicing altogether. That allows its image quality to rival higher resolution dedicated cameras with Bayer filter arrays, and allows for digital zoom that rivals modest optical zoom modules.

    Google is also at the forefront of applying machine learning to photography. This pays off in more accurate white balance, sharper images, as well as ‘real’-looking background blur and subject isolation for the best portraits we’ve seen outside of a dedicated camera. The list goes on, but importantly: these techniques are bringing high quality photography – and videography – to the masses, on unprecedentedly small and convenient devices. This democratization of the art using technology is what garners the Google Pixel 3 our Innovation of the Year award.

    Read more about the Google Pixel 3

    DPReview product of the year, 2018

    Shortlist:

    • Fujifilm X-T3
    • Nikon Z7
    • Sony Alpha a7 III
    • Tamron 28-75mm F2.8 Di III RXD

    Runner-up: Fujifilm X-T3

    Picking the single best product of the year is always a difficult task, and if we’re being honest, it’s impossible. Everyone’s needs are different. There has never been a better time to be a photographer, and in 2018 there are fantastic cameras, lenses and accessories out there for everyone.

    But pick we must. This year’s shortlist is comprised of those products that represent, in our collective opinion, four of the best bits of gear released in 2018. Two of them really stood out, though. Runner-up is the Fujifilm X-T3 which – in case you didn’t already get the message – we really like. Fujifilm didn’t need to make the X-T3 as good as it is – hell, Fujifilm didn’t even need to replace the X-T2 yet – but they did, and they did. And the resulting camera is one of the best APS-C format ILCs money can buy, even rivaling some full-frame models.

    Read our review of the Fujifilm X-T3

    Winner: Sony Alpha a7 III

    And the winning spot this year is taken by the Sony a7 III. Arguably the best-value full-frame ILC available right now, the a7 III is a superbly versatile camera for both stills and video imaging, at a great price. Other cameras in Sony’s lineup offer higher stills resolution and some nice extras, but the a7 III takes most of the essentials, and packages them inside an attractive, very usable and affordable body. As such, the a7 III is a worthy winner of our most important award – the best product of 2018.

    Click here to read our Sony Alpha a7 III

    Articles: Digital Photography Review (dpreview.com)

  • The (Almost) Perfect Autofocus of the Sony a7R III: a Hands-On Review

    The post The (Almost) Perfect Autofocus of the Sony a7R III: a Hands-On Review appeared first on Digital Photography School. It was authored by Anabel DFlux.

    Focus is one of the most important concepts for a photographer. It can make or break an image. Whether you’re a pixel peeper like me who always looks for technical critical focus or an image maker who uses specific focus points to tell a story,  how the camera focuses is everything.

    That’s why the newest addition to the Sony Alpha series is so conversation-worthy. With the 399 focus points on the Sony a7R III, and its ability to track focus like no other, the company touts it’s hard to get a shot that’s out of focus. This camera is like an artificially intelligent robot – it can predict and figure out exactly what you want in focus on.

    With the thumb joystick on the back of the camera, you can quickly and easily change your focus point. And its AI Servo is out of this world. It could figure out the entire outline of a subject and hold on to it for dear life.

    I take varying images – shooting animal action sports, live concerts, and everything in between. So I took all the boasting I’ve heard about this camera and put it to the ultimate test.

    About the Sony a7R III

    The a7R III is one of Sony’s newest and flashiest addition to its impressive mirrorless line of cameras. According to its website, the Sony a7R III sports the following drool-worthy perks:

    • 42.4 MP 35mm full-frame Exmor R™ CMOS and enhanced processing system
    • Standard ISO 100-32000 range (upper limit expandable to 1024005, with a lower limit of 50)
    • Fast Hybrid AF with 399-point focal-plane phase-detection AF and 425-point contrast-detection AF. The focus modes include:
      • AF-A (Automatic AF)
      • AF-S (Single-shot AF)
      • AF-C ( Continuous AF)
      • DMF (Direct Manual Focus)
      • Manual Focus
    • Face detection, with Modes:
      • Face Priority in AF (On/Off)
      • Face Priority in Multi Metering (On/Off)
      • Regist. Faces Priority (On/Off)
      • Face registration (max. number detectable: 8)
    • High-speed continuous shooting of up to 10fps (12fps with AF/AE tracking)
    • 5-axis image stabilization with 5.5-stop exposure advantage
    • 4K video recording
    • Dual card slots with simultaneous or consecutive recording
    • Silent Shooting Mode

    The camera is compatible solely with Sony E-mount lenses, including G-Master and Zeiss lenses (sought after in the Sony world). The aspect ratio is 3:2, and the camera can record still images in JPEG, (DCF Ver. 2.0, Exif Ver.2.31, MPF Baseline compliant) and RAW (Sony ARW 2.3 format). The images are quite large: a 35mm full-frame image is 42MP (7,952 x 5,304 pixels), which in uncompressed RAW format takes up about 80MB of storage.

    The camera also has built-in noise reduction software you can turn on or off as needed.

    But what really set this camera apart (and why I fell in love with it) is the autofocus.

    The Sony a7R III Autofocus Features

    The a7R III allows for silent shooting at up to 10fps with AF/AE tracking – great for those who do wildlife photography. Shooting at 10 FPS yields up to 76 images at a time (when shooting JPEG).

    Its phase-detect points cover around 47% of the sensor area. When you combine that with the contrast-detect sensor areas, the total AF coverage is nearly 68% of the frame.

    Advanced algorithms provide high AF precision down to light levels as low as -3 EV for more reliable autofocus in dark scenes. The enhanced Fast Hybrid AF speeds up AF approximately two times faster under dim lighting conditions. The camera’s infrared technology allows it to autofocus even in extremely low or difficult lighting situations.

    The camera also has an ‘eye autofocus’ setting. You read that right: it can find eyes on your subject and lock focus on them with the push of a button. This is photographic witchcraft and I love it. The a7R III’s Eye AF evolves with twice the effective eye detection and tracking, even when shooting a moving portrait subject. It’s touted by the company to work when:

    • the subject’s face is partially hidden
    • the subject is looking down or wearing glasses
    • the subject is backlit
    • the lighting is dim or low
    • the subject is far away.

    The a7R III includes a touchscreen that provides touch AF, focus point dragging and focus racking features. The AF-C (continuous autofocus) option feature is extraordinary. The camera can keep tracking the subject even if it’s changing direction erratically or an object gets in the way.

    Tip: The ‘Expand Flexible Spot’ mode is a good one to start from, and works well with the AF joystick for quick adjustments to the preferred focus area.

    Real Life Use

    This camera is fast and accurate. With my DSLRs, I usually have to refocus multiple times. But I didn’t have to do it once on the Sony a7R III. I think mirrorless cameras really outshine most DSLRs in the autofocus department.

    Here’s how it did in various scenarios:

    Action and Sports

    I photograph a lot of action, and when I first bought this camera I took it to a Frisbee dog competition to test it out. I was absolutely blown away by the autofocus. The camera even recognized a dog’s face with its facial tracking autofocus and maintained focus on the dog’s face throughout its trick-induced performance. When the dog moved further away the focus changed to the animal’s entire body, which I appreciated.

    Regardless of how spontaneously the dog moved, the focus remained locked.

    I typically use my Canon 7D Mark II for animal sports photography due to its speed and the fact the body is intended for action. But I now prefer the a7R III due to its superb tracking. The 7D tends to get lost when there isn’t much contrast between the subject and the other objects in the frame, such as photographing in the fog. (Many of these dog sporting events happen around 7am when the fog rolls onto the field.)

    The Sony mirrorless clearly identified the subject despite the lack of contrast. It can even refocus on dogs running at me without needing any prompting or additional technique.

    Portraits

    Portraits are an absolute breeze with this camera. From face tracking to eye tracking, it’s almost impossible to take an out-of-focus image unless you have your settings wrong. As I mentioned earlier, the eye tracking feature is said to work in problematic scenarios (the face is partially hidden, the subject is looking down, etc.)

    Well, I can confirm that what Sony promises is true. It works in all of those scenarios. Even when I shot a model wearing unnatural contacts and bright glittery makeup, the camera had no issue.

    Dimly-Lit and Golden Hour Portraits

    Much like the camera’s success with well-lit portraits, the Sony a7R III can focus on portraits in dim light as if they were lit to perfection. I’m happy to say there was absolutely no difference between the two. Night portraits were a breeze.

    The golden hour portraits were just as easy (not to mention exquisite). My other cameras have focusing issues when the sun is low and hitting the lens at an angle. But the a7R III breezed through and held focus on the subject no matter how the sun was hitting the lens glass.

    Live Concerts

    Dogs may wake me up in the mornings, but it’s the rock stars who keep me awake at night. In the evenings you’ll probably find me shooting a live concert with an arsenal of camera equipment to get me through the job.

    Live concerts are extremely difficult focusing situations. In fact, they’re like a low-light sports situation. For the most part, you’ll have limited lighting, and have to deal with colored bulbs that can paint the subject with a very saturated color (such as the dreaded red hue).

    Live concerts are also high-energy and filled with action as the guitarists swing their guitars and the drummer pounds away. You may not always have enough contrast to work with, and plenty of annoying obstacles to get in the way of whatever musicians you’re photographing.

    Much like I found success in dog sports photography, the Sony a7R III does mighty well at maintaining focus on the subject despite erratic movement or instruments getting in the way. If the light is low but even, the camera does a splendid job of finding the subject thanks to its Advanced AF algorithms.


    Unfortunately, live concerts are also where we hit a bit of a snag. As venue goers know, most music venues (especially small indie ones) don’t have consistent lighting on the stage. It can be uneven, sporadic, and wild. Some genres of music (e.g. metal and rock) really love using strobe lights on the stage as well.

    And this is where the Sony a7R III flops terribly.

    The moment strobes are used, the camera completely loses its ability to focus or find the subject. It’s a negative I haven’t seen covered in other reviews and one that keeps me from bringing this camera to a live concert (after having a particularly bad experience at a recent show).

    When strobes were involved, none of the autofocus settings or adjustments worked. The camera began to hunt and then failed to focus at all. This happened with other native and non-native lenses. My guess is the infrared technology is affected by the strobing effects, but that’s just an assumption.

    Non-Native Lens with an Adapter

    As an avid 16-year Canon user with an army of L lenses, I have no plans on switching brands anytime soon. When I added the Sony a7R III to my kit, I immediately looked for ways to adapt my L glass to the Sony camera. (That way I’d need to buy only buy one native lens for the Sony and use the rest of my existing kit.)

    After testing out several adapters I found that the Metabones Smart Adapter worked best.

    Now it was time to test the autofocus on a non-native lens.

    Although some of the autofocus features (e.g. eye-tracking) are disabled on non-native lenses, the facial recognition and AF-C (continuous autofocus) features worked like a charm. Once I’d calibrated the adapter to my lenses I didn’t experience any lag, searching or loss of focus. And despite certain features being unavailable, the camera was just as fast with non-native lenses as it was with native ones – even in low light. (I took this set up out for a spin during a club event.)

    But the strobing issue was still there, which is why I’m convinced it’s a camera issue rather than a lens issue.

    Final Thoughts

    I have no regrets investing top dollar in this mirrorless camera. I find myself using it as much as my DSLRs, and I have three of them. I’ll often pick the mirrorless for more complex shoots simply because of its exquisite face tracking with autofocus.

    Have I got you salivating? Think the Sony a7R III might be your next camera? Let’s talk about it in the comments.

    The post The (Almost) Perfect Autofocus of the Sony a7R III: a Hands-On Review appeared first on Digital Photography School. It was authored by Anabel DFlux.


    Digital Photography School

  • Zhong Yi Optics launches Mitakon Speedmaster 65mm F1.4 lens for Fujifilm GFX

    Zhong Yi Optics has launched the Mitakon Speedmaster 65mm F1.4 for Fujifilm GFX cameras. This announcement makes Zhong Yi Optics the first third-party manufacturer to develop a lens for Fujifilm’s G mount and gives them the claim — for the time being — of having the fastest standard lens designed specifically for GFX medium format mirrorless camera systems.

    The lens provides a 46-degree angle of view, roughly equivalent to a 50mm lens on a 35mm full-frame camera. It’s constructed of eleven elements in seven groups and has a minimum focusing distance of 70cm.

    The Mitakon Speedmaster 65mm F1.4 features an aperture range of F1.4 through F16 via its nine-blade aperture diaphragm. The front filter thread measures in at 72mm and the whole lens weighs 1,050g.

    Below is a collection of sample images provided by Zhong Yi Optics:

    $ (document).ready(function() { SampleGalleryV2({“containerId”:”embeddedSampleGallery_8140293890″,”galleryId”:”8140293890″,”isEmbeddedWidget”:true,”selectedImageIndex”:0,”isMobile”:false}) });

    The Mitakon Speedmaster 65mm F1.4 is currently available to purchase online for $ 799.

    Articles: Digital Photography Review (dpreview.com)

  • How to Capture Candid Moments This Christmas

    The post How to Capture Candid Moments This Christmas appeared first on Digital Photography School. It was authored by Mat Coker.

    Ever since I was a little kid with a 110 camera and little rolls of film, it’s the candid moments I love to capture.

    At Christmas, that often meant the expression on someone’s face as they opened a gift. However, over the years I discovered that there is a lot more to Christmas than the excitement of opening gifts.

    I’ll show you a few specific ingredients to use if you would like to better capture candid moments this Christmas.

    1 - How to Capture Candid Moments This Christmas

    Our living room window is a backdrop for candid moments to happen. Many times I have passed through the living room, only to stop and fumble for my camera to capture something interesting.

    Why Candid Moments?

    Taking candid photos is a fun challenge. You don’t get to direct the scene, and you have to take whatever the moment offers.

    The benefit to this is that you really get to see what is going on. Many people complain that they miss out on a group or family experience because they’re always taking pictures. If you focus more on seeing than on clicking, you may find that you’re more in-tune to events than ever before.

    “The camera is an instrument that teaches people how to see without a camera.” – Dorothea Lange

    Even though you’re not in control of the scene, you can still make the most of the moments given to you by:

    1. Understanding the type of moment
    2. Choosing the best angle
    3. Paying attention to your background
    4. Learning to write about your photos
    2 - How to Capture Candid Moments This Christmas

    When our kids were young they always napped over the Christmas holidays. The days were packed with activities and they were exhausted by the afternoon. My little girl fell asleep with an LED lantern. I couldn’t help but sneak in for a photo. I pushed my camera to its limits with this low light photo. 56mm, f/1.2, 1/15th, ISO 6400.

    1. What kind of moment is it?

    This first question I ask about a candid moment is whether it’s an action moment or an emotional moment.

    What inspired you to pick up the camera? Are you anticipating a burst of excited emotion? Is somebody about to do something?

    Action vs emotion is a quick way to understand the nature of the moment that is about to happen. This becomes more intuitive over time so you won’t have to overthink it.

    3 - How to Capture Candid Moments This Christmas

    I consider this to be an action moment. It is about my son playing with his model plane. Action is often about gesture. He is holding the plane precisely, and you can even see by the shape of his mouth that he is making the sound of the airplane. The plane is in focus so we likely look at it first, but then we’re led back to his face. His eyes are looking at the plane, so our focus is brought back to it as well. The more engaged a person is in an action moment, the more interesting the photo will be to you.


    4 - How to Capture Candid Moments This Christmas

    This is more of an emotional moment. It’s not a high energy moment like laughter or tears, rather it’s soft and subtle. It’s among my favorite portraits of my daughter. The only thing that indicates Christmas in this photo is the paper crown from her Christmas cracker, a tradition carried on for at least four generations in my family.

    2. What is the Best Angle to Use?

    There are five main angles from which you can choose:

    • Bird’s eye view
    • High angle
    • Face to face
    • Low angle
    • Bug’s eye view

    My favorite angles for candid moments are high-angle because it often makes the scene appear more dramatic, and face-to-face, because it’s such an engaging angle.

    5 - How to Capture Candid Moments This Christmas

    This is an action moment. My son was playing with his new helicopter. I went for a low angle because I wanted to be looking up at the helicopter. Normally, we see helicopters in the sky, so let’s go for a more dramatic looking angle. In this action moment, you can even see him lifting his foot for balance. When kids play, they get right into it!


    6 - How to Capture Candid Moments This Christmas

    High angles are great for looking over shoulders. Some moments are tough to define as simply action or emotion. Though my son is looking at the pictures in his new book, it’s not exactly what we think of as an action moment. We can’t see his face to detect any emotion. But this photo comes to life in my mind as I think of all the times I read him this book while he was tucked into bed or sitting on my lap. In that sense, I would call it an emotional moment.


    7 - How to Capture Candid Moments This Christmas

    I jumped up on the coffee table to get this bird’s eye view angle of my son. He had just tried crawling for the first time and collapsed after using all his energy trying to reach a can a play dough!

    3. Pay Attention to the Background

    Backgrounds can be a distraction in your photo if they are messy or cluttered. But they can also add to the mood or story of your photo.

    I try for one of two types of backgrounds:

    • Clean and simple
    • Scenic

    You can see that the photos above either had a clean and simple background or something more scenic, but not cluttered.

    8 - How to Capture Candid Moments This Christmas

    I love this humorous photo of my daughter, but the background is really cluttered and distracting. One thing I could have done while taking the picture is to get closer to her. That way she would appear larger and there would be less background. But another way to deal with a cluttered background is to crop it away!


    9 - How to Capture Candid Moments This Christmas

    This face to face angle draws me right into this photo. The background is clean and simple with no distracting elements. I find that black and white often draws out the humanity and emotion of the moment.

    4. Journal

    Many photographers understand themselves to be creative people. Creative people are often compelled to write.

    Take time this Christmas season to write about what is happening in your life. You can write about your kids, your parents, or your traditions. Think of it as a way of preserving some of your family history. Write about the moments of days gone by and the new moments happening around you.

    Christmas can be a very difficult season for people who struggle with depression or anxiety. It can be a very sad time of year when you miss loved ones. Many people have found that writing helps you wrestle with and take control of what you’re struggling with.

    10 - How to Capture Candid Moments This Christmas

    Inspired by photojournalists, take time to truly reflect this Christmas. Add words to your photos.

    This Christmas

    As you grab your camera to take candid photos this Christmas, think:

    • Is this an action or emotion moment?
    • Which angle would look best?
    • Is the background clean or scenic?
    • What will I write about?

    I would be thrilled to see some of your favorite Christmas photos when you post them in the comments below!

    The post How to Capture Candid Moments This Christmas appeared first on Digital Photography School. It was authored by Mat Coker.


    Digital Photography School

  • DPReview TV: Nikon Z6 and Z7 review for video

    Following up on their review of the Nikon Z7’s still photo capabilities, Chris and Jordan take a look at the Z7 and Z6 for video shooting. Both cameras – particularly the Z6 – represent a huge step forward for Nikon in terms of video, but Jordan doesn’t think they’re quite ready to be your primary video camera. Take a look and see what they have to say about it.

    Get new episodes of DPReview TV every week by subscribing to our YouTube channel!

    • Introduction
    • Design and Handling
    • Stabilization
    • Autofocus
    • Manual Focus
    • Image Quality
    • Slow Motion
    • External Recording
    • Audio Quality
    • Timelapses
    • Conclusion

    Articles: Digital Photography Review (dpreview.com)

  • How to Boost Your Creativity with Lightroom Presets

    The post How to Boost Your Creativity with Lightroom Presets appeared first on Digital Photography School. It was authored by Stacey Hill.

    1 - How to Boost Your Creativity with Lightroom Presets

    There are many divisive points in the photography world – brand versus brand, film versus digital, and minimal editing versus Photoshop. The one that seems to have a fervent dislike is the use of Presets in Lightroom. Find any post on presets and people line up in the comments to judge and criticize anyone who uses them. People get told they are lazy, that their images all look the same ala Instagram filters and so on.

    Up to a point they are right – anything overused becomes a short-lived fad. If all you ever do in your editing is use canned settings and don’t learn even the basics, then I agree with them.

    Many people make the mistake of thinking that applying a Preset (or a filter) makes a bad photo better, but hopefully, Instagram has taught us better by now. Instead, think of Presets as tools to help you automate your process, make you faster and more efficient at editing.

    Still, there’s a lot of potential and possibilities that presets offer us. Let’s explore that idea!

    (Note:  While this article specifically addresses Creativity with Lightroom Presets, the same principles apply for any other program that allows presets, including Photoshop Actions)

    2 - How to Boost Your Creativity with Lightroom Presets

    This is the same image as the header but this features a preset which deepens the green tones and desaturates the image, toning down the yellow. I like this much more than the original which is true to life.

    The Benefits of Using Lightroom Presets

    1. Saves Time

    You can spend hours on editing just one image if you want to. However, most of us don’t have the luxury of that much time. Nor do customers want to pay that much for their images.

    My recommendation is you should do a basic edit for each image to suit its requirements. However, if you want a specific look or a consistent style to your images, imagine how much more time you have with just being able to click a preset to finish it off?

    Some images take more time to edit. You can allow extra time for those images by utilizing presets on the easier ones.

    Of the two images below, the top image is an unedited RAW File, while the second image is a processed image using Presets.

    3 - How to Boost Your Creativity with Lightroom Presets 4 - How to Boost Your Creativity with Lightroom Presets

    2. Easy and Fun

    Why do people judge you for doing something that is easy?  Does everything have to be complicated and involved? Can’t it be fun too?

    Not everyone has time to fully understand and master every setting and option within Lightroom (or any other program). Presets can allow you to quickly and efficiently apply complex effects.

    It’s also fun to experiment with new styles.

    3. Consistency

    If you have a shoot where the subject/light/tones are all similar, you can achieve a consistent finish for the final image by applying a preset. You can also make one specifically to suit the shoot if required.

    Besides, if you have done a series of tweaks to your image, do you remember exactly what you did and what the settings were?  Do you remember everyone to add to lots more images manually? Yes, you can write it all down or pull it out of the ‘history,’ but there’s no need.

    Of the two images below, the top image is an unedited RAW File, while the second image is a processed image using Presets.

    5 - How to Boost Your Creativity with Lightroom Presets 6 - How to Boost Your Creativity with Lightroom Presets

    4. Customizable

    You can easily create your own presets in Lightroom and save them for using repeatedly. Alternatively, you can create one that only works for a specific shoot. Presets are also available to buy pre-configured for all kinds of different finishes.

    Once you have applied the preset, you can continue to edit and refine the look. Depending on the settings, you can stack multiple presets on top of each other for a unique outcome.

    There are many different ways to use and apply presets, and you can get a sophisticated outcome quickly and easily even when you may not fully understand all the capabilities of the software.

    5.  Different Functions can have Presets

    For your editing functions, the primary use for Presets is in the ‘Develop’ module. However, you can create presets that apply to Metadata, or when you Import or Export images. This process can help you apply copyright information or customer information to images, or quickly change the export settings depending on requirements. For example, print versus web use.

    Of the two images below, the top image is an unedited RAW File, while the second image is a processed image using Presets.

    7 - How to Boost Your Creativity with Lightroom Presets 8 - How to Boost Your Creativity with Lightroom Presets

    So, can I just use Presets for everything?

    Presets are not a magic one-click fix. Each preset reacts differently with individual images. It is essential to understand the basics of your program because some editing is necessary.

    However, if you only want to use presets, no one is going to stop you. Do you want to make that choice though?

    Can people tell if you are not entirely in control of your editing software?  Yes. In general, experienced people can tell.

    That said, I strongly recommend that everyone should have a solid understanding of the basic features their editing program has so they know enough to be able to edit without relying on presets. If you are using presets, you should understand how you can further tweak and improve the effect.

    Please note that not all presets are created equal. Some are better designed and, when applied, provide a more polished effect.

    Of the two images below, the top image is an unedited RAW File, while the second image is a processed image using Presets.

    9 - How to Boost Your Creativity with Lightroom Presets 10 - How to Boost Your Creativity with Lightroom Presets

    Freedom to be Creative

    One of the most powerful things Presets can do is take us out of our comfort zone and show us new possibilities in the way we edit images. Humans are creatures of habit, so once we find the comfortable place that we can generate images of acceptable quality, we are likely to settle in there.

    Maybe we don’t know everything the program can do? Perhaps we don’t understand how we can apply this feature here on top of that function there. For example, how many people fully understand Split Toning?

    What if we didn’t need to understand absolutely EVERY function and feature in our software? Maybe we simply don’t have the time. What if we could understand enough to be able to use the necessary bits and then use the knowledge someone else has created to add that extra dimension to our editing?

    What if we CAN try a new look with one click? Maybe a purple-toned one, then a matte-finish one, and a black and white one? We can compare a whole heap of different processes.

    Maybe by trying out Presets, we can learn more about the software’s capabilities? Perhaps it can give us more confidence to shoot in a different style, taking advantage of the new editing prospects.

    Breakdown of an Edit

    In the screenshot below it shows the final edit of the clematis flower (Before and After images featured above).

    As you can see, after Import, the next step is ‘Paste Settings.’ This is where I have copied the Preset and some adjustments made on a previous image in the shoot.

    A further 19 steps have been taken to enhance and finalize this image to achieve the desired outcome.

    Could I have stopped after the first ‘Paste Settings?’  Absolutely.

    Was it the best that image could have looked?  Not in my opinion. So, I spent the time I had saved using a preset to do further fiddly little tweaks and refinements.

    11 - How to Boost Your Creativity with Lightroom Presets

    Using Presets Creatively

    This winter landscape of frost-crusted rocks, icicles, and what I can assure you was freezing water, was already quite blue-toned. The blue tone was due to the 10-stop filter I used to achieve long exposure on the water.

    I liked how the blue tone emphasized the cold crisp winter feel so I decided to use it to set the whole mood for this image.  A blue-toned, slightly matte finish preset helped boost that aspect of the process. It added more brightness on the whites, deepened the shadows a touch and added a bit of clarity for extra crispness.

    I could have completely changed the color space to natural daylight, but seeing this blue tone inspired me to follow that direction further. I knew I had a preset that would do interesting things to the blue tones and it worked better than expected.

    Of the two images below, the top image is an unedited RAW File, while the second image is a processed image using Presets.

    12 - How to Boost Your Creativity with Lightroom Presets 13 - How to Boost Your Creativity with Lightroom Presets

    I tend towards darker, moody edits. So, using Presets for an image helps me see different possibilities quickly. With a few clicks, I can assess what is suited to a high-key edit, a desaturated, matte edit, a neutral, natural edit, or perhaps black and white one.

    Sometimes I strike gold and end up with something delightfully unexpected (like the green currants at the top of this article). It never fails to amaze me how much scope Lightroom has to do things I don’t fully understand yet. However, using presets has taught me a great deal, and I am slowly unpacking them, figuring it out and beginning to make my own Presets now.

    14 - How to Boost Your Creativity with Lightroom Presets

    Conclusion

    Lightroom (and other editing programs) offer a lot of functions and scope for editing your images. Many people don’t have the time to learn all the features and capabilities in detail. It can be frustrating when you are learning how to use it.

    Presets give you access to features within the software without needing to know exactly how to implement them manually.

    Using Presets allows even novice users the ability to be creative and experiment with different styles and looks to their editing. More experienced users can create their own presets, or utilize purchased ones in their editing process. They save time and can make your editing process more efficient as well.

    Presets offer you the opportunity to try a style that is different to what you typically create. Alternatively, perhaps you want to dabble and see how an image turns out with a range of edits. Using Presets can also help you learn more about the program by showing more of its capabilities.

    While Presets can be overused, or not used to best effect, they also offer many advantages. Provided they are used as part of your process, and not as a magic solution, Presets can be a valuable tool.

    Finally, playing with them is fun. Being able to experiment safely and easily with one click of a button gives you the latitude to be brave while considering new editing styles.


    The post How to Boost Your Creativity with Lightroom Presets appeared first on Digital Photography School. It was authored by Stacey Hill.


    Digital Photography School

  • Photokina 2018: Tamron interview – “We have standard three-business-day turnaround for repairs”

    Stacie Errera is VP of Marketing and Communications for Tamron USA.

    We met with Tamron’s Stacie Errera at Photokina 2018 in Cologne, Germany where we discussed the brand’s unique identity, product development prioritization, future lens plans and the importance of user feedback.


    How is Tamron different from other lens manufacturers?

    Our focus on customer service at all aspects of the users’ experience makes us different. We’re very focused on education – we like keeping our customers up on the latest techniques to create great photography. So whether it’s in-person workshops, working with our local authorized dealer base to bring workshops to stores, our magazine or our newsletter, we’re very focused on education. We’re also focused on support – all of our products have a six-year warranty. We have standard three-business-day turnaround for repairs with no extra charge for every customer – it doesn’t matter who you are. If you have a lens and you need a repair, you send it in and you get it back within three days. That’s the best in the industry.

    We have standard three-business-day turnaround for repairs with no extra charge for every customer

    Is Tamron’s three-day repair turnaround for US customers only?

    It’s worldwide. Almost all markets now have that. Any place we have a subsidiary, it’s three days and anywhere we have a distributor, it’s mostly three days. This policy actually came as a mandate from our president to increase confidence in Tamron lenses and Tamron customer service.

    And our overall philosophy or feeling we want customers to have – which extends into the lens design itself – is a ‘human touch quality’. We want that to extend beyond the product. We strive really hard to work closely with our customers. We hear what they have to say and work with them on social media and in person to give them good service. So I think it sets us apart a little bit, how closely we try to listen to and help motivate and mentor our customers.

    The Tamron 28-75mm F2.8 Di III RXD is the most compact F2.8 zoom available for Sony E-mount. Also important: It’s very sharp.

    How do customer needs and feedback play into the design and development of new lenses?

    We do a few customer surveys a year where we find out what people are looking for. Also any feedback that my tech team or sales team might get is fed to me and then it goes up through the chain. With our subsidiaries, we sit down several times a year and put together our thoughts and make recommendations – these are based off of what people are asking for, what they feel they need and what they feel might be missing from a current lens line. Sometimes people bring up technologies and maybe you’ll think the idea is crazy, but we still pass it on. So we definitely try to pass all that information up to our headquarters.

    Who do you see as Tamron’s user base? Is it pros, enthusiast, or a combo of both?

    It’s a combo of both. We do several professional tradeshows a year and have very busy booths and a lot of customers there. As we put together our VIP program we’re seeing all the customers who own multiple lenses, so we do have a lot of pros out there. I’d say we’re maybe 60% enthusiast, 40% pro.

    We want to make it affordable so [photographers] can have four, five, or six lenses in their bag without going broke

    Our enthusiasts, they run the gamut from first entry-level DSLR / ILC users up to serious enthusiast that have been using cameras for 20+ years, many of whom came out of the film days. We really have a wide range of users. And again, just looking at our database with the VIP program – how many people own multiple lenses – we know our users really are gear-intensive customers. They’re into getting new lenses; many update their cameras, then get new lenses to match.

    Tell me more about Tamron’s VIP program.

    Any customer that registers their Tamron USA lenses purchased after 2011 are eligible for Tamron USA’s VIP program. If they have four lenses, five lenses or six+ lenses there’s silver, gold and platinum VIP.

    We just had all our platinum members out at a VIP summit in Santa Fe for four days of seminars and field workshops. They brought their lenses and it’s amazing to see these customers that have lots of gear but continue to get new lenses to make sure they have the right tool for the job. We want to make it affordable for them so they can have four, five, or six lenses in their bag without going broke.

    The new Tamron SP 15-30mm F2.8 Di VC USD G2 is the only stabilized F2.8 wide zoom for full-frame DSLRs. It’s also, you guessed it, very sharp.

    How important is affordability to your long-term growth and vision for Tamron?

    It’s definitely high up there. Our goal is to number one, make sure the lens is high quality. The second goal for us, depending on the category of the lens, is definitely size and weight. So looking at the Sony FE and E-mount, for example, we’re definitely looking at compactness and lightweight designs as key features of those products.

    But we also do look to keep the price in an affordable range for the customer. One of the philosophies of the company is we want to make photography accessible for everyone. By having tools that can be more affordable for the photographer, we can expand their bag and make sure they have the right tool for the types of photography they like to do.

    One of the philosophies of the company is we want to make photography accessible for everyone

    What about for DSLRs, is size and weight still a high consideration?

    For both mirrorless and DSLR size and weight are a consideration. For example, the 17-35mm F2.8-4 for DSLRs, it is the lightest and most compact in its class of lenses that are F4 or faster. If you look at the 15-30 F2.8 for DSLR, while it’s definitely a large lens with it’s constant 2.8 aperture, it is still the only lens in the category with stabilization. So it’s not compact, but within the category it still has advantages.

    How important a consideration is video when Tamron develops lenses?

    It’s a high consideration. We are trying to make sure the motors in our lenses are as silent as they can be. However, depending on who the videographer is and what they’re filming, they may be using manual focus anyway. The new 28-75 F2.8 for Sony FE has a rapid extra-silent drive (RXD) and it is definitely geared toward video because we know people are using Sony full-frame to shoot video more so than on some other systems.

    A sample photo shot with the Tamron SP 15-30mm F2.8 Di VC USD G2.

    The 28-75 F2.8 for Sony FE is one of our favorite lens available for full-frame E-mount. How this lens been received by customers and will we see other full-frame Sony E-mount lenses soon?

    That lens has definitely been very well-accepted by Sony shooters worldwide. Right now we’re still in a very heavy demand situation. Supply is catching up, though. I think it’s really the first lens that seems to fit the form factor of the camera itself. That balance and that lightweight design without compromising performance, everything about it fits the form factor and goal for what that system is all about. So definitely, with the acceptance of this, we’ll see more from Tamron for Sony mirrorless cameras.

    We’ll see more from Tamron for Sony mirrorless cameras

    Tamron now makes lenses for Sony FE, E, A, Nikon F, Canon EF, M, Micro Four Thirds, Pentax K-mounts. With all these mounts, how does Tamron prioritize what lenses they are going to make?

    We look at the market and see where there are gaps – what’s moving, what’s not moving.

    Really the past few years have been dedicated to analyzing the mirrorless portion of the market. With all the recent introductions to mirrorless I think it’s very evident that the market is swiftly moving toward mirrorless dominance. But that’s not to say full-frame DSLRs are not still strong. My opinion is that people will continue, for at least the next few years, using multiple formats. I have my DSLR I use for some situations and I have my mirrorless I use for other situations – I have my smartphone that I use still for others. So I think we’re in a place where each consumer is a multi-format user. Obviously there are people that are mirrorless-only, DSLR-only. And obviously there are pros not ready to make the jump to mirrorless yet. But overall, it’s a fun time to be making lenses.

    Really the past few years have been dedicated to analyzing the mirrorless portion of the market

    Do you have any prediction for how much of your business will be represented by mirrorless lenses rather than SLR lenses?

    Right now we have a couple of mirrorless lenses plus the recent introduction of the full-frame Sony mirrorless. I think we’ll move along with the market. The US market is swiftly catching up to some other markets in the world. And I think we’ll see some changes worldwide for Tamron over the next few years. But it’s hard for me to attach a number or percentage to that at this point. But we’re definitely moving with the market.

    All-in-one zooms for DSLRs are still a crucial part of Tamron’s portfolio. The Tamron 100-400mm F4.5-6.3 Di VC USD for APS-C – which this photo was shot with – offers a good balance of quality and affordability.

    We now have two new full frame mounts, Canon R and Nikon Z, as well as the announcement of the Panasonic/Leica/Sigma L-mount alliance. Is there talk about making lenses for these mounts?

    I think we need to get those cameras into our engineers’ hands and analyze them and see what they’re all about and make determinations from there. I think that we’re keenly looking at all these different mounts and I think it’s an important part of the market today. I’m not involved in the talks over in Japan, but I would assume there is definitely a strong interest in these.

    I think we’ll see some changes worldwide for Tamron over the next few years

    Sigma, Panasonic and Leica announced their L-mount partnership at Photokina. Has Tamron considered making partnerships with other brands in similar fashion?

    At this point in time, there’s none I’m aware of. That doesn’t mean there won’t be partnerships in the future.

    What’s the immediate future hold for Tamron?

    I think we’ll continue expanding our lineup. We’ll be continuing our G2-series, the 15-30 F2.8 G2 now completes the SP (Superior Performance) trio of fast, image-stabilized zooms. It was very important for us to complete that trio. We’ll also be filling in the full-frame arena and raising the bar for all-in-ones, an area of the market where we are the leader. It’s just a progression of filling and finding areas of need as the market changes.


    Editors’ note: Dan Bracaglia

    Tamron is a brand increasingly putting out lenses I want to get my hands on, from their outstanding, stabilized SP 15-30mm F2.8 Di G2 to their perfectly sized 28-75mm F2.8 Di III RXD – my favorite lens for Sony FE without question. Both of these lenses represent unique designs within their chosen mounts.

    2018 is an exciting time for third-party lens brands

    2018 is an exciting time for third-party lens brands, but with the number of mirrorless mounts growing, it’s as important as ever for these companies to carefully consider what they prioritize. Tamron seems to understand this though – lens development boils down to a careful mix of user feedback and market analysis.

    Though all-in-one zooms for DSLRs have long been the brand’s bread-and-butter, here’s hoping we’ll even see other well-sized, constant-aperture mirrorless zooms in the near future given the market success of the 28-75mm F2.8 Di III RXD and Stacie’s mention of ‘changes worldwide for Tamron over the next few years.’

    …with Tamron’s new commitment to three-day repair turnarounds, their lenses are looking more desirable than ever

    Speaking of mirrorless, Stacie wouldn’t give me any indication what plans the company has for the new Nikon Z and Canon RF-mounts. This isn’t terribly surprising given how new they are, but it will be interesting to see whether existing mirrorless models eventually become available for these new mirrorless mounts.

    At the end of the day, I’m thankful that brands like Tamron and Sigma exist. Though they take very different approaches to lens development, both are going to great lengths to ensure that there are a lot of cool lens choices on the market. And with Tamron’s new commitment to three-day repair turnarounds, their lenses are looking more desirable than ever.

    Articles: Digital Photography Review (dpreview.com)