RSS
 

Camera Rescue aims to save 100,000 analog cameras for future generations

19 Feb

Finland-based organization Camera Rescue has rescued 46,000 analog cameras and it plans to more than double that number by 2020. Cameraville recently interviewed the organization’s Juho Leppänen to discuss the mission, as well as the unique challenges they face.

Camera Rescue launched in 2018 with the mission of preserving analog cameras for future generations. The organization finds used film photography gear and puts it through what it calls a ‘camera rescue process,’ which includes testing and, when necessary, repairing the devices. Rescued cameras are then sold through KameraStore.com.

The organization’s core team member Juho Leppänen discussed Camera Rescue’s mission and work in a 10 minute video from Cameraville, including the technical issues the team has to overcome. A lack of technicians capable of repairing these cameras remains a problem, though the team is addressing that problem by training a new generation of repair technicians.

“We took all the guys we could find that have the experience [and] they’ve been teaching newer guys,” Leppänen explained.

Beyond the organization’s own work, Leppänen details technical issues facing the analog photography market. “If we want new cameras, we need a new mechanical shutter,” according to Leppänen, who also pointed toward aging scanning technology that must be updated.

“Most of the scanners that are around are based on Windows XP,” which is no longer supported, Leppänen said. Though new scanners could be developed, cost remains an issue, with Leppänen explaining that it may cost €3 million just to produce the first batch of new scanning technologies.

The analog photography industry also requires new automated film development machines and an overall low barrier, in terms of difficulty and cost, for new photographers to get started. “If we want new people to come to film,” Leppänen explained, “we need to make the first roll very easy, and to make the first roll easy, it needs to be cheap.”

Additional videos about Camera Rescue, as well as the team’s history, can be found on Cameraville’s blog.

Articles: Digital Photography Review (dpreview.com)

 
Comments Off on Camera Rescue aims to save 100,000 analog cameras for future generations

Posted in Uncategorized


Sigma cine 28mm T.1.5 lens gets a price and shipping date

18 Feb

Sigma has announced its new 28mm T1.5 cine lens for full frame sensor cameras will be available starting in the middle of March. The lens will cost $ 3499 but will also be offered with luminous markings, to make it easier to use in low light, for $ 4,499.

The lens is latest of a set of 10 full-frame fixed-focal-length lenses, eight of which have a T1.5 maximum aperture. The lenses have 180° focus ring rotation, and are tested using the company’s 46-million-pixel Foveon sensor.

As with the rest of Sigma’s cine series, the 28mm T1.5 FF will be available in PL, EF and E mounts. The company has also announced a new carry case for a set of five lenses that will cost $ 750. It is designed to hold the 14mm, 28mm, 40mm, 105mm and 135mm lenses, and will be available at the same time as this 28mm lens.

For more information see the Sigma website.

Press release:

Sigma Ships Its 28mm T1.5 Full-Frame Cine Lens

Sigma Corporation of America, a leading still photo and cinema lens, camera, flash and accessory manufacturer, today announced one of its newest additions to the cine prime lens lineup, Sigma 28mm T1.5 FF, will be available in mid March 2019 for $ 3,499.00 for the regular version and $ 4,499.00 for the fully luminous (FL) version.

Sigma Cine 28mm T1.5 FF is a fast and sharp T1.5 cine lens compatible with full-frame camera sensors and optimized for ultra-high-resolution 6K-8K productions. Featuring a 180-degree focus rotation, this lens is available in EF, E and PL mounts with lens support foot and cap included.

One of the key focal lengths to achieve a true cinematic look, the wide-angle perspective of a 28mm lens has long become an industry standard in shooting motion pictures. DPs and filmmakers of all genres will now have the opportunity to add this gem to their Sigma Cine lens collection to further enable their creative vision and enhance their workflow.
In addition, Sigma is now offering a five-piece case that can hold the 14mm, 28mm, 40mm, 105mm and 135mm cine lenses to safely transport your gear. The new case is also available for purchase in mid March for $ 750.00.

Prominent Characteristics of Sigma Cine Lenses

  • Individual inspection of every single lens with A1 proprietary Modulation Transfer Function (MTF) measuring system using 46-megapixel Foveon direct image sensors. Even previously undetectable high-frequency details are now within the scope of their quality control inspections.
  • Computer-based ray tracing has been used from the design stage onward to minimize flare and ghosting and enhance contrast in backlit conditions. Ghosting has also been checked at every prototype stage, with its causes identified, assessed and eliminated.
  • Color balance standardized across the line to make color correction a breeze.
  • Dust-proof and splash-proof construction, with each ring and mount sealed to prevent water and dust from entering.
  • The body is made 100% of metal to stand up to tough professional use over the long term.
  • Luminous paint for enhanced visibility
  • Laser engraving for enhanced durability
  • Mount Conversion Service allows users to convert their lenses to and from EF and E-mounts (charges apply). If the camera system changes, it is possible to simply convert the mount system to continue using the high-performance Sigma lenses.

Articles: Digital Photography Review (dpreview.com)

 
Comments Off on Sigma cine 28mm T.1.5 lens gets a price and shipping date

Posted in Uncategorized


Panasonic announces new Lumix TZ95, FZ1000 II cameras

18 Feb

Panasonic has announced it’s adding two new zoom cameras to its Lumix lineup: the Lumix TZ95 compact camera and the Lumix FZ1000 II bridge camera.

Lumix TZ95

First up is the Lumix TZ95, the latest camera in Panasonic’s Travel Zoom (TZ) series. At the heart of the TZ95 is a 20.3-megapixel 1/2.3-inch sensor. Beyond stills, the TZ95 can capture 4K30p video. In front of the sensor is an optically stabilized 24mm (35mm equivalent) Leica lens with 30x optical zoom, giving it a maximum focal length of 720mm (35mm equivalent).

The TZ95 can capture Raw photos and features a maximum burst rate of 10 frames per second (fps). On the rear of the camera is a three-inch 1040k-dot tilting touchscreen and a 2,330k-dot equivalent Live View Finder (LVF).

Panasonic’s signature 4K Photo mode makes an appearance in the TZ95 and adds a new Auto Marking feature that makes it easy to pick out individual frames within a 4K video file.

The TZ95 includes both Bluetooth and Wi-Fi for connecting to and transferring images to smartphones or tablets and tagging the GPS location information within images.

Panasonic says the TZ95 can capture approximately 380 shots per charge and in the event the battery does die, USB charging is possible.

$ (document).ready(function() { SampleGalleryV2({“containerId”:”embeddedSampleGallery_1410592312″,”galleryId”:”1410592312″,”isEmbeddedWidget”:true,”selectedImageIndex”:0,”isMobile”:false}) });

The Panasonic Lumix TZ95 will be available at the end of April 2019 in black and silver for £399.99 (UK) / €449.99 (Ireland).

Lumix FZ1000

The new Lumix FZ1000 II features a 1-inch 20.1-megapixel sensor behind a 16x optical zoom Leica lens with a 25-400mm (35mm equivalent) focal length range and F/2.8-4.0 aperture range. The lens features Panasonic’s 5-axis hybrid Optical Image Stabilizer (O.I.S.+) with a Level Shot function that automatically detects horizontal lines within an image and keeps it level while shooting.

In addition to stills at up to 12fps, the FZ1000 II can capture 4K30p video in the MP4 format at 100Mb/s with the option for 120fps recording at 1080p. Like the TZ95, the FZ1000 II features Panasonic’s 4K Photo mode with the new Auto Marking feature.

The rear of the camera features an articulating three-inch 1.24m-dot touchscreen as well as an OLED 0.39-inch 2.36m-dot EVF.

The FZ1000 II includes built-in Bluetooth and Wi-Fi for wireless connection to mobile devices. The rechargeable lithium-ion battery is rated for 440 shots per charge when working with the rear LCD and 290 shots when using the EVF (430 shots per charge when using the EVF in the ‘eco’ setting, which limited it to 30fps).

$ (document).ready(function() { SampleGalleryV2({“containerId”:”embeddedSampleGallery_9550211351″,”galleryId”:”9550211351″,”isEmbeddedWidget”:true,”selectedImageIndex”:0,”isMobile”:false}) });

The Panasonic Lumix FZ1000 II will be available at the end of March 2019 for £769.99 (UK) / €849.99 (Ireland) / $ 897.99 USD.

Articles: Digital Photography Review (dpreview.com)

 
Comments Off on Panasonic announces new Lumix TZ95, FZ1000 II cameras

Posted in Uncategorized


How to Photograph Destination Weddings Successfully

18 Feb

The post How to Photograph Destination Weddings Successfully appeared first on Digital Photography School. It was authored by Jackie Lamas.

So you’ve booked your first destination wedding, now what? Don’t worry, photographing a destination wedding is not much different from photographing a local wedding. Check out how to photograph destination weddings and make sure that everything runs as smoothly as possible.

1. Logistics and planning

It’s incredibly exciting getting the chance to travel to photograph a couple’s wedding. With that, however, comes the logistics and effective planning, so you aren’t scrambling or getting delayed by a flight.

First things first, make all the flight purchases and itineraries yourself. You should arrive at the destination at least one full day before the event.

For example, if the wedding is on a Friday, you need to arrive early Thursday morning at the latest. The best would be to arrive on Wednesday anytime. This way, if a flight gets delayed or canceled, you have time to figure out your next move. Never plan to arrive on the same day as the event.

If you are not extending your stay, make sure to leave the destination the next day or next night. The reason for this is because, after a full day of photographing a wedding, you won’t want to worry about packing, airport shuttles, and all that goes into traveling back home.

Get your rest, eat a good breakfast and then be on your way. Make sure to say goodbye to your clients before leaving if they are still on the property.

It is entirely up to you if you wish to extend the stay and turn the opportunity into a vacation. However, make sure that you separate the costs of work and vacation so that your clients aren’t paying for your vacation and you can relax knowing that you can enjoy your vacation.

Having said that, it is acceptable to extend the stay and travel a bit on your own. Destination weddings are perfect for this type of traveling, however, always be careful of your equipment when traveling.

2. Research the location of the wedding

Since you’ll most likely be traveling to a new place, you won’t be familiar with the location. Research online as much as possible so that you can find possible shoot locations and get an idea of what you’ll be working with.

Googling the location and adding “weddings” can also bring up other photographer websites who have photographed there. It can give you ideas of where to photograph or how the light looks.

Reach out to the planner or coordinator of the wedding and touch base with them before you arrive. It’s also nice to introduce yourself to them via email before arriving. Ask them in-depth questions about things such as the weather, the location, travel, and access.

All of these logistical and location questions are important so that you know whether to rent a car or if it’s easily accessible to the nearest town.

Getting all of this information can help you make an itinerary with the couple and they will be impressed that you went the extra mile to find out all of the details not only the wedding, but of the actual location.

3. Make the most of your time before the event

It can seem pretty enticing to take a dip in the pool after traveling to the destination of the wedding, however, it’s best to make the most of your time before the event.

Take the time to walk the grounds and get the lay of the land. This can help you get an idea of possible locations that aren’t too far from any of the important events of the wedding day. Ask the coordinator or planner to give you a quick tour of where the ceremony and the reception are taking place.

This is also a great time to check out the town if the couple has opted for photos there. Go and take a look and take the time to make a list of possible locations for portraits, family portraits, creative bridal party locations, etc.

In order to capture this shot, we had to wake up for sunrise at 6:30. Doing research on the location will help you determine the best time for photos.

Also, take a short break to say hi to the couple. Reassure them that you have arrived and have been checking out the location for the best possible photo spots.

Upon arriving, also check your gear. Check that everything is in working order after traveling and that your batteries are charged. If you find you need something, it’s best to find it during this time rather than finding out you needed extra double aa batteries during the ceremony.

Preparing yourself, the photo locations, and your gear allows you to fully relax knowing that you have everything ready to go for the event. Then you can take that dip in the pool without any worries.

4. Gear

Flying with gear can be stressful. Never check-in your gear. Whenever possible, put it in a carry-on case so that it is with you at all times – at least the most important gear. Light stands and tripods are not as crucial as a flash and your favorite portrait lens.

Keeping your lens within arm’s length always ensures nothing gets thrown or broken in the course of the trip. Also, you’ll be able to take photos as you travel on the plane, in the airport, and anywhere.

Before traveling, make sure to speak to an insurance agent about getting your gear insured while you travel. Some insurance agencies only cover your gear in the country you live in. Be sure to call around and have your gear covered as you travel.

Also, ask if your gear is covered in transit. That means that while you’re on your way to where your event is taking place. Transit means in the car on the way to the airport, to the resort, or on the plane.

Having your gear insured while you are traveling makes you feel more at ease in the event something were to happen. Something like a broken lens, a faulty flash, having your camera fall in the water or having your gear stolen.

No one would want this to happen, however, being insured against these things helps keep repair and replacing costs lower than if you didn’t have your gear insured.

Now that you’re insured make sure you bring a backup camera and lens that helps you to cover the wedding in case your main camera stops working for any reason. This is pretty basic for any wedding event – local or destination. However, overseas or far from your local camera shop, it’s unlikely you’ll be able to rent anything if something does go wrong.

5. Tell a story

Most destination weddings take place in places that tell part of the couples’ story or is meaningful to them in some way. Take a photo of the dress where the resort is shown off. For example, a couple from Washington has their wedding in Puerto Vallarta, Mexico. An excellent photo to showcase the beach would be to take a photo of the wedding dress outside where you see the reflection of the ocean in the sliding door windows.

You can also strategically place the details of the wedding day, such as the shoes, bouquet, or the family formals so that some part of the location tells the story. Including these details in the photos makes for a beautiful wedding album and tells the story of the entire day. It has more meaning than a photo of the bride’s shoes in a location that could have been local.

Destination weddings tend to have a smaller guest list, and therefore, most of the guests are very close to the couple. This means that toasts and first dances may be emotionally driven.

Photograph from a more journalistic point of view during these emotional moments, that way, you can capture the mother with tears of joy during the ceremony, or a meaningful hug from a best friend after the first kiss. All of these moments are important during destination weddings.

The bride’s father is the officiant and her sister is behind them.

Take lots of portraits of the bride and groom with their guests, either candid or posed. As the guest list is small, every person is essential, and you should photograph each of them. If the wedding is tiny, say less than 20 people, take a group photo of everyone who attended.

Capture all moments. This man was telling the bride that she was the most beautiful bride he had ever seen during the bride and groom portraits. A funny and sweet moment to remember!

It’s sure to be a favorite among all the guests, and the bride and groom will appreciate you took the time to get a group photo of everyone who made their day special.

6. Get vendor information

Destination weddings are perfect for publications and lots of blogs. You’ll want to get the full list of vendors so that you can also share the images with them and across social media sites.

Tagging a vendor in your photos always creates more buzz and can help you to book more destination weddings in the future. This is especially helpful if you would like to keep photographing weddings at that particular destination.

Send the coordinator/planner a thank you email along with the link to selected photos of the event so that they too can share the images and tag you. Include any hashtags that you’d like for them to use on social media.

Doing this can create a positive rapport with the vendors and give you another opportunity to photograph more weddings at the same location. It also helps your future clients if they need referrals to vendors that you have personally worked with before.

In conclusion

There is not much difference between a local wedding and a destination wedding. With these tips, you’ll be more than prepared to photograph your destination wedding. With the right planning, you’ll do the very best for your clients, and you might even get to enjoy a vacation while you’re at it.

Have you photographed destination weddings? We’d love to hear your experiences in the comments below.

The post How to Photograph Destination Weddings Successfully appeared first on Digital Photography School. It was authored by Jackie Lamas.


Digital Photography School

 
Comments Off on How to Photograph Destination Weddings Successfully

Posted in Photography


How to Push Past Fear in Photography: A Retrospect

18 Feb

The post How to Push Past Fear in Photography: A Retrospect appeared first on Digital Photography School. It was authored by Adam Welch.

Five years. It doesn’t seem like so long ago that I first sat down to write an article which I hoped would help other photographers overcome some of the fears that we all face at one time or another. So much can change in five years. As I sit here and read back through that piece, “How to Overcome Fear in Photography,” I feel uniquely placed to add some insightful commentary on the things I’ve learned over the years about combating the oddly universal apprehensions that we all have to overcome from time to time as photographers. At the very least, I hope it lends a measure of solidarity to you no matter what stage you happen to find yourself at on your journey on the path of photography.

pushing-past-fear-in-photography-dps-adam welch-2

Fear #1: My work isn’t good enough

Ah, yes. I can personally guarantee that no matter how experienced or accomplished you may become in making photographs there is always concealed within yourself a secret doubt about whether or not your photos are good enough. The idea that we somehow fall short in our efforts is something that is forever in the back of your mind to one degree or another. Good photographers consistently are their own worst critics.

pushing-past-fear-in-photography-dps-adam welch-3

How to beat it:

Like all facts of life, the remedy to this lies not in solving the problem but rather in controlling our reaction. The recognition that we all strive towards an unattainable perfection with our work should not be a source of anxiety but instead should fill us with a sense that there are always new ways to improve. An assurance that we can do better gives us something to aspire to and through our aspirations lies creative growth.

Fear #2: I’ll never “make it” as a photographer

When you think about it, the idea of relying on photography to pay all of your bills is a scary thing. Let’s face it, going “all-in” on any endeavor drags us through all sorts of anxiety and fear. This is especially true if you happen to be leaving an established career which lies outside of photography as I did. Confounding the problem further is if you do decide to make a go of it as a photographer, you may be met with quiet disbelief and polite warnings of caution from your coworkers, your friends, and even your family.

pushing-past-fear-in-photography-dps-adam welch-4

I never saw myself as being anything resembling a teacher…yet here we are.

How to beat it:

Alright, let’s get one thing out of the way first: no one can tell you if you’re ready to be a full-time photographer except for you. However, the point I want to get across to you is that you CAN make it happen if you are willing to put in the work, accept failures with renewed vigor and never give up if it’s something you truly want to accomplish.

I’ll also let you in on another secret: photographers today seldom “make it” solely on income from their photographs alone, although some do. Many lead photography workshops and teach courses, sell books, produce editing presets and otherwise diversify themselves in many creative ways to keep the ball rolling. Sure, carving out a career in photography today is more competitive than ever.

The key to overcoming the fear of not being able to survive is by realizing that being a skilled photographer is not enough. You need to be flexible, persistent and resourceful in creating different sources of income based on your love of photography.

Fear #3: “I don’t know how to do…”

Closely related to that nagging fear of your work not being on par with other photographers lies the dreaded idea that you don’t possess a particular photographic skill which you’re convinced you need to master to take your work to the next level. Whether it’s working with strobes or filters, posing people for portraits, working with particular post-processing software, or simply learning what all those buttons do on your new camera; we all feel a little outmatched at times by our own ignorance.

How to beat it:

pushing-past-fear-in-photography-dps-adam welch-1

Luckily, of all the fears we’ve talked about, this one is the easiest to push past. It’s also the one which requires the highest level of tough love in order to overcome. Here goes…*clears throat*. The only thing standing in the way of you learning a new photographic technique or skill is you. Now, I know that’s a hard pill to swallow but stay with me. We live in a world today which offers arguably infinite knowledge right at our fingertips. The internet, eBooks, YouTube videos, online discussion groups, and photography courses have enabled us to learn virtually anything in the privacy of our homes.

Furthermore, the majority of this enormous wealth of knowledge is available for free!  There is virtually no excuse for us to be worried about not knowing how to do something. Knowledge truly is power.

Fear #4: The great unknown

If there’s one all-encompassing fear that eats at both new and established photographers, it is the fear of uncertainty. I remember back when Instagram changed its algorithm a couple of years ago. Many people, photographers and otherwise, suddenly realized that one of their primary sources of client exposure (and income) could be taken from them overnight. The fear crept in.

The same was true when YouTube reorganized it’s video monetization guidelines for creators causing widespread panic for those who depended on the outlet for a large slice of their work. I make and sell a large number of develop presets for Lightroom. When Adobe changed their file formats for develop presets a couple of years ago, there was a brief moment when I thought that all of the presets I had made thus far would no longer work with the new versions of Lightroom. Do you think that scared me? Absolutely it did. The harsh and inevitable reality of situations occurring which are wholly beyond our control can terrify us.

pushing-past-fear-in-photography-dps-adam welch-6

How to beat it:

There are two ways we can deal with the fear of the unknown. The first is that we can curl up into a ball and hope that nothing negative happens. I don’t recommend that option. Alternatively, we can accept that there are always things that can happen to us that we don’t see coming which spark fear and apprehension in our hearts. For example, your camera battery may die just as the sun breaks over that mountain top. Alternatively, your lens may malfunction just as the bride and groom kiss, or three clients might cancel their engagement sessions in one month.

Moreover, Instagram could change the algorithm for the 100th time, and your connecting flight for that incredibly expensive photo workshop in Patagonia may get delayed. Any number of a trillion problems may arise at any given time. We can’t control everything, especially when it comes to photography. Whatever happens, the only weapons we have to combat the fear of the unknown is preparation and acceptance. Prepare yourself for as many scenarios as you can and then just let go. “Be the ball” as Ty Webb might say. If you continuously operate under the notion that the future holds nothing but bad things not only will your photography suffer but so will you.

Pushing Past the Fear

Hindsight, as they say, is 20/20. As photographers, we base much of our learning on experience and experimentation. Trial and error is often our best teacher. We grow and evolve in our work as much through failure as we do by our success. The idea that there can be a day when you walk out with your camera without a doubt in your mind and feeling completely free of any degrees of photographic angst may likely never happen. You gain confidence through constant practice. You make gains, take losses and learn new skills by making mistakes. At times the future may hold much uncertainty, but being able to push past your fears is the key to reaching your potential in photography.

The hope I had five years ago when I wrote the first article on overcoming fear in photography is the same hope I carry now. I hope you now know that whatever fear you might be facing with your photography is likely shared by others. Moreover, it is entirely beatable. Push past your fears and allow yourself to be the photographer you know you can be.


The post How to Push Past Fear in Photography: A Retrospect appeared first on Digital Photography School. It was authored by Adam Welch.


Digital Photography School

 
Comments Off on How to Push Past Fear in Photography: A Retrospect

Posted in Photography


Open letter to Panasonic: Innovations in manual focus could make Lumix S a winner for cinematographers

17 Feb

Jack Lam is a cinematographer based in Beijing and Hong Kong. His body of work includes TV commercials, seasonal TV drama series and theatrical feature films. His commercial clients include Cathay Pacific, Lenovo, Airbnb, Alibaba, and Mandarin Oriental Hotel Group. He also works with DJI as a design consultant for their cinema products.

This guest editorial has been lightly edited for style and clarity.


As a working cinematographer, I am super excited by Panasonic’s announcement of the Lumix S mirrorless camera system. The Panasonic GH5 is so well-designed, it has become a reliable workhorse for many video shooters. I have no doubt a full-frame version of it will be amazing, and everything I read about the S1/S1R confirms that.

However, Lumix S has the potential to become much greater that what we see in this product launch. With this brand new camera system, Panasonic has a unique opportunity to create the perfect small camera system for professional cinematographers. But doing so requires Panasonic to address a long-standing problem that is overlooked by all other camera makers, as well as some rethinking of conventional ideas on camera design.

This missing feature – one that can become a potential killer feature for Panasonic – is good manual focus control for video.

“What’s the big deal with MF?” one may ask, “Don’t most cameras already have MF?” Well, when I say good manual focus control, I mean good enough for real working professionals – advanced documentarians and Hollywood cameramen alike.

The new Lumix S series cameras present an excellent opportunity for Panasonic to redefine the interface between mirrorless cameras and cinematographers who need pro-level focus control.

I want MF control that is simple, accurate, reliable, repeatable, predictable, measurable and ergonomically sound. It should also be wireless-capable and highly integrated as part of the camera (so that we can keep the camera small and don’t need to add six other accessories just to pull focus). Do you know of any small (DSLR/mirrorless) camera in the market that fulfills all of the above requirements? I have found none.

My perspective

My work varies widely in budget and crew size, ranging from run-and-gun documentaries, TV commercials to feature films for national theatrical releases. While the Arri Alexa is my go-to camera of choice for most of my work, I also use small form-factor mirrorless cameras when I see fit. I used to own every Panasonic GH model from the GH1 to the GH4, before I took a break from the m43 system for the full-frame Sony A7S.

This missing feature – one that can become a potential killer feature for Panasonic – is good manual focus control for video.

There are many instances where a smaller camera is the better camera for the job (for example, run-and-gun docs, sensitive locations, small gimbal, special car rigs, crash cams, etc.). Unfortunately, every time I shoot with a small camera I am faced with one big problem, a problem that haunts every video shooter but one that receives very little attentions in camera reviews: how do I pull focus? To be more specific, how do I pull focus effectively and professionally, as my director expects me to? How do I make sure I can nail the focus equally well in the first take, the second take, and each take thereafter?

The problem with focus pulling in today’s cameras

I am sure every DSLR video shooter shares this experience. Ever since the so-called DSLR video revolution, anyone looking to get into this game must build their own camera rig with all kinds of third-party components as if making a science project. Finding the right combination of lenses, lens adapters, focus gears rings, follow focus system, and the rig cage to hold everything together… All of these take a lot of time and energy to experiment and to troubleshoot, while we should really be focusing our time on our own artistic growth. The worst thing is, despite all the time and money we spend, the resulting rigs we built are never very good. They are unreliable, clumsy to use, and not very ergonomic.

The need to piece together unstandardized third-party camera parts also introduce uncertainties to productions. While we can order an Arri Alexa kit from any rental house in the world and have a pretty good idea of what to expect, it is never the case with DSLR/mirrorless camera rentals. Running a multi-camera shoot usually means operating with camera rigs from multiple brands, and their parts are not always compatible with each other.

All such desperate attempts in rig-building are primarily meant to provide a means of focus control. At the heart of this problem is the fact that camera manufacturers have failed to provide a good solution for focus pulling as part of their camera design.

Would you call such a monster user friendly?

Autofocus is not the answer for professionals

With the incredible progress in autofocus technology, can AF help us achieve good focus pulling, or even replace MF altogether? The answer is a resounding NO. Autofocus IS NOT and WILL NEVER be a good solution for professional cinematographers.

I have tried the AF in some of the latest cameras in the market. Dual pixel phase detection, facial recognition, AI subject tracking… I have to say the amount of technology is very impressive. AF works amazingly for stills, but for video I find it only useful under very limited conditions. Perhaps AF can be useful when I am following only ONE subject with a small gimbal without a focus puller’s help. Maybe I can give AF a try when I am shooting a sit-down interview on a slider. But when it comes to professional filmmaking, these said situations are just ‘kindergarten focus pulling’.

With the incredible progress in autofocus technology, can AF help us achieve good focus pulling, or even replace MF altogether? The answer is a resounding NO. Autofocus IS NOT and WILL NEVER be a good solution for professional cinematographers.

Real focus-pulling in a professional setting is much more complicated and much more nuanced. It often involves multiple actors and multiple marks. The camera may be panning from actor to actor, who may or may not be hitting their marks. We need to synchronize our focus shifts with dialogue beats, action beats, and emotion beats. Sometimes we need to predict the action and rack focus before the actor moves. Sometimes we don’t want to focus on the actor’s eyes. In fact, even the term ‘follow focus’ can be misleading because sometimes we intend to not follow anything at all to create a certain mood. Until the day arrives when a computer can understand dialogues, emotion, and esthetics, it is only foolish to think that AF can replace a focus puller.

I would even argue that the reason why some video shooters would even consider trying AF is only because there is no good MF control available to them. If we have an easy way to control MF reliably, most of us wouldn’t even need to bother with AF at all.

After all, why dumb down to artificial intelligence when we have the intelligence (and heart) of a real human being?

Focus control for stills and video are two different animals

The old saying goes, “To a man with a hammer, every problem looks like a nail.” When camera engineers started making still cameras that shoot video, the obvious solution for focus control was to use the existing AF system that works so well for stills and applied it to the video mode. Then the marketing department finished the job by calling it the new frontier of filmmaking.

However, focus control for motion picture is a very different task than getting sharp focus in a still image in many ways. For stills, all we need is to place the focal plane at the right subject as quickly as possible. How the image looks during the focusing process does not matter. For video, there is an element of time, and every frame counts. During a focus pull, the soft frames are just as important as the sharp ones as a form of artistic expression. That means hunting for focus is not an acceptable strategy.

For stills, all we need is to place the focal plane at the right subject as quickly as possible… For video, there is an element of time, and every frame counts.

To put it simply, focusing for stills is a question of WHAT to focus on. Focusing for video involves the interpretation of WHAT, WHEN, and HOW FAST to focus, and that makes it a much more complex problem for a computer to solve because it requires the understanding of intention.

Besides, focus pulls that look timely and confident often require one to know the focal distance of out-of-frame subjects ahead of time. Camera-based AF technology simply can’t do that.

Touchscreen tapping IS NOT focus pulling

There is an element of performing art in focus pulling. To a focus puller, the focus wheel is like piano keys are to a pianist. A focus puller’s distance scale is like a musician’s octave scale. A real focus puller thinks in terms of feet and inches, and prefers to have total control of focal distance. Then there is rhythm and timing in focus pulling, just like music.

For the same reasons why a piano app on an iPad can never replace a real piano, touchscreen tapping can never truly replace the focus wheel. If you want to build a camera that is loved by real professionals, you must first understand and respect the way a professional works.

If a professional musician can’t fit a grand piano in his tiny New York apartment, what would he get instead? The same goes for focus pulling with small cameras.

Focus pulling truly is an art form (let the pros do it their way)

If you still have any doubt in the above statement, this YouTube video by Fandor does a great job explaining the intricacy of focus pulling.

Please note – many of the focus pulls featured in this video, while being very easy to perform manually, are simply not possible with AF.

This YouTube video by Fandor does a great job explaining the intricacy of focus pulling. Many of the focus pulls featured in this video, while being very easy to perform manually, are simply not possible with AF.

Small cameras deserve professional manual focus control too

Skeptics may say, “if you care so much about the art of focus pulling, you should be using those big, expensive camera systems.”

This is certainly not true. Even big Hollywood productions have a need for small cameras with good focus control. I once spoke with cinematographer Tom Stern, ASC, about his experience shooting the movie American Sniper (2014). He shared that one day they had an interior helicopter scene, and it took a very long time to set up their Alexa XT cameras inside the tiny space. Director Clint Eastwood figured they were running out of time and made the call to “let’s bring in that little camera”. They ended up shooting the whole scene with the Blackmagic Pocket Cinema Camera.

In retrospect, Mr. Stern expressed disappointment with this camera for two reasons: 1) the image didn’t match well with the Alexa; 2) the pocket-sized camera wasn’t so small anymore after the cinema lens and the Preston follow focus system (and the required accessories to support it) were mounted.

Sadly, four years after the movie was made, we still don’t have a small camera that fully answers Mr. Stern’s demands.

Articles: Digital Photography Review (dpreview.com)

 
Comments Off on Open letter to Panasonic: Innovations in manual focus could make Lumix S a winner for cinematographers

Posted in Uncategorized


5 Great Android Apps for Taking Creative Selfies

17 Feb

The post 5 Great Android Apps for Taking Creative Selfies appeared first on Digital Photography School. It was authored by Erin Fitzgibbon.

Selfies with a Creative Twist

Last year I wrote an article about pushing beyond the selfie. I wrote about trying to make self-portraits that spoke more deeply about who you are as a person; that we should all try to make a portrait that portrays more than just a smiling face. I still believe strongly in that premise. I’m not the type to shoot endless selfies and post them on Instagram. I want to show off the amazing energy and rich personalities of the people I photograph.

Using another app called Photo Lab I created this image in just a few quick minutes. The free version requires the Photo Lab logo.

Peer pressure

But the problem is I have friends who love taking selfies. Everywhere we go they want to make sure we capture the moment. You know the quick shots that commemorate a place and time and how much fun you’re having there. The creative in me wants to do more than just put a hand on my hip and smile. I want to do more. So as a tribute to my friends and salute to those of who you crave creative options I’ve compiled a list of Selfie and Photo Apps that can help you to take great images but also allow you some creative opportunities.

App #1

Sweet Camera – I love this app. If I’m taking a selfie (mostly for my gaming avatar) I use this app. It’s quick and easy to use, and I’ll admit it’s fun. There are a ton of free filters to download and if you want you can add endless combos of ears, sparkly fake earrings, etc. The app works nicely on Android and links quickly through the share option to all my social media accounts. My friends love this one for all the fun little options they can use. One of their favorites is the ability to change their hair color.

I created this image in just a few minutes using a large window for lighting and the Sweet Camera app.

App#2

Pip Camera – Photo Editor Pro – this one is really about the different filters you can use. Pip camera allows you to take your photos and insert them into fun frames. Take a full length shot then insert yourself into a glass bottle. The effect is a lot of fun. There are also options to use polaroid frames. You can even take your photo and edit it, so it looks like the front page of a magazine. This app is about easily using options to make creative images. It’s more than just a selfie app that hides skin blemishes.

I used the bottle effect to take this photo of my friend. It’s the typical joyful jumping shot with a little adjustment.

App#3

Retrica – Yes, Instagram has many filters you can use for your selfies, but Retrica is probably one of the most comprehensive apps. Its got hundreds of different filters you can play around with and use for free. The editing power for managing blemishes and smoothing skin isn’t as powerful as other apps, but there’s a lot you can do with Retrica.

The filters on Retrica are a lot of fun to use in experiments.

App#4

Photo Overlays – this has lots of backgrounds that you can use to create interesting overlays. For those of you who use Photoshop, it’s really about blending layers. For those of you who know nothing about Photoshop, it’s plain fun to insert you and your friend’s face into the moon. Give it a try. Just be prepared to deal with advertisements. There are lots of opportunities for creativity with this app.

Photo Overlays lets you play around with layers in a really simplified manner.

App#5

VSCO– VSCO is more of a photo editor than a selfie app with lots of options for creativity. VSCO also works as a social media sharing platform in and of itself. It comes with lots of preset options as well as some pretty comprehensive editing tools. This app is more of an editing program for your mobile device than a quick and simple selfie app. However, it’s fun to use if you’re the type that wants to do more than add some fun stickers. VSCO lets you get creative with your mobile photos.


Processed with VSCO with b1 preset

Be creative!

So basically, the sky is the limit for all of those out there who want to tweak their selfies. You don’t have to stick to the simple little stickers and filters you find in your Instagram toolbox. There are a lot more options out there. Give some of these a try and show us what you create. The world of mobile photography is always expanding. The really cool part about it is that it is accessible to all. Some may turn down their noses at the idea of using these apps and filters but for the average user its a lot of fun to experiment. For me, these apps can never replace Photoshop and Lightroom – I love the creative flexibility of those programs too much to give up on them. I’m still a huge advocate for creating more than the quick and simple selfie, however, if you’re less inclined to take time to shoot something a little more original perhaps these options can fulfill your creative needs.

So now it’s time to see your creative endeavors. I’ll leave you with a few more fun experiments, but I know the rest of you are a lot better at this than me. I’m not the selfie type. So it’s your turn show me what you can do in the comments below.


The post 5 Great Android Apps for Taking Creative Selfies appeared first on Digital Photography School. It was authored by Erin Fitzgibbon.


Digital Photography School

 
Comments Off on 5 Great Android Apps for Taking Creative Selfies

Posted in Photography


Enhance Your Images with Creative Photo Editing

17 Feb

The post Enhance Your Images with Creative Photo Editing appeared first on Digital Photography School. It was authored by Stacey Hill.

Much effort goes into creating an image; you have to buy the camera gear, learn how to use it, and then get out there and take interesting photos. However, once they are taken and downloaded on our computers, many images never see daylight.  Perhaps we take too many shots and can’t choose the best ones? Maybe our editing skills are not where we would like them, and we are frustrated?  It could be that we find editing boring?

While there is a school of thought that minimal or no editing is a preferred choice, the other end of the scale is all about luminosity masks, HDR and Photoshop layers by the dozen.  In between, there is a middle ground where many of us fall.

Here, we’d like to edit our images better but don’t necessarily understand the capabilities within the software we have. We may be uncertain how much editing is too much (or conversely, not enough).  Perhaps we don’t know what all the tools and sliders do and get confused and frustrated as a result.

One of the most powerful things that had a positive impact on my editing was choosing to play and experiment freely – to go in completely different directions.  Many of the outcomes were unexpected and gave me results that I really liked.

Note for this article I work with Lightroom and Photoshop.

Beyond the basics

Let us assume you’ve completed the following steps with your image editing:

– you’ve uploaded your image to your computer
– its loaded into your software program of choice
– you’ve completed basic edits – exposure, contrast, highlights, shadows, etc
– you have applied any cropping, lens corrections, and other adjustments

So what is left?  You have a nice shot, that is well composed. The exposure etc is all right.  However, it may still feel lacking in some way?  Perhaps you feel you could do more to the image if only you knew how?

Let’s look at what else makes up your image and how you can work further with that to achieve a stronger picture.

Colour

Most likely your image is in color, and color has a significant impact on people’s brains.  A lot of the way we process and relate to color is instinctive and emotional. Our culture, society and personal experiences also contribute to how we relate to color.  Color psychology is a fascinating area to research.

As an example, in the Western world, white is the color of purity and innocence. However, in Eastern cultures, it is the color of mourning.

All colors have different emotional contexts associated with them, and people react differently as a result.  So the people viewing your images, (especially online around the world), may relate differently to the color in your work. How often do you consciously think about the color in your image from this point of view?

Contrast

Contrast can be several different things within your image. It can relate most directly to the tonal range, i.e. the contrast between the light and the dark areas.  However, it can also relate the different colors and how they interact together.  How your subject matter relates to the rest of the image can be part of the contrast too.  Does your subject stand out in a particular way?

Can you somehow use these different contrast ideas to process your image in an alternative way?

For example, using a spot of color in a black and white scene can provide a point of interest and color contrast and change the way the viewer sees the image.

Tonal Range

While the tonal range of the scene is part of the image as you shoot it, with some careful editing you can change it.  How can this be impactful?  Visualize very high-key fashion or wedding photography images where its all white and bright, and the tonal range can be quite restrained.  Professional images may be purposefully lit and shot that way, but we can still achieve a similar look via editing on the right image too.  This can completely change the mood of your image as well.

Texture

Adding textures to images has become relatively popular, especially in still life and flower photography.  Its also being used with portraits and landscapes. Imagine if you had a beautiful subject with a great pose and an awful background? What if you could remove the background and make it awesome instead?

Alternatively, add some extra depth and interest, elevating your image above the average approach?

Cropping

Sometimes a hard crop is called for to bring out the best in an image.  Alternatively, an abstract approach could make a big difference.

Some before and after examples

Color

For me, color is the most versatile and flexible option to work with.  By changing the color, you can instantly change the whole mood and feel of your image.

BEFORE – This image had basic edits done and a black and white process – this was originally shot to be a black and white image.  Nice depth of field, a bit of tweaking on the vignette to bring focus to the center, but it feels cold and unwelcoming.

AFTER – the addition of a sepia tone makes the skin tones more inviting and adds warmth to the image. Sepia invokes a feeling of nostalgia. Perhaps a reminder of careless childhood days where adventures were had?

Contrast

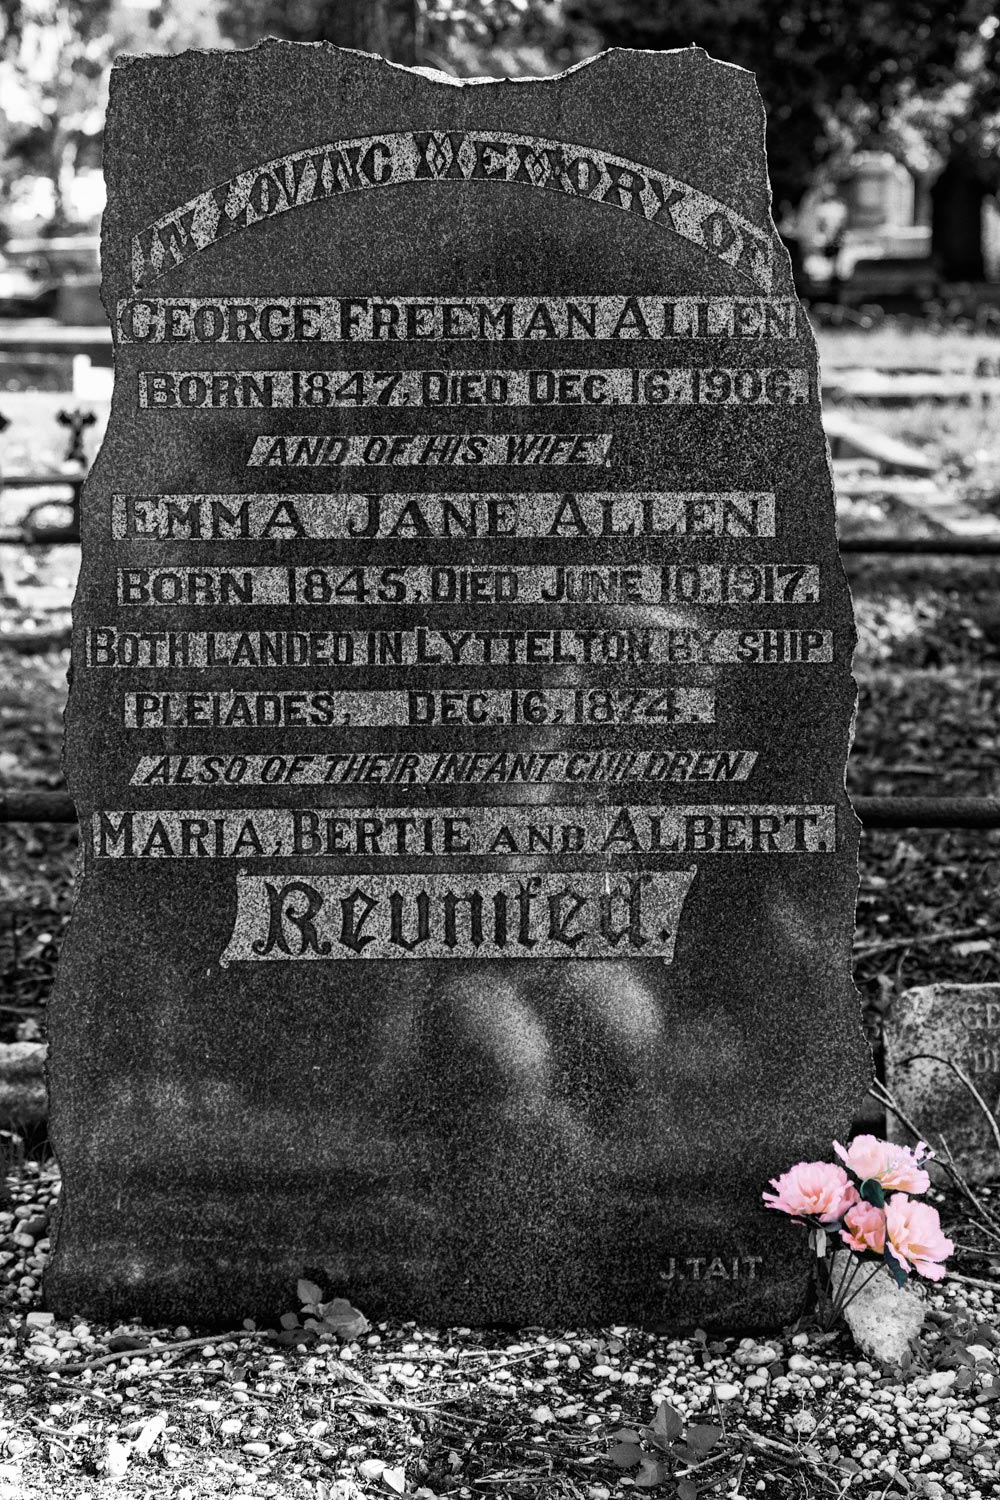
There are two types of contrast used in this image.  There is much contrast between the bright background and the heavy dark marble of the headstone.  Also, the pale stone behind the words offers tonal contrast as well.

This image was originally shot to be a black and white image, and as such, it looks quite good.  However, when I read the words on the headstone, I saw that a whole family was buried here over 200 years ago. Still, there was a bunch of flowers carefully poked into the corner of the headstone base. Who left the flowers and why?

BEFORE – unedited RAW


AFTER – I wanted to bring attention to the flowers, so I brought the color back into the final black and white image. The flowers were only a small part of the overall image, yet enough to catch the eye. My intention here was to ensure the flowers were part of the overall story.

Tonal range

Radically altering the tonal range is one of the tools that offer the most excitement in my editing process.  Being brave and going way up or down the histogram has resulted in some very creative and exciting results.

BEFORE – this is shot with my Lensbaby Velvet 56 which gives much softness when it is wide open.  This shows the unedited RAW file.

AFTER – This histogram has been pushed way to the right. Doing this overexposed the image. It removed most of the blacks and shadows, giving it more of a high-key tonality. The mood of this image now comes across as light, airy, floral, delicate and fragile. The original image was heavy and spiky and didn’t feel like a flower at all.

Texture

BEFORE  – I spent ages taking shots while this gorgeous steam train puffed up. The dark coal smoke against the white clouds of steam was very atmospheric.  The background is pretty awful and doesn’t do it any justice at all. So time to get creative!

AFTER – this one went through a range of edits. First, I played a bit with color.  I did a straight black and white treatment. Secondly, I added a sepia tone with an old vintage newspaper frame to add more of that vintage feel to the image. This is a side by side image for comparison.


AFTER continued – the background was annoying me, so I very carefully extracted the train and all the smoke from the background and then had some fun playing. This one had a Scribble Action along with a replacement background added.

AFTER continued – still wasn’t happy, so I put a new replacement background on the image. However, it was quite heavily textured and didn’t fit, so I ran a Topaz Impression over the whole lot to apply a painterly effect. I also added a subtle framing texture.  Doing so, finally provided the outcome I wanted.

Cropping

Sometimes a hard crop is what an image needs to bring the focus in or to tell the story that you want. People often seem afraid of a hard crop.  I let the image tell me its story and work from there. If it is only ever going to be a digital format, i.e. not printed, then a hard crop has little long term effect.

BEFORE – original unedited RAW file.  The flowers are pretty, and the focus is good, but the background ones are distracting.

AFTER a hard crop and a soft edit.  Now the focus is on the delicate veins in the petals, the water droplets and even the pollen grains on the anthers.

Conclusion

There are many things you can do in post-processing that can further enhance your images.  Any good RAW conversion program has reasonable editing capability included.  What you choose to do with it is really up to you.

Maybe one day you take a handful of images, forget the rules and play and see what you get?

I find presets are a great source of creative inspiration – where someone else has made up a recipe of settings. However, it can be a random lottery to what the outcome is.  Still, you can quickly click and get a very different result, cancel it and move on to the next one.  It might surprise you what you end up with.

What about the deliberate considerations you make when editing? Do you shoot with a specific outcome (like black and white) in mind?  Do you edit and then wonder what other possibilities there are and then dabble a bit until you find something you like?  Alternatively, maybe you have a definite outcome in mind and work hard to get there?

It is allowed and encouraged for you to color outside the lines!  Be brave!  Experiment!  No one ever needs to see it, but you might be surprised at what you can achieve, what you might learn and how much fun you can have.

Share your images with us in the comments below.

The post Enhance Your Images with Creative Photo Editing appeared first on Digital Photography School. It was authored by Stacey Hill.


Digital Photography School

 
Comments Off on Enhance Your Images with Creative Photo Editing

Posted in Photography


Get Low and Aim High – How to Use Low-Angle Photography to Great Effect

17 Feb

The post Get Low and Aim High – How to Use Low-Angle Photography to Great Effect appeared first on Digital Photography School. It was authored by Glenn Harper.

One way you can make photos stand out is to compose them from an unusually low viewpoint. But why is low-angle photography so effective?

Good photography is hard to define, not least because there is always an element of subjectivity in judging it. Even when you have firm ideas about what great photos look like, there is no guarantee you’ll create them frequently. In fact, the more honed your tastes become, the less easily your own photos are likely to satisfy you.

Low angle photography - gate shot from below

Shooting this Prague gate from below gave it more visual impact and a cleaner composition.

Is there any secret to taking eye-catching pictures? If so, I wish I could harness it. There’s one idea I try to bear in mind: show people things in your pictures they don’t see in their day-to-day lives. That means looking closely and seeing details, noticing the unusual, emphasizing the point of interest, keeping things simple, and knowing what to exclude. What is it you have seen and want to convey?

Low angle photography - statue looking downwards

Statues shot from below often work well when the subject looks down at the camera.

Used creatively, low-angle photography meets the criteria of being unusual and will often make viewers look twice. However, it needs a bit more thought than just pointing the camera upwards.

Getting low, aiming high

Of course, low-angle photography isn’t a radical idea in the context of photographing architecture or statues, because they will often rise above you anyway. Unless you photograph these subjects from distance, you’ll always be pointing the lens upwards. But even with these subjects, you need to get the angle of the shot right and consider what qualities you’re aiming to accentuate.

Low angle photography - St Dunstan's Hill in London

In this slightly eerie photo, the street name at the right adds extra interest and gives the picture scale.

If you’re photographing less lofty subjects such as people, animals or plants, you’ll have to get very low to make the perspective unusual. This, of course, could draw attention to you as a photographer, so you might have to shake off any inhibitions. Concentrate on the shot and you’ll soon forget about what other people think.

Architecture & statues

In the case of architecture, more ornate buildings (e.g. Gothic) aren’t always best shot from directly beneath, because all their detail becomes obscured or lost. You could photograph them that way and pick out a detail such as a gargoyle using shallow depth of field. The same can be done with statues on occasion, whereby you focus on an interesting part of the statue from below and isolate it.

Low angle photography - Canary Wharf in London

Three buildings add to the enclosed feeling of this photo, while the carefully positioned clock lends it some scale.

Modern buildings like office skyscrapers often have the benefit of windows and lines, which narrow and converge if you photograph them from immediately below. This is an effective way of directing the eye towards the top of the building. Use of diagonals is an old trick for leading the eye into the picture, but you might need something else to make the shot a great one: perhaps a dramatic sky or cloud above the building.

Low angle photography - statue of Emmeline Pankhurst in London

Using a shallow depth of field, I isolated the eyeglass in the hand of famous suffragette Emmeline Pankhurst, London.

Camera angle

There is no obligation when standing under a building or any other subject to keep it central or horizontal in the frame. By rotating the camera, often you’ll find an angle that increases the slightly giddy impression of towering height. This effect should not be underestimated. It’s a useful trick in low-angle shooting to make the viewer feel slightly disorientated.

Low angle photography - architecture

Left: Silhouette of Rouen Cathedral. Right: One Canada Square – the tallest building in the UK when I shot it. The presence of a second building adds to the giddying effect.

When pointing a camera upwards inside a church or cathedral, I avoid including small sections of detail at the edge of the frame. Instead, I rotate the camera until everything in the picture looks intentional and not something I didn’t notice.

Low angle photography - Rouen Cathedral

This is an obvious shot to take of the Crossing Tower in Rouen Cathedral. The main trick lies in composition and finding an effective angle.

People

Photographing people from a low angle produces some interesting effects. If you look at old “film noir” movie stills, you’ll see a lot of shots where the camera is pointing upwards. This gives portraits a moody feel and empowers the subject because he/she towers above the photographer and, ultimately, the viewer. The downside of shooting from below is that it can be unflattering, often making subjects look broader in the body and fatter in the face.

Low angle photography - casual portrait from a low perspective

A somewhat moody low-angle portrait. You’ll see a lot of low angles as well as low-key lighting in old film noir movies.

You can shoot from low angles in street photography, too, whether from the hip or the ground. Be careful when shooting from the ground that you’re not invading anyone’s privacy by pointing the camera upwards—stay aware of your surroundings and watch who is entering the frame and how they are dressed.

Low angle photography - Venice Carnival

This shot at the Venice Carnival was taken from ground level. Without any prompting, the lady in the middle obligingly leaned over towards the camera.

The mere act of taking street photos from a low level may not, in itself, create a successful photo (if only it were that easy). You still need to have seen something interesting or out of the ordinary and the composition must be right. You might notice a detail at ground level and juxtapose it with the people above it.

Animals & pets

Many people photograph their pets from above, but if you get down to their level you can almost humanize them. That is to say, you’ll often capture their character better than from above. Like human subjects, photographing a pet from floor level gives it more power. An example of this might be if you photograph a cat preparing to pounce—you’ll put yourself in the position of the cat’s prey.

Low angle photography - Birman cat

Cats often take on that regal, aloof look when photographed from below.

Flowers

Sometimes you’ll get good results when shooting flowers from a low angle. One benefit in good weather is that you might get a plain blue sky as a background. Blue goes well with red and yellow – the three together form a triadic color scheme. It also blends well with orange (e.g. California Poppies), since blue and orange are complementary colors.

This low-angle shot from many years ago was completely unsighted. I was aiming to contrast life (flowers and bumblebee) with the WW1 gravestone and tragedy of war. I don’t know that I succeeded, but the idea still resonates.

Of course, it may not be color that inspires you to photograph flowers from below. You might want to emphasize a long stem or capture the translucent qualities of a flower’s petals against a bright sky. You might go for the dramatic effect of many flowers looming over the lens—a bit like a miniaturized forest.

Low angle photography - flowers

These flower shots from below aim to show the sunlit semi-opaque petals as well as color and shape. The fact that they are tall flowers makes this treatment easy even with a bulky SLR.

Trees

Trees are a prime candidate for low-angle shooting, either individually or collectively. Like buildings, you need to stand immediately below them to make the shot even slightly unconventional and maximize the effect. Such photos aren’t always striking unless there is an interesting branch formation or pattern above, so you should take care in picking a subject. Colorful foliage is an obvious thing to look out for, too, especially during fall.

Low angle photography

I shot this mainly for its bark pattern and texture, using the blue sky as a pleasing backdrop. Interesting branch formations or foliage colors might also prompt you to take such pictures.

Equipment

You don’t need any special equipment to shoot from low angles, but obviously a flip-out LCD screen is a useful thing to have. If you don’t have that, at least digital photography costs nothing to experiment with, so you can shoot blind until you get what you want. This was how I first took low-angle photos—with repeated unsighted exposures. A wide-angle lens might help you accentuate height sometimes with its sweeping view of the world, but this is not a necessity.

I hope this article inspires you to shoot some great low-angle photos, whatever the subject. Good luck, and please share with us in the comments below!

The post Get Low and Aim High – How to Use Low-Angle Photography to Great Effect appeared first on Digital Photography School. It was authored by Glenn Harper.


Digital Photography School

 
Comments Off on Get Low and Aim High – How to Use Low-Angle Photography to Great Effect

Posted in Photography


Canon developing six new RF lenses, including ultra-compact 70-200 F2.8

17 Feb

$ (document).ready(function() { SampleGalleryV2({“containerId”:”embeddedSampleGallery_4014773327″,”galleryId”:”4014773327″,”isEmbeddedWidget”:true,”selectedImageIndex”:0,”isMobile”:false}) });

Canon has announced the development of six RF lenses which are expected to be released at various points in 2019.

The most captivating has to be the RF 70-200 F2.8L IS USM. The lens is almost impossibly small, yet manages to be as fast as Canon’s EF model. The 70-200 will be stabilized, though we won’t find out how many stops of shake reduction it provides for some time, as Canon has not yet published specs for any of the upcoming lenses.

Canon will be offering two versions of its RF 85mm F1.2L USM: a ‘regular’ model and a ‘DS’ variant. DS stands for Defocus Smoothing, which Canon says ‘offers a combination of beautifully smooth defocused bokeh.’ While we don’t know exactly what that means yet, it seems likely that the DS model includes an Apodization element, of the kind we’ve seen before in ‘APD’ and ‘STF’ lenses from other manufacturers.

The dual model approach echoes Fujifilm’s decision to market two versions of its XF 56mm F1.2 – a standard model and an ‘APD’ variant optimized for bokeh.

Meanwhile, there are two fast zooms on the way: the RF 15-35mm F2.8L IS USM and the RF 24-70 F2.8L IS USM.

Lastly, there’s a versatile (but slower) travel zoom lens in the works too – the RF 24-240mm F4-6.3 IS USM.

Press Release:

CANON ENSURES THE SUCCESSFUL FUTURE OF ITS RF MOUNT WITH THE DEVELOPMENT OF SIX NEW LENSES

New Lenses Under Development Cover a Range of Core Focal Lengths

MELVILLE, N.Y., February 13, 2019 – Continuing with the message of “optics at its core,” Canon U.S.A. Inc., a leader in digital imaging solutions, today announced that its parent company, Canon Inc, is developing six new RF-series lenses, further displaying the company’s commitment to the EOS R full-frame mirrorless camera system. Canon’s new RF mount allows for fast, light, and high-performing optics with a large opening diameter and short back focus distance. Each new lens in development will help fulfill the needs of amateur and advanced amateurs to professional photographers and videographers, covering critical focal lengths. In 2019, Canon’s already well-established optical lens heritage will celebrate a production milestone of 140 million EF and RF lenses and the celebration starts with the development announcement of these six lenses[i].

The six new RF lenses under development include:

  • RF 85mm F1.2 L USM
  • RF 85mm F1.2 L USM DS
  • RF 24-70mm F2.8 L IS USM
  • RF 15-35mm F2.8 L IS USM
  • RF 70-200mm F2.8 L IS USM
  • RF 24-240mm F4-6.3 IS USM

“Optics are the critical piece of the visual puzzle that bend light and capture an image as the artist envisioned,” said Kazuto Ogawa, president and chief operating officer, Canon U.S.A., Inc. “That is why it is so important for us to strengthen our family of RF lenses for the EOS R camera system. With this collection of new lenses, customers will have more of the tools they need, for the images they desire to create.”

All six RF lenses under development are built around Canon’s new RF mount, which features a large 54mm diameter and shorter back focus distance than on current EOS DSLR cameras. In addition, the RF mount enhances communication and power transmission between the lens and camera body, which has helped Canon to achieve the world’s fastest autofocus speed for a full-frame mirrorless camera system[ii].

The details of the new Canon RF lenses under development are as follows:

The RF 85mm F1.2 L USM is a large aperture mid-telephoto prime lens. It offers excellent performance for advanced and professional portrait photographers and is a widely popular focal length and aperture speed combination for users.

The RF 85mm F1.2 L USM DS, with Defocus Smoothing lens technology, is a uniquely designed lens that offers a combination of beautifully smooth defocused bokeh. Featuring a super-fast F1.2 aperture, the lens will help produce breathtaking portraits that will surely stand out from the crowd.

The RF 24-70mm F2.8 L IS USM is a high-performance, standard zoom lens for professionals and photo enthusiasts alike – ideal for shooting portraits, landscapes, documentaries or weddings.

The RF 15-35mm F2.8 L IS USM, offering a wide angle and fast aperture in a single package, is ideal for a variety of shooting applications including architecture, interiors or landscapes.

The RF 70-200mm F2.8 L IS USM is a must-have for any professional photographer, especially for those shooting weddings, sports or wildlife. This lens is a great all-around, high-speed, medium telephoto zoom lens and does well to round out any camera bag.

The RF 24-240mm F4-6.3 IS USM is the ideal lens for amateurs and advanced amateurs who love to travel, no matter the destination. The versatile, all-purpose lens offers a range of focal lengths for capturing extraordinary shots in a form factor that is both compact and lightweight.

Availability

All six of the new Canon RF lenses under development are expected to be available later in 2019*. To learn more about the lenses under development and to follow along for the official announcement, please visit usa.canon.com

[i] 140 million milestone figure is the accumulated production as at 19th December 2018. Figure includes RF lenses and Cinema lenses

[ii] As of 13 February 2019, among interchangeable lens digital mirrorless cameras incorporating a 35mm full frame equivalent image sensor with contrast detection AF and phase detection AF on the image plane. Calculated from the results of measured AF speed, based on CIPA guidelines (differs depending on shooting conditions and lens used). Measured using internal methods. Measurement conditions: EV12 (ambient temperature/ISO 100), Manual Mode, using the RF 24-105mm F4 L IS USM (at a focal length of 24mm) with the following settings: shutter released using the shutter button, 1-point AF (Center AF), One-Shot AF)

*Specifications, availability and prices are subject to change without notice. Actual prices are set by individual dealers and may vary.

Articles: Digital Photography Review (dpreview.com)

 
Comments Off on Canon developing six new RF lenses, including ultra-compact 70-200 F2.8

Posted in Uncategorized