RSS
 

Canon USA unveils RAISE, an online photo platform with AI-powered features

02 Mar

Canon USA has launched RAISE, its first online photo community. The platform offers photographers a destination for storing their images, which are organized using Canon’s artificial intelligence engine. Users have the option to create Collections for privately sharing images with others outside of the community, and they can browse other users’ images via a personalized feed.

RAISE’s most notable feature is its AI-powered organization, which includes auto-tagging images with the subject, category, color, style, composition, and emotion. Canon designed the platform for more than just uploading images, however, with Canon USA President Kazuto Ogawa explaining, ‘Creativity is born from community – from collaboration with like-minded individuals. With RAISE, we are building that community for photographers.’

Photographers have the option of publicly sharing their work with the RAISE community. Images can be uploaded in high-resolution JPEG format, and starting in March, Canon will release a RAISE plugin for Adobe Lightroom Classic CC. The company says its users retain ownership of images uploaded to the platform.

Canon is showcasing RAISE at the Wedding Portrait & Photography Show in Las Vegas through March 1, 2019.

Articles: Digital Photography Review (dpreview.com)

 
Comments Off on Canon USA unveils RAISE, an online photo platform with AI-powered features

Posted in Uncategorized


How to Correct Perspective Distortion in Photoshop

02 Mar

The post How to Correct Perspective Distortion in Photoshop appeared first on Digital Photography School. It was authored by Ana Mireles.

When talking about perspective, you step into a deep and somewhat complicated subject. It has to do with geometry, history of art, viewpoint and so on. However, solving that big issue won’t be the point of this tutorial. Instead, it focuses on solving perspective issues in your photography using photoshop. So keep reading to learn which Photoshop tools can help you out.

Because perspective can be a broad term, in this article, I’m going to narrow it down to one aspect, and that is the way straight lines seem to converge as they get further away. This can be used as a creative element of the picture, or it can help convey a sense of depth and tridimensionality as per this example:

You may be familiar with this effect, such as when you’re walking on the street, and you tilt your camera up to photograph a building. Now, this might be your intention, but sometimes you don’t want or need this distortion. Of course, you can correct this issue by using tilt and shift lenses, or with a large format camera. However, many of us don’t have access to that equipment. This is where Photoshop is handy to fix perspective in post-production.

As usual, Photoshop has different ways of dealing with the same problem. One may work better than others in different cases. However, I find that more often than not, you need to combine them to get the job done. So here’s an introduction to some different approaches:

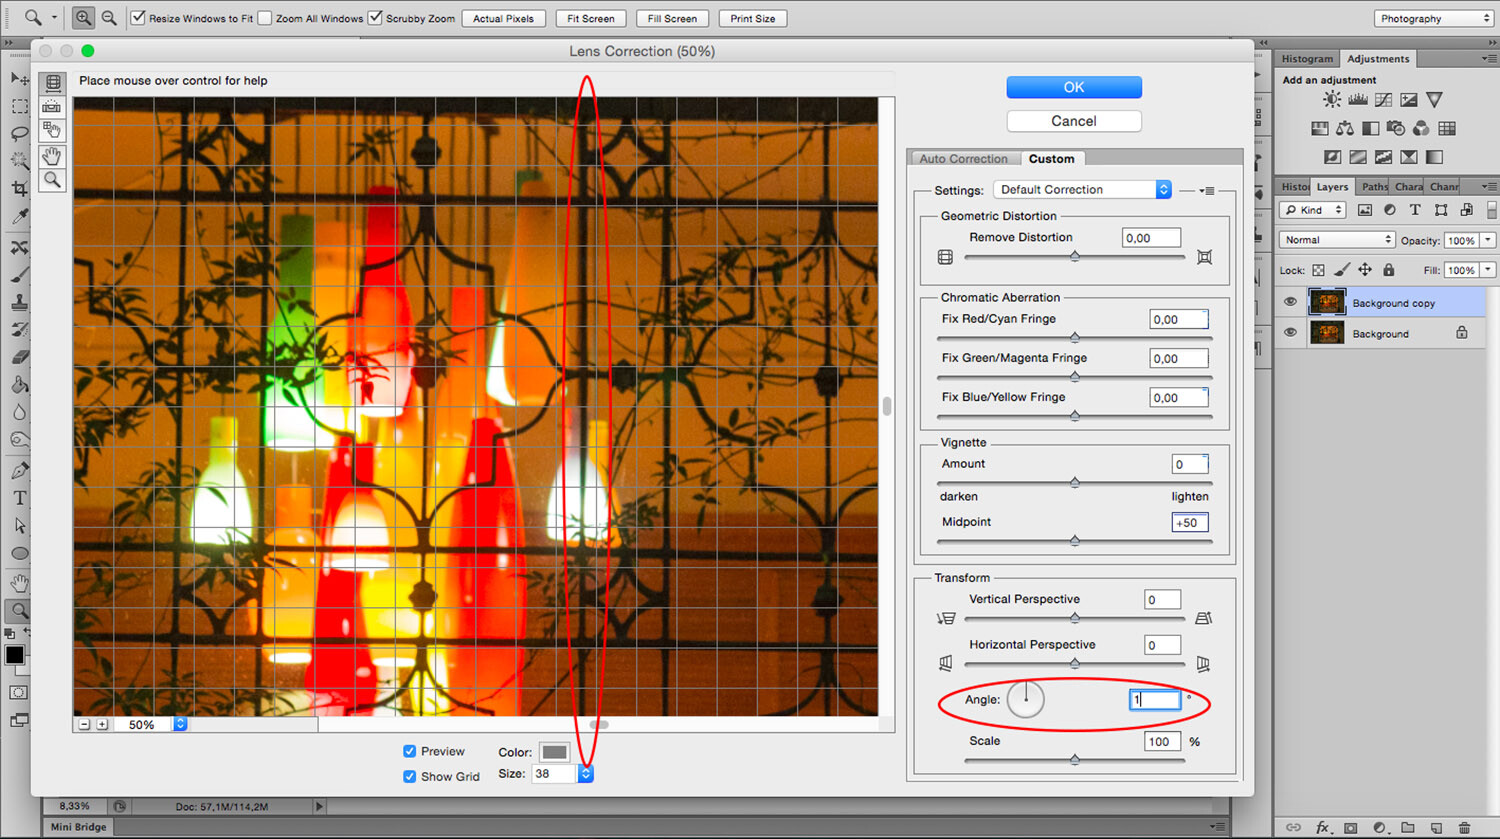
Lens correction and transformation

One way to correct perspective distortion is by using the Lens Correction Filter. You can find it under the Filter Menu. When you choose this, a new window pops up. To start working on it, ensure you’re in the Custom tab to access the settings and set your grid with the bottom slider so that you can have it as a reference.

For this exercise, you’re only going to need the Transform part of the panel that you’ll find in the bottom right. I find that starting with the center point saves time as the changes you make after happen on both sides simultaneously. So I zoomed in to the center and rotated the angle so that the central line aligned with the grid. Remember, you can make the grill tighter if you need to.

Now you can start fixing the vertical and horizontal lines with the sliders. On the sides of each slider, you can see an icon showing the way the image gets affected. If you pull the vertical slider to the left, the top part gets wider or sliding to the right the bottom part is the one that becomes wider and so on.

As you move the lines around, you may be losing part of the image towards the edges. To bring everything back in, use the scale slider. After you’re done, you’ll have to crop out the blank pixels.

As you can see the Lens Correction Tool can be handy, but sometimes you still have to make some adjustments here and there. For this step, you can use the different Transform tools found under the Edit menu.

In this case, I’m using the Skew tool which allows me to move all the corners and middle points independently. Whenever you’re using any of these tools, you can pull out Guide Lines by clicking on the ruler and dragging. That way you can work more precisely without leaving the transform mode.

For this image that’s all I needed to do. However, remember that all the transformation tools can help to correct perspective, so experiment with them to find the one that works best for you and your image. Here, you can see on the left how I started, and on the right, is the new corrected version.

Perspective Tool Crop

Another way of fixing the problem is with the Perspective Tool Crop. This feature corrects the lines almost automatically. However, I wanted to give you the option of doing it manually first so that you have more control over the perspective. If you want to try it out, draw a rectangle around the image with the Perspective Tool Crop active and then drag the corners to match the grid with the distorted lines.

It usually does a good job, but you might still need to tweak it a little bit with the transform tools. Be aware that the Perspective Tool Crop, as the name says, crops your image. You might lose some information from the borders. In any case, you can give it a try and decide which method is best for you.

If you have any other tips to correct perspective distortion, share them with us in the comment section.

The post How to Correct Perspective Distortion in Photoshop appeared first on Digital Photography School. It was authored by Ana Mireles.


Digital Photography School

 
Comments Off on How to Correct Perspective Distortion in Photoshop

Posted in Photography


Spectre is an AI-powered long-exposure app for the iPhone

02 Mar

The team behind the popular Halide app has has launched its second app. Spectre uses computational imaging methods to simulate long-exposure photography on conventional cameras.

You can use the app to make moving subjects disappear in busy areas, such as the cars on the bridge below, or you can create light painting and other effects through subject motion, just like when shooting with a DSLR that has been set to a long shutter speed.

However, Spectre works in a different way, doing away with many of the limitations of a conventional long-exposure. There is no need to put the phone on a tripod or take a series of test exposures to find the shutter speed that works best.

Instead, the app uses machine learning and computer vision to create a computational shutter. Spectre doesn’t capture a single frame at a long exposure but takes hundreds of frames during the exposure time and merges them. This means you not only get a still image as a final result but also a video.

Results are saved in Apple’s Live Photos format which lets you make adjustments after capture, such as choosing a key frame or applying Live Photo effects.

The app uses scene recognition for optimized results. For example, frames captured of a beach scene might be merged for a smooth appearance of the water. A busy cityscape at night is processed for a pleasant rendering of light trails. Thanks to AI-powered image stabilization handheld long exposures of up to nine seconds are possible and during capture a stability indicator tells you if your hands are too shaky.

If you’d like to try long-exposure photography with the iPhone and Spectre, you can download the app on the App Store now for an introductory price of $ 1.99.

Articles: Digital Photography Review (dpreview.com)

 
Comments Off on Spectre is an AI-powered long-exposure app for the iPhone

Posted in Uncategorized


DPReview TV: Canon EOS RP review

02 Mar

The EOS RP is Canon’s second full frame mirrorless camera, built around the new RF mount, and comes with an aggressive launch price of $ 1300. While there are some inevitable compromises to be made at this cost, Chris and Jordan discovered that there’s a lot to like about this pint-sized full-framer.

Get new episodes of DPReview TV every week by subscribing to our YouTube channel!

  • Introduction
  • Body and handling
  • EVF
  • Battery
  • Sensor protection
  • Sensor
  • Dynamic range
  • Low light performance
  • Focus stacking
  • User interface
  • Autofocus
  • Video capabilities
  • Wrap-up

Articles: Digital Photography Review (dpreview.com)

 
Comments Off on DPReview TV: Canon EOS RP review

Posted in Uncategorized


CP+ 2019: Voigtländer unveils new manual focus lenses for Sony E-mount and Leica M

02 Mar

CP+ 2019: Voigtländer shows new lenses for Sony E-mount

We’re at the CP+ show in Yokohama, Japan, where Cosina is letting customers get their hands on three fast manual-focus primes for Sony E-mount and Leica M, respectively. We took a closer look.

Nokton 50mm F1.2 Aspherical

First up is the Nokton 50mm F1.2 Aspherical for E-mount. Although this is a metal-bodies, classically-styles manual focus prime, optical construction is thoroughly modern, comprising eight elements in six groups, including two aspheres.

Nokton 50mm F1.2 Aspherical

Considering the fast maximum aperture of F1.2, the Nokton is very compact, and fairly light at 434 g. Voigtländer claims that this is thanks to the use of aspherics, which allow for high-resolution imaging wide-open without the need for more, or larger elements.

Nokton 50mm F1.2 Aspherical

The Nokton 50mm F1.2 features a 12-bladed manual aperture, and a 58mm filter ring. Electrical contacts on the mount allow for focal length and aperture information to be transmitted to compatible E-mount cameras. Minimum focus distance is 0.45m (about 18 inches).

Nokton 21mm F1.4 Aspherical

The Nokton 21mm F1.4 for Sony E-mount handles like a slightly larger version of the 50mm, and operates in exactly the same way. Manual focus and aperture rings allow for direct manual control, and the overall quality of build and finish is as high as we would expect from a premium Voigtländer lens. All three of these new lenses, in fact, are lovely to hold and use.

Nokton 21mm F1.4 Aspherical

Optical construction comprises 13 elements in 11 groups, with at least one aspherical element (Cosina is being a little vague, for now, on the exact optical formulation). Like the Nokton 50mm, there are 12 aperture blades, and electrical contacts communicate focal length and aperture to the camera.

Nokton 21mm F1.4 Aspherical

The Nokton 21mm F1.4 is a fairly large lens, with a 62mm filter thread. For video use, the aperture dial can be ‘de-clicked’ for smooth stepless control. Minimum focus is 0.25m (about 10 inches).

Nokton ‘Vintage’ 75mm F1.5 Aspherical

The Nokton 75mm F1.5 Aspherical is a fast short telephoto prime lens for Leica M-mount. Preferred by some rangefinder photographers over 80mm+ lenses for portraiture, 75mm is meaningfully longer than 50mm, while not quite long enough that the framelines in an optical viewfinder end up too small for accurate composition.

Nokton ‘Vintage’ 75mm F1.5 Aspherical

Intended to recall the classic rangefinder lenses of the mid 20th Century, the Nokton 75mm might look like an antique, but its optical makeup is entirely modern. Optical construction comprises seven elements in six groups, including one aspherical element. According to Voigtländer, this should ensure good sharpness and resolution even at the lens’ widest aperture of F1.5.

Again, there are 12 aperture blades, which ensures near-circular apertures across the range of F1.5-16. At wide and medium apertures, this should result in the all-important pleasant circular highlight bokeh beloved of portrait photographers. As we’d expect for a lens designed for rangefinder cameras, minimum focus is a fairly unremarkable 0.7m, which represents the minimum focus coupling distance for a Leica M-series camera.

Pricing and availability for all three new lenses has yet to be confirmed, but we’ll bring you more details as they become available.

Articles: Digital Photography Review (dpreview.com)

 
Comments Off on CP+ 2019: Voigtländer unveils new manual focus lenses for Sony E-mount and Leica M

Posted in Uncategorized


CP+ 2019: Hands-on with Tamron’s trio of full-frame lenses

02 Mar

Introduction

Tamron has its three newly-announced full frame lenses on show at CP+ in Yokohama. It’s a slight odd setup, though. You can look at the lenses in a glass cabinet or you can handle rather more rudimentary samples, with no marking on their switches and their names stick on with labelling tape. Thankfully we were able to convince Tamron to let us photograph the more complete versions.

Tamron SP 35mm F1.4 Di USD

The SP 35mm F1.4 Di USD [Model F045] is the company’s latest fast prime for Canon and Nikon DSLRs. It’s designed for full frame and arrives as a higher-end alternative to its stabilized 35mm F1.8 VC. It uses a conventional ring-type USD (ultrasonic drive) focus motor.

Tamron SP 35mm F1.4 Di USD

The SP 35mm F1.4 is fairly long lens but isn’t excessively wide. The company promises you get the image quality to justify the size. Tamron suggests it’s suitable for ‘nearly every photographic genre, including photojournalism, landscape, sports, street life, wedding groups and family snapshots,’ which is a pretty wide range.

Among the best 35s

Despite its fairly modest proportions (by modern standards, at least), Tamron seems bullish about the SP 35mm’s performance, saying it should by the best of its type. We were certainly impressed by how smooth and solid everything felt, when we handled it. Not a bad way to mark the 40th anniversary of the SP series.

Tamron 35-150mm F2.8-4 Di VC OSD

The Tamron 35-150mm F2.8-4 Di VC OSD [Model A043] is an interesting and somewhat unfamiliar concept: a full-frame lens extending from slightly wide-angle to moderate telepoto focal lengths, while retaining a semi-fast maximum aperture. Tamron describes it as a ‘Portrait Zoom.’

35-150mm F2.8-4: a ‘portrait zoom’

It’s about half the size of a 70-200mm F2.8, and still shorter even when extended, which should make it easy both to carry and to handle. Interestingly, the company says all its functions will remain available when adapted to a mirrorless camera. The sample we saw is fairly early, so we haven’t been able to get a sense for the speed or sound of the ‘Optimized Silent Drive’ micromotor.

35-150mm F2.8-4: handy for APS-C?

Although Tamron doesn’t mention its use on APS-C cameras, we reckon the 52.5-225mm equivalent range it would offer on a Nikon APS-C DSLR, long with the F4.2-6 equiv maximum aperture could be fairly interesting for a range of shooting situations. It wouldn’t offer especially shallow depth-of-field, but might make a temptingly portable midway point between a variable-aperture 55-200mm and the significantly higher cost of a 70-200mm lens, depending on how Tamron prices it.

Tamron 17-28mm F2.8 Di III RXD

The final lens we got to see what Tamron’s wide-angle F2.8 zoom for Sony’s E-mount cameras. The 17-28mm F2.8 Di III RXD is a full-frame zoom that makes a lot of sense alongside the relatively small 28-75mm F/2.8 Di III RXD that’s one of our favorite lenses for FE-mount Sonys.

Tamron 17-28mm F2.8 – a compact wide-angle

The Model A046 is based around the same ‘Rapid eXtra-silent stepping Drive’ focus motor used in the 28-75mm, so should be both quick and quiet. The lens itself is a touch shorter than its normal zoom counterpart but otherwise resembles it pretty closely. The biggest difference is that, unlike the 28-75mm, the 17-28mm F2.8 doesn’t extend when you zoom.

Articles: Digital Photography Review (dpreview.com)

 
Comments Off on CP+ 2019: Hands-on with Tamron’s trio of full-frame lenses

Posted in Uncategorized


CP+ 2019: Ricoh shows PENTAX-DA* 11-18mm F2.8 ED DC AW

02 Mar

Hands-on with PENTAX-DA* 11-18mm F2.8 ED DC AW

Alongside the GR III, Ricoh is using the CP+ show in Yokohama Japan to give its customers a first look at a new high-performance wideangle lens for APS-C. The PENTAX-DA* 11-18mm F2.8 ED DC AW was announced way back in the Fall of 2017 and was supposed to ship the following summer, but it was delayed. We’re at CP+, where we took a closer look.

Hands-on with PENTAX-DA* 11-18mm F2.8 ED DC AW

The 11-18mm is a large, pretty heavy and quite costly lens, and if someone had told us it was actually designed for full-frame, we’d have no difficulty in believing them. According to Ricoh, the new lens offers significantly improved image quality compared to the older 12-24mm F4 ED AL.

Designed for outdoor use

Designed for use outdoors, the ‘AW’ in the lengthy model name stands for ‘All-Weather’ – a higher grade of weather-resistance than the more common ‘WR’ rating offered further down Ricoh’s Pentax lens lineup. Like all of the Pentax AW lenses, the 11-18mm F2.8 feels like it could be carried up a mountain in the rain, dropped off the top, dusted off and put back on the camera without sustaining any serious damage (but please don’t try it).

Designed for outdoor use

The distinctive orange ring is a rubber gasket, helping keep dust and moisture from getting into the camera from around the lens mount.

Focus clamp

We’re used to seeing lock/clamp switches on lenses, but it’s unusual to see a focus lock. Since the 11-18mm is intended for use by astrophotographers, for whom precise focusing positioning is essential, especially at wide apertures, Ricoh wanted to make sure that once accurate focus has been achieved, it stays locked.

Moving the clamp switch to ‘on’ disengages the focus clutch, ensuring that even if the focus ring is knocked, the focus position won’t change.

Optical construction

With a focal range equivalent to 16.5-27mm when mounted on an APS-C body, the 11-18mm’s optical construction is comprised of 16 elements, including two aspherical elements, two extra low-dispersion elements and one aspherical extra-low dispersion element. Ricoh claims that its ‘HD’ coating reduces reflections by more than 50% compared to regular coatings, too, which should help increase optical quality even further, by reducing flare and ghosting.

Price and availability

The PENTAX-DA* 11-18mm F2.8 ED DC AW will be available soon, for $ 1399.

Articles: Digital Photography Review (dpreview.com)

 
Comments Off on CP+ 2019: Ricoh shows PENTAX-DA* 11-18mm F2.8 ED DC AW

Posted in Uncategorized


Canon EOS RP Full-frame Camera – Why Some People Won’t be Buying this Camera

02 Mar

The post Canon EOS RP Full-frame Camera – Why Some People Won’t be Buying this Camera appeared first on Digital Photography School. It was authored by Caz Nowaczyk.

Canon have released their new Canon EOS RP full-frame mirrorless camera, and not without some controversy. The Canon EOS RP is it’s entry-level mirrorless camera that comes in at US$ 1299.

Find out the reasons why some people won’t be buying this new camera in these great videos by Jared Polen, Matti Haapoja,and SLR Video Shooter.

You’ll be surprised by the results.


The disappointments of Canon EOS RP for people shooting video:

While this is one of Canon’s lightest full-frame cameras, some people will be highly-disappointed to know that the camera has no 24p video capabilities in HD. It only offers it when shooting 4k. So for many photographers who also like to do video, this will be a major source of disappointment.

The other major downfall is when you use crop sensor lenses on this camera, you lose the ability to shoot in HD. What?!

So, unless Canon comes out with a firmware fix to these issues, you will likely want to choose an alternative camera for video.

However, If you are wanting to use this camera for photography, you will likely find this a great lightweight, affordable, full-frame, mirrorless camera.

So, will you be buying the Canon EOS RP, or will you stick to the Canon EOS R?

You may also find the following articles helpful:

Best Vlogging Cameras for 2019

Fujifilm X-T3 versus Fujifilm X-H1: The Best Mirrorless Camera for You?

9 Recommended Accessories for Your New Sony a7R III or a7 III Camera

Camera Comparison – The Fujifilm X-H1 Versus the Sony a7R III

Gear Review: Canon EOS M50 Mirrorless Camera Kit

The post Canon EOS RP Full-frame Camera – Why Some People Won’t be Buying this Camera appeared first on Digital Photography School. It was authored by Caz Nowaczyk.


Digital Photography School

 
Comments Off on Canon EOS RP Full-frame Camera – Why Some People Won’t be Buying this Camera

Posted in Photography


Apple announces winners of its 2019 ‘Shot on iPhone’ Challenge

02 Mar

One month ago, Apple launched its 2019 ‘Shot on iPhone Challenge.’ Immediately after the announcement, Apple faced backlash regarding the terms and compensation the for the winners. Within two days of its original announcement Apple changed course saying it would pay licensing fees to winners of its ‘Shot on iPhone Challenge.’

Now, those winners have been announced, with Apple highlighting the top ten photos from the ‘Shot on iPhone’ Challenge. The international panel of judges selected photos captured on various iOS devices ranging from the iPhone 7 to Apple’s most recent flagship, the iPhone Xs Max. The photographers themselves hail from all over the world, including Singapore, Germany, Belarus, Israel and the United States.

$ (document).ready(function() { SampleGalleryV2({“containerId”:”embeddedSampleGallery_6970484569″,”galleryId”:”6970484569″,”isEmbeddedWidget”:true,”selectedImageIndex”:0,”isMobile”:false}) });

The above gallery showcases photos that will be displayed on select billboards in various cities around the world. Each image in the above gallery includes comments from the judges.

Articles: Digital Photography Review (dpreview.com)

 
Comments Off on Apple announces winners of its 2019 ‘Shot on iPhone’ Challenge

Posted in Uncategorized


Weekly Photography Challenge – Backlighting

02 Mar

The post Weekly Photography Challenge – Backlighting appeared first on Digital Photography School. It was authored by Caz Nowaczyk.

This week’s photography challenge topic is BACKLIGHTING!

© Kevin Landwer-Johan

Your photos can include anything with backlighting. It could be portraits, street photography, nature, food, objects, silhouettes etc. They can be color, black and white, moody or bright. You get the picture. Have fun, and I look forward to seeing what you come up with!

backlight-photography-incredible-nature

© Jaymes Dempsey


Some Inst-piration from some Instagrammers:


View this post on Instagram


A post shared by Anoop K M (@itz_anoop_km) on


View this post on Instagram


A post shared by stefanosalso (@sensofalsato) on


View this post on Instagram


A post shared by Ivan Kavaldzhiev Photography (@ivankavaldzhievphotography) on


View this post on Instagram


A post shared by Thomas Beckert (@propixelvs) on


View this post on Instagram


A post shared by Ireneya Irina (@ireneya_) on


Check out some of the articles below that give you tips on this week’s challenge.

Tips for Shooting BACKLIGHTING

How to Use Backlight to Create Incredible Images

How to Backlight Translucent Objects for Dramatic Effect

Sunshine: My Favorite Light Source

Three Types of Light: Diffused, Backlight and Reflected – What are They and When to use Them

7 Steps to Create Street Photography Silhouettes


Weekly Photography Challenge – BACKLIGHTING

Simply upload your shot into the comment field (look for the little camera icon in the Disqus comments section) and they’ll get embedded for us all to see or if you’d prefer, upload them to your favorite photo-sharing site and leave the link to them. Show me your best images in this week’s challenge.

Share in the dPS Facebook Group

You can also share your images in the dPS Facebook group as the challenge is posted there each week as well.

If you tag your photos on Flickr, Instagram, Twitter or other sites – tag them as #DPSbacklighting to help others find them. Linking back to this page might also help others know what you’re doing so that they can share in the fun.

The post Weekly Photography Challenge – Backlighting appeared first on Digital Photography School. It was authored by Caz Nowaczyk.


Digital Photography School

 
Comments Off on Weekly Photography Challenge – Backlighting

Posted in Photography