RSS
 

9 Creative Architecture Photography Techniques for Amazing Photos!

19 Mar

The post 9 Creative Architecture Photography Techniques for Amazing Photos! appeared first on Digital Photography School. It was authored by Simon Bond.

It’s great to get a technically sound photo, and architecture photos demand this. Getting the technical side of your photo correct should be your first priority, but beyond that, it’s worth experimenting. In this article, you’ll learn about some creative photography techniques, and how you can apply these to your architecture photography. Whether you adopt any of these for your work will be at your discretion, but having extra options for your photography is never a bad idea. So read on to find out which creative architecture photography techniques you could apply.

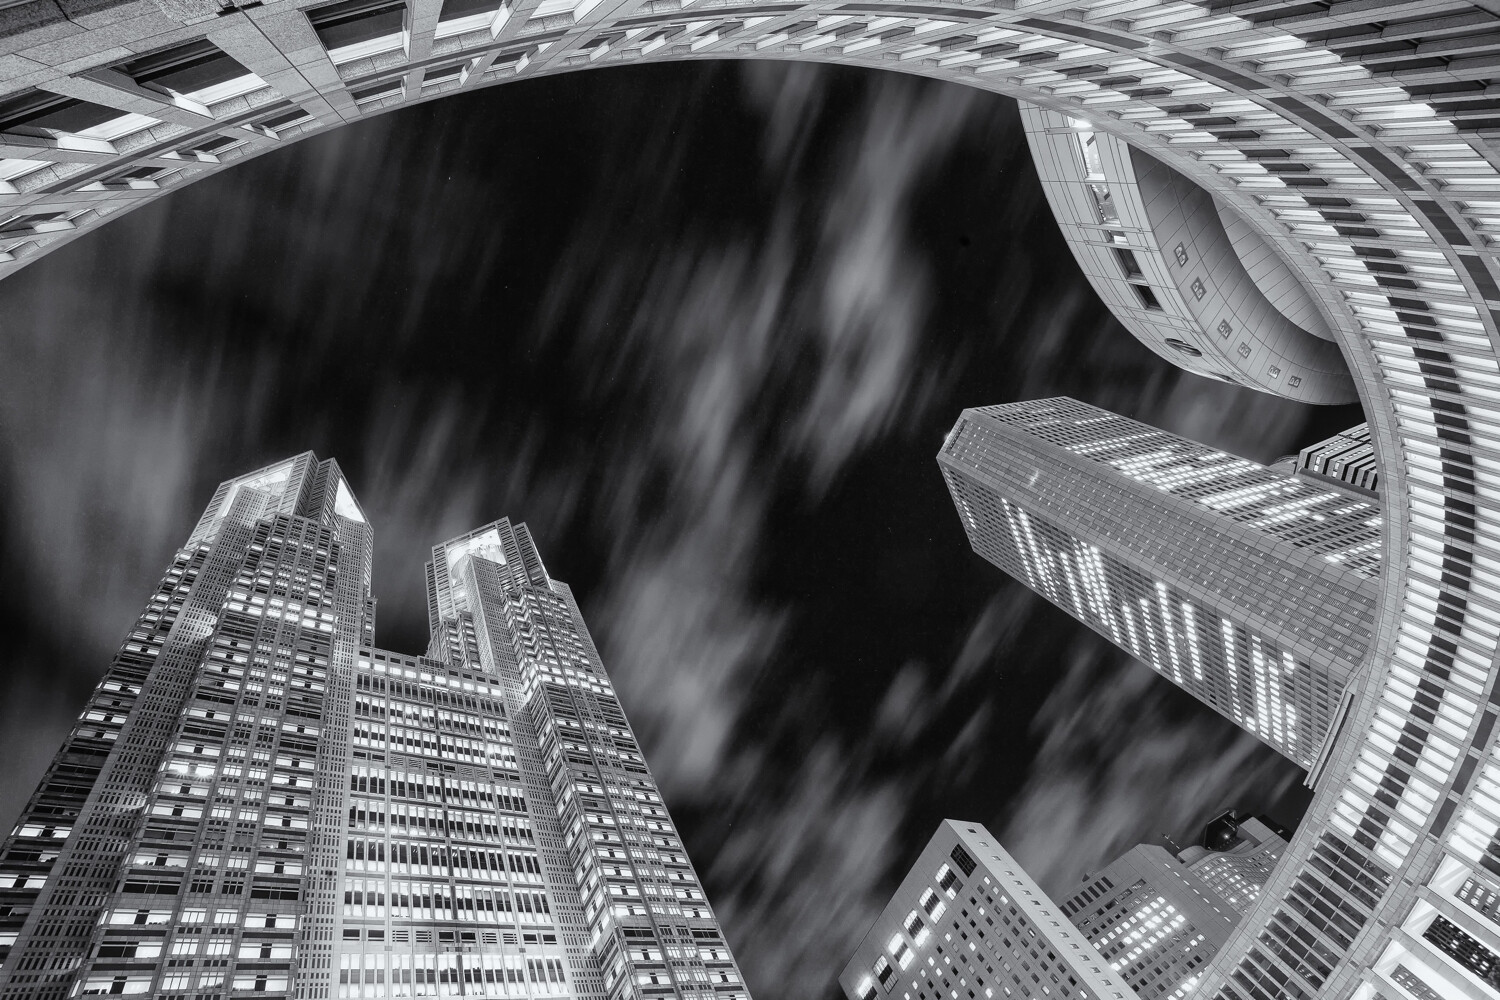
This photo of the Tokyo metropolitan government building has used a worm’s eye view, and a wide-angle lens.

1. A different perspective

Many architecture photos are taken at eye level. In other words, a standing composition from street level or an elevation that brings you level with the building if that’s available. This is far from the only way to photograph architecture though. Using extreme perspectives like worms eye or birds eye views can give dramatic results.

  • Worms eye view – This is likely to be the easiest perspective to achieve and works best when photographing taller structures. You can use this to emphasize interesting ceiling features or to take photos of skyscrapers from the base of the building. If you happen to be surrounded by tall buildings that are close to each other, you can use this perspective to fill the sky.
  • Birds eye view – To get this type of angle, you’ll first need to find a way of getting above the structure you’re photographing. With the advent of drone photography, this has now become a lot easier to achieve. No drone? No problem. You can always find a tall building to photograph from or, if you’re lucky, a hot air balloon ride!

2. Infrared photography

You can change the nature of your creative architecture photography, without needing to use extreme perspectives. One of the best ways to do this is by using infrared photography. This will change your image into more of a dreamscape. This style of photography works much better outdoors, and in places where there is some vegetation. Through some post-processing, you’ll create an image where photosynthesizing plants are white, and the sky is dark. Architecture then forms a powerful focal point within your infrared photo. There are some excellent guides on this style of photography. You have three main choices when it comes to carrying out this style. You can convert your camera for infrared, use an infrared filter, or you can produce this effect through post-processing.

Infrared photography is a great technique to experiment with.

3. Light painting

One of the most creative photography techniques out there is light painting. Through the use of light painting techniques and styles, you can customize the way you photograph architecture. The trick is knowing where and how to apply this to your photograph because not all architecture lends itself to every technique. Perhaps it’s impossible to gain access to the area of the structure in which you’d like to light paint? Perhaps light painting will be too big a distraction and detract from the architecture itself. When you can use light painting to form a leading line to the architecture, or perhaps to frame the architecture, you’ll be on the right lines. There are various tools you can use. Below is a selection.

  • A torch – The simplest of light painting tools. This can be used to create patterns in front of the camera, or perhaps to light up a section of the architecture you wish to photograph.
  • A light source on a string – Repeating patterns work well in photography, and spinning a light source on a string will provide this repetition. You could also use this to create a light orb, and strategically place the orb in front of your architecture.
  • LED light sticks – In recent years products like the pixelstick and the magilight have really revolutionized light painting. These excellent tools can be used to create bespoke light paintings in front of the architecture you’re photographing.

In this photo a pixelstick has been used to light paint around the pagoda.

4. Kinetic light painting

Light paintings’ cousin is kinetic light painting. The technique also requires a tripod, but this time you move the camera rather than the light source. Once again, this can be quite experimental, and not all locations are well served by this photography style. The two main types of kinetic light painting are the zoom burst and camera rotation.

  • Zoom burst – This technique works well with tall buildings, from a distance, and where they’re lit up with lots of interior building lights. You’ll need to set the camera on a tripod, with a lens that can zoom. A kit lens works very well for this, or perhaps a 24-70mm lens. You begin the photograph at the longer focal length, and then zoom out. You can read more about this technique here.
  • Camera rotation – This time you rotate your camera around a tripod head. It works well with tall buildings, where you have a worms eye view. Once again, you can read more about how to do this by reading this guide.

This is a single photo of the Tokyo Skytree. It’s straight out of the camera, and has used kinetic light painting.

5. Refraction photography

You can also use refraction photography with a crystal ball for creative architecture photography. That’s because the fisheye-like properties of the glass ball will capture the entire piece of architecture you intend to photograph. There are tricky aspects you need to handle including the upside-down image within the ball, and centering the architecture within the ball. Providing you can find a good place to position the ball, you’ll be able to use this technique to produce a unique photo of a building or sculpture.

This location is a popular place to photograph St Paul’s cathedral in London. The addition of a crystal ball gives this image another perspective.

6. Detail photos

The main focus of architectural photography is to capture the whole scene. That’s not always needed though, and you can find great detail photos by using lenses of longer focal length. These photos might not work on their own but would certainly add to a selection of photos of one particular piece of architecture. You’ll need to look out for details in the roofing, lines of repeating architecture like arches in a church, or ornate decorations on a wall. Then look to focus in on this particular area. Look to light the detail photo well by either choosing the correct time of day for the sun or using an external flash.

Detail photos of architecture are always worth taking.

7. Digital blending

A process known as digital blending allows you to get perfect pictures. The technique is great for getting technically perfect photos, but you can push beyond that and get more creative. One of the main advantages of this is the ability to photograph towards a sunset sky, and then to balance light across the scene so your architecture doesn’t become too silhouetted. The technique requires you to use a tripod for best results and to take a set of bracketed images. You’ll then need to use luminosity masks to blend the bracketed images in post-processing.

In this photo digital blending is used to ensure the roof windows aren’t blown out.

8. Contrast

Contrast is a broad term, and can be interpreted in several ways. You can use any of these interpretations for more creative architecture photography. Let’s look at some of the ways contrast can be applied.

  • Light and shadows – The most obvious when it comes to photography is to use the light in your photo. You can use this to accentuate areas of interest on the architecture, by using shadows to show detail points.
  • Colors – In some cases, you can play colors off against each other. Obviously, you can’t move architecture, so you’ll need to be creative about how you add opposite colors that contrast with it.
  • Old and new – Old architecture surrounded by new can make an effective photo. Think of a church or temple surrounded by modern skyscrapers.

Framing is a potent photographic technique, which draws the eye to the main subject.

9. Framing

Look to frame the architecture you’re photographing. An arched doorway is a great way to frame your main subject. You could introduce the framing yourself, by holding something in front of the camera. You can use gaps in a fence as a way of framing your photo.

Which creative architecture photography technique will you use?

There are many ways to add creativity to your photography. You’ve now learned about some of the best creative architecture photography techniques. Are any of these techniques you’ve tried before? Which of these ideas will you try? We’d love to see the results of your photography from the past, and anything you might take in the future. As always please share your thoughts and photos in the comments section of this article.

The post 9 Creative Architecture Photography Techniques for Amazing Photos! appeared first on Digital Photography School. It was authored by Simon Bond.


Digital Photography School

 
Comments Off on 9 Creative Architecture Photography Techniques for Amazing Photos!

Posted in Photography


Photo Mechanic 6 will launch March 25 with faster speeds, new UI and 64-bit support

19 Mar

Photo ingesting software Photo Mechanic is about to receive a major update in the form of Photo Mechanic 6. This update follows the last major update, version 5, released way back in 2012.

According to Camera Bits, the company behind the software, Photo Mechanic 6 will be faster, offer 64-bit compatibility, have an ‘intuitive and compact’ user interface and support for selecting specific images to ingest.

Photo Mechanic is billed as a faster alternative to catalogue-based software like Lightroom, enabling photographers to quickly ingest, tag, cull, view, oragnize, and export images. Among the product’s features is support for ingesting images while shooting with a tethered camera, copying files from more than one card simultaneously, using saved GPS tracking logs to geotag photos and more.

Photo Mechanic 6 will be released on March 25. Existing customers who are eligible for an update will be able to purchase the new version for $ 89 USD; a new product license will cost $ 139 USD.

Articles: Digital Photography Review (dpreview.com)

 
Comments Off on Photo Mechanic 6 will launch March 25 with faster speeds, new UI and 64-bit support

Posted in Uncategorized


ZTE’s next flagship phone might come with a sideways-sliding camera

18 Mar
Image: Notebook Italia

Last year we witnessed the appearance of upwards-sliding mechanisms and hole-punch displays on smartphones, both technologies designed to conceal the front camera and maximize the screen-to-body ratio.

Now it looks like Chinese manufacturer ZTE has come up with a modified version of the sliding mechanism. If the images posted by Italian publication Notebook Italia are genuine, the company’s upcoming high-end model Axon S will feature a sideways-sliding mechanism that hides both front and rear cameras.

Image: Notebook Italia

The advantages of the latter aren’t quite clear (as no additional display surface is freed up) but the feature definitely results in a design that makes the Axon S stand out from the crowd.

Labels on the device indicate the three cameras on the rear will include a 48MP primary unit and a 19MP secondary tele lens with 5x optical zoom. The primary camera will have an adjustable (F1.7-2.4) aperture and the tele camera module comes with an F3.8 aperture. The specifications of the third camera aren’t quite clear.

Image: Notebook Italia

We don’t know if or when the Axon S will be released or how much it will cost, but the device could be something to look forward to, both from a design and camera specification point of view.

Articles: Digital Photography Review (dpreview.com)

 
Comments Off on ZTE’s next flagship phone might come with a sideways-sliding camera

Posted in Uncategorized


Canon issues advisory for new super-telephoto lenses, promises firmware fix soon

18 Mar

Canon has issued a product advisory for its new super-telephoto lenses, the EF 400mm F2.8L IS III and the EF 600mm F4L IS III.

Canon says the two lenses might experience a ‘phenomenon where the exposure may flicker slightly if recording a movie with the camera shooting mode set to M or Av in combination with select cameras.’

According to the press release, an upcoming firmware update (version 1.0.8) will fix the issue with the affected cameras. In the meantime, Canon says there are two ways to avoid this problem:

  1. When shooting movies, set the camera’s shooting mode to P or Tv mode.
  2. When using the lens alone or with the EXTENDER EF 2x, set the exposure setting step to 1/2 or 1/1 with the camera’s custom function, even if the camera shooting mode is M or Av.

DPReview will update this article accordingly when the new firmware is released.

Articles: Digital Photography Review (dpreview.com)

 
Comments Off on Canon issues advisory for new super-telephoto lenses, promises firmware fix soon

Posted in Uncategorized


How Mark Rothko’s Paintings Can Inspire Your Photography

18 Mar

The post How Mark Rothko’s Paintings Can Inspire Your Photography appeared first on Digital Photography School. It was authored by Megan Kennedy.

I first encountered a painting by Mark Rothko when I was a uni student, perusing the National Gallery of Australia. Seeking the wisdom of abstract expressionists like Lee Krasner, Clyfford Still and Hans Hofmann, I was somehow completely unaware of Rothko’s renowned canvases. So when I came across #20,1957 I was instantly mesmerized. In the reverent light of the gallery, the cells of the painting seemed to shift under my gaze, bleeding and retracting at once. And when I looked away, the after-image formed a striking hollow into the gallery surrounds.

I felt meditation and calm, but I also felt something I couldn’t quite put my finger on. The ineffable. #20,1957 was like nothing I’d ever come across before.

My reaction to the Rothko painting wasn’t unique. Audiences around the world have reported a deep emotional experience when viewing Rothko’s work. Rothko hoped that in viewing his paintings, others would be drawn into a deep meditative state, a state of vulnerability and receptivity that he himself entered into while creating his artworks.

Today, Rothko’s motivations and techniques continue to inform not only painting but visual arts as a whole.

Mark Rothko

Born in Dvinsk, Russia (now Daugavpils, Latvia) on September 25, 1903, Mark Rothko (born Marcus Rothkowitz) immigrated to the USA with his family in his youth. Inspired to take up art in the autumn of 1923, he began his artistic career painting urban life, portraits, nudes and landscapes. His portrayal of architectural space leaned on abstract compositional techniques, exploring the relationship between the painting and the viewer, an aspect that would play a critical role in his future works.

In the early 1940’s, Rothko shifted from painting the figurative to the symbolic, exploring themes such as prophecy, ancient myths, archaic ritual and the unconscious. Inspired by the surrealist method of automatic drawing, Rothko began to delve into more abstracted imagery, graduating almost entirely to abstraction by the late 1940’s. Unimpeded by the figurative or symbolic, Rothko stained the canvas with diluted oil paint, rendering shapes and forms with soft, indistinct edges, some outlined by luminous white halos.

Mark Rothko, No. 3 No. 13 1949, MOMA
No. 3 No.13, 1949 photo credit: Sharon Mollerus on Flickr

Rothko’s arrived at his signature style in the 1950’s. His expanses of graduated tones and ethereal light seemed to suspend vibratious squares and rectangles upon active planes of color. Toward the end of the 1950’s, Rothko began to paint in an increasingly darker, more restricted pallet.

Mark Rothko (1903-1970)
No. 9 (Dark over Light Earth/Violet and Yellow in Rose), 1954 photo credit: G. Starke on Flickr

In 1964, Rothko received a commission for a series of paintings for a non-denominational chapel in Huston, Texas – a space that was ideal for immersion in his stark, contemplative canvases. Unveiled in 1971, the paintings took 6 years to complete. However, sadly, Rothko never saw the culmination of the space. He committed suicide in his studio on February 25, 1970. He was 66.

Mark Rothko (1903-1970)
Black on Dark Sienna on Purple, 1960 photo credit: G. Starke  on Flickr

Making photos inspired by the art of Mark Rothko

Painting and photography are two different mediums, I know. There is a significant separation between the paintbrush and the camera (although there are some commonalities too). Creating photographic work inspired by Rothko’s paintings isn’t about mimicry, it’s about trying out different styles and techniques. While this article discusses ways to approach photography that reflects Rothko’s paintings, you don’t have to end up with an exact copy of Black on Dark Sienna on Purple, 1960 (I sure didn’t!).

Through the elements and principals of art and design, Rothko created work that communicates beyond seeing. Using the same principals, photographers can create work inspired by Rothko that challenges the viewer and plays with the concept of photography and visual arts.

Using color

When described solely as a colorist Rothko said, “if you are only moved by color relationships, you are missing the point.” Rothko used color as a path to realizing the unseen. Looking beyond the event of color as an optical phenomenon, Rothko constructed oscillating visions driven by our innate conceptions of color.

Like Rothko, photographers use color as a tool to convey an image beyond seeing. Our associations with color stem from experience and instinct. Emphasizing color over literal subject matter doesn’t just convey color relationships; it communicates emotion and ineffability.

Capturing photography imbued with color is simple enough, but may require a little exploration. Look for flat planes of solid or graduated color. Seemingly dull urban surfaces like doors, walls or panels come to life within the camera frame. Try to include as little objective evidence as possible, articulating the emotional charge of color without the disturbance of other visual detritus.

The color in this image breaks up space, conveying meaning through our inherent associations

Unfocused photography

Another way to exemplify color is through unfocused photography. Rothko created a visual vibration within his paintings by blurring the edges of his colors and forms. This effect can be re-imagined by unfocusing your camera lens (turn off Auto Focus first) before taking a photograph. Unfocused photography creates a painterly quality that emphasizes color over subject matter. Rather than taking pin-sharp photos, unfocused photography frees the edges of the components that make up a scene, creating a unique movement throughout the image.

Unfocused photography emphasizes color, creating a unique movement throughout the image

Rothko’s abstract expressionism

Although Rothko himself shrugged off classifications, his work is generally categorized as abstract expressionist. Developed in New York in the 1940’s, abstract expressionism refers to a movement of predominantly non-representative painters. Neither completely abstract nor completely expressionist, abstract expressionism encompassed a wide variety of styles and techniques. Overall however, the practitioners of abstract expressionism stood united in their desire to reinvent the nature of painting.

Abstract expressionism is understood today to be divided into two camps – the action painters and the color field painters. Considered a member of the latter, Rothko prioritized austere beds of color over the wild, diacritic mark. Rothko’s serene blocks generate an emotional aura predominately through shape, form, color and line. It’s these basic precepts that have translated into abstract photography.

Like abstract painting, abstract photography operates independently from depicting the objective. As a result, abstract photographers emphasize the non-objective, peeling back the literal to expose the bare bones of an image. Beyond language, abstraction investigates the visual, discards the literal and charges an image with potentiality.

Aerial photography cultivates abstraction through distance. Abstract macro photography closes in on a subject to reveal often unseen planes. Like Rothko’s paintings, what you exclude from a photograph is just as important as what you include. Turning your lens to strong shapes, forms, colors, textures and lines cultivates imagery that cuts through to the essence of visual language.

Abstract photography operates independently from depicting the objective

Movement

Through extensive layering, blending and blurring, Rothko manipulated hard-edged structures of color into stark, yet softly transcendent forms.

Intentional camera movement (ICM) uses the same principals of movement within a photograph. Through motion, ICM reduces a subject to shape, form, color, and line, creating an abstracted study of movement and light. Similar to painting, ICM involves the physical movement of the camera during an exposure. Also, like Rothko’s actions documented in the strokes of a brush, ICM creates an artwork that is visibly, inextricably linked to the experience of the photographer.

To take an ICM photograph, first, turn off autofocus and, if you have it, image stabilization. Set your camera to Shutter Priority, adjust your exposure time to around 1/2 of a second and turn your ISO down to the lowest setting on your camera. The longer your shutter speed, the more a subject will blur.

Point your camera at a subject, depress the shutter and physically move the camera. Once the shutter closes, review the result on your LCD screen. Your movement will register as blurred lines within the image.

The nature of ICM is that it is both simple and experimental – it takes some adjustment to perfect. Explore different combinations of subject matter, time of day, focus, shutter speed, aperture, and movement to create an image you’re happy with. Moreover, don’t forget to wear your camera strap!

Conclusion

Saying once that “the most interesting painting is one that expresses more of what one thinks than of what one sees,” Rothko shifted the way art is made and observed. Now, with the advent of digital photography, we have new ways to communicate visually.

However, Rothko’s reflections on the human spirit continue to resonate as a vital pause amongst visual loudness. Through his use of color, abstract expressionism and movement, Rothko’s work transcend artistic mediums, informing and inspiring contemporary practice today.

The post How Mark Rothko’s Paintings Can Inspire Your Photography appeared first on Digital Photography School. It was authored by Megan Kennedy.


Digital Photography School

 
Comments Off on How Mark Rothko’s Paintings Can Inspire Your Photography

Posted in Photography


Panasonic Lumix S1R sample galleries updated

18 Mar

$ (document).ready(function() { SampleGalleryV2({“containerId”:”embeddedSampleGallery_9627273872″,”galleryId”:”9627273872″,”isEmbeddedWidget”:true,”selectedImageIndex”:0,”isMobile”:false}) });

Now that our Panasonic Lumix S1R has final firmware, we’re pressing ahead with our full review – but not before getting in some shooting time. Take a look at how the S1R deals with a variety of situations in our sample gallery, and we have to admit, we’re kind of smitten with the out-of-camera JPEGs (there are some Raw conversions too, of course). Head to the end of the gallery to see some samples of the S1R’s incredible 187MP multi-shot mode.

You can also click below to check out our pre-production sample gallery from the launch event in Barcelona last month.

See our Panasonic Lumix S1R
sample gallery

See our pre-production Panasonic
Lumix S1R sample gallery

Articles: Digital Photography Review (dpreview.com)

 
Comments Off on Panasonic Lumix S1R sample galleries updated

Posted in Uncategorized


Review: Yongnuo 50mm f/1.8 lens for Canon – At just US$50 could this be the most affordable “nifty fifty”?

18 Mar

The post Review: Yongnuo 50mm f/1.8 lens for Canon – At just US$ 50 could this be the most affordable “nifty fifty”? appeared first on Digital Photography School. It was authored by Kunal Malhotra.

The 50mm f/1.8 lens, or as we call it, the ‘Nifty Fifty,’ is one of the most widely used lenses in the market. This is usually the first lens a modern digital camera owner desires to purchase after the kit lenses.

The reasons why this is the most popular lens are fairly simple – the first being affordability, and the second, the ability to produce pleasing bokeh.

In terms of affordability, the Yongnuo 50mm f/1.8 lens is ideally the cheapest Nifty Fifty. Priced at less than US$ 50, this is less than half of the Canon variant and works on APS-C as well as full-frame cameras.

However, the Yongnuo lens for Nikon costs around US$ 70 as it includes the focus motor. I recently bought one for my Canon 5D Mark iii, so I thought of sharing my views about this lens.

Build quality and ergonomics

The Yongnuo 50mm f/1.8 lens looks exactly like the Canon 50mm f/1.8 lens (discontinued version). The plastic used in the Yongnuo lens feels a bit cheaper though. Surprisingly, the rubber grip is smooth, and the ‘AF and MF’ switch is similar to Canon.

The construction of the lens consists of 6 elements in 5 groups and has 7 diaphragm blades – the same as the Canon variant. This Yongnuo lens is light to carry as it weighs only 120g – 40g lighter than its competitor. Overall the lens looks and feels good at this price point.

Focus speed and accuracy

I have been using this for almost a month now, during the day as well as night time. The focus speed is a bit slow as the lens hunts for focus, especially in low light conditions. If you are shooting stationary subjects, then it is fine, but if you want to nail the focus swiftly, then you might be disappointed.

Though the focus speed is not that fast, the accuracy is fairly good. It takes time to focus but when it does the focus is accurate. I would not recommend this lens for video shooters as it messes a lot with the focus. However, if you are a hobbyist and casually shoot portraits or still objects, this lens can do the job.

Sharpness and Image Quality

Before clicking photos using the Yongnuo 50mm f/1.8, I had much less expectation from this lens. To my surprise, this lens produced amazing sharpness and image quality. I did not compare it side by side with its competitor lens, but I am sure it is on par with it.

The few image samples that you see are all shot at an event during the sunset/evening time. The images are tad sharp, and the colors also look natural. I had done a test on vignetting performance, and at f/4 it was almost gone. This lens worked for me when I was shooting stationary subjects as well as when shooting performing artists at an event.

For me, the bokeh shape was a bit unpleasant at f/1.8, and I’m not sure exactly why. I used this lens at f/2.8 and achieved sharp and crisp images with minimum vignetting and shallow depth of field effect.

Conclusion

This lens by Yongnuo is for someone who has just started with photography or has a tight budget but still wants to achieve the f/1.8 look at 50mm. The focus speed is something that might irritate you, but once it focuses the image quality is quite impressive. I would suggest this lens to someone who shoots still subjects or portraits without much movement. If you are a wedding, event or a professional portrait photographer, you might be disappointed.

Have you used this lens? What are your thoughts?

The post Review: Yongnuo 50mm f/1.8 lens for Canon – At just US$ 50 could this be the most affordable “nifty fifty”? appeared first on Digital Photography School. It was authored by Kunal Malhotra.


Digital Photography School

 
Comments Off on Review: Yongnuo 50mm f/1.8 lens for Canon – At just US$50 could this be the most affordable “nifty fifty”?

Posted in Photography


How to Improve Your Photography by Changing Perspective

18 Mar

The post How to Improve Your Photography by Changing Perspective appeared first on Digital Photography School. It was authored by Simon Ringsmuth.

Sometimes I find myself stuck in a bit of a photographic rut, and it seems like no matter what I do I just can’t quite find interesting subjects to take pictures of or compelling scenes to capture. Even worse, when I do think I’ve stumbled across something that would make a good picture, I’ll start clicking away only to be disappointed with the results.

One trick I’ve learned over the years to dig myself out of these pits is to change my perspective. By looking at familiar subjects from a different angle, or under a different light, I often find myself seeing it almost for the first time. It’s a fun exercise and doesn’t involve much effort. It can transform even the most boring scene or bland subject into something worth photographing and framing.

There is any number of ways you can change your perspective on things to get a good photo. I’m going to examine four of my favorite techniques and show you an example of each one. Hopefully, this gives you some ideas to try out on your own and start turning the mundane into something magical.

Look at the lighting

Not long ago I was walking around a pond near my work with my Fuji X100F when I stumbled across the following scene. As you can see, it really wasn’t much to look at whatsoever. I noticed two brown leaves among a sea of dull green leaves, but nothing stood out to me as photo-worthy.

A few minutes later the sun poked out from behind the clouds. I decided to take a look at this same scene from a slightly different perspective, and with a bit of a change in lighting as well.

Instead of shooting from above with the sun behind me, I shot from below with the sun behind my subject.

That simple change made a massive difference.

The result is one of my favorite leaf photos I have ever taken.

One morning in May, I used the same technique to get this shot of a butterfly.

I put myself in such a position that the sun would be behind this particular butterfly. It not only gave an incredible glow to its wings but made the dew on the grass glow and sparkle in a way that makes the scene seem almost magical.

Normally, I incline to take pictures like this with the sun behind me, not behind my subject. However, this was a good reminder that sometimes creative lighting choices yield amazing results.

You cannot overstate the effect that lighting has on your photos. Even the word photograph itself means to draw with light. Even so, I often think of lighting in terms of formal portraits or other contrived situations. It doesn’t immediately cross my mind to alter the lighting when I’m trying to capture casual shots in an interesting manner.

The next time you feel a bit of a slump coming on, try looking at everyday items and situations from a different perspective. A perspective where the light is altered, and see how it changes everything right before your eyes.

Another tip is to try creating your own lighting, like in the shot below. It is nothing more than a jar of pasta in my kitchen that I set on top of a flashlight. However, the result was something interesting and unexpected that brought a big smile to my face.

On a similar note, this purple vortex was shot using pretty much the same principle. It might look like something out of a movie or painting, but it’s just a plastic bottle with some purple water that I lit with a flashlight.

The original setup is far less dramatic and quite boring – not the type of scene that seems ideal for an interesting photo. However, with a bit of light manipulation, even scenes like this can result in a magical picture.

Get closer

When I first started taking pictures, I didn’t realize how much I could change the impact of my images by moving myself around a bit. Sometimes I would end up moving to shoot a subject or a scene from a different angle. However, the proverbial light bulb really lit up when I realized how moving closer to my subjects could have resulted in such a dramatically different outcome. This has come in to play when taking pictures for clients – such as this one that I shot at 190mm with an aperture of f/4.

The picture is fine on its own. However, when I moved closer, I found the resulting image more intimate and personal. It was almost like I had caught the two in a bit of a private moment. I shot this image at 150mm with an f/4 aperture. While the focal length was shorter, the image feels more comfortable and natural because I was physically closer to the couple.

I didn’t zoom in to get this shot – I zoomed out. But, I moved a lot closer to them. Not only did this give me a more personal picture, but it also helped the couple feel more comfortable with me. Instead of being remote and distant, I was now able to talk and joke with them. This enabled them to let down their guard and smile a bit more naturally.

Of course, the converse of this is true as well. Sometimes you might find that moving farther away can give you a better shot. The point is that a simple change in perspective can profoundly impact your pictures. Also, if you are working with people, it can change the entire mood and tone of the photo session as well.

Re-frame your subject

When you don’t want to move back and forth but you want to kick your pictures up a notch or two, try moving your subject around. Such that they are in a slightly different spot with slightly different surroundings. Take this photo from a maternity session as an example. The expectant mother is in a garden leaning against a brick outcropping.

Like the couple in the earlier example, this picture is fine on its own, but it feels like it’s missing something. By moving my subject to a nearby flower bed and shooting a similar photo, we were able to add an entirely different dimension to the photo. As a result, I captured an image that feels much more personal and intimate despite a similar pose and expression.

A simple re-framing of the subject, and even adding foreground and background elements, can have a huge impact on the resulting images and the story you want to tell or emotions you are trying to convey. This works with more than just people too, such as this image of the moon. It’s not bad. The subject is sharp and in focus. However, the picture isn’t all that compelling. It’s just a big white circle against a black background. As a result, the image is somewhat lifeless and uninteresting.

Now contrast that image with another one that I captured months later just after sunset. This time I composed my shot so there would be some tree branches in the foreground. This simple compositional decision made the final image far more compelling than just a shot of the moon in the sky with nothing else around it.

Above and below

There is one final tip that can help make your pictures a lot more interesting (or just more fun to look at). Examine your subject or the scene from a vantage point that’s either much higher or lower than you might be accustomed. That may involve climbing up on a ladder or crouching down to the ground. The more creative you can get, the more compelling your results can be.

These two shots are the same sleeping infant. However, I took one from a very low angle and the other from directly above. Neither one is better or worse than the other, and that’s not the point. Instead, both pictures showcase the same subject in different ways. Thus, they convey different meanings to the viewer.

The same scene from a different angle feels more personal and intimate, even though almost nothing about the baby has changed.

On a similar note, I did a family photo session for some clients recently where they wanted a picture of all their hands together. After discussing some ways to accomplish this, we decided to shoot the hands from above. It involved a tall ladder, and all the family members crowded around a tree stump. They were thrilled with the result.

It all came about because I shifted my vantage point to directly above instead of my normal inclination to take photographs from my eye level.

Finally, one more example involves nothing more than a washing machine that my father had rigged to run with the lid open. I held my camera directly above to get this picture of the spin cycle in action.

While it may not be as special as an infant or three generations of hands together, it’s an interesting image of a familiar situation made possible by shifting perspectives.

Hopefully, these images give you a sense of what’s possible by changing a few simple things with your photography. You don’t need expensive gear or fancy studio setups to accomplish some interesting results. Often you just need to adjust your viewpoint or find ways to use the light differently.

I’d love to see some of your examples and read your tips on this same idea. If you have any thoughts or images about this, please share them in the comments below!

The post How to Improve Your Photography by Changing Perspective appeared first on Digital Photography School. It was authored by Simon Ringsmuth.


Digital Photography School

 
Comments Off on How to Improve Your Photography by Changing Perspective

Posted in Photography


NASCAR teams up with DroneShield to bring down unwanted drones at racing events

18 Mar

It’s not just countries and federal agencies getting tough on drones, unruly or otherwise. According to a report from TechCrunch, NASCAR, the sanctioning body of multiple stock-car racing series in the United States and abroad, has struck a deal with anti-drone technology company DroneShield to help shoot down rogue drones at specific venues.

According to the report, DroneShield will be present at NASCAR-sanctioned events held at Texas Motor Speedway in Fort Worth, Texas. This includes events for the Monster Energy NASCAR Cup Series and other feeder stock-car series throughout the 2019 season. Below is a promotional video captured and shared by DroneShield showing off its new DroneGun product:

In an email announcing the news, DroneShield CEO said ‘We are proud to be able to assist a high-profile event like this […] We also believe that this is significant for DroneShield in that this is the first known live operational use of all three of our key products – DroneSentinel, DroneSentry and DroneGun – by U.S. law enforcement.’

DroneShield Sentry (left), DroneShield Sentinel (right).

Despite being the first time its trifecta of products are being used, this isn’t the first time DroneShield has been used at major sporting events. DroneShield technology was used at the 2018 Winter Olympics in PyeongChang, South Korea, as well as at the Commonwealth Games in Brisbane, Australia most recently.

Articles: Digital Photography Review (dpreview.com)

 
Comments Off on NASCAR teams up with DroneShield to bring down unwanted drones at racing events

Posted in Uncategorized


Widen your window: a message to landscape photographers

17 Mar

If there’s one thing landscape photographers obsess over more than gear, it’s light. And often, we fall into the trap of treating light as a zero-sum game – either a sunset is amazing or it’s a complete fizzer. This all-or-nothing mindset is detrimental to our growth as photographers and the work we can produce.

Instead, when we approach our time in the field with a richer appreciation for the subtle, ever-changing interplay between light and landscape, we foster greater opportunities for creative expression.

Expectations create limitations

Early in my landscape photography journey, I would fixate on burning sunrises and sunsets. Almost obsessively, I would track the clouds each day, searching for the signs of a promising explosion of color. While every month or two the heavens would align, more often than not, the sky either fizzled out or failed to produce the color I had hoped for.

By tying our time in the field to ‘great light’, we limit our opportunities

Chasing idealized visions of light, I’d either a) go out anticipating perfect conditions, only to be disheartened when it didn’t materialize, or b) I wouldn’t go out at all if there weren’t signs of a banger on the way. I’m not sure which was worse. Both mindsets have been harmful to my development as a photographer. In hindsight, internalizing the concept of ‘perfect light’ falling across each scene was an unrealistic expectation—one that set me up for disappointment and hampered the images I took.

By tying our time in the field to ‘great light’, we limit our opportunities. Opportunities to grow in versatility. Opportunities to better experience landscapes and compose scenes. Opportunities to expand, refine and execute on our photographic vision.

Go out earlier, stay out later

If you’re the kind of person who, like I was, predominantly shoots 20 minutes either side of sunset (or sunrise), then consider widening your capture window. That is, arrive on location an hour earlier, and continue taking images well into twilight.

This enables you to gain a more rounded understanding of the key elements of the scenes unfolding before you. Exploring locations without looming time pressures offers you the freedom to discover compelling compositions. Compositions that may not present themselves to others who simply arrive at the car park 10 minutes before sunset.

Time is a limited resource, particularly so for some more than others

(Note: This emphasis on time is understandably more difficult for people traveling or working another full-time job—people like me. Time is a limited resource, particularly so for some more than others. If that’s you, then reflect on your priorities. Do you want to capture a collection of good images from multiple locations? Or is your preference for a handful of great images—images that you’d be proud to add to your portfolio?)

Additionally, expanding your capture window forces you to experience the landscape under ever-changing lighting conditions. Over a one hour period on sunset, a scene can change from golden side light, to indirect light from colorful clouds overhead, to soft, yet moody, blue light before dusk arrives. Sometimes a burning sky can be too overwhelming, commanding all the attention in an image, while softer light during twilight may better emphasize the mid-ground and foreground elements.

Challenge yourself

By allowing yourself more time, you can still reserve a window for your ideal composition later in the shoot. Having that composition safely scheduled away opens up new opportunities to create images you not only previously overlooked, but may have entirely not thought possible.

Furthermore, this mindset needn’t – and shouldn’t – apply to sunrise/sunset scenes. Challenge yourself to head out during non-ideal conditions. When time allows, explore landscapes in the middle of the day, after (or for those more adventurous, during) rain or even under moonlight.

Without a colorful sky acting as a crutch to make the scene interesting, how else might you compose it make it compelling? For seascapes, try shooting handheld and getting even closer to the action. For forest scenes, consider shooting with a telephoto lens to really focus in on the subject and remove all distractions. While it’s approaching cliche, experiment by adding a human element to your image for an enhanced sense of scale and place. And when all else fails, shoot abstract – capture intimate details that hone in on key elements of the landscape.

Final thoughts

This article shouldn’t be treated as a prescriptive guide – nor would I want it to be. Each of us has our unique way of seeing and capturing the world around us. That’s one of the reasons so many landscape photographers are passionate about their craft. It’s a medium for personal expression.

Rather, I’m sharing this article to encourage you to expand the scope of your photography and of your potential as an artist. To broaden your view of the images you can (and hopefully will want) to create. To open up new possibilities for your creative vision.


Mitch Green is a Melbourne based Travel and Landscape photographer. He can be found via his website, through Instagram, or down by the beach at 5am waiting for sunrise.

Articles: Digital Photography Review (dpreview.com)

 
Comments Off on Widen your window: a message to landscape photographers

Posted in Uncategorized