Blog

  • What is Shape and Form in Photography?

    The post What is Shape and Form in Photography? appeared first on Digital Photography School. It was authored by Megan Kennedy.

    shape-and-form-in-photography

    The words shape and form in photography are sometimes used interchangeably. However, the terms are actually two distinct visual characteristics. In this article, we’ll take a look at the difference between shape and form and their application in photography.

    shape-and-form-in-photography-pink-blossom

    What is a shape?

    shape-and-form-in-photography-shapes

    In basic terms, shape describes a flat, enclosed area of space. Shapes can be constructed with colors and lines, but all shapes are limited to two dimensions – width and length.

    Curves and other irregular, flowy shapes are known as organic shapes, while angular shapes like squares and triangles are geometric shapes.

    Early rock art is an early example of the use of shape in visual culture. During the Renaissance (and for many years thereafter), form was the predominant characteristic of two-dimensional art. However, with the advent of modern art, artists returned to the use of shape within abstracted and minimalist artistic movements.

    Artists like Piet Mondrian, Picasso, Wassily Kandinsky and Agnes Martin all applied the language of shape to convey a visual experience.

    What is form?

    shape-and-form-in-photography-forms

    Forms in visual art differ from shapes because they are perceived as three dimensional – they operate on width, length and depth. Forms can be either geometric or free-form, with no specific delineation or visual boundary. In two-dimensional formats like painting and photography, three-dimensional forms are generated with aspects like line, movement and value (darkness and lightness).

    Artists from Leonardo da Vinci and Michelangelo to Mark Rothko and Georgia O’Keeffe are well known for their execution of form.

    Shape in photography

    carpark

    From Anna Atkin’s cyanotype impressions to Grant Mudford’s flattened architectural depictions, shape has had a strong presence in photography since it’s inception.

    Lewis W. Hine’s Steamfitter, an iconic depiction of the 1870s industrial labor, makes use of strong, flat shapes to emphasize the form of the subject.

    And Harry Gruyaert and Ed Peters both incorporate bold shapes into their street photography.

    Form in photography

    shape-and-form-in-photography-color

    Form has also had a consistent presence in photographic history.

    Carleton E. Watkin’s Sugar Loaf Islands is an example of texture elevating form.

    And Hiroshi Sugimoto’s Abandoned Theater series studies the power of light in sculpting form and time.

    Philippe Halsman’s famous Dali Atomicus combines shapes and forms to create a dynamic and surreal portrait of Salvadore Dali.

    And Robert Frank’s Parade, Hoboken, New Jersey appeals to our sense of both shape and form in photography to create an intriguing street perspective.

    How to use shape and form in photography

    There are endless photographic opportunities for both shape and form. Focusing on aspects like light, perspective, depth of field and color/black and white will help coax out shape and form in your photography.

    Focus on light

    shape-and-form-in-photography-silhouette

    Depending on the angle of a light source, light can either elevate or flatten a subject. If you want an image made up of dramatic forms, aim for angled lighting to encourage shadows.

    Silhouettes, on the other hand, render subjects as dark two-dimensional shapes. To create a silhouette, photograph a subject positioned against a light background with little or no front-lighting.

    Get some perspective

    shape-and-form-in-photography-fern_light

    Sometimes form can be stimulated with a change in perspective. Photographing front-on to a subject can flatten forms into shapes. Approaching your subject from an angle reveals shadows that cultivate form.

    Dive into depth of field

    depth_field

    Depth of field affects the way shapes and forms are read.

    A shallow depth of field separates the subject from the background (and sometimes foreground) of an image, conveying a more dimensional picture.

    The borderless nature of blurred forms also create a sense of activity within a photograph, contributing further to the perception of form.

    Experiment with color/black and white

    black_and_white_demo

    To place greater emphasis on form, many photographers choose black and white over color. Often you’ll find that depth can be emphasized to a greater extent with the tonal sensitivity of a black and white scheme.

    On the other hand, solid colors emphasize the ‘flatness’ of shape. Using blocks of bold color is a way to enhance the immediacy of two-dimensional structures.

    Movement

    What is Shape and Form in Photography?

    Form is often visualized with fluid borders. This effect can be created through intentional camera movement (or ICM). ICM involves moving the camera during a long exposure (usually 1/125th or less). The results are abstracted forms that are unique, engaging and fun to make!

    Conclusion

    While shape and form in photography play different roles, each cultivates a distinct level of impact and engagement.

    Through the use of light, perspective, depth of field, color/black and white and movement, we can use shape and form to enhance the construction of an image.

    The post What is Shape and Form in Photography? appeared first on Digital Photography School. It was authored by Megan Kennedy.


    Digital Photography School

  • Down in Nuawluns: Nikon Z50 sample gallery

    $ (document).ready(function() { SampleGalleryV2({“containerId”:”embeddedSampleGallery_4278418787″,”galleryId”:”4278418787″,”isEmbeddedWidget”:true,”selectedImageIndex”:0,”isMobile”:false}) });

    We received a reviewable Nikon Z50 a couple of days before the Thanksgiving national holiday. This gave us a chance to take the camera, and the recently-announced Nikkor Z 24mm F1.8 S lens to New Orleans, Louisiana. It’s a city renowned for its music, its food and the unique character of its French Quarter. We took the Z50 out onto the streets of ‘Nuawluns’ to try to capture a little of its flavor.

    Articles: Digital Photography Review (dpreview.com)

  • Gear of the Year – Barney’s choice part 1: Ricoh GR III

    Photo: Dan Bracaglia

    I’m of the opinion that if you use a phrase like ‘shut up and take my money’ in the title of an article about a camera, you’d damned well better buy it. It’s not about gear acquisition (honest it isn’t) it’s about reader trust.

    Yeah, right. But either way, I was serious. It wasn’t long after writing our review of the Ricoh GR III that I bought my own, right before a trip to Japan this summer. I’ve been to Japan a few times for work, but this was to be a proper vacation for once. Just me, a couple of guidebooks, some depressing podcasts and a sturdy pair of hiking boots. And the GR III.

    In the end, it didn’t end up being all vacation (one of those “Hey, so we’re planning a video project in Japan, and since you’re going to be there anyway…” things) but I did get in a decent amount of hiking, and the GR III was with me every step of the way.

    ISO 200 | 1/400 sec | F5.6

    The GR III wasn’t the only personal camera I took to Japan (I also grabbed my Nikon Z7 with a 24-70mm F2.8 lens, just to be on the safe side) but it was the one I ended up using most. Partly that’s because it’s a great camera and I love the images that come out of it, but that’s equally true of the Z7. Mostly it’s because the GR III is small enough to fit into a shirt pocket.

    In terms of image quality, the new sensor in the GR III offers a useful resolution boost over its predecessors, but more important to me is the addition of stabilization and a major increase in usable Raw dynamic range.

    ISO 160 | 1/400 sec | F7.1

    There’s no doubt that 28mm equiv. is a limiting focal length, but it also turns out to be perfect for trail landscapes and for quick grab shots walking around cities. Considering that the GR III is barely any bigger than my phone (albeit thicker) it’s hard to imagine a better traveling companion, provided of course that you don’t need to shoot video.

    Downsides? Naturally there are a few. The aforementioned uninspiring video mode, for one, but aside from that, the GR III’s maximum aperture of F2.8 means there’s very little scope for creative depth of field control, and while built-in stabilization helps, low light shooting often ends up meaning high ISO shooting.

    ISO 640 | 1/40 sec | F4

    There’s no built-in flash, which I know some GR/II fans will sincerely miss, the battery is tiny (but offers more stamina than you might expect in normal use) and there’s no EVF. Outside on a sunny day it’s not always easy to get an accurate idea of composition on the shiny rear screen, and it’s hard even to make out the horizon level indicator when shooting in especially bright conditions.

    It’s a pocketable and silent camera with a very sharp lens, which can get you pictures that larger, louder cameras simply cannot.

    Of course you can boost the screen brightness, and you can also add an optical finder. Neither are a perfect solution though. Bumping up the brightness kills battery life, and with a finder, framing becomes approximate, there’s no shooting data in your eye-line (obviously) and the GR III suddenly gets less pocketable.

    Being such a small camera, the GR III’s controls are also rather cramped in general, but that comes with the territory.

    Like many cameras of its type, the GR III is arguably at its best when used as a point and shoot, but that doesn’t mean you can’t (or shouldn’t) take full control. The GR III offers full manual exposure control and retains the top control dial from previous generations, which for an aperture-priority photographer such as myself is probably the most important single control point. A large, responsive touchscreen takes care of almost everything else.

    ISO 1600 | 1/40 sec | F2.8

    Although some GR/II fans will miss those cameras’ dedicated +/- rocker switch for exposure compensation, the rear jog switch on the GR III can be set up to do the exact same thing, and users of previous generations will be reassured to know that it’s just as easy to accidentally hit.

    That was sarcasm. For the most part, the GR III does exactly what I want it to, when I want it to, and it’s exactly in line with what Ricoh has aimed to provide from the very beginning of the GR series way back in the 1990s. The GR III is a pocketable and silent camera with a very sharp lens, which precisely for those reasons can get me pictures that larger, louder cameras simply cannot.

    Like all cameras, it has some limitations. Many of these are inherent to the design and form factor, but all are forgivable and in my opinion none devalue its main selling points.

    For all of these reasons, my first choice for Gear of the Year is a camera that I’ve carried with me more than any other in 2019, not including my phone: the Ricoh GR III.

    Watch out for Part 2 of my personal ‘Gear of the Year’ in a few days.


    Ricoh GR III sample gallery

    $ (document).ready(function() { SampleGalleryV2({“containerId”:”embeddedSampleGallery_7380089310″,”galleryId”:”7380089310″,”isEmbeddedWidget”:true,”selectedImageIndex”:0,”isMobile”:false}) });
    Articles: Digital Photography Review (dpreview.com)

  • Capture One 20 photo editing software arrives with new and enhanced tools

    Phase One has announced the launch of Capture One 20, the latest version of its photo editing software. Additions and enhancements brought in Capture One 20 are based on user feedback, according to Phase One, which says the latest version of its software brings a ‘highly intuitive and functional’ UI that is easier for new users to learn and use.

    Capture One 20 brings both updated and new features, including a redesigned Basic Color Editor that now works on Layers, a new Crop tool that Phase One says is Capture One’s ‘most advanced’ crop tool to date, a new HDR tool that adds White and Black point sliders, a ‘re-engineered’ Noise Reduction tool, and new scrolling tools.

    In addition, Capture One users can expect enhanced versions of the software’s appearance, interface, DNG support, copy and apply functions in Layers, and an entirely new ‘Select Next When’ option that makes it possible to automatically switch to the next image once a certain action has been performed (adding a color tag, etc).

    Other enhancements include new toolbar text and icons, enhanced browser thumbnail resolution, improvements to the adjustments clipboard, and an enhanced White Balance Picker tool that has been re-engineered for what Phase One says is ‘much higher consistency.’ As expected, the updated software also brings new lens and camera support for models that include the Canon EOS 90D and M6 II, the Ricoh GR III, Nikon Z 50, and more.

    Below is a feature overview of the newly-released Capture One 20:

    Capture One 20 is available starting today with versions that limit support to camera models from Fujifilm and Sony (Capture One Pro Fujifilm 20 and Capture One Pro 20 for Sony, respectively). Customers have the choice to purchase Capture One 20 for $ 299 ($ 159 to upgrade from a previous version) or to sign up for a subscription to receive access to it for rates starting at $ 15/month. The Fujifilm and Sony versions of the software are slightly cheaper at $ 129 per license or $ 8/month.

    Articles: Digital Photography Review (dpreview.com)

  • DJI and SkyPixel launch contest to celebrate 5th anniversary

    SkyPixel, which can be accessed in DJI’s consumer apps, as well as online, has attracted over 18 million aerial photographers and content creators from 140 countries to its platform since launching in 2014. To celebrate their 5th anniversary, they’ve partnered with DJI, Nikon, and Western Digital Corp to award 56 category winners and finalists prize packages worth over $ 117,000 combined. The SkyPixel 5th Anniversary Aerial Photo & Video Contest launched on Tuesday, December 3rd, and concludes on February 3rd.

    This year’s contest features 9 storytelling categories spanning two disciplines, videography and photography. In honor of the competition’s 5th anniversary, an additional category, Aerial Story, which invites users to share their journeys from a drone’s perspective, has been added. Here are more details for each category:

    Videography

    • Nature: Capture footage of natural scenery, wildlife, and landscapes
    • City: Showcase the beauty of urban landscapes and man-made architecture
    • Sport: Document moments in movement the power and energy of humans doing sports
    • Travel: Stories about humanity, culture, or an unforgettable adventure (people should be included in these videos)

    Entires should not exceed 5 minutes and must contain at least 30 seconds of aerial footage.

    Photography

    • Portrait: Capture a person’s expression, actions or passion in the beauty of their surroundings
    • Nature: Reveal the natural beauty of the world
    • Architecture: Show off impressive structures from a new perspective
    • Sport: Capture the energy and excitement of an athlete in action
    • Aerial Story: Consisting of 5 images, they should document adventures from a drone’s perspective.

    Photos must be captured by a drone. Although DJI is a major sponsor, entries captured by any brand of drone are eligible. Each image must be at least 3 MB with a resolution of 300 dpi (in this case, pixels per inch).

    All winners will be featured as SkyPixel recommended photographers and be considered for the role of a DJI Creator. SkyPixel claims that entries from winners and finalists have received over 1 million views in past competitions. Winning entries will also be showcased at exhibits in DJI Flagship stores around the globe in Spring, 2020. Entries will be judged by a panel of award-winning experts including Jamie Hancock, Jarred Seng, Chris McLennan, and Thomas Chu. Results for this year’s winners and finalists will be announced on March 3rd. To enter, visit SkyPixel’s official contest site.

    Articles: Digital Photography Review (dpreview.com)

  • John Wick, Deadpool 2 director shot Apple’s new ‘Snowbrawl’ ad with iPhone 11 Pro

    Apple tapped Deadpool 2 and John Wick director David Leitch to direct a 90-second iPhone advertisement called ‘Snowbrawl.’ As its name suggests, the video features high-action footage of a snowball fight filmed in cinematic style using the iPhone 11 Pro.

    It’s not uncommon for Apple to publish video and image ads shot using its latest iPhone models. The company has increasingly embraced short-form storytelling as part of its ads and ‘Snowbrawl’ is no different. The commercial shows off the iPhone 11 Pro’s camera capabilities while telling the brief story of children engaged in an epic snowball fight to save a kidnapped teddy bear.

    Creatives have been producing works shot using the iPhone for years. The 2018 movie Unsane was shot entirely using the iPhone 7 Plus, for example, though it should be noted that a variety of gear, including stabilizers and external lenses, are often used as part of these projects.

    Articles: Digital Photography Review (dpreview.com)

  • Modded ‘Ribcage’ Sony RX0 II features passive MFT mount for interchangeable lenses

    Canadian retailer Back-Bone Gear is offering the new Ribcage RX0 II, a modified version of the tiny and rugged Sony RX0 II camera that features a passive MFT mount for use with manual lenses, as well as a C mount (via a mounting ring) ideally intended for use with 1″ and 1.1″ format lenses.

    The Sony RX0 II features a 1″ stacked Exmor RS CMOS sensor, removable IR-cut filter, support for capturing video at up to 4K resolutions, slow-motion capture at up to 1,000fps, and much more. Joining the camera’s robust features is an ‘extra-super-duralumin’ rugged body and 180-degree tilting LCD.

    The modified Ribcage version of the RX0 II enables users to attach their existing lenses using an adapter, to use the tiny camera for niche applications involving telescopes and microscopes, or to use unique lenses with the camera, such as vintage models. Back-Bone Gear notes that its modified MFT mount doesn’t supply power for the lenses, hence why it must be used only with manual lenses.

    The Ribcage model features CNC-machined aluminum components and includes a removable mounting plate with 1/4″-20 and 3/8″-16 mounts. The Ribcage RX0 II modified camera is available now for $ 1,299; it ships with a replacement IR-cut filter, charging cable, wrist strap, and more.

    Articles: Digital Photography Review (dpreview.com)

  • Qualcomm’s new 865 chipset supports 8K video, 4K HDR, no-limit 960fps capture and more

    Qualcomm has introduced the Snapdragon 865 Mobile Platform, its latest chipset that pushes the limits of mobile processing in a device that’s small enough to fit on the face of a penny.

    In addition to support for Qualcomm’s Snapdragon X55 4G/5G modem, the chipset also brings a number of improvements in the imaging department thanks to its Kryo 585 octa-core CPU, Adreno 650 GPU and Spectra 480 Image Signal Processor (ISP).

    Unlike previous chipsets, which could only hand one pixel per clock cycle, the Snapdragon 865 can handle four pixels per clock cycle. In addition to power savings and running cooler, this increase enables exciting new features on the photo and video front.

    Specifically, the Snapdragon 865 can handle up to two gigapixels of data per second thanks in part to its dual 14-bit ISPs. This means the Snapdragon 865 will be able to handle up to 200-megapixel captures, as well as dual 64-megapixel camera captures with zero shutter lag and HEIC photo capture. It can also apply multi-frame noise reduction on the fly, as well as provide real-time object classification, segmentation and replacement in images thanks to its 5th generation Qualcomm AI Engine. This new technology will make it possible to ‘quickly and intelligently identify different backgrounds, people, and objects, so they can be treated individually for a truly customized photo,’ according to Qualcomm.

    The Snapdragon 865 chipset is also a major boost for mobile video. In addition to 8K video capture, the chipset can also handle 4K HDR (HDR10+, HDR10, HLG and Dolby Vision), 4K video at 120fps and 4K video capture while simultaneously capturing a burst of five 640-megapixel photos. This makes it the first chipset that captures Dobly Vision video on the fly and in addition to capturing 120fps video, the chipset can also playback 120fps video in realtime when paired with a 120Hz display, such as those found inside the Razer Phone, Razer Phone 2, Sharp Aquos R3 and Asus ROG Phone II smartphones.

    Qualcomm has addressed high-speed capture as well. The Snapdragon 865 can capture 720p video at 960fps without limits. 720p video at 960fps is nothing new, as the Sony Xperia XZ and over a dozen of other smartphones from Sony, Samsung, Huawei, Sony and Xiaomi can attest to, but current devices are limited to capturing just a few seconds at a time. When paired with the proper hardware, the Snapdragon 865 chipset will be able to record 960fps video indefinitely; or at least until you run out of storage.

    Below is Qualcomm’s day two livestream of its Snapdragon Tech Summit in Maui:

    Qualcomm says flagship devices based on the Snapdragon 865 are expected to be available in the first quarter of 2020. So far HMD, Motorola, Oppo and Xiaomi have confirmed they have devices on the way based on the Snapdragon 865 chipset.

    Press release:

    Qualcomm Introduces the World’s Most Advanced 5G Mobile Platform

    The Qualcomm Snapdragon 865 Mobile Platform Delivers the Best 5G Mobile Experiences for Next Generation Flagship Devices—Devices Expected to be Commercially Available in First Quarter 2020

    MAUI, HAWAII — December 4, 2019 — Qualcomm Technologies, Inc., a subsidiary of Qualcomm Incorporated, introduced the Qualcomm® SnapdragonTM 865 Mobile Platform, which combines the world’s most advanced 5G Modem-RF System with the world’s most advanced mobile platform designed to deliver the unmatched connectivity and performance required for the next generation of flagship devices.

    The platform’s best-in-class Qualcomm® SnapdragonTM X55 5G Modem-RF System provides peak speeds of up to 7.5 Gbps, surpassing most wired connections and transforming the mobile experience. The leading 5th generation Qualcomm® AI Engine and new Qualcomm® Sensing Hub provides more intelligence and personalization than ever before. Snapdragon 865 includes the blazing fast Qualcomm SpectraTM 480 Image Signal Processor (ISP), which brings new features to mobile photography and videography thanks to gigapixel speeds – up to 2 gigapixels per second. Gamers can use Snapdragon to compete at the highest levels with an array of brand-new Qualcomm® Snapdragon Elite GamingTM features for desktop-quality gaming and ultra-realistic graphics. Our next-generation Qualcomm® KryoTM 585 CPU delivers up to 25% performance improvement, and the new Qualcomm® AdrenoTM 650 GPU offers up to 25% overall performance boost compared to the previous generations, ensuring superior processing power for the next generation of flagship devices. The Snapdragon 865 empowers you to game, capture, cross-task and connect like never before.

    “Snapdragon 865 supports the world’s most advanced 5G connectivity and features, raising the bar for what a mobile device should be,” said Alex Katouzian, senior vice president and general manager, mobile, Qualcomm Technologies, Inc. “It’s the culmination of Qualcomm’s more than 30 years of wireless leadership and innovation.”

    Benefits of the Snapdragon 865 include:

    • The World’s Most Advanced 5G Mobile Platform: The Snapdragon 865 is the most advanced 5G mobile platform—ever. Its Snapdragon X55 5G Modem-RF System is the world’s first commercial modem-to-antenna 5G solution for consistent, lightning-fast speeds across the board—with peak speeds of up to 7.5 Gbps. The comprehensive Modem-RF System-approach allows advanced technologies such as Qualcomm® 5G PowerSave, Qualcomm® Smart TransmitTM technology, Qualcomm® Wideband Envelope Tracking technology and Qualcomm® Signal Boost to help deliver superior coverage and data speeds along with support for all-day battery life. This 5G global solution supports all key regions and bands including mmWave and sub-6 in both TDD and FDD frequencies. Plus, it’s compatible with both NSA and SA modes along with Dynamic Spectrum Sharing (DSS), global 5G roaming and support for multi-SIM. In addition to 5G connectivity, the Snapdragon 865 is redefining Wi-Fi 6 performance and Bluetooth audio experiences via the Qualcomm® FastConnectTM 6800 mobile connectivity subsystem. Extensive Wi-Fi 6 feature innovation helps users take advantage of incredible speed (approaching 1.8 Gbps) and latency, especially in crowded environments with many devices contending on a network. FastConnect 6800 is also among the first to be designated Wi-Fi CERTIFIED 6 by the Wi-Fi Alliance. The introduction of Qualcomm® aptXTM Voice makes Snapdragon 865 the first mobile platform to wirelessly support Super Wide Band (SWB) voice over Bluetooth for a new class of crystal clear audio, in addition to aptX Adaptive and Qualcomm TrueWirelessTM Stereo Plus, thereby reducing latency, increasing battery life and improving link resilience for wireless headphones and earbuds.
    • Gigapixel Speed ISP: The Snapdragon 865’s ISP operates at staggering speeds of up to 2 gigapixels per second and provides brand-new camera features and capabilities. You can capture in 4K HDR with over a billion shades of color, capture 8K video, or snap massive 200-megapixel photos. You can also take advantage of the gigapixel speeds to slow things down and capture every millisecond of detail with unlimited* high-definition slow-motion video capture at 960 fps. And now, for the first time ever on mobile, Dolby Vision video capture creates brilliant HDR footage that’s primed and ready for the big screen. In tandem with the 5th generation Qualcomm AI Engine, the gigapixel speed ISP can quickly and intelligently identify different backgrounds, people, and objects, so they can be treated individually for a truly customized photo
    • 5th Generation Qualcomm AI Engine: The new 5th generation Qualcomm AI Engine and new AI software tools pack incredible performance for the latest camera, audio, and gaming experiences. It delivers a whopping 15 TOPS of AI performance, which is 2x more powerful than its predecessor. At the heart of the Qualcomm AI Engine is a new and improved Qualcomm® HexagonTM Tensor Accelerator that has 4x the TOPS performance of the previous Tensor Accelerator while operating at 35% greater power efficiency. Then, there’s real-time translations using AI—your phone can translate your speech into a foreign language in both text and speech. In addition to the Qualcomm AI Engine, the all-new Qualcomm Sensing Hub enables your device to be contextually aware of its surroundings– using extremely low power. Highly accurate voice detection ensures your requests are heard loud and clear by your favorite voice assistant, while enhanced always-on sensors and intelligent sound recognition brings contextual AI to the next level. An updated Qualcomm® Neural Processing SDK, Hexagon NN Direct and Qualcomm® AI Model Enhancer tools gives developers ultimate freedom and flexibility to create faster and smarter apps.
    • Desktop-quality Gaming: Snapdragon 865 unlocks brand new and first-to-mobile premium features to deliver ultra-smooth gaming experiences with the highest graphics quality in the next generation of Snapdragon Elite Gaming. Snapdragon 865 is the first mobile platform on Android to support Desktop Forward Rendering allowing game developers to bring over desktop quality lighting and post processing effects creating a new level of realism for mobile games. With a first-to-mobile feature, Adreno Updateable GPU Drivers can be downloaded directly from an app store when made available by OEMs, which allows players to have control over their graphics driver updates and GPU settings for their top games to achieve premium performance. An upper echelon of display and visual fidelity for mobile HDR gaming is here with 144Hz display refresh rate available for the first time on mobile and Game Color Plus to enrich game image quality with enhanced details, boosted color saturation and local tone mapping. Game play is now optimized to the micro-second level with the Snapdragon Game Performance Engine, providing adaptive and predictive real-time system tuning for sustained performance over longer periods of time. The new Adreno 650 GPU offers new hardware embedded features like Adreno HDR Fast Blend to boost game scenes with heavy blending, often used in complex particle systems and rendering, to deliver up to 2x performance lift for certain operations.

    Devices based on Snapdragon 865 are expected to be commercially available in the first quarter of 2020. For more information, please visit [link]. Livestream replays will also be available Snapdragon Tech Summit Event Hub.

    Battery life and storage varies significantly based on device, settings, usage, and other factors.

    Articles: Digital Photography Review (dpreview.com)

  • Wildlife Photographer of the Year announces LUMIX People’s Choice Award finalists

    Wildlife Photographer of the Year LUMIX People’s Choice Award finalists

    Drawing over 48,000 entries from 100 countries, the Natural History Museum’s Wildlife Photographer of the Year awards is not only well-known, it’s also the world’s longest-running photography competition. Thanks to a partnership with LUMIX, the public can have their say in which shortlisted image should win. 25 photos have been selected by a panel of judges and anyone can vote for their favorite here.

    ‘The LUMIX People’s Choice images capture the essence of the competition; they all ignite a reaction about the natural world and make you see it differently. Showcasing breath-taking beauty, compassion and cruelty, it is impossible not to be moved by them – I think everyone who votes has a tough decision to make,’ said Tim Littlewood, the National History Museum’s Executive Director of Science and member of the judging panel.

    Those in close proximity to the Natural History Museum of London can view all 25 shortlisted images at the Wildlife Photographer of the Year exhibition. It will be open for viewing until voting closes on February 2nd. The entry that receives the most votes for the LUMIX People’s Choice Award will be on display until the exhibition concludes on May 31st. The winner plus four other top entries will be featured online at The Wildlife Photographer of the Year hub where they’ll be seen by millions of online visitors from all over the world.

    Wildlife Photographer of the Year is an annual event hosted by the Natural History Museum. Its goal is to shine a light on nature photography as an art form while challenging the viewer to question the plights facing animals and our planet. Entries for the 2020 competition are open until Thursday, December 12th. Photographers of all ages and skill levels are encouraged to submit their work.

    Shortlisted image: Matching outfits by Michel Zoghzoghi, Lebanon

    About the photo: Michel was in the Pantanal, Brazil photographing jaguars. One afternoon, as he was on the Três Irmãos River, a mother and her cub crossed right in front of his boat. He watched, mesmerized, as they left the water holding an anaconda with a very similar pattern to their own.

    Gear and specs: Canon EOS 1D X Mark II +500mm f4 lens; 1/1250 sec at f13 (-1e/v); ISO 1250.

    Shortlisted image: What a poser by Clement Mwangi, Kenya

    About the photo: In Kenya’s Maasai Mara National Reserve, Clement spent time observing this beautiful leopard as she soaked up the last warm rays of the setting sun. Clement is mindful to remember to take pleasure in life’s simple moments – being all too aware that sometimes, as a wildlife photographer, you can miss the exceptional while looking for the unusual.

    Gear and specs: Canon EOS 5D Mark III + Sigma 150-500mm lens; 1/320 sec at f6.3; ISO 1250.

    Shortlisted image: Inquisitive by Audun Rikardsen, Norway

    About the photo: From a hide on the coast of northern Norway, it took Audun three years of planning to capture this majestic bird of prey in its coastal environment. After some time, the golden eagle became curious of the camera and seemed to like being in the spotlight.

    Gear and specs: Canon 6D Mark II + Canon 8-15mm f4 lens; 1/640 sec at f18 (-1e/v); ISO 400, Canon 600II Flash; Siuri tripod head; motion sensor.

    Shortlisted image: Tender play by Steve Levi, USA

    About the photo: It was early March and Steve spotted this mother polar bear and her two cubs after 10 days of looking. They had recently left their birthing den in Wapusk National Park, Canada, to begin the long journey to the sea ice so their mother could feed. After a nap the cubs were in a playful mood.

    Gear and specs: Nikon D850 + 800mm f5.6 lens + 1.25x teleconverter at 1000mm; 1/1250 sec at f10; ISO 640.

    Shortlisted image: Family get-together by Michael Schober, Austria

    About the photo: Marmots have become accustomed to the presence of humans in Hohe Tauern National Park, Austria and allow people to observe and photograph them at close range. This behaviour is beneficial for the marmots, as human company deters predators such as golden eagles.

    Gear and specs: Nikon D4 + Nikon 17-35mm f2.8 lens; 640 sec; ISO 400.

    Shortlisted image: Training session by Stefan Christmann, Germany

    About the photo: When Stefan came across this penguin couple in Atka Bay, Antarctica, seemingly with an egg, he was surprised as it was too early in the season for egg-laying. Upon closer inspection he discovered the egg was a snowball! Perhaps the diligent couple were practicing egg transfer in preparation for when their real egg arrived. This is possibly the first time it has ever been witnessed and documented.

    Gear and specs: Nikon D810 + Nikon AF-S Nikkor 400mm f2.8 E FL ED VR lens; 1/1000 sec at f4.0; ISO 800.

    Shortlisted image: Beak to beak by Claudio Contreras Koob, Mexico

    About the photo: Ría Lagartos Biosphere Reserve in the state of Yucatán is home to Mexico’s largest flock of Caribbean flamingos. This chick is less than five days old – it will stay in its nest less than a week before it joins a crèche of other youngsters who wander around the colony searching for food.

    Gear and specs: Canon EOS 5D Mark II + Canon 300mm f2.8 Lens + Canon 2X Teleconverter II; 1/160 sec at f11; ISO 1600; Camo throwover blind.

    Shortlisted image: Teamwork by Jake Davis, USA

    About the photo: Jake was on a boat off the coast of Great Bear Rainforest, British Columbia, Canada where he watched humpback whales bubble-et feeding. Here the leader whale dives to locate the fish, once the fish are located, the rest of the pod swim in decreasing circles while blowing bubbles which create a net, trapping the fish.

    Gear and specs: Canon EOS 1D X Mark II + 100-400mm lens; 1/500 sec at f5.6; ISO 2500.

    Shortlisted image: A pulsing sea by David Doubilet, USA

    About the photo: A school of red tooth triggerfish form a cloud of silhouettes above a river of convict blennies flowing over the coral in Verde Island Passage, Philippines. The Passage, a strait that separates the islands of Luzon and Mindoro, is one of the most productive marine ecosystems in the world.

    Gear and specs: Nikon D3S with Nikon 17-35 mm f/28 lens in SEACAM Underwater housing. Sea & Sea YS 250 strobes at ½ power 1/50th sec f/10 at ISO 250.

    Shortlisted image: Station squabble by Sam Rowley, UK

    About the photo: Sam discovered the best way to photograph the mice inhabiting London’s Underground was to lie on the platform and wait. He only saw them fight over scraps of food dropped by passengers a few times, possibly because it is so abundant. This fight lasted a split second before one grabbed a crumb and they went their separate ways.

    Gear and specs: Nikon D500 + 105mm f2.8 lens; 1/125 sec at f2.8; ISO 1000.

    Shortlisted image: Ocean’s signature by Angel Fitor, Spain

    About the photo: Angel took this image in the waters off of Alicante, Spain. Immersed in a strong current, an otherwise slightly undulating salp chain twists and turning forming whimsical shapes. Salps move by contracting, which pumps water through their gelatinous bodies.

    Gear and specs: Nikon D800 + Sigma 20 mm f1.8 lens; 1/250 sec at f16; ISO 50; Nexus D800 housing; Two Retra strobe.

    Shortlisted image: Losing the fight by Aaron Gekoski, UK

    About the photo: Orangutans have been used in degrading performances at Safari World, Bangkok – and many other locations – for decades. The shows were temporarily stopped in 2004 due to international pressure, but today the shows continue – twice a day, every day – with hundreds of people paying to watch the orangutans box, dance, play the drums and more.

    Gear and specs: Canon 5D Mark II +100-400mm f4.5/5.6 lens; 1/100 sec at f5.6; ISO 800.

    Shortlisted image: The surrogate mother by Martin Buzora, Canada

    About the photo: Elias Mugambi is a ranger at Lewa Wildlife Conservancy in northern Kenya. He often spends weeks away from his family caring for orphaned black rhinos like Kitui here. The young rhinos are in the sanctuary as a result of poaching or because their mothers are blind and cannot care for them safely in the wild.

    Gear and specs: Nikon D4S + 85mm f1.4 lens; 1/5000 sec at f1.4; ISO 800.

    Shortlisted image: Captive by Marcus Westberg, Sweden

    About the photo: A giant panda sits in its cage in a breeding center in Shaanxi, China. With a growing wild population and no realistic plan of how to breed and raise pandas for rerelease into the wild rather than a life in captivity – not to mention lack of habitat being the largest barrier to the continued spread of the wild population – it is unclear how such centers will benefit the species.

    Gear and specs: Canon 1D X Mark II + 16-35mm f2.8L III lens at 20mm; 1/60 sec at f28; ISO 2500.

    Articles: Digital Photography Review (dpreview.com)

  • The 6 Top Photoshop Tools for Still Life Photography

    The post The 6 Top Photoshop Tools for Still Life Photography appeared first on Digital Photography School. It was authored by Darina Kopcok.

    top-photoshop-tools-for-still-life-photography

    Even if you do most of your editing in Lightroom, you’ll still find that you need Photoshop to really finesse your photos. Because it’s a pixel editor, Photoshop offers you more retouching tools and gives you further control than you can obtain from Lightroom.

    In still life photography, like food and product, every aspect of your image needs to hold up to scrutiny for maximum impact. It needs to look clean and perfect.

    There are certain tools in Photoshop that will help you tweak the best out of your images.

    Although this article won’t go in-depth for every single tool – you’d need several articles for that – it will get you up and running in applying some basic treatments to your still life photography.

    So without further ado, here are the most useful Photoshop tools for still life photography.

    Photoshop for still life photography

    1. Spot Healing Tool

    The Spot Healing tool is one Photoshop tool that you’ll use on every still life image you retouch in Photoshop. This tool has improved greatly over the years.

    Similar to the Healing Brush tool, it samples pixels from the surrounding areas to correct blemishes and imperfections. However, unlike the Healing Brush, it automatically samples the pixels without your having to specify where they should come from.

    Why is this so great? Because the Spot Healing brush does this way better than it used to. This means you can remove dust and small marks very quickly.

    If you’ve ever tried the Spot Removal tool in Lightroom, you’ll know that clicking on it repeatedly will quickly slow down Lightroom’s performance. Photoshop will give you better results, more quickly.

    When you’re dealing with still life photography, remember that you want a clean-looking image. Zooming in on your photo at 100% and cleaning up any dust or blemishes will make a big difference in the overall aesthetic.

    To use the Spot Healing tool, select it from the tool menu or hit J.

    Zoom into your image and simply click on the blemish you wish to correct. It will automatically sample from an appropriate area and apply the pixels.

    You can also clean up a larger area by brushing over it.

    One thing to note is that if you use it repeatedly in a small area, the pixels can start looking unnatural and plastic-like.

    The 6 Top Photoshop Tools for Still Life Photography

    2. Patch Tool

    The Patch tool is another Photoshop tool for still life photography that you’ll most likely use on the majority of your images.

    It works great on small areas by creating a selection and replacing the pixels with other pixels of your choosing. It considers lighting, shade and texture when sampling an area.

    The 6 Top Photoshop Tools for Still Life Photography

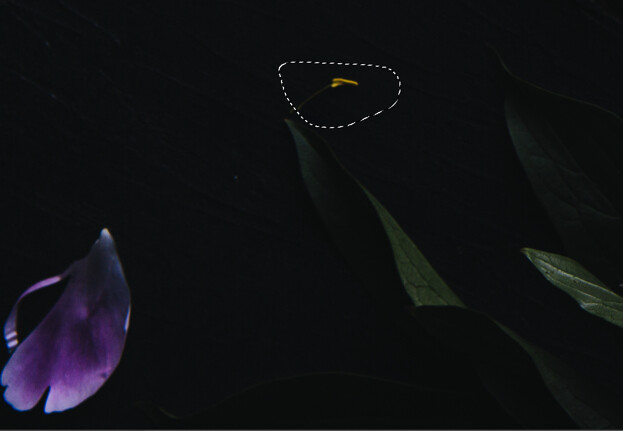
    In the image below, I wanted to get rid of the yellow filament from my flower because I found it distracting.

    There are many ways to do this in Photoshop, but I find the patch tool quick and seamless for this type of correction.

    To use the tool, select it from the toolbar.

    Draw a selection around the area that you wish to correct.

    The 6 Top Photoshop Tools for Still Life Photography

    Click on your mouse and drag the selection to an area that you would like to replace the selected pixels with. Let go of the cursor.

    Press Command D to undo the selection.

    To have greater control over the final result, make sure you have Content-Aware selected in the tool menu and play with the Structure and Color to further influence the edges.

    Photoshop Tools for Still Life Photography

    The 6 Top Photoshop Tools for Still Life Photography

    3. Content-Aware Fill

    Content-Aware Fill is sort of like the Patch tool on steroids.

    It was first introduced in CS5 as a fill option in the Fill Dialog box. In 2019, Adobe improved this tool by leaps and bounds.

    Content-Aware analyzes the pixels from a chosen area to determine what pixels it should use to remove unwanted objects. With the improvement, it allows you to choose exactly where you want it to sample the pixels from. It gives you so much more control and also allows you to rotate, scale or resize your selection, and preview the results.

    To use Content-Aware Fill, draw a selection around the area you would like to correct. The Lasso tool makes a nice, versatile tool, but I often use the Rectangular or Elliptical Marquee tools.

    Go to Edit and choosing Content-Aware Fill from the dropdown menu.

    Photoshop tools for still life photography

    This opens up the Content-Aware task space.

    Photoshop tools for still life photography

    On the right-hand side of the task space, you’ll see a Preview area that will show you how the changes are affecting your image.

    If required, resize the sampling area with the Sampling Brush Tool.

    You can find the tools for Content-Aware Fill in the left-hand corner of the workspace. The Brush tool is the first one on the top and the one you’ll most often use.

    The 6 Top Photoshop Tools for Still Life Photography

    You’ll also notice on the right-hand side of the workspace that you can make adjustments to the opacity.

    The 6 Top Photoshop Tools for Still Life Photography

    Save your changes as a Duplicate Layer.

    I often use Content-Aware Fill to even-out my still life photography backgrounds, which tend to look less even in color and texture as I would like.

    In this image of a salad, I wanted to even-out the left-hand corner of the image, which was looking too dark, despite my removing vignetting. I used the Rectangular Marquee tool to select the part that I wanted to change and brushed out the parts of the image I didn’t want sampled from.

    The 6 Top Photoshop Tools for Still Life Photography

    I played around with the opacity until I got something that looked good, which in this case was 66%.

    4. Clone Stamp Tool

    Can anyone live without the Clone Stamp tool?

    No matter what kind of photography you do, you probably use the Clone Stamp tool a lot. Great retouching is largely about cleaning up the little things, which all come together for a powerful, transformative effect. Clone Stamp is one of the crucial Photoshop tools for still life photography.

    The Clone Stamp tool allows you to copy pixels to a different part of the image to another. It’s great on areas where you have texture and pattern, or an edge. However, with this tool there is no real blending, so you often have to use it with other tools to get a more seamless-looking result.

    Note that if you work with the Clone Stamp tool on its own layer, you can use it with other tools such as Free Transform to make further adjustments to the cloned areas.

    Photoshop Tools for Still Life Photography

    In the image above, I used a surface that was textured and knotty, but I wanted it to look smoother. I did this (achieving the image on the right) by cloning smoother areas over the bumpy areas.

    To utilize the Clone Stamp tool, select it from the toolbar by hitting S for the shortcut, or hit Cmd/Ctrl+S 

    Photoshop for still life photography

    Select the area that you wish to paint the pixels from by choosing Opt/Alt. The selection point will be indicted by the crosshairs.

    Paint with your cursor over the area you want to correct while making sure the crosshairs don’t pick up any pixels you don’t want.

    Photoshop tolls for still life photography

    5. Transform

    Transform is another of the useful Photoshop tools for still life photography because it allows you to make changes and adjustments to objects in your image, like straightening and shaping.

    For example, I decided to make a change to the olive oil bottle in the image below. I wanted to adjust the direction the handle was facing and to make the bottle appear larger in scale. I did this easily and quickly with Transform.

    The 6 Top Photoshop Tools for Still Life Photography

    Start with your background layer or your top layer. Use the appropriate tool to make a selection. In this case, I used the Lasso tool but I could have also used the Quick Selection tool.

    photoshop tools for still life photography

    Copy the selection onto another layer by hitting Ctrl/Cmd+J.

    The 6 Top Photoshop Tools for Still Life Photography

    Then hit Ctrl/Cmd+T to bring up Transform, or go to Edit and choose Transform from the Menu.

    Make the adjustment by manually rotating or expanding the Transform box by clicking on the white points/squares.

    photoshop tools for still life photography

    Hit Enter to accept the adjustment.

    Always make sure to constrain proportions when necessary.

    6. Focus Stacking

    If you’re shooting a product, you’ll usually need your subject to be sharp throughout. This means using a high F-stop number like F/13 or F/16. However, this requires a lot of power if you’re using flash.

    You can also get lens diffraction at these higher numbers, which will degrade the quality of your photo.

    The answer to shooting with a wider aperture and still getting a sharp image is to focus stack in Photoshop.

    This is when you take two or three images with different focus points and blend them together to create one image file that is sharply in focus throughout. It’s a quick process and isn’t anywhere near as complicated as it sounds.

    To utilize focus stacking, make sure your images have the same exposure and alignment.

    Export PSD files into a folder or onto your desktop where you can easily navigate to them. 

    Follow these steps:

    • Open Photoshop.
    • Go to File and choose Scripts.
    • Select Load Files into Stack.
    • Click Browse and select all the images from where you saved them initially.
    • Check the Box for Attempt to Automatically Align Source Images.
    • Click OK. Each of the images will open as a new layer in Photoshop.
    • Hold down Shift and click on the top layer in the Layers panel to highlight all the layers.
    • Under Edit, select Auto Blend-Layers.
    • Check the box for Stack Images and also for Seamless Tones and Colors. DO NOT check ‘Content-Aware.’ Click OK.
    • Save the final image.

    If you have uploaded a lot of images, flatten the final image by selecting Layer -> Flatten Image -> Save.

    photoshop tools for still life photography

    Three images focus-stacked in Photoshop

    Conclusion

    Photoshop is a powerhouse of a program and there are many tools that can help you retouch your photography. The tools mentioned here are my top Photoshop tools for still life photography. They are easy to learn and utilize, and will quickly take your images to the next level.

    Do you have any other Photoshop tools for still life photography that you’d like to share? Do so in the comments section!

    The post The 6 Top Photoshop Tools for Still Life Photography appeared first on Digital Photography School. It was authored by Darina Kopcok.


    Digital Photography School