Blog

  • 3D Four Letter Words: Robert Indiana’s LOVE Sculptures

    [ By Steve in Art & Sculpture & Craft. ]

    LOVE-sculpture-0
    Looking for love in all the right places? Replicas of artist Robert Indiana’s iconic Pop Art “LOVE” sculpture have spread to the 4 corners of the globe.

    LOVE-sculpture-1d

    LOVE-sculpture-1b

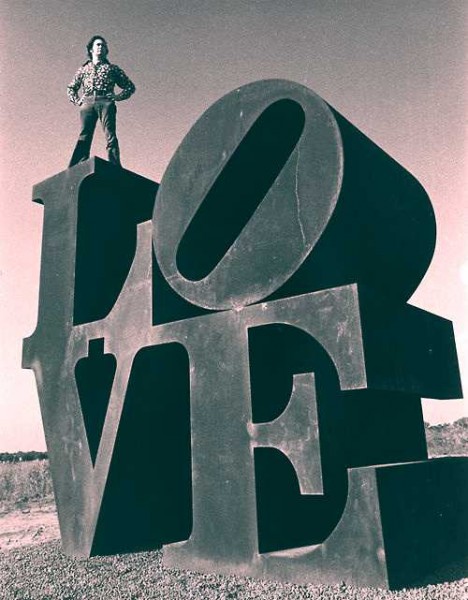
    Robert Indiana (formerly Robert Clark) first expressed the essential iconography of “LOVE” in 1958 but it wasn’t until 1964 that the image garnered wide public notice, via a Christmas card commissioned by the Metropolitan Museum of Art. One of the first three-dimensional LOVE sculptures has stood, since 1970, in front of the Indianapolis Museum of Art.


    LOVE-sculpture-1c

    LOVE-sculpture-1a

    Like many metal artworks designed to stand out in the open, the IMA’s LOVE sculpture is made from Cor-ten steel, an alloy that weathers to a rich, slightly iridescent, purplish-brown patina after years of seasonal changes. The sculpture measures 12′ x 12′ x 6′ and has recently undergone a structural and aesthetic restoration.

    I LOVE New York
    LOVE-sculpture-2c

    LOVE-sculpture-2a

    LOVE-sculpture-2b

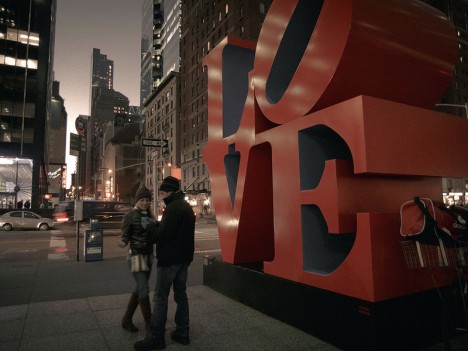
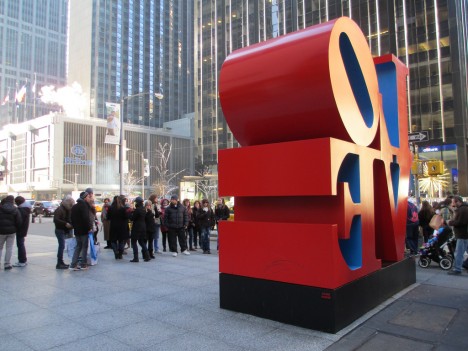
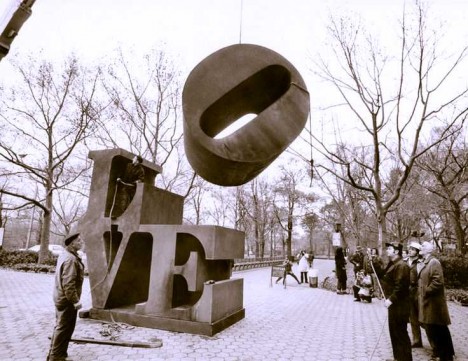
    There are currently around 50 LOVE sculptures installed in public and private spaces worldwide. Some are better-known than others, mainly due to their proximity to pedestrian traffic. One of the first NYC LOVE sculptures was installed at 59th Street and 5th Avenue in 1971, while perhaps the most prominent NYC LOVE sculpture stands at the corner of 6th Avenue and 55th Street in Manhattan. Kudos to Flickr users Chee917 and Robert Wright (wrightrkuk), who snapped the sculpture in 2012.

    LOVE Is Blue
    Vancouver LOVE sculpture

    LOVE-sculpture-3b

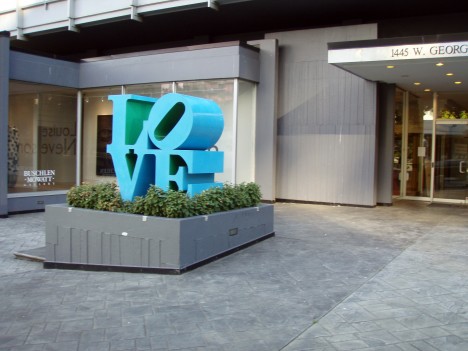
    Most of the world’s LOVE sculptures have red painted facades with blue or blue & green sides to match Indiana’s original MOMA card and popular USPS stamp. This isn’t a must, however, as Indiana famously neglected to properly copyright the work. This bright blue representation outside 1445 West Georgia Street in Vancouver, Canada (later moved) shares its blue & green color scheme with another LOVE sculpture located at the Park Mall in Singapore.

    Reflections of LOVE
    LOVE-sculpture-4

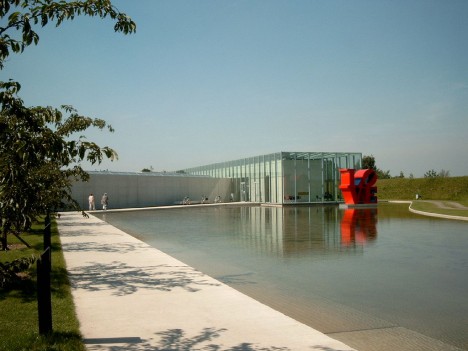
    Photographer Wassily from nl brings us the striking scene above. Featuring a large LOVE sculpture set into the reflecting pool outside the Langen Foundation’s main building in Neuss-Holzheim, Germany, the photo dates from 2005 shortly after the building opened.

    Next Page – Click Below to Read More:
    3d Four Letter Words Robert Indianas Love Sculptures

    Share on Facebook


    [ By Steve in Art & Sculpture & Craft. ]

    [ WebUrbanist | Archives | Galleries | Privacy | TOS ]

    WebUrbanist

  • Why is Monitor Calibration Important and How to do it

    Why you need to calibrate your monitor

    If there one thing that’s certain about photos on the internet, it’s that nobody is seeing exactly the same thing as you. In general, most screens are too bright, and have whatever default color the monitor happens to ship with. Some are great, others not so much. As the monitor gets older, these colors change too. It’s more of an issue with older bulb light monitors, and less so with LED, but still these colors change over time.

    There’s also the matter of print matching. If you’ve ever printed (you’re missing out if you haven’t), and been dissatisfied with the print, it could be that your screen is fooling you when you’re editing.

    There is a way to get your screen to a known standard, and doing this means that you know you have good representative color and brightness on your screen, and that you’ve made a step toward better prints. This is screen or monitor calibration.

    Calibrating your screen 01

    What is monitor calibration?

    To calibrate your screen, you need a puck-like device that sits on your screen, and measures the color being displayed. This is called a spectrophotometer. It’s just a name for what it does: photo = light, spectro = from spectrum meaning a range of colors, and meter = to measure. So it measures the light color. Don’t worry, you don’t need to buy one of these specifically, and match software to it, they come as kits, with the required software bundled with it.

    What do you need to do it?

    Some examples of the screen calibration kits include the X-Rite i1 Display Pro (which is what I have), the Spyder Pro, and the Color Munki. The process for each is similar and pretty straightforward. First you install the software, and run it. Next you attach the device. Initially you have to decide the settings, but the correct ones are usually suggested. Usually these are 120cd/m2 or less in brightness, D65 or Native for Illuminant and 2.2 for Gamma. At the start you may need to set the monitor brightness and contrast via the monitors own menu. Finally you just let the software run and it will create a profile automatically at the end. One thing that’s critical is that you need to have your monitor on for a while before starting the calibration. It takes up to 30 minutes for the monitor to settle.

    How do you do monitor calibration?

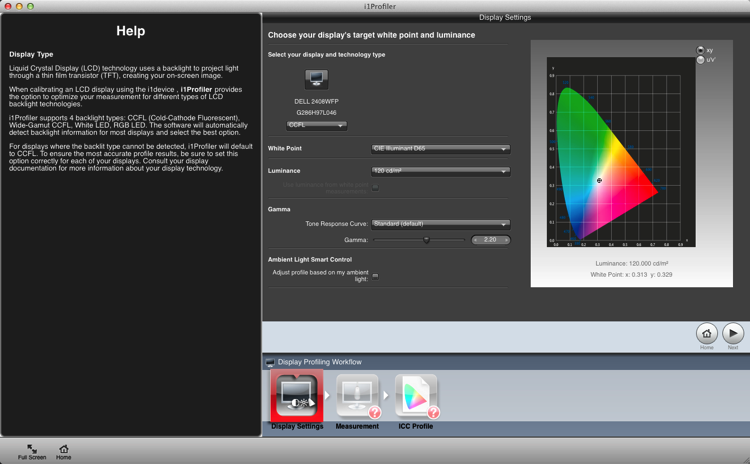
    Let’s look at this using the software supplied with the i1DisplayPro, i1 Profiler. Here’s the screen you see at the start (after registering the product).

    Calibrating your screen 02

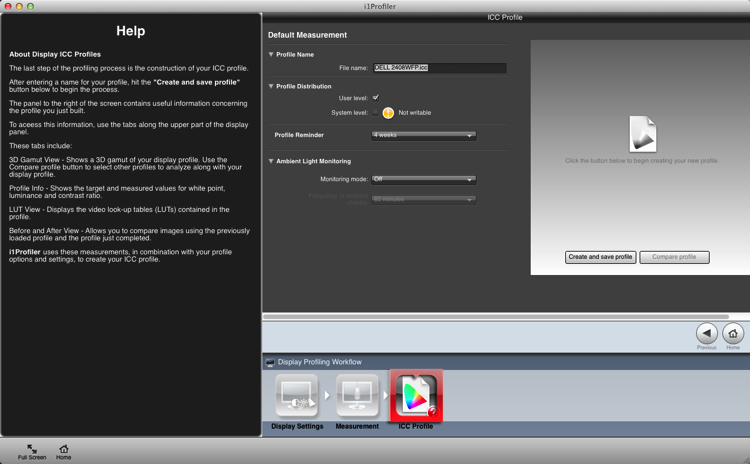
    Click on Display Profiling to begin. The software detects your screen type automatically and applies recommended defaults for the screen. Press Next (below).

    Calibrating your screen 03

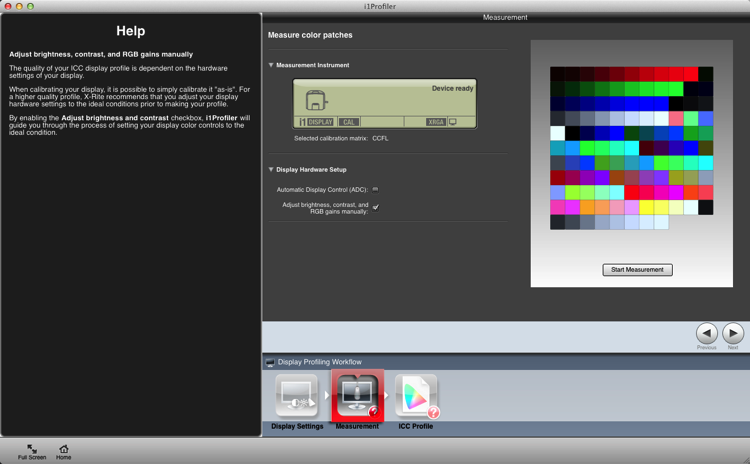
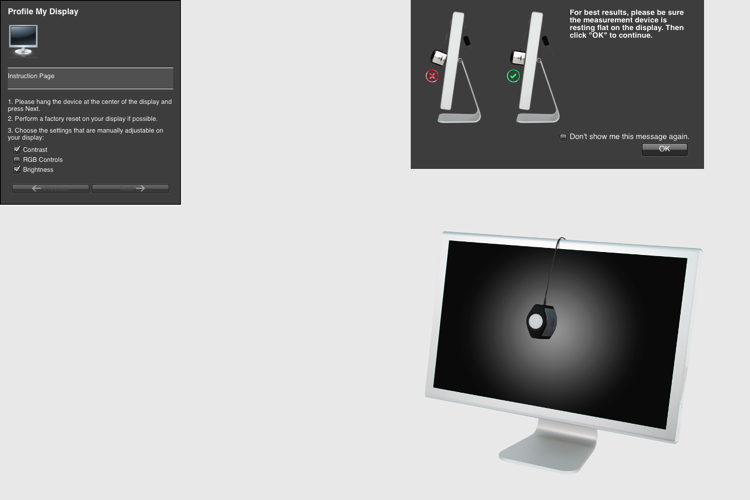
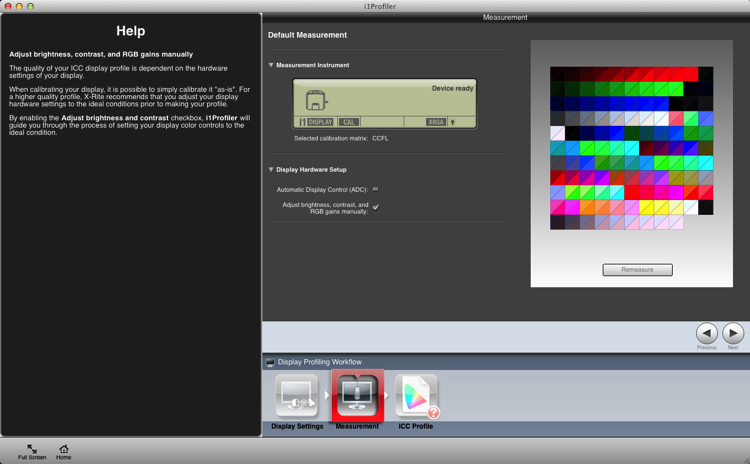
    You’re on to the Measurement screen now (below). Choose the manual option for the screen brightness and contrast. The color tiles you see on the right are the colors that will flash on the screen as the calibration runs. Click the Next button to begin.

    Calibrating your screen 04

    The next figure below, is a cropped version of the screen you will see. Place the device on the screen as instructed. Press ‘Ok’ to continue.

    Calibrating your screen puck position

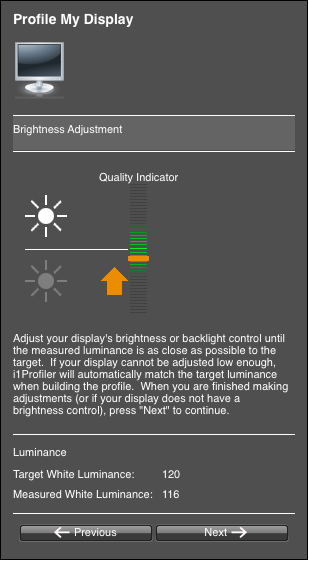
    Use the controls on you monitor to get the correct brightness settings (see below) for the profile. Click Next when it’s correct. The screen will cycle through the series of colors seen as tiles back further. As each tile displays, the entire screen changes to that color. This takes about two minutes.

    Calibrating your screen 06

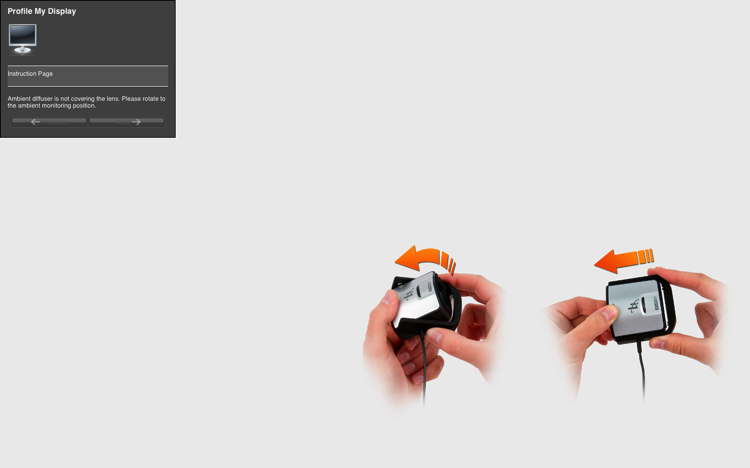
    Take the device off and set it for ambient light, even if you don’t use this function.

    Calibrating your screen 07

    The tiles now show a before and after view of the color changes from the profile. Click next.

    Calibrating your screen 08

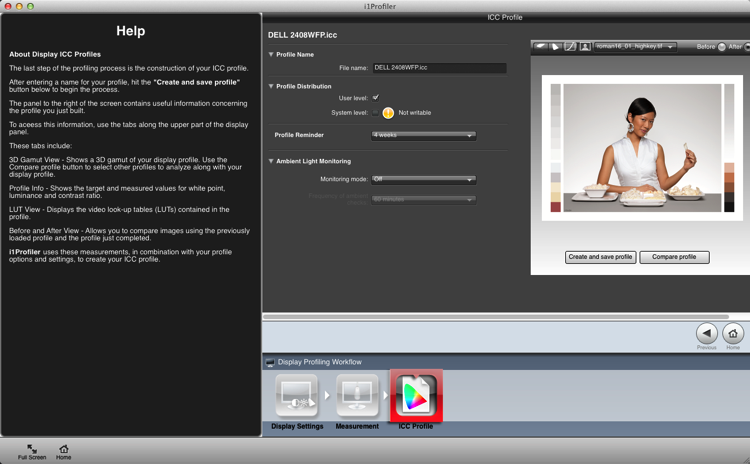
    Click Create and Save Profile to make a new monitor profile.

    Calibrating your screen 09

    Once the profile is made, you can do a comparison using the test charts in the screen.

    Calibrating your screen 10

    Summary and questions

    That’s it. You’re done. Lightroom, Photoshop and color managed browsers like Safari will use this profile when you view images, allowing you to edit and process images with the best color rendition. Ideally you should do this calibration no less than once a month for best color. You’ve also taken your first steps into color management without knowing it; probably the most important.

    Do you have any questions about this process? Have you tried it? Had any difficulties? If you use a similar device which one, and have you had good success with it? Please share in the comments below.

    googletag.cmd.push(function() {
    tablet_slots.push( googletag.defineSlot( “/1005424/_dPSv4_tab-all-article-bottom_(300×250)”, [300, 250], “pb-ad-78623” ).addService( googletag.pubads() ) ); } );

    googletag.cmd.push(function() {
    mobile_slots.push( googletag.defineSlot( “/1005424/_dPSv4_mob-all-article-bottom_(300×250)”, [300, 250], “pb-ad-78158” ).addService( googletag.pubads() ) ); } );

    The post Why is Monitor Calibration Important and How to do it by Sean McCormack appeared first on Digital Photography School.


    Digital Photography School

  • Rugged Landscapes: 3D Art Carpets Transform Indoor Environments

    [ By WebUrbanist in Design & Furniture & Decor. ]

    3d carpet art

    Inspired by natural landscapes and crafted with carpet factory remnants, these labor-intensive creations are as much terrains as textiles.

    3d room rug

    Alexandra Kehayoglou is an artist from Argentina who uses leftover scraps from the family business, a carpet factory in Buenos Aires, to build her wool room-wrapping creations.

    3d landscape carpet

    3d island design

    3d landscape tufted

    Her use of materials mimics natural textures of natural moss, water, trees and ice, providing the functions of a traditional rug with a layer of artistic flair via memory-evoking scenery, often on creations that wrap vertically to become tapestries.

    3d chair flowing

    3d rug factory

    3d creation proces

    The source material, she says, are the landscapes of her homeland, from grasslands to deserts, lakes to glaciers. They are richly-textured when on the floor, but gain additional dimensions as they wrap up walls or onto furniture, becoming more than just a horizontal surface.

    Share on Facebook


    [ By WebUrbanist in Design & Furniture & Decor. ]

    [ WebUrbanist | Archives | Galleries | Privacy | TOS ]


    WebUrbanist

  • Weekly Photography Challenge – Time

    Time – it just keeps on ticking and there’s nothing we can do about it.

    Except maybe try and capture the concept of time in an image – like these images I shared earlier.

    Niko Knigge

    By Niko Knigge

    The hands of time can be taken quite literally, as in the image above – or more figuratively such as the images below:

    ?? ?????

    By ?? ?????

    Jason Mrachina

    By Jason Mrachina

    Basheer Tome

    By Basheer Tome

    Weekly Photography Challenge – Time

    As always we have a weekly challenge and this week it all about time. Finding time, time warp, hands of time – however you want to interpret it is up to you. Take it literally and photograph a time piece like an interesting watch or clock, or perhaps a sundial like above. Or get more out there and think about time as in long exposures, star trails, car light trails, a moment frozen in time, etc.

    Corie Howell

    By Corie Howell

    Tom Roeleveld

    By Tom Roeleveld

    Luc Mercelis

    By Luc Mercelis

    ?ethan

    By ?ethan

    KHAIRIL FAIZI

    By KHAIRIL FAIZI

    Share your images below:

    Simply upload your shot into the comment field (look for the little camera icon in the Disqus comments section) and they’ll get embedded for us all to see or if you’d prefer upload them to your favourite photo sharing site and leave the link to them. Show me your best images in this week’s challenge. Sometimes it takes a while for an image to appear so be patient and try not to post the same image twice.

    googletag.cmd.push(function() {
    tablet_slots.push( googletag.defineSlot( “/1005424/_dPSv4_tab-all-article-bottom_(300×250)”, [300, 250], “pb-ad-78623” ).addService( googletag.pubads() ) ); } );

    googletag.cmd.push(function() {
    mobile_slots.push( googletag.defineSlot( “/1005424/_dPSv4_mob-all-article-bottom_(300×250)”, [300, 250], “pb-ad-78158” ).addService( googletag.pubads() ) ); } );

    The post Weekly Photography Challenge – Time by Darlene Hildebrandt appeared first on Digital Photography School.


    Digital Photography School

  • Review : WD MyCloud Mirror Personal Cloud Storage

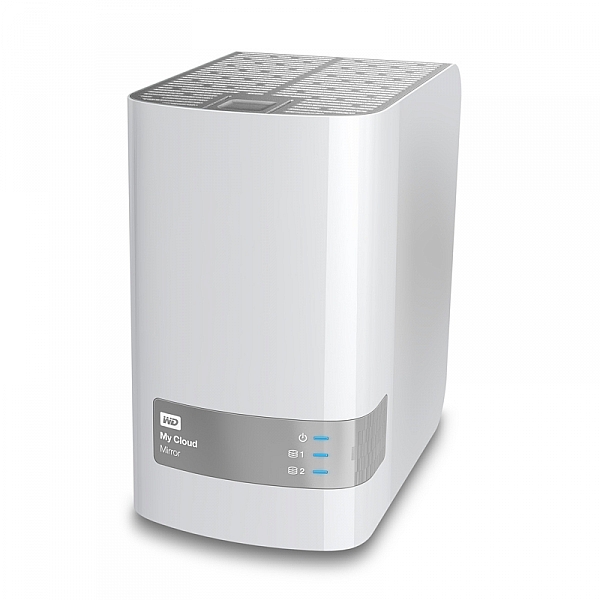
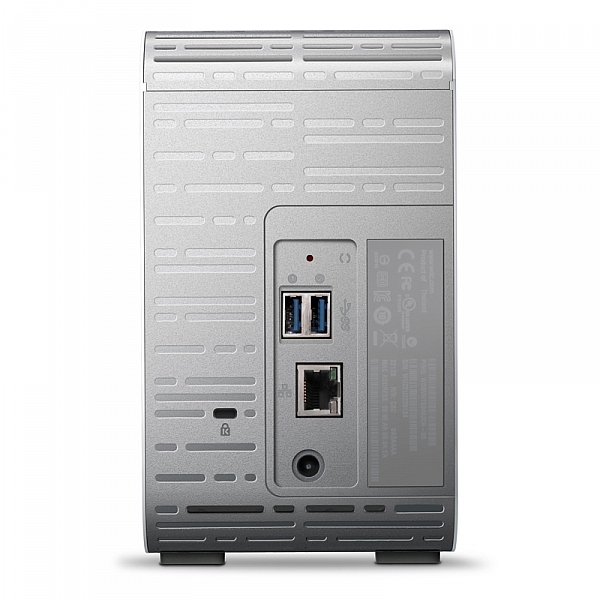
    Some would argue that, these days, it’s just as important to backup our mobile (camera) devices for the very reason we backup our regular digital photographs. Here’s my take on doing just that with my review of the My Cloud Mirror.

    wdfMyCloud_Mirror (1)

    MyCloud Mirror Personal Cloud Storage on Amazon

    Even though I have my camera with me most of the time, I still have my iPhone (or your Android or Windows thing or heck, even your Blackberry) with me about 99.8% of the time. That’s maybe more than most people as my 9 to 5 is social media and photography, so I tend to have the phone near, and as a result, I take a lot of photographs with the thing.

    It’s the iPhone 6 Plus, it has a half decent camera and as a result I take a lot of photos, videos, time lapse sequences, slow motion videos, etc. The bottom line is, I use it to create a LOT of content, and I know a lot of you guys do too. The theme with my other storage and backup related articles here on dPS has been “don’t lose stuff when you don’t need to!” and really, the same goes for your phone. You use it to create memories, even if you can’t print those memories out at A1 size (23.4 x 33.1″), they are still moments that you might like to remember. (Or they’re just photographs of every coffee you’ve ever had and really, you should just stop that!*)

    wdfMyCloud_Mirror

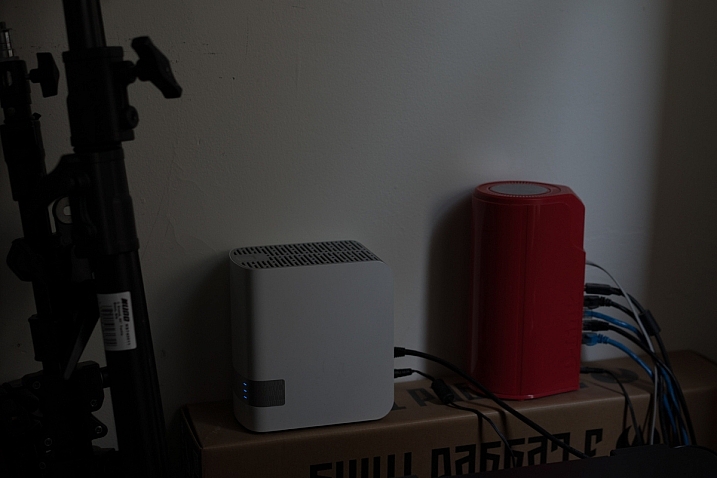
    As ever, without slapping down a whole page of technical jargon that you really don’t understand, I shall explain the WD MyCloud Mirror in the easiest way I can. You unbox it, plug it into power and to your network, (Cat5 cable between your MyCloud and your internet modem / router) follow the configuration instructions, and within minutes (unless you really are very very bad at things with buttons and knobs) you will have a storage drive that is both connected to your computer on your home network / wireless, and you will have a storage “cloud” that is available to you on your phone (apps available in Google Play and iTunes app store) and via any internet connected browser.

    Maybe the skeptic in you is saying, “but I still have to remember to actually backup my phone!” Actually, and you knew I’d say that, it does it automatically (make sure your app settings are right) so you can shoot on your phone, and have your photos automatically transferred to your MyCloud Mirror (you control if it does it all the time or only when you’re connected via Wifi to avoid crazy mobile data bills).

    Simon_Pollock_WD_MyCloud_Review

    My ultimate test of the WD MyCloud Mirror was on a recent trip to Fiji for a photography workshop. I was using a Fijian sim card in my iPhone and had wifi at random hours of the day. I set the MyCloud app to upload my iPhone content when on Wifi, and that’s exactly what it did – seamlessly! My wife could navigate to a website back in Melbourne and see what I’d photographed on my phone, and show my boys where I was – it was great. Now, you can do that using a camera, card reader, and a laptop with wifi (or a hundred other ways) but for those moments that I simply whipped out my phone and snapped a memory, they were preserved and immediately available for others to see (or to not see, depending on your security settings, obviously).

    Some specs for you to wrap your head around

    • Keep your content in one, double-safe place
    • Get abundant, dual-drive storage with access from anywhere
    • Save everything with twice the protection using Mirror Mode (RAID 1-default)
    • Easily transfer to and from Dropbox™ and other cloud accounts

    You can use the MyCloud Mirror with the following

    • Windows® 8.1 or earlier, Windows 7, Windows Vista® or Windows XP (32 bit) SP 3 operating systems
    • Mac® OS® X Mavericks, Mountain Lion™, Lion™ or Snow Leopard® operating systems
    • DLNA®/UPnP® devices for streaming
    • Router with Internet connection

    Supported browsers:

    • Internet Explorer® 8 or higher
    • Safari® 6 or higher
    • Firefox® 21 or higher
    • Google Chrome™ 27 or later on supported Windows and Mac OS platforms

    What’s that about a mirror?

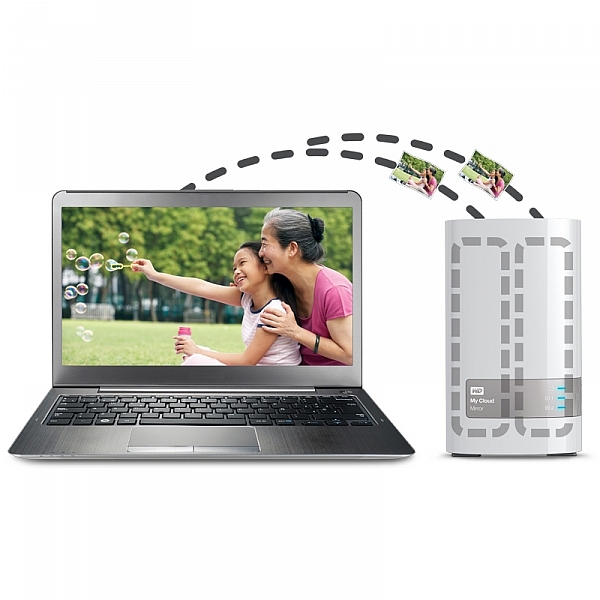
    You may also have picked up on the word mirror in the name of the MyCloud, it does indeed have two disks in it and it mirrors your data. While you’re backing it up from your phone, you’re also making a redundant copy of it onto the second drive, so if disk number #1 should fail, disk #2 will still have all of your duck-faced selfies (be honest, who doesn’t love a duck-faced selfie). Here’s a picture of that happening, just perchance I’ve confused you with my techno-babble.

    wdfMyCloud_Mirror (3)

    In summary, I totally love the WD MyCloud Mirror (I have the 4/2 (mirrored) TB version). I can’t recommend it enough for those of you that are half serious about your phone photography, or even just half serious about storage and content access while you’re anywhere with an internet connection.

    The WD MyCloud Mirror has been online for three months to test its reliability. It’s been online, and available all of that time, without a hiccup. I was sent the unit for test and review purposes, and will always give an unbiased opinion of a product. I award the MyCloud Mirror Five stars for simplicity in setup and usage, as well as (three months) constant reliability.

    *there’s a good chance that sentence was about, and directed at me :) 

    googletag.cmd.push(function() {
    tablet_slots.push( googletag.defineSlot( “/1005424/_dPSv4_tab-all-article-bottom_(300×250)”, [300, 250], “pb-ad-78623” ).addService( googletag.pubads() ) ); } );

    googletag.cmd.push(function() {
    mobile_slots.push( googletag.defineSlot( “/1005424/_dPSv4_mob-all-article-bottom_(300×250)”, [300, 250], “pb-ad-78158” ).addService( googletag.pubads() ) ); } );

    The post Review : WD MyCloud Mirror Personal Cloud Storage by Sime appeared first on Digital Photography School.


    Digital Photography School

  • 4 Tips for More Dramatic Beach Photos

    For some of us, the beach is a way of life. Whether it’s barefoot strolls at sunset, surfing in the big waves, or simply relaxing in the sun, the beach can be a magical place that is food for the soul.

    Capturing it in a photograph though, can be a completely different story!

    Suddenly you notice things that weren’t so apparent before you took your camera out: super bright harsh light, and photos that look boring and that don’t convey the feelings you experienced when you were at the beach.

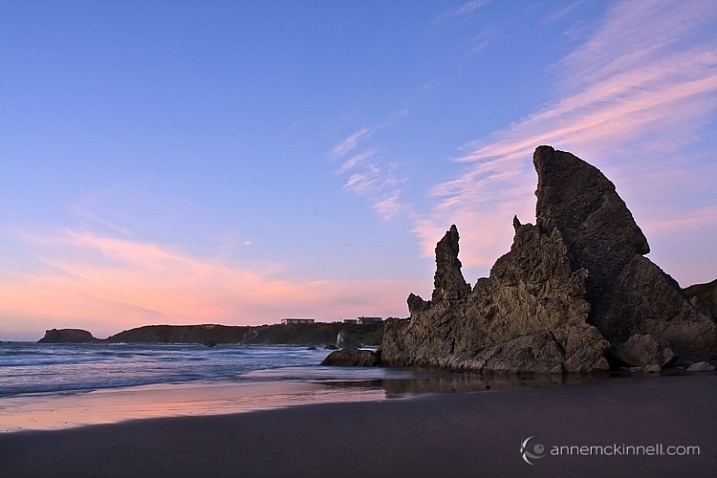
    Bandon Beach, Oregon by Anne McKinnell

    These tips will help you make the most of your time photographing at the beach, and ensure you come home with photos that are just as dramatic and memorable as your fun day in the sun.

    1. Photograph during the Golden Hour

    The middle of the afternoon, when the sun is high in the sky and the light is bright, is a great time for swimming and sunbathing, but not such a great time for photography. Just like other types of landscape photography, beach photography is all about the quality of the light.

    At the edges of day, when the sun is low in the sky, you’ll find more gentle golden light that will make your photos glow. Sometimes you can photograph during the day too, but only when there are big puffy clouds in the sky that diffuse the light and create drama. If you have a big bright blue sky, it’s better to enjoy the afternoon swimming and visiting with friends, and save the photography for later.

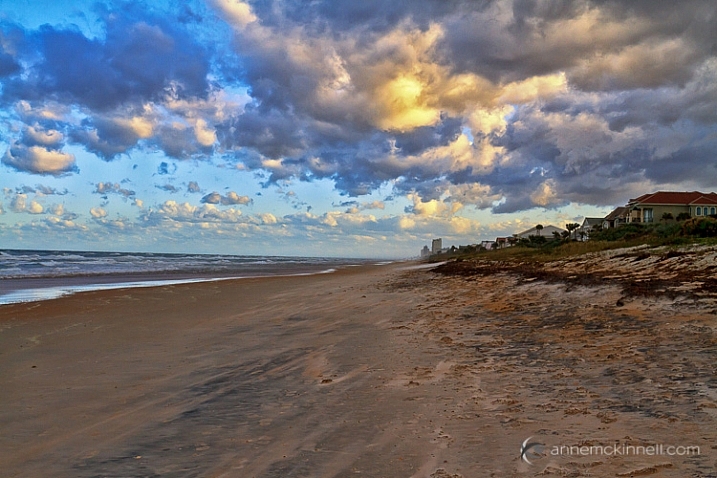
    Ormond Beach, Florida by Anne McKinnell

    2. Use a Graduated Neutral Density Filter

    Even at the edges of the day, the sky is usually quite a bit brighter than the sand or rocks in the foreground of frame, which makes it difficult for your camera to get a good exposure, without blowing out the highlights and creating dark shadows.

    Try to even out the exposure by using a graduated neutral density filter which is kind of like sunglasses for your camera. It’s a piece of plastic or glass that is dark on the top, and light on the bottom, and you use it to darken the just the sky portion of your image.

    3. Use foreground elements to create an interesting composition

    The beach always looks inviting when we’re just about to step onto the soft sand with our bare feet. But when you photograph it just as you see it, it can end up looking boring.

    Try using a foreground element in your composition to add interest to the scene. Is there something unique about your particular beach? Perhaps it has colourful rocks, big boulders, driftwood, or seashells. Try incorporating the unique element into the foreground of your image, to make your photograph more interesting.

    Rebecca Spit, British Columbia by Anne McKinnell

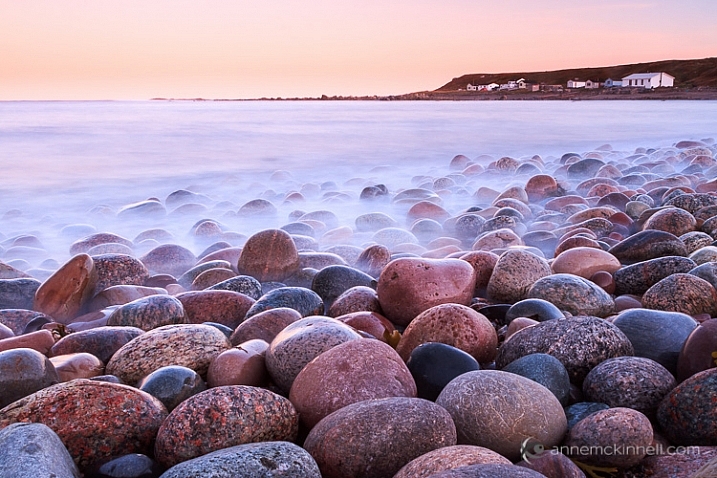
    You can also use a low angle and get really close to your unique element to emphasize it. If you have big colourful rocks, getting down low, and angling your camera upwards, will make them seem even larger. Whereas if you photograph them from eye level they may not look nearly as dramatic as you remember them being.

    Gros Morne National Park, Newfoundland by Anne McKinnell

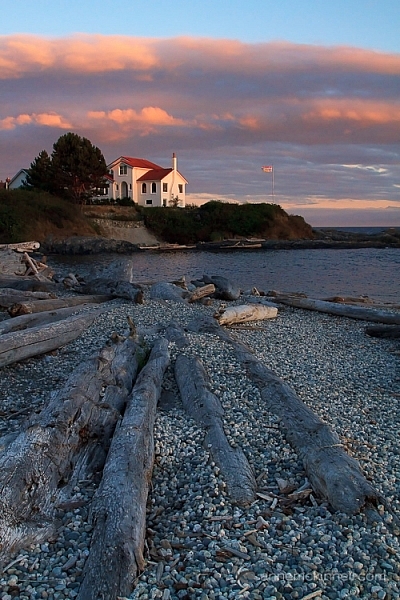
    Look around and see what you can use for leading lines that will guide the eye out to the sunset, or towards an important feature in the frame, like sea stacks, or a house in the distance.

    Ross Bay, British Columbia by Anne McKinnell

    4. Sunbursts and silhouettes

    Try some new techniques to create dramatic images. If you are looking towards the sun, you can create a sunburst by including the sun in your frame and using a small aperture like f/22. It also helps if you can partially hide the sun behind an object.

    If you have an interesting foreground element with a strong shape, use it to create a silhouette. To do this, use spot metering and expose for the sky, allowing your foreground element to go completely black.

    You can even do the silhouette and sunburst together for even more drama!

    Canon Beach, Oregon by Anne McKinnell

    Next time you go to the beach remember these tips to help you come home with photos that are just as much fun as you had playing in the surf.

    Do you have any other beach photography tips, or some favorite beach photos? Please share in the comments below.

    googletag.cmd.push(function() {
    tablet_slots.push( googletag.defineSlot( “/1005424/_dPSv4_tab-all-article-bottom_(300×250)”, [300, 250], “pb-ad-78623” ).addService( googletag.pubads() ) ); } );

    googletag.cmd.push(function() {
    mobile_slots.push( googletag.defineSlot( “/1005424/_dPSv4_mob-all-article-bottom_(300×250)”, [300, 250], “pb-ad-78158” ).addService( googletag.pubads() ) ); } );

    The post 4 Tips for More Dramatic Beach Photos by Anne McKinnell appeared first on Digital Photography School.


    Digital Photography School

  • A conversation with portrait photographer Brian Smith

    When Brian Smith was just a High School student with a budding interest in making photographs, he learned that photography could earn you some significant perks – and at that age, that meant a pass to leave campus. These days he’s well known for his portraiture, including a portfolio of A-list celebrities. He sat down with DPReview Editor Barney Britton at PIX 2015 to discuss his background, career and his secret to putting all of his portrait subjects at ease in front of the camera.

    Articles: Digital Photography Review (dpreview.com)

  • Sphericam 2 professional fully spherical camera records 4K/60 fps videos

    $ (document).ready(function() { SampleGalleryV2({“containerId”:”embeddedSampleGallery_7236055564″,”galleryId”:”7236055564″,”isEmbeddedWidget”:true,”standalone”:false,”selectedImageIndex”:0,”startInCommentsView”:false,”isMobile”:false}) });

    The folks at Sphericam are back with a second generation model of their unique angular camera. The Sphericam 2 is, according to the company, the first fully spherical pro-grade 360-degree camera that records 4K footage at 60 fps. The resulting videos can be used in VR applications, as well as on platforms that support 360-degree content like YouTube and Spinnable.

    Unlike other spherical cameras, Sphericam features angular sides comprising a geometric design made from anodized aluminum. These ‘faces’ allow the camera to be placed flat on a surface, and also house things like lenses, mounting points, and buttons. Sphericam 2 has six cameras, each using a sensor with global shutter and synchronized to fire within 50 microseconds of each other.

    Footage is available as 60 fps raw/unstitched and as 30 fps stitched panoramic videos. Capturing in 30 fps allows the video to be stitched in real time; a live streaming function is currently in development. Content, meanwhile, is recorded at up to 1.2 Gbps to an internal microSD card. The camera supports use of up to six MicroSD cards at once by way of a removable module adding up to a total maximum storage capacity of 768GB, or about 85 minute of footage.

    The camera has two power options: a non-removable rechargeable battery for up to 90 minutes of operation, and a USB-C port for continuous operation when plugged in. Finally, Sphericam features a total of 8 mounting points, each a standard threaded 1/4-20 offering, for use with various third-party mounting accessories. 

    Sphericam 2 is available for preorder from Sphericam for $ 2499; shipping is estimated to start 10 to 12 weeks after ordering.

    Via: Sphericam

    Articles: Digital Photography Review (dpreview.com)

  • Manfrotto introduces six new monopods for XPRO range

    From the top down, Prime, Over and Land monopods from Manfrotto

    Tripod and accessory manufacturer Manfrotto has announced a total of six new monopods that it has added to the XPRO range, including models in carbon fiber as well as aluminum. The models cover three families of monopods: Prime for the heaviest equipment, Over for those who need height but for lighter kit, and Land for traveling.

    The Prime models come in three variants, one of which has four sections and is made of carbon fiber. The other two are aluminum, and one of those features a pop-out three-leg support system that is concealed within the lower leg section. The Prime models can support up to 10kg / 22lbs and offer a maximum height of 168cm / 66.14in.

    The Over series can support up to 7kg / 15.43lbs, and offer heights of up to 176cm / 69.29in, while there is only one Land monopod – a 5-section model which packs down to 41.5cm / 16.3in and weighs only 0.7kg / 1.5lbs. It can hold 6kg / 13.23lbs and can open to 141cm  / 55.51in.

    Each of the models offers dual 1/4in and 3/8in threads and Manfrotto’s new Quick Power Lock leg clamps, as well as D-shaped tubing to help prevent rotation.

    For more information visit the Manfrotto websiite.

    Model Material Leg Sections  Price
     Prime Aluminum 3 £54.95
     Prime with legs Aluminum 3 £99.95
     Prime Carbon Fiber 4 £149.95
     Over Aluminum 4 £69.95
     Over Carbon Fiber 5 £169.95
     Land Aluminum 5 £69.95

    US pricing is not yet available.

    MANFROTTO PRESENTS: NEW XPRO MONOPODS

    Manfrotto, world leader in the photography, imaging equipment and accessories industry, announces a new photo monopods range: the New XPRO MONOPODS. These products bring the premium style and performance of the 055 and 190 series tripods on single-legged camera supports and are superbly designed and crafted for professional and advanced photographers. The new XPRO MONOPODS range consists 6 of new models of the PRIME, OVER and LAND monopods.

    COMPACTNESS, PORTABILITY & PAYLOAD
    With 6 new models available – 4 in aluminium and 2 in Carbon Fibre, the new XPRO MONOPODS come in different sizes and with ¼” or 3/8” mounting threads.

    The PRIME Monopods provide the highest payload in the range and are able to support up to 10kg (22lbs) of weight. Available in 3 models (2 aluminium and 1 carbon fibre), one features a unique retractable mechanism that allows the three feet to fully disappear inside the last tube – only coming out when needed.

    The OVER Monopods have increased the maximum height by 16% more than previous model, widening the shooting angles’ versatility whilst still maintaining remarkable compactness. Available in aluminium and carbon fibre.

    Extending the range further, the LAND Monopod is a 5 section monopod ideal for travelling. It folds down to 41.5 cm (32.6 in) for easy transportation and can be packed into Manfrotto backpacks or messenger bags. Available in aluminium only.

    EASE OF USE & STABILITY
    The New Quick Power Lock provides stability of use to all XPRO MONOPODS and a fast locking grip, which can be released with a single hand movement.

    The D-shaped tubes greatly improve the anti-rotation resistance allowing for a solid locking grip by eliminating jerky movements.

    Remove problems of vibration, speed and portability with the New XPRO MONOPODS: suitable for Sport photography, Bird watching, Travelling and Nature photography.

    Prices from £54.95. For more information, please visit www.manfrotto.co.uk

    Articles: Digital Photography Review (dpreview.com)

  • Never Grow Up: Man Quits Job, Builds Dream Treehouse Dwelling

    [ By Steph in Architecture & Houses & Residential. ]

    dream treehouse 12

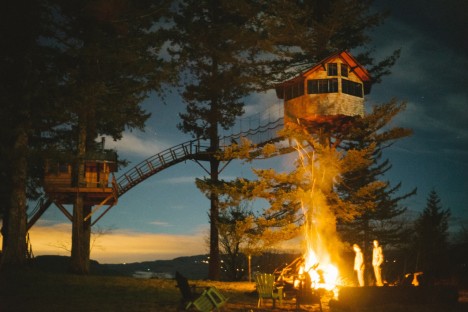
    Fed up with his fast-paced life in New York City, Foster Huntington quit his job, hopped into a Volkswagen van and traveled around the country before settling in Washington state to build his dream treehouse dwelling complete with a skate bowl and wood-fired soaking tub. The photos alone are enough to make anyone daydream about doing the same. Set against a hazy landscape just across the Columbia River from the Oregon border, two compact structures are nestled high up in the fir trees, connected by a meandering bridge.

    dream treehouse

    dream treehouse 2

    dream treehouse 3

    The 27-year-old adventurer and photographer gathered a group of friends to help him make his dream into a reality. It took them about a year to complete ‘the Cinder Cone,’ as he calls it, with one building functioning as a sleeping cabin and the other a workshop. Each measures about 200 square feet, and the sleeping cabin has bunk beds and hammocks to fit a group.

    dream treehouse 4

    dream treehouse 9

    dream treehouse 11

    The getaway feels like it’s in the middle of nowhere, but it’s close to Portland. The spacious hot tub on a deck further down the hillside keeps things cozy in cold weather, and Huntington and his guests have their own private skate park just a few steps down from the workshop. The friends involved in the building process referred to the Cinder Cone as “big-boys camp” and “Neverland.” It’s all very Portlandia, and The New York Times called it ‘Bro-topia,’ which sounds about right, but it’s hard to deny that the place is incredibly dreamy.


    dream treehouse 13

    dream treehouse 5

    dream treehouse 6

    dream treehouse 14

    Huntington has produced both a short film and a photo book documenting the building process, and lots of photos – from the very beginning of the project to its enviable usage today – can be seen on his Instagram. 

    Share on Facebook


    [ By Steph in Architecture & Houses & Residential. ]

    [ WebUrbanist | Archives | Galleries | Privacy | TOS ]

    WebUrbanist