Blog

  • DxOMark Mobile report: Sony Xperia M5

    In terms of processing power, look and feel the Sony Xperia M5 is categorized below Sony’s Xperia Z flagship line of smartphones. However, like the Z-models it’s dustproof, waterproof and has a lot to offer in the photography department. The rear camera offers a 21.5MP Sony Exmor sensor with on-chip phase detection combined with an F2.2. lens, as well as 4K video recording. Scoring 79 in DxOMark’s Mobile testing, it sets the bar as the best mid-range device in DxO’s rankings – on par with previous-generation flagships like the Samsung Galaxy S5.

    Articles: Digital Photography Review (dpreview.com)

  • Adobe issues fix for Creative Cloud Mac update that could delete files

    Last week, Adobe rolled out a Creative Cloud update with a harmful bug that, for some Mac users, deleted files from the system root directory. Once the bug was discovered with the help of backup platform Backblaze, Creative Cloud version 3.5.0.206 was pulled from release and was replaced Sunday with an update that promises to fix the issue.

    The bug appears to have deleted the first file in the root directory for users who downloaded the update, whatever that file might have been. Backblaze users noticed problems because alphabetically, the service’s .bzvol folder sits at the top of their root directory. When Creative Cloud deleted the folder, Backblaze alerted the user that something was wrong.

    In a blog post on Friday, Adobe acknowledged the issue, saying that ‘the updater may incorrectly remove some files from the system root directory with user writeable permissions.’ Version 3.5.1.209 was released Sunday with a fix for the problem.

    Adobe directs users who experienced problems with the Creative Cloud update to contact customer service. The latest update is available now for Mac and Windows.

    Articles: Digital Photography Review (dpreview.com)

  • Ricoh celebrates 80th anniversary with limited edition silver GR II

    $ (document).ready(function() { SampleGalleryV2({“containerId”:”embeddedSampleGallery_0284849097″,”galleryId”:”0284849097″,”isEmbeddedWidget”:true,”standalone”:false,”selectedImageIndex”:0,”startInCommentsView”:false,”isMobile”:false}) });

    If the stealth-black GR II isn’t quite showy enough for you, then you may be interested in Ricoh’s new ‘Silver Edition’ camera, which it created to celebrate its 80th anniversary. In addition to its new color, Ricoh has also diamond-engraved the lens’ specs onto its front ring, added a custom on/off ‘termination’ screen and bundled a leather carrying case. Only 3200 of the Silver Edition GR II cameras will be sold worldwide, so get your order in soon. 

    The compact GR II features a 16MP APS-C-size CMOS sensor, 28mm equivalent F2.8 lens, 1080/30p video and Wi-Fi with NFC.

    The GR II Silver Edition is priced at $ 699.

    Ricoh Imaging Unveils GR II Silver Edition Commemorating the 80th Anniversary of Ricoh Company, Ltd.

    Special-edition package pairs a silver-colored GR II premium digital compact camera and leather camera case

    DENVER, Colo., February 15, 2016 – Ricoh Imaging Americas Corporation today announced the RICOH GR II Silver Edition to commemorate the 80th anniversary of the founding of Ricoh Company, Ltd. This exclusive package consists of a silver-color edition of the GR II premium digital compact camera (launched in July 2015) and an exclusively designed camera case. It will be marketed in a limited quantity of 3,200 units worldwide.

    The GR II is the smallest premium digital compact camera, offering digital single-lens reflex (DSLR) image quality with Wi-Fi and Near Field Communication (NFC) functionality. The GR 18.3mm F2.8 lens is a compact, high-performance GR lens with a focal length of 28mm (in the 35 mm format). It also boasts a large, APS-C-size CMOS image sensor with approximately 16.2 effective megapixels.

    Features of the GR II Silver Edition include:

    • Stylish silver camera body: The camera body has a high-grade, silver-color leather- tone finish, featuring an elegant, grained texture.
    • Distinctive features compared to the standard GR II: The Silver Edition’s shutter release button and the ring cap have been finished in silver identical to that of the camera body. Additionally, the lens descriptions are engraved on the front ring using a diamond- cutting process and the GR logo’s color on the camera’s front panel has been changed to white. Even the product box has been specially designed for this
    • Termination screen: When the camera’s power is turned off, the camera displays an original termination screen, which has a solid, high-grade design expressing the GR II’s product concept.
    • Genuine leather camera case: The package includes a black, genuine-leather camera case exclusively designed for the GR II camera body. It provides features useful for quick- action snapshot photography, including a belt loop on the back, and a top cover that opens fully for easy removal of the camera body.

    Articles: Digital Photography Review (dpreview.com)

  • Amazing Animal Art: 50+ Creature-Inspired Creations

    [ By Steph in Art & Sculpture & Craft. ]

    animal art hammered 9

    As seen through the eyes of sculptors, painters, street artists, photographers and even knitters, the animal kingdom flourishes in curlicues of steel and paper, splatters of ink and trailing thread. Working in styles that range from the hyperrealistic to the fantastically surreal, these artists manage to capture some of the complexity of Earth’s incredible wild creatures.

    Swirling, Ornate Animal Sculptures by Ellen Jewett

    animal art jewett 1

    animal art jewett 2

    animal art jewett 3

    Flora and fauna come together in stunning ceramic compositions by Ellen Jewett. The animals themselves consist of flowers, snails, vines and other plant matter, leaving hollows within each creature’s body to make them seem weightless.

    Urban Swarms by Pantonio

    animal art urban swarms 3

    animal art urban swarms 5

    animal art urban swarms 6

    Fluid swarms of blue-toned fish, birds and other animals flow across urban surfaces on a large scale in a stunning new series by Portuguese street artist Antonio Correia, aka Pantonio. Set against stark white, the colorful creatures provide a striking contrast to the gaining historic settings in which they’re painted.

    Delicate Paper Animal Art by Calvin Nicholls

    animal art nicholls

    animal art nicholls 2

    animal art nicholls 3

    animal art nicholls 4

    Tiny scraps of paper are cut and layered to create birds, dogs and other creatures in the relief sculptures of Calvin Nicholls. Using an X-acto knife, scalpel and scissors, the artist shapes pieces of paper that can be just fractions of a millimeter in size and builds them on to p of each other until a three-dimensional form is created. Each piece takes three weeks to an incredible two years to complete.

    Vivid Microscopic Underworlds by Robert S. Connett

    animal art underworlds

    animal art underworlds 2

    animal art underworlds 3

    Creatures too small for us to see with the naked eye are revealed in brilliant color by illustrator Robert S. Connett – whether they’re representations of actual living microorganisms, or plucked from the artist’s imagination. Connett refers to these scenes as “underworlds,” shining a light on fantastical pockets of flourishing life lurking in dark, wet places.

    Hammered Steel Animals by Selcuk Yilmaz

    animal art hammered

    animal art hammered 2

    animal art hammered 4

    animal art hammered 5

    animal art hammered 6

    animal art hammered 7

    Turkish sculptor Selcuk Yilmaz forms thin strips of steel into mask-like animal heads, including a lynx, tiger and fox., as well as the full body of a majestic lion. Hammering and welding the pieces into form, the artist produces incredibly powerful-looking, life-sized creatures that shimmer in the light.

    Next Page – Click Below to Read More:
    Amazing Animal Art 50 Creature Inspired Creations

    Share on Facebook


    [ By Steph in Art & Sculpture & Craft. ]

    [ WebUrbanist | Archives | Galleries | Privacy | TOS ]


    WebUrbanist

  • Beginner Tip: How to Use the Canon Quick Menu to Change Cacmera Settings

    canon-quick-menu-3

    When it comes to beginner photographers, one of the first major goals is often to get off Auto. Doing so really is an important step to using your camera to the best of its capabilities. However, the concern that I hear most often from beginners in terms of stepping away from auto mode, is that it takes so long to get their shutter speed, aperture, ISO, white balance, and focal points set, that sometimes they’ve missed the shot that they were hoping for completely. I understand how frustrating that dynamic can be, and I have one Canon tip to share that may make life a little simpler if you’re just starting out.

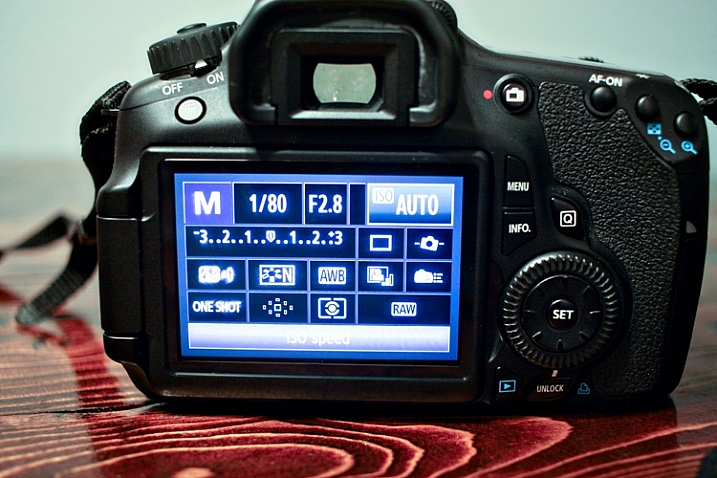
    Canon EOS cameras have a feature called the EOS Quick Menu. For the vast majority of EOS cameras, you’ll access the Quick Menu or Control Screen by pressing the button on the back of the camera with the letter Q. For a few older EOS cameras, you’ll have to push the button in the center of the multi-controller (that’s the big wheel on the back of your camera to the right of the screen). Once you hit that button, a very handy screen pops up that looks something like this:

    canon-quick-menu-1

    Now, you’ve got many of the most commonly changed settings right at your fingertips. You can change shutter speed, aperture, ISO, metering mode, focal point, file type, and several other features, right from the Quick Menu, without having to scroll through several different menus or adjust settings located in several different places on your camera body. You just use the multi-controller to navigate to the setting that you’d like to change, and then press the SET button to access that setting.

    It’s worth noting that your available options will change somewhat depending on which camera mode you’re in. In the above image, the camera is set to manual mode and thus there are high number of settings available to be changed.

    canon-quick-menu-2

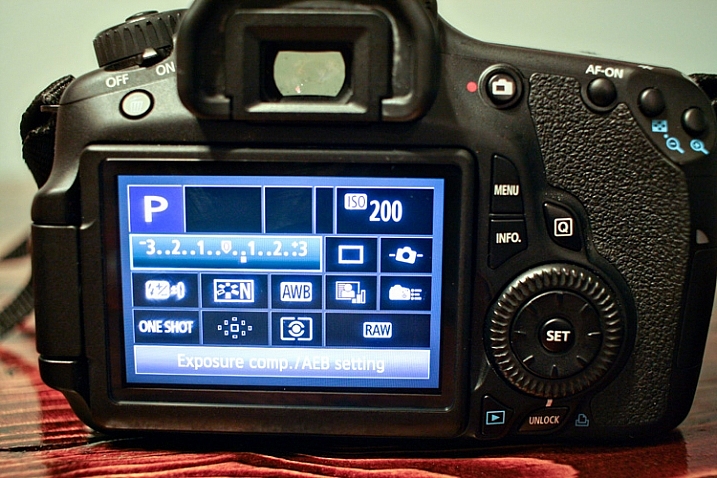
    If you switch the camera to Program mode, the option to change shutter speed and aperture vanishes, as those are set automatically by the camera. You still have access to other controls like ISO, file type, metering, and exposure compensation through the Quick Menu in this mode.

    canon-quick-menu-4

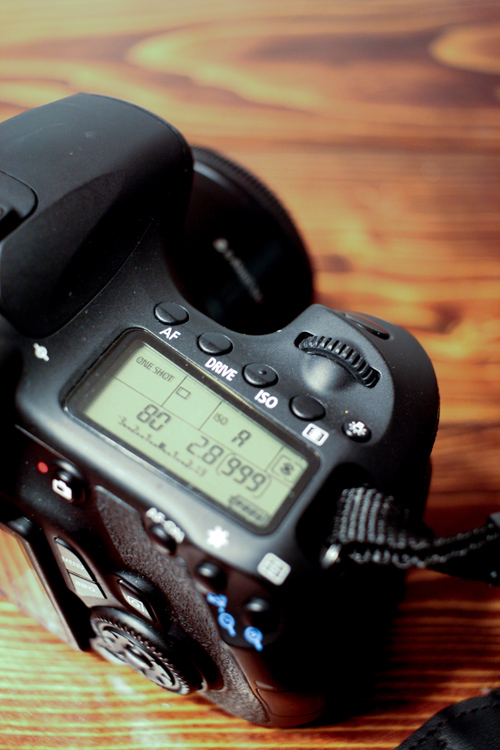
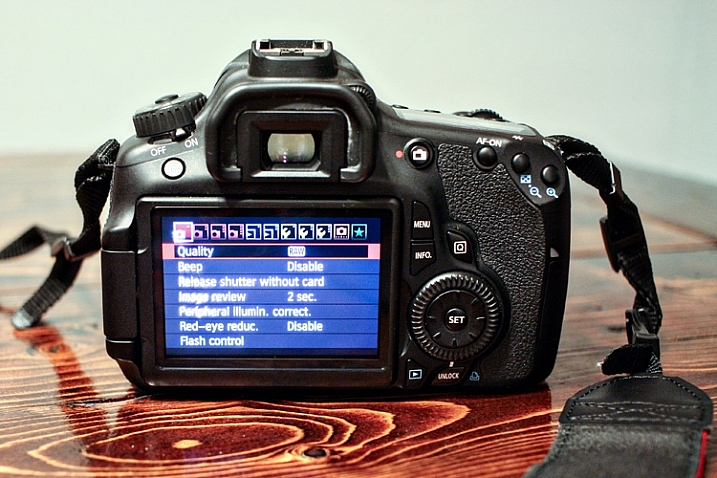
    Of course, all of these features can also be accessible via the buttons/dials on the top and side of your camera, or in the standard menu screens. I do think it’s important to learn how to change your settings in those traditional ways, as the Quick Menu may not always be the most effective, or efficient, way to change a particular setting depending on the circumstances. The more you know about your camera, the better you’ll be able to utilize all of its features! That said, it’s never a bad thing to know how to accomplish the same task in more than one way, and the Canon Quick Menu can be a huge help when you’re trying to make changes to your settings in a short amount of time. In my opinion, both shorthand and longhand have their time and place!

    If you’re a Canon EOS user, have you found the Quick Menu to be a helpful tool? Are there some settings you still prefer to access and change in other ways? Do you shoot Nikon or another brand of camera – and does it have something similar? Please share in the comments below.

    googletag.cmd.push(function() {
    tablet_slots.push( googletag.defineSlot( “/1005424/_dPSv4_tab-all-article-bottom_(300×250)”, [300, 250], “pb-ad-78623” ).addService( googletag.pubads() ) ); } );

    googletag.cmd.push(function() {
    mobile_slots.push( googletag.defineSlot( “/1005424/_dPSv4_mob-all-article-bottom_(300×250)”, [300, 250], “pb-ad-78158” ).addService( googletag.pubads() ) ); } );

    The post Beginner Tip: How to Use the Canon Quick Menu to Change Cacmera Settings by Meredith Clark appeared first on Digital Photography School.


    Digital Photography School

  • Ultra-compact: Sony Cyber-shot RX1R II review

    Sony CyberShot RX1R II Review

    The Sony Cyber-shot RX1R II is a full-frame, 42MP compact camera with a fixed 35mm F2 lens. The successor to the 24MP RX1R, the Mark II inherits a lot of technology from Sony’s flagship a7R II mirrorless interchangeable lens camera. 

    Between the continuing evolution of the RX100 and a7-series’, Sony is on a big roll when it comes to small tech. And in this case, ‘small’ doesn’t mean ‘insignificant’. With many of its recent cameras, Sony has achieved the miniaturization of technology and functionality traditionally reserved for bulkier DSLRs and the like.

    With the Cyber-shot RX1R II for example. Sony has somehow managed to cram a high-res electronic viewfinder, a Zeiss Sonnar T* 35mm F2 lens and the same full-frame 42MP BSI CMOS sensor and autofocus system from the a7R II into a coat-pocketable body. For many photographers that probably sounds like a dream come true, but as you might expect, there have been a few compromises along the way.

    Key features

    • 42MP BSI CMOS full-frame sensor
    • BIONZ X processor
    • Fixed ZEISS Sonnar T* 35mm F2 lens
    • Hybrid autofocus system
    • Variable low-pass filter
    • Tilting 3″, 1.23 million dot LCD
    • Pop-up 2.36M-dot OLED electronic viewfinder
    • 1080/60p video recording
    • Wi-Fi with NFC

    Though the RX1R II bears more than a passing resemblance to its predecessor, there are a lot of changes. And since the introduction of the RX1 and RX1R back in 2012, Leica introduced the Q, a full frame compact with a fixed 28mm F1.7 lens. Though it sits above the RX1R II in price and offers a wider lens, a lot of photographers will see them as natural competitors – at least in spirit. Take a look at how they compare.

      Sony RX1R   Sony RX1R II  Leica Q
    MSRP $ 2799 $ 3299 $ 4250
    Sensor 24MP CMOS 42MP BSI CMOS 24MP CMOS
    Low-pass filter No Variable No
    ISO range
    (expanded)
    50-102400 50-102400 100-50000 
    Lens 35mm F2 35mm F2 28mm F1.7
    Min. focus distance 14cm 14cm 17cm
    AF system Contrast det. Hybrid Contrast det.
    AF points 25-pt 399-pt 49-pt
    EVF resolution No EVF 2.36M-dot OLED 3.68M-dot LCOS
    LCD 3″ 1.23M-dot fixed 3″ 1.23M-dot tilting 3″ 1.04M-dot fixed touchscreen
    Burst rate 5 fps 5 fps 10 fps
    Video 1080/60p 1080/60p 1080/60p
    Wi-Fi No Yes, with NFC Yes
    Battery life (CIPA) 220 shots 220 shots N/A
    Dimensions 113 x 65 x 70mm 113 x 65 x 72mm 130 x 80 x 93mm
    Weight 482 g 507 g 640 g

    For some more preliminary impressions of the RX1R II, check out Barney’s Gear of the Year article, and the accompanying video below.

    Now, let’s get to the full spec sheet of the RX1R II. 

    Articles: Digital Photography Review (dpreview.com)

  • How to Use Exposure Compensation to Take Control of Your Exposure

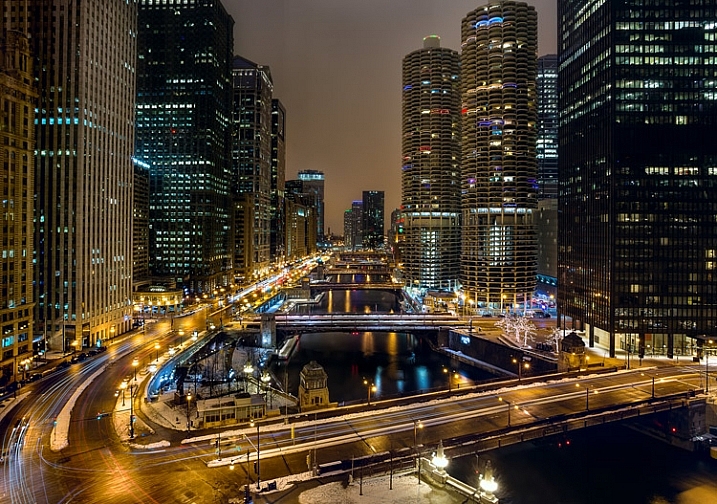
    Chicago-River-2016-01-02You don’t have to shoot in Manual mode to take complete control over the exposure process.

    When you use shooting modes other than Manual, the camera will set at least one of the three exposure controls (shutter speed, aperture, and/or ISO) for you. However, your camera provides you with an override called exposure compensation. It gives you the ability to change the camera’s exposure values from something other than what the camera automatically sets for you. In this article, I will show you how to use it to get the exposure you want every time.

    When should you use Exposure Compensation?

    First, let’s back up and talk about when you might want to use exposure compensation. You may wonder why you’d want to change anything, if your camera is already determining the proper exposure level.

    The first reason is that your camera’s meter can be fooled by some of the conditions you face. The meter operates by looking at the tones in its view, then averaging them out. Basically, the manufacturers have determined that most scenes will average out to a middle grey tone, often referred to as 18% grey. Therefore, if the tones in your frame are darker than this middle grey tone, the meter will show that there is not enough light for a proper exposure, and therefore the meter thinks your picture will be underexposed. Conversely, if the tones in your frame are lighter than middle grey, the meter will show that there is too much light for a proper exposure and it thinks your photo will be overexposed. A lot of the time the camera meter is right, but sometimes it is not.

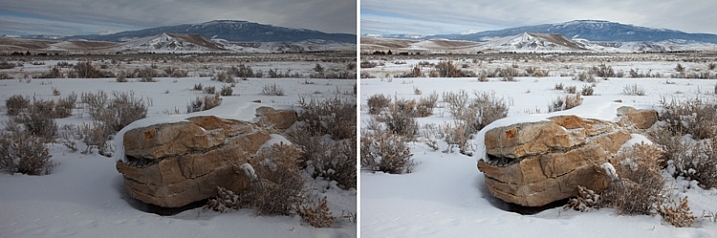
    Some situations are supposed to be brighter than middle grey. A classic example is a photograph taken of a snowy scene. Your camera’s meter will assume that all that white snowy scene should be grey, and will therefore choose exposure settings that underexpose the image. Obviously you don’t want that. Here is an example, the picture to the left was taken strictly by the camera’s meter, and the picture to the right overexposed by one stop according to the camera’s meter:

    A snowy scene frequently confuses your camera's meter. To the left is a shot taken at normal exposure. To the right is one taken after adding in a stop of exposure compensation (overexposure).

    A snowy scene frequently confuses your camera’s meter. To the left, is a shot taken at normal exposure. To the right, is one taken after adding in a stop of exposure compensation (overexposure).

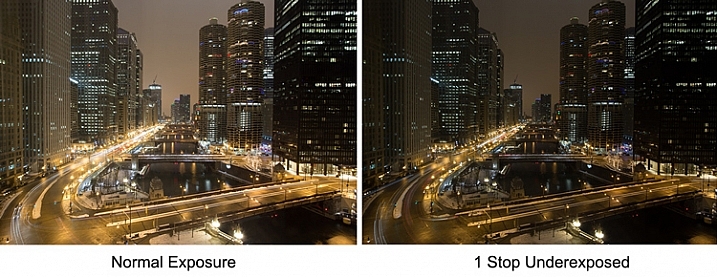
    Another example is night photography, where the darkness of the scene should result in dark tones in your picture. The camera’s meter won’t recognize this though, and will tell you to brighten up the picture. Using exposure compensation will allow you to take control, and set a proper exposure.

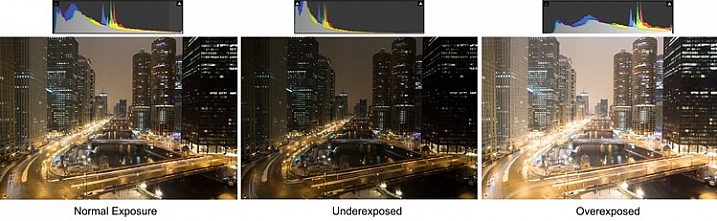
    As an example, check out the pictures below. In the picture on the left, taken at normal exposure as per the camera’s meter, it brightened the night scene and it looks a little washed out. To the right is an underexposed (according to the meter) image that more closely resembles the actual conditions of the scene.

    Night-Comp

    The camera’s meter (and even the histogram) tells you that the normal exposure is correct (see below). But the reason the camera thinks the normal exposure is correct, is that it that the average of the tones closely approximates middle grey. However, the underexposed image actually more closely captures the reality of the situation.

    Histogram-Comp

    Another reason you may want to use exposure compensation is that you simply don’t like the “correct” exposure. You may want to darken the scene to add some mood or drama, or you may want to brighten things up. Photography is ultimately an artistic endeavor, and is highly subjective, so exposure compensation gives you a tool to put that to work.

    Finally, if you subscribe to the theory that you should expose to the right, exposure compensation will allow you to do so in camera modes other than Manual. If you are unfamiliar with this concept, expose to the right means that you slightly overexpose your images so that most of the tones appear on the right side of the histogram (without clipping anything). You later reduce the tones in post-processing and this can sometimes result in slightly better image quality. The overexposure happens by using exposure compensation.

    How Exposure Compensation Works

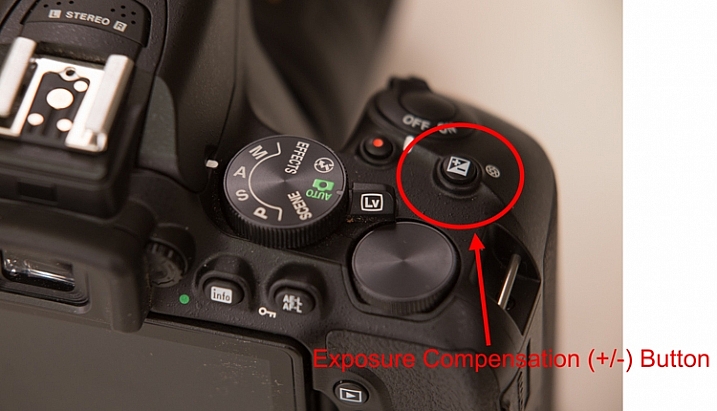
    Now that you know what exposure compensation is, how do you use it? In most cases, your camera will have a little button with a +/- on it. That is the button you press to change the exposure compensation. While pressing that button, turn the main dial of your camera right or left (by main dial, I am referring to the dial on the top right of your camera, usually next to the shutter release button). That will change the exposure compensation. Turning the dial one way will reduce the exposure, and the other way increases it. Each click of the dial will usually change exposure settings by 1/3 of a stop.

    PlusMinusButton

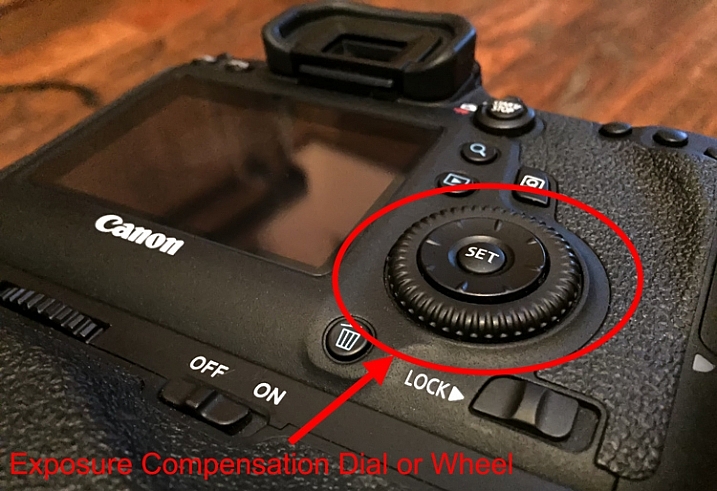
    If you have a higher-end DSLR, then your camera will have a second dial or wheel on the back of the camera. Those cameras will usually not have the +/- button, but that second dial will be used to change the exposure compensation settings. The advantage is that you can just turn that dial with your right thumb without needing to press any buttons.

    Wheel

    Exposure Compensation in Different Camera Modes

    So what does exposure compensation actually do? You know that it changes the exposure, but how does it do so? By changing the aperture? Or the shutter speed? Or both?

    The answer is that it depends on what mode you have your camera in. I will explain what is going on for each of the camera modes:

    • Aperture Priority Mode – In Aperture Priority mode, exposure compensation changes the shutter speed. Remember that in this mode, you set the aperture and the camera sets a corresponding shutter speed. If you change the Aperture, your camera just sets another corresponding shutter speed, and there is no change in the exposure level. Exposure compensation gives you the ability to change the shutter speed (and the overall exposure value) while staying at the same aperture you originally set.
    • Shutter Priority – In Shutter Priority mode, exposure compensation changes the size of your aperture. It is basically the reverse of Aperture Priority mode. You set a shutter speed, and the camera sets a corresponding aperture. Exposure compensation therefore changes the exposure by allowing you to change that aperture size.
    • Program – In Program mode (P on your mode dial), exposure compensation changes the shutter speed. At least that’s what happened on the cameras I tested. It is possible that yours works differently, or that you can change it in the menu. As with so many things, this is a good excuse to pull out your camera’s user manual and go through it.

    What about Manual and Automatic modes? These don’t have exposure compensation. In Manual mode, the camera does not set an exposure value for you in the first place, you set everything yourself. Whenever you change the aperture or the shutter speed, you are changing the exposure value. In Automatic mode, there is no exposure compensation because you have no control over exposure – the camera does everything for you. That is one of the reasons why you should never use this mode.

    Exposure-Compensation

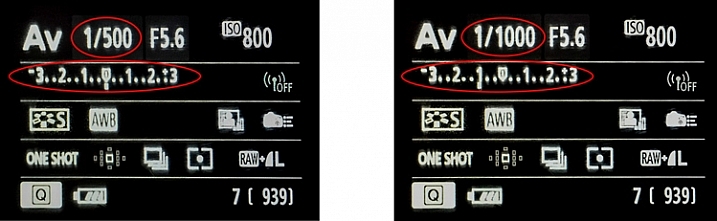
    Here we see the back of the camera before and after applying one stop of exposure compensation. In the example to the left, the camera shows a normal exposure with a shutter speed of 1/500 of a second. In the example to the right, the shutter speed is reduced by 1 stop to 1/1000 of a second, and the meter reading reflects that.

    Exposure Bracketing

    While talking about exposure compensation, there is a related topic that you might find useful as well. It is Auto Exposure Bracketing (AEB, or just bracketing). It is where you set your camera to take multiple pictures in a row with the first at normal exposure, the next one(s) underexposed, and the final one(s) overexposed (if you have Canon it may look more like this:  underexposed>normal>overexposed, you can also change the order on a Nikon if you go to your menu settings).

    When you enable the feature in your camera’s menu, you set the amount of under and overexposure. The camera will take three to five pictures in rapid succession (depending on your camera, if you shoot Canon you have to also set your drive mode to high speed burst). In a way, this accomplishes the same thing as exposure compensation, because you are dialling in a certain amount of underexposure or overexposure.

    Bracket

    Why would you want to do this? Several reasons. Usually it comes into play when there is a wide divergence of tones in the image. Using a little blending later, you can use the brightest tones from the underexposed image and the darkest tones from the overexposed image. In addition, if you are ever going to use any high dynamic range processing on your images, you should have multiple images to work with. Finally, you might just think of it as “exposure insurance” for important shots to make sure that you have nailed the exposure.

    Conclusion

    We all want to be able to take complete control over the exposure process, but not all of us want to work in Manual mode. When you work in a mode like Aperture Priority mode, the camera offers you a lot of benefits – speed being the main one. By adding exposure compensation to your process, you can get the speed of other modes, along with the control of manual.

    If you haven’t used exposure compensation before, give it a try. If you are familiar with it, chime in below with your own tips and experiences.

    googletag.cmd.push(function() {
    tablet_slots.push( googletag.defineSlot( “/1005424/_dPSv4_tab-all-article-bottom_(300×250)”, [300, 250], “pb-ad-78623” ).addService( googletag.pubads() ) ); } );

    googletag.cmd.push(function() {
    mobile_slots.push( googletag.defineSlot( “/1005424/_dPSv4_mob-all-article-bottom_(300×250)”, [300, 250], “pb-ad-78158” ).addService( googletag.pubads() ) ); } );

    The post How to Use Exposure Compensation to Take Control of Your Exposure by Jim Hamel appeared first on Digital Photography School.


    Digital Photography School

  • Win a Pro-Level Portfolio Website CMS for FREE

    In this giveaway you can win one of 5 great prizes provided by our friends at MotoCMS. Whether you’re professionally into photography or you just plan to start making money out of your photos, you probably know by now that a good website managing software is a gold find for your business. Something that would have a lot of design Continue Reading

    The post Win a Pro-Level Portfolio Website CMS for FREE appeared first on Photodoto.


    Photodoto

  • Beauty-centric Panasonic Lumix GF8 is all about the selfies

    $ (document).ready(function() { SampleGalleryV2({“containerId”:”embeddedSampleGallery_2273125847″,”galleryId”:”2273125847″,”isEmbeddedWidget”:true,”standalone”:false,”selectedImageIndex”:0,”startInCommentsView”:false,”isMobile”:false}) });

    Panasonic has introduced the Lumix DMC-GF8, essentially a GF7 with an emphasis on selfie-friendly features. It continues to offer the GF7’s 16MP Four Thirds sensor, 1080/60p video and built-in Wi-Fi, but wraps it all up in your choice of a pink, silver, brown or orange leather-like finish. Not only does the GF8’s 3″ 1.04M-dot touchscreen tilt upward 180-degrees to take the guesswork out of self-portraits, the camera offers a ‘Soft Skin’ mode that can be combined with Panasonic’s Creative Control filters such as Retro or High Key. 

    Beautification doesn’t stop at image capture though. The Lumix GF8 offers a new ‘Beauty Retouch’ function to clear up skin texture, whiten teeth and add makeup after the fact. Panasonic’s press releases stresses the appeal of these features to women, but don’t feel left out gentlemen, the silver and brown versions of the camera have plenty of ‘unisex’ appeal. The GF8 also comes with 100GB of storage on Google Drive, which adds up to a lot of selfies.

    The DMC-GF8 will not available in the United States, at least at this point in time.

    LUMIX GF8 for the Best-Ever Attractive Selfie Shots 
    Featuring Advanced Beauty Retouch Mode

    Panasonic is introducing a new Digital Single Lens Mirrorless (DSLM) Camera, the LUMIX GF8 that adds even more fun than its predecessor GF7 for users to enjoy more unique photo shooting. The new LUMIX GF8 offers high capability for shooting selfie with a host of options such as newly integrated beauty functions. 

    The 3.0-inch 1040K-dot rear monitor with touch control tilts up by approx.180-degree and the camera goes into Self Shot Mode automatically once the monitor is flipped. In the Self Shot Mode, a variety of functions for selfies are available on the LUMIX GF8. The beauty functions enables users – especially women – to shoot portraits more attractively with its Soft Skin, Defocusing and Slimming effects. After shooting, you can even put on an aesthetic/make-up retouch, in camera, with Beauty Retouch function. 

    The LUMIX GF8 integrates Wi-Fi® connectivity to offer more flexible shooting experience and instant image sharing with easy operation. 

    The basic photographic performance of LUMIX GF8 as a camera is excellent. It enables users high-quality image recording with real-to-life details through excellent resolution, image rendering and color reproduction. Taking full advantage of 16.00-megapixel Digital Live MOS Sensor and Venus Engine, images are produced with highly sharp resolution even shot in low-lit situations and even max. ISO 25,600 high sensitivity can be selected. The Contrast AF System of LUMIX GF8 excels in both speed and accuracy by exchanging digital signal between the camera and the lens at max. 240 fps. A variety of extensive AF functions including Face/Eye Detection AF or Low Light AF assures in-focus shots even in difficult shooting situations. 

    The LUMIX GF8 also features full HD 1920 x 1080, 60p (60 Hz) / 50p (50 Hz) high quality video recording in AVCHD progressive and MP4 with stereo sound. The practical full-time AF and tracking AF is available in video recording, too. The LUMIX GF8 features a unique video recording option called Snap Movie Mode which lets users record video in designated short period of time (2/4/6/8 sec) as they shoot “moving photos”.

    Last but not least, the iA (Intelligent Auto) mode and the Scene Guide make LUMIX GF8 easy to use even for beginners of digital interchangeable lens system camera. Portrait, Child, Scenery modes, which are used often, have respective shortcuts on the dial. Most appropriate parameters for each scene are automatically applied by just setting the dial to the mode to capture those scenes most beautifully. 

    Available in silver, brown, pink and orange, the LUMIX GF8 boasts sleek, stylish profile in traditional camera design. Its high mobility enables to users carry it around and enjoy creative, high quality photography with the unlimited potential of interchangeable lens system camera. 

    1. Enjoy Selfies in a More Flexible Way – Beauty Retouch & Hands-Free Selfie

    The new LUMIX GF8 is a perfect camera for selfie especially for women. A rich variety of beauty functions in LUMIX GF8 enables users to shoot more attractive portraits. In shooting mode, the Soft Skin mode makes skin look smoother while Slimming looks the subject sharpened up in 10 fine steps. Defocusing gives natural defocus around face to make the picture more impressive.

    After shooting, you can even put on virtual make-up on the face in the playback mode with newly added Beauty Retouch function. In Aesthetic Retouch, various effect can be applied to the face including clearing the skin texture, lifting up the face whitening of teeth and so on. In the Make-up Retouch, users can choose the color of foundation, lips, cheeks or eye-shadow

    The 3.0-inch 1040K-dot static type touch control monitor boasts 180-degree tiltable structure. Once the monitor is flipped up, the camera activates Self Shot Mode automatically. In conventional selfie pictures, users have to stretch their arms to hold the camera, which makes the selfie pictures all-too-common. However, the hands-free selfie allows users to use their hands as they like, resulting in free, expressive posing. However, Face Shutter and Buddy Shutter functions are integrated for a trigger of shutter release in LUMIX GF8. They work when the face is once covered with a waving hand or when two faces come closer in a frame. 

    Creative Control filter that are suitable for impressive selfie shots – Retro, Soft Focus, Expressive, High Key and Toy Effect can be combined with the Self Shot mode, too. 

    2. High Performance Digital Single Lens Mirrorless with High Speed Response

    The LUMIX GF8 incorporates 16.00-megapixel, large Digital Live MOS Sensor complying with Micro Four Thirds system standard that achieves both higher resolution and higher sensitivity image recording with less noise. The image processor Venus Engine features its advanced noise reduction systems. It features high level of noise is control thanks to the expanded controllable area of noise. This makes it possible to remove large block of noise which was formally hard to detect and helps produce clear, smooth image especially for the nighttime scenery. The combination of the Digital Live MOS Sensor and the Venus Engine achieves fine detail reproduction, making it possible to capture clear image even in low lit situations and allows max. ISO 25600 while achieving minimum ISO 100 (Extended).

    The LUMIX GF8 features high-speed Light Speed AF, making it possible to capture even the fast-moving subject clearly. The camera and the lens exchange the digital signal at max. 240 fps to minimize the time to focus. The LUMIX GF8 realizes the high speed burst shooting at approx.5.8 fps (AFS) / approx.5 fps (AFC, 1-area AF) in 16.00-megapixel and max. 40 fps using an electronic shutter. Also, AF Tracking enables consecutive shooting to capture moving subject in sharp focus at approx.4 fps*.

    The Low Light AF help users to get in-focus shot even in extremely low-lit situations such as under the moonlight or the starry sky. Sharp focus can be set on the target subject even when you cannot use an AF assist lamp.

    In addition to the conventional Face Recognition AF, the LUMIX GF8 incorporates Face / Eye Detection AF which automatically sets focus right on the eye of human face. With the Pinpoint AF, users can magnify the target area to set focus by 5x by just touching it on the monitor. The One-shot AF enables using AF even in MF mode by just touching the icon on the screen to set rough focus on the subject and you can go back to MF just to adjust precise focus.

    The LUMIX GF8 records stunningly smooth, high-resolution full-HD 1,920 x 1,080 60p (60 Hz) / 50p (50 Hz) videos in AVCHD Progressive or MP4 (MPEG-4 / H.264) format. High quality sound can be recorded with Dolby® Digital. A Wind Cut function is also available to block out most of the noise from background wind. 

    * In 1-area-focusing AF mode.

    – Maximum time to record motion pictures continuously with [AVCHD] is 29 minutes 59 seconds in Europe and some Asian areas.
    – Maximum time to record motion pictures continuously with [MP4] is 29 minutes 59 seconds or up to 4 GB.
    – You can check the recordable time on the monitor. (For [FHD] in [MP4] format, the file size is large and so the recordable time will drop below 29 minutes 59 seconds.)

    3. Easy Wireless Connectivity via Wi-Fi® with Smartphones

    The LUMIX GF8 integrates Wi-Fi® connectivity (IEEE 802.11 b/g/n) to offer more flexible shooting experience and instant image sharing with easy operation. Once connecting the camera and smartphone/tablet installing Panasonic’s dedicated application software Panasonic Image App for iOS / Android, users can shooting / browsing / sharing images remotely. 

    Connecting the camera to the smartphone/tablet is quick and easy with a press of Fn1/Wi-Fi* button or by reading the QR code. Plus, the LUMIX GF8 users are eligible to have free 100GB storage on Google Drive™ to save photo and video data*.

    * The service is available for two years after the activation.

    4. A Host of Advanced Functions Packed in a Sleek Body with Ease of Use

    Although the LUMIX GF8 packs a host of advanced functions, it features sleek, stylish profile with high mobility.  Every part including button and dial is carefully chosen to achieve high quality design and operability. The leather-touch grip is ergonomically designed and easy to hold. Dressed in fashionable colors – silver, brown, pink and orange, the LUMIX GF8 makes perfect match for unisex users to enjoy high quality photo shooting daily.

    The LUMIX GF8 comes with Rec.Setting Reset button on the back. All recording settings can be reset with the button and it is helpful for users who made wrong settings unconsciously. 

    5. Other Features

    iA+ (Intelligent Auto) Mode for Photo and Video

    For beginners, iA (Intelligent Auto) mode supports taking beautiful pictures with a variety of shooting-assist functions including AF Tracking, Intelligent Scene Selector, Face Recognition, Intelligent ISO Control and Food Recognition.

    Scene Guide

    The Scene Guide* offers 20 sample pictures shot by professional photographers. Users can choose the one closer to the situation they are going to shoot and optimum parameters for shooting the scene will be automatically set. Furthermore, shooting procedure, technical advice and recommended interchangeable lens for the scene can be shown for users to learn photography. 

    * Video recording using Scene Guide is not possible in some scenes.

    Creative Control

    The LUMIX GF8 integrates a variety of artistic functions that adds fun to digital photography. The popular Creative Control mode features a total of 22 filter options – Expressive / Retro / Old Days / High Key / Low Key / Sepia / Monochrome / Dynamic Monochrome / Rough Monochrome*1 / Silky Monochrome*1 / Impressive Art / High Dynamic / Cross Process / Toy Effect / Toy Pop / Bleach Bypass / Miniature Effect*2 / Soft Focus*1 / Fantasy / Star Filter*1 / One Point Color / Sunshine*1 mode. Effect parameter of each mode is also adjustable. Also, LUMIX GF8 is capable of taking pictures “with” and “without” filter effect simultaneously, so that users can compare them to choose later.

    *1 For photo only.

    *2 Sound will not be recorded with [MINIATURE EFFECT] in Creative Control Mode and approximately 1/10 of the time period is recorded. (If you record for 10 minutes, the resulting motion picture recording will be approximately 1 minute long.) 

    Snap Movie

    Users can record video in designated short period of time (2/4/6/8 sec) as they shoot “moving photos”. In this function, rack focusing or addition of fade effect (color in/out, black in/out, white in/out) are available. Those short video clips are easy to be shared using Panasonic Image App and It is also possible to connect them in any order you like and even to add music instead of recorded sound on the combined file later.

    Time Lapse Shot

    The camera automatically starts recording photos at time lapse sequence once the start time, interval and the number of pictures to shoot are set. 

    Stop Motion Animation

    This function enables producing a stop motion (stop frame) video in camera with the pictures that are sequentially shot while moving the object by degrees. This effect makes the object appears as if it is moving by itself.

    Silent Mode

    This mode switches shutter from mechanical to electronic and turns all sound (AF, operation) off while suppress emission of AF assist lamp and flash with just a single setting for special shooting occasions.

    Panasonic Lumix DMC-GF8 specifications

    Body type
    Body type Rangefinder-style mirrorless
    Sensor
    Max resolution 4592 x 3448
    Other resolutions 4:3 (3232 x 2424, 2272 x 1704), 3:2 (4592 x 3064, 3232 x 2160, 1824 x 1216), 3:2 (4592 x 2584, 3840 x 2160, 1920 x 1080), 1:1 (3424 x 3224, 2416 x 2416, 1712 x 1712)
    Image ratio w:h 1:1, 4:3, 3:2, 16:9
    Effective pixels 16 megapixels
    Sensor photo detectors 17 megapixels
    Sensor size Four Thirds (17.3 x 13 mm)
    Sensor type CMOS
    Processor Venus Engine
    Color space sRGB, Adobe RGB
    Color filter array Primary color filter
    Image
    ISO Auto, 200-25600 (extends to 100-25600)
    Boosted ISO (minimum) 100
    White balance presets 5
    Custom white balance Yes (2 slots)
    Image stabilization No
    Uncompressed format RAW
    JPEG quality levels Fine, standard
    File format
    • JPEG (Exif v2.3)
    • Raw (Panasonic RW2)
    • MPO (3D)
    Optics & Focus
    Autofocus
    • Contrast Detect (sensor)
    • Multi-area
    • Center
    • Selective single-point
    • Tracking
    • Single
    • Continuous
    • Touch
    • Face Detection
    • Live View
    Autofocus assist lamp Yes
    Digital zoom Yes (2x-4x)
    Manual focus Yes
    Number of focus points 23
    Lens mount Micro Four Thirds
    Focal length multiplier 2×
    Screen / viewfinder
    Articulated LCD Tilting
    Screen size 3″
    Screen dots 1,040,000
    Touch screen Yes (with touch AF, shutter, playback, menus)
    Screen type TFT LCD
    Live view Yes
    Viewfinder type None
    Photography features
    Minimum shutter speed 60 sec
    Maximum shutter speed 1/500 sec
    Maximum shutter speed (electronic) 1/16000 sec
    Exposure modes
    • Program
    • Aperture priority
    • Shutter priority
    • Manual
    Scene modes
    • Portrait
    • Child
    • Scenery
    • Silky Skin
    • Backlit Softness
    • Relaxing Tone
    • Bright Blue Sky
    • Romantic Sunset Glow
    • Vivid Sunset Glow
    • Glistening Water
    • Clear Nightscape
    • Cool Night Sky
    • Warm Glowing Nightscape
    • Artistic Nightscape
    • Glittering Illuminations
    • Handheld Night Shot
    • Clear Night Portrait
    • Soft Image of a Flower
    • Appetizing Food
    • Cute Dessert
    • Freeze Animal Motion
    • Clear Sports Shot
    • Monochrome
    Built-in flash Yes
    Flash range 5.60 m (at ISO 200)
    External flash No
    Flash modes Auto, auto w/redeye reduction, flash on, flash on w/redeye reduction, slow sync, slow sync w/redeye reduction, flash off
    Flash X sync speed 1/50 sec
    Continuous drive 5.8 fps
    Self-timer Yes (2 or 10 secs, 3-shot/10 sec)
    Metering modes
    • Multi
    • Center-weighted
    • Spot
    Exposure compensation ±5 (at 1/3 EV steps)
    AE Bracketing ±3 (3, 5, 7 frames at 1/3 EV, 2/3 EV, 1 EV steps)
    WB Bracketing Yes (3 shots in blue/amber and magenta/green axes)
    Videography features
    Resolutions 1920 x 1080 (60p, 60i, 50p, 50i, 30p, 25p, 24p), 1280 x 720 (30p, 25p), 640 x 480 (30p, 25p)
    Format MPEG-4, AVCHD, H.264
    Videography notes 24p only available with AVCHD
    Microphone Stereo
    Speaker Mono
    Storage
    Storage types SD/SDHC/SDXC card
    Connectivity
    USB USB 2.0 (480 Mbit/sec)
    HDMI Yes (micro-HDMI)
    Microphone port No
    Headphone port No
    Wireless Built-In
    Wireless notes 802.11b/g/n with NFC
    Remote control Yes (via smartphone )
    Physical
    Environmentally sealed No
    Battery Battery Pack
    Battery description Lithium-ion battery & charger
    Battery Life (CIPA) 230
    Weight (inc. batteries) 266 g (0.59 lb / 9.38 oz)
    Dimensions 107 x 65 x 33 mm (4.21 x 2.56 x 1.3″)
    Other features
    Orientation sensor Yes
    GPS None

    Articles: Digital Photography Review (dpreview.com)

  • Lens Technique: Wide-angle portraiture with the Sigma 24-35mm F2 DG HSM Art

    Photographers tend to shy away from wide-angle lenses when shooting portraits, but DPReview Technical Editor Rishi Sanyal thinks that’s all wrong. In this video, he uses the Sigma 24-35mm F2 Art to illustrate his case for wide-angle portraits, capturing a couple of models with a setting sun in Seattle’s lovely Discovery Park. Step away from your 85mm comfort zone and learn some of Rishi’s tips for environmental portraits.

    Articles: Digital Photography Review (dpreview.com)