Blog

  • How tough can it be? LensRentals looks at why it’s so hard to make lenses

    Just check it and fix it, it can’t be that hard. Can it?

    Why can’t you just make them better? It sounds like a reasonable question until you start unpacking exactly what it entails. This is exactly what Roger Cicala and company do in the latest LensRentals blog post. As usual with Cicala’s posts, the closer he looks, the more complicated the question becomes. So why can’t everyone just (repeatably and affordably) make lenses, you know… better?

    With his usual critical (and somewhat wry) eye, Cicala looks at the importance and challenges of quality assurance (the processes to ensure you build things to standard) as well as quality control (checking that you’ve done so). This includes a look at the impacts of design tolerances, manufacturing tolerances, repeatability and the need to make products affordably-enough that people will be willing to buy them. And just what can you do with the ones that aren’t quite right?

    It’s a long article but if you’ve ever wondered why they don’t just check and fix every lens as the last step of the production line, or you’ve found yourself using the phrase ‘you get what you pay for’ and you’d like to understand why it’s often true, it’s well worth a read.

    And, if you get a chance to read it all, we’d love to know whether you end up more impressed by Leica’s ability to make expensive, mechanically simple, manual focus single-focal-length lenses really well or by the ability of the big brands to build collapsable, image stabilized kit zooms for next-to-nothing and have them work at all. Let us know in the comments.

    Articles: Digital Photography Review (dpreview.com)

  • Architectural Cultures Condensed: Vernacular Dwelling Collages

    [ By Steph in Art & Drawing & Digital. ]

    architecture collage 1

    Can you distill the architecture of a particular city down to an image of just a single building? Not effectively – unless you’re Sweden-based artist Anastasia Savinova, who scouts and photographs the most distinctive typologies of specific locations and then blends them into a single structure via paper collage. Entitled “Genuis Loci,” the series consists of monstrous, Frankenstein-like cobbled buildings packing in as much visual information as possible.

    architecture collage 9

    architecture collage 11

    architecture collage 7

    “Traveling around cities and countries, I take pictures of buildings, look into windows sneakily, go to local shops, flea markets and bars, watch everyday life – all this helps to build the feeling of the Place. This feeling becomes a foundation for a series of large-scale collages. The Integral Image emerges from visual information and a dozen of associations. While architecture and landscape are visual components of the integral image of the Place, at the same time, this image is inseparably linked with a mentality and a way of life.”

    architecture collage 2

    architecture collage 3

    architecture collage 4

    “It is saturated with ‘an incorporeal something.’ Ancient Romans called it ‘genus loci’ – the protective spirit of a place. In contemporary usage, ‘genus loci’ refers to a location’s distinctive atmosphere. A big house on each collage is composed of many buildings, which are typical for a particular country or city, in their connection with the land and the spirit of the place.”

    architecture collage 11

    architecture collage 8

    architecture collage 6

    Some almost look like they could be real structures, while the rest are pure fantasy, towering dozens or hundreds of feet into the air, sprouting forests from their roofs or balancing precariously on ladders. Can you guess from the images which countries are represented here? If you can’t figure it out, check out Savinova’s website for all the specifics.

    Share on Facebook


    [ By Steph in Art & Drawing & Digital. ]

    [ WebUrbanist | Archives | Galleries | Privacy | TOS ]


    WebUrbanist

  • Nifty fifty: Hands-on with the Hasselblad H5D-50c Wi-Fi

    Hasselblad H5D-50c Wi-Fi Hands-On Review
    www.hasselblad.com

    Following our recent field test of the Phase One 645DF+ and an accompanying IQ250 back, we thought it would be interesting to see how the same 50MP CMOS sensor is employed by another medium-format beast: the Hasselblad H5D-50c Wi-Fi. This particular Sony sensor is interesting. It may not be the highest resolution sensor in its size class, but its CMOS technology allows ISO sensitivity ratings that its CCD rivals simply can’t match. This extra sensitivity – largely due to the low noise CMOS architecture – lends immense flexibility to cameras that traditionally have been rather tied to the studio and are often only capable of location work when accompanied by a few powerful lights. The low noise sensor combined with the large surface area of the medium format sensor also lends the camera slightly more Raw dynamic range than even the best full-frame cameras, something landscape shooters are sure to appreciate.

    That the majority of medium-format camera brands want to be able to offer the features that this 50MP sensor makes possible is understandable, and in fact Pentax, Phase One, Leaf and Hasselblad have all built solutions around it. Of course, having the same sensor doesn’t automatically guarantee that all of these cameras will give exactly the same results. 

    In Use

    Key Specification:

    • 50MP CMOS sensor (32.9 x 43.8mm)
    • ISO 100-6400
    • 3.0″ 460k-dot LCD
    • Up to 1.5 fps continuous
    • Built-in Wi-Fi
    • 153 x 131 x 205mm / 6.0 x 5.2 x 8.1in
    • 2290g / 5lb

    The Hasselblad H5D-50c Wi-Fi is a medium-format DSLR camera that uses a back fitted with a 50MP sensor. The sensor measures 43.8 x 32.9mm and has a pixel array of 8272 x 6200 that outputs Raw images weighing in between 65 and 90MB. The Raw files are saved in Hasselblad’s own 3FR format that uses lossless compression. The camera is capable of simultaneous JPEG output as well – but JPEG files are only 12.7MP and measure 4128 x 3088. Think of them as the digital equivalent of a Polaroid proof print.

    The H5D-50c’s CMOS sensor allows an ISO range of 100-6400 which is slightly wider and shifted towards higher sensitivities when compared to the 50-800 range of the company’s CCD offering. Color is recorded in 16-bit ‘definition’ and rendered according to Hasselblad’s Natural Color Solution color profile. The company recommends its own Phocus software for post-production work and for tethered shooting, but the files are also compatible with Adobe’s Camera Raw application – all of which are included in the purchase price of the kit.

    Other primary specifications worth pointing out include a shutter speed range of 34 minutes to 1/800sec – more impressive at the longer end than the shorter – spot, center-weighted and center-spot metering across a EV1-21 range, and a single-spot AF system that works between EV1-19.

    The new features of the H5D-50c Wi-Fi obviously include the integration of Wi-Fi wireless communication in the digital back. This allows the user to connect the camera to an iOS smart device so that it can be controlled remotely and images can be viewed, before and after shooting, on the screen of an iPhone or iPad. An app called Phocus runs the connection and allows a good deal of control over the camera’s settings, as well as the ability to browse images stored on the card loaded in the camera.

    Live View is another important ‘new’ feature, giving photographers the chance to see through the lens via the rear screen. At the same time you can use the built-in level to check the camera is straight, and once images are captured it’s possible to preview focused areas via magnification or peaking, as well as see over- and under-exposure warnings.

    This is also the first new Hasselblad for some time to accept film backs, so users can switch easily between digital and traditional media.

    Handling

    The body of the H5D-50c is a good deal more modern than the 1980’s Mamiya derivative that is the Phase One 645DF+ (which has since been replaced by the Phase One XF). The well-designed hand grip makes the weight of the body pleasant to hold, and the lens and back feel balanced. Although the kit – even with the small standard 80mm lens – is heavy, the designers have made a great job of reducing the strain through the way we are forced to hold the body. During my time with the camera, non-photographers consistently commented to me on how big it was, but also how comfortable it is to hold and use. Probably due to the form-factor, many people also thought it was a video camera.

    Hasselblad has arranged the majority of control points around the bulky grip of the right hand. An LCD panel on the top of the grip displays options and settings with the resolution and panache of yesterday’s Casio digital watch – but without the screen size. This tiny display is the interface between the photographer and a mass of complicated functions, and while it can do the job it really isn’t ideally suited to it.

    The grip is equipped to keep all of your fingers busy, with buttons on the back for the thumb, on the top for fingers and on the front for stretched out digits. It is remarkable how much can be accessed without changing the way the camera is held – including the mirror lock-up, depth-of-field preview and the True Focus button. With the HVD 90x prism head attached, as it was for the duration of this test, the photographer has access to an exposure compensation button – at a stretch – and the button for adjusting the exposure mode. All adjustments of features and functions are dealt with efficiently by a pair of small but comfortable wheels under the thumb and forefinger.

    Further control is afforded by the screen on the digital back and the accompanying small, spongy buttons. While 35mm-style DSLRs can host all their features on a rear screen, this screen only really allows us to alter white balance, image format and other issues relating directly to the operations of the back. The back is attached to the body alright, and the two communicate, but the two are not fully integrated. You can’t adjust body functions via the back, so the real estate of that spacious rear screen is largely redundant when not being used to view what has just been captured.

    Working with a single AF point that is fixed in the middle of the frame is par for the course for a lot of medium-format shooters, but hardly ideal. Although the system is reasonably quick I think it is fair to say that autofocus isn’t one of the camera’s strongest points – as indeed it isn’t in the Phase One 645DF+. When tripod-mounted, you’re obviously better off focusing manually using the magnified view in Live View, but when working handheld, AF is much improved by the addition of Hasselblad’s True Focus system.

    True Focus makes a real difference if you’re a ‘focus lock and recompose’ kind of a photographer. After locking AF and recomposing your scene, the camera measures the angle that the camera has been shifted by, and adjusts the focus position accordingly to compensate for the fractionally greater subject to imaging plane distance. It is very clever, and works very well most of the time.

    As with other large-bodied medium-format cameras, some caution needs to be exercised when working with the H5D hand-held. No matter how comfortable the grip and how well suited the camera seems to off-tripod operation, the slap of the mirror is a significant hazard to image sharpness, especially at shutter speeds below 1/250sec.

    Image quality

    I think most experienced medium-format photographers will be inclined to forgive some handling irritations for the sake of the image quality (they’re probably used to doing exactly that). And for me, the detail and dynamic range of the successful frames I shot with the H5D-50c worked like some memory-obliterating drug, making me forget about how awkward the camera can – sometimes – be to use. 

    Unsharpened Sharpened

    Images from this camera look really quite soft in their Raw state, which alarmed me at first. They need a good deal of sharpening applied. However, when used at low ISO settings and at an optimal aperture, the amount of detail captured is fabulous.

    Hasselblad seems to have set the processing in Phocus to prioritize noise reduction over detail, so images are less noisy than those shot on the Phase One IQ250 back and opened in Capture One Pro – but they need a good deal more sharpening to bring out textures in the subject matter. When the same images are opened in Adobe Camera Raw the amount of noise from the two backs is much more comparable. 

    Dynamic range is extensive, and the camera is capable of capturing a wider range of tones than the best full-frame DSLRs. As is the case generally with digital capture, it is easier to lift shadows than to recover blown highlights: once pixels saturate and clip, there’s no information to recover. Modern CMOS sensors like this one can retain a truly astonishing amount of detail in shadow areas, with little of the noise and / or banding penalty that we might have expected in previous-generation CCD sensors. This low noise CMOS architecture combined with the massive amount of light the large medium format sensor can collect means photographers can deal with high contrast scenes by exposing for highlights and tone-mapping shadows in post.

    Unfortunately, exposing in this manner isn’t helped by the camera’s unsophisticated metering system, nor the fact that the rear screen is not a very reliable visual gauge of what has been captured – other than when the histogram display is showing. There is a clipping display option, but it is more a reflection of what will be lost in the JPEG images rather than what will be unrecoverable in the Raw files. 

    With HCD 28mm ISO 100, f/14, 0.3sec. Processed in ACR with -38 highlights, +100 blacks, no shadow correction. Processed in ACR with -38 highlights, +100 blacks, +90 shadow correction.

    I found Hasselblad’s color quite difficult to get used to, and in some cases it took a while to make it work. I suppose it is hardly surprising that color, dynamic range and sharpness are easier to deal with in the company’s Phocus software than they are in Adobe Camera Raw, but even so there were occasions I struggled to get images to look the way I remembered seeing the original scene.

    Summing up

    This is the third medium-format camera I have tested in recent months so it is almost impossible not to compare the Hasselblad H5D-50c Wi-Fi in some ways to the Phase One 645DF+ and the Leica S Type 007. Although different in handling and specification, the Hasselblad H5D-50c Wi-Fi is generally quite similar to the Phase One camera; as it is based on a older body, uses the same sensor, has Wi-Fi and Live View – but both seem very clunky when compared to the slick operation of the Leica. The Hasselblad mirror is less violent than the Phase One unit, and the body handling is overall more comfortable and better thought-out, but the integration of the digital back is less complete.

    I appreciate being able to use flash at all shutter speeds, but found it hard to accept that my fastest shutter speed under any type of light was a very restricted 1/800sec. To me, that is a serious short-coming.

    While obviously the quality of the images a camera produces is of the upmost importance, then surely the comfort of the photographer should take more precedence than it does with this H5D body. Most medium-format bodies are actually fairly old fashioned, and the H5D is a prime example. The company may have added some new features to jazz it up, but in my opinion, the whole system could do with a refresh.

    ‘The image quality it produces is really excellent,
    but there are so many other things the H5D-50c Wi-Fi could do better.’

    Perry Oosting, the Hasselblad CEO, hinted in an interview with us that things are about to change and modernize at Hasselblad, and that the core products would be first on the list. I hope that means we will see something more suited to these modern times than this very able but imperfect machine. As I have said, the image quality it produces is really excellent, but there are so many other things the camera could do better.

    We like: 

    • Fabulous image quality
    • Great handling
    • Flash sync at all speeds

    We don’t like: 

    • Body and back not fully integrated
    • Top shutter speed is too slow
    • Accuracy of rear screen preview

    Real-world Samples

    $ (document).ready(function() { SampleGalleryV2({“containerId”:”embeddedSampleGallery_8580589921″,”galleryId”:”8580589921″,”isEmbeddedWidget”:true,”standalone”:false,”selectedImageIndex”:0,”startInCommentsView”:false,”isMobile”:false}) });
    Articles: Digital Photography Review (dpreview.com)

  • Olympus SH-3 with 4K video recording announced in Japan

    Olympus Japan has announced the Stylus SH-3, a relatively minor update to the SH-2 model introduced last March. The SH-3 offers 4K video at a paltry 15 fps and gains a half dozen new Art Filters. Otherwise, it features the same 16MP BSI CMOS sensor as the SH-2, as well as its predecessor’s 25-600mm equivalent F3.0-6.9 24x optical zoom lens, 5-axis image stabilization and night scene capture mode. 

    The Stylus SH-3 will be available in Silver and Black in Japan on February 26 for just under ¥40,000 (~$ 350). It’s unclear whether there are any plans to release the camera outside of Japan.

    Olympus Stylus SH-3 specifications

    Body type
    Body type Compact
    Body material Aluminum alloy
    Sensor
    Max resolution 4608 x 3456
    Image ratio w:h 1:1, 4:3, 3:2, 16:9
    Effective pixels 16 megapixels
    Sensor photo detectors 17 megapixels
    Sensor size 1/2.3" (6.17 x 4.55 mm)
    Sensor type BSI-CMOS
    Processor TruePic VII
    Color space sRGB
    Color filter array Primary color filter
    Image
    ISO Auto, 125-6400
    White balance presets 4
    Custom white balance Yes
    Image stabilization Sensor-shift
    Image stabilization notes 5-axis (yaw, pitch, roll, up/down, left/right)
    Uncompressed format RAW
    JPEG quality levels Fine, normal
    File format
    • JPEG (Exif v2.3)
    • Raw (Olympus ORF format)
    Optics & Focus
    Focal length (equiv.) 25–600 mm
    Optical zoom 24×
    Maximum aperture F3.0 – F6.9
    Autofocus
    • Contrast Detect (sensor)
    • Multi-area
    • Center
    • Selective single-point
    • Tracking
    • Single
    • Continuous
    • Touch
    • Face Detection
    • Live View
    Autofocus assist lamp Yes
    Digital zoom Yes (4x)
    Manual focus No
    Normal focus range 10 cm (3.94″)
    Macro focus range 3 cm (1.18″)
    Screen / viewfinder
    Articulated LCD Fixed
    Screen size 3″
    Screen dots 460,000
    Touch screen Yes
    Live view Yes
    Viewfinder type None
    Photography features
    Minimum shutter speed 30 sec
    Maximum shutter speed 1/2000 sec
    Exposure modes
    • iAuto
    • Program Auto
    • Manual
    Scene modes
    • Portrait
    • e-Portrait
    • Landscape
    • Interval
    • Sport
    • Indoor
    • Self portrait
    • Sunset
    • Cuisine
    • Documents
    • Beach & Snow
    • Super macro
    • Backlight HDR
    • Night capture
    • Night+portrait
    • Night scene
    • Fireworks
    • Handheld star light
    • Live composite
    Built-in flash Yes
    Flash range 8.30 m (at ISO 3200)
    External flash No
    Flash modes Auto, redeye reduction, fill-in, off
    Continuous drive 11.5 fps
    Self-timer Yes (2 or 12 sec, custom)
    Metering modes
    • Multi
    • Center-weighted
    • Spot
    Exposure compensation ±2 (at 1/3 EV steps)
    Videography features
    Resolutions 3840 x 2160 (15 fps), 1920 x 1080 (60p, 30p), 1280 x 720 (30p), 640 x 480 (30 fps)
    Format H.264
    Videography notes High speed: 120 fps (1280 x 720), 240 fps (432 x 324)
    Microphone Stereo
    Speaker Mono
    Storage
    Storage types SD, SDHC, SDXC, Internal Memory
    Storage included 37MB
    Connectivity
    USB USB 2.0 (480 Mbit/sec)
    HDMI Yes (micro-HDMI)
    Microphone port No
    Headphone port No
    Wireless Built-In
    Wireless notes 802.11b/g/n with smartphone app
    Remote control Yes (wired or via smartphone)
    Physical
    Environmentally sealed No
    Battery Battery Pack
    Battery description LI-92B lithium-ion battery & USB charger
    Battery Life (CIPA) 380
    Weight (inc. batteries) 271 g (0.60 lb / 9.56 oz)
    Dimensions 109 x 63 x 42 mm (4.29 x 2.48 x 1.65″)
    Other features
    Orientation sensor Yes
    Timelapse recording Yes
    GPS None

    Articles: Digital Photography Review (dpreview.com)

  • How to Take Care of Your Camera in Cold Weather

    Mid-day, mid-winter, Alaska light. It just doesn't get any better.

    Where I live, it gets cold. Not your “Brrr, I need to put on a sweater” kind of cold, but genuine, bone-chilling, spit-freezes-before-it hits-the-ground, kind of cold. Here in Fairbanks, Alaska, winter temperatures regularly drop far into the negatives, and yearly we suffer through snaps that send the mercury plummeting to -40F (-40C).

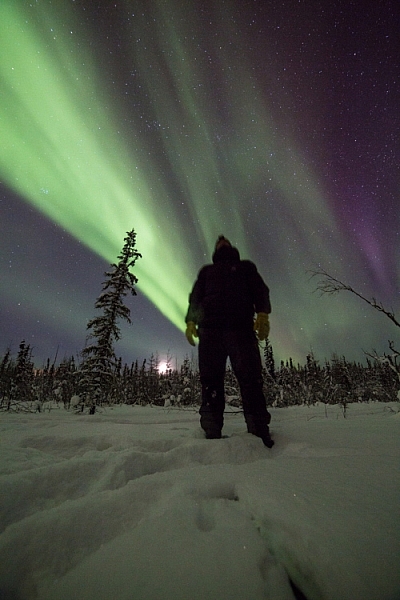
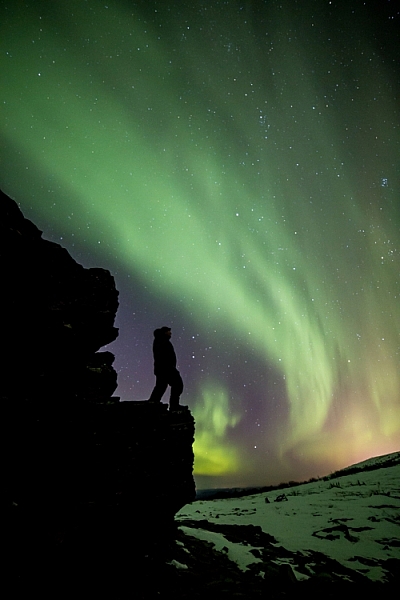
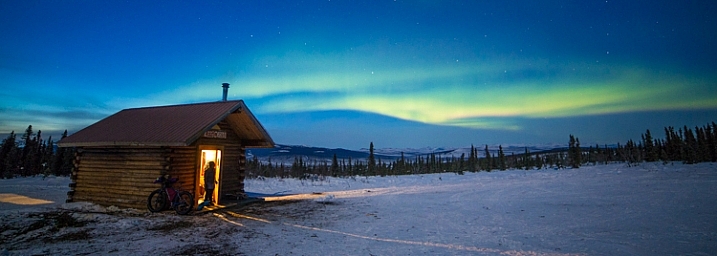
    You’d think that in such conditions I wouldn’t want to step outside, let alone take photos, but you’d be wrong. Winter light, what few hours there is of it, is absolutely beautiful. That sweet, crisp glow can pull me from the deepest funk, and lure me out with a camera in hand. During many long winter nights, the aurora borealis dances overhead, and that too can draw me from my cozy cabin, into the snowy forest to make images. On the days I made the two images below, it was seriously cold, but that light, yep, that light will get me outside.

    Low winter sun, and frosted birches near Fairbanks, Alaska. AK-FAI-Winter-sun-112172-17

    To venture out in those temperatures, you’ve got to be prepared. You need the right clothes to stay warm, and you’ve got to make sure your camera equipment is ready too.

    Forget about fashion

    To shot the aurora during mid-winter in Alaska you need to dress warm!

    To shot the aurora during mid-winter in Alaska, you need to dress warm!

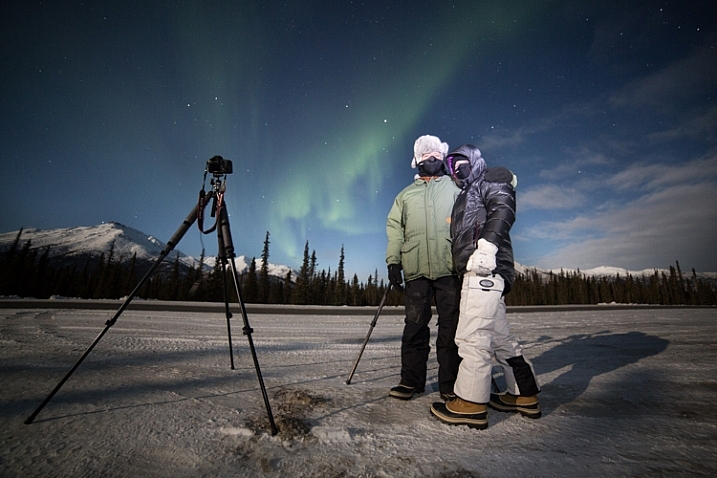
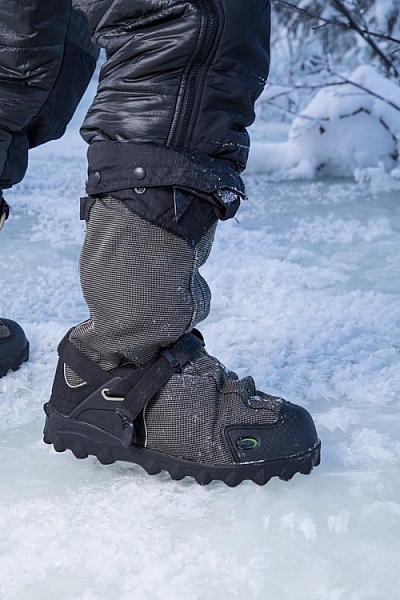
    You’ve got to dress right. It doesn’t matter what the light is doing, if you get frost-bite on your fingers, and can’t operate the camera. When dressed in my winter-photo clothing, I feel a bit like an onion, wrapped in layer upon layer. From inside to outside my system goes like this: long underwear, fleece or wool sweater and pants, down or synthetic vest, 800 fill down jacket with hood, windproof Thinsulate pants, two pairs of thick wool socks topped by expedition quality winter boots, a musher’s style hat complete with ear flaps, a balaclava or face mask, and thin nimble gloves with a pair of expedition overmitts dangling from wrist straps. Last, I’ll often throw a couple of chemical hand-warmers into my jacket pockets. When temperatures drop to -40F, it’s best not to mess around.

    Two of my clients on an aurora photography tour, dressed for the weather.

    Two of my clients on an aurora photography tour, properly dressed for the weather.

    The author's well-worn NEOS overboots.

    The author’s well-worn NEOS insulated overboots.

    Stay Charged

    The fluctuations of electricity mean that a cold battery cannot kick out the same amount of electricity as a warm battery. This means that on a brutally cold day, your camera or flash batteries will last only a small fraction of the time they normally would at room temperature. It’s a problem easily solved by carrying a spare battery or two.

    A backup battery will let you swap out the cold, dead one in your camera, but there is a hitch: the spares should not be kept in your camera bag, but in an inside jacket pocket. That way they are warm when they go into the camera. When the dead battery warms back up in your pocket (with the help of the aforementioned chemical hand warmers) it will be ready to use for a while again. I find I can shoot at extremely cold temperatures for the better part of day by cycling two batteries back and forth from my pocket to my camera. Though this will vary a lot, depending on how power-hungry your camera is.

    AK-FAI-Aurora-111154-35.jpg

    Avoiding Bad Breath

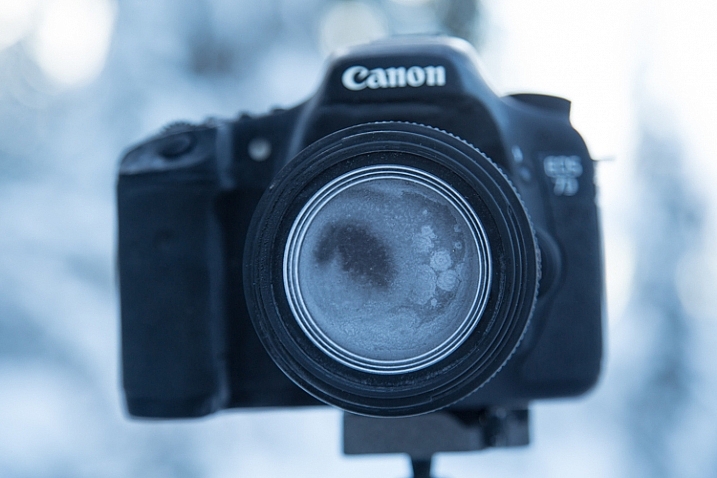
    The cold comes with other risks, one in particular, can ruin your day of photography, and that is – watch your breath. I mean it. A mistimed, warm, humid, breath will condense on your lens, resulting in a layer of milky frost on the glass. It doesn’t matter how much money you spend on your lenses, no amount of sharpness will make up for that kind of damage. Wiping at it, usually just smudges it more, and defrosting it inside (see below), can take hours. Watch where you breathe, if you turn your camera around to check lens settings, don’t exhale. I also usually wear a neck gaiter or balaclava that I pull up over my mouth and nose. So with your mouth covered, your breath is directed up, where it frosts on your eyelashes instead of your camera.

    This is what happens if you accidentally breathe on your lens during a cold weather shoot.

    This is what happens if you accidentally breathe on your lens during a cold weather shoot.

    Lens Caps Exist for a Reason

    Breath is the usual culprit of fogged lenses, but when shooting at night, there is always the chance that natural frost will form. To avoid this, use your lens cap when you aren’t shooting. If you are walking from one location to another, taking a break, or searching for a new composition, put the cap back on your lens. When I’m out shooting the aurora at night, my cap is on my lens, even if I’m just walking a short distance to a new shooting location.

    AK-Interior-Whites-103193-8

    Back Indoors

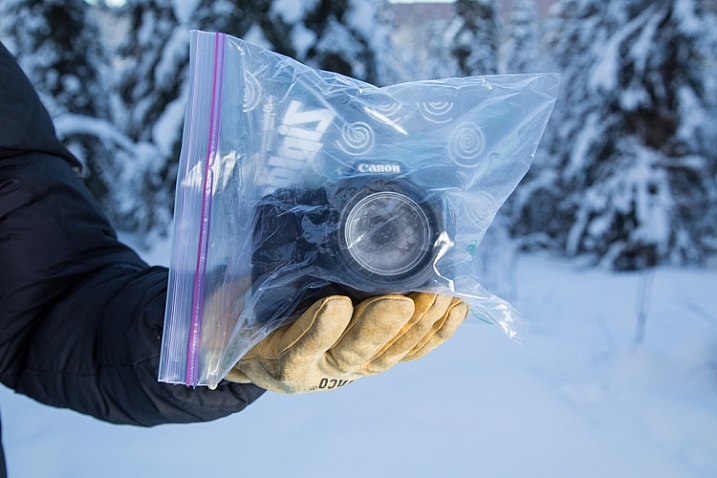
    Last, and perhaps most importantly, is the return indoors. You know how on a hot day, your cold beer glass gathers condensation? Ever watched how those drips can form and run down the bottle, pooling in a messy ring on the hard-wood table? Imagine that happening to your camera gear. It can, and it will. When you step back indoors to take a break, warm up, or finish up for the day, place your camera and lenses into an airtight bag.

    A properly bagged and sealed camera, ready to be taken back indoors after a cold outdoor shoot.

    A properly bagged and sealed camera, ready to be taken back indoors after a cold outdoor shoot.

    Ziplocks are good, but I favor light-weight roll-top dry bags like those used by boaters to keep their gear dry. These are tough, reusable, and work like a charm. Once sealed up tight in a ziplock or dry bag, condensation can’t form on your gear. Just let your camera warm up to room temperature before you pull it out.

    AK-NoatakPreserve-KellyRiver-1083-491

    The cold scares a lot of photographers, and make no mistake, a frigid, mid-winter Alaskan night is nothing to mess around with. But with a few precautions – warm clothes, spare batteries, avoiding frost, and protecting against condensation – you can take advantage of the stellar beauty of crisp, clear, days and nights like this one.

    googletag.cmd.push(function() {
    tablet_slots.push( googletag.defineSlot( “/1005424/_dPSv4_tab-all-article-bottom_(300×250)”, [300, 250], “pb-ad-78623” ).addService( googletag.pubads() ) ); } );

    googletag.cmd.push(function() {
    mobile_slots.push( googletag.defineSlot( “/1005424/_dPSv4_mob-all-article-bottom_(300×250)”, [300, 250], “pb-ad-78158” ).addService( googletag.pubads() ) ); } );

    The post How to Take Care of Your Camera in Cold Weather by David Shaw appeared first on Digital Photography School.


    Digital Photography School

  • How to Use the X-Rite ColorChecker Passport to Obtain Perfect Color

    There are two ways you can approach color reproduction in photography. The first is to try and reproduce the colors of the subject as accurately as you can. If you take a photo of someone wearing a red sweater, then you want the photo of that sweater to have exactly the same shade of red as the real thing. The other way is to produce colors that are pleasing to the eye, rather than accurate.

    The key point to understand here is that your camera isn’t designed to produce accurate colors, it is biased towards the second approach. The reason behind this is probably quite simple. Camera manufacturers want you to be happy with the photos that your camera produces, and that means tweaking colors so that they look more attractive.

    ColorChecker Passport & Lightroom

    The way your camera records color is determined by the color and white balance settings selected when you take the photo. This is especially true for JPEG files – if you use the Raw format you have the freedom to change those color settings when you process the file.

    Each manufacturer has a different name for the setting used to control color. Canon calls it Picture Styles, Nikon – Picture Control, Sony – Creative Style, Pentax – Custom Image, Olympus – Picture Mode and Fujifilm – Film Simulation.

    Let’s look at Canon’s Picture Styles as an example (I’m familiar with these as a long time Canon user). Their neutral and faithful Picture Styles are designed to give reasonably accurate colors, but the others aren’t. Portrait is designed to give good skin tones, landscape for strong greens and blues, and standard to make good reds. You will not achieve accurate color with the portrait, landscape or standard Picture Styles, but you may well end up with pleasing colors.

    But what if you simply want accurate color? There are a number of reasons why you might want to do this.

    • When photographing something that needs to be recorded accurately, such as product shots for a commercial client.
    • When photographing flowers, where it is very difficult to tell if the colors are accurate.
    • To make sure that photos taken with two different cameras match as closely as possible.
    • To simply start with a photo that has accurate colors as the first step in post-processing, so you can decide in which direction to go, from a neutral starting point.

    The X-Rite ColorChecker Passport

    The truth is that if you want accurate color, then for the reasons mentioned above, you can’t rely on your camera’s settings – you need some outside assistance. That’s where the X-Rite ColorChecker Passport comes in. This relatively inexpensive device is simple to use, and just as importantly from the point of view of a Lightroom user, integrates neatly with Lightroom.

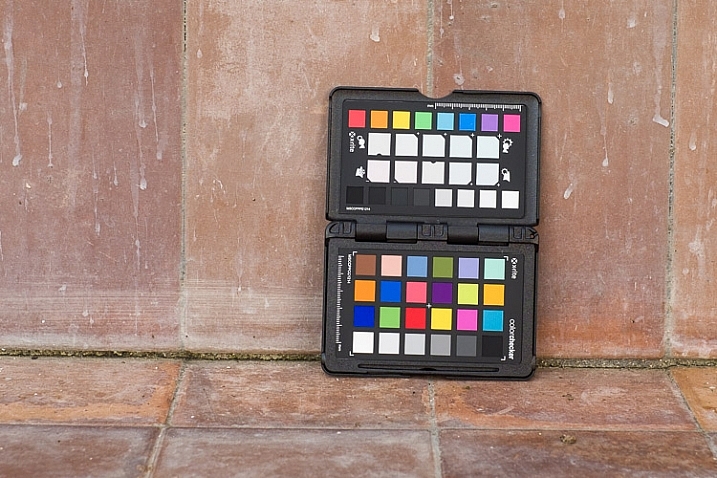
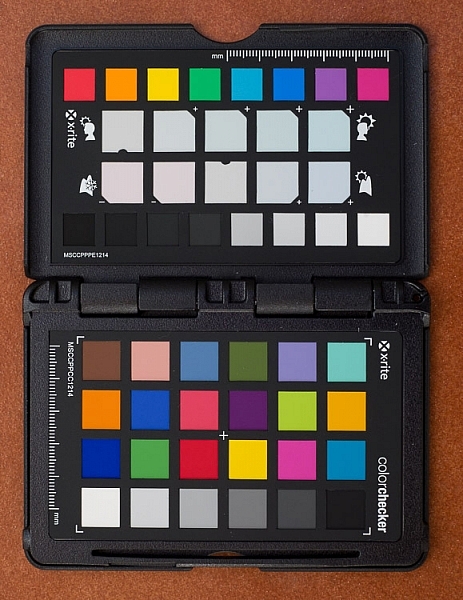
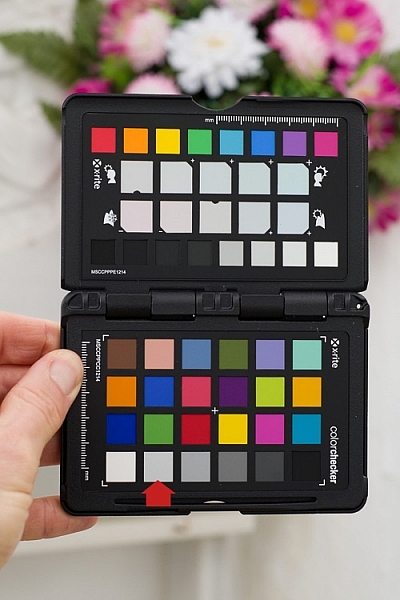
    The X-Rite ColorChecker Passport itself is made of grey plastic, and opens up to display the color patches shown here.

    ColorChecker Passport & Lightroom

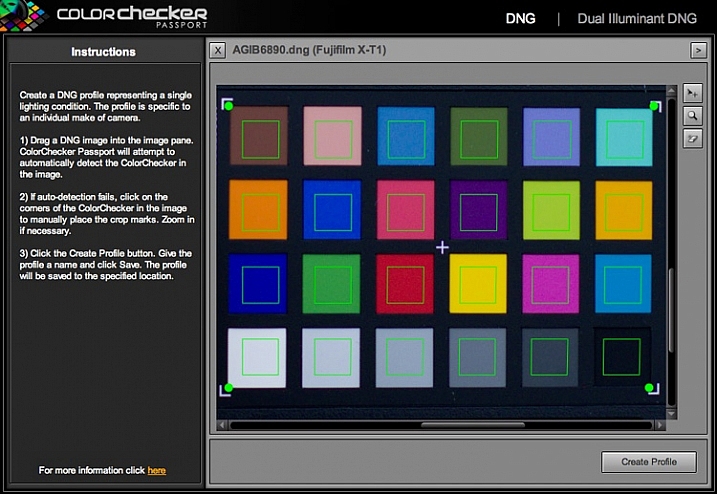
    The ColorChecker Passport is easy to use. Simply take a photo of the Passport in daylight (using the Raw format), convert it to DNG (use the Export option in Lightroom to do so) and drag the DNG file to the ColorChecker Passport software.

    ColorChecker Passport & Lightroom

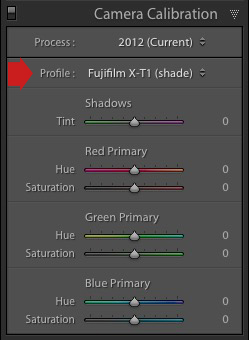
    The software creates a profile, calibrated for your camera, and stores it along with the other profiles found in Lightroom’s Camera Calibration panel. You’ll need to restart Lightroom to see it, but once you have done so, you can apply that profile to any photo taken in daylight with that camera. The profile is also available in Photoshop’s ACR if you need it.

    Note: The software also installs a Lightroom plug-in that you can use to create the profile by selecting the photo containing the ColorChecker Passport, going to File > Export and selecting the ColorChecker Passport preset.

    ColorChecker Passport & Lightroom

    The next two photos show the difference that using the calibrated profile can make. Both were created from the same Raw file. The first uses the Velvia camera profile specific to Fujifilm cameras. The second uses the Camera profile that I created using the ColorChecker Passport. This photo has the most accurate color, although it may not be as pleasing to the eye as the first, which uses a profile designed to make the photo look good.

    ColorChecker Passport & Lightroom

    ColorChecker Passport & Lightroom

    Dual Illuminant Profile

    You can also create a different type of profile called a Dual Illuminant Profile. To do so, you need two photos of the ColorChecker Passport taken with the same camera at the same ISO setting, but under different light sources. One should be daylight, and the best light source for the second one is probably tungsten. A Dual Illuminant Profile is more accurate as it takes into account the way sensors record light differently, under different light sources.

    Using the ColorChecker Passport for White Balance

    The final part of the color accuracy equation is white balance. You really shouldn’t rely on your camera’s auto white balance setting, as it can be misled by scenes that have more than average amounts of colors like red or blue in them.

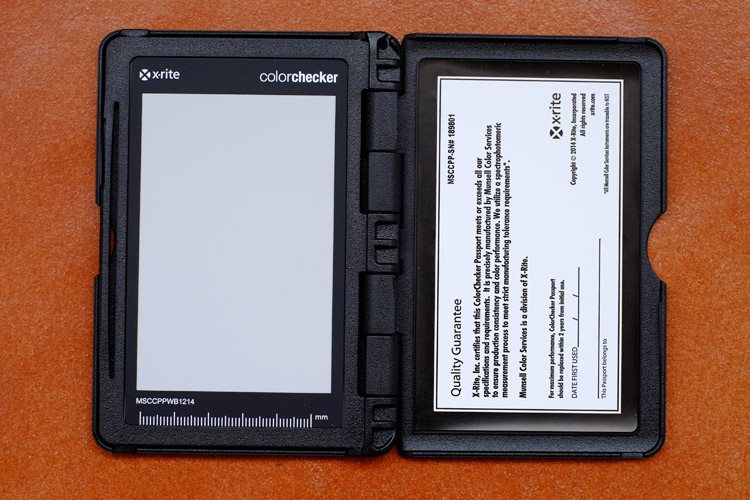
    The ColorChecker Passport is small enough to carry around with you just about everywhere. That means you can use it on location, to record colors accurately, and set white balance. The Passport also has another panel that you can use to take a white balance reading, and create a custom white balance setting on location.

    ColorChecker Passport & Lightroom

    Alternatively, you can take a photo of the Passport’s color swatches in the same light as the subject, and use it to create a new profile. Then, in Lightroom’s Develop module, you can use the White Balance Selector to click on the 18% grey swatch second from left on the bottom row (indicated below). This method ensures both accurate color (from the profile) and accurate white balance (from the 18% grey swatch).

    ColorChecker Passport & Lightroom

    Have you use a Coler Checker before? Please share your experiences and comments below.


    The Mastering Lightroom CollectionMastering Lightroom ebook bundle

    My Mastering Lightroom ebooks are a complete guide to using Lightroom’s Library and Develop modules. Written for Lightroom 4, 5, 6 and CC  they  show you how to import and organise your images, use Collections, creatively edit your photos and how to work in black and white. Grab this book on sale now at 40% off over at Snapndeals, for a limited time only.

    googletag.cmd.push(function() {
    tablet_slots.push( googletag.defineSlot( “/1005424/_dPSv4_tab-all-article-bottom_(300×250)”, [300, 250], “pb-ad-78623” ).addService( googletag.pubads() ) ); } );

    googletag.cmd.push(function() {
    mobile_slots.push( googletag.defineSlot( “/1005424/_dPSv4_mob-all-article-bottom_(300×250)”, [300, 250], “pb-ad-78158” ).addService( googletag.pubads() ) ); } );

    The post How to Use the X-Rite ColorChecker Passport to Obtain Perfect Color by Andrew S. Gibson appeared first on Digital Photography School.


    Digital Photography School

  • The Modern Cyclist: 14 Bold Bike Ideas & Innovations

    [ By Steph in Design & Products & Packaging. ]

    bike postale

    Minimalist frames, technology-equipped accessories, 3D printing and lots of multi-functionality make bikes more convenient, safe, fun and beautiful, as proven by these 14 cycling concepts and innovations. With modular parts, commuter-friendly features and designs that make racing more fun for casual cyclists, bikes get a functional makeover for the modern age.

    Archont Electro E-Bike
    bikes archont

    bikes archont 2

    bikes archont 3

    Isn’t this bike a beauty? The Archont by Ono features the profile of a vintage motorcycle, but it’s an electric bicycle with a handcrafted stainless steel frame and 29-inch front wheel. The curvaceous cruiser has a 72-volt battery with a range of 99 kilometers and can go up to 80 km/h.

    fUCI Bike: Fast Road Bike for Non-Racers
    bike fuci

    bikef uci 2

    bike fuci 3

    bike fuci 4

    Most racing bikes are designed to the standards of the UCI (Union Cycliste Internationle), the governing body of every major bike tour in the world, to keep the races fair. But not everyone who wants a fast bike wants to compete in official races, and there are lots of fun features their bikes could have without these regulations. Designer Robert Egger presents fUCI (eff UCI), which has a larger back wheel, electric motor in the hub, a storage space in the wheel and a smartphone mount.

    Recoiling Plume Mudguard
    bike plume mudguard

    bike plume mudguard 2

    bike plume mudguard 3

    This mudguard has literally got your back when it starts raining, keeping you from getting splattered. With a rubber mount stretching to fit any standard seat post size, the simple add-on absorbs shock so it won’t automatically fold up when you hit a bump. Resistant to rust and corrosion, it suspends over the real wheel or retracts within seconds.

    Sno-Bike
    bike snow

    bike snow 2

    Combining two entirely separate sports, the Sno Bike concept by Venn Industrial Design Consultancy features a Z-shaped tensile frame linking a rear wheel to a single ski controlled by the handlebars. How would it actually handle in real-life conditions? It’s impossible to say, since it’s just a concept, but it looks like fun.

    Shibusa Bicycle with Swappable Electric-Assisted Parts
    bikes shibusa

    bikes shibusa 2

    This sleek black modular bike can be boosted with electric components or made back into a regular bicycle just by swapping a few parts. The award-winning Shibusa design eliminates the bulkiness associated with many electric bikes for a “hassle-free commuter” offering plenty of flexibility. Modular components include a stand-alone bike light, battery pack, storage rack and charge monitor.

    Next Page – Click Below to Read More:
    The Modern Cyclist 14 Bold Bike Ideas Innovations

    Share on Facebook


    [ By Steph in Design & Products & Packaging. ]

    [ WebUrbanist | Archives | Galleries | Privacy | TOS ]


    WebUrbanist

  • ‘We want to make lenses that can be used forever’: Sony engineer discusses G Master lenses

    ‘We want to make lenses that can be used forever,’ says a senior engineer behind Sony’s new G master lenses. At the launch of the ‘G Master’ range of high end lenses, we spoke to Motoyuki Ohtake, Distinguished Engineer in Sony’s Lens Design Department about the process and the philosophy behind the latest lenses.

    The development process series involved re-thinking several parts of the design and manufacturing process, he says.

    Motoyuji Ohtake, Distinguished Engineer, Opto Design Department, Core Technology Division, Digital Imaging Business Group at Sony.

    To understand how the lenses came about, he explained the usual process of lens development. ‘Sometimes we propose a new lens but often it comes from the product planning department [the marketing department that assesses potential requirements and demands]. We then make a series of rough designs, some are big, with high optical performance, others are more compact but maybe not so optically strong. We discuss which design to proceed with, based on what we think is the optimal balance or cost, performance and size to make the perfect product.’

    After deciding which of the initial designs to pursue, there’s a great deal of collaboration between teams, he explains: ‘we work with the mechanical team, the lens motor team, the lens control team, the lens element team and maybe the equipment team who will have to prepare the manufacturing process.’ Each of these team feeds its expertise into the design. ‘Maybe the optical team proposes a new lens design and the motor team tells us which motor is best. Or warn us if the focus will be too slow. They feed back about the mechanical aspects,’ he says.

    The G Master series required many of these teams to re-think their parts of the process, from design to manufacture.

    Re-thinking basic assumptions

    ‘For the G Master lenses we decided we would assess the spatial frequency at 50 lines per mm,’ says Ohtake: ‘Usually lens makers, including ourselves, evaluate lenses at 10 and 30 lpmm (or 10, 20 and 40 for Carl Zeiss-branded optics).’

    ‘At the start of the process we all agreed we should change the spacial frequency [to a more challenging target],’ he says: ’but which is best to get good performance? We could design for 100 lpmm but the lens would become very bulky and long – which might not be a very practical lens. A balance of the size and the optical performance was very important.’

    The target of 50 lpmm wasn’t dictated by the company’s 40MP camera or 4K video, he says. ’All our FE lenses were designed for at least 40MP. Because we have an image sensor team within Sony, we get to see the sensor roadmap, so we’ve been designing for this all along with FE. With the G Master we’d like to make lenses that can be used forever.’

    A focus on bokeh

    But it’s not just the more stringent frequency assessment that was developed for the G Master lenses, Ohtake explains: ‘We had to discuss what good bokeh means. We have some designers from Minolta who understand that the spirit of the ‘G’ lenses was good bokeh in the background but we had no way to evaluate that.

    ‘We looked at what is considered good bokeh and how it affects not just the background rendering but also the transition from perfectly sharp to out-of-focus regions. We developed a way to evaluate bokeh and were able to make a simulation. This meant we didn’t have to build a lens to see how it performed, we could now computer model it before taking a design too far.’

    This is a significant change, Sony says, as it means bokeh can be one of the primary design considerations, rather than being something that can only be adjusted later in the process, once the main aspects of the design have been settled upon.

    Another piece of the puzzle – shape and smoothness

    This analysis of the factors that affect bokeh showed that both the precision of the lens molding and the smoothness of the lens surface could have an effect.

    ‘Traditionally it was very hard to achieve both: current technology gives a roughness on the scale of 20-30nm on the aspheric surface. Improving this usually involved polishing, which can then lead to the lens element being slightly unevenly shaped.’

    ‘We developed a new way of making the lens element and a new molding process, including a new machine. Now we can get roughness down to around 10nm and get a more accurate shape to the aspherical surface.’

    AF technologies

    Ohtake wouldn’t budge when we asked which his favorite lens was, but immediately reached for the 85mm F1.4 when we took this group shot.

    The first three G Master lenses use three different AF motor technologies between them – emphasizing Ohtake’s point that different technologies work better in different contexts.

    The 24-70mm F2.8 uses a Direct Drive SSM system (piezoelectric element). This is very fast, very quiet and very precise. We used a linear motor for the 24-70mm F4 but this lens has a heavier focus element, so direct drive was a better choice.

    The focus element in the 85mm F1.4 was even heavier, however. ‘For the 85mm we use a ring type focus motor. This is very good for heavy lens elements and our lens software team developed a good algorithm so that it works well with contrast-detection autofocus’ (a traditional weakness for ring-type designs).

    Finally, the 70-200mm uses a combination of a linear actuator and a ring-type focus motor. ‘The focus group had become too heavy so we separated the two focusing lenses. One is very heavy, so we used a ring type motor for that one, then used a linear motor for the other. The ring type is used to quickly achieve approximate focus and the linear motor is used for the high precision aspect.’

    Still correct to optically correct

    Discussing the idea that bokeh and sharpness have previously been in conflict, we asked Ohtake about other trade-offs. We’ve been told that the ability to correct lateral chromatic aberration in software makes lens design easier, since you don’t have to correct it optically, which can quickly complicate the lens design and detract from other parameters.

    Not for G Master lenses, he explains. ‘Light doesn’t separate nicely into red, green and blue’ (the color channels that most cameras capture, and which can be adjusted, relative to one another, to correct lateral CA). It’s a continuum with each wavelength being displaced slightly differently. ‘To get the really high contrast we wanted in G Master, we had to suppress it in the lens.’

    The future of APS-C

    We also asked Ohtake about Sony’s APS-C lenses for E-mount. His team likes designing APS-C lenses, he says: ‘The focus elements are light, so it’s easier to design. We have all these focus motor technologies in-house and we’d like to try them in APS-C lenses if that’s what the Product Planning team says is required.’

    Articles: Digital Photography Review (dpreview.com)

  • Finally! Adobe updates Bridge CC for improved performance

    Adobe has released a significant update to Bridge CC, its venerable file management program. Where Photoshop and Lightroom have seen multiple incremental updates over the past few years, Bridge has been left somewhat alone. That all changes today with multiple improvements including improved cache management, and an option to import images from external devices including iOS and Android mobile devices.

    Sluggish performance, especially when displaying large numbers of thumbnails has been a perennial complaint among photographers who use Bridge. And although it has taken a while, Adobe seems to have listened to those complaints. Thumbnail previews are now generated on-demand rather than all at once, and metadata is loaded first so that filters can be used before all thumbnails have been generated. In another effort to boost performance, Adobe has introduced improvements to its cache management to automatically purge stale items when Bridge is idle.

    This Bridge update also re-instates a feature that automatically identifies and stacks images shot in a sequence either for an HDR or panoramic composite. 

    Bridge CC version 6.2 is available for download now.

    Press release:

    Bridge Reloaded

    Today we are pleased to announce the release of Adobe Bridge CC version 6.2.

    Bridge was brought back to be managed by Megan Donahue, Director, Creative Cloud and Arno Gourdol, Sr. Engineering Director, Creative Cloud and their awesome teams.  Arno is no stranger to Bridge since he has worked on several past releases.  Our team has been working on several new initiatives that enhance user experience around asset management used by Creative Cloud customers. Most recent initiatives launched by this team include collaboration features in Creative Cloud as well as Creative Cloud Assets, and Creative Cloud Libraries.

    This latest release of Adobe Bridge CC includes updates to the following feature set:

    Automated cache management

    The central cache of Adobe Bridge stores thumbnails, previews, and metadata information in a database. This database improves the performance when users browse or search files. However, the larger the cache, the more disk space it uses. Cache preferences help you manage the trade-off between performance and cache size. We have worked on improving purging cache capability, which is an existing feature in Bridge. In this update, automatic purging of stale cache items has been enabled when the application is idle.

    We are also providing a cache compaction option to set up cache clean-up at exit in case the database size increases beyond a certain size. Both these options improve performance of the application and help keep the cache and database clean over extended periods.

    For more information see, Work with the Adobe Bridge cache.

    On-demand thumbnail generation

    To improve the responsiveness of Bridge when you are browsing through a large set of assets, we have made improvements to the way the thumbnails, previews, and metadata are extracted/generated. Now when you select a folder, the thumbnails/previews are extracted on priority for only the on-screen assets. The thumbnails for the remaining files are either generated on demand (when you scroll down/up) or when the application is idle. The metadata extraction happens on priority for all assets, thereby enabling the filter panel and search to become functional sooner.

    This change enables you to work with bulky folders without any performance issues like hangs and not-responding states. With this change, you will now have a fully updated Filter panel even before all the thumbnails/previews are generated. This will also enable you to search for the files even before all the thumbnails/previews are generated.

    Import from device option on Mac

    On Mac OS 10.11.x, Bridge CC did not recognize the following types of devices:

    iOS mobile devices

    Android mobile devices and digital cameras connected in PTP (Picture Transfer Protocol) or MTP (Media Transfer Protocol) mode

    In this update, an alternative to import media from these devices has been provided. You can now choose File > Import From Device to import media from the devices.

    For more information, see Import from device on Mac OS 10.11.x.

    Note: This is a Mac only feature and launches Apple Image Capture to bring files from devices into Bridge.

    Other significant updates

    We also reinstated Autostack Panorama/HDR feature. Given our focus was on stability and performance of Bridge, we have made significant updates to the core technology components. This will set the foundation for a technology platform to enable future development and modernization of Bridge.

    Our team is very excited to bring this release as a stepping-stone for the work we have set out for 2016!

    Articles: Digital Photography Review (dpreview.com)

  • Instagram now supports multi-account use

    If you’re juggling multiple Instagram accounts for personal and professional use, the latest version of the app is about to make life a little easier. Version 7.15 for iOS and Android adds support for up to 5 accounts. Read more

    Articles: Digital Photography Review (dpreview.com)