Blog

  • 3 Easy Steps to Photograph Glassware with Minimal Gear

    Photographing glass objects is always a complicated task because of the reflective surface, and at the same time translucent nature, of this material. The catalogue images with great glassware perfectly illuminated, are usually done with complicated setups, in studios that allow the control of reflections, and lighting equipment with accessories that are not accessible to most photographers.

    In this article I will show you how photograph a glass on both white and black backgrounds, with minimal equipment, and a fairly simple lighting setup.

    01

    The techniques used here are known as black-line and white-line lighting, and are defined by the way light is shown at the edges of the glass, in contrast to the color of the background. This is usually done with a light placed behind and above the object, with softboxes or diffusion panels to create the transparency in the glass, black and white cardboard to create the edges, and black and white acrylic panels to create the bottom reflection.

    Equipment needed

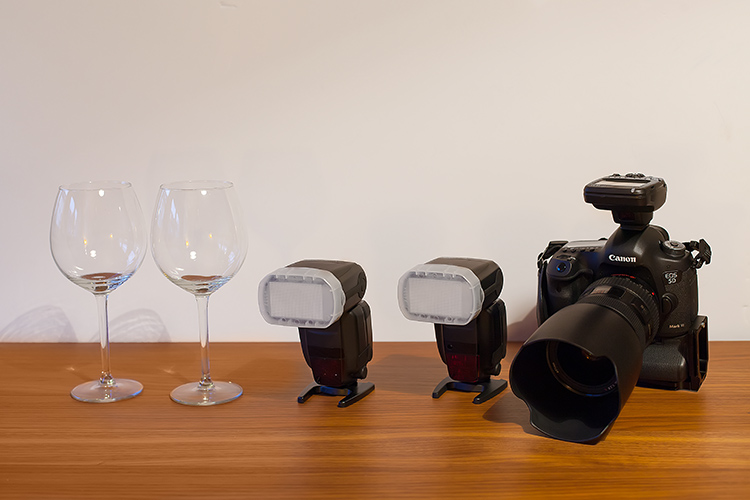
    Well, you may not have a studio and lighting equipment with accessories available, but it doesn’t mean you can’t give this kind of photography a try. Here is what you will need:

    02

    Besides the camera body and the lenses of your choice, you will need two flashes with diffusers, a trigger to fire them, some white cardboard, and two identical glasses (you will see why you need two of them later).

    Step one: Clean the glasses

    The first step, and a really important one may I add, is to clean the glasses really well, as any dirt in the glass will be visible in the image. Toilet paper and glass cleaning fluid are a good choice to get rid of spots or smudges, and a compressed air can be a good choice to get rid of dust specks.

    03

    Step two: Prepare your set

    In these images, instead of an acrylic panel to create a reflection effect, I decided to use an old school technique to simulate the same effect – with the use of another glass turned upside down, under the main photographed glass. I use this technique a lot, as it allows me to have a pure white or black background, without a horizon line created by the base that holds the object, which can give ghost reflections sometimes, and is hard to keep clean due to electrostatic.

    Step three: set up your lights

    Even though camera flashes (speedlights) are very low power compared to studio units, they have more than enough power for this kind of setup, and are an accessible and simple solution.

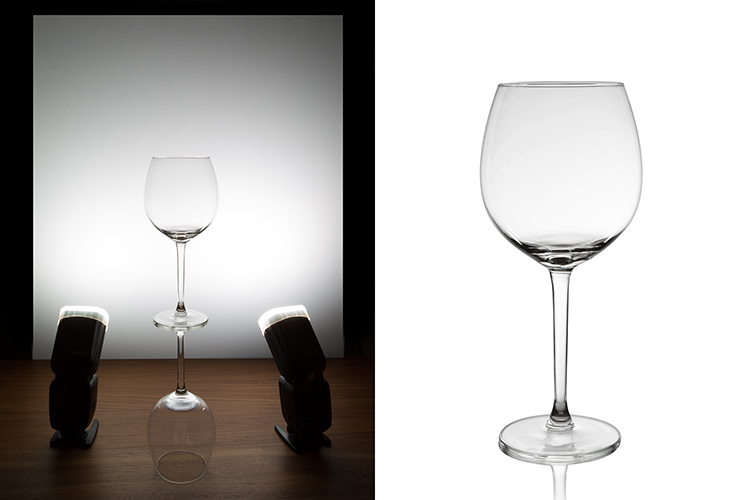
    You will need to use the white cardboard as the background, and one flash with a diffuser on each side of the glas, illuminating the background evenly. This simulates the use of a softbox as backlight in a really simple way.
    Here is the behind the scenes image showing the setup:

    04

    Voila, here is a perfect white background glassware image. It’s amazing what you can get straight out of the camera with such a simple setup. The camera settings used were: f/22, 1/200th (flash sync speed), ISO 50. Both flashes were on 1/2 power with a 50mm zoom setting.

    It is important to have a large depth of field to get well-defined glass edges (including the back side of the glass), and to use the highest sync speed for your flash/camera combination to avoid the ambient light making a reflection and changing the color temperature of the image.

    Bonus step: Black background setup

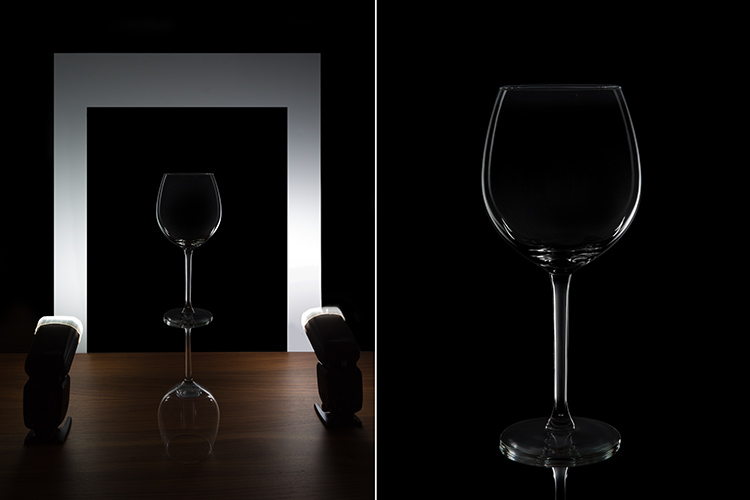
    The black background image might seem a lot more complicated, but actually it’s as simple as cutting a hole in your white cardboard, that will function as an open window for the black background. Here is the behind the scenes image for that setup:

    05

    Here is the black background glass image.

    The camera and flash settings are the same, but the white cardboard acts as a reflector, defining the white line around the glass. Just be sure not to have anything behind the cardboard or use some black velvet as the background, which doesn’t reflect light and guarantees you a pure black.

    So, there you go, a simple, yet highly effective technique to produce amazing glassware images with white or black background, and bottom reflection effect – without a studio, fancy lighting equipment, or a ton of accessories.

    Give it a try, I’m sure you’ll get great results! Please share your images in the comments area below.

    googletag.cmd.push(function() {
    tablet_slots.push( googletag.defineSlot( “/1005424/_dPSv4_tab-all-article-bottom_(300×250)”, [300, 250], “pb-ad-78623” ).addService( googletag.pubads() ) ); } );

    googletag.cmd.push(function() {
    mobile_slots.push( googletag.defineSlot( “/1005424/_dPSv4_mob-all-article-bottom_(300×250)”, [300, 250], “pb-ad-78158” ).addService( googletag.pubads() ) ); } );

    The post 3 Easy Steps to Photograph Glassware with Minimal Gear by Ivo Guimaraes appeared first on Digital Photography School.


    Digital Photography School

  • Wonder of nature: Eight winning photos from the 9th International Garden Photographer of the Year competition

    $ (document).ready(function() { SampleGalleryV2({“containerId”:”embeddedSampleGallery_0735964398″,”galleryId”:”0735964398″,”isEmbeddedWidget”:true,”standalone”:false,”selectedImageIndex”:0,”startInCommentsView”:false,”isMobile”:false}) });

    A photographer from the UK has collected £7500 along with the title International Garden Photographer of the Year as the results of the ninth competition have been announced. Richard Bloom took the first prize with a picture of a field of lupins he came across while in the South Island of New Zealand in the summer of 2015. Bloom commented ‘The landscape was already amazing, scattered with drifts of naturalised lupins, which gave it an almost psychedelic, wonderland feel.’

    The competition has eight main categories along with additional prizes for portfolios, projects and photographers under the age of 16. The competition culminates in an exhibition at the Royal Botanic Gardens, in Kew, London, and a book is produced of the winning entries and those commended. On request judges also offer feedback on entries once the winners are announced.

    The 2016 competition is already open for entries, and is open to photographers around the globe, with a deadline of October 31st. Entry costs from £10 for adults.

    To see more of the winning entries visit the International Garden Photographer of the Year website.

    Articles: Digital Photography Review (dpreview.com)

  • 4 Quick Ways to Add a Vignette to Your Images in Post-Processing

    What is a vignette?

    way-to-add-vignette-tutorial
    The word vignette comes from the root word vine, which originally was taken to mean a decorative border on a page. In photography, this translates to a border around the edge of the image. This border is caused by a reduction of light from the center of the image, or a light fall-off. Light fall-off can be due to a variety of reasons: the amount of light hitting the sensor, the type of lens used, or an intentional addition in post-production. This article will focus on the latter.

    In adding vignettes in post-processing, you have two choices: darker or lighter, and soft-gradual or hard-edge.

    Why add a vignette?

    way-to-add-vignette-tutorial

    The addition of a vignette in post-processing comes down to your personal taste. It would also largely depend on your photography style, and the type of image you are editing. Generally speaking, high-key images do not need a dark vignette. If you want to add a vignette to bright images, most often a lighter one looks better, but I would still be very careful about adding one.

    A vignette helps draw the viewer’s eye to the center of the image. This is particularly useful if the image has plenty of clutter, or distracting elements around the edges. Similarly, if the edges are pretty bare which makes the image look flat, a vignette adds an illusion of foreground, or another layer to the image, giving it more depth.

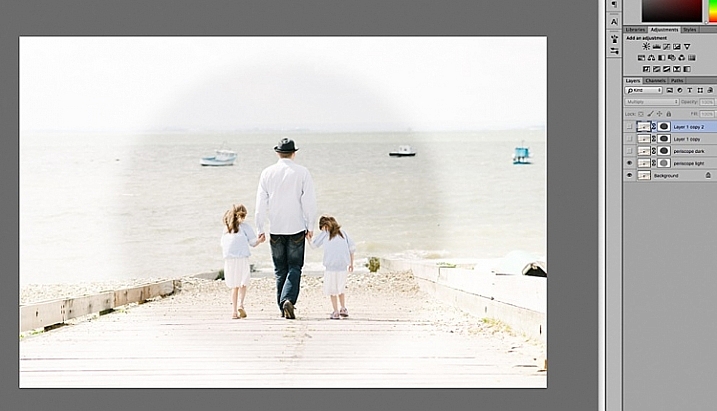
    Be gentle and sparing when adding a vignette, it can enhance or ruin an image. What works often, and best, is a gradual and very subtle vignette, especially for portraits. More exaggerated vignetting may be required on some artistic images – the choice is yours. If you want to add a spotlight effect to an image, then adding vignettes can be essential. A hard-edged vignette, if done unintentionally, makes your image look like a view through a periscope and can burn your image, like a moth to a flame.

    Here are four quick ways to add a vignette

    In Adobe Camera Raw

    The quickest and easiest way to add a gradual and gentle vignette in your image is via Adobe Camera Raw (this works in both Photoshop and Lightroom).  My previous article on batch editing with Bridge and Adobe Camera Raw explains how you can open your file in Camera Raw and make your initial edits.

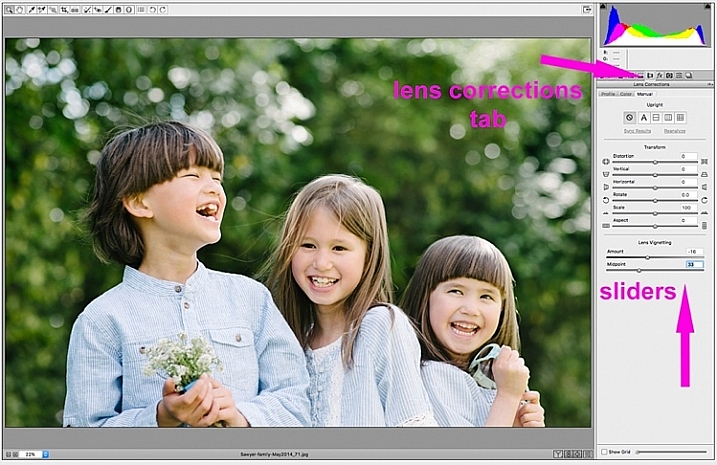
    1. Using the lens correction tab

    On the image below, you will see the lens vignetting slider under the lens correction tab. Move the sliders along to add, and remove vignettes to your image, according to taste.

    way-to-add-vignette-tutorial

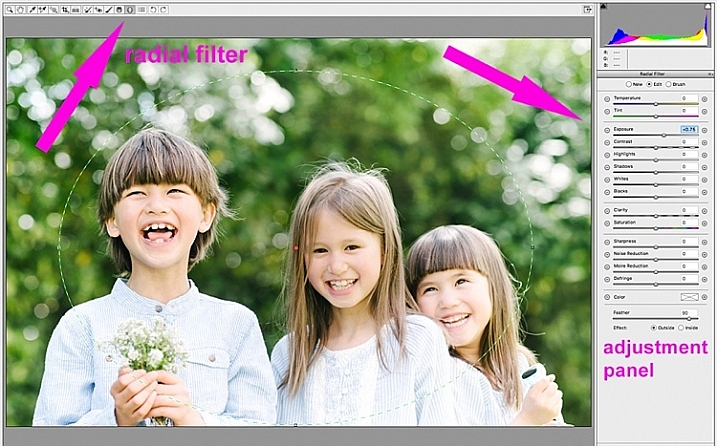
    2. Using the radial filter tool

    You can also add a dark or light vignette using the radial filter tool. On the adjustments panel, you need to specify where you want the vignette added – whether inside or outside the radius, then adjust the exposure to lighten or darken the vignette (with this method you can even add blur, lower highlight, or change the color of it if you like – anything on the sliders). This is a really handy feature in ACR because it acts like a layer mask, although you can’t easily do fine tuning with this tool like you can in Photoshop.

    way-to-add-vignette-tutorial

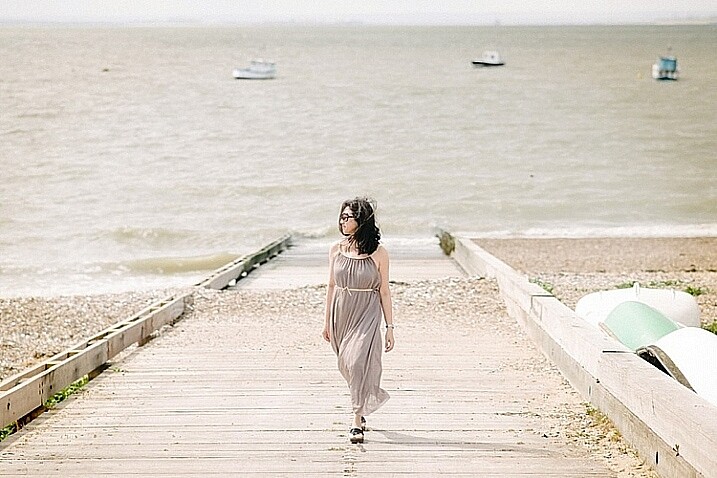
    Below is an image with a pretty dark and heavy vignette. In my opinion it’s too much, and takes away from the image, rather than enhancing it.

    way-to-add-vignette-tutorial

    Below is the same image with a bright vignette; this doesn’t look right to me at all.

    way-to-add-vignette-tutorial

    On this version below, I think the vignetting is just right, as it enhances the natural look of the photograph, which was my aim.

    way-to-add-vignette-tutorial

    In Adobe Photoshop

    If you skip Adobe Camera Raw and open your file in Photoshop, there many ways to add a vignette. Below are the two quickest ways I have found. Before attempting to add a vignette in Photoshop, in order to perform non-destructive edits to your images, I recommend you learn to use layers and masks.

    1. Using blend modes

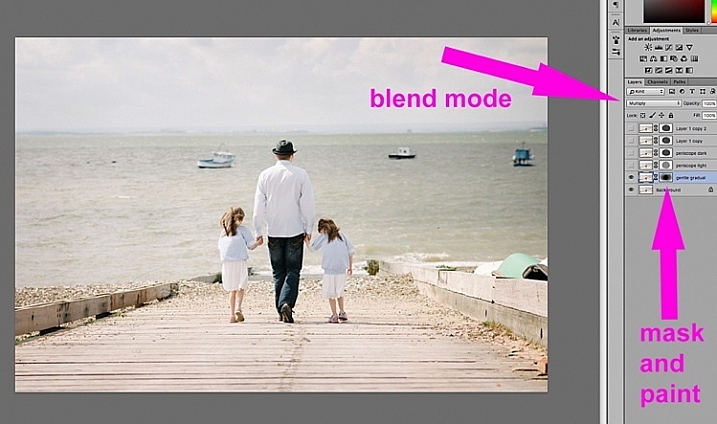
    The first quick way  of adding vignettes in Photoshop that I found is by duplicating the background layer using CMD/CNTRL + J. You need to make all your adjustments on the layers above your background layer, in this case the duplicated layer, so that your original file is safe and untouched.

    way-to-add-vignette-tutorial

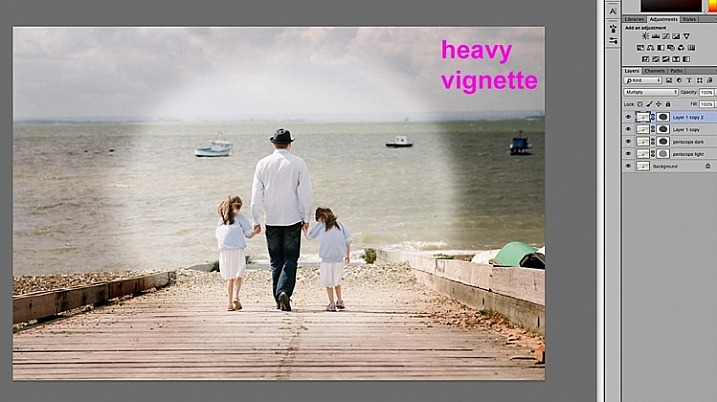
    With your duplicate layer selected, change the mode to darken or multiply to add a dark vignette, or to screen or lighten to add a light vignette. Now add a layer mask to the duplicate layer. If you choose to paint the vignette on, make sure the mask is blacked out. Select a big soft brush, using the brush tool set to a very low opacity, and paint with white on the vignette around the edges.

    Alternatively, you can choose to remove the vignette instead of painting it on, which in this case would be my preference. With your duplicate layer superimposed on the background layer, add a white layer mask. Choose a big soft brush set to a higher opacity and start painting the layer mask black, starting from the middle and ever so gently radiating outwards until all the vignette is removed from the center, and only a touch on the edges is left. Adjust the opacity of the layer to suit your taste.

    Below are two examples of exaggerated vignetting added in Photoshop using this method.

    way-to-add-vignette-tutorial

    way-to-add-vignette-tutorial

    Manually painting, or removing the vignette by hand, gives you flexibility as to where to apply the vignette, how far in, and to what degree, depending on what’s required for each image.

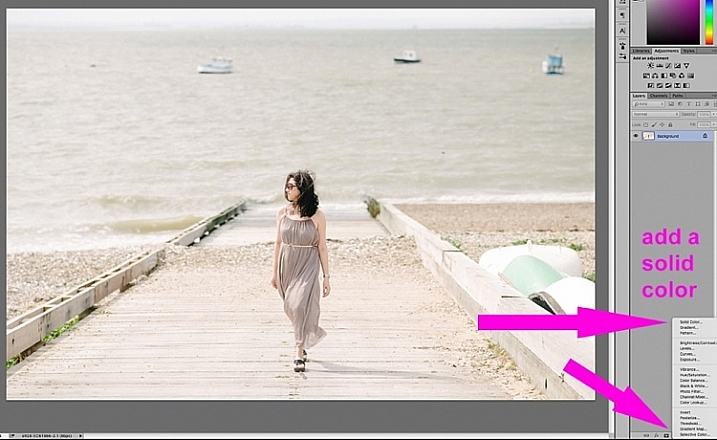
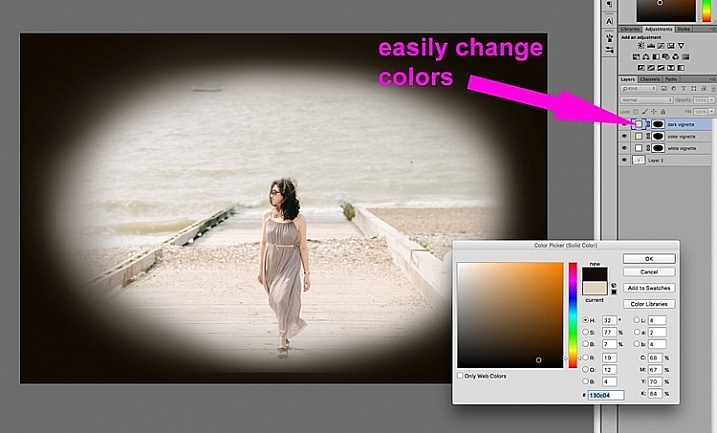
    2. Using a solid color layer

    Another quick way is to add a solid color. This method allows you to be more experimental, as it’s very easy to change the colors with a click of the eyedropper tool.

    way-to-add-vignette-tutorial

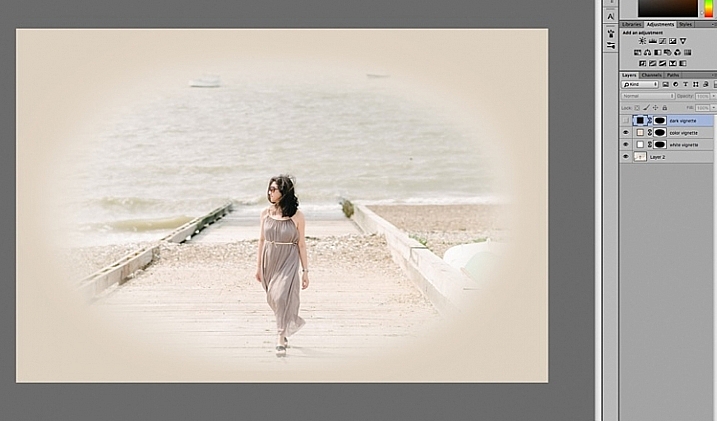
    The solid color will sit on top of your image, so all you will see is a flat rectangular block of color. You need to add a layer mask, and start removing some of the color beginning at the center and radiating outwards. Again, use a soft large black brush to remove the color. If you do this kind of vignetting, as in the two images below, it has to be intentional as these do not give you a natural look to the images at all. They may work for a scrapbook, or other specific purposes, but this is not the look I would give to my clients.

    way-to-add-vignette-tutorial

    On the image below, the vignette was added using the same solid color method as above. You can then play around with the blend modes to see what looks best.

    biege - color-burn

    This was done using the same solid color as above but Color Burn Blend Mode.

    way-to-add-vignette-tutorial

    This one is done with a black solid color added, masked, and Overlay Blend Mode with the layer at 80% opacity.

    This one is done with a black solid color added, masked, and Overlay Blend Mode with the layer at 80% opacity.

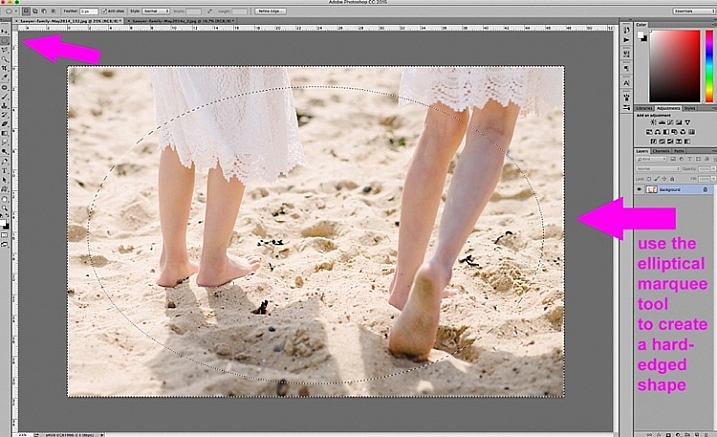
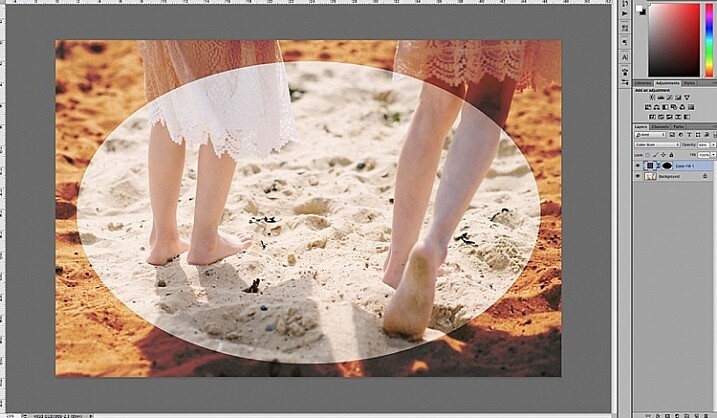
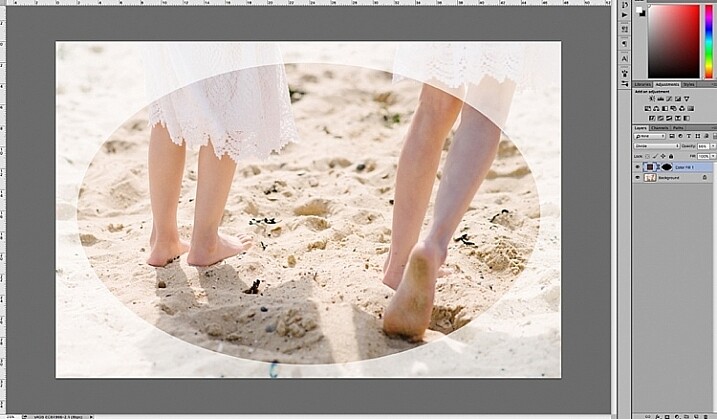
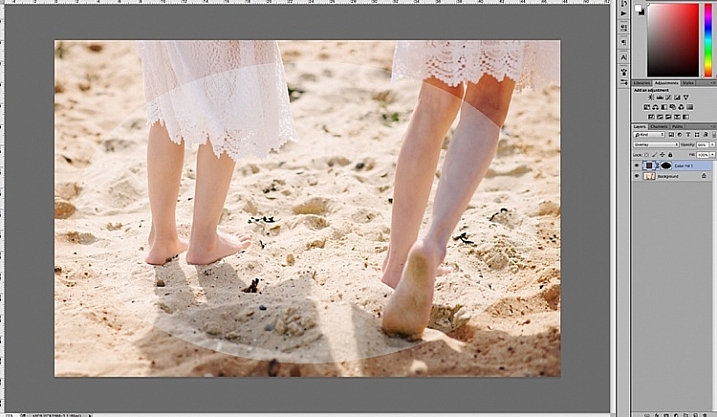
    You can also make shapes as vignettes, using the marquee tool.  The elliptical marquee tool was used for the image below, creating a hard-edged vignette. Make your shape by dragging this tool on your image, and you will see marching ants around the shape you have just created. You must immediately invert it using CMD/CNTRL + shift + I so the outside of the shape will be selected and would now be the area surrounded by the marching ants (as below).

    elliptical marquee

    Click on the solid color icon and select a color. A new layer with your shape filled with the solid color will automatically be created. Select this layer and play around the the blend modes and the layer opacity. You will see below what the Divide, Color Burn and Overlay modes look like.

    Color Burn Blend Mode

    Color Burn Blend Mode

    Divide Blend Mode

    Divide Blend Mode

    Overlay Blend Mode

    Overlay Blend Mode

    You will want to feather the mask on your color layer, or blend the edges manually using the brush tool so that you do not see the edge of the vignette so well-defined. I’ve left it like this for demonstration purposes so you can see what the vignette layer is doing.

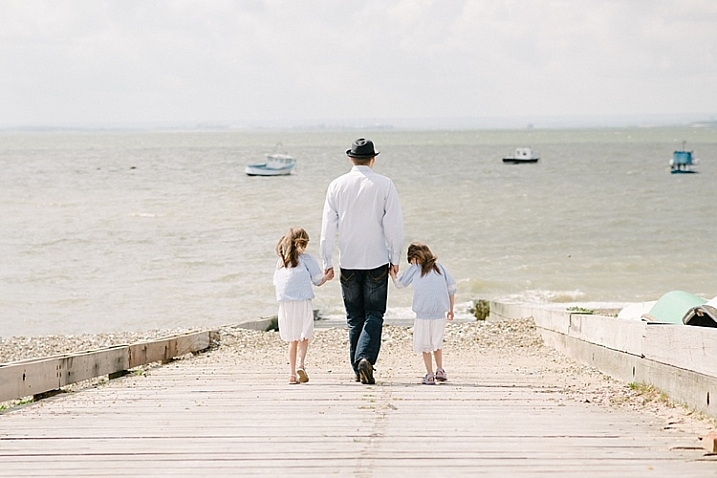
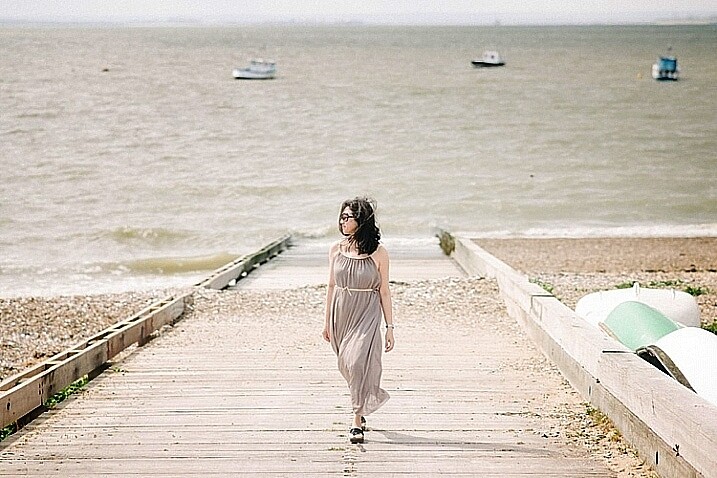
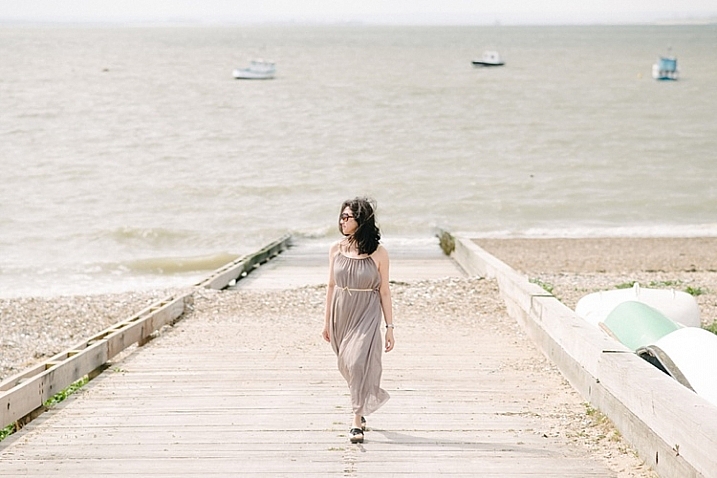
    Below is the final image with only a hint of vignette on the edges, just to take the edge off the brightness of the scene.

    way-to-add-vignette-tutorial

    I hope this tutorial has given you some new ideas on how to enhance your images using vignettes. Do you have other quick ways of adding vignettes to your images? Share them here.

    googletag.cmd.push(function() {
    tablet_slots.push( googletag.defineSlot( “/1005424/_dPSv4_tab-all-article-bottom_(300×250)”, [300, 250], “pb-ad-78623” ).addService( googletag.pubads() ) ); } );

    googletag.cmd.push(function() {
    mobile_slots.push( googletag.defineSlot( “/1005424/_dPSv4_mob-all-article-bottom_(300×250)”, [300, 250], “pb-ad-78158” ).addService( googletag.pubads() ) ); } );

    The post 4 Quick Ways to Add a Vignette to Your Images in Post-Processing by Lily Sawyer appeared first on Digital Photography School.


    Digital Photography School

  • Working with what you’ve got: Bambi Cantrell on photographing brides, babies and more


    Bambi Cantrell is a 30-year veteran of the photography industry specializing in portraiture and wedding photography. In this presentation from PIX 2015, she translates lessons learned over her career into real photographic results, whether her client is a bride, a couple or a young family. As Cantrell’s tastes and photography have evolved over the years, she encourages others to embrace change. ‘Lay a strong foundation on concepts,’ she says. ‘Don’t put blinders on…. You can adapt as you decide to change and get older.’

    Keep it simple.
    ‘Give me a wall, a window and a reflector, and I’m home free,’ says Bambi Cantrell, ‘Don’t feel like you have to have every single tool that’s made to get good pictures.’

    Do what you can with what you’ve got.
    ‘I love tungsten lighting as well,’ Cantrell says. ‘Use existing light sources to create beautiful images. It’s not that the planets line up perfectly for [pro photographers] and not someone else. It’s how can I take the best possible picture with what I’ve got in front of me right now.’

    A great expression can be perfection.

    ‘She’s just laying across the bed in her home, holding her newborn baby,’ Cantrell says. ‘It’s about who you’re photographing. What is this person like?’

    Articles: Digital Photography Review (dpreview.com)

  • Quick review: Nextbit Robin camera

    The Nextbit Robin is a different kind of smartphone. It’s an Android device with a fresh modern design, but its most important feature is the one you never see – it’s fully integrated with the cloud, backing up and archiving your phone’s images, apps and files so you never run out of local storage. We got ahold of an early unit to test out its camera and unique interface. Read more

    Articles: Digital Photography Review (dpreview.com)

  • Review of the Vü Professional Filter System

    Filters are wonderful little tools that help modify the light coming through your camera lenses, and alter what is recorded onto the sensor or film, whichever the case may be. Different filter types exist for varying purposes; polarizing filters deepen sky color and remove glare and reflections from shiny surfaces, a UV filter screens out ultraviolet light and adds a protective surface over the camera lens, while a graduated neutral density (GND) filter allows you to expose a foreground properly while avoiding a bright, blown-out sky.

    The Vü filter system represents the higher-tier of camera accessories in this segment of hardware, and I was fortunate enough to have a couple of weeks using them.

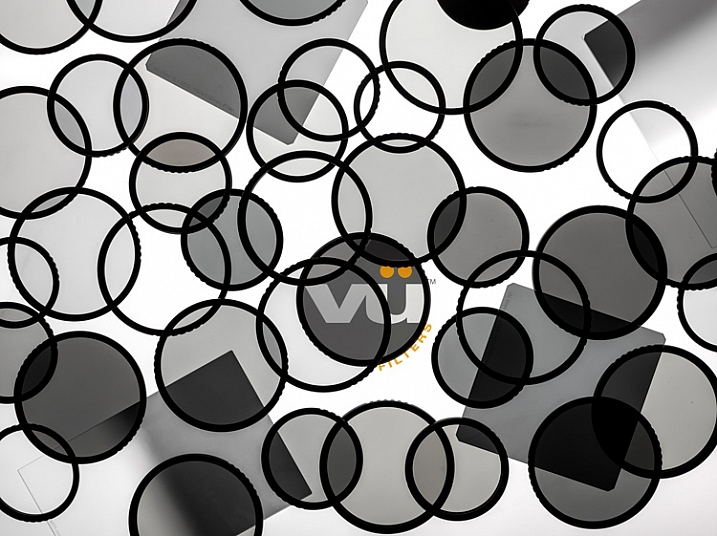
    VU_Layout_wLogo

    Image courtesy of Vü Filters

    Upon opening the complete set of the company’s filters, the first thing I noticed was the quality and attractiveness of the packaging. All of the boxes were constructed of very sturdy material, clearly marked, and conveyed a great sense of style.

    The set I received consisted of several filters and accessories, including a filter holder, drop-in filters, and lens adapters for the lenses I specified when ordering (in this case, a Canon EF-S 50mm f/1.8, and Canon EF-S 24mm f/2.8 STM). As my time was limited, I restricted my use to the screw-on Circular polarizing Filter ($ 59-126 depending on filter size)), the 10-stop Neutral Density (ND) Filter ($ 144) and Drop-in Filter Holder ($ 150).

    If you’re looking for a quick, overall thought on the system, it’s generally good. The filters are high-quality and are very well constructed.

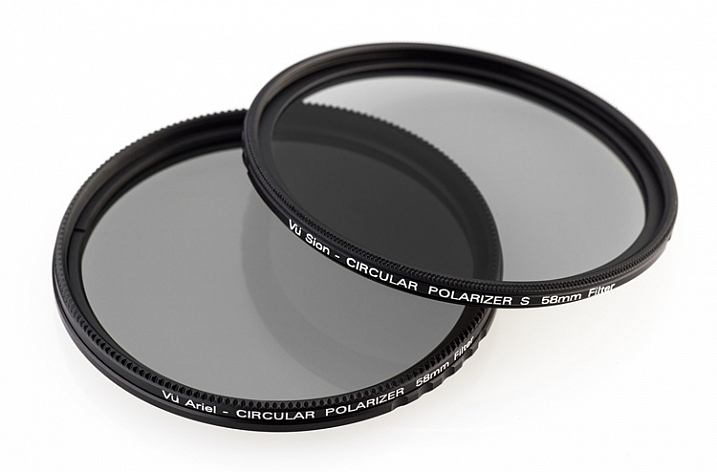
    Circular Polarizing Filter

    Vu_CPOL_Group_Left

    Image Courtesy of Vü Filters

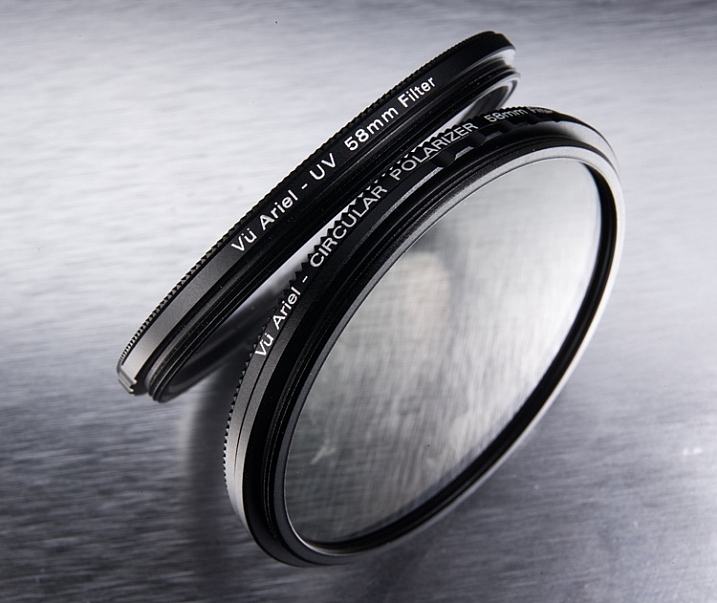
    The circular polarizing filter did just what I expected. It darkened the desired areas in my photo, removed any extra shininess from the image, and generally smoothed the photo over, giving it a look that is hard to discern or describe, but which definitely exists.

    The circular polarizer tends to smooth out rough points, darkens skies, and removes some of the reflective properties of shiny surfaces.

    The circular polarizer tends to smooth out rough points, darkens skies, and removes some of the reflective properties of shiny surfaces.

    Using this filter was the easiest, as it only required I that connect it to the step-down adapter for my particular lens size, and then screw that assembly onto the lens itself.

    Ariel_Lens_01

    Image courtesy of Vü Filters

    As with all polarizing filters, this one works best when light is coming from the right angle, in this case, about 45 degrees. Using it when light is directly in front of, or behind you, won’t yield much or any of an effect on your image.

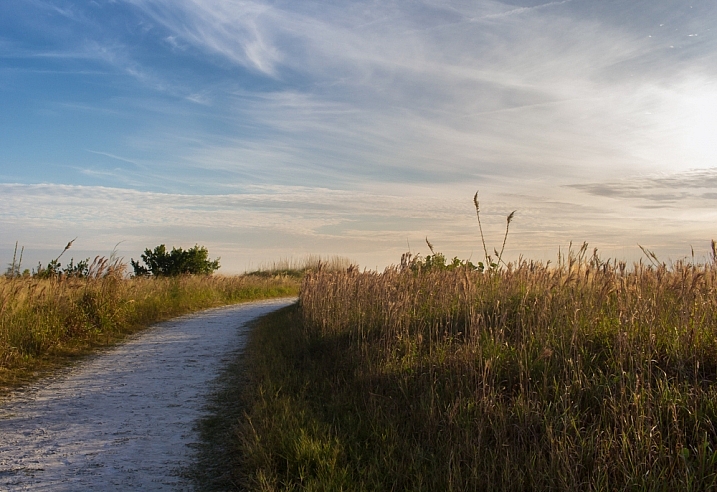
    Again, the polarizer helped darken this sky a bit more to where I wanted it to be.

    Again, the polarizer helped darken this sky a bit more, to where I wanted it.

    10-Stop Neutral Density Filter

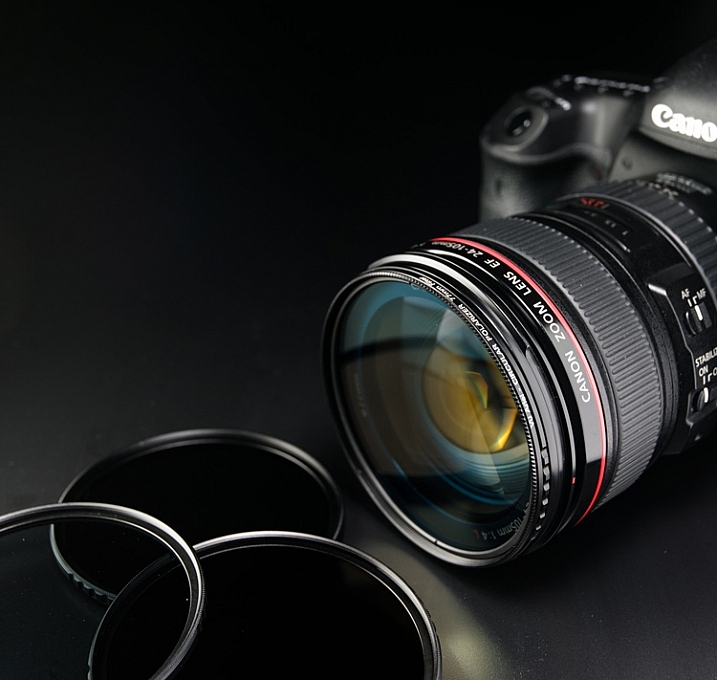
    VFH100_CanonFront_CPOL_NDGrad

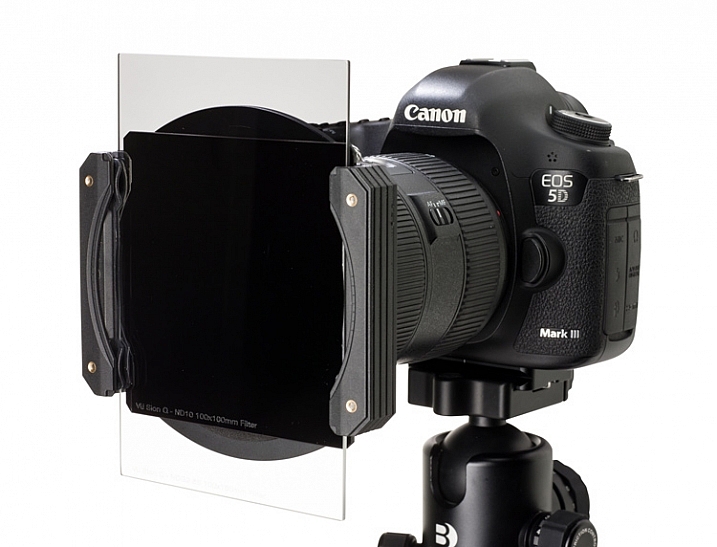
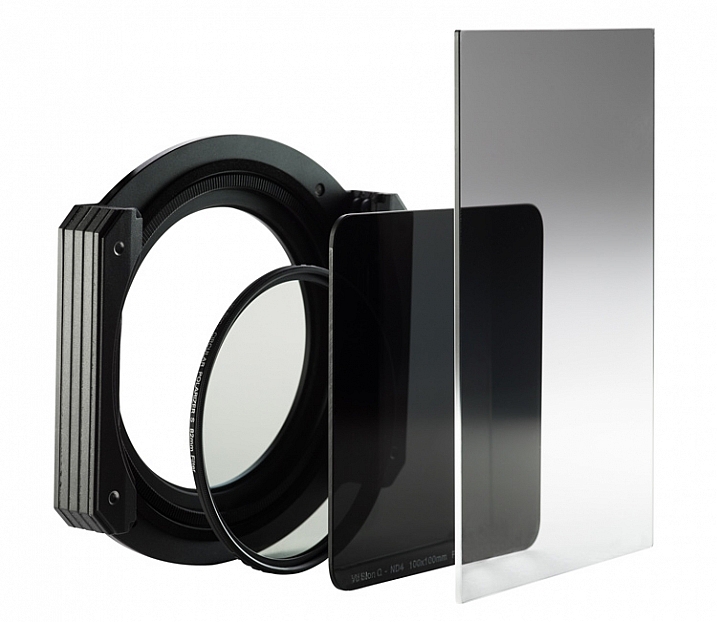
    Image courtesy of Vü Filters showing the filter holder, 10-stop ND, and Graduated drop-in filters mounted on a Canon lens.

    I was most excited to try the 10-stop neutral density filter. The purpose of this filter is to reduce the amount of light coming through the lens. As you might imagine, this particular filter reduces that amount by 10 stops of light, which is quite a bit. The beauty of it, is that you can use a much slower shutter speed in daylight, and capture long exposure images when it would normally be impossible.

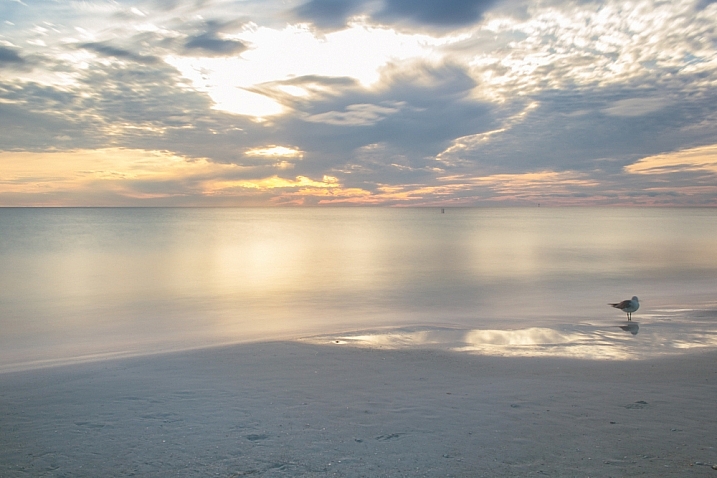
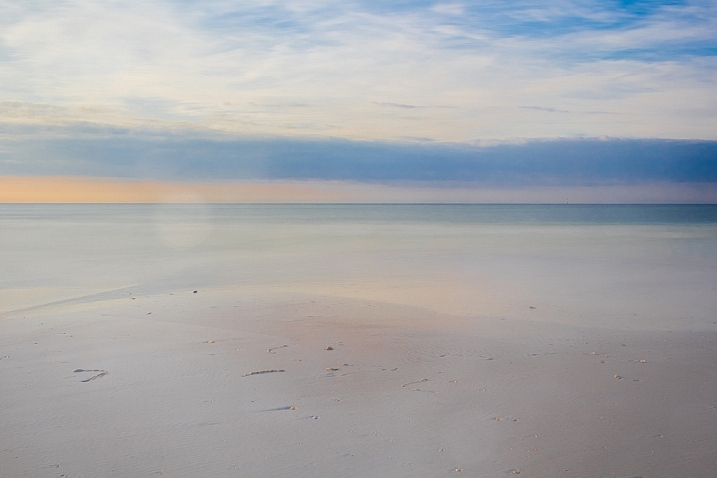
    I tried this myself using the Vü 10-stop ND filter, and was extremely happy with the results. I was able to capture the ebb and flow of the ocean waters at our nearby beach, well after the sun had risen. With the filter, 25 and 30 second exposures were possible, which produced shots that I would never have thought possible.

    The 10-stop neutral density filter allows you to take long-exposure shots when there is plenty of light available.

    The 10-stop neutral density filter allows you to take long exposure shots when there is still plenty of light available.

    The Vü ND filter fortunately does not suffer from common ailments of other dark, lower quality filters, such as color shifting near the corners of the lens. Tones remain faithful and consistent across the entire image.

    To me, that’s the grand measure of the usefulness of this system; shots that would have been impossible, or extremely difficult to create, can now be accomplished using these types of accessories. As a photographer, it opens up a multitude of ideas and situation I can now explore.

    Drawbacks of the system

    Of course, everything can’t be roses, and I did have a couple of complaints about the Vü system.

    First and foremost, as wonderfully performing and artfully constructed as the system is, I’m afraid that some novices may get a bit lost figuring out how to use them, creating a barrier to entry that could easily be avoided.

    The boxes of filters, and bags of adapters, come devoid of any instructions, inside or out. An advanced user that has experience with different filter systems will figure it out rather quickly, but someone who lacks this experience will likely fuddle around until they eventually understand how everything fits together.

    VFH150_Parts Vu_FilterHolder_Group_02

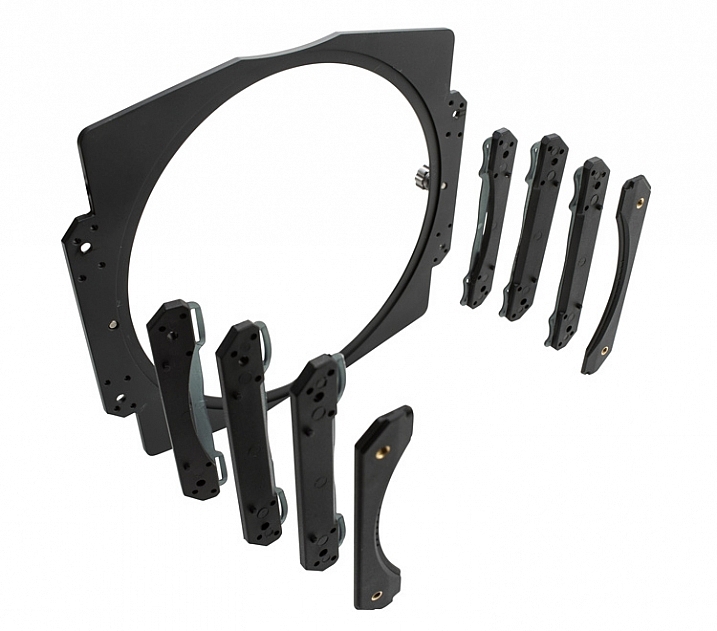
    As an example, attaching the 10-stop ND filter to my camera’s lens (a Canon 60D with the Canon EF-S 24mm 2.8 STM) was a bit of a chore. The large metal filter holder was required, since this particular filter is the drop-in type, meaning the filter is a large square piece of thick glass. The filter slides vertically into the holder attachment, which is then attached to the lens via an adapter ring, suited for your lens’s filter size.

    Another example of long-exposures at daytime with the neutral density filter.

    Another example of long-exposures at daytime with the neutral density filter.

    It took several tries to get this right, and in the end was no small feat. I wasn’t positive after I was done that I had attached it correctly, but it functioned without any issues, so I’m assuming I did. A simple set of instructions for each piece would negate this problem altogether in my opinion.

    The Vü website gives details and information about the products themselves, but I couldn’t find a support section where a user could quickly fetch instructions.

    VFH100_FilterGroup

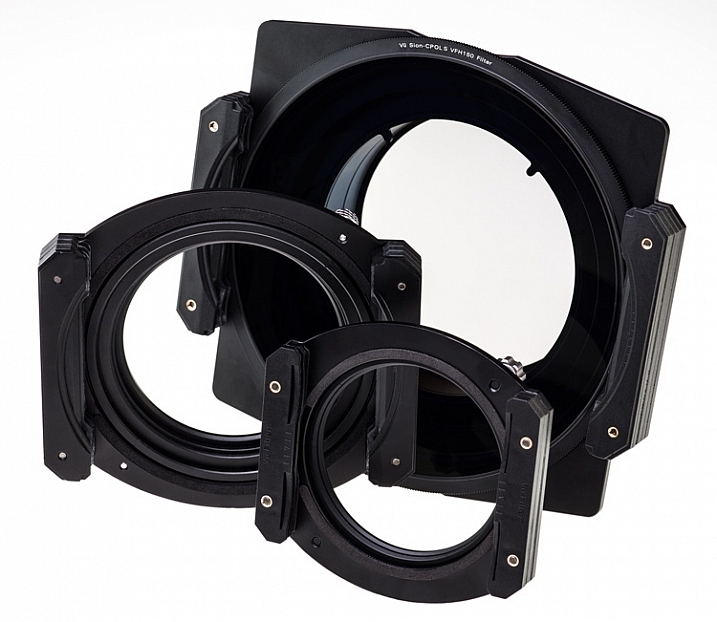
    Once you figure out how to attach the product to your camera, and put them together, the filters and holder feel very solid and well constructed. Several sizes of adapter rings are available, to ensure the filters will fit almost any lens, and additional accessories for the system are also available. The holder, as I mentioned before, is large and a bit unwieldy, and using it without a tripod would be difficult.

    My contact at the company was very helpful and knowledgable, and made sure everything got to me as quickly as possible.

    Editor’s note: the video below was provided by the supplier when we discussed this issue with them. This should help solve the problem.

    Summary

    At the end of the day, regardless of any assembly difficulties I might have experienced, I found the filters very attractive from several standpoints. The filters were obviously made with the serious photographer in mind, and didn’t skimp on materials, strength, or quality.

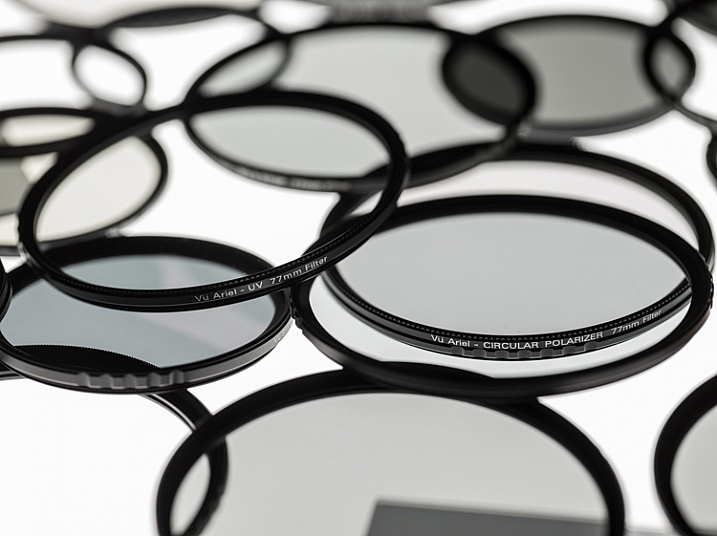
    VU_TableTop_06 Ariel_Hero_f32

    Pricing is, in my opinion, below what you would expect for this level of craftsmanship. Ordering their whole line would be expensive, but picking and choosing individual filters within the system, would prove affordable for most photographers.

    Most importantly, the filters themselves work fabulously, and produce very good images. Some in the industry still consider filters to be a degradation to image quality, but after seeing the images these filters can produce, I slide off the fence into the more positive side of the field, and would use these accessories in all of my work.

    Have you given Vü filters a try? Sound off below and tell us your experience!

    Learn more about Vü filters, including the full product line, and you can purchase them online at Amazon.

    googletag.cmd.push(function() {
    tablet_slots.push( googletag.defineSlot( “/1005424/_dPSv4_tab-all-article-bottom_(300×250)”, [300, 250], “pb-ad-78623” ).addService( googletag.pubads() ) ); } );

    googletag.cmd.push(function() {
    mobile_slots.push( googletag.defineSlot( “/1005424/_dPSv4_mob-all-article-bottom_(300×250)”, [300, 250], “pb-ad-78158” ).addService( googletag.pubads() ) ); } );

    The post Review of the Vü Professional Filter System by Tim Gilbreath appeared first on Digital Photography School.


    Digital Photography School

  • Air Bonsai: Magnetic Levitation Kit Lets You Float Little Trees

    [ By WebUrbanist in Design & Furniture & Decor. ]

    floating air bonsai plant

    Taking bonsai approaches to the next level, a Japanese company based out of Kyushu has raised over half a million dollars so far for its levitating (and rotating) tree system.

    floating tree collection

    The fauna in question span quite a range, from flowering plants to pine trees to mosses. The magnetic levitation tech supports up to 250 grams of whatever species you prefer (up to a few inches in width), powered via a simple AC adapter.

    floating plant diy kit

    floating tree demo

    Of course, you can further decorate your little floating worlds however you like, with ceramic figures, lava rocks or other scene-setting touches.

    floating bonsai tree system

    The system comes as a DIY kit priced starting at around $ 200, depending on whether you wish to get both the mechanical system and a starter plant or just the technology portion. There are also both modern and traditional-looking, hand-crafted bases, depending on your aesthetic preferences.

    Share on Facebook


    [ By WebUrbanist in Design & Furniture & Decor. ]

    [ WebUrbanist | Archives | Galleries | Privacy | TOS ]


    WebUrbanist

  • Week in Review: One for the history books

    Week in Review: One for the history books

    It was a Wednesday like any other Wednesday. The sun rose in the East. The DPReview staff made their morning coffee run. They sat down at their desks. And then they wrote. They wrote. For unlike another Wednesday, this Wednesday would see the introduction of a historic camera: the Pentax K-1. Memories of Pentax’s first promise of a full-frame DSLR were all but a distant memory, but Pentax would finally step into the world of full-frame digital photography. 

    To say it was a busy week is an understatement. The world didn’t only get full-frame Pentax this week, it got so many more things: a Canon EOS 80D! A kit lens with a strange detachable power zoom accessory! A Panasonic GF-series update made just for selfies! 

    Just to be sure you didn’t miss anything, you better take a look back with us.

    It’s all gonna be O-K

    After years of promises and months of teasing, this week Ricoh finally unveiled the Pentax K-1, a 36.4MP full-frame DSLR built around the K lens mount. At a very enticing body-only MSRP of $ 1800, the K-1 offers 5-axis IS, built-in Wi-Fi and 4.4 fps burst shooting. We took a look back at the long and winding road Pentax has taken to full-frame, and while the K-1 shows a lot of promise, we think Ricoh still has a tough road ahead.

    Subtle video upgrades

    Just hours after the K-1 announcement, Canon swooped in and dropped the EOS 80D, G7 X Mark II, an updated 18-135mm F3.5-5.6 and a couple of interesting accessories (more on that in a second).

    The 80D is a fairly incremental update to the 70D, but it does offer updated Dual Pixel AF with continuous focus as well as an upgraded 45-point all cross-type AF system. Subtle enhancements in the video department, like the addition of 1080/60p recording and a headphone socket, nudge the camera 80D toward video enthusiasts, but don’t hoist it into the ranks of video-centric cameras like the Sony A7S and Panasonic GH4. Still, it should offer plenty to help a non-pro get good results.

    In this week’s unusual innovations we saw Canon introduce the PZ-EI Power Zoom adapter, the first OEM-branded accessory of its kind, specifically built for its new 18-135mm. For just an extra $ 150, prospective 80D owners who are interested in shooting video with their new kit can pick up a PZ-E1 and gain control over zoom speed by way of physical controls or Canon’s Smart Utility app. It’s a neat solution and relatively inexpensive solution for video shooters, rather than building power zoom functionality into the lens and raising the cost (and weight of the lens) for everybody.

    Know thy selfie

    Speaking of long and winding roads, the introduction of the selfie-tastic Panasonic Lumix DMC-GF8 this week underscored just how far that series has wandered from where it started. The GF8’s brightly colored accents (or ‘unisex’ silver and brown, if you prefer), beauty re-touch features and 180-degree articulated selfie-friendly LCD are all a far cry from the pioneering little GF1. That camera’s enthusiast features long ago drifted and evolved into the GX-series, while Panasonic seems to be making a Casio-esque play with its entry-level GF-series to capitalize on shoppers interested in selfie-centric features in some Asian countries. To each his own, right?

    Two good?

    It’s easy to get excited about the Sony RX1R II‘s potential. A compact 42MP full-frame camera with updated AF and a Zeiss 35mm F2 lens has that effect. But it’s also easy to suffer a case of sticker shock when you realize it’s $ 3300. Our full review, published this week, digs into the camera’s performance to see if the problems that plagued the RX1R persist, and whether it’s a $ 3300 well spent. There’s just one way to find out…

    Go wide

    Yeah, we’ve heard it before: a 75-100mm focal length is more flattering for portraits than wide-angle lenses. But what if we all stepped away from our 85mm portrait primes for a minute and embraced a different perspective? Tech Editor Rishi Sanyal does just that in our lens technique video. Using the Sigma 24-35mm F2 Art to make his case, he captured some environmental portraits at sunset in Seattle’s gorgeous Discovery Park (the nice part, not the bit by the sewage treatment plant). 

    Rumors of new lenses are coming fast and furious, including this rumored Sigma 50-100mm F1.8 Art for APS-C. It would seem that the timing is right, too, what with CP+ starting next week. We’ll be in Yokohama covering the show, so tune in next week as we separate rumors, fact and fiction. 

    Articles: Digital Photography Review (dpreview.com)

  • PhotoPills: The Photographer’s Swiss Army Knife

    It’s 6pm, it’s cold, and the sun is on its way to set. The tripod is placed, the composition is done – now I just have to wait for the big show that Mother Nature puts on every day to happen again. The sky is threatening, but with a little luck, the sun will pierce the clouds to pass above the lighthouse in front of me.
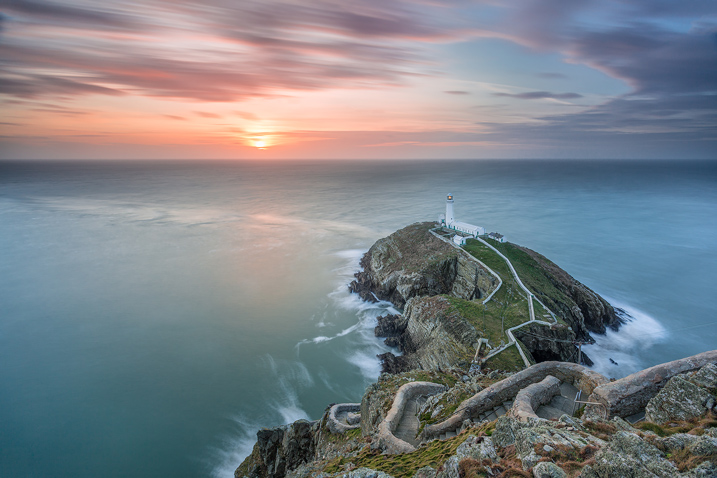
    Image 1

    If I think about the first time I went out with the tripod on my shoulder, it makes me smile. I knew more or less where to go, I had no idea of the exact time at which the sun would set, nor where. Failure was inevitable!

    Years have passed since then, and many things have changed. But the biggest and decisive one is in my hands right now: PhotoPills – photo planning app.

    What is PhotoPills?

    PhotoPills is like having a Swiss Army Knife for all photography matters in your pocket, at your service. Whether you’re a seasoned photographer, or someone who’s barely touched a camera, PhotoPills has you covered. You have a question, you get the answer.
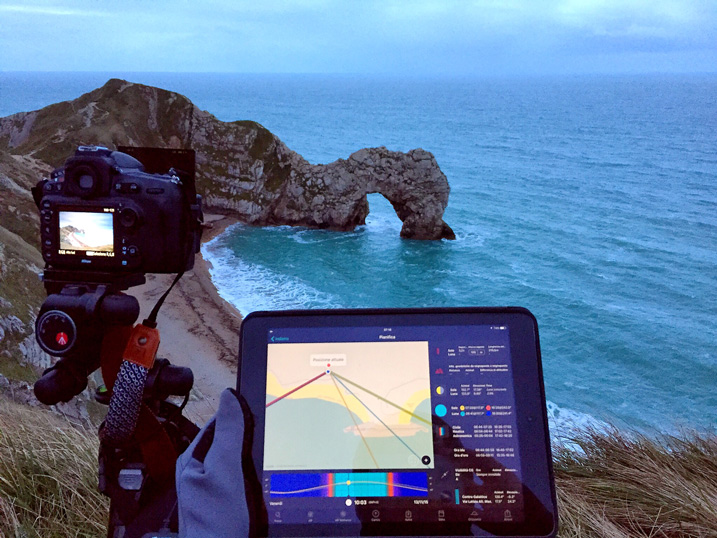
    Image 2

    Using PhotoPills at Durdle Door (UK)

    Beginners will love it. I see it in every single workshop I run. There, in the field, before deciding the frame and the shooting spot, people enjoy using the Augmented Reality views, to easily track the position and the path of the Sun, the Moon, and the Milky Way. It’s the simplest way to understand what’s going to happen next.

    On the other hand, on a more advanced level, being able to plan your shots directly on a map, even the Milky Way shots, saves a ton of time. PhotoPills’ Planner is so well designed, that you can quickly figure out the perfect shooting spot, date, and time for any scene you imagine.
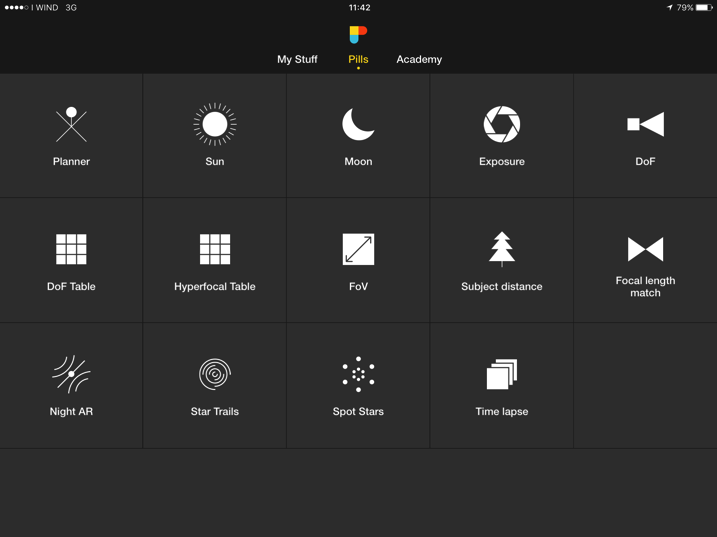
    Image 3

    PhotoPills screen menu

    Everything starts from a clean and user friendly interface.

    You can choose between three menus, simply through a swipe to the right or left at the top of the interface. After choosing your camera, the map type, and other settings in “My Stuff” menu, you can enter the main section called “Pills” where you have the access to all the available modules.

    The possibilities are almost endless, and in this article, I’ll do my best to describe some of the things you can do with this app. Are you ready?

    Widgets

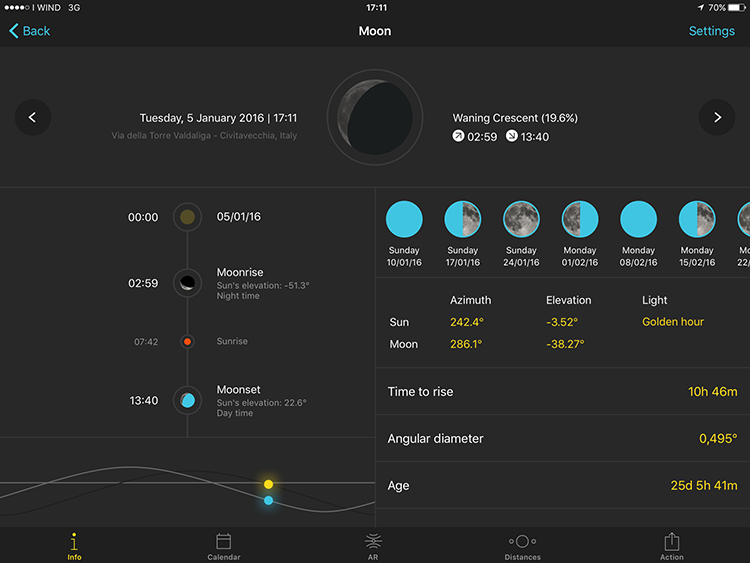
    Imagine that you’re going to bed (at home, or anywhere in the world) and want to know at what time the sun will rise tomorrow, when the golden hour starts, or when the Moon will rise, or what about the the galactic center visibility times?

    The first thing that I love in this App, is that all you have to do is to pull down from the top of the screen and enable the three PhotoPills widgets in the notification center. If you do so, you’ll have all the key light, sun, moon and Milky Way information in just one swipe. Also, you’ll have access to the five upcoming photo plans you’ve saved using the Planner.
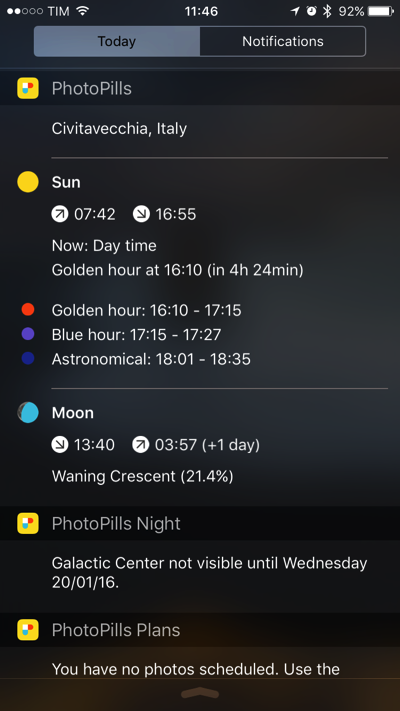
    Image 4

    I love using the widgets when I’m traveling, since it’s so easy to have everything I need on one single screen. A cool feature is that it works offline too. As it happens with the Augmented Reality views, PhotoPills doesn’t need an internet connection to give you all the key data you need.

    But that is not all, in the case you want to have all this information (and much more) for a different location or date, just use the new Sun and Moon Pills. So easy, and so nice to have everything together. I really hope that an Apple Watch version will be implemented soon too.
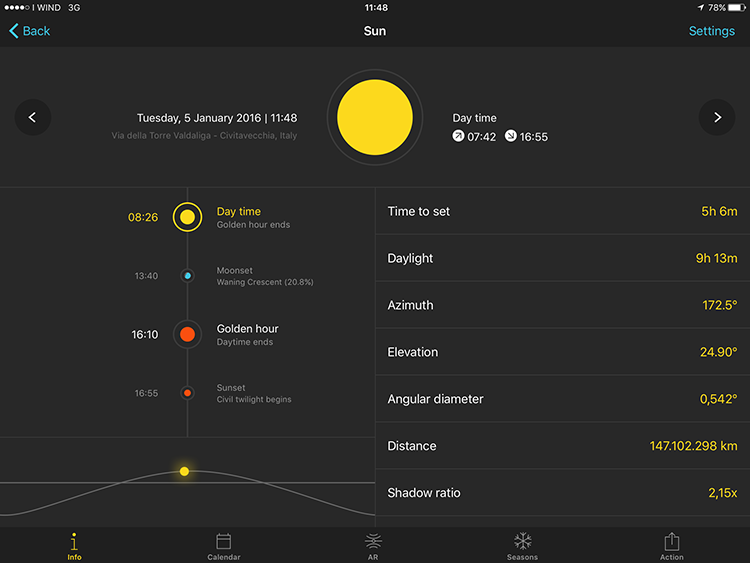
    Image 5A

    Sun Pill

    Image 5B

    Moon Pill

    Augmented Reality

    In a landscape image, composition is more than fundamental. How many times have you arrived at your shooting location, and wondered where the sun would set? For me, every time – but before using PhotoPills, I was never able to have a precise answer.

    The Augmented Reality (AR) module included in the App, makes things so easy. Just point your phone at a subject, and use the AR tools available within the Sun, Moon and Night AR pills to see where the Sun, the Moon or the Milky Way will be in the image.
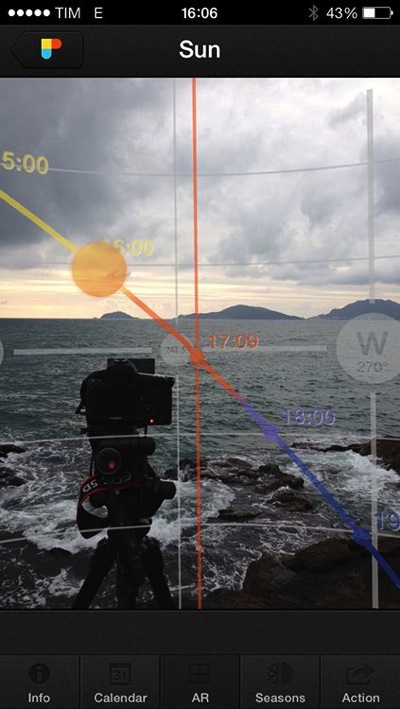
    Image 6

    Sun AR in action

    Besides, and this is particularly clever, you can change the time to see how everything evolves, just by scrolling on the screen with your finger.

    The application is also useful for all the star hunters out there – with the Night AR view it is easy to plan star trails shots. For example, if you’re planning to shoot a circumpolar, the Night AR view will also help you locate the North Star (Polaris). And, if you live in the southern hemisphere, PhotoPills will give you the position of the south celestial pole, right where you need to frame.
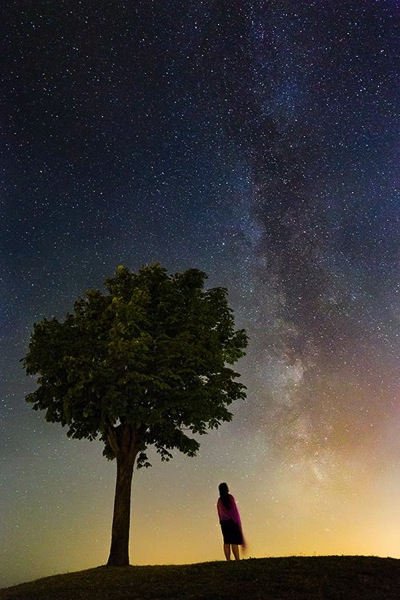
    Image 7 1

    A Milky Way shot planned using Night Augmented Reality

    Planner

    If the Augmented Reality tools are my students’ favorites, I simply love the Planner. I use it to plan every shoot.
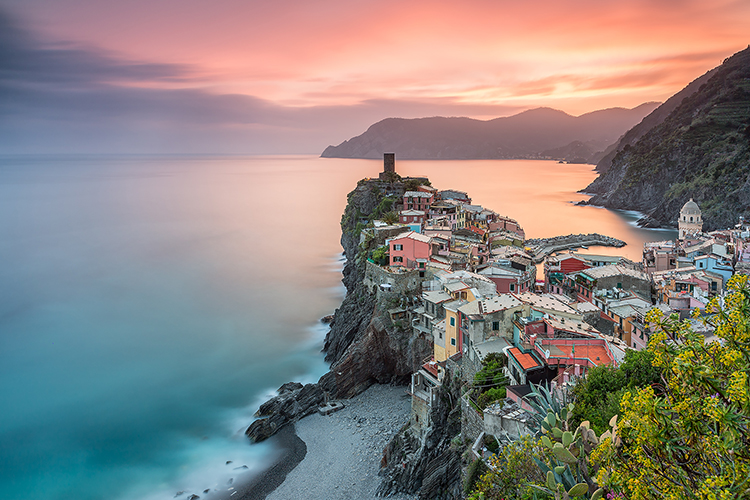
    Image 8

    No matter if it’s a sunset in Vernazza (above), a moonrise in Iceland, or the Milky Way in Yosemite National park, the PhotoPills Planner helps me find the right time, for the alignments I’m looking to happen. It’s my imagination’s best ally.
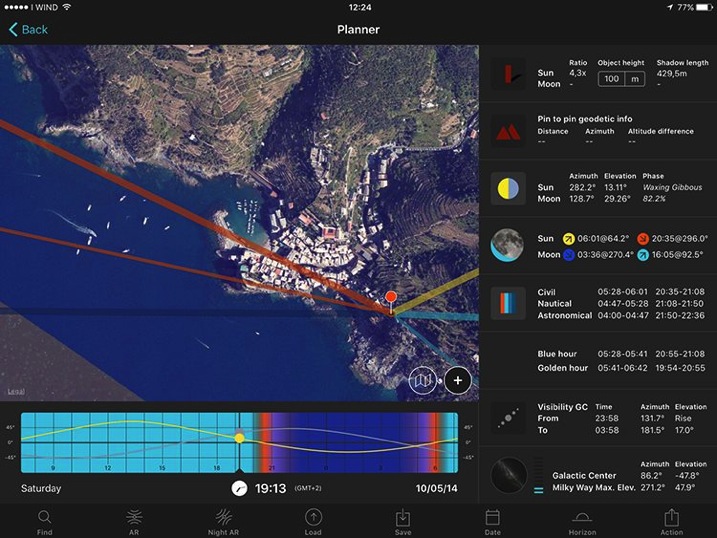
    Image 9A

    Planning Pill for Vernazza shot above
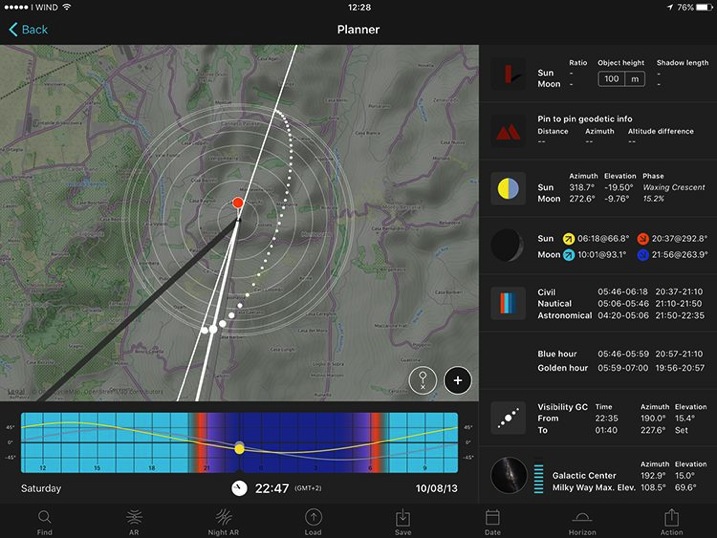
    Image 9B

    Planning Pill for Milky Way shot above

    A lovely feature, is that once I’ve figure out the shooting spot and shooting time, I can save the plan in my To-Do list of planned photos. Then, every time I have an idea, I plan it and save it in my list. This way, I make sure not to miss any of my favourite shots.

    Location Scouting

    We’re all exploring new locations all the time, looking for new possibilities, and to be able to store the most valuable places in our own database is just a must. So, every time I find a place I’d like to remember and study for a possible shot, I use PhotoPills to save it as a Point of Interest.

    Another useful feature is that I can upload to PhotoPills all my .kmz files, so I can bring with me all the plans already made with Google Earth!
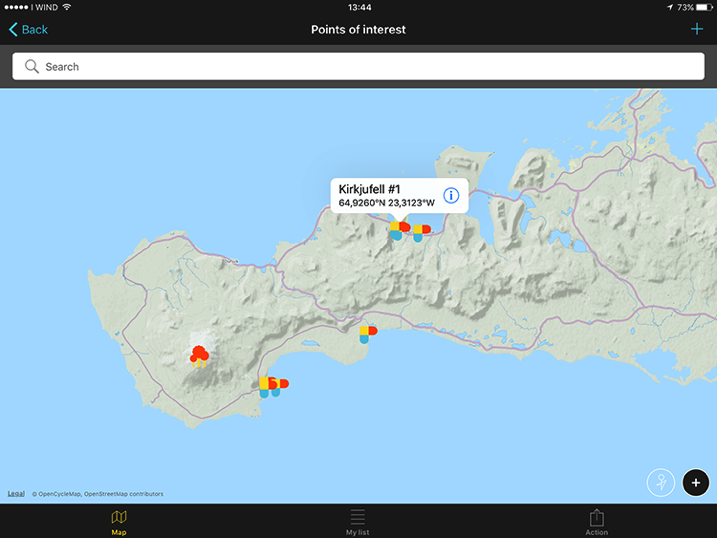
    Image 10

    Point of Interest visualized on map

    Calculations

    Knowing the shooting time and spot is obviously the first step, but you also need to make many more decisions before pressing the shutter – this is where PhotoPills is brilliant.

    These are just four of the numerous calculators I use to figure out the settings I need:
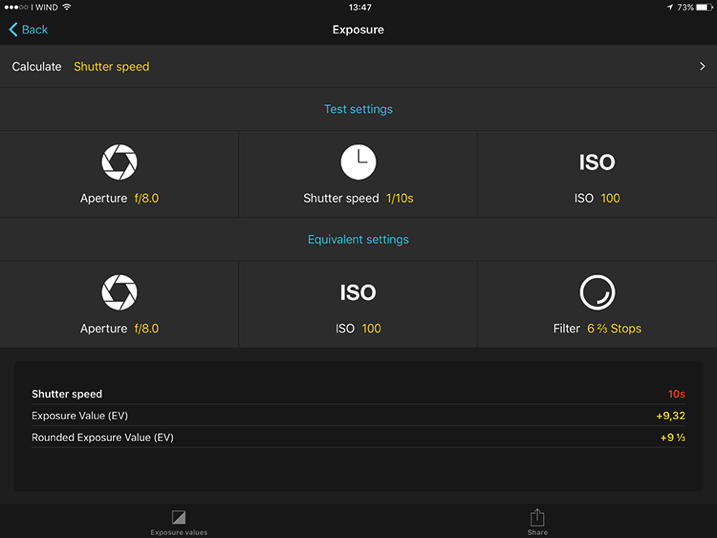
    Image 11A

    Long Exposure calculator

    Long Exposure calculator: You already know, my favorite one! With this module I’m able to calculate the exact exposure time when using ND and GND filters. By the way, PhotoPills has the only Long Exposure calculator that allows you to convert the shutter speed for non-standard f-stop reductions.

    Spot Stars calculator: When shooting the Milky Way, it helps determine the maximum exposure time that allows me to capture the stars as big bright spots. The longer the exposure time, the more light is collected by the camera sensor, and the brighter the stars will appear in the image. If I go beyond this exposure time, stars will begin to appear as trails in the image, which is something I want to avoid at all costs.

    Time lapse calculator: If you’re doing time lapse photography, this calculator will save you lots of time. Just set the frames per second (24fps), the duration of the event you’re shooting (example 6 hours), the desired clip length (30 seconds) and the image size (4Mb) to get the shooting interval (30 seconds), the number of photos (720) and the total memory usage of the SD card (2.81Gb). I used to need 15 minutes to figure out all those numbers, before I started using PhotoPills.

    Depth of Field calculator: I use it to calculate the distance where to focus, to maximize depth of field (hyper focal distance). This becomes very useful in my night shots, since I want everything in focus, from the foreground to the stars. I simply calculate the hyperfocal distance and then I make sure to focus my lens at a slightly longer distance. This assures me that I’ll have the stars in sharp focus.
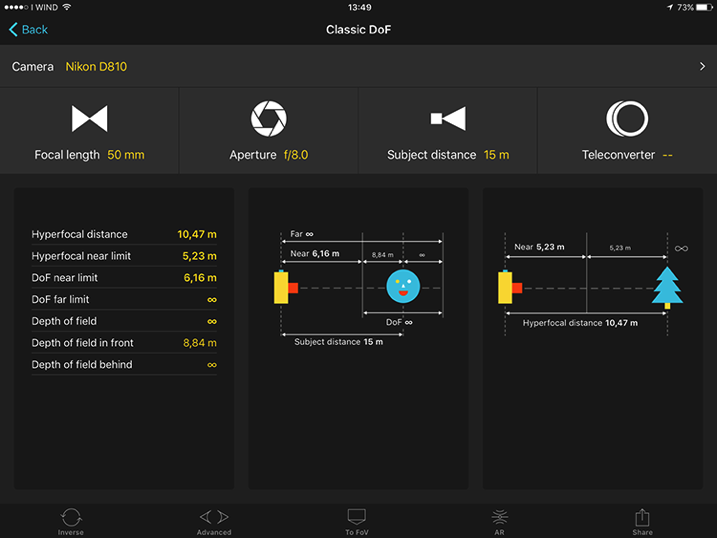
    Image 12

    DoF Calculator

    Conclusions

    PhotoPills is definitely a must have for (but not only) landscape photographers. The features are many and well-maintained, and the difficulties that you can encounter at the beginning, can quickly be overcome thanks to the Academy (a virtual university of PhotoPills where you can follow video tutorials, and read insights on each function of the application to really turn our ideas into real images).

    The price of $ 9.99 in the App Store is higher than average, but is ridiculous compared to the large amount of features and practical uses, as PhotoPills replaces much of the paid, and free apps, in one go.

    It must be mentioned that PhotoPills is currently available only for iPhone and iPad, but the Android version has been announced to launch in 2016.

    After many months of use, now I cannot imagine a photographic adventure without this application. Once you fall into the Imagine-Plan-Shoot creative loop, you won’t be able to stop pushing your imagination, and this will lead you to discover a new world of possibilities.

    Definitely, give it a try!

    Pros:

    • Clean and friendly user interface
    • Many different tools in a single application
    • Cached maps for offline use
    • Possibility to import POI from .kmz files
    • Localized languages
    • Tons of tutorials

    To be considered:

    • Android version still in development (release expected in 2016)

    Do you use PhotoPills or another photography planning app? Please share your experiences and tips in the comments below.

    googletag.cmd.push(function() {
    tablet_slots.push( googletag.defineSlot( “/1005424/_dPSv4_tab-all-article-bottom_(300×250)”, [300, 250], “pb-ad-78623” ).addService( googletag.pubads() ) ); } );

    googletag.cmd.push(function() {
    mobile_slots.push( googletag.defineSlot( “/1005424/_dPSv4_mob-all-article-bottom_(300×250)”, [300, 250], “pb-ad-78158” ).addService( googletag.pubads() ) ); } );

    The post PhotoPills: The Photographer’s Swiss Army Knife by Francesco Gola appeared first on Digital Photography School.


    Digital Photography School
  • Monument is an intelligent personal photo storage device

    Cloud photo storage services are abundant, but not all photographers are willing to pay the monthly fees associated with large storage amounts. Monument, a project currently seeking crowdfunding, aims to bring the organization and syncing features found in cloud services like Google Photos to a photography-centric storage device that you keep in your own home. Read more

    Articles: Digital Photography Review (dpreview.com)