Blog

  • 9 Steps to Get Over Your Fear of Off-Camera Flash

    fastflash_bookIf you want to learn more about using flash for creating portraits, pick up Gina’s brand new dPS ebook: Fast Flash for Portrait Perfection. Now on sale for an introductory price for a limited time only.


    For the first three years as a professional photographer I suffered a severe case of Photophobia and Photoaugliaphobia. I tried to cover it up by saying things like, “I’m a natural light photographer” or “I really don’t like the aesthetics of flash photography”. In reality I was scared to death of using flash. I just couldn’t wrap my head around the concepts and science behind it.

    Fear: False Evidence Appearing Real

    • Photophobia – Fear of light
    • Photoaugliaphobia – Fear of glaring lights

    Each shoot I went on that involved flash was accompanied by a sleepless night, with dreams about turning up to the shoot naked (anxiety dream) and just the thought of having to use flash, also had a mild to moderate laxative effect on me.
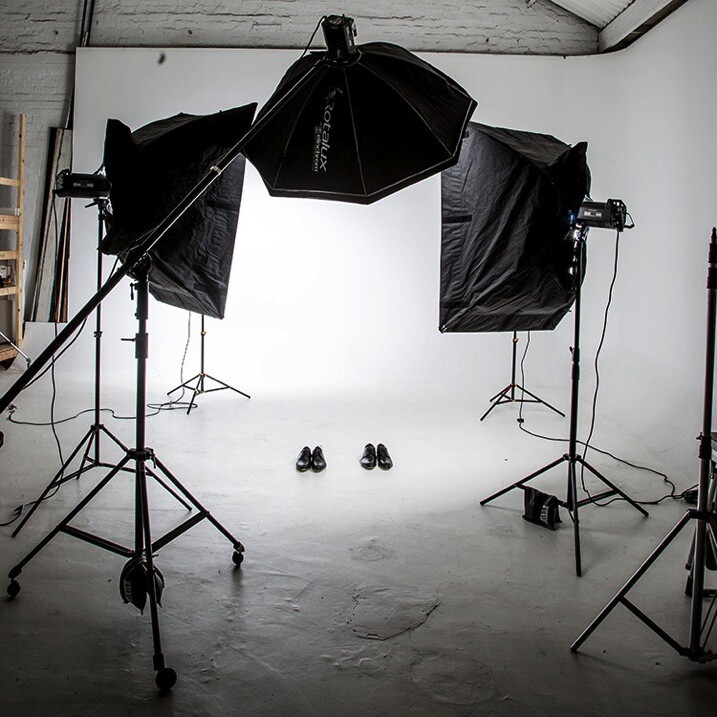
    Fearflash main

    I managed to work out a system where if I shot at f/8, with the flash dialled in to a particular spot, I would end up with a shot that looked half decent. I had a few successful shoots (and by that I mean there was a detectable image on the film, often blown out by two stops) and was feeling pretty confident about my high-tech – stand here, shoot at f/8, and don’t change anything on the dial – approach to flash photography.

    I started getting cocky and developed a “geez you’re good you should do this for a living” strut. In my mind, I’d mastered flash. Sure it wasn’t amazing, but I’d convinced myself that I was pretty good at it.

    Then everything changed. I botched a few big jobs in a row; a wedding, where only one frame turned out, a corporate shoot where the flash overexposed the logo, and a historic family portrait where 200 members of the same family flew in from around the world to be in one place together. I set the camera to the wrong shutter speed. The only record of the event is now a faded memory.
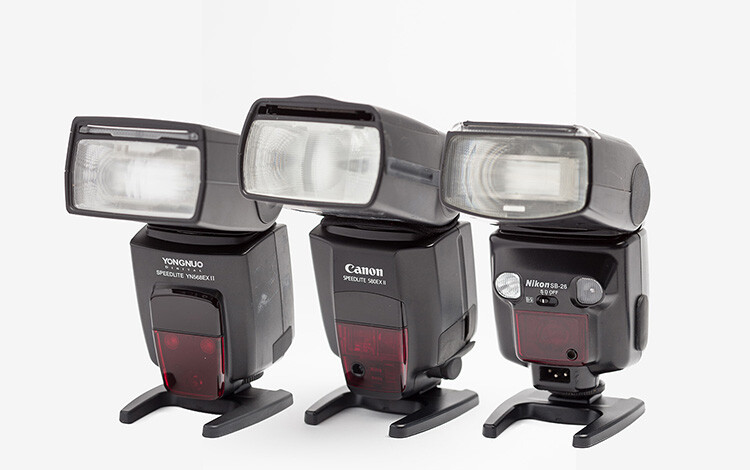
    Gear 11

    I blamed Flash. It was the common denominator – it’s unreliable, difficult to use, and completely stupid. Why bother, I’m a natural light photographer and I don’t need this in my life.

    I then started to go through all the stages of grief:

    • Denial – this isn’t my fault right? Flash did it. It’s stupid, right?
    • Anger – what do you mean this is my fault?? Are you kidding me?
    • Bargaining – dear God/Universe/Oprah please make this go away. I will never eat Nutella again.
    • Depression – I suck at photography, what was I thinking? Who do I think I am?
    • Acceptance – I suck at photography, what was I thinking? Who do I think I am?

    Probably the toughest, and most grown-up thing I did as a professional photographer, was to face up to the fact that I sucked at flash photography. I needed to develop a learning style, a protocol that would help me understand flash, learn how to use it well, and stop being afraid of it.
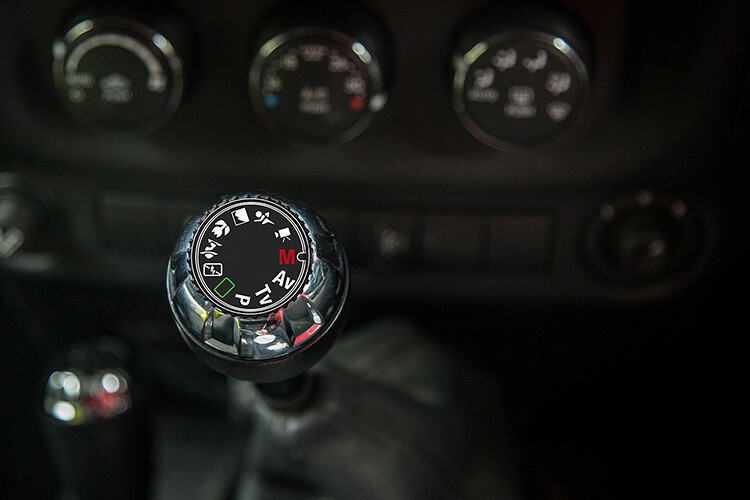
    PG 51 manual mode

    Learning a new skill can be overwhelming at first. I can still remember learning to drive stick shift, and bunny hopping my father’s car around the block, stalling at every red light and being frustrated at the number of things I needed to remember. At the time, I thought there was no way I could possibly remember how to do everything. But, little by little, day by day, I started to overcome the shock of the new, and driving became second nature.

    I think the reason that many photographers become frustrated with flash, is because they are working with lighting styles, and modifiers that are too complicated and involve too many variables. Most of us are impatient. We want to get to the “good stuff” right away. But the danger is that you never really understand the subtle differences between each lighting style and modifier.

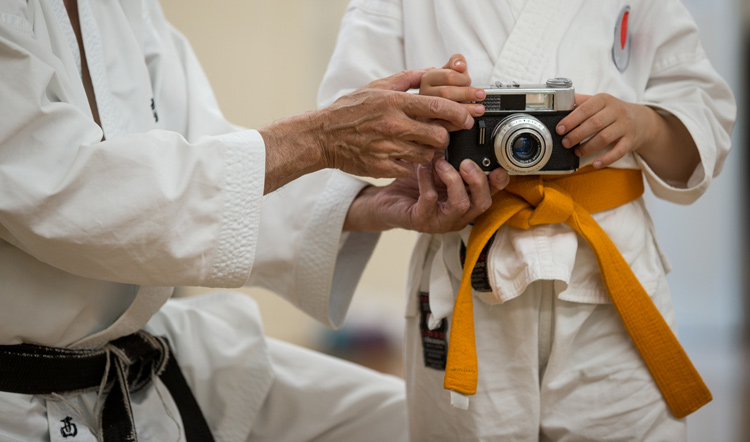
    When it comes to teaching flash photography, I like to implement what I call, The Bruce Lee Protocol. Bruce Lee was a master in martial arts, whose training requires participants to master each level, or belt, before they move on to the next. If a white belt in Karate attempted to break a plank of wood with a roundhouse kick, they would probably end up breaking their foot.
    Fearflash 2b

    We all want to skip straight to the black belt, but doing this before we’re ready usually ends with tears.
    Taken for: Japan Karate Association Australia (JKA)

    It took me many years to realize that owning every single light modifier and photography gadget, was not going to make me a better photographer. The one thing that would improve my photography was deciding on one lighting style and modifier, and working with it until I felt I’d mastered it.

    I use one light with the same modifier for 80% of my fill-flash photography. I can vary the look of my shots by the way I expose my images, and where I position the light. If you’re just starting out, I recommend that you buy only one modifier and one light, then work with that setup until you’re confident, and happy with your style. Here is my stepped approach to learning how to light with flash based on The Bruce Lee Protocol.

    The Bruce Lee Protocol to Learning Flash

    Just like training for a black belt, I believe it’s a great idea to stay on one level, until you feel 100% ready to move on to the next. A white belt in Karate would never attempt to break a plank of wood in half with a roundhouse kick , a newbie to lighting shouldn’t attempt to work with a beauty dish before they have mastered working with an umbrella.

    Step One: White Belt – Laying the foundation

    I think it’s a great idea to ease into lighting, by starting with daylight. Work with hard light, soft light, flat light, and contrasty light, until you are confident you can notice the subtle differences.

    Step Two: Yellow Belt – Easing into a new way of thinking

    Start by adding fill-flash to your images, using flash on-camera, set to auto. This will give you the confidence to continue working with flash. The next stage is to introduce flash on-camera modifiers, to soften and shape the light.

    Step Three: Orange Belt – Expanding your knowledge
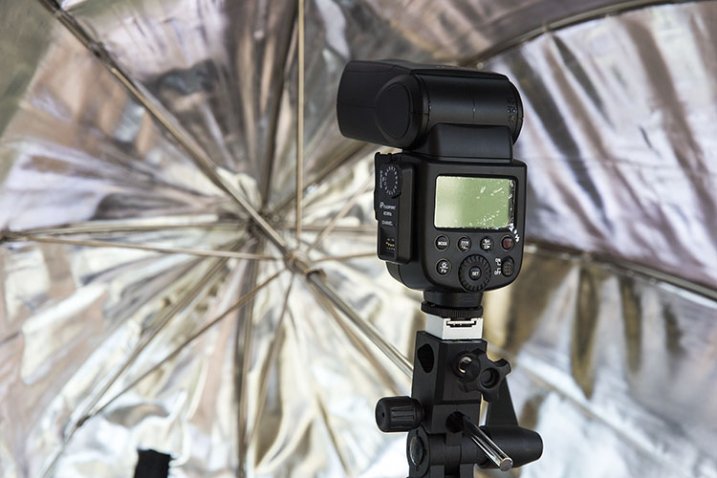
    FlashPoint Li-on zoom flash and commander set

    Umbrella light is a great choice for a fill-light. It closely resembles daylight, making it perfect for lighting large areas. Because the light is very soft and spreads everywhere, this is the easiest light shaper to work with, making it an ideal light modifier to start learning.

    Step Four: Green Belt – Developing your skills

    Once you have gotten the hang of working with umbrellas, try adding reflectors to your shot, and focus on balancing the daylight and flash.

    Step Five: Blue Belt – Confidence

    It’s time to ditch the Umbrella and move up to softboxes, umbrellas boxes and octaboxes.

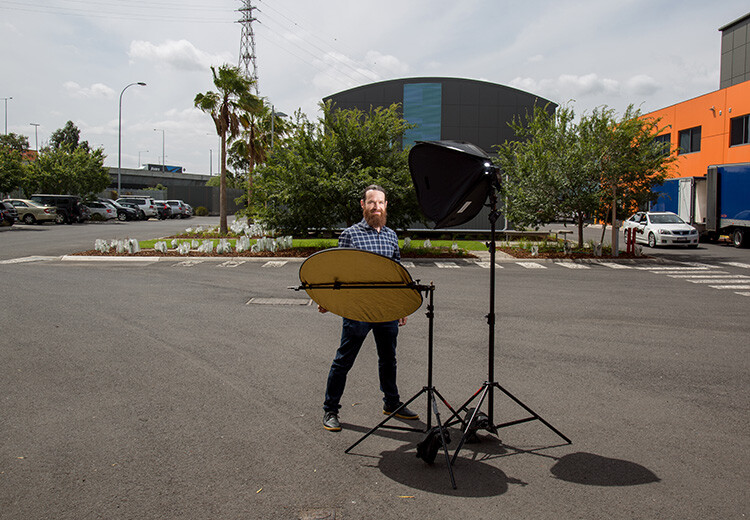
    The umbrella box is the most convenient light modifier, because it combines the simplicity of an umbrella, with the control of a softbox. The box design eliminates the complications of using this modifier outdoors. Umbrella boxes are also cheaper than softboxes, so they’re a great choice for your first serious light modifier.
    Head 5 200

    Softboxes create a soft light that is more contained than that from an umbrella. This makes it a better choice of light modifier if you want to light only certain areas of your image. They are completely enclosed, and are a much better light modifier to use outside, as they are less likely to blow around in windy conditions.

    Step Six: Purple Belt – Getting serious now

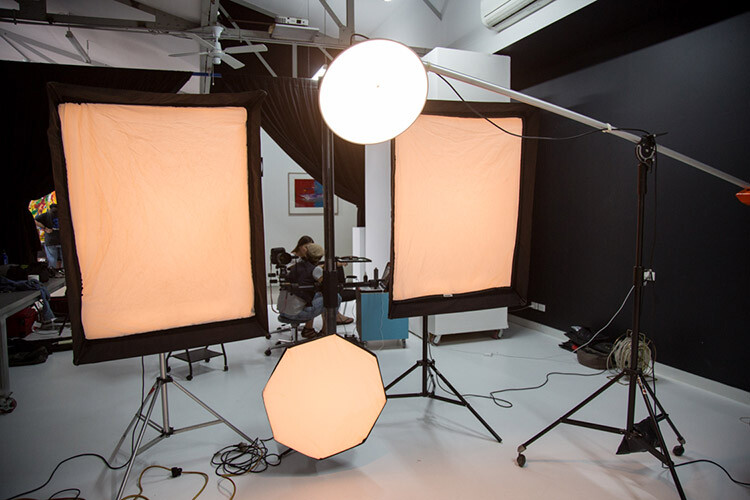
    Once you have mastered soft light, it’s time to start experimenting with hard light. Hard light is tricky to work with, because there is very little room for error. Hard light modifiers include beauty dishes and grid spots.

    If you’ve done all the work, adding a beauty dish or grid spot to your lighting setup, will be much easier to manage at this stage.
    Fearflash 1

    Step Seven: Brown Belt – Bringing everything together

    Now you are ready to work with hard and soft light at the same time. The hard light, like a beauty dish or grid spot, can be used as the main light, and the soft light becomes the fill.

    Step Eight: Red Belt – Developing your own style

    Once you’ve mastered each of the lighting styles individually, and know how to work with them together, you can focus your attention on developing a lighting style that is unique to you.

    Step Nine: Black Belt – Enlightenment

    A black belt in lighting comes with the realization that we never really stop learning. Most of the best photographers in the world will admit that they are yet to master their craft, and the more they know, the more they realize they have yet to learn.

    One of my greatest highlights of the past few years, has been watching the students I have taught overcome their fear of flash, and seeing their styles evolve and develop.

    Here are some of my favourite examples of their work, and the steps they took to create these images.

    Lisa McTiernan
    Lisa McTiernan

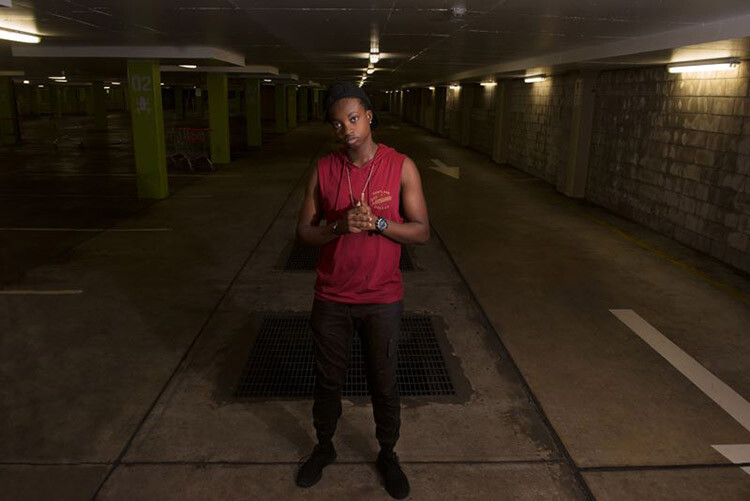
    Off-camera flash has scared me for a while now. Finally! Simple, easy to understand info, that even after one go has opened up a whole new world for my photography. Gina Milicia you’re my hero. Legit.

    I wanted a moody vibe for this shoot in an empty concrete carpark. I wanted the shot to look like it was lit by the fluorescent lights on the walls and ceiling, and not by my speedlight. After setting the exposure for the ambient light, I bounced the flash (with the diffusion dome) off the ceiling at an angle to soften, and bounce it back onto my subject’s face and upper-body to highlight his red shirt. I set the flash to 1/16 power, and adjusted the level until I got the look that worked. Exposure: 1/100th, f/5.6, ISO 500, 27mm lens.

    Kristi Louise Herd

    Kristi Louise Herd

    www.herdstarphotography.co.uk ( weddings only for now) www.flickr.com/photos/herdstar

    This is from a photo shoot I did with an aspiring model, it was my first night shoot and my first using flash. Before I did the shoot I read and re-read your ebook, Portraits, Lighting the Shot. Tricks I learned from you became invaluable. I used the trick with the phone to focus, as the light was pretty dim. It worked fantastic, and the softbox, which I had never used before, was held just above and sightly to the left of the model (I had seen this again in a diagram from your ebook). Camera settings: Nikon D750 f/4.2, 1/30th, ISO 800, focal length 112mm. I would never have achieved this shot without learning from you Gina Milicia.

    Erica Rampant

    Erica Rampant

    Hi Gina, I asked a few weeks ago about placement for lighting for a milk bath shoot. Here is the result! It was taken with a Nikon D610, 50mm Sigma Art lens, ISO 100, f/2.2, 1/160th of a second.

    This is my friend Antonette, she just gave birth to a healthy baby boy and I was there to photograph it. She had a home birth and her baby was born in water! I’m still a new photographer and have only been shooting for five months, but have been listening to you, and learned so much!

    Natalie Ord
    Natalie Ord

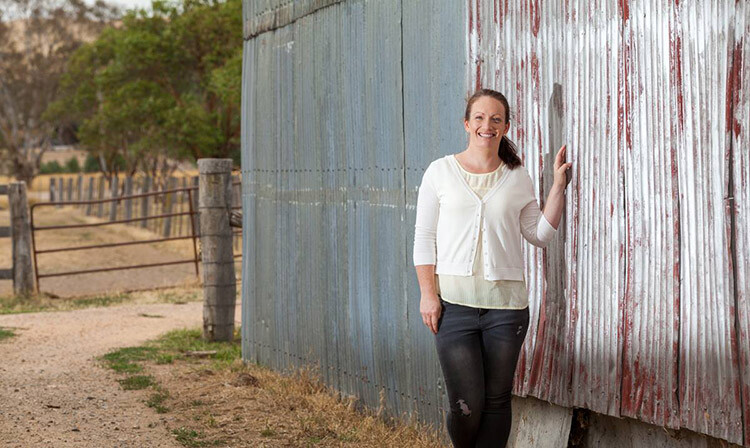
    This is a shoot a recently did for a client. The day was windy, overcast, and I had limited time. I needed to portray the client as friendly, accessible, and show that she is rural-based, so it was important for me to get the background exposed right. I couldn’t have done that without using off-camera flash.

    Settings were 1/320th, ISO 250, f/7.1, using PocketWizards, a Canon Speedlite 600EX without a softbox, as it was windy and I didn’t have anyone to hold the stand, shot on my 70-200mm f/2.8L with a Canon 5D MkII.

    Gary Lun
     

    Gary-Lun-3

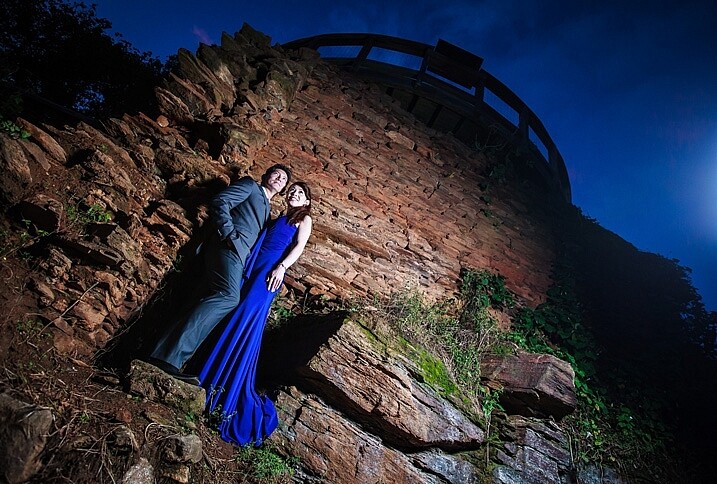
    Canon 5D MkII with Canon 16-35mm f2.8 at 18mm, f/4.5, 1/125th, ISO 1600. Flash was Yongnuo YN560III at 1/8 power, positioned at camera right. Softbox was using SMDV SpeedBox-60.

    Quick story: I was doing an engagement shoot at a typical location in town for many photographers. It was packed with photographers that day! Anyway, in order to get a unique photo I knew I must use flash. So I waited until all other photographers were gone, because the sun is going down (since most of them were using natural light), took my flash out, asked the couple to stand near something with texture, and took the shot.

    Phil Enn
    Phil Enn

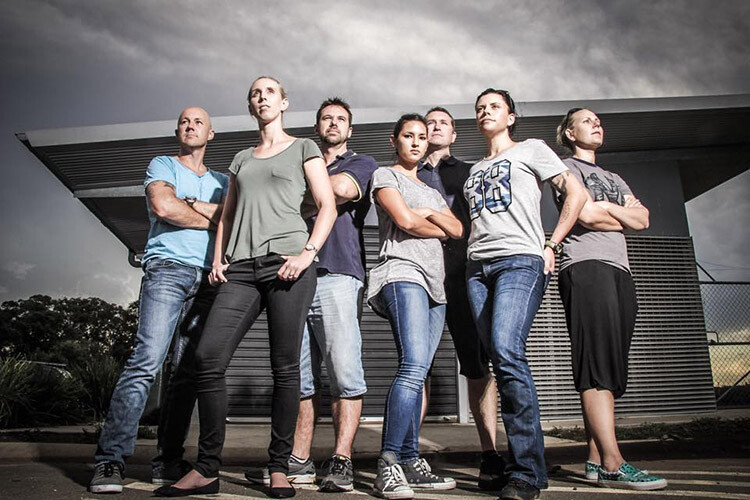
    Canon 7D, 17-85mm at 17mm, f1/6, ISO 200, six speed lights held in a bunch, off to camera right.

    Andrew McNamara

    Andrew McNamara

    Canon 5D MkII, 24-70mm at 24mm, f/9.0, ISO 100, 1/50th with a camera-mounted Canon 480exII Speedlite. As stated in the original story, shot from inside a training element for the Southern Cross Search Dogs photoshoot. I had a diffuser on the flash, just for the safety of the dogs eyes, and bounced it just a little.

    P.S. I’m one of those people who are afraid of flash so this was a big step!

    Rahim Mastafa
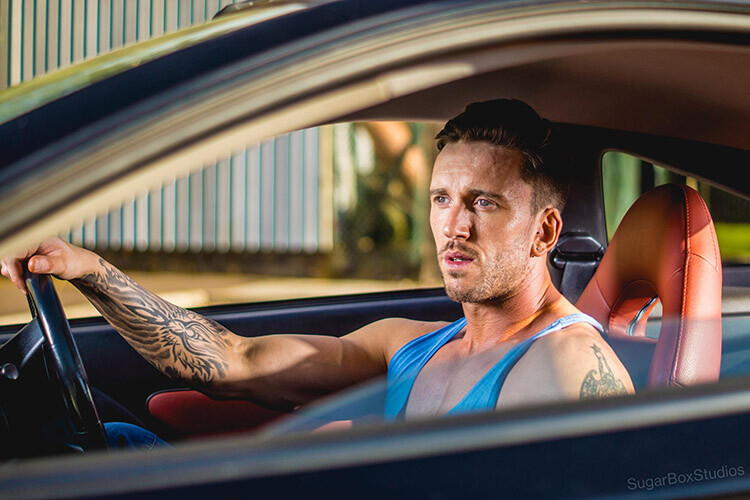
    Rahim Mas
    Inspired by one of your ebooks, I used one studio strobe as a key light to the front of him, and a speed light as a kicker, over his shoulder on the backrest. Settings were: f/2, 1/1500th, ISO 100, Sony a77, 50mm lens.

    Matt Zahn

    Matt Zahn

    This was part of my self portrait challenge. Since it was nighttime, and obviously no natural light to shoot with, I attempted to create the illusion that this was natural light coming through a window. I used my Canon 430exII Speedlite on my T5i. I slid a home-made snoot over the end, and used some electrical tape to create some of the shadows. This shot was taken at 1/400th, f/5.0, ISO 400. I also placed a gold reflector to camera left, behind me.

    Scott Stokhaug
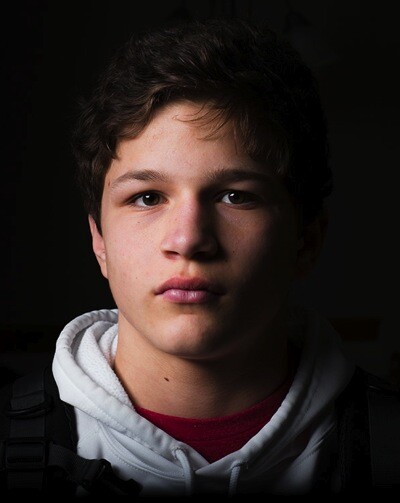
    Scott Stockhaug

    With the help of your ebook, Flashfast for Portrait Perfection, I made a minimal investment to get that speedlight off my camera, and open many new doors! This photo is my Rembrandt lighting, along with black background that was shot in my home, in broad daylight, with no backdrop. I love this technique!

    Next step

    So where are you on The Bruce Lee Protocol steps? Do you have a fear of flash? Have you overcome and mastered it already? Please share with us where you are, and what you’ve done to conquer your fears.


    fastflash_bookIf you want to learn more about using flash for creating portraits, pick up Gina’s brand new dPS ebook: Fast Flash for Portrait Perfection. Now on sale for an introductory price for a limited time only.

    googletag.cmd.push(function() {
    tablet_slots.push( googletag.defineSlot( “/1005424/_dPSv4_tab-all-article-bottom_(300×250)”, [300, 250], “pb-ad-78623” ).addService( googletag.pubads() ) ); } );

    googletag.cmd.push(function() {
    mobile_slots.push( googletag.defineSlot( “/1005424/_dPSv4_mob-all-article-bottom_(300×250)”, [300, 250], “pb-ad-78158” ).addService( googletag.pubads() ) ); } );

    The post 9 Steps to Get Over Your Fear of Off-Camera Flash by Gina Milicia appeared first on Digital Photography School.
    Digital Photography School

  • Intelligent Design? 14 Strikingly Modern Places of Worship

    [ By Steph in Architecture & Public & Institutional. ]

    modern church ribbon 3

    Dramatic and sculptural, monolithic as a stone monument or light as a bridal veil, these churches, chapels and meditation rooms eschew conventional architectural typologies for places of worship, prioritizing the way the structures make visitors feel while they’re inside. Some emphasize a connection to nature, while others encourage internal reflection or symbolize the act of marriage with unexpected visual metaphors.

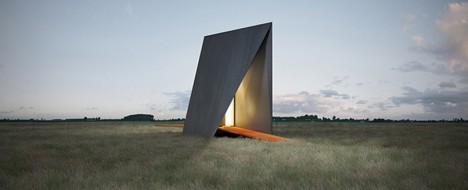
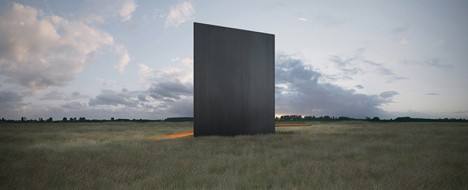
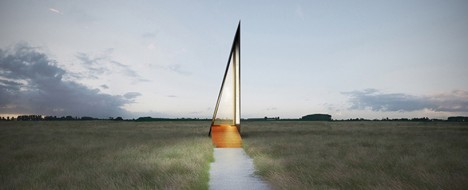
    Minimalist Chapel
    modern minimalist chapel

    modern minimalist chapel 2

    modern minimalist chapel 3

    modern minimalist chapel 4

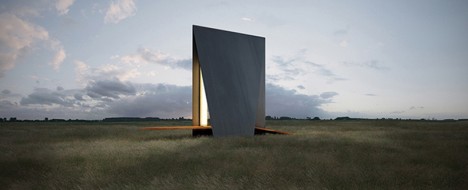
    Reinterpreting the stark, minimalist works of sculptor Richard Serra in architectural form, this blade-like chapel rises from the flat grasslands of Serbia, offering a space for meditation. Stockholm-based architect Predrag Vujanovic creates a strong perpendicular line contrasting the landscape with just two main elements: the folded steel of the roof, and the cortex steel sheets making up the ramp.

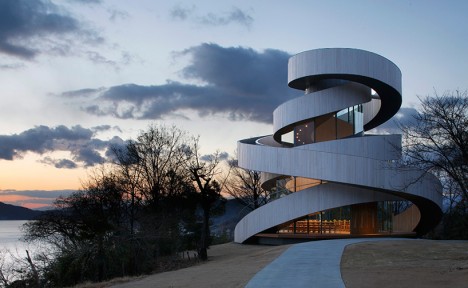
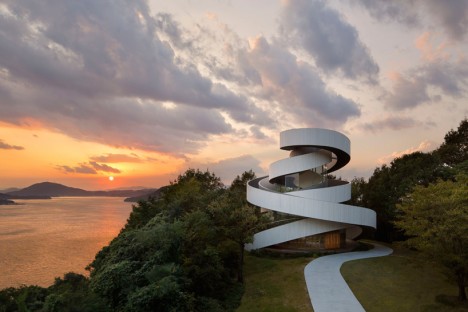
    Ribbon Chapel
    modern church ribbon 1

    modern church ribbon 2

    modern church ribbon 4

    modern church ribbon 5

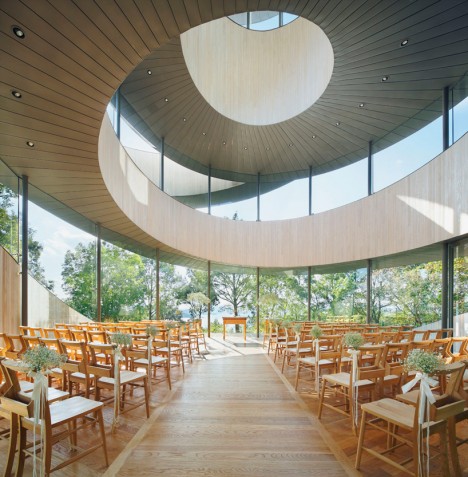
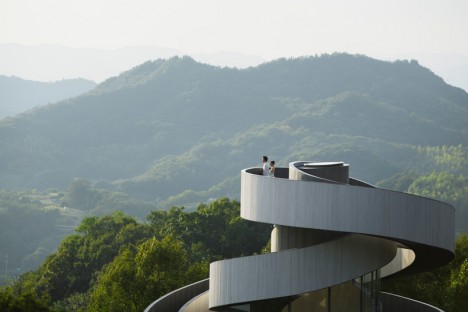
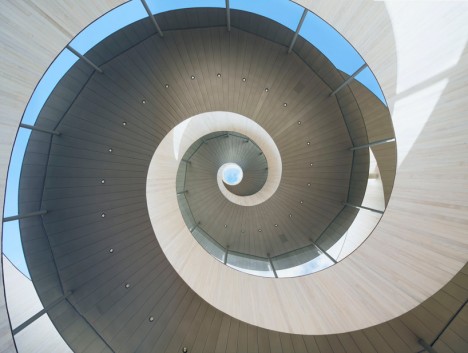
    Japan’s most striking wedding chapel consists of two separate stairways that spiral up to the sky, joining into an observation platform looking out onto the sea at the pinnacle. The space beneath is glassed in to create an airy interior fitting up to 80 guests. From the center of the nave, one can look straight up into the oculus skylight framed by the spiral of the ramp.

    Kamppi Chapel of Silence
    modern kamppi chapel

    modern kamppi chapel 2

    modern kamppi chapel 3

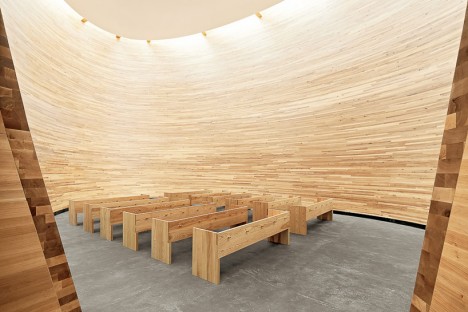
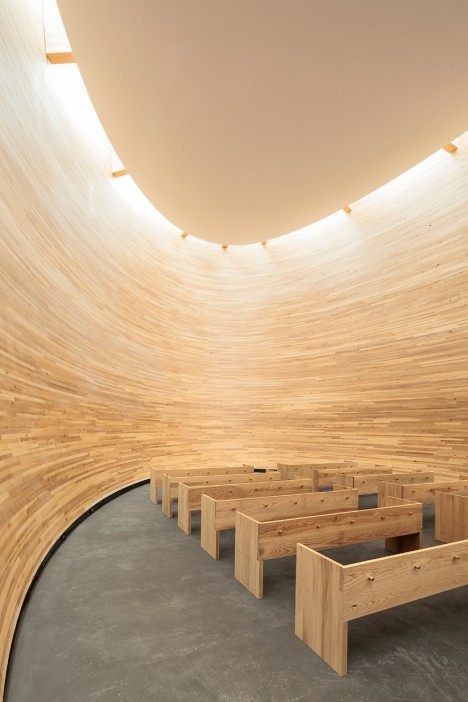
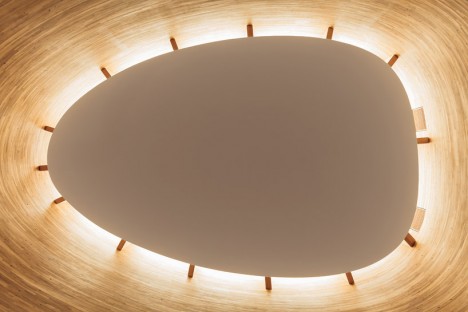
    Solid wood and windowless, this egg-shaped chapel on the southern side of busy Narinkka Square in Helsinki, Finland offers a quiet place of refuge. CNC-cut, glue-laminated sections of timber create the curving walls of the striking space, leading the eye upward to the void between the perimeter and the roof, where sunlight streams in.

    St. Voile Chapel
    modern st voile

    modern st voile 2

    modern st voile 3

    modern st voile 4

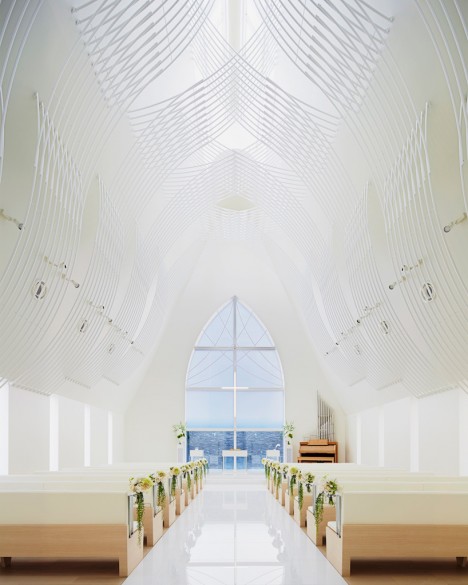
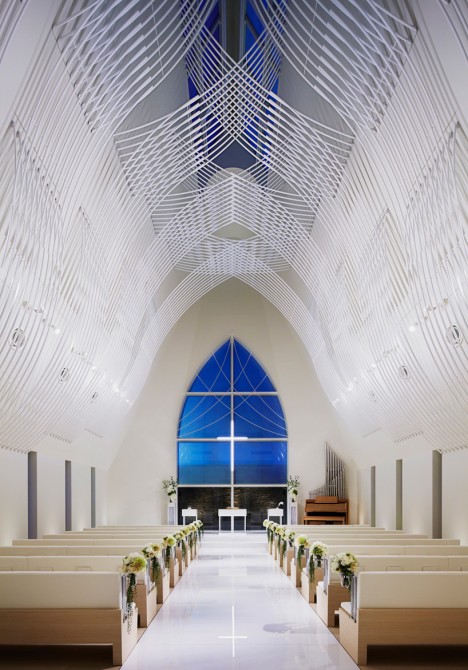
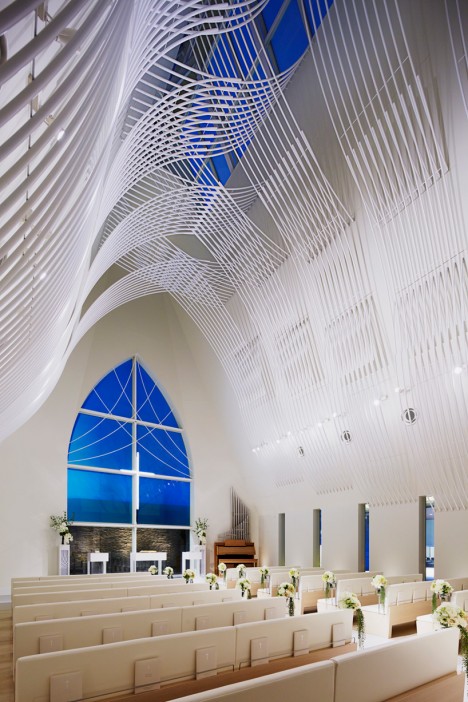
    A series of white pipes climb the walls of the St. Voile Chapel by Kasahara Design Work, interweaving in flowing organic patterns as a visual metaphor for marriage. Located on the banks of Niigata’s Shinano River, the chapel is largely defined by the play of daylight on these interior lines, which streams in through a pair of skylights at the pinnacle of the steep and narrow roof.

    Gratitude Open Chapel
    modern open chapel

    modern open chapel 2

    modern open chapel 4

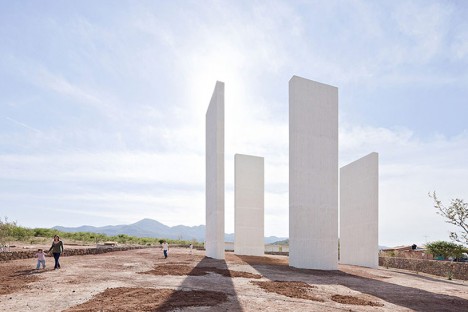
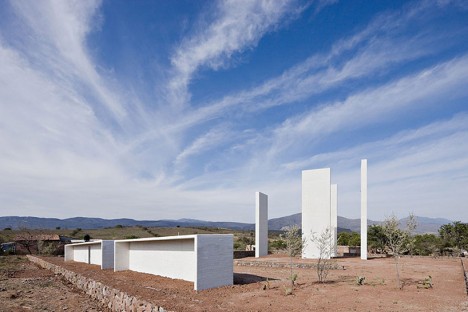
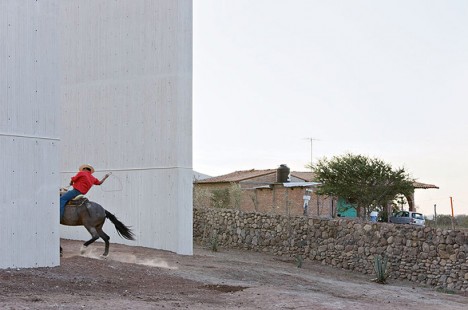
    Set against the landscape of Lagunillas, Mexico like a series of four monumental stones, the simple white elements making up ‘Gratitude Open Chapel’ by Tatiana Bilbao + Dellekamp Arquitectos don’t actually form an interior space at all, but rather an outdoor gathering place for pilgrims making the holy ‘Ruta del Peregrino’ route.

    Next Page – Click Below to Read More:
    Intelligent Design 14 Strikingly Modern Places Of Worship

    Share on Facebook


    [ By Steph in Architecture & Public & Institutional. ]

    [ WebUrbanist | Archives | Galleries | Privacy | TOS ]


    WebUrbanist

  • Sigma introduces EF-630 multi-function flash

    Sigma has announced a more powerful external flash for DSLRs, the EF-630. It updates the existing EF-610 flash units by covering a 24mm to 200mm focal range (as wide as 17mm with the built-in Wide Panel), with an auto zooming function. Based on Sigma’s naming conventions it’s safe to assume the EF-630 offers a guide number of 63. It’s also able to tilt upward by 90°, left/right by 180° and downward by 7°. It offers TTL exposure control, high-speed sync and slave mode for use with other flashes. 

    No pricing or availability is given for the EF-610.


    Press release:

    Sigma Introduces Electronic Flash EF-630 Multifunctional External Flash

    Boasts TTL exposure control, high-speed sync, wireless flash functions, rear-curtain sync, auto-zoom, and wide-angle illumination coverage and more

    KANAGAWA, JAPAN — February 23, 2016 – Sigma Corporation of America, a leading DSLR lens, camera, flash and accessories manufacturer, has just announced the Sigma Electronic Flash EF-630, a multifunctional flash designed to work with current digital SLR cameras. Offering greater output of light, the EF-630 features TTL exposure control, high-speed sync, wireless flash functions, auto-zoom and bounce-flash, amongst additional features that make it ideal for many types of photography.

    “Lighting is one of the most important factors when it comes to creating a beautiful image, and can be the difference between capturing the perfect moment and missing it entirely,” comments Mark Amir-Hamzeh, president of Sigma Corporation of America. “The EF-630 has all the features advanced photographers look for in a flash and is the perfect companion to the DSLR.”

    The Sigma EF-630 flash automatically adjusts for focal lengths of 24mm to 200mm focal length, making it ideal for wide angle and super-zoomed shots alike. For ultra-wide angle shots, photographers can utilize the built-in Wide Panel to cover an angle of up to that of a 17mm lens.

    Compatible with most well-known digital SLR cameras, the EF-630 features auto TTL exposure control, as well as remote control operation through the TTL wireless flash function, where the camera lens calculates the correct exposure automatically for perfect lighting. For multi-flash setups, photographers can use the Slave Flash Function to trigger additional flashes. To achieve a softer look, photographers can bounce light off of a white wall, ceiling or reflector by tilting the EF-630’s flash head upwards by as much as 90°, or swiveling left or right by 180°. For close-up shots, the flash head can also be titled down by 7°.

    The FP Flash function of the EF-630 makes flash photography possible at shutter speeds greater than the normal sync speed, which is typically limited at shutter speeds up to 1/250 second for most cameras. The FP Flash function for high shutter speeds is necessary when setting a larger aperture to limit depth of field when shooting in daylight, as high shutter speeds are used to balance the daylight and the flashlight at any shutter speed. To capture natural motions, the Rear-curtain Sync mode allows the flash to be triggered immediately before the rear-curtain of the shutter closes, recording blurred trails behind a moving subject rather than in front.

    Additional EF-630 features:

    • Intuitive user interface: dot matrix LCD screen for improved menu visibility, D-Pad and dial settings controls, and easy one-click disengage function improve ease of use
    • Modeling flash function: check for intense reflections and shadows before capturing the shot
    • AF assist light: accurate auto-focus in low light conditions
    • Auto Power-off: flashgun automatically powers off after a period of non-operation to conserve battery life
    • Manual flash power level control: manually sets the flash power level from 1/1 to 1/128

    The new EF-630 Flash can be updated with the latest software from a workstation or laptop using the Sigma Optimization Pro software and Flash USB Dock (sold separately).

    Articles: Digital Photography Review (dpreview.com)

  • 12-bit Versus 14-bit RAW – Which is Right for You?

    So you’ve done the research, read the articles, browsed through your photos, and decided it’s time to make the leap from shooting in JPG to shooting in RAW, in order to get the most quality possible out of your photos. Congratulations, and welcome to the fold!

    Things are nice over here in RAW land, we have cookies too. Now that you’ve firmly decided once and for all to shoot in RAW, you can stop thinking about file formats and get back to making beautiful images, right? Well, sort of. Turns out there’s yet another layer to this cake, that adds yet one more twist to the mix: RAW compression formats.

    raw-formats-compared-sunrise-corrected

    “What?!” I can hear you saying now. “What’s a compression format? And why does it matter? Can’t I just shoot in RAW and be done with it?” Well yes, and no.

    For starters go grab your camera, caress it gently, and rest assured that you have in your hands a very capable imaging device, that would have been the envy of every photographer in the world 10, or even five years ago. You don’t have to understand everything about RAW, JPG, and other formats, as long as you’re getting out there and taking photos that you like. But, if you would like to know more about how all this works, then by all means, read on. You might want to sit down and grab a cup of coffee, because things are about to get a bit tricky.

    How RAW format works

    When you take a photo with any camera (DSLR, mirrorless, point-and-shoot, or even your smartphone) a massive amount of color information is captured by the camera’s image sensor, and sent to a computer chip that analyzes it, and ultimately saves it to your memory card as a picture. If you shoot in JPG, a great deal of that data is discarded to save storage space, and facilitate easier sharing. But, if you shoot in RAW, most of that color data is retained, which results in you having much more flexibility to edit each picture in a program like Lightroom or Photoshop, but also results in file sizes that can be quite large and not at all conducive to emailing or posting on social networks. Many cameras allow you to choose different types of RAW formats such as:

    • JPG – Every camera offers this format which stores 256 tonal values for each color, but compresses the file in such a way that a significant portion of the photo data is discarded. This format is ideal for photographers who do not do much editing in Photoshop or Lightroom, and the file sizes are much smaller than RAW, which makes them very easy to share.
    • 12-bit RAW lossy compressed – This format stores 4,096 tonal values for each color (red, green, and blue) per pixel, but then throws away some information it deems unnecessary, using an algorithm to compress the file, so it’s a bit smaller and takes up less space on your memory card. Most of the discarded data is on the right side of the histogram, which makes sense, since digital cameras typically capture much more information in the mid-tones and highlights to begin with. Thus, there is a great deal more leeway when performing a lossy compression algorithm, since it is removing some data from a part of the image where there is so much to begin with, that removing a little will not matter to most users.
    • 12-bit uncompressed – Also stores 4,096 tonal values for each color, but does not throw out any data to shrink the file size.
    • 14-bit lossy compressed – This format stores 16,384 tonal values for each color (way more than 12-bit – 12-bit mean:s 2 to the power of 12 or 2x2x2x2x2x2x2x2x2x2x2x2, 14-bit is 2 to the power of 14) but also discards some data it deems gratuitous, in order to compress the file so it’s a bit smaller.
    • 14-bit uncompressed – The best option most cameras offer (though some ultra-high-end models do have 16-bit RAW files, but they usually cost more than a new car) stores 16,384 tonal values for each color per pixel and does not throw any away, giving you the highest possible amount of information, to work with in post-production.
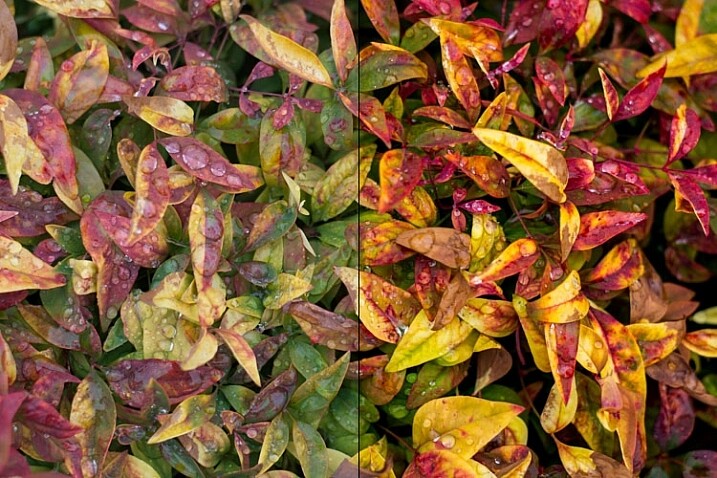
    The original photo (left) was somewhat bland and flat, and shooting in RAW gave me the flexibility I needed to properly edit this into an image I really liked.

    The original photo (left) was somewhat bland and flat, and shooting in RAW gave me the flexibility I needed to properly edit this into an image I really liked (right).

    Looking at this data the answer seems clear, right? Just shoot in 14-bit uncompressed RAW because it’s obviously better! Well again, yes and no.

    Due to the increase in the amount of data offered by a 14-bit file, the resulting RAW images take up much more space on your memory card and computer, and are much slower to load in a program like Lightroom or Photoshop. If you shoot with a high-megapixel camera like the Nikon D800, Sony A7Rii, or Canon 5DS, you can easily get RAW files approaching 100MB each. That is great when you need it, but can be quite a burden if you decide that all the extra data is not always worth the tradeoff in storage space.

    Another issue that comes into play when comparing formats is whether the increased data actually does give you more flexibility when editing the image. Of course it does in theory, but in practice, having 16,384 tonal values for each color could be a bit of overkill for most people. If you generally get your exposure correct in camera, then you may not need the sheer quantity of data provided by a 14-bit uncompressed RAW format file.

    Real-life examples

    Some camera makers have other RAW formats, such as sRAW and mRAW, that actually decrease the pixel count of your images, while still giving you the flexibility of a RAW file. But, at the end of the day, one thing is clear – shooting in RAW will always give you significantly more freedom to edit your images than shooting in JPG. The question then becomes, which RAW format to use?

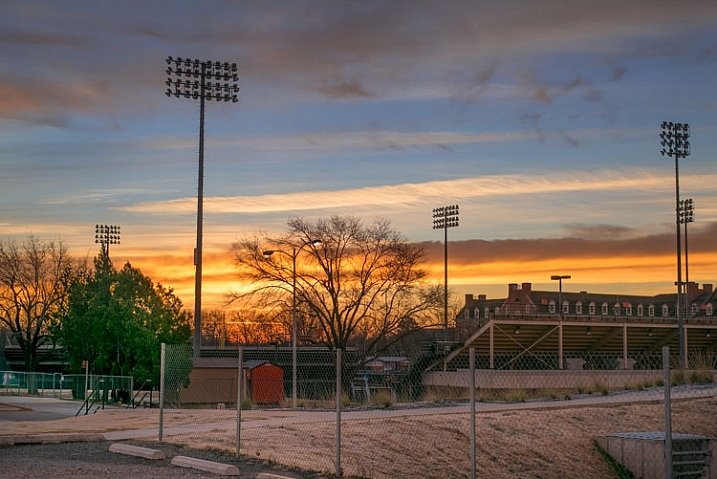
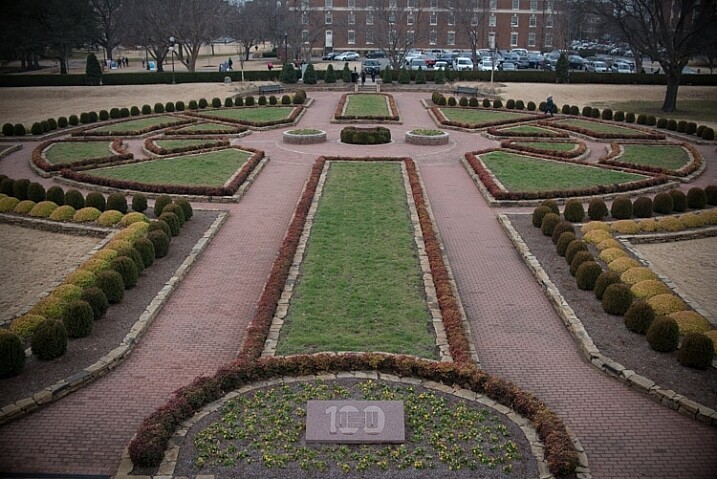
    There are benefits and drawbacks to each one, but all RAW types allow you to have an extraordinary degree of flexibility in post-production, compared JPG. Like almost everything in photography, there is no single correct answer to the question, and it is largely dependent on your shooting style and needs as a photographer. To see how this plays out in a real-life scenario, here’s a picture I took, overlooking the Formal Gardens at Oklahoma State University.

    f/4, 35mm, ISO 100

    35mm, f/4, 1/350 second, ISO 100

    I re-shot the same picture using massive over- and under-exposures using four different RAW formats, then corrected them in Lightroom. Shooting these photos as JPGs would have resulted in unusable images, but RAW gives you so much extra information, that you can often salvage parts of a picture that would have been entirely lost otherwise. RAW is useful for much more than fixing overexposed pictures, but it’s in extreme circumstances like this that the real differences between the 12-bit, 14-bit, compressed, and uncompressed formats, would be most likely to show up.

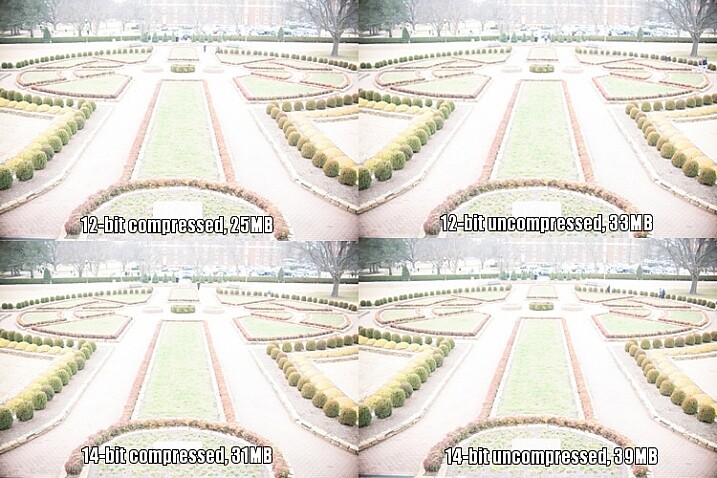
    This first set of images has been intentionally overexposed by three stops, by leaving the aperture at f/4 and ISO at 100, but increasing the shutter speed to 1/30 second.

    raw-formats-compared-garden-overexposure-compared

    Overexposed intentionally by three stops, to test which format offers the most in terms of highlight recovery.

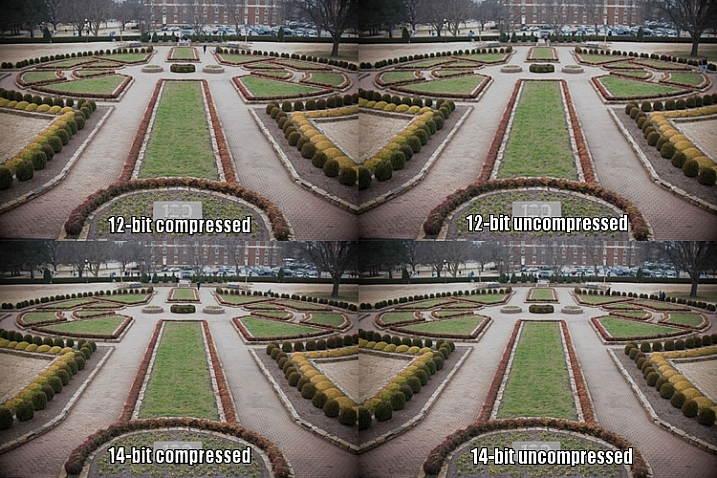
    I then used Lightroom to bring the exposure values back down by three stops, for a correctly exposed image. Some data has been lost due to clipping, where things are so overexposed there is literally nothing left to recover, but for each picture I was able to get a decent image, useful for comparison purposes. I still wouldn’t use these in an actual production environment, but it does give you an idea of how flexible the RAW format really is.

    raw-formats-compared-garden-overexpoure-fixed-compared

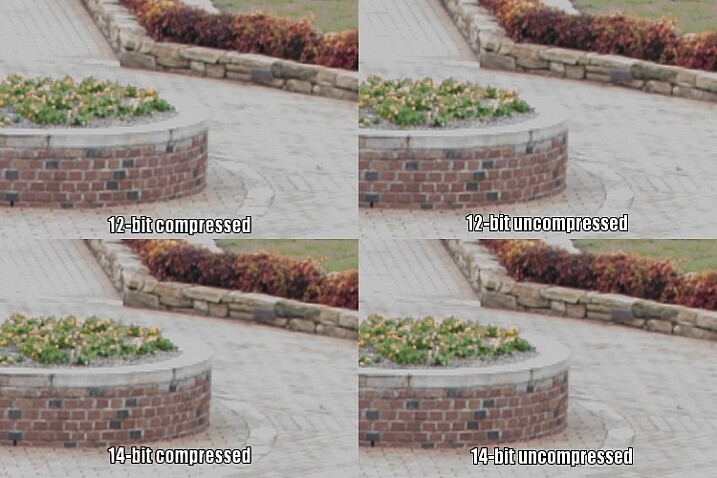
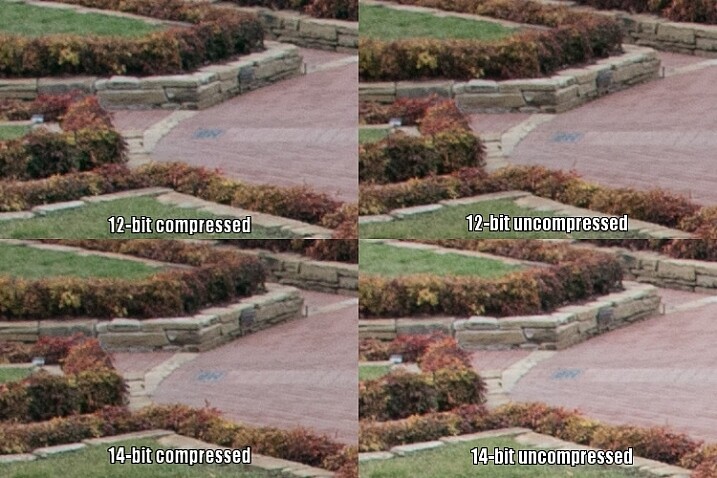
    All images look virtually identical, but that’s not too unexpected given that these are minuscule thumbnails of 24-megapixel images. To get a better understanding of how the RAW compression formats compare, here is a 1:1 crop of the same section of each photo.

    raw-formats-compared-garden-overexpoure-fixed-compared-crop

    Upon close inspection, all four RAW formats appear to offer similar functionality when recovering highlight data.

    Notice much of a difference? I don’t. That’s not to say there isn’t any difference, just not one that’s discernible to the human eye.

    Since the initial 14-bit uncompressed file is more than 50% bigger than a 12-bit compressed image (39MB versus 25MB) there is clearly a lot more data to work with, but as this test illustrates much of that is not likely to matter a whole lot in practical terms. The biggest difference I can see is not due to lossy compression but bit rate, as both 14-bit files show just a few more clearly-defined bricks in the sidewalk, to the right of the planter.

    However, keep in mind this is a 1:1 crop of a 24-megapixel image. You’re looking at about 94,000 pixels in each section above, out of nearly 25 million, or about .04% of the total image. If you have to zoom in this far to see any noticeable differences between 12-bit and 14-bit RAW files, that were overexposed by three whole stops to begin with, then to me it does not offer a significantly compelling reason to shoot 14-bit RAW most of the time.

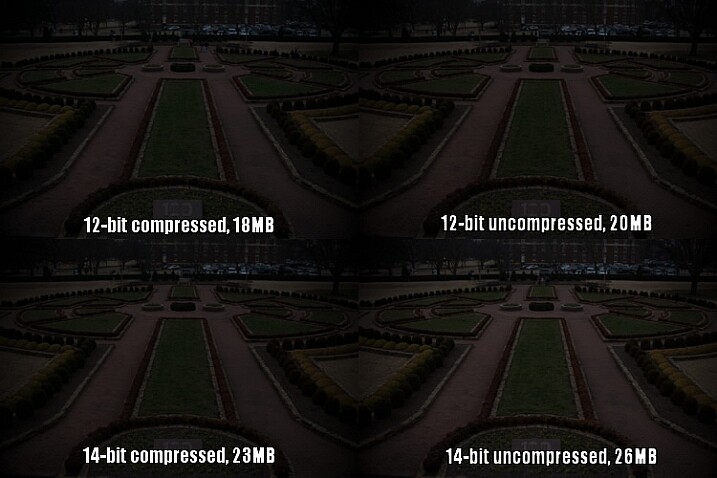
    To continue with the comparison, here’s the same picture underexposed by three stops in camera, by increasing the shutter speed to 1/3000 second.

    raw-formats-compared-garden-underexposure-compared

    Underexposed by three stops to test shadow recovery.

    Since almost no data was clipped, which I could tell by looking at the histogram, adjusting the exposure by three stops in Lightroom results in an image that is virtually identical to the correct one at the top of this article. Taking another look at the 1:1 crops below, yields a similar result as the first test.

    raw-formats-compared-garden-underexpoure-fixed-compared-crop

    Once again, all four RAW formats appear to be on par with each other for recovering detail in the shadows.

    The results here are remarkably similar to the overexposure test, and remember that these pictures have been severely underexposed before correcting them in post. The differences between the corrected images you see above are negligible, and the much smaller 12-bit compressed file gives results that are almost identical to the 14-bt uncompressed.

    So, which format should you use?

    While you can’t draw a universal conclusion from just one test, this example does illustrate that shooting in 12-bit compressed RAW still gives you plenty of data to work with, when editing your images. As I mentioned at the top of the article, some data is literally thrown away when shooting with a lossy compression format, but in most situations it’s nothing you are likely to notice. Only in extreme circumstances, such as when you want to do massive highlight or shadow recovery, or if a photo has been severely over or under-exposed, are you likely to notice any practical benefits from shooting in 14-bit RAW.

    However, if you are the type of photographer who wants the most possible data in each picture, and continually pushes your camera to its limits, I would recommend capturing as much information as possible (i.e. shooting in 14-bit) and retaining every last chunk of it (shooting uncompressed).

    Even when shooting for clients I use 12-bit RAW because it gives me more than enough color information to edit my shots.

    Even when shooting for clients I use 12-bit RAW because it gives me more than enough color information to edit my shots. I could use 14-bit RAW, but for my purposes I have found that I simply don’t need to.

    A notable caveat here is that the test I performed was just one example, and it’s entirely possible that a different scenario would have done a better job at illustrating the differences in terms of the different RAW formats. When doing this I tried to pick something that was generally representative of a typical photographic scenario, and not a situation that was far outside the realm of what most people would encounter when taking pictures. If I had over or under-exposed by four or five stops, or shot at higher ISO values, perhaps there would be some significant differences in terms of what each format has to offer, and I don’t want to draw any large-scale conclusions from just one small set of data.

    What this test does illustrate is that even though 12-bit compressed RAW contains less photographic information than its higher bit rate counterparts, enough important data remains to give you plenty of wiggle room, if you need to do extreme corrections in post-production.

    The original uncorrected version of the image at the top of this article, shot in 12-bit compressed RAW.

    The original uncorrected version of the image at the top of this article, shot in 12-bit compressed RAW.

    I generally don’t like to give advice when it comes to photography, life, jobs, or matters of the opposite sex, but I have shot with many types of RAW formats for a few years, and feel entirely comfortable shooting in 12-bit compressed. I do all my pictures this way, even paid jobs for clients, and have never had a circumstance in which a bad picture would have been salvageable if I had only shot in 14-bit uncompressed.

    In my experience (which, I admit, is not the same as a professional photographer who makes his or her living taking pictures) there are plenty of other factors that matter just as much, such as: choosing the right lens, nailing your focus, composing your shot, knowing when and how to use external lights, and a host of other things that are more important than eating up your memory cards with 14-bit uncompressed RAW files. If your pictures regularly, and consistently, require the type of extreme editing that can only be saved by heavily editing a 14-bit uncompressed RAW file, I’m going to go out on a limb and say there are probably other things that you need to work on to improve your photography, besides choosing the right file format.

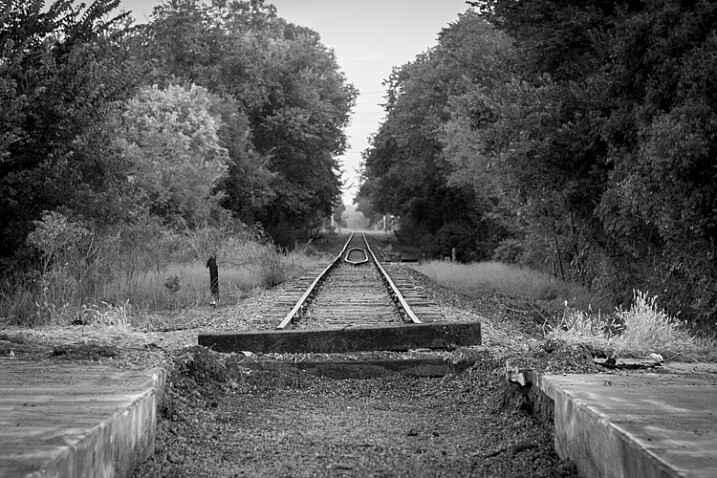
    Even black and white photographers can get a lot of benefits from shooting in RAW.

    Even black and white photography can benefit from using the RAW format due to the additional data available in each individual pixel.

    Of course it should be noted that the RAW format is beneficial, not just for fixing images that are way too bright or dark. RAW files give you significant flexibility when editing the colors of an image, and allow you to bring out more natural skin tones, get the deep rich blues hidden in a dull gray sky, find the intricate details of a flower petal that would be lost in a JPG, and perform all sorts of other edits that have nothing to do with making a dark photo a little brighter. Any RAW format is better than none, if you’re the kind of person who likes to edit your images after you take them, but if you want a nice balance between having lots of data while still keeping file sizes down, 12-bit compressed will most likely suffice just fine.

    What about you? I’m curious what your experiences have been with compressed and uncompressed RAW. Perhaps you’re the kind of photographer who shoots in JPG and doesn’t bother messing with processing afer the fact. I’d like to hear about your experiences in the comments below, especially if you have found times when shooting 14-bit uncompressed RAW has come in handy. The more information we have to work with, the better informed we will all be as photographers.

    googletag.cmd.push(function() {
    tablet_slots.push( googletag.defineSlot( “/1005424/_dPSv4_tab-all-article-bottom_(300×250)”, [300, 250], “pb-ad-78623” ).addService( googletag.pubads() ) ); } );

    googletag.cmd.push(function() {
    mobile_slots.push( googletag.defineSlot( “/1005424/_dPSv4_mob-all-article-bottom_(300×250)”, [300, 250], “pb-ad-78158” ).addService( googletag.pubads() ) ); } );

    The post 12-bit Versus 14-bit RAW – Which is Right for You? by Simon Ringsmuth appeared first on Digital Photography School.

    Digital Photography School

  • ISO, Aperture, Shutter Speed Guide for Product Photography

    Who said you have to be a professional photographer to take a good picture—but wait, a great product image requires more than just lights, aim and shoot! When you are shooting products to sell on your ecommerce store, you want to achieve the best results possible. A remarkable product image can give your online store a professional look that tells Continue Reading

    The post ISO, Aperture, Shutter Speed Guide for Product Photography appeared first on Photodoto.


    Photodoto

  • Panasonic adds weather-resistant Lumix G Vario 12-60mm F3.5-5.6 Power OIS to lens lineup

    $ (document).ready(function() { SampleGalleryV2({“containerId”:”embeddedSampleGallery_4953132805″,”galleryId”:”4953132805″,”isEmbeddedWidget”:true,”standalone”:false,”selectedImageIndex”:0,”startInCommentsView”:false,”isMobile”:false}) });

    With the start of CP+ 2016 just one day away, Panasonic is introducing the Lumix G Vario 12-60mm F3.5-5.6 ASPH Power O.I.S. to its family of Micro Four Thirds lenses. Featuring a splash and dustproof design, the lens is compatible with Panasonic’s Dual IS feature, currently available on the Lumix DMC-GX8. Its construction includes 11 elements in 9 groups, seven aperture blades and a high-speed stepping motor.

    The Lumix G Vario 12-60mm F3.5-5.6 ASPH will be available in May for $ 499.99.


    Press release:

    New LUMIX G VARIO 12-60mm / F3.5-5.6 ASPH. / POWER O.I.S. Lens

    New Micro Four Thirds Versatile Standard Zoom Lens

    Newark, NJ (February 24, 2016) – Panasonic is introducing a new zoom interchangeable lens, the LUMIX G VARIO 12-60mm / F3.5-5.6 ASPH. / POWER O.I.S. (35 mm camera equivalent: 24-120 mm) for the LUMIX G line of Micro Four Thirds System cameras.  Featuring a splash/dust-proof design, the new lens offers a versatile 5x zoom range of 24-120mm (35mm camera equivalent) that covers a variety of daily shooting situations from dynamic landscapes to portraits. 

    For everyone interested in a modern alternative to bulky DSLR interchangeable lenses, Panasonic LUMIX Mirrorless Micro Four Thirds lenses deliver impressive, no-compromise optical performance. The durable, all-weather LUMIX 12-60mm F3.5-5.6 Lens features the highest standards of detail and sharpness. Built for travel and great photo and video capture, it comes complete with a splash and dustproof sealed body.** And with Dual I.S. (Image Stabilization) compatibility, you’ll shoot with unprecedented hand-held stability anywhere you go. 

    **When mounted on a compatible LUMIX G Mirrorless camera

    Incorporating an inner focus drive system and a stepping motor, the new LUMIX G VARIO 12-60mm / F3.5-5.6 ASPH. / POWER O.I.S. is capable of smooth, silent operation to work with the camera’s high-speed, high-precision contrast AF system for both photo and video recording. It is also compatible with the sensor drive at max. 240 fps to take maximum advantage of cameras with high-speed AF. This stunning AF performance is able to record 4K video, where precise focusing is required.

    Seven blades give the aperture a rounded shape that produces an attractively smooth effect in out-of-focus areas when shooting at larger aperture settings. A highly reliable metal mount assures durability for active use, and uses multi-coated lens elements that minimize ghosts and flare to further enhance its shooting performance. 

    It also features 0.54x (35mm camera equiv.) magnification capability for impressive macro close-up shots.  Comprised of 11 elements in 9 groups, the lens system features three aspherical lenses and an ED (Extra-low Dispersion) lens which effectively suppresses spherical distortion or chromatic aberration to achieve stunning picture quality.

    The LUMIX G VARIO 12-60mm / F3.5-5.6 ASPH. will be available in May at www.shop.panasonic.com and valued channel partners in metallic black for $ 499.99.

    Panasonic Lumix G Vario 12-60mm F3.5-5.6 ASPH Power OIS specifications

    Principal specifications
    Lens type Zoom lens
    Max Format size FourThirds
    Focal length 12–60 mm
    Image stabilisation Yes
    Lens mount Micro Four Thirds
    Aperture
    Maximum aperture F3.5 – F5.6
    Minimum aperture F22.0
    Aperture ring No
    Number of diaphragm blades 7
    Aperture notes Circular aperture
    Optics
    Elements 11
    Groups 9
    Special elements / coatings 3 aspherical + 1 ED elements
    Focus
    Minimum focus 0.20 m (7.87″)
    Maximum magnification 0.27×
    Autofocus Yes
    Motor type Stepper motor
    Full time manual No
    Focus method Internal
    Distance scale No
    DoF scale No
    Physical
    Weight 210 g (0.46 lb)
    Diameter 66 mm (2.6″)
    Length 71 mm (2.8″)
    Sealing Yes
    Zoom method Rotary (extending)
    Power zoom No
    Zoom lock No
    Filter thread 58.0 mm
    Hood supplied Yes
    Tripod collar No

    Articles: Digital Photography Review (dpreview.com)

  • Sigma announces sd Quattro and sd Quattro H Foveon mirrorless cameras

    $ (document).ready(function() { SampleGalleryV2({“containerId”:”embeddedSampleGallery_6087587295″,”galleryId”:”6087587295″,”isEmbeddedWidget”:true,”standalone”:false,”selectedImageIndex”:0,”startInCommentsView”:false,”isMobile”:false}) });

    Sigma has announced two mirrorless ILCs: the Sigma sd Quattro and the sd Quattro H. Both cameras use the company’s full-depth SA lens mount as used in its SLRs, and are built around APS-C and APS-H sized sensors, respectively. The cameras share a body design with a built-in viewfinder that, while unusual, appears more ergonomically conventional than the recent DP Quattro series of large-sensor compacts.

    Both cameras feature on-sensor phase detection as part of a hybrid AF system, which should mean they work effectively with existing SA-mount lenses. The down-side is that it reduces the range of lenses that could be added via adapter.

    Both cameras use the latest, ‘Quattro’ version of Sigma’s Foveon technology, which measures different color information based on how deeply into the sensor it is able to penetrate. The Quattro design features full resolution at the top (predominantly blue-sensing) layer but then 1/4 of that resolution for the two deeper layers used to interpret information about red and green color components.

    The APS-H sensor features 25.5MP in its top layer, which the company considers equivalent to the capture of a 51 megapixel sensor using the conventional Bayer design. This 26.6 x 17.9mm sensor is around 30% larger than the more common APS-C size, but it’s currently unclear what proportion of Sigma’s ‘DC’ lenses designed for APS-C offer a large enough image circle for use with the camera.

    The APS-C version uses a phase-detection capable variant of the sensor used in the existing DP Quattros, offering 19.6MP on its top layer. Sigma says this should offer a level of detail comparable with a 39MP Bayer chip. (Foveon explained the logic of these claims when we spoke to them a few years ago).

    The cameras feature two rear screens, one of which displays the camera’s current settings. They also feature USB 3.0 interfaces. A vertical/battery grip will be available.


    Press Release:

    Sigma Announces Two New Mirrorless Cameras: Sigma sd Quattro and sd Quattro H

    Interchangeable lens APS-C and APS-H Foveon Quattro sensors in state-of-the-art camera systems

    KANAGAWA, JAPAN — February 23, 2016 — Sigma Corporation of America, a leading camera, DSLR lens, flash and accessories manufacturer, today announced the new high-performance, compact Sigma sd Quattro and Sigma sd Quattro H mirrorless camera systems with Foveon Quattro sensors. The Sigma sd Quattro features an APS-C sized sensor and the Sigma sd Quattro H touting a larger APS-H sized sensor for even greater image quality. Thanks to the mirrorless aspect of the cameras, both the sd Quattro and sd Quattro H are designed to take full advantage of all Sigma Global Vision lenses.

    “With the introduction of these two new cameras, Sigma continues its rich history of innovation. The Foveon sensor is renowned for its imaging characteristics, and the mirrorless interchangeable format offers photographers the full line of Sigma Global Vision lenses to help realize their creative visions,” stated Mark Amir-Hamzeh, President of Sigma Corporation of America. “The sharpness of detail and nuanced color tone captured by the Foveon sensors is a key component of Sigma Global Vision. The sd Quattro, and the sd Quattro H, with the newly announced Foveon Quattro APS-H sensor, will be greatly appreciated by photographers who demand the utmost in imaging purity, with the added benefit of portability for both in-studio and on-location photography.”

    Both the sd Quattro and sd Quattro H feature similar design aspects with a compact form consistent with the dp Quattro line, making them highly portable and utilizing the Foveon Quattro sensor for exceptional imaging quality and fast processing. A magnesium alloy body makes the sd Quattro and sd Quattro H durable and rugged, while a dust- and splash-proof design makes it ideal for photographers facing harsh conditions. In addition to the new body design, both cameras boast a list of useful advancements. These include a two-mode Autofocus detection that combines Phase Detection for focus speed and Contrast Detection for focus accuracy. The focus settings have also been enhanced with such modes as Movement Prediction, Face Detection, Free Movement, Focus Peaking and a variety of others. The new 2.3 megapixel viewfinder displays close to 100% of the field of view and when placed in “Auto” will toggle between the viewfinder when the user has the camera to their eye and then to the LCD when the user lowers the camera. A new “Super-Fine Detail” mode brings out the full potential of the Quattro sensor by capturing seven different exposures with one shot and merging them for exceptional dynamic range (images can be extracted individually as well). Meanwhile an updated algorithm for the Auto White Balance allows for greater accuracy, even with multiple light sources.

    While the sd Quattro and sd Quattro H are similar in physical design details, they stand apart when their Foveon sensors are compared. The sd Quattro utilizes the same sensor found in the dp Quattro line and produces image quality comparable to that of a 39 megapixel Bayer-pattern sensor on resolution testing. The stacked silicon Foveon Direct Imaging sensor captures all detail information on the top 19.6 megapixel layer along with all color information for the Blue channel, while the two five-megapixel layers below capture Red and Green color information, all without the need for a low pass filter. Merged together they create incredible image quality that is comparable to medium format files. The sd Quattro H boasts a larger APS-H sensor (26.6×17.9mm) than the sd Quattro and can produce images equivalent to that of a 51-megapixel Bayer-pattern sensor camera on resolution testing. The sensor structure is similar to that of the sd Quattro but uses a 25.5 megapixels on the top layer of the sensor that captures the detail information. Both cameras use the latest Dual TRUE III image processor and take full advantage of the Art, Contemporary and Sport line Global Vision lenses that are made for high megapixel cameras. Like all Sigma Cameras, RAW (X3F) data can processed via Sigma Photo Pro, which offers editing options, including Monochrome mode to take advantage of the incredible monochrome images the Foveon sensor captures.

    Sigma sd Quattro specifications

    Articles: Digital Photography Review (dpreview.com)

  • Nissin releases i60A flash unit with a guide number of 60m

    Flash manufacturer Nissin has announced a hotshoe flash unit that features a guide number of 60m and the company’s NAS 2.4GHz radio wireless control system. The Nissin i60A can control three groups of flashes in its role as a commander, or it can be controlled via another Nissin flash unit (only the Di700A at the moment) equipped with the NAS system or by the company’s Air 1 commander unit. Although each unit will have a TTL system dedicated to the mount it is designed for, the i60A also comes with multiple control systems built-in. This means that every flash can be used off-camera in an optically connected network of Canon, Nikon and Sony TTL flashes, no matter the mount. The i60A is equipped with 8 channels.

    The zoom head covers focal lengths of 24-200mm, and it is at the 200mm that the quoted GN60m@100 ISO has been measured. The unit has been designed to be small so that it will be attractive to owners of compact system cameras – it measures 98x73x112mm and weighs 300g without batteries. Manual control allows 1/3-stop increments from full power to 1/256th, and auto exposure compensation is available up to +/-2EV.

    The head rotates 180° and tilts directly upwards, and the unit is powered by 4AA cells, that Nissin says will provide 220 full power bursts, or via an external battery pack.

    The Nissin i60A will be available for Nikon, Canon cameras in May 2016, and Micro Four Thirds, Sony and Fujifilm cameras in the future. No pricing information has been released yet. Nissin doesn’t have any English information posted yet, but there is a Japanese press release PDF on the website.

    Articles: Digital Photography Review (dpreview.com)

  • Underline: 10-Mile Park to Trace Path of Elevated Rail in Miami

    [ By WebUrbanist in Architecture & Cities & Urbanism. ]

    underline

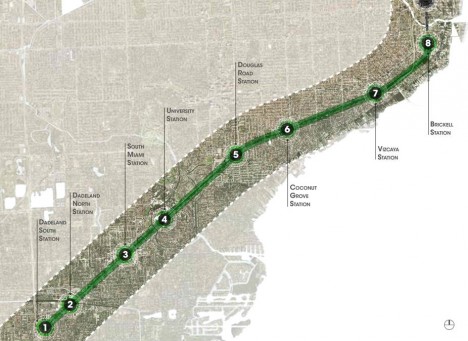
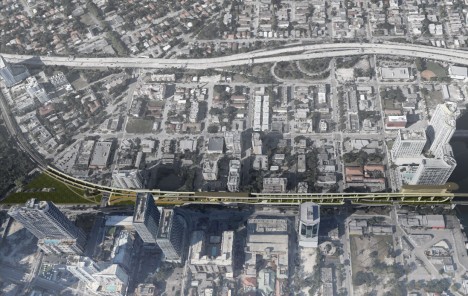
    Following in the footsteps of the High Line (and Low Line) of New York City, the Underline project aims to take the underutilized space below Miami’s elevated MetroRail and transform it into a connected park-and-pathway system spanning ten miles and hundreds of acres.

    miami underline project

    The undertaking is ambitious, but it has solid precedents around the country: “The Underline will connect communities, improve pedestrian and bicyclist safety, create over a hundred acres of open space with restored natural habitats.”

    underline system map

    Before-and-after concept images, shown above and below, highlight key points along the trail, including expanded park space, bicycle repair stations and play areas.

    miami before after park

    Connecting Miami, Coral Gables and South Miami, the design further aims to “encourage a healthy lifestyle, provide an easily accessible place to exercise, create a mobility corridor that integrates transit, car, biking and walking, provide a 10-mile canvas for artistic expression, attract development along US1, and generate significant economic impact.”

    underline master plan

    Beyond its immediate and direct effects, the trail would also connect out to a system of existing bike paths as well as ones under development, serving as a nexus between a total of 250 miles of extant and proposed trails across southern Florida.

    miami park project

    James Corner Field Operations of New York City was selected to create the master plan for The Underline, with input collected from surveys and six public meetings.

    underline miami design

    Their master plan provides “standards and requirements for the urban trails including trail widths and proposed materials. It also includes recommendations for lighting and wayfinding, seating, amenities, etc. The plan proposes improvements to crosswalks, intersections. Landscape recommendations include a plant palette and placement. There are also proposals for destination parks.”

    Share on Facebook


    [ By WebUrbanist in Architecture & Cities & Urbanism. ]

    [ WebUrbanist | Archives | Galleries | Privacy | TOS ]


    WebUrbanist

  • How to Use the Channel Mixer in Photoshop to Change Colors in Your Images

    There may be times when you want to play around with some elements in your images. Perhaps you want to change a color to a more suitable one in post-processing. One of the tools you can use in Photoshop is the Channel Mixer. It is a simple process that allows you to change the color of any element in your image to any other color under the rainbow. The Channel Mixer adjustment is widely used for making good black and white image conversions, correcting color casts, and exaggerating color. But why not use it for fun too, such as changing the color completely!

    channel-mixer-photoshop-tutorial_0007

    Before you start, however, there is one vital thing you must know, if you want to work in Photoshop in a non-destructive way: layers and masks.

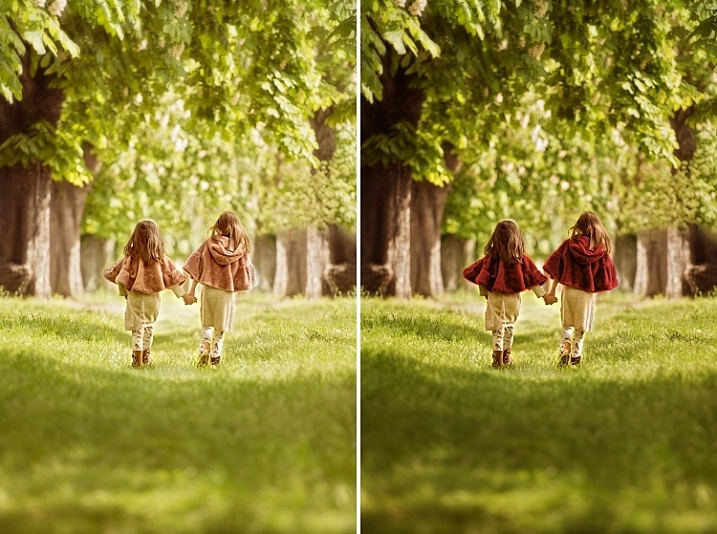
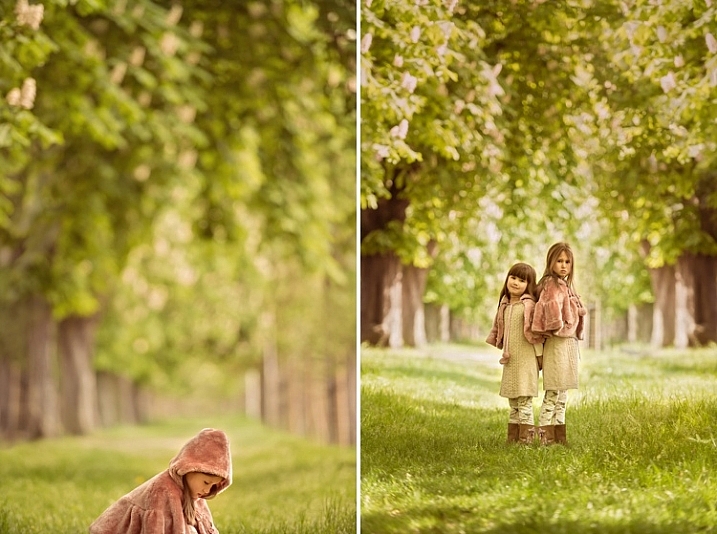
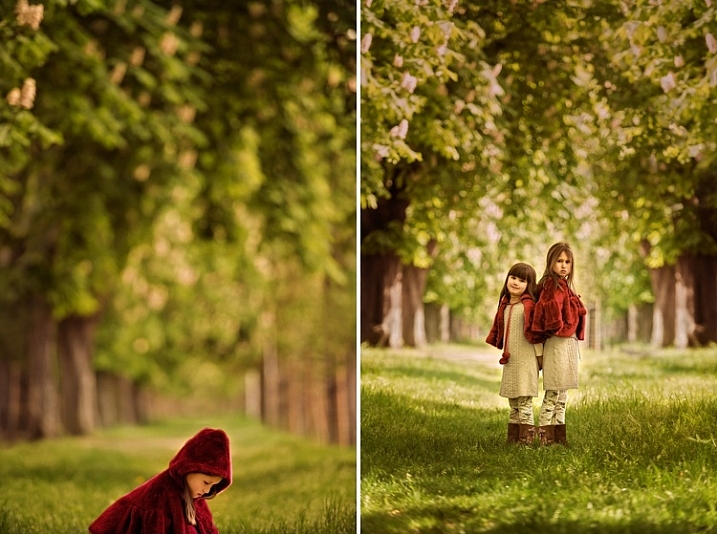
    The examples below are from a photoshoot I did with my girls. I did not like the colors of their capes, and didn’t have any other alternative, so Photoshop was to be the answer.

    channel-mixer-photoshop-tutorial_0000

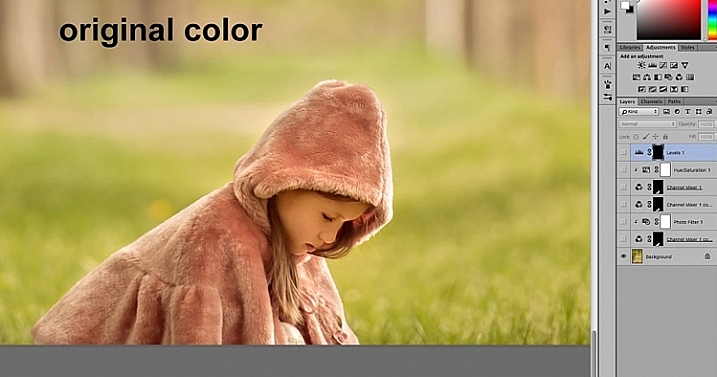
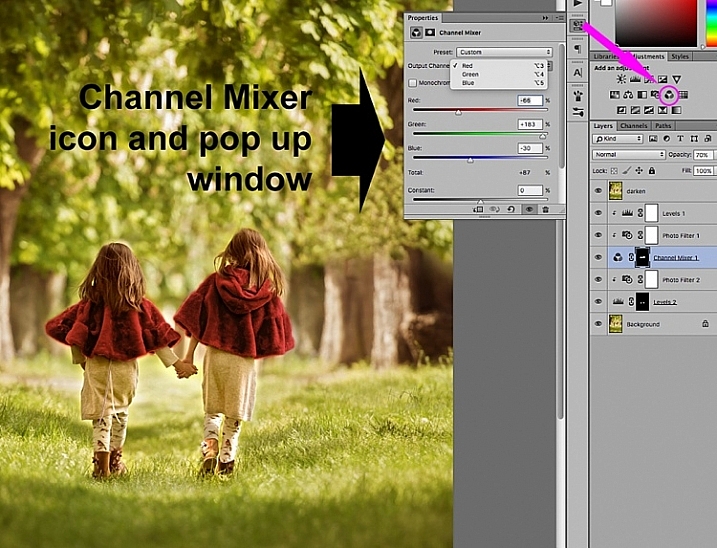
    The first thing you need to do once your file is opened, is to select the area where you want the color changed using either the quick mask mode, or one of the lasso tools. While your selection is highlighted, add a channel mixer adjustment layer and your selection will automatically be added as a layer mask. Click on the channel mixer icon to the left of the layer itself and a window pops-up.

    channel-mixer-photoshop-tutorial_0001

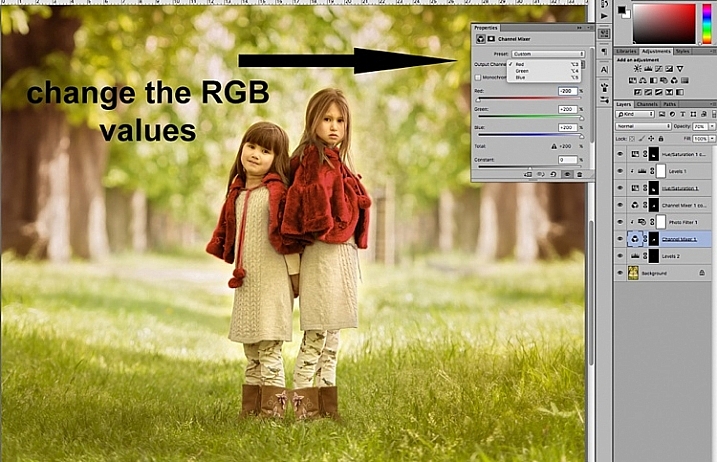
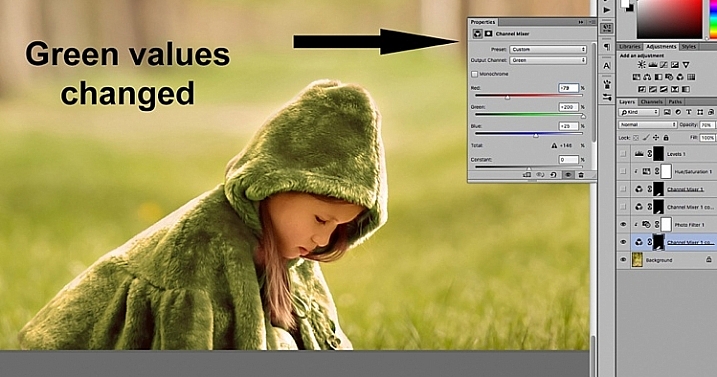
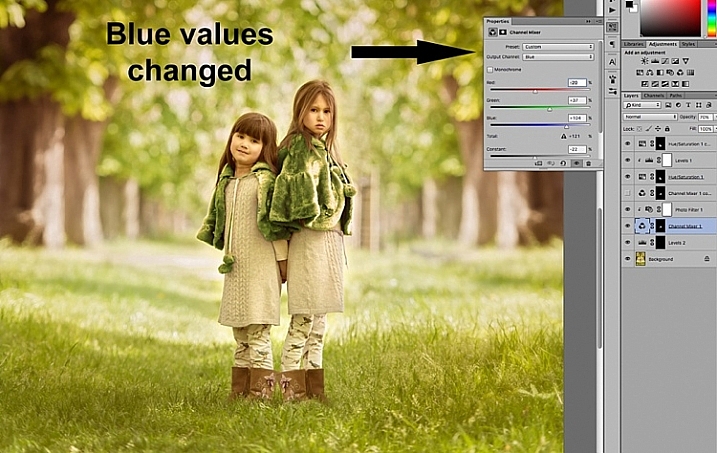
    There are three values under the output channel: Red, Green, and Blue . You need to bring up each value and move the sliders until you get your desired color. It will take a little experimenting, and going backwards and forwards between the three colors, until you arrive at your chosen color. When the color change is vastly different, you will notice that the RGB values individually requires major changes.

    channel-mixer-photoshop-tutorial_0002

    You need to keep an eye on the total value for each channel, aim to keep it within 100%. A warning is displayed when you go over 100%, as this means the color output is too bright or dark, and you are losing data in the darkest areas or the highlights. A negative value means you are adding more of the colour to the channel, and a positive value means you are taking away.

    channel-mixer-photoshop-tutorial_0003

    channel-mixer-photoshop-tutorial_0004

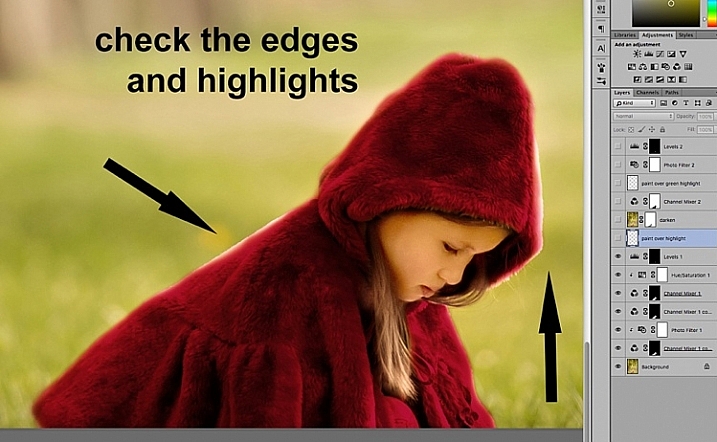
    Once you have decided on your new color, don’t forget to check the edges and carefully mask around if necessary. When the new color is a lot darker than the original color, such as on the image below, more meticulous masking is necessary to clean up the edges. In some cases, painting the highlights with the same color is needed for the image to look natural. You may also have to adjust the opacity of the brush, or the adjustment layer as required. The important thing is to make sure the image looks believable, if that was your original intention.

    channel-mixer-photoshop-tutorial_0005

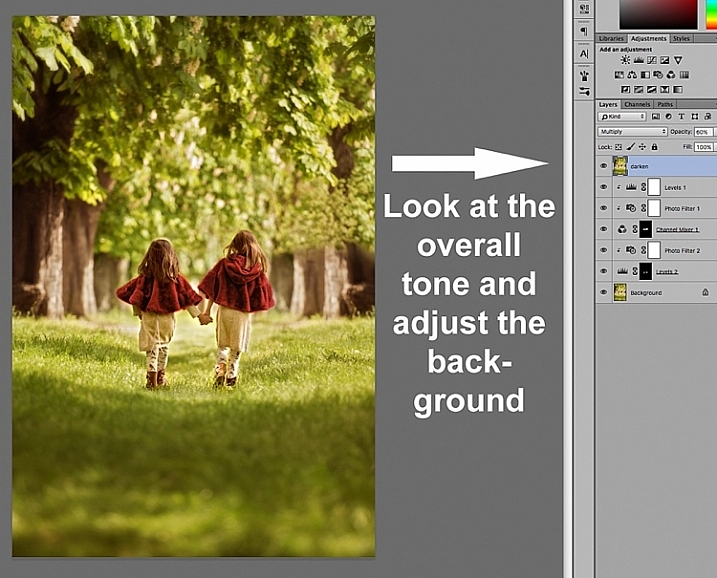
    Once you have changed the color and cleaned up your masking work, check the overall look, and adjust the background accordingly.  In the case of the image below, the original background looked too bright for the new moodier look so I darkened it to go with the scene I was after.  There are various ways of darkening an image in Photoshop. The method I used here was to duplicate the original image (duplicate layer), and change the Blend Mode to Multiply. You can then mask out any areas you don’t want to get too dark, or change the opacity of the layer, as done on the image below.

    channel-mixer-photoshop-tutorial_0006

    You will notice that I have added additional layers such as levels for brightening some areas, and photo filters for warming up or cooling down other areas. It is essential to have a good look at the overall picture, not just the isolated area and selective changes you have made. This is because our perception of color is relative and mostly dependent on the colors around them. Here are the before and after images (below).

    channel-mixer-photoshop-tutorial_0010

    channel-mixer-photoshop-tutorial_0008

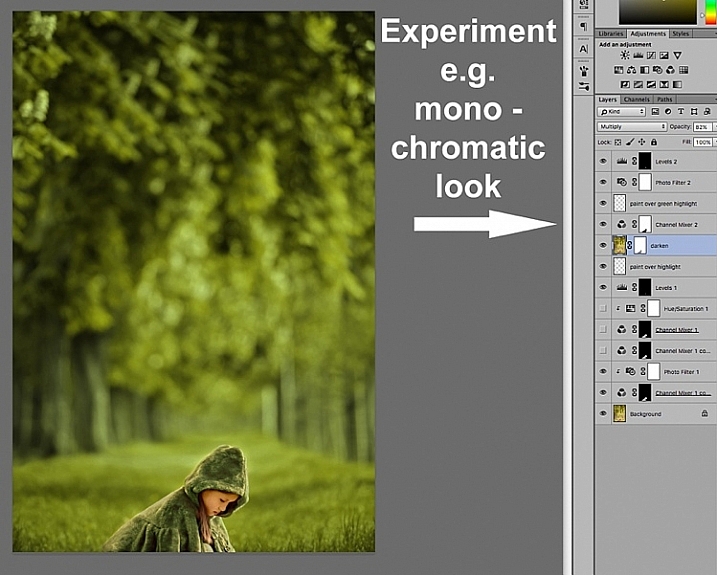
    Your Photoshop play doesn’t have to end in isolated color changes. You can experiment in many various ways to achieve any look you desire. In the image below I decided to go for a more monochromatic look. This involved selecting the background, applying another channel mixer adjustment layer, and moving the sliders on each RGB value until I got the color I was after.

    channel-mixer-photoshop-tutorial_0009

    Or you can throw all caution to the wind and go totally crazy. You can add and remove colors from each channel at purely 100% in a mix and match fashion, and see what array of unrealistic looks you get, such as the magenta image below – for fun!

    channel-mixer-photoshop-tutorial_0011

    I hope this has been a little helpful tip for your Photoshop play.  Do you have other ideas on how to use the channel mixer to achieve various effects in Photoshop? Share them in the comments section below please.

    googletag.cmd.push(function() {
    tablet_slots.push( googletag.defineSlot( “/1005424/_dPSv4_tab-all-article-bottom_(300×250)”, [300, 250], “pb-ad-78623” ).addService( googletag.pubads() ) ); } );

    googletag.cmd.push(function() {
    mobile_slots.push( googletag.defineSlot( “/1005424/_dPSv4_mob-all-article-bottom_(300×250)”, [300, 250], “pb-ad-78158” ).addService( googletag.pubads() ) ); } );

    The post How to Use the Channel Mixer in Photoshop to Change Colors in Your Images by Lily Sawyer appeared first on Digital Photography School.

    Digital Photography School