Blog

  • Nature and Wildlife Photography Tips for Beginners

    The post Nature and Wildlife Photography Tips for Beginners appeared first on Digital Photography School. It was authored by Adam Welch.

    If you have an interest in wildlife or nature photography, then there is a good chance you have seen an image at some point that has completely taken your breath away. Maybe it was a photograph of a sweeping landscape washed in the golden light of the dying afternoon sun, or a close-up of some small natural miracle that you had never noticed before that moment.

    You might even have asked yourself, “How did they do that?”

    Winter landscape

    Well, the majority of those incredible photographs came about through a good deal of physical hardship, practiced patience, and a healthy amount of self-made luck.

    Here are some tips to help you become stronger at wildlife photography and better at recording the natural world.

    Do your homework before heading out

    Be as educated as possible before you ever make a photo. Doing your homework is one of the most important, yet loathed, parts of wildlife photography. It never pays to walk into a situation and be completely clueless.

    Though you can never be totally prepared for every challenge you will face (that’s part of the fun), you can educate yourself so that you safely make the most of your outing.

    What gear to pack

    Advanced gear is not a requirement. However, patience and perseverance are essential. You don’t need the latest and greatest zoom lens or space-age gadgetry in order to produce outstanding nature and wildlife photos.

    At the same, you must also understand any limitations of your kit, so that you will have realistic expectations and avoid disappointment.

    Deer

    This photograph was made using the 28-135mm kit lens that came with my camera after I slowly and quietly crawled into range.

    Gear up for what you’ll most likely be shooting. Packing for a photographic outing can cause a lot of anxiety. It’s easy to overpack due to fear of lacking a piece of gear.

    Overpacking, though, can be even worse than underpacking. You become weighed down and uncomfortable. You find yourself not enjoying what you’re doing, which is one of the most preventable of all mistakes made by photographers.

    Research the animals and scenes you are likely to encounter. Decide what gear most and least important to you. Make choices, commit to them, and then let it go. It will make packing a lot less stressful.

    If you plan on photographing wildlife, such as birds and animals that scare easily, then pack your best zoom lens so you can keep distance between you and your subject.

    Are you shooting landscapes or scenes where stealth is not a concern? You might consider taking along a wider angle lens to better capture your scene.

    Ultimately, there is no secret formula and no true all-in-one lens to cover every situation. Be informed before you leave so that you can make the best use of whatever lens you have.

    A good bag is worth its weight in gold

    All the planning in the world isn’t worth much unless you can comfortably carry your essential tools with you. Find a camera bag that can carry the gear you need easily and is equally comfortable on your body.

    Bags range greatly in price and quality, but you usually get what you pay for. For added peace of mind, you might consider a bag that is semi-weatherproof or water-resistant.

    Here’s my go-to lightweight bag for wildlife photography, shown with and without the handy rain cover deployed:

    Camerabag

    Read reviews and find a bag that fits your body, your gear, and your planned outing. You will have a much more comfortable and enjoyable experience.

    Speaking of comfort:

    Shoes

    Comfort items

    Shoes: A good pair of hiking shoes or boots is one of the most important pieces of gear for any wildlife photographer. Grit, dirt, mud, water, insects, rocks, and creepy-crawlies; you need a pair of shoes or boots that can handle all of these elements.

    Your shoes should be well-fitting and suitable for walking long distances. If your feet become uncomfortable, it won’t be long before you start thinking about cutting your trip short.

    Prepare a checklist

    It’s always a good idea to have a mental checklist before beginning any shoot. Before your outing, ask yourself the following questions:

    • Are any special permits or permissions required? Some national parks, state parks, and wildlife sanctuaries require special permits for access to certain areas, especially backcountry environments.
    • Where will I park my vehicle? This is very important. Believe me, if you park your vehicle in an unauthorized area, then you will be stuck with a sizeable fine. Or worse, you’ll return to find your vehicle has been towed.
    • Are there time restraints of any kind? Most natural areas and parks have hours of operation just like a business. You might arrive expecting to shoot a great sunrise, only to find out the location you chose isn’t accessible until after daybreak. Also remember that wild creatures and critters are usually most active in the early morning or late evening.
    • What are the expected weather conditions? This is a biggie. Know what to expect as far as the weather is concerned. Check the forecast the day of departure and keep tabs on it throughout the day if possible. Never risk endangering yourself or your equipment by venturing out unprepared for bad weather.
    • What are the times for sunrise and sunset? Again, be sure the places you want to capture a sunrise or sunset are accessible during those times. You need to also be aware of the sunrise-sunset schedule so that you can allow enough time to reach your location and set up your gear before it’s go time.
    • Are there any commonly photographed animals, landmarks, or structures? Research what is usually photographed around the area you plan to visit. Find a park ranger or staff member and ask about lesser-known spots that are less traveled by tourists. Knowing what’s popular will save you time and help you avoid shooting a scene the same way it has been done time and time again. Look for ways to be creative and set your work apart!

    So, you’ve researched your location and have a good idea of what to expect. Here are a few basic tips that can help you after you’ve reached your destination.

    Shoot RAW

    Shootraw

    If possible, set your camera to capture images in RAW format. RAW image files are basically unprocessed (one might say uncooked), straight from your camera’s image sensor. They contain a massive amount of pixel information when compared to JPEGs and take up a lot more memory card space. However, this additional information allows more latitude for adjustments in post-processing.

    Use the lowest practical ISO

    The ISO number of photographic film and image-sensors relates to their sensitivity to light. The boiled-down explanation is that, everything else being equal, the higher the ISO number, the less light that is required to make an image.

    Unfortunately, with higher light sensitivity comes increased image noise. In most (but not all) situations, you will want to use the lowest ISO possible. That is not to say you should be afraid of bumping up the ISO. A fast shutter speed is often needed to capture the quick movements of wildlife, and increased noise is far less noticeable than a blurred image.

    Use AF continuous (AI Servo) mode when photographing wildlife
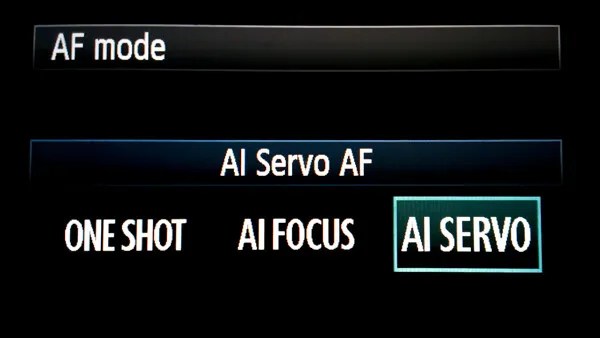
    Afservo

    Autofocus (AF) can be your best friend or your worst enemy. When it comes to photographing most wildlife, however, autofocus is a great tool!

    Animals and birds, especially the wild variety, are almost constantly on the move. They shift positions and move closer or farther away selfishly, with little regard for the photo you are so carefully trying to compose. This is when AF-Continuous and AF-Servo modes come in handy.

    Though called different names depending on your camera’s make, these settings both accomplish the same objective: They keep a moving subject constantly in focus.

    Place your selected focus point over your subject and half-press the shutter button to engage the AF. Focus will be tracked for as long as you follow your subject while maintaining pressure on the shutter button. Read your camera’s manual (you’ve done that already, right?) for detailed information concerning specific autofocus capabilities for your model, and how each mode can be selected.

    Don’t forget the tripod

    “I really didn’t think I would need my tripod” are words that usually begin a sad story about how a potentially great shot was missed. In most wildlife and nature photography situations, a tripod is always a good idea. It’s better to have access to a tripod and not need it than to need it and not have one available. Find the lightest and most compact tripod that is sturdy enough to handle your camera setup.

    Learn so you can prepare. Prepare so you can photograph. Photograph so you can grow.

    Photographing wildlife can be difficult, but it can also yield huge artistic, personal, and even spiritual rewards. So go out and have fun doing what you do, but don’t forget to put the camera down every now and then to enjoy the world around you.

    “Nature never goes out of style.” – Unknown

    The post Nature and Wildlife Photography Tips for Beginners appeared first on Digital Photography School. It was authored by Adam Welch.


    Digital Photography School

  • Jakumei Optics announces the $735 Dulens APO 85mm F2 for Canon EF, Nikon F mounts

    Chinese lens manufacturer Jakumei Optics has announced (translated) the release of the Dulens APO 85mm F2 manual lens for Canon EF- and Nikon F-mount camera systems.

    According to the manufacturer, the lens’ apochromatic (APO) design is inspired by ‘Sonnar-style’ lenses, the first of which was created by Dr. Ludwig Bertele in 1929.

    The lens is constructed of seven elements in six groups, including two extra-low dispersion elements and one high-refractive index lens. Other features include an aperture range of F2-F16, a nine-blade aperture diaphragm, a 90cm (3ft) minimum focusing distance and a 55mm front filter thread.

    The lens is available in black, grey and silver, and is available to purchase on the Shoten Kobo website (translated) for approximately $ 735 (76,950 JPY).

    Articles: Digital Photography Review (dpreview.com)

  • Hasselblad 907X and CFV II 50C sample gallery and impressions

    $ (document).ready(function() { SampleGalleryV2({“containerId”:”embeddedSampleGallery_0891752730″,”galleryId”:”0891752730″,”isEmbeddedWidget”:true,”selectedImageIndex”:0,”isMobile”:false}) });

    It has been a while since the Hasselblad 907X was launched. It didn’t go on general release at first as the company made a limited edition all-black kit to commemorate the moon landing, but now the chrome-edged production version is finally available to purchase.

    The concept is a tiny, slim body that acts as an interface between the CFV ll 50C digital back and Hasselblad’s XCD lens series, to create a very small lightweight kit that is highly portable, fun to use and, most importantly, beautiful to look at. As the sensor in the CFV ll 50C is the same as that used in the X1D ll and the lenses are the same, in theory we should expect the same image quality, so really choosing this camera over the more conventional X1D ll is a matter of the handling experience.

    Hasselblad CFV II 50C digital back and 907X

    The kit is very small for a medium format setup, though certainly not tiny by general camera standards. It is, however, very comfortable to hold and pretty simple to use. Most operations are conducted via the rear screen as there are few control points on the actual body. The shutter release is surrounded by a dial for changing exposure values and a single press button that accesses exposure compensation or shutter speed in manual exposure mode. In landscape orientation this is all very comfortable and easy, but working in portrait orientation takes a bit of getting used to.

    The rear screen flips up to make shooting from low angles easy, but doesn’t twist for low angles when the camera is flipped over. A small flap opens below the screen to access flash, headphone and mic sockets and iOS users will be able to use an app for remote control and image previews.

    It’s a very fun camera to use and a kit does (just) fit in a coat pocket or a small bag

    The shape and style of the 907X is reminiscent of the V series film cameras, and the experience of using it is strangely similar too. It’s a very fun camera to use and a kit does (just) fit in a coat pocket or a small bag, and returns first class results. There is a big difference in image rendering between Adobe Camera Raw and Hasselblad’s Phocus software, so as awkward as Phocus is to use I recommend processing these files in that rather than the application most people will automatically reach for.

    There is an accessory optical viewfinder coming soon as well as a grip, but neither were available at the time of shooting. The optical finder looks cool, but it won’t necessarily be essential since the rear screen is clear and bright even in sunny conditions. The grip though will make it easier to hold the camera still when shooting video.

    Articles: Digital Photography Review (dpreview.com)

  • Coming into focus: how Panasonic’s DFD gamble may yet pay off

    Panasonic’s DFD autofocus system tries to determine distance information without masking pixels as most on-sensor phase detection systems do.

    We’ve been impressed by what we’ve seen so far of the autofocus changes Panasonic introduced with its new S5. The latest version doesn’t iron-out all the quirks but continuous AF for stills, in particular, appears much improved. But beyond this, the details we were given about how these improvements had been achieved are interesting. They help to highlight both the benefits and the continued challenges of the company’s Depth-from-Defocus system.

    It’s a system with a poor reputation in some quarters but one that’s continued to improve significantly in recent years. The S5 shows both how far DFD has come as well as hinting at what’s still needed.

    What is depth-from-defocus?

    Fundamentally, focus is a a question of distance: adjusting the lens optics until the light rays from a subject at a particular distance converge on the sensor plane.

    The alternative: phase detection

    Most manufacturers have settled on phase-detection as the heart of their AF systems: this views the target from two different perspectives then works out how much the focus needs to be moved in order to bring those two perspectives into phase with one another (the point at which that subject is in focus).

    In mirrorless cameras, this is usually done by having partial pixels that only receive light from one or other half of the lens, to provide two differing perspectives. The downsides of these systems tend to be that these partial pixels either receive less light than a full pixel or that the complexity of the electronics (and the noise they produce) increases, in systems that combine pairs of half pixels. The performance can be excellent, but to a degree you’re trading away some light capture or noise performance to attain that AF performance.

    There are two broad approaches used by cameras to conduct autofocus: ones that hunt until they find the point that’s in focus and those that try to interpret the depth in the scene, so that they can drive the focus without the same need to hunt.

    DFD is Panasonic’s system for interpreting depth. It works by making a tiny focus adjustment and analyzing how the image has changed as a result. With an understanding of the out-of-focus characteristics of the lens being used, the camera can interpret these changes and build a depth map of the scene.

    This challenge is made more difficult if elements in the scene are moving: the camera’s depth map needs to be constantly updated, because the distances are changing. This is where subject-recognition and algorithms designed to anticipate subject movement come into play, since they allow the camera to understand which bits of the scene are moving and what’s likely to happen next.

    What’s new with the S5

    Panasonic told us that the S5’s autofocus has been improved by a number of fundamental changes. Part of it comes from improved subject recognition. This is based on deep learning (an algorithm trained to recognize specific types of subject) which helps the camera know what to focus on and to not refocus away from it. For instance, teaching the algorithms to recognize human heads when they’re looking away means the camera understands it doesn’t need to find a new subject or refocus when the face it had recognized suddenly ‘disappears.’

    Another part comes from re-writing the AF code to make better use of the available processing power. During the development of the S5, Panasonic’s engineers discovered they didn’t have to lean on the machine-learning trained algorithms for both subject recognition and movement tracking: they could combine the machine-learned recognition with their existing, faster, distance and movement algorithms, which freed-up processing power to run the process much more frequently.

    This video shows the view though the viewfinders of the S5 (left) and older S1 (right). Note that even when the S1 is in focus, there’s still some very obvious pulsing and fluttering, this is much less noticeable in the S5.

    Finally, other software improvements allowed the entire AF system to be run faster: providing more up-to-date information to the processor. The combined result of these changes, for stills shooters at least, is much improved autofocus with less reliance on the trial-and-error hunting of contrast detection AF. This, in turn, reduces the focus flutter in the viewfinder, making it easier for a photographer to follow the action they’re trying to capture, so you get an improved experience as well as improved focus accuracy.

    Video is a greater challenge

    But this approach is primarily a benefit for stills photography. Video is a more difficult challenge, partly because the focusing process is visible in the resulting video but on a technical level, because you have to read out the sensor in a manner that’s similar to the video you’re trying to produce. In stills mode you can reduce the resolution of the sensor feed (in terms of spatial resolution or bit-depth), to increase the readout rate, which increases how often the AF system receives new information about what’s happening. This low-res feed during focus doesn’t have any impact on the final image.

    For video you need to run the sensor in a mode that’s tied to that of the footage you’re trying to capture

    In high res video modes you need to run the sensor at a bit depth, pixel resolution and frame rate tied much more closely to those of the footage you’re trying to capture. At best, you get to read the sensor at double the output frame rate. Video is typically shot using shutter speeds at least twice as fast as the frame rate, meaning you can read the sensor out at 60 fps for 30p output, because each frame of video is usually made up from 1/60th second chunk of time or less, leaving you time to conduct another readout for the AF system before you have to expose your next frame.

    The problem is that full frame sensors are big and slow to read out. The sensor in the S5 is very similar to the ones used in the likes of the Sony a7 III, which typically take over 21ms to read-out in 12-bit mode: not quite fast enough to run at 48 fps for double-speed capture of 24p footage. This has the unfortunate side-effect of meaning the camera’s worst AF performance comes in the mode most likely to be used by the most demanding video shooters.

    Unfortunately for a brand so associated with video, the S5’s full-frame 4K/24p is the mode that delivers its weakest AF performance.

    Despite this challenge, Panasonic has re-worked the AF response even in this weakest mode, to be less prone to unnecessary refocusing.

    A bright new tomorrow

    The updates in the S5 show us a couple of things. Firstly, that Panasonic is well aware of the criticisms being leveled at its cameras and is continuing to fine-tune its software to squeeze everything it can out of the current hardware.

    DFD is not there yet but, in principle, staying committed to an AF method that gets better as hardware gets faster may prove a good choice

    But, more significantly, the improvements we’re seeing when shooting stills and when using AF-C during bursts of stills in particular suggest that some of the downsides we’ve seen in the past aren’t necessarily inherent flaws of the DFD concept. Instead they’re aspects that can improve as sensor readout and processing power improve. You don’t need to be a semiconductor physicist to recognize that improvements in those areas are always coming.

    In principle, in the long run, staying committed to an AF method that gets better as hardware gets faster may prove to be a better choice than an approach that trades-off light capture for AF performance. But the S5’s performance, particularly in video, shows DFD is not there yet. The risk for Panasonic is whether these fast-readout sensors and powerful processors arrive before the majority of full frame buyers have already committed themselves to other camera systems.

    Articles: Digital Photography Review (dpreview.com)

  • Farm to table with Becca Skinner and the Canon EOS R6

    In this video we travel to Montana to meet photographer Becca Skinner. Using the Canon EOS R6 Becca documents her permaculture garden and teaches us about homesteading alongside her husband and professional chef Eduardo Garcia.

    The Canon EOS R6 features a 20MP full-frame sensor and the latest version of Canon’s Dual Pixel CMOS autofocus, with human and animal face and eye detection. It also offers in-body stabilization up to eight stops with some lenses, the option for silent shooting at up to 20 fps, and a fully articulated touchscreen. The EOS R6 also has a lot to offer video shooters, including 4K/60p capture and HD up to 120 fps.

    Canon EOS R6 sample images by Becca Skinner

    $ (document).ready(function() { SampleGalleryV2({“containerId”:”embeddedSampleGallery_6007135101″,”galleryId”:”6007135101″,”isEmbeddedWidget”:true,”selectedImageIndex”:0,”isMobile”:false}) });


    This is sponsored content, created with the support of Amazon and Canon. What does this mean?

    Articles: Digital Photography Review (dpreview.com)

  • Canon EOS R Mirrorless Camera: A Hands-On Review

    The post Canon EOS R Mirrorless Camera: A Hands-On Review appeared first on Digital Photography School. It was authored by Jaymes Dempsey.

    Canon EOS R review

    The Canon EOS R isn’t the newest Canon camera on the block, but it’s one of Canon’s four full-frame mirrorless offerings.

    Which means that, if you’re an advanced Canon photographer looking to move to mirrorless, you don’t have many options.

    But what does the Canon EOS R offer advanced and professional photographers? And how does is hold up in the field?

    That’s what this review is all about.

    I’ve now had the Canon EOS R for nine months, which has given me plenty of time to test it. I’ve worked with the EOS R in rain, in snow, through blowing sand, at night, in the studio, and much more. So I know what this camera can do; I also know its limitations.

    Canon EOS R review
    Canon EOS R | Canon EF 70-200mm f/4L | 1/160s | f/4 | ISO 400

    And I’ve used the EOS R with an EF to EOS R adapter, so I can confidently say whether Canon EF/EF-S lenses work well with the EOS R, or whether you need to purchase a whole new set of (expensive) Canon RF glass.

    Are you ready to discover everything you need to know about the Canon EOS R?

    Let’s get started.

    Canon EOS R: Overview

    Canon EOS R review sample image
    Canon EOS R | Canon EF 24-70 f/4L | 5s | f/7.1 | ISO 200

    The Canon EOS R debuted back in 2018 as Canon’s first full-frame mirrorless camera, featuring:

    • A 30.3 MP sensor
    • A native ISO range of 100-40000
    • Dual Pixel Autofocus with 5655 AF points
    • 5 fps shooting with continuous autofocus; 8 fps shooting with One-Shot AF
    • A fully-articulating rear LCD with touch functionality
    • A 3.69M-dot electronic viewfinder
    • One SD card slot
    • 4K/30p video (with a 1.7x crop)
    • A 370-shot battery life
    • A brand new (RF) lens mount
    • Weather sealing
    • 1.46 lb (660 g)
    • 5.35 x 3.86 x 3.31 in (136 x 98 x 84 mm)
    • Current price: $ 1799 USD

    While there are plenty of worthy capabilities on that spec list, at the time the EOS R was seen as something of a letdown.

    Why?

    For two key reasons.

    First, the EOS R only offered a single SD card slot. This meant professional photographers who require redundancy in their work (e.g., wedding photographers, sports photographers) didn’t feel comfortable working with an EOS R.

    Second, the EOS R didn’t include any innovative features, and certainly not any features on the same level as Sony’s groundbreaking autofocus, huge megapixel counts, blazing-fast continuous shooting speeds, and in-body image stabilization (admittedly, Sony doesn’t offer all these in the same camera, but still!).

    That said, the EOS R did, and does, offer some compelling attributes.

    And after testing the EOS R for nearly a year, I can say, without a doubt, that it is a great camera…

    …for the right person.

    Absolutely, the EOS R has some drawbacks, and it fails to really break out in most areas. But it’s also reasonably priced and gives you access to additional mirrorless capabilities that you just can’t get on a DSLR, without needing a brand new bag of lenses (not to mention its relatively fast autofocus and strong image quality that we’ve come to expect from Canon’s higher-end cameras).

    Plus, no two photographers are alike, and one photographer’s trash is another photographer’s treasure.

    Bottom line:

    While the EOS R just doesn’t work for some photographers, there are others for whom it’ll be an absolute dream to use.

    So let’s take a closer look at the Canon EOS R!

    Canon EOS R review sample image
    Canon EOS R | Canon EF 24-70mm f/4L | 1/80s | f/6.3 | ISO 400

    Canon EOS R: Build

    The Canon EOS R is medium-level compact, with a relatively lightweight (but solid) build. It’s easily smaller than the full-frame Canon 5D Mark IV, which is longer, taller, and around 1.5x heavier; the same is true of the Canon 6D Mark II.

    Canon EOS R review

    That said, the EOS R hardly feels slim, and it doesn’t really scream travel-ready to me. Personally, I don’t mind the weight of the EOS R, but if you’re coming from a smaller APS-C mirrorless body then the difference may take a little getting used to.

    The EOS R packs a top LCD, as well as a shooting mode dial, a video button, a standard top command dial, and more.

    Canon EOS R review

    Moving on to the back, you have a 3.2-inch fully-articulating touchscreen, which tilts in pretty much any direction and flips out to the side. You also get several buttons that are almost completely programmable, along with an (also programmable) multi-selector wheel.

    Canon EOS R review

    Then there’s the electronic viewfinder and, to its right, a programmable touch bar (which I’ll discuss more thoroughly in a moment).

    Now, the Canon EOS R is listed as weather-sealed, and it can clearly withstand some difficult conditions. I’ve used it (carefully) in snow and rain, and I’ve had no problems whatsoever. At the same time, the weather sealing just isn’t on the same level as some of the true professional bodies on the camera market, which is why I don’t think the EOS R is the right choice for shooters that regularly subject their gear to intense beatings.

    Canon EOS R: Handling

    I think I’m in the minority here, but I absolutely love the feel of the EOS R and its in-built capabilities. I’d even go so far to say that it’s the best camera I’ve ever handled, thanks to a few key features.

    First, I’m a huge fan of the fully-articulating screen, which is fantastic for getting into odd angles when shooting macro photos, architectural photos, landscape photos, or even street photos when shooting unobtrusively from the hip. Plus, you get touchscreen-based autofocus, so you can easily tap your desired AF point and lock focus in milliseconds.

    Second, the electronic viewfinder is clear, bright, and crisp. Thanks to its 3.69M-dot resolution, I rarely miss my optical viewfinder (which was a huge concern for me when I first added mirrorless technology to my camera lineup).

    Canon EOS R review

    What’s also great about the EVF is how you can use it to “see” in black and white. You can literally look at a black and white world, which is ultra-helpful when it comes to composing compelling black and white images using the viewfinder.

    Third, the camera fits perfectly into my hand and I can easily use it without checking where I’m pressing, due to a deep front grip and well-positioned buttons.

    Fourth, the EOS R offers the programmable touch bar. This has been a point of contention among EOS R users, because some find it finicky to the point of being unusable, but I’m firmly in the opposite camp. I love the touchbar, which I immediately programmed to adjust my ISO and I haven’t changed since. It’s saved me from missing countless images, because instead of fiddling with buttons and dials, I can boost the ISO with a roll of my thumb.

    Canon EOS R review

    Have I had occasional issues with the touchbar?

    Yes. It’s very sensitive, which means that I’ve accidentally boosted the ISO without meaning to. But while this was frustrating, it was absolutely worth the trade-off discussed above.

    And fifth:

    I love the silent shooting mode. Unlike silent modes offered on other cameras, the EOS R’s silent shooting is truly silent or, at least, so quiet that you can’t hear the shot unless you listen very, very closely. This is one of those features that just can’t be done on DSLRs, and when it is present in mirrorless cameras, it can be inhibited in some annoying way (e.g., as a separate mode that doesn’t allow you to adjust all your other camera settings).

    But on the EOS R, silent shooting is unrestricted, which is one of the reasons I love using the R for street photography. It’s a discrete option in the menu that can be toggled on and off at will. And it allows you to fire off shot after shot without being heard (which is also useful for photographing quiet events, such as weddings and concerts).

    That said, there are two key usability issues with the EOS R.

    First, the single SD card slot, which I mentioned above, but bears repeating. For me, it’s not a big deal, because I’m not a professional wedding photographer, sports photographer, or portrait shooter. But I can absolutely understand why certain photographers require the second card slot, and in those situations I’d simply refuse to use the EOS R; having a backup is just too important.

    Second, battery life is mediocre for a mirrorless camera, which is to say very poor compared to DSLRs. Canon rates the EOS R at 370 shots, and I’ve been able to get far more than that out of it (maybe 600 shots or so), but you’re definitely going to need at least two batteries in the best of situations, and if you’re doing long photoshoots then three is probably better.

    It’s also worth mentioning the lack of in-body image stabilization in the EOS R. This is disappointing, and if you’ve ever used cameras like the Olympus OM-D E-M1 Mark II, you’ll know how powerful good IBIS can be for low-light shooting. But Canon does offer a lot of image-stabilized lenses, so it’s certainly not a dealbreaker.

    Canon EOS R: Autofocus and speed

    The EOS R uses Canon’s much-loved Dual Pixel AF technology, which was confined to Live View modes on Canon DSLRs. In practice, the autofocus feels fast, but doesn’t really give Sony a run for its money. I spent a few hours shooting ducklings in a river, and my hit rate wasn’t as high as I’d like, especially when the ducks were backlit.

    Canon EOS R review sample image
    Canon EOS R | Canon EF 400mm f/5.6L | 1/2000s| f/7.1 | ISO 500

    AF coverage is very good, though, and spans pretty much the entire sensor (thanks to the mindblowing 5600+ AF points).

    Another bonus here is that autofocusing works all the way down to -6 EV. I’ve used the EOS R in almost complete darkness, and I’ve found that autofocus does indeed work, though it hunts as you approach that -6 EV territory.

    Canon EOS R review sample image
    Canon EOS R | Irix 11mm f/4 | 2s | f/13 | ISO 200

    That said, the EOS R does offer Eye AF, which allows you to nail focus on your subject’s eyes when capturing portraits. Note that this is generally used instead of Face Detection AF, though the two are designed to work together to get you the best focus depending on whether the eyes or only the face are in view.

    You have two options on the EOS R regarding autofocus selection:

    You can select AF points using the touchscreen, or you can select AF points using the multi-selector wheel on the rear of the camera. I use the touchscreen almost exclusively, and there’s a nice implementation that allows you to make only a corner of the screen touch-sensitive for AF use, so you don’t have to worry about repeatedly selecting AF points with your nose.

    In terms of shooting speeds, I do wish the EOS R were faster.

    You can work at 8 fps if you’re using One-Shot AF, but this drops to 5 fps when autofocusing continuously. I consider that 7-8 fps a minimum for action photography, and 5 fps just can’t compete in sports or wildlife or other action scenarios.

    The upshot of this is that the buffer is relatively deep; you can capture 65 RAW images without pause, or 126 high-quality JPEGs, which is always nice for situations where you need to keep on shooting during once-in-a-lifetime moments.

    So while the EOS R clearly isn’t well-equipped for dedicated action photography, it won’t completely fail you in fast-paced situations.

    Canon EOS R: Image quality

    The EOS R offers reliable image quality without being particularly groundbreaking.

    First, in terms of resolution, you get 30.3 MP, which offers a middle ground between the 45+ megapixel sensors offered by Sony’s A7R series and the Nikon Z7 (as well as the Canon 5DS/5DS R), and the standard 24 MP sensor. Personally, I think this is a nice place to be, because you get good detail and significant cropping capabilities without producing huge file sizes or a lot of high-ISO noise.

    Canon EOS R review sample image
    Canon EOS R | Canon 24-70mm f/4L | 1/1600s | f/8 | ISO 200

    Canon cameras aren’t usually known for their high ISO performance, and here the EOS R is a good performer without being great.

    The Canon EOS R offers an ISO range of 100-40,000, with the ability to expand to ISO 50 on the low end and ISO 102,400 on the high end. I feel comfortable pushing the ISO to 800 or 1600 when aiming for a clean image, and I’ll often go to ISO 6400 when shooting street images at night, but this is a step down from the truly impressive low-light capabilities of the Nikon Z6 or the Sony a7 III.

    The same is true of dynamic range, where images are good without being breathtaking. You don’t get the 15 stops of a Sony a7R IV, but the results are perfectly usable for, say, serious landscape photographers.

    Canon EOS R review sample image
    Canon EOS R | Canon EF 24-70 f/4L | 1/200s | f/10 | ISO 200

    All in all, I’m pleased by the Canon EOS R’s image quality without being floored. If you’re coming from an APS-C camera or an older full-frame DSLR, you’ll notice a big difference, but the EOS R doesn’t offer much of an image quality boost compared to a camera such as the Canon 6D Mark II and is pretty on par with the 5D Mark IV.

    Canon EOS R review sample image
    Canon EOS R | Canon EF 100mm f/2.8L Macro | 1/3200s | f/2.8 | ISO 250

    Canon EOS R: Using the adapter

    There are three Canon EF to RF adapters on the market:

    The basic EF-EOS R adapter, which simply allows you to connect your EF/EF-S lenses to an EOS R body.

    The midrange EF-EOS R adapter, which gives you a dedicated aperture ring when using EF/EF-S lenses.

    And the high-end EF-EOS R adapter, which allows you to drop in filters (such as a circular polarizer or an ND filter).

    I have only used the first of these, which you can grab for $ 99 USD. I’ve tested it on the EOS R with a handful of lenses in quite a few situations, and it works flawlessly. I’ve noticed zero autofocus lag, which means that you can comfortably use your EF and EF-S lenses without worry.

    However, the adapter comes with two minor drawbacks:

    First, it does take up space, either in your bag or on your camera. If you’re aiming for the smallest, lightest kit possible, then it’s probably not your best option.

    And second:

    It’s inconvenient to work with a group of lenses, some of which are EF-mount and some of which are RF-mount, because you have to keep moving the adapter on and off the camera.

    To me, these drawbacks aren’t a big deal, and I plan to keep my EF lenses for a long time. But it’s certainly worth thinking about.

    Canon EOS R review sample image
    Canon EOS R | Canon EF 24-70mm f/4L | 1/100s | f/9 | ISO 100

    Who should purchase the Canon EOS R?

    If you’re looking for an advanced or pro-level camera that’s easy to use, relatively inexpensive, and can do a lot of things well without really specializing in one area, then the EOS R is a great option. It’s especially compelling if you’re already a Canon shooter and have a slew of Canon lenses that can be attached via the EF-EOS R adapter.

    Canon EOS R review sample image
    Canon EOS R | Canon EF 24-70mm f/4L | 1/320s| f/9 | ISO 200

    You can use the EOS R for great results if you’re a:

    • Portrait photographer
    • Street photographer
    • Landscape photographer
    • Travel photographer
    • Macro photographer
    • Architectural photographer

    But it’s not an action camera, which means that you shouldn’t grab the EOS R if you’re looking to shoot sports or wildlife exclusively. Instead, I’d recommend the newly released EOS R5 or the EOS R6, which both offer a whopping 20 fps shooting via the electronic shutter. The same is true when it comes to wedding photography: Both the EOS R5 and the EOS R6 offer dual card slots, which make them much better choices for the redundancy-conscious photographer.

    In fact, given the release of the EOS R5 and EOS R6, which are pretty much all-around powerhouses, it’s worth asking:

    Is the Canon EOS R obsolete?

    In most ways, the EOS R5 and the EOS R6 are objectively better than the EOS R.

    But in the end, it comes down to price; the EOS R5 costs over twice that of the EOS R, and the “cheaper” EOS R6 is also relatively expensive ($ 2500 USD) while only offering a 20 MP sensor.

    So if you’re looking for a high-quality camera but you can’t afford the EOS R5 or R6, then the EOS R is a great choice.


    Rating: 3.5 out of 5.

    Canon EOS R review

    The post Canon EOS R Mirrorless Camera: A Hands-On Review appeared first on Digital Photography School. It was authored by Jaymes Dempsey.


    Digital Photography School

  • Video: How to choose your focal length for landscape photography

    Every landscape scene offers a collection of compositions just waiting to be framed by the proper focal length, but how do you choose what one to go with? While the answer will always be subjective, photographer Nigel Danson has shared a video showing how he goes about choosing the best focal length for certain scenes.

    The video is a longer watch, coming in at just under 27-minutes, but through it, Danson explains how he chooses a specific focal length and shares example photos captured at different focal lengths to show what tends to work best with different lenses, from a 14mm ultra-wide-angle lens to a 200mm telephoto lens.

    It’s a fantastic deep dive into the selection process for landscape photos and even Danson was surprised when he looked through what his most-used focal length was — 24mm. He notes this focal length is likely the most used due to it being difficult to capture portfolio-worthy shots at ultra-wide-angle focal lengths, leaving him ‘more disappointed than pleased,’ upon returning home to cull and edit the captured frames.

    Despite his most-used focal length, Danson says his favorite focal lengths to shoot with are at either extreme — either ultra-wide or telephoto — due to the ability to ‘create something more dramatic […] and creative,’ despite it ‘not being easier.’

    You can find more videos from Danson on his Youtube channel, follow him on Instagram and visit his website to view his portfolio of work and purchase his new 2021 calendar.

    Articles: Digital Photography Review (dpreview.com)

  • Getting Started With Affinity Photo Editing Software

    The post Getting Started With Affinity Photo Editing Software appeared first on Digital Photography School. It was authored by Kevin Landwer-Johan.

    Affinity Photo is a powerful image editing software. It’s both affordable and enjoyable to use.

    But, as with any program for custom manipulation of photos, there is a reasonably steep learning curve involved. If you’re used to editing your images with Adobe Photoshop, you’ll find the interface is different. This will take only a little getting used to.

    I haven’t been using Affinity Photo for very long and have found it to be well designed, allowing for intuitive use. Switching image editing programs is not something I choose to do lightly. When you’ve been used to a particular workflow within a computer program, there must be a reasonable motivation to change.

    My motivation was partly price. Affinity Photo is a product you can purchase outright without any monthly subscription fees. It’s also discounted from time to time, making it even more affordable. Even still, at full price, it is very reasonable for the quality of the product you receive.

    Tone map persona in Affinity Photo
    The Tone Mapping Persona interface in Affinity Photo

    Opening files in Affinity Photo

    The first step is to open a photo file you want to edit. This is pretty straightforward and there are a few options for making it happen.

    For Windows users, you can right-click an image file in your file manager and choose Affinity Photo from the list. If Affinity Photo is not listed (and it probably won’t be the first time you use it), click Choose Another App. You’ll then need to locate Affinity Photo on your C:/ drive and select it. Here you can also check the box at the bottom of the panel to always use Affinity Photo to open the type of image file you have chosen.

    Using a Mac, you can simply open Affinity Photo, navigate to File in the top menu, and click Open. This also works on a PC.

    You can also drag and drop photos from your file manager onto Affinity Photo when it’s running.

    Affinity Photo opens all standard image types, including RAW files. There is no need for two separate programs to open and edit RAW files. Affinity Photo combines functions that require both Lightroom and Photoshop. I am finding this makes for a great image editing workflow.

    opening a RAW file in Affinity Photo
    Opening a RAW file in Affinity Photo

    Becoming familiar with the interface

    Once you’ve opened your first photo, you have a massive number of options available to work with. Let’s walk through some of the most important features and where to locate them in the user interface.

    Under the main menu at the top you have the Persona and Context toolbars. Here you’ll find buttons for various Personas such as:

    • Photo Persona (for photo editing)
    • Liquify Persona (for manipulating distortion)
    • Develop Persona (for developing RAW images)
    • Tone Mapping Persona (for mapping image tones)
    • Export Persona (for when you’re ready to export your image)

    As you select a Persona, the Context toolbar changes to include only the tools you’ll need with that Persona.

    With the Develop Persona selected, the Context menu shows a different set of tools.

    Affinity Photo Develop persona tool bar

    These tools allow you to control how you see your photo as you’re working on it. You can view a single instance of your image. There’s also a split-screen and a mirrored option. The mirrored option is shown below.

    Split screen in Develop persona

    Within this Persona, you have a set of adjustment tools in the right-hand panel. These allow you to make similar adjustments to your RAW files as you can in Lightroom.

    Once you’ve finished making the adjustments to your RAW image, click the blue Develop button in the top left corner. The interface changes to the Photo Persona, where you can continue to refine the edits on your image.

    Here is how the Context toolbar looks when you have the Photo Persona selected while you’re editing your photos:

    Affinity photo personal tool bar

    You have buttons for making auto adjustments to levels, contrast, color, and white balance.

    When editing photos in the Photo Persona, you also have a specific set of relevant panels open. These panel sets make up your Studio of editing tools. They are also highly customizable. To show or hide various panels, go to View in the top menu, then select Studio.

    Here I have the panels for Layers and Adjustments open:

    photo editing persona in Affinity Photo

    Getting a feel for Affinity Photo

    As you can see, there are many similarities between Affinity Photo and other image editing software. I’ve found that working in the Photo Persona is very similar to my workflow in Photoshop.

    The Develop Persona took a little more getting used to. But it offers a very well-designed interface and makes working on RAW images straightforward once you get used to how it functions.

    Like anything new, getting used to Affinity Photo takes some commitment and practice. This is true whether you’re new to photo editing or have been using other software to manipulate your images.

    Having everything you need to edit RAW images from start to finish, including the option to use multiple layers, has been very satisfying.

    Not having an image organizer included means you need to work with your operating system’s file manager or use an additional program. There are many free and cheap digital asset management programs that you can use to organize your photos.

    customizing panels in Affinity Photo

    Conclusion

    For any photographer with years of experience using a particular brand of editing software, changing is a big step. If you’re new to photo editing, learning to use any photo imaging software manually is a big step, too.

    Affinity Photo provides an impressive set of photo editing tools all within one application. I find it to be well laid out and intuitive to use after using Adobe products for many years.

    For people new to photo editing, take the time to learn Affinity Photo. You’ll be able to use it to edit your photos just as well as any other available software.

    The post Getting Started With Affinity Photo Editing Software appeared first on Digital Photography School. It was authored by Kevin Landwer-Johan.


    Digital Photography School

  • Tips for Getting Your Portraits Right In-Camera

    The post Tips for Getting Your Portraits Right In-Camera appeared first on Digital Photography School. It was authored by John McIntire.

    Getting your portraits right in-camera is a skill that every portrait photographer should strive to develop. Doing so will save you time and improve your photography across the board.

    This doesn’t mean you shouldn’t post-process your images, and it doesn’t mean that Photoshop is cheating. But by putting in the extra time and effort at the capture stage, there will be less post-processing to do.

    It’s also good if you have certain post-production techniques in mind. If you are able to shoot to the requirements of the technique (that is, if you’re able to get it right in-camera), then the whole process will be easier.

    Getting Your Portraits Right In-Camera
    Putting extra effort in at the capture stage will help you to get the best results possible straight out of the camera. If you take a lot of portraits, this will wind up saving you hours upon hours of time in the post processing stages.

    This article will provide you with a series of tips to help you create better portrait images during the capture stage of the process. It should be noted that the points discussed here fall firmly on the technical side of things. Subjective things like composition, posing, expression, etc., won’t be discussed.

    Also, nothing discussed here is a rule. I would hesitate to even call it a guideline. If you try something here that doesn’t get you the results you are after, that just means it’s the wrong tool for the job. By all means, do something else. 

    Aperture

    One of the easiest things you can do in the pursuit of getting your portraits right in-camera is to prioritize sharpness. One of the easiest ways to do this is to choose the right aperture.

    Shooting wide-open can be great in low-light conditions, and it can also provide a nice shallow depth of field for aesthetic purposes. The trade-off comes in terms of getting the focus right. The focal plane of a wide aperture lens (f/1.8, f/1.4, etc.) is very, very narrow, making it very easy to miss the focus on your subject’s eyes.

    Getting Your Portraits Right In-Camera
    Left: Shot at f/4, this image has a shallow depth of field. Canon 5D Mark III | Canon EF 50mm f/2.5 Macro | 50mm | 1/125 sec | f/4 | ISO 100

    Right: Shot at f/14, this image is sharp from front to back. Canon 5D Mark III | Canon EF 16-35mm f/4L IS USM | 35mm | 1/125 sec | f/14 | ISO 100

    A good way to combat this is to choose a smaller aperture. By selecting an aperture around f/5.6 or f/8, ensuring the focus is where you want it to be becomes much easier. When you’re starting out, this can be the difference between a couple of sharp images (or even no sharp images) gained out of luck and a memory card full of them. 

    Again, this is not a rule, and shooting wide open is fun and has plenty of its own merits. But that doesn’t mean you should always shoot wide open. 

    Taking control of the light

    You’ve probably heard the phrase “Photography is light.” It’s everywhere, but it cannot be repeated enough. If you want to take better photos, you need to learn to take control of the light. This is especially important for portraits. 

    Natural light

    With natural light, you will want to learn how to find the light with the qualities best-suited to the portrait you want to create.

    For the most part, you will want to avoid shooting in midday sun. Instead, learn to find patches of soft light. This can be an area of open shade, it can be window light, or it can be garage door lighting. 

    Getting Your Portraits Right In-Camera
    Looking for situations like this overcast day, where the light is more flattering for portraits, is a key skill to develop. Canon 5D Mark III | Canon EF 85mm f/1.8 | 85mm | 1/320 sec | f/1.8 | ISO 200

    Studio lighting

    In the studio, you will have a somewhat easier time of things.

    After all, a studio should be designed from the ground up for you to alter the light at will. Use the right modifiers, learn some of the basic lighting patterns, and use modeling lights whenever possible. All of these will make it easier for you to take control of the lighting in your portraits. 

    Getting Your Portraits Right In-Camera
    Studio lighting is a lot easier to control as you are in charge of everything, but there are a lot of options to sort through. Canon 5D Mark III | Canon EF 16-35mm f/4L IS USM | 35mm | 1/125 sec | f/14 | ISO 100

    Flattering light

    Another thing about light that is important when getting your portraits right in-camera is whether or not the light is flattering. While this is quite a subjective topic, there are a few things for you to keep in mind that will help you to get more flattering light. 

    Light from above

    In most natural circumstances, we humans are lit from above. This is how we generally see other people. Lighting your subject from other angles will result in oddly-placed shadows that won’t feel right to your viewer.

    By placing the main light source above your subject, you are working to ensure that you are presenting your subjects in a way that people will recognize. 

    Getting Your Portraits Right In-Camera
    Lighting from above will help to ensure that your studio lighting looks more natural. Also, bringing the light source in close softens the light, making it more flattering.

    Soft light

    As mentioned, using a soft light source will help you get more flattering results. This will reduce the overall contrast in your images, and help to reduce the appearance of skin textures in your portraits. It will also help to make the transitions from shadows to highlights smoother. 

    Getting Your Portraits Right In-Camera
    Using as soft a light source as possible reduces contrast and provides more flattering light for your subjects. Canon 5D Mark III | Canon EF 16-35mm f/4L IS USM | 35mm | 1/125 sec | f/5.6 | ISO 100

    Lens choice

    Selecting a focal length suitable for portraiture is another important thing that will help you get your portraits right in camera.

    The focal length you choose will dictate how your images are distorted. At the extreme ends, wide-angle and long telephoto lenses cause significant distortion in your images. In order to avoid this, you will find that most portraits are taken at a focal length somewhere between 50mm and 135mm. As a general guide, you can’t go wrong by selecting a focal length in that range. 

    Getting Your Portraits Right In-Camera
    Left: With a focal length of 35mm (taken up close), you should be able to see the distortion on the subject’s face caused by the wider angle lens. Canon 5D Mark III | Canon EF 16-35mm f/4L IS USM | 35mm | 1/125 sec | f/8 | ISO 200

    Right: A 50mm focal length is a safer choice for portraits and is close to how the human eye sees. Canon 5D Mark III | Canon EF 50mm f/2.5 Macro | 50mm | 1/125 sec | f/5.6 | ISO 100

    Now, that is, once again, not a rule. There are some amazing examples of portraits taken at extremely wide focal lengths, just as there are plenty of portrait examples taken with much longer focal lengths. If you think an extreme focal length is right for your portrait, go ahead and try it. 

    Getting Your Portraits Right In-Camera
    While you can use extreme focal lengths (such as 16mm, used in the photo above) if you want to, you will find that it’s usually best to stick to more traditional focal lengths for most purposes. Canon 5D Mark III | Canon EF 16-35mm f/4L IS USM | 16mm | 1/125 sec | f/5.6 | ISO 100

    Perspective and viewpoint

    Your viewpoint as the photographer has a huge impact on your portrait images, and there are a few things you can do and avoid to help you get better portraits. 

    Viewing angle

    For the most part, try to keep your lens at the same level or below the level of your subject’s eyes. Shooting above and downward toward your subject has the effect of making your subject appear vulnerable and weak.  

    (This is my bias speaking. I really don’t like taking photos from above, but it is still not a rule.)

    For stronger portraits, try to avoid that.

    Getting Your Portraits Right In-Camera
    Left: Here, the camera was on a level with the floor. You can see the mild distortion this viewpoint has caused; the subject appears to be falling backward. Canon 5D Mark III | Canon EF 85mm f/1.8 | 85mm | 1/160 sec | f/9 | ISO 100

    Right: Bringing the camera up to navel-height has removed the distortion. Canon 5D Mark III | Canon EF 85mm f/1.8 | 85mm | 1/160 sec | f/9 | ISO 100

    Distortion

    Just like when you are photographing buildings, having your camera not level to the ground can cause distortion in your images.

    Converging verticals on a human subject look even weirder than they do on buildings. If you are shooting from above your subject, this can lead to distorted facial features. If you are shooting from below, it can cause distortions of the legs, arms, and torso that just won’t look right to your viewer.

    Some of this can be mitigated by selecting a longer focal length or stepping further away from your subject, but this won’t completely prevent distortion. To avoid any of this distortion in close-up portraits, shoot from eye-level or just below eye-level. To avoid it in half-length to full-length portraits, shoot from the level of your subject’s navel. 

    Exposure

    For the most part, exposure is another subjective topic. There is often no right or wrong exposure, but if you’re starting out with portraits, there are a few things that will help you along the way. 

    Getting Your Portraits Right In-Camera
    To ensure that you are retaining all of the details in your images, take test shots and watch the histogram as you are building your scene. Here, the spike on the left is the background, and the rest of the tones fall well within the two sides of the histogram, denoting relatively low contrast.

    Portraits can have a lot of contrast in them. Just imagine a subject with light-colored hair who’s wearing a black shirt. For the best outcome, you will want to ensure that the exposure retains details in both extremes. 

    Getting Your Portraits Right In-Camera
    If you have access to them, tools like the light meter and the ColorChecker Passport shown above will help to give you accurate exposures and colors just about every time.

    To ensure that you have retained all the details in your images, you can refer to the histogram on the back of your camera. A simple way to use this is to make sure that the information depicted by the histogram does not go past either the left-hand or the right-hand sides of the graph.

    If the histogram goes off the right-hand side, your image will be overexposed and you will be missing details in the highlights of your image. If the histogram goes off the left-hand side, your image will be underexposed and you will be missing details in the shadows. 

    Manipulate the exposure

    Sometimes, you won’t be able to retain all the detail in a given scene, as the contrast will be too high. In order to keep your shadows and highlights from clipping, you will want to manipulate the scene. There are a lot of ways you can do this.

    You can use a reflector to bounce light into areas of the scene that are too dark, thus reducing the overall contrast of the scene. You could do the same with flash as fill light. 

    Getting Your Portraits Right In-Camera
    Using a reflector is a great way to help control the contrast in your images. Here, a piece of polystyrene (styrofoam) board from a package did the job and didn’t cost anything.

    You could also use a diffuser in front of your main light source to soften the light and reduce the overall contrast in the frame. This works with both natural light and studio strobes. 

    Of course, in a studio, you could always opt to use a bigger modifier, or move your light source closer to your subject. Both of these have the effect of softening the light and reducing the overall contrast in your scene. 

    Getting Your Portraits Right In-Camera
    To soften your light, use bigger modifiers or bring them in close. Alternatively, as shown in the image above, do both and add a reflector for good measure.

    If you are new to portraits but familiar with other aspects of photography, you can think of this as similar to using graduated neutral density filters in landscapes.

    By placing a graduated neutral density filter in front of the lens, you are (usually) increasing the exposure time needed for one part of the image (usually the sky) so that it falls at a value closer to the foreground, reducing the contrast in the image by however many stops the filter represents.

    You can think of these tools for portraits in the same way, except that they manipulate the actual light in the scene in front of you, rather than fitting onto the lens and manipulating the final exposure. 

    End

    Getting Your Portraits Right In-Camera
    I feel the need to reemphasize that this article is in no way anti-post processing. Doing what you can at the capture stage is simply about better camera craft and obtaining a better starting point. Canon 5D Mark III | Canon EF 16-35mm f/4L IS USM | 35mm | 1/125 sec | f/5.6 | ISO 100

    While this article is definitely not a complete and exhaustive guide to portrait techniques, these few basic tips should help you get your portraits right in camera. If you take your time to be mindful of your choices regarding camera settings, lighting, and exposure, you will start to find that you need to spend much less time in post-production. 

    Of course, if there are any tips that you use to get your portraits right in-camera, please feel free to leave them in a comment. 

    The post Tips for Getting Your Portraits Right In-Camera appeared first on Digital Photography School. It was authored by John McIntire.


    Digital Photography School

  • Panasonic introduces Lumix DC-S5 stills/video hybrid camera

    $ (document).ready(function() { SampleGalleryV2({“containerId”:”embeddedSampleGallery_3649805005″,”galleryId”:”3649805005″,”isEmbeddedWidget”:true,”selectedImageIndex”:0,”isMobile”:false}) });

    Panasonic has announced the Lumix DC-S5, a compact full-frame mirrorless camera for creators who want good still and video capabilities, without having to haul around the S1 or S1H.

    The S5 features a 24MP BSI CMOS sensor, also found in the S1, which has a standard ISO range of 100-51,200. Its 5-axis image stabilizer can reduce shake by up to 6.5 stops when paired with a compatible lens, and the sensor-shift system allows for the creation of 96MP high-res JPEGs or Raws. The autofocus system has been revamped, with less ‘wobble’ when focusing and faster and a new ‘head detection’ function.

    A firmware update later this year will add Cinema 4K, Raw video output, vector scope display and more.

    The S5 is loaded with video features, with more to come later this year. It can capture 10-bit 4:2:0 4K/60p video with an APS-C crop, or 10-bit 4:2:2 using the full width of the sensor at 30p or 24p. There’s a 30 minute time limit when shooting 10-bit and no limit with 8-bit. The S5 offers V-Log / V-Gamut and HLG, and also has anamorphic and Slow&Quick modes. Headphone and mic sockets are onboard, and the camera supports the company’s XLR adapter. A firmware update later this year will add DCI ‘Cinema’ 4K, Raw video output, vector scope display and more.

    GH5, S5, S1H

    Design-wise, the S5 is considerably more compact than the other S-series models, and a bit smaller and lighter than the GH5. It has a magnesium alloy chassis and is sealed against dust and moisture. Its fully articulating touchscreen has 1.84M dots, while its electronic viewfinder has 2.36M dots. The camera has dual SD card slots, though only one supports UHS-II speeds. Dual-band Wi-Fi and Bluetooth are available for transferring images to your smartphone. The S5 uses the new DMW-BLK22 battery, which can crank out 440 shots per charge using the LCD and 470 with the EVF, according to CIPA ratings. A battery grip is optional.

    The Lumix DC-S5 will be available in mid-September at a price of $ 1999 for the body and $ 2299 when kitted with the 20-60mm F3.5-5.6 lens. If you’re in the U.S. and preorder by the end of September, Panasonic will send you a Sigma 45mm F2.8 DG DN lens at no charge.

    Read our Panasonic S5 initial review

    Press Release

    New Hybrid Full-Frame Mirrorless Camera, the LUMIX S5

    Featuring Exceptional Image Quality in High Sensitivity Photo/Video And Stunning Mobility

    Newark, NJ – (September 2, 2020) Panasonic is delighted to announce the new LUMIX S5, a new hybrid full-frame mirrorless camera that achieves both excellent performance in photo/video and stunning mobility for serious photographers and videographers.

    At the heart of the camera, the LUMIX S5 contains a 24.2-megapixel 35mm full-frame CMOS sensor that boasts a wide dynamic range and high sensitivity performance. The LUMIX S5 further realizes recording maximum ISO 51,200 crystal-clear high sensitivity video with the adoption of the Dual Native ISO technology.

    As a pioneer of photo/video hybrid mirrorless cameras, LUMIX has the largest lineup of cameras that record 4K 10-bit video[*1]. As the latest member of the family, the LUMIX S5 is capable of 4K 60p/50p4:2:0 10-bit, and 4K 30p/25p 4:2:2 10-bit internal recording. It is also capable of 4K 60p/50p 4:2:2 10-bit HDMI output. For 4K 30p 4:2:0 8-bit internal recording, there is no time limit. Panasonic’s exceptional heat dispersion technology delivers stable, long-time video recording. The LUMIX S5 provides 14+ stops of dynamic range, which is as wide as those of cinema cameras, and V-Log / V-Gamut compatibility with popular colorimetry called “VariCam Look.” A variety of recording formats and modes including 4:3 Anamorphic mode, Slow & Quick Motion, 4K/60p interval shooting and 4K HDR are also provided.

    The LUMIX S5 boasts high-speed, high-precision AF (Auto Focus) in both photo shooting and video recording that are made possible with advanced deep-learning technology featuring real-time detection of the subject’s type and features such as human eye, face, head and body.

    Combining the Body I.S. (5-axis) in the camera and the O.I.S. (Optical Image Stabilizer, 2-axis) in the LUMIX S Series lens, the 5-axis Dual I.S.2 prevents blurred images with the use of a 6.5-stop[*2] slower shutter speed. The splash/dust-resistant rugged design provides professional photographers with high reliability.

    To enhance the photographic experience, the 96-megapixel High Resolution Mode (JPEG/RAW), Live View Composite function and HLG Photo mode are available.

    Thanks to the high energy efficiency and a new 2,200mAh high-capacity battery, it can capture approximately 470 pictures (using the LVF) / 1,500 pictures (in Power Save LVF mode). Power and charging are possible via the USB-C port. Double SD Card slot (UHS-IIx1 and UHS-I x1), 5GHz/2.4GHz Wi-Fi and Bluetooth 4.2 connectivity are also supported. The LUMIX S Series full-frame mirrorless camera system adopts the L-Mount system to provide users with a diverse and future-proof range of products from Panasonic, Leica Camera and Sigma. Panasonic now offers four innovative models in the LUMIX S Series of full-frame Digital Single Lens Mirrorless cameras – the S1R, the S1, the S1H, and the new S5. The LUMIX S1R is ideal for taking high-resolution images, the LUMIX S1 is an advanced hybrid camera for high-quality photos and videos, and the LUMIX S1H is designed and developed specifically for film production. The LUMIX S5 packs the essence of these conventional S Series cameras in a compact, lightweight body. With this lineup, Panasonic is committed to meeting the demands of all creators by challenging the constant evolution of the photo/video culture in today’s new digital era.

    *1 *Of mirrorless interchangeable lens cameras, as of September 2, 2020.

    *2 Based on the CIPA standard [Yaw/Pitch direction: focusing distance f=200mm when S-E70200 is used. Firmware must be updated to the latest version.

    1. High image quality even in high sensitivity photo/video and Dual I.S. to suppress virtually any type of blurring

    The LUMIX S5 contains a 24.2-megapixel 35mm full-frame CMOS sensor (35.6 mm x 23.8mm). The LUMIX S5 boasts a wide dynamic range and reproduces sharp images with exceptional clarity. Noise is minimized even when shot at maximum ISO 51,200 high sensitivity. It is an ideal camera to use especially in low-light situations.

    The LUMIX S5 features Dual Native ISO sensitivity, the technology that was first introduced in the Panasonic professional cinema camera VariCam line-up. Normally, noise increases as sensitivity rises with a single native ISO image sensor. However, the image sensor with Dual Native ISO in the S5 minimizes noise generation by choosing an optimal circuit to use according to the sensitivity before gain processing. As a result, it allows a maximum ISO 51,200 high sensitivity recording. Dual Native ISO gives film creators a greater variety of artistic choices as well as the ability to use less light on the set, saving time. The LUMIX S5’s Dual Native ISOs are 640 and 4000[*1].

    Taking full advantage of its high-resolution sensor, the LUMIX S5 provides a High Resolution mode that faithfully reproduces precise details to be saved as beautiful, highly realistic images not only RAW but also in JPEG. Eight consecutive images are automatically shot while shifting the sensor using the Body I.S. (Image Stabilizer) mechanism and synthesized into a 96-megapixel equivalent (12,000 x 8,000-pixel) image by the Venus Engine, which boasts high-speed signal processing. This high-resolution photo is ideal for landscape photography of stationary subjects or artwork with delicate details using a tripod. However, it can also be used in situations where moving subjects are included in the scene, by switching the sub mode.

    The LUMIX S5 integrates the Body I.S. (Image Stabilizer) for powerful handshake correction. Panasonic developed an algorithm that precisely calculates shaky movements sensed by the gyro sensor, image sensor and accelerometer sensor. This enables more accurate shake detection and compensation, making it possible to use a 5-stop slower shutter speed[*2]. Combining the Body I.S. (5-axis) in the camera and the O.I.S. (Optical Image Stabilizer, 2-axis) in the LUMIX S Series lens, the 5-axis Dual I.S. 2 the correction power is maximized to allow 6.5-stop slower shutter speed[*3]. It is highly beneficial in telephoto shots and in adverse situations, such as in low-light or with one-handed shooting. The 5-axis Dual I.S. 2 works for both photo and video recording, including 4K. The Body I.S. compensates for camera movement even when other L-Mount lenses without O.I.S. are used.

    With the new Live View Composite function, the camera releases the shutter at designated intervals of exposure time and synthesizes the parts with high luminosity to produce a single picture. While the total brightness of each consecutive image is accumulated in bulb shooting, only the target subject, the bright parts of an image, are detected and the user can synthesize them carefully while seeing it in live view. This is useful for capturing shots of fireworks or stars in the night sky where the background needs no gain-increase.

    *1 When recording mode is set to V-Log. The sensitivity varies depending on the recording mode.

    *2 Based on the CIPA standard [Yaw/Pitch direction: focusing distance f=60mm when S-R2060 is used.

    *3 Based on the CIPA standard [Yaw/Pitch direction: focusing distance f=200mm when S-E70200 is used

    1. Exceptional video recording performance for cinema-quality film creation

    As a pioneer of photo/video hybrid mirrorless cameras, LUMIX has the largest lineup[*1] of cameras that record 4K 10-bit video. As the latest member of the family, the LUMIX S5 is capable of 4K 60p 4:2:0 10-bit, and 4K 30p 4:2:2 10-bit internal recording up to 30 minutes. It is also capable of 4K 60p4:2:2 10-bit HDMI output. For 4K 30p 4:2:0 8-bit internal recording, there is no time limit. It will comply with RAW video output to ATOMOS NINJA V over HDMI as well as C4K video recording with the future firmware update (which will be detailed in Chapter 6).

    Dynamic range measures the luminance range that a digital camera can capture. The LUMIX S5 delivers 14+ stops of Dynamic Range, which are virtually the same as those of the Panasonic cinema cameras, to precisely reproduce everything from dark to bright areas. The ability to capture accurate colors and rich skin tones is a must for any filmmaker. The LUMIX S5 imports the renowned colorimetry of the VariCam lineup of cinema cameras. The LUMIX S5 contains V-Log/V-Gamut capture to deliver a high dynamic range and broad colors. V-Log renders a very flat image while maintaining all of the color information within the image. This means that there is a greater level of play when the images are put through post-production processes. The CMOS sensor of the LUMIX S5 achieves a wide color gamut known as V-Gamut, which is the S5’s optimum color space and achieves a color space that is wider than BT.2020. V-Log has log curve characteristics that are somewhat reminiscent of negative film and V-Gamut delivers a color space even larger than film. 35 conversion LUTs for VariCam cinema cameras can be downloaded free of charge for use in the LUMIX S5. It is easy to match the color tone with the footage recorded in V-Log of S1H/S1 and V-Log L of GH5/GH5S. Practical tools like a Waveform Monitor and V-Log View Assist are also available.

    With Slow & Quick mode, impressive video slow and quick motion video in 4K(1-60fps, 30x quick to 2.5x slow) or in FHD (1-180fps, 60x quick to 7.5x slow) is available. It is possible to use AF[*2] to capture the subject in sharp focus in this mode, too. It can also be accessed directly using the mode dial.

    The HDR (High Dynamic Range) video recording in 4K is also available, which reproduces both the bright parts and dark parts of an image, making it appear as if seen in person. The camera records video with a designated gamma curve compatible with ITU-R BT.2100, and the user can now choose Hybrid Log Gamma (HLG) in Photo Style. The HLG[*3] Photo mode provides a wider dynamic range to reproduce light and shadow with more natural contrast. The HLG Photos can also be produced as an HSP file[*4] with compressed high-brightness signals in its full resolution (5,888 x 3,312, in 16:9) in addition to JPEG/RAW files. The user can playback these vibrant images on the latest Panasonic HLG-compliant 4KTV via HDMI cable connection or other HLG-compliant devices.

    For more continuous burst shooting, 6K PHOTO[*5] makes it possible to capture unmissable moments at 30 fps by extracting the frame with the best timing out of a 6K burst file (in 4:3 or 3:2 aspect ratio) to save as an approximate 18-megapixel equivalent high-resolution photo.

    *1 Of mirrorless interchangeable lens cameras, as of September 2, 2020

    *2 The AF mode switches to MF when the frame rate is set to of 150 fps or more. The angle of view is reduced when the frame rate is set to 180 fps. Recording stops when the continuous recording time exceeds 30 minutes.

    *3 “HLG (Hybrid Log Gamma)” is an international standard (ITU-R BT.2100) HDR format.

    *4 “HSP” is an HDR picture format using HLG format video technology.

    *5 6K PHOTO’ is a high speed burst shooting function that cuts a still image out of a 4:3 or 3:2 video footage with approx.18-megapixel (approx. 6000 x 3000 effective pixel count) that the 6K image manages.

    1. High-speed, high-precision AF achieved supported by real-time detection technology

    The LUMIX S5 boasts high-speed, high-precision AF in both photo shooting and video recording. Combining the Contrast AF with DFD (Depth From Defocus) technology, it focuses on the target in approximately 0.08 sec[*1]. As a camera that excels in low-light shooting, the LUMIX S5 boasts -6EV[*2] luminance detection performance with Low Light AF thanks to the higher sensitivity and optimized tuning of the sensor. Allowing maximum 480 fps communication speed between the sensor and the lens, users can take full advantage of this high-speed, high-precision AF when LUMIX S Series lens is used.

    The LUMIX S5 also incorporates an advanced deep learning technology that detects specific subjects like humans and fast-moving animals. Notably for humans, the head is separately recognized from the eye, face and body by real-time detection technology to provide even more precise focusing. The camera continually tracks an individual even if they move quickly, turn their back to the camera, tilt their head or move far away from the camera. On the other hand, improvements to the DFD technology has enhanced AFC, which also enables users to keep tracking small or fast-moving subjects to capture them in crisp focus.

    *1 11EV, at wide-end with S-R24105 (CIPA) in LVF120 fps setting.

    *2 At ISO100, F1.4, AFS

    1. Reliable basic performance and expandability for creative freedom

    The LUMIX S5 boasts outstanding mobility yet excels in basic performance and expandability. To withstand heavy field use, the LUMIX S5 is composed of a magnesium alloy full die-cast body and is splash/dust-resistant[*1]. With an optimum layout of heat dispersion components, heat is effectively transferred outside which results in stable, continuous video recording for a long time.

    The LUMIX S5 has a large LVF (Live View Finder) with a high magnification ratio of approx. 0.74x. High-precision, high-speed OLED (Organic Light-Emitting Diode) display features 2,360K-dot high resolution. Adoption of OLED for the LVF achieves high speed response with minimum time lag of less than 0.005 sec. With an eyepoint of approximately 20 mm, it offers high visibility with comfort for users wearing glasses.

    A 3.0-inch free-angle LCD in 3:2 aspect with 1,840K-dot high resolution provides touch control. Composition during recording in various popular aspect ratios such as 16:9, 4:3, 1:1, 4:5, 5:4 and 9:16 can be checked with the Frame Marker function. The REC Frame Indicator identifies whether the camera is recording or not.

    The LUMIX S5 has a double SD Memory Card slot. One slot complies with UHS-I and the other with the high-speed, high-capacity UHS-II (Video Class 90). The camera’s battery can be recharged either via AC or USB according to the user’s convenience.

    Compatibility with Bluetooth 4.2 (called BLE: Bluetooth Low Energy) enables constant connection with a smartphone/tablet with minimum power consumption. The settings of a LUMIX S5 camera can also be copied and transmitted wirelessly to other S5 cameras when using multiple S5 cameras. Wi-Fi 5-GHz (IEEE802.11ac) [*2] also is effective in addition to 2.4-GHz (IEEE802.11b/g/n.) This provides secure and stable connection on location for smooth remote control and high-speed data transfer.

    *1 Dust and Splash Resistant does not guarantee that damage will not occur if this lens is subjected to direct contact with dust and water.

    *2 5GHz Wi-Fi is not available in some countries.

    1. Optional accessories and application software

    A variety of accessories can be used for the LUMIX S5 to enhance its usability and convenience. Microphone Adaptor (DMW-XLR1) is a plug-in type adaptor for an XLR microphone to record high-quality stereo sound. It is ideal for lip-sync recording. Dedicated switches allow direct, quick control. MIC, LINE and CONDENSER MICROPHONES are switchable. Battery Grip (DMW-BGS5) allows approximately 940 pictures (using the LVF) / 3000 pictures (in Power Save LVF mode) with an extra battery inside the grip. More accessories such as Remote Shutter (DMW-RS2), DC coupler (DMW-DCC17), Tripod Grip (DMW-SHGR1) are available.

    Application software LUMIX Tether enables tethered shooting via USB. Users can control the camera by connecting it to a PC via USB. It lets them view the image on a large PC screen while shooting. For live streaming, LUMIX Tether for Streaming (Beta) with LIVE VIEW mode can be used.

    The LUMIX Sync application for iOS/Android devices enables photo transmission to a smartphone or a tablet via easy wireless connection. It also allows remote control of the camera using these devices.

    1. Future Firmware Update

    To further enhance its performance, a firmware update is scheduled for the LUMIX S5 by the end of 2020. In addition to C4K video recording, it will support RAW video data output to ATOMOS NINJA V over HDMI at a resolution of 5.9K (5888×3312) 29.97p/25p, 4K(4128×2176) 59.94p/50p and Anamorphic 3.5K (3536×2656)/50p. A variety of video recording assist functions such as the Vector Scope Display, Master Pedestal Adjustment and SS/Gain Operation(SEC/ISO, ANGLE/ISO, SEC/dB) will also be available. L.MonochromeS and L.ClassicNeo are the new options to be added for Photo Style.

    The Lumix S5 will be available at valued channel partners in mid-September for $ 1999.99 for the body only and $ 2299.99 with a 20-60 kit lens.

    Panasonic Lumix DC-S5 specifications

    Price
    MSRP $ 1999 (body only), $ 2299 (w/20-60mm lens)
    Body type
    Body type SLR-style mirrorless
    Body material Magnesium alloy
    Sensor
    Max resolution 6000 x 4000
    Image ratio w:h 1:1, 4:3, 3:2, 16:9
    Effective pixels 24 megapixels
    Sensor photo detectors 25 megapixels
    Sensor size Full frame (35.6 x 23.8 mm)
    Sensor type CMOS
    Processor Venus Engine
    Color space sRGB, Adobe RGB
    Color filter array Primary color filter
    Image
    ISO Auto, 100-51200 (expands to 50-204800)
    Boosted ISO (minimum) 50
    Boosted ISO (maximum) 204800
    White balance presets 5
    Custom white balance Yes (4 slots)
    Image stabilization Sensor-shift
    Image stabilization notes 5-axis Dual IS 2
    CIPA image stabilization rating 6.5 stop(s)
    Uncompressed format RAW
    JPEG quality levels Fine, standard
    File format
    • JPEG (Exif v2.31)
    • Raw (Panasonic RW2, 12-bit)
    • HLG (CTA-2072)
    Optics & Focus
    Autofocus
    • Contrast Detect (sensor)
    • Multi-area
    • Center
    • Selective single-point
    • Tracking
    • Single
    • Continuous
    • Touch
    • Face Detection
    • Live View
    Autofocus assist lamp Yes
    Manual focus Yes
    Number of focus points 225
    Lens mount Leica L
    Focal length multiplier 1×
    Screen / viewfinder
    Articulated LCD Fully articulated
    Screen size 3
    Screen dots 1,840,000
    Touch screen Yes
    Screen type TFT LCD
    Live view Yes
    Viewfinder type Electronic
    Viewfinder coverage 100%
    Viewfinder magnification 0.74×
    Viewfinder resolution 2,360,000
    Photography features
    Minimum shutter speed 60 sec
    Maximum shutter speed 1/8000 sec
    Exposure modes
    • Program
    • Aperture priority
    • Shutter priority
    • Manual
    Built-in flash No
    External flash Yes (via hot shoe)
    Flash modes Auto, Auto/Red-eye Reduction, Forced On, Forced On/Red-eye Reduction, Slow Sync, Slow Syn./Red-eye Reduction, Forced Off
    Flash X sync speed 1/250 sec
    Continuous drive 7.0 fps
    Self-timer Yes
    Metering modes
    • Multi
    • Center-weighted
    • Highlight-weighted
    • Spot
    Exposure compensation ±5 (at 1/3 EV steps)
    AE Bracketing ±3 (3, 5, 7 frames at 1/3 EV, 2/3 EV, 1 EV steps)
    Videography features
    Format MPEG-4, H.264, H.265
    Modes
    • 3840 x 2160 @ 60p / 200 Mbps, MOV, H.265, Linear PCM
    • 3840 x 2160 @ 50p / 200 Mbps, MOV, H.265, Linear PCM
    • 3840 x 2160 @ 30p / 150 Mbps, MOV, H.265, Linear PCM
    • 3840 x 2160 @ 25p / 150 Mbps, MOV, H.265, Linear PCM
    • 3840 x 2160 @ 23.98p / 150 Mbps, MOV, H.265, Linear PCM
    • 3328 x 2496 @ 30p / 150 Mbps, MOV, H.264, Linear PCM
    • 3328 x 2496 @ 23.98p / 150 Mbps, MOV, H.264, Linear PCM
    • 1920 x 1080 @ 60p / 100 Mbps, MOV, H.264, Linear PCM
    • 1920 x 1080 @ 50p / 100 Mbps, MOV, H.264, Linear PCM
    • 1920 x 1080 @ 30p / 100 Mbps, MOV, H.264, Linear PCM
    • 1920 x 1080 @ 25p / 100 Mbps, MOV, H.264, Linear PCM
    • 1920 x 1080 @ 23.98p / 100 Mbps, MOV, H.264, Linear PCM
    Microphone Stereo
    Speaker Mono
    Storage
    Storage types Dual SD/SDHC/SDXC slots (UHS-II supported in slot 1)
    Connectivity
    USB USB 3.2 Gen 1 (5 GBit/sec)
    USB charging Yes (Power Delivery supported)
    HDMI Yes (micro HDMI)
    Microphone port Yes
    Headphone port Yes
    Wireless Built-In
    Wireless notes 802.11ac (dual-band) + Bluetooth
    Remote control Yes (wired or via smartphone)
    Physical
    Environmentally sealed Yes
    Battery Battery Pack
    Battery description DMW-BLK22 lithium-ion battery and charger
    Battery Life (CIPA) 440
    Weight (inc. batteries) 714 g (1.57 lb / 25.19 oz)
    Dimensions 133 x 97 x 82 mm (5.24 x 3.82 x 3.23)
    Other features
    Orientation sensor Yes
    Timelapse recording Yes
    GPS None

    Articles: Digital Photography Review (dpreview.com)