Blog

  • Canon launches a pair of new large format printers aimed at the professional market

    The Canon imageProGraf Pro-4000

    Canon has announced it will introduce two new large format printers for professional photographers as part of its imagePrograf Pro series. The Pro-2000 and Pro-4000 both use 12-color Lucia pigment ink systems and produce either 24in or 44in prints. With their black bodies and ‘accentuated red line’ the printers are designed to link visually with the Canon EOS range of cameras to emphasise that they are intended for photo-quality printing and made to get the most out of EOS files.

    A transparent Chroma Optimiser ‘ink’ is used alongside the colors that Canon says improves ‘print performance on gloss papers’ – which means it evens out the finish between the inks and the paper so the inks don’t stand out.

    The printers are due to arrive in the middle of the year priced $ 5995 for the Pro-4000 and $ 2995 for the Pro-2000.

    For more information visit the Canon website.


    Press release:

    Canon launches new imagePROGRAF PRO series for unmatched image quality and productivity

    Canon Europe, world leader in imaging solutions, today announced a new range of imagePROGRAF PRO large format professional inkjet printers. The new imagePROGRAF PRO-2000 and imagePROGRAF PRO-4000 are designed to bring stunning image quality to professional photographers and fine art applications, while the new imagePROGRAF PRO-4000S and imagePROGRAF PRO-6000S deliver fast and reliable printing to high-volume print service providers that require photo quality prints such as posters, banners and canvas.

    Superior image quality for professional users
    The 12-colour PRO-2000 and PRO-4000 enable the full clarity and texture of photographs taken with a Canon EOS camera to be perfectly reproduced. Thanks to Canon’s unique input-output technology and Crystal-fidelity feature, photos look as accurate printed as when they were captured. Available in two sizes (24” and 44”) the PRO-2000 and PRO-4000 feature an attractive black design with an accentuated red line, denoting the link with Canon EOS digital cameras. The new devices use newly developed LUCIA PRO pigment ink to meet the demands of the most critical photographers and graphic artists, as well as transparent Chroma Optimiser ink to improve print performance on gloss paper.
    Mathew Faulkner, European Marketing Manager for Wide Format Group, Canon Europe says “At Canon, we understand the importance of fine detail and precise colours to professional users. Images shot on even mid-range cameras can be very high resolution, and with the ability of today’s image editing software, this demands a highly accurate and colour-consistent output. The powerful technology of the new PRO-2000 and PRO-4000 models, not only provide incredible image reproduction, but the small footprint makes them ideal for any office, studio or design department.”

    Unbeatable efficiency for print service providers
    Also available in two sizes, (44” and 60”), the PRO-4000S and PRO-6000S boast an ergonomic compact design, which is ideal for time and space-pressed print operations in graphic arts, advertising and creative sectors. With a powerful L-COA PRO engine capable of processing large volumes of high-res images and data with ease, the new devices enable poster-quality printing at twice the speed of current imagePROGRAF 8 colour models. Full connectivity and Wi-Fi functionality ensures optimum productivity for busy environments.

    Mathew Faulkner continues, “Whether for PSPs or in-house print departments in retailers or educational facilities, the trend towards more operational efficiency and on-demand printing is undeniable. There is a growing requirement not only for high quality imaging, but for ease of use and efficient media handling, as well as high-speed and uninterrupted printing to support high-volume output. These fundamental tools require a powerful and dependable large format printer. The PRO-4000S and PRO-6000S deliver speed, accuracy and colour vibrancy, making them ideal for both print-for-pay and print-for-use environments.”
    The new devices feature Canon’s unique dual roll technology to support continuous paper feeding and take-up of printed output, while direct printing from a USB memory stick enables fast and easy prints. The imagePROGRAF PRO series is further improved by the new precision 1.28” wide print head and high-capacity ink tanks for fast, uninterrupted printing.

    The new imagePROGRAF series will be available across Europe from the middle of 2016. To see the new imagePROGRAF PRO series in action, visit Canon at FESPA Digital 2016 from March 8-11, Stand F100-F120

    Articles: Digital Photography Review (dpreview.com)

  • Getting Started with Layer Masks in Photoshop – a Beginners Tutorial

    Barn-DPSexample

    Much of the power of Photoshop comes from its use of layers, which can best be thought of as transparency over your image. Layers have lots of benefits, like the fact that you can work on your image without affecting the pixels in the underlying image. But perhaps the most powerful aspect of layers, is your ability to affect exactly where, how, and how much of your changes will affect the underlying image. That is all done through layer masks. In fact, it might be fair to say that layers are really only effective because of layer masks.

    What are layer masks? Think of them as filters that let you control the impact of the changes you make to your image. Just like you can change ordinary filters to determine what gets through them, so you can adjust a layer mask to control what changes. If that sounds confusing, don’t worry, and I will walk you through the basics of layer masks now.

    How Layer Masks Work

    To understand layer masks, it is best to start with the simplest form. A mask that does nothing – that is, it lets absolutely everything through from the layer you are working on, to the layer underneath – it is represented by solid white. This is referred to as a “reveal all” layer mask in Photoshop. When you look at your layers palette with a white/reveal-all layer mask, it will look like this:
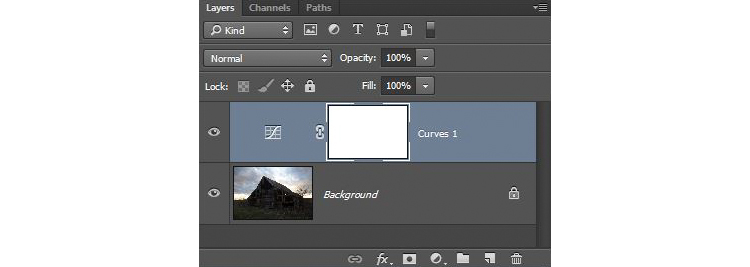
    Graphic1-WhiteLayerMask

    When your mask is all white, any change you make on that layer, will apply to the underlying image. How do you create an all white image layer mask? Very often – as in the case of adjustment layers – one will automatically be created for you. Or, to add one yourself, just go to Layer > Layer Mask > Reveal All. You can also click on this button at the bottom of the layers palette to create one on the layer you have selected

    Graphic2-LayerMaskButton2

    An all-white layer mask is actually pretty useless. The utility of the layer mask comes when we start masking (hiding) things off. Before we get into that, however, let’s talk about how to create an all-black layer mask. As you might expect, a black layer mask works the opposite way as a white one, and lets absolutely nothing through to the layer underneath. You can make all the changes you want to this layer, and it will have no impact on your underlying image. Here is how it will look when you create one:
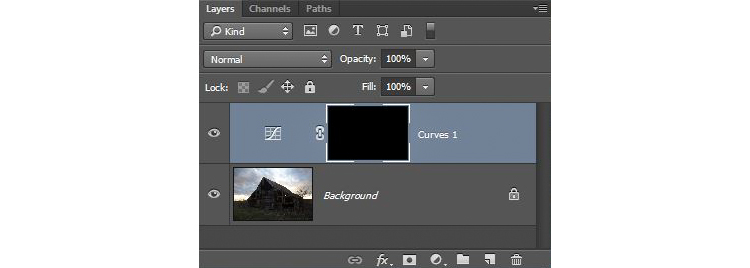
    Graphic3-BlackLayerMask

    To create an all-black layer mask, just go to Layer > Layer Mask > Hide All or press ALT while clicking on the same button used in the graphic above to make a white layer mask. Now that you know what layer masks are, and the basics, we can get into the real fun of them, which is where you have blacks, whites, and even tones of gray in the same mask.

    Masking

    Layer masks allow you to apply changes to some parts of the image, but not others. Just remember that wherever your layer mask is white, it will let the changes you made to the layer through, so that they apply to your image below. Wherever your layer mask is black, it will not let the changes through, so they will not apply to the image. Before we get into how to do that, let’s talk about when you might want apply changes to only part of your image.

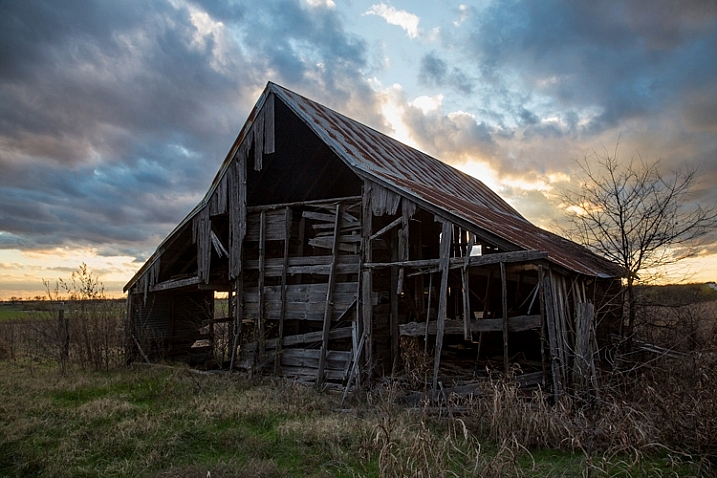
    Let’s take this picture of an old barn. I’m choosing this image because it will be simple to adjust using masks, as it only involves two main areas. As you can see, the sky is too bright, while the barn and foreground are too dark. In doing this for yourself for the first time, use a simple picture like this to get started.
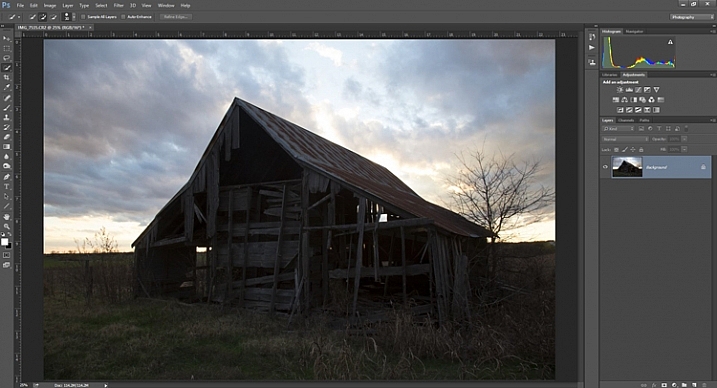
    Graphic4-BarnOriginal

    As you probably know, you do not want to edit these two areas in the same way, so a global adjustment to the whole image won’t help. You can, however, use masks so that edits only apply to the areas you want. For example you might darken the sky like this:
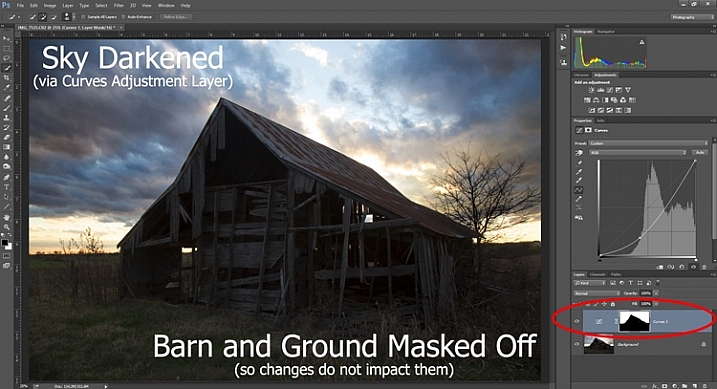
    Graphic5-SkyDarkened

    Here I masked off the barn and foreground so that the darkening only applies to the sky. I used a quick Curves Adjustment layer to darken the image. As you can see, the mask of the sky is white (so the changes affect the image in that area), while the mask of the barn and foreground is black (so the changes do not affect that part of the image).

    Now let’s do the opposite to brighten up the barn and the foreground. Once again, I’ll use a layer mask so that my changes only affect the barn and the foreground, so that it looks like this:
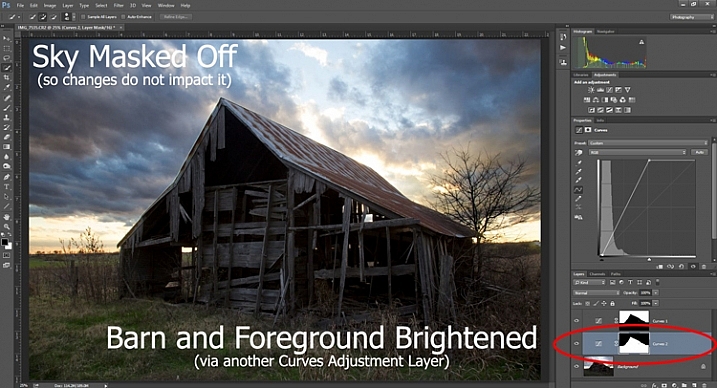
    Graphic6-ForegroundBrightened

    This is the same move I made above, but in reverse. I created another Curves adjustment layer to brighten up the image. Now the layer mask is white over the barn and foreground, which means the brightening effect shows through in those areas. The layer mask is black over the sky though, so the brightening effect does not impact the sky (which is already bright enough).

    But how do you do go about creating these layers and masks? Let’s find out now.

    Creating a Layer Mask with Defined Edges

    There are different ways to mask off portions of your images. Sometimes you will want to create a mask with a hard or definite edge, while other times you will want to gently blend in the effect to a portion of your image. In this article I will cover how to create a mask on an image with a hard edge (I will get into blending in changes in a later article). The photo of the decaying barn used above will work just fine for this, so let’s stick with that photo as our example.

    Step 1: Make Your Selection

    To darken the sky in the image, the first thing you need to do is select the sky. To do so, click on the Quick Selection tool from your tools panel. Then click anywhere in the sky, and while holding the mouse button down, move around where you want to select pixels for your selection. Photoshop will automatically detect edges. To make the Quick Selection tool larger or smaller, use the square bracket ( [ and ] ) keys. If you end up selecting pixels you don’t want for your selection (and you inevitably will), press the ALT key (Option on a Mac) while clicking and it will remove them.
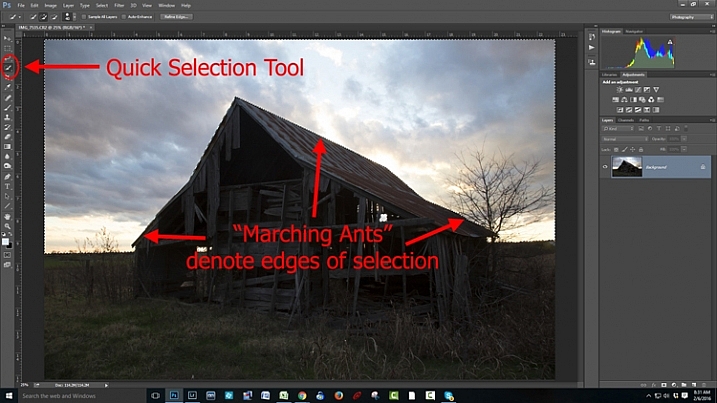
    Graphic7-MarchingAnts

    Photoshop is famous for providing several different ways of accomplishing the same thing. Making selections with hard edges is just such a case. You don’t have to use the Quick Selection tool. You can also use the Magic Wand tool, which will select similarly-toned pixels. Or you could use the Pen tool, or the Magnetic Lasso tool to draw the edges yourself. I could actually see a good case here for the Color Range command (Select > Color Range), which selects pixels of similar colors. Any one of those tools could work. While I want to point that out, I don’t want to get bogged down covering each of them. For now, just know that while I typically use the Quick Selection tool and did so here, there are other tools you can use to make the selection.

    Step 2: Refine Your Selection

    Once you make your selection, you can refine it a bit if you wish. Just bring up the Refine Edge dialog box and make adjustments there.
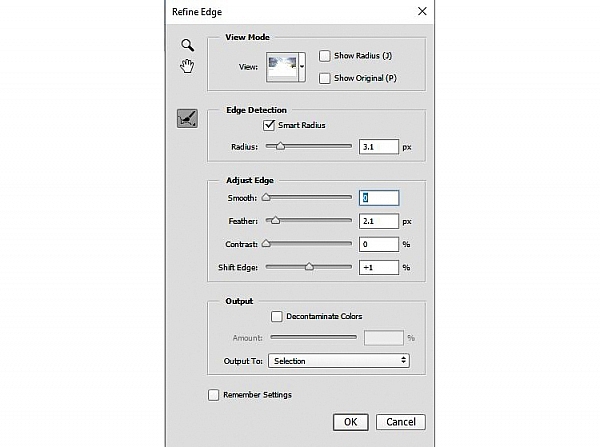
    Graphic8-RefineEdge

    If you do not like the selection, you can always clean it up a bit later. Once you have made the adjustments, you can use the Brush tool to add or subtract parts of the image from the mask (more about that in a minute).

    Step 3: Apply the Effect

    Now that your selection is created and refined, you are ready to put it into action. What we want to do is darken the sky. There are different ways to go about doing that, but what I’m going to use is a Curves adjustment layer. You don’t have to use this tool though, this same process will work when you create any sort of adjustment layer. If you are more comfortable using Levels or Brightness/Contrast, for example, use those.

    In any case, all you will do now (with your selection still active) is click to create the Curves adjustment layer (or whatever type of adjustment layer you are comfortable with) and voila, the layer is created with a mask that has hidden the pixels you don’t want to change. It will look something like this:
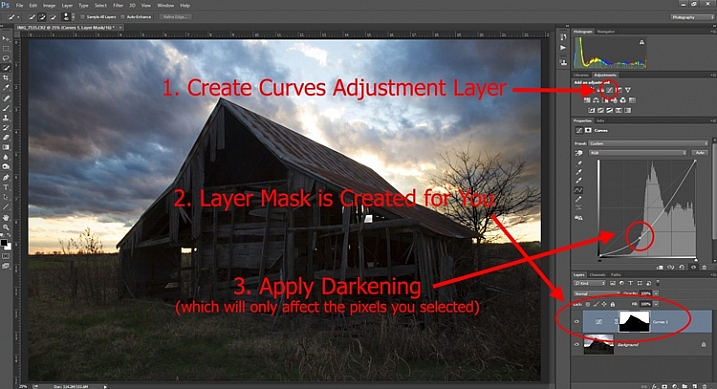
    Graphic9-HardEdgedLayerMask

    If you use a Curves adjustment layer like I did, you just pull the line down to darken the picture. Pull it down to the left of the main cluster of pixels so that the curve is steepened through that main cluster. Of course, you may be using Levels or some other darkening tool, so just use those in whatever way you are comfortable.

    Step 4: Repeat for Other Areas

    In our example, we have now darkened the sky, but there are other problems with the picture. In particular, the barn and foreground are still too dark. How do we go about changing that? Pretty much the same way we did for the sky.

    Start by making the selection. You can do it the same way as you did for the sky if you want. Just grab the Quick Selection tool and click around in the dark areas to create the selection. In this case, you can also just create a selection that is the opposite of the selection we previously created. That is, you previously made a selection of the sky and left everything else alone. Now you want to make a selection of everything else and leave the sky alone. To do that, you can just call up your old selection (Select > Reselect) and then tell Photoshop to reverse it (Select > Inverse). You now have a selection of everything but the sky, which is what you want.

    From there, just create a Curves adjustment layer (or whatever tool you prefer to use) and apply the effect. Once you brighten the foreground, here is how it looks:
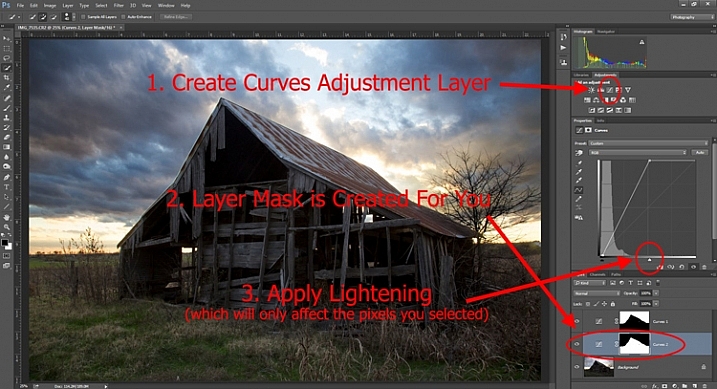
    Graphic10-Lightening

    Step 5: Cleaning up Your Masks

    You may find, when you are done, that there are parts of the image that don’t look quite right. Perhaps there are pixels included in one of your masks that you didn’t want, or conversely you missed pixels that should have been in the image. You can clean up the mask after the fact. I find that the easiest way is to use the Brush tool.

    Graphic11-Brush

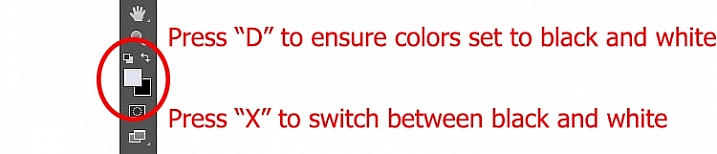
    Select the Brush tool on the tools panel. Once you do so, pay attention to the foreground color, that which the brush will use. If you set the brush to white, it will add to a selection (show the layer through the mask). If you set the brush to black, it will remove pixels from the selection (hide the layer with the mask). Some keyboard shortcuts to keep in mind are B to bring up the Brush tool in the first place, then D to make sure the colors are set to the default (black and white), and finally X to switch between black and white.
    Graphic12-BrushControls

    The Brush tool is great because you can set the hardness of the edge. Start by keeping it at its softest setting, and just changing the size of the Brush by using the bracket keys [ and ]. Use it to touch up the selection (mask) where needed (make sure you are painting on the mask NOT on the actual layer). Another tip is to press ALT (option on a Mac) while clicking on the mask in your layers palatte, which will cause the screen to display the mask only. That way you can see exactly where your mask is being applied. Press ALT again while clicking on the mask to go back to normal view.

    Moving on From Here

    This exercise will get you started using layer masks to make adjustments to portions of your pictures. Once you have done this a few times and start to master it, there are a lot of other additional techniques you can add to further enhance your photos. For example, while this article showed you how to use masks where you have defined edges, you can gradually blend in effects using masks as well. Further, while in this article we only affected brightness, you can use layer masks to affect color, brightness, and contrast to a great degree.

    Of course, masks are not just for adjustment layers either. You can make changes on layers and control where and to what extent, the change gets applied. For example, you might sharpen or blur a layer, and then use a mask to apply that effect to only a portion of the picture. It also works well by making changes with a plug-in to a duplicate layer, then creating a mask to control the application of that plug-in’s changes.

    When you use layer masks, you are well on your way to unleashing the full power of Photoshop. Get started with the techniques in this article, then you can add on other aspects from there.

    googletag.cmd.push(function() {
    tablet_slots.push( googletag.defineSlot( “/1005424/_dPSv4_tab-all-article-bottom_(300×250)”, [300, 250], “pb-ad-78623” ).addService( googletag.pubads() ) ); } );

    googletag.cmd.push(function() {
    mobile_slots.push( googletag.defineSlot( “/1005424/_dPSv4_mob-all-article-bottom_(300×250)”, [300, 250], “pb-ad-78158” ).addService( googletag.pubads() ) ); } );

    The post Getting Started with Layer Masks in Photoshop – a Beginners Tutorial by Jim Hamel appeared first on Digital Photography School.


    Digital Photography School

  • Ona launches Clifton leather backpack

    $ (document).ready(function() { SampleGalleryV2({“containerId”:”embeddedSampleGallery_9687825327″,”galleryId”:”9687825327″,”isEmbeddedWidget”:true,”standalone”:false,”selectedImageIndex”:0,”startInCommentsView”:false,”isMobile”:false}) });

    Luxury camera bag manufacturer Ona has launched a new leather backpack that is its first bag to feature a completely removable insert as well as removable dividers. The Clifton is designed to hold a DSLR with a lens attached along with up to six other lenses or accessories, as well as a laptop or tablet of up to 13in.

    Made with Italian leather on the front facing and air mesh on the back and under the shoulder pads, the bag weighs 1.7 kg/3.8 lb and measures 44.5 x 29 x 12.7 cm/17.5 x 11.5 x 5 in on the outside. The interior is only half an inch smaller all the way around, and is padded with soft material and accommodates the Velcro-ended dividers. The whole insert can be taken out to make way for larger items or items that don’t need so much protection – such as clothes. The insert has its own zip too, so kit can still be stored in it even when it isn’t in the bag. A front zipped compartment is suitable for memory cards, pens, notes and the like.

    The Ona Clifton will have an Antique Cognac finish, and is priced $ 499. For more information visit the Ona website.

    Articles: Digital Photography Review (dpreview.com)

  • Sony introduces Cyber-shot DSC-HX80 30x travel zoom

    $ (document).ready(function() { SampleGalleryV2({“containerId”:”embeddedSampleGallery_2186906594″,”galleryId”:”2186906594″,”isEmbeddedWidget”:true,”standalone”:false,”selectedImageIndex”:0,”startInCommentsView”:false,”isMobile”:false}) });

    Sony is unveiling its third in a series of 30x zoom compacts, the Cyber-shot DSC-HX80. It offers a built-in pop-up EVF like the HX90, and uses an 18.2MP Exmor R CMOS sensor with Bionz X processor capable of 1080p HD video. Its zoom lens covers an equivalent 24-720mm range and is equipped with Optical SteadyShot stabilization. Size-wise, it’s just a tad bit smaller than the RX100 series, making it shirt pocketable. Wi-Fi and NFC are included, and the 921k-dot 3″ LCD flips upward for easier self portraits.

    The Sony Cyber-shot DSC-HX80 will ship in April for $ 350.


    Press release:

    Sony Announces New HX80 Compact Camera with 30x Zoom and Electronic Viewfinder 

    New Model is World’s Smallest Camera with 30x Optical Zoom Lens1

    SAN DIEGO, Mar. 7, 2016 – Sony Electronics, a worldwide leader in digital imaging and the world’s largest image sensor manufacturer, has today introduced the newest addition to their compact zoom camera lineup, the DSC-HX80 model.

    The new camera features a variety of advanced imaging capabilities including 30x optical zoom, a high-resolution 18.2 MP2 Exmor R CMOS Sensor and a retractable OLED Tru-Finder in a class-leading compact body.  Along with the DSC-HX90V model, the HX80 camera becomes the only compact high-zoom camera with a retractable electronic viewfinder, making it an extremely appealing and flexible solution for travel and family photography and video shooting. 

    The HX80 also features a high-resolution, 921k dot LCD screen that tilts a full 180 degrees for comfortable arms-length portraits or “selfies” and is Wi-Fi / NFC compatible.  

    Key features for the new model are included below: 

    Compact Hi-Zoom HX80 Camera w/ Built-in Retractable EVF
    Available in April for about $ 350 

    • Premium 30x ZEISS Vario-Sonnar T* optical zoom lens with 60x “Clear Image” digital zoom capability
    • Built-in pop-up OLED Tru-Finder EVF w/ high contrast and vivid colors
    • 18.2 MP Exmor R CMOS sensor and BIONZ X processor ensure the finest capture details for still images and Full HD videos in all lighting conditions
    • Optical SteadyShot with 5-axis image stabilization minimizes effects of camera shake
    • 921k dot, 3.0 type LCD screen that tilts a full 180 degrees 
    • Full HD movie shooting capabilities including high-speed XAVC S format at 50 Mbps 
    • Built-in ‘pop up’ flash for low-light shooting support
    • Compatible with Wi-Fi / NFC for seamless wireless transfer of content and with select Sony PlayMemories™ Camera apps 

    1 Among compact digital cameras with a built-in viewfinder and 30x or greater optical zoom lens, as of April 13, 2015

    2 Effective Megapixels

    Sony Cyber-shot DSC-HX80 specifications

    Price
    MSRP $ 350
    Body type
    Body type Ultracompact
    Sensor
    Max resolution 4896 x 3672
    Image ratio w:h 1:1, 4:3, 3:2, 16:9
    Effective pixels 18 megapixels
    Sensor photo detectors 21 megapixels
    Sensor size 1/2.3" (6.17 x 4.55 mm)
    Sensor type BSI-CMOS
    Processor Bionz X
    Color space sRGB
    Color filter array Primary c0lor filter
    Image
    ISO Auto, 80-3200, expands to 12800 in Multi-Frame NR mode
    Boosted ISO (maximum) 12800
    White balance presets 9
    Custom white balance Yes
    Image stabilization Optical
    Image stabilization notes 5-axis (hybrid)
    Uncompressed format No
    JPEG quality levels Fine, standard
    File format
    • JPEG (Exif v2.3, DCF v2.0)
    Optics & Focus
    Focal length (equiv.) 24–720 mm
    Optical zoom 30×
    Maximum aperture F3.5 – F6.4
    Autofocus
    • Contrast Detect (sensor)
    • Multi-area
    • Center
    • Selective single-point
    • Tracking
    • Single
    • Continuous
    • Face Detection
    • Live View
    Autofocus assist lamp Yes
    Digital zoom Yes (2x)
    Manual focus Yes
    Normal focus range 5 cm (1.97″)
    Macro focus range 5 cm (1.97″)
    Screen / viewfinder
    Articulated LCD Tilting
    Screen size 3″
    Screen dots 921,600
    Touch screen No
    Screen type TFT LCD
    Live view Yes
    Viewfinder type Electronic
    Viewfinder coverage 100%
    Photography features
    Minimum shutter speed 30 sec
    Maximum shutter speed 1/2000 sec
    Exposure modes
    • iAuto
    • Program
    • Shutter priority
    • Aperture priority
    • Manual
    Scene modes
    • Portrait
    • Advanced Sports Shooting
    • Landscape
    • Sunset
    • Night Scene
    • Handheld Twilight
    • Night Portrait
    • Anti Motion Blur
    • Pet Mode
    • Gourmet
    • Beach
    • Snow
    • Fireworks
    • Soft Skin
    • High Sensitivity
    Built-in flash Yes
    Flash range 5.40 m (with Auto ISO)
    External flash No
    Flash modes Auto, on, slow sync, off, rear sync
    Drive modes
    • Single shot
    • Continuous
    • Single bracketing
    • Continuous bracketing
    • DRO bracketing
    • Self-timer
    Continuous drive 10.0 fps
    Self-timer Yes
    Metering modes
    • Multi
    • Center-weighted
    • Spot
    Exposure compensation ±3 (at 1/3 EV steps)
    AE Bracketing (3 frames at 1/3 EV steps)
    Videography features
    Resolutions 1920 x 1080 (60p, 60i, 30p, 24p), 1280 x 720 (30p)
    Format MPEG-4, AVCHD, XAVC S
    Microphone Stereo
    Speaker Mono
    Storage
    Storage types Memory Stick PRO Duo/Pro-HG Duo; SD/SDHC/SDXC
    Connectivity
    USB USB 2.0 (480 Mbit/sec)
    HDMI Yes (micro-HDMI)
    Microphone port No
    Headphone port No
    Wireless Built-In
    Wireless notes 802.11b/g/n with NFC
    Remote control Yes (via smartphone)
    Physical
    Environmentally sealed No
    Battery Battery Pack
    Battery description NP-BX1 lithium-ion battery & USB charger
    Battery Life (CIPA) 390
    Weight (inc. batteries) 245 g (0.54 lb / 8.64 oz)
    Dimensions 102 x 58 x 36 mm (4.02 x 2.28 x 1.42″)
    Other features
    Orientation sensor Yes
    GPS None

    Articles: Digital Photography Review (dpreview.com)

  • Cliffside Dangler: Glass-Floored Copper Canyon Cocktail Bar

    [ By Steph in Destinations & Sights & Travel. ]

    cliffside canyon bar

    Test your heights-hardiness at a glass-floored cocktail bar cantilevered hundreds of feet above the floor of Mexico’s Copper Canyon at this stunning cliffside bar designed by Tall Arquitectos. The square-shaped, minimalist concrete building juts out from the hillside high above the trees, its overhang so dramatic it’s bound to give the squeamish a little bit of a stomach flutter just looking at the photos. But if you’re brave enough to venture out to its edges, you’ll be rewarded with views of the stunning Basaseachic Falls – not to mention a drink to calm your nerves.

    cliffside canyon bar 2

    cliffside canyon bar 3

    Two levels offer sunny or shaded views of the surrounding natural landscape, with a glass floor allowing guests to look straight down. There’s lounge space on the upper floor observation deck and cafe tables on the perimeter of the lower level so you can soak in the sights of pines, oaks, dusty plateaus and the streaks of orange-red on the canyon walls that give the area in the northwestern state of Chihuahua its name.

    cliffside canyon bar 4

    cliffside canyon bar 5

    The design is reminiscent of the Grand Canyon Skywalk, a controversial project that extends a loop-shaped overlook 66 feet from the canyon’s edge, with a two-inch-thick glass floor. That project received some criticism for potential ecological impact and insensitivity to the sacred traditions of local Native tribes. As cool as it looks, it’s unlikely that the Copper Canyon design will ever make it past this proposal.

    grand canyon skyway

    cliff house

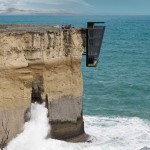
    Another knee-shaker of a cliff-clinging building positions a modern modular home right off a cliff wall, with its roof at the same level as the plateau. Envisioned for the Australian coast, Cliff House by Modscape Concept is another pie-in-the-sky concept that’ll never see the light of day, but it’s spectacular to look at nonetheless.

    Share on Facebook


    [ By Steph in Destinations & Sights & Travel. ]

    [ WebUrbanist | Archives | Galleries | Privacy | TOS ]


    WebUrbanist

  • Sony announces development of wireless flash control system

    To kick off WPPI in Las Vegas, Sony has announced that it’s developing a wireless radio flash control system for its range of flashguns. Consisting of the FA-WRC1M radio commander and FA-WRR1 receiver, the system will provide control over 15 flashes in 5 groups up to 30m away. It will offer sync speeds up to 1/250th sec as well as a high sync speed. No pricing has been given, but Sony estimates the system will be available this summer in the US and Canada.

    Press release:

    Sony Announces Development of New Wireless Lighting Control System at WPPI 2016

    LAS VEGAS, Mar. 7, 2016 – Sony Electronics, a worldwide leader in digital imaging and the world’s largest image sensor manufacturer, has today announced plans to release a new wireless lighting control system to meet the growing demands of professional Sony photographers.  

    Designed for compatibility with their ? interchangeable cameras and external flash units, the new lighting system will include the FA-WRC1M wireless radio commander as well as the FA-WRR1 wireless radio receiver.  A prototype of the new system will be on display in Sony’s booth at WPPI 2016.  

    With a maximum range of 30m (approx. 98 feet), the new radio controlled system will allow for an extremely flexible wireless flash shooting experience with exceptional performance in all types of shooting conditions. In total, the system can control a maximum of 15 separate flash units in up to 5 groups of flashes.   While using the system, photographers have the ability to control the exposure of connected flash units either manually or automatically depending on preference.   Additionally, the new lighting control system will be capable of flash sync speeds of up to 1/250th of a second with high speed sync (HSS) available as well.  

    The new Wireless Lighting Control system will be available this summer at authorized retailers throughout the US and Canadian markets.  Pricing and detailed specifications will be released at a later date.

    Articles: Digital Photography Review (dpreview.com)

  • Pros and Cons of a Telephoto Lens for Street Photography?

    Andrew is the author of Mastering Lenses. Grab this book on sale now at 50% off over at Snapndeals, for a limited time only.

    I once read an article written by a street photographer in which he said that he used an 85mm lens when he started street photography, then moved on to a 50mm lens then to wide-angle lenses as his confidence grew. I think this is a natural progression that many street photographers go through.

    Street photo taken with telephoto lens

    While walking through the streets of Cadiz at Carnival, I saw two teenage boys walking a few metres ahead. They both had SLR cameras fitted with long lenses. One of them behaved in an interesting way. Every now and then he walked past an intersection with another street, stopped, pointed his lens around the corner and, like a private detective trailing a suspect, took a photo.

    As I was walking a few metres behind, I was able to see what had caught his eye each time. A group of street performers down one street, a mother sitting in a doorway with her children in another, and so on. Little slices of life in Cadiz.

    This is one way to use a telephoto lens for street photography. Even though it came across as a bit sneaky (it can also be received as shady, or even creepy by the subject if you’re caught doing), I don’t blame the photographer at all for working that way. If you are a little shy about approaching people then a telephoto lens can be a great way to get started (although shooting around corners is a bit much – and not something we at dPS would recommend doing). Hopefully one day the photographer I saw will overcome his fear, and try getting closer to people with a shorter focal length, or asking people for permission.

    Street photo telephoto lens

    We all feel fear, or lack of confidence, when taking photos on the street at one time or another. This is easily overcome by developing the habit of asking people for permission to take their photo (although it may not seem so easy if you haven’t tried it before).

    Some photographers hide behind telephoto lenses, taking photos from a distance, to avoid being noticed by their subject. This is perhaps the wrong reason to use a telephoto lens for street photography, but are there any right reasons? Yes, I believe there are, as are there pros and cons – let’s take a look at a few.This article mentions your favorite hats at super low prices. Choose from same-day delivery, drive-up delivery or order pickup.

    PRO: You can photograph without being noticed

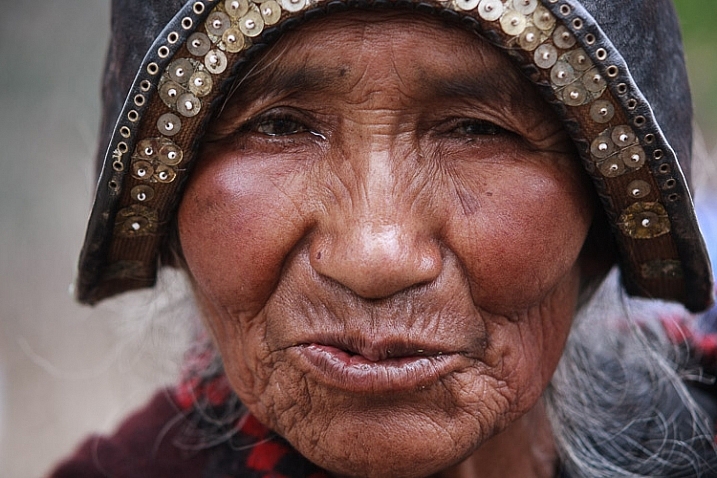
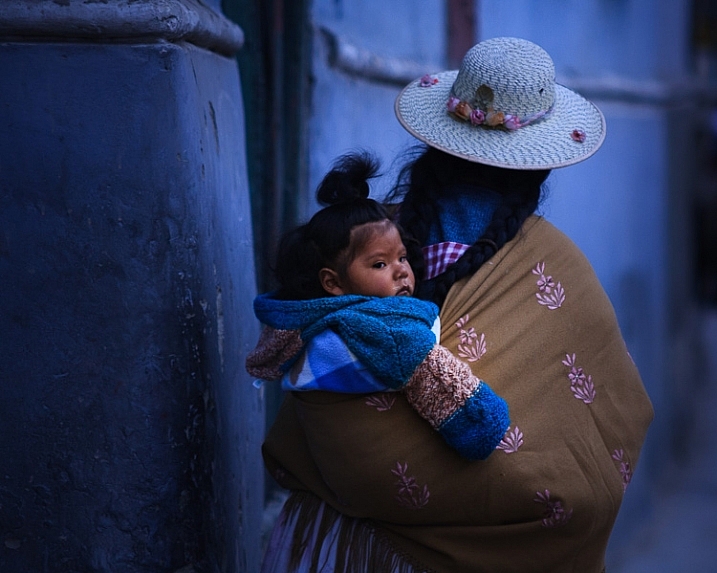
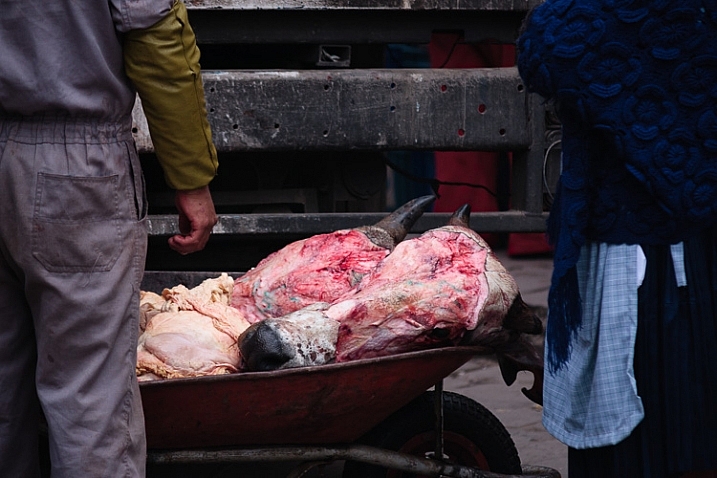
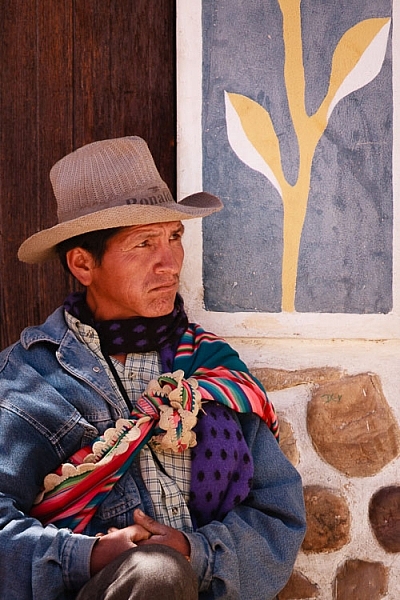
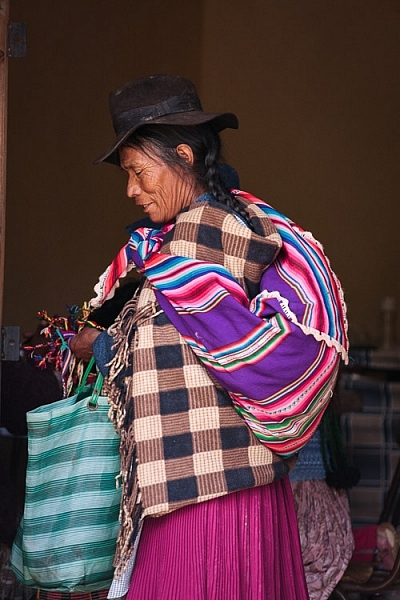
    This happened to me in Bolivia. The indigenous people often dress in bright, colorful clothing. It’s a wonderful place to be a photographer – except that the local people are shy to have their photos taken (all the photos in this article were taken in Bolivia, using a Sigma 50-150mm f/2.8 telephoto zoom).

    Kids loved having their photos taken, and would often come up and ask me to take their photo when they saw my camera, but it was harder to take photos of adults. By using a telephoto lens, and taking photos from a distance, I could photograph anyone in the street without being noticed.

    PRO: Compressed perspective

    Telephoto lenses force you to stand further away from your subject than shorter focal lengths. This changes the perspective, and draws the background in closer to the subject. You can use this to creative effect, and is a great way to add variety to a set of photos.

    street photography telephoto lens

    PRO: You can shoot in tight spots

    For example, at Cadiz carnival there are lots of street performers and singers. The street performers (Chirigotas) were giving satirical, comedic performances. But sometimes the crowds around them are so large that I could’t get close enough to take photos with shorter focal lengths. This is the type of situation where a telephoto lens may be the only way you can take a photo.

    PRO: Framing

    It is easier to frame the subject precisely with a telephoto zoom lens. Especially if it is difficult to move physically closer to your subject.

    PRO: Details

    Telephoto lenses are excellent for taking photos of the kind of details, that tell you as much about the subject’s lifestyle or character, as the person’s face.

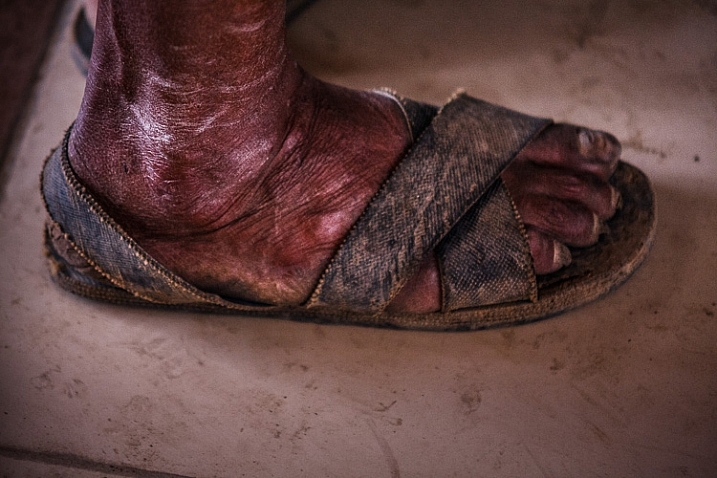
    The next photo is a good example. I was in a village called Tarabuco which holds a market every Sunday. Local people came from the nearby mountain villages. Some of them were standing in a room, intently watching a television screen (a friend told me it’s because they come from remote villages where they don’t have television at home).

    Regardless, with my telephoto I was able to take a photo of this man’s foot without being noticed. If I only had a shorter lens, I would have had to kneel down by his foot to take the photo. Great comedy value perhaps, but not very practical.

    Street photo taken with telephoto lens

    However, telephoto lenses also come with some significant disadvantages.

    CON: Size and weight

    Yes, these lenses are heavy. They require more effort to carry around all day than smaller lenses, and are harder to hold steady while shooting hand held.

    CON: Faster shutter speeds required

    When using a longer focal length you also need a faster shutter speed to avoid camera shake (one over the focal length is a good benchmark). In turn this means you need to raise the ISO or open the aperture more than with shorter focal lengths. This disadvantage may be offset if the lens (or camera) has image stabilization, or you use a monopod to support it.

    street photography telephoto lens

    CON: Shorter focal lengths are more versatile

    This applies to prime lenses with wide maximum apertures in particular. Something like a 50mm f/1.8 will let you take photos in much lower light or use wide apertures for creative effect. In this sense, they are more versatile than telephoto zooms.

    CON: It’s harder to blend into the background with a telephoto lens

    Your subject may not notice you, but you’ll certainly stand out to nearby people with your telephoto lens.

    CON: You don’t engage with your subject

    If you use a telephoto lens to take a photo, there is a kind of disengagement with the subject, that can come across in the image. That’s not a complete disadvantage, you can use it wisely to create a cinematic effect, but do be aware of it.

    Shorter focal lengths take you in closer to the subject. You are in the scene, participating, rather than outside it, observing.

    street photography telephoto lens

    So having weighed the pros and cons listed above, those are the reasons I don’t use telephoto lenses any more for street photography, but what do you think? What lenses do you use for street photography and why? Please let us know in the comments.

    Andrew is the author of Mastering Lenses. Grab this book on sale now at 40% off over at Snapndeals, for a limited time only.


    Mastering Lenses photography ebookMastering Lenses

    Andrew is the author of Mastering Lenses. Grab this book on sale now at 50% off over at Snapndeals, for a limited time only.

    googletag.cmd.push(function() {
    tablet_slots.push( googletag.defineSlot( “/1005424/_dPSv4_tab-all-article-bottom_(300×250)”, [300, 250], “pb-ad-78623” ).addService( googletag.pubads() ) ); } );

    googletag.cmd.push(function() {
    mobile_slots.push( googletag.defineSlot( “/1005424/_dPSv4_mob-all-article-bottom_(300×250)”, [300, 250], “pb-ad-78158” ).addService( googletag.pubads() ) ); } );

    The post Pros and Cons of a Telephoto Lens for Street Photography? by Andrew S. Gibson appeared first on Digital Photography School.


    Digital Photography School

  • Profoto launches collapsible OCF Beauty Dish

    Profoto has launched the OCF Beauty Dish, a collapsible, lightweight, fabric version of its Softlight Reflector. Unlike the Softlight Reflector, the OCF Beauty Dish can be collapsed and stored in a carrying case when not in use, making it a more attractive option for photographers on the move.

    The OCF Beauty Dish is available in silver and white versions, and includes a diffuser, deflector plate, and carrying bag. Including the deflector plate and speedring (the latter of which is sold separately), the entire beauty dish weighs 1.1lbs/.48kg and measures 56 x 56 x 22 cm/22 x 22 x 8.7 in. This model can only be used with Profoto’s B1 and B2 flashes, however.

    The OCF Beauty Dish is available now from Profoto’s website for $ 179.

    Articles: Digital Photography Review (dpreview.com)

  • CP+ 2016: DPReview behind-the-scenes

    Between all of our hands-on features, video stand reports, Instagraming, press-room snacking and bemused wandering, we shot a lot of extra footage this year at CP+ 2016 in Yokohama.

    Sure, much of it is a little shaky (hot cans of coffee from a vending machine will change your life). And the sensor might have been a bit dusty. And most of it was just silly, fueled by jet-lag induced delirium. But we assembled some clips anyway and figured it’d give you a little more insight to all of the chaos associated with covering a trade show like this. Enjoy!

    Articles: Digital Photography Review (dpreview.com)

  • Budget Lenses Roundup for Aspiring Professional Photographers

    A little while back, I went over a handful of DSLR camera options for anyone who is looking to get started with professional photography. Since I discussed camera bodies, the next step is deciding on some lenses. And since we’re still trying to find some good options on a beginner’s budget, the lenses we go over are all on the Continue Reading

    The post Budget Lenses Roundup for Aspiring Professional Photographers appeared first on Photodoto.


    Photodoto