Blog

  • In the thick of the action: Nikon D5 real world samples gallery

    With a newly designed 20MP full-frame sensor, an advanced autofocus system with 153 phase-detect points, a robust build with full weather sealing and 12 action-freezing frames per second, the Nikon D5 has been getting plenty of attention around the DPReview office over the past couple of weeks. It’s a purpose-built machine: we don’t think there’s a camera in the world that can keep erratically moving subjects in focus during fast bursts like the D5 can. But it’s good at a lot else as well.

    We’ve toted it to tennis matches, a rugby match, up and over the Cascade mountains, along the Puget Sound waterfront and even a styled wedding shoot. After all, though the D5’s specs may indicate it’s geared toward the discerning sports shooter, that doesn’t mean Nikon’s new flagship wouldn’t make a great (though hefty) all-rounder for photographers shooting all day, every day.

    Articles: Digital Photography Review (dpreview.com)

  • Le Corbusier Murals Applied as Graffiti to Notre Dame du Haut

    [ By WebUrbanist in Art & Street Art & Graffiti. ]

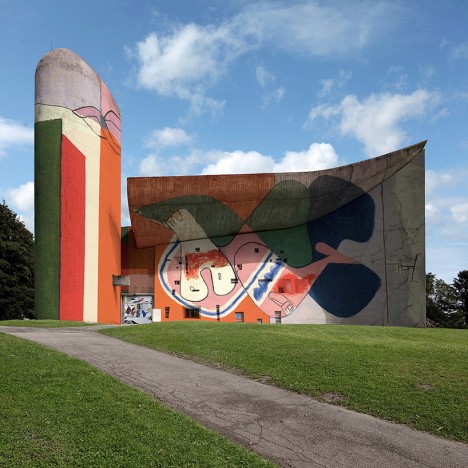
    corbu vandalized notre dame

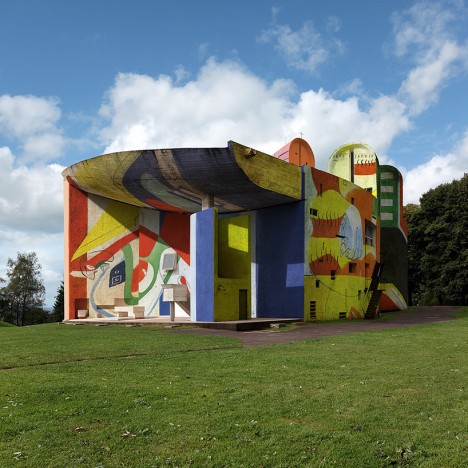
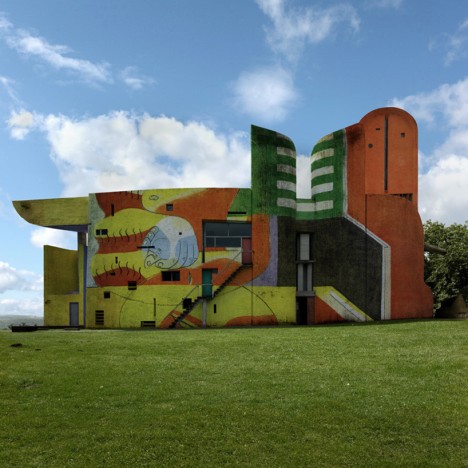
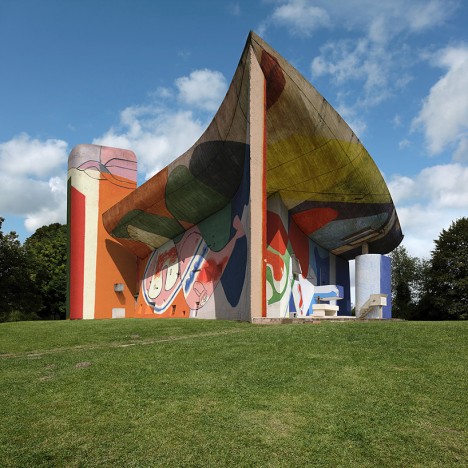
    Actual murals made by architect Le Corbusier have been digitally added to the walls of one of his most famous buildings, transforming Notre Dame du Haut, added an array of colors to its complex curves.

    corbu chapel full size

    Architect Le Corbusier, who passed 50 years ago, remains famous for his rigid Modernist works, but for spiritual spaces he made an exception, shifting from a rule-based to an artistic approach.

    corbu chapel photoshop art

    Still, the resulting structure was simply white and gray, devoid of color until these murals were introduced. The thin-seeming walls are covered from the ground up, but so too are the thick swooping roofs that curve up and around, seeming almost to float above the sides.

    corbu modern graffiti mural

    The fictional images were crafted by Belgian photographer Xavier Delory, who applied a set of artworks Corbu made for an architectural colleague.

    corbu chapel side view

    “Le Corbusier was not only an architect, he was also a painter and sculptor. He is the author of the phrase ‘synthesis of the arts’ meaning an alliance between painting, sculpture and architecture. At first he thought about what painting and sculpture could bring to architecture, not playing a decorative role but rather ‘as a house guest’ in a second phase, he moved this level of synthesis to a fusion of modern architectural styles at Ronchamp.”

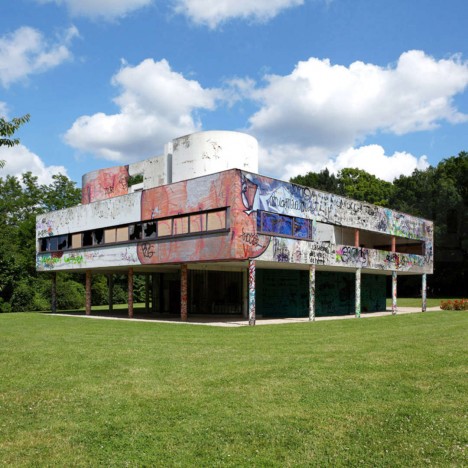
    vandalized savoye

    In a previous series, the same photographer re-imagined the Villa Savoye, another famous work by Corbu, sparking a series of fake stories suggesting the iconic house had actually been vandalized.

    Share on Facebook


    [ By WebUrbanist in Art & Street Art & Graffiti. ]

    [ WebUrbanist | Archives | Galleries | Privacy | TOS ]


    WebUrbanist

  • Scaffolding Staircase: Huge Steps to Rise from Rotterdam Plaza

    [ By WebUrbanist in Architecture & Public & Institutional. ]

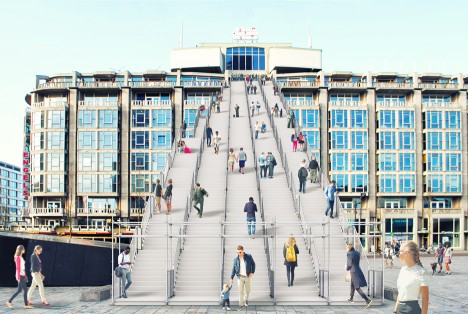
    urban staircase

    A temporary installation to commemorate the rebuilding of the city after the second world war, this massive staircase made from scaffolding will lead visitors up onto a postwar structure in the heart of Rotterdam.

    scaffolding staircase close up

    Standing 60 feet high, the staircase of the 180 steps end on top of the Groot Handelsgebouw, an early building from the postwar construction effort that began 75 years ago. Dubbed simply The Stairs, this project by Dutch architecture firm MVRDV will also involve film screenings and events on the rooftop.

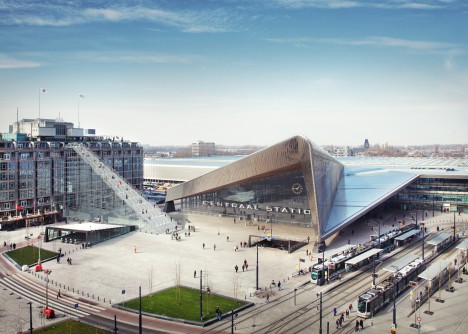
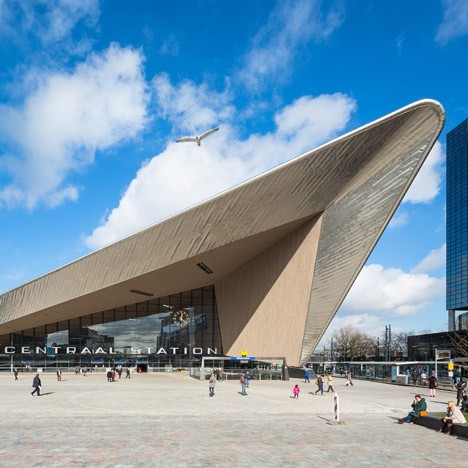
    central station rotterdam

    If the resulting temporary roof-topping venue is sufficiently popular, a more permanent means of access may replace the temporary stairs.

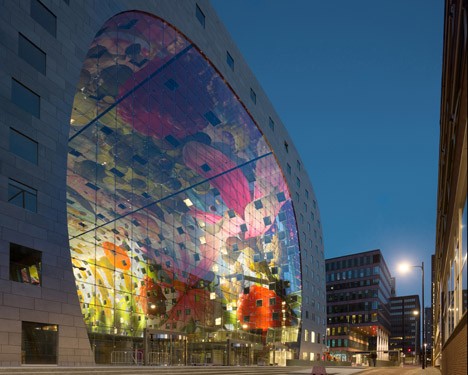
    mvrdv market hall

    Other temporary and permanent architectural and urban design projects are also being developed and opened as part of the 75th-year commemoration (above: Market Hall with digital mural by MVRDV)

    Share on Facebook


    [ By WebUrbanist in Architecture & Public & Institutional. ]

    [ WebUrbanist | Archives | Galleries | Privacy | TOS ]


    WebUrbanist

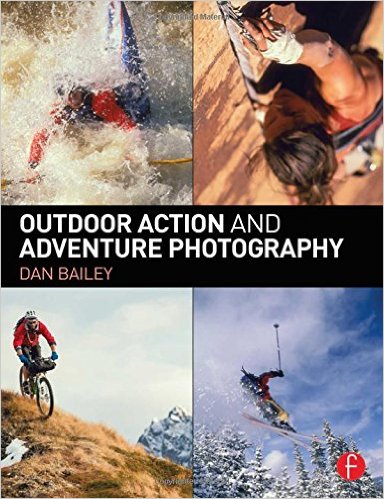
  • Review – Outdoor Action and Adventure Photography Paperback Book

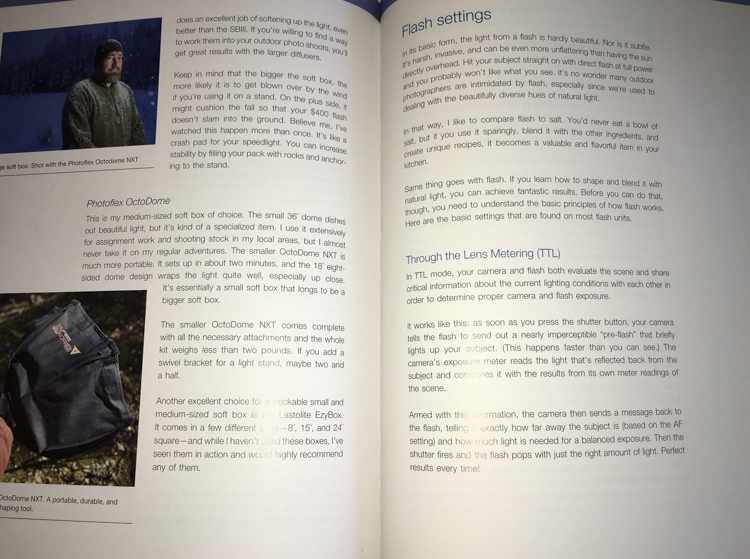
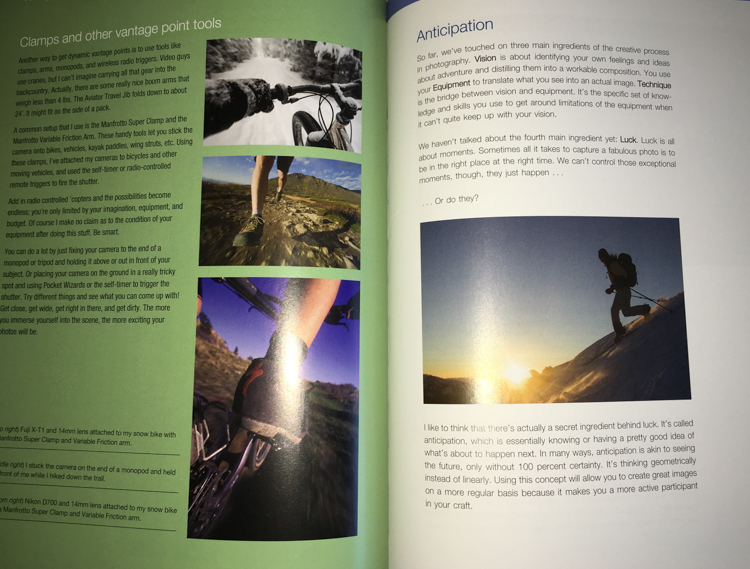
    outdoor action and aventure photographyOutdoor Action and Adventure Photography by Dan Bailey is a refreshing change of course in this digital age we live in – it’s actually a paperback book. It is a good thing that Dan had decided to go hardcopy with this book, because it is filled with information, and as a result I feel like many people will want to jot things down, highlight paragraphs, and refer back to it time and again.

    Overview

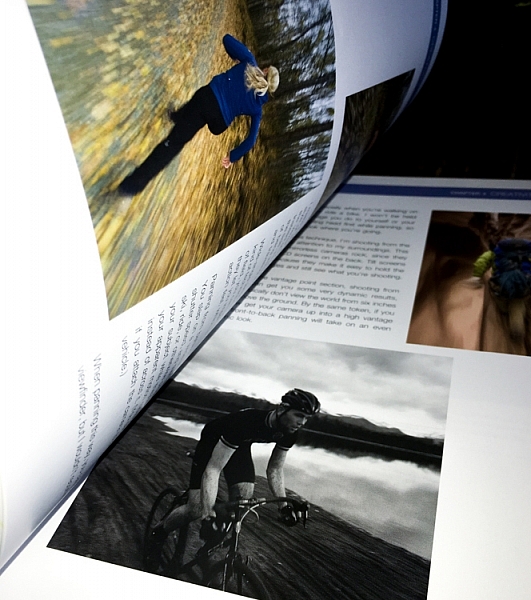
    The book starts out with a heartfelt acknowledgement section that truly shows you how much time, effort, and passion, Dan has put into this work. It’s not just something that he’s slapped together – and it shows! Not only is the book well written and informative, but it is beautifully illustrated with a number of photographs from Dan’s portfolio.

    After the acknowledgements, you’re given a general introduction to frame your mind for what you’re about to learn. Outdoor Action and Adventure Photography is geared to outdoor photographers, but I’d argue it’s geared even more so towards the outdoor enthusiast, who wants to take great photographs of their adventures.

    outdooraction

    What I mean is that this book is designed to show you how to take photographs, while you’re hitting a triple black diamond ski slope, or hiking up the side of a mountain. It’s geared more towards the extreme side of outdoor adventure, and the challenges that you would face if you were trying to photograph in those conditions.

    What You’ll Learn

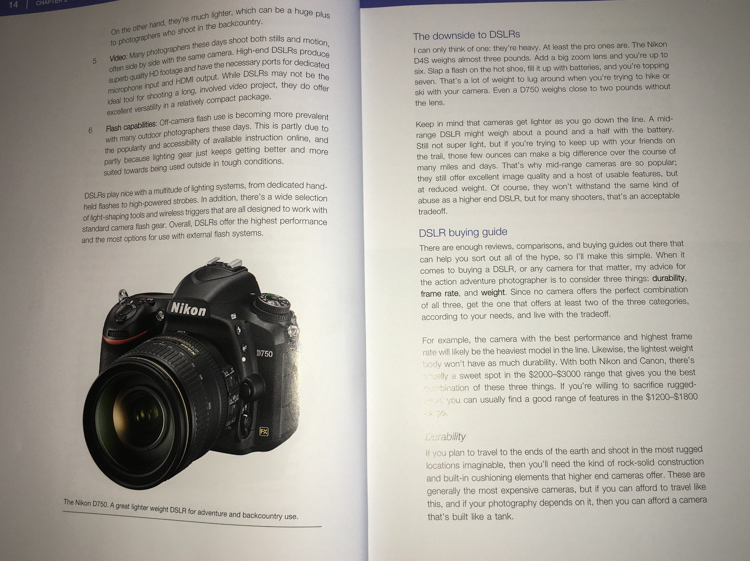
    After the general framework is set, the book is broken down into a fairly logical path. First you’re introduced to the types of gear that you’ll need. Dan makes a great point about how, for this type of work, expensive gear does make a difference. Not necessarily just for the image quality, but because higher quality professional gear is designed to take a beating, and in the conditions you’ll be facing, the gear you use will need to withstand a few bumps.

    outdooraction-3

    One of the largest problems faced by adventure photographers is the desire to pack light, but maintain a versatile and high quality kit. In the book, Dan addresses how he handles this challenge, and from what I can gather he is focused more on lightweight and ease of use, versus trying to carry every possible lens and body up the side of a mountain. He has a few different configurations of bodies and lenses that he brings, depending on how far and strenuous the adventure is expected to be.

    outdooraction-2

    Another big issue that is addressed in this book is regarding lighting. Light on the side of a mountain is not always going to be what you want it, and in this section Dan spends a great deal of time discussing different types of flashes, he provides a great step by step workflow, and talks about different use cases.

    outdooraction-4

    Finally, there’s a great section on weighing the decision to go pro. What does it mean, do you have what it takes, will you go full-time or part-time? A lot of what is discussed in this section can be applied to other fields of photography, but there are a few considerations specific to Dan’s field, that are worth considering if you’re thinking about making this a career choice.

    Final Thoughts

    Outdoor Action and Adventure Photography is a book that is designed for the outdoor enthusiast who wants to take great photographs in extreme conditions. While Dan keeps a fairly conversational tone throughout, the book is so packed with information, I’d equate it to more of a textbook than a simple informational guide.

    If you’re looking to take great photographs while hitting the slopes with your friends – this is the book for you!

    googletag.cmd.push(function() {
    tablet_slots.push( googletag.defineSlot( “/1005424/_dPSv4_tab-all-article-bottom_(300×250)”, [300, 250], “pb-ad-78623” ).addService( googletag.pubads() ) ); } );

    googletag.cmd.push(function() {
    mobile_slots.push( googletag.defineSlot( “/1005424/_dPSv4_mob-all-article-bottom_(300×250)”, [300, 250], “pb-ad-78158” ).addService( googletag.pubads() ) ); } );

    The post Review – Outdoor Action and Adventure Photography Paperback Book by John Davenport appeared first on Digital Photography School.


    Digital Photography School

  • The Top 10 Camera Features Wish List of dPS Readers and Writers

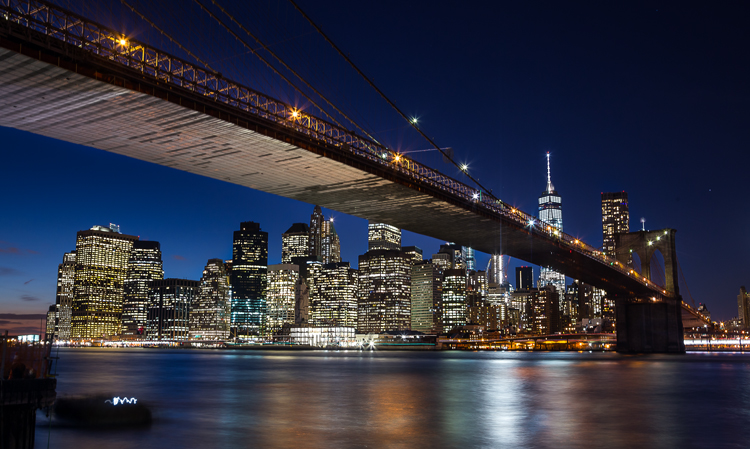
    Brooklyn Bridge picture taken using a remote shutter release and a neutral density filter, which could be eliminated with camera improvements.

    Brooklyn Bridge picture taken using a remote shutter release and a neutral density filter, which could be eliminated with camera improvements.

    It is becoming almost cliche, but there has never been a better time to be a photographer. What we can do now with modern digital cameras, without spending that much money, is incredible. Without breaking the bank, you can now get an extremely high resolution digital camera, with low light performance and a dynamic range unheard of just a few years ago, that shoots at speeds measured in multiple frames per second. If that isn’t enough, it will also double as a video camera with HD quality as a bare minimum. It will even send the pictures wirelessly to your phone. It seems ungrateful to ask for more. Still, everything can be improved, can’t it?

    And just to be clear – when I say improved, I don’t mean adding more megapixels. Or demanding even better low light performance and dynamic range. Or achieving even faster focus and shooting speeds. The manufacturers know everybody wants that stuff, and they seem to be putting all their energy into those areas.

    But doesn’t it seem like there are features that could be added to cameras that wouldn’t require a technological breakthrough? Or that wouldn’t make your camera cost a fortune? It always seemed that way to me. So I started asking around to other photographers, then I started asking readers, and finally I asked my fellow dPS writers.

    How would you improve digital cameras?

    I got some good answers, and have combined them with my own to create a list of 10 new features (a wish list) that could be added to digital cameras to make them better. Here they are, in no particular order:

    1. A Small LCD for the Histogram

    The first improvement is a separate, smaller LCD on the back of the camera. Why? Let me explain.

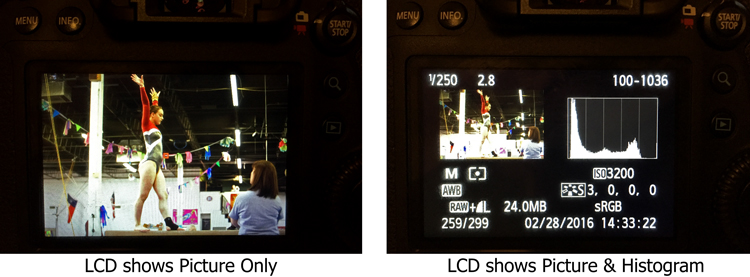
    We all know that the best way to evaluate exposure when you are shooting is to look at the histogram. Looking at just the picture on the LCD doesn’t work as well when you are trying to evaluate exposure. But look what happens to the picture on the screen when you add the histogram:
    LCD-graphic

    On the left, where you have the full picture, you can clearly see it. But once you add the histogram, the picture on the right becomes tiny. It is unusable and tells you nothing. We are essentially forced into a position of having to choose between a picture we can see, or just viewing the histogram (but not both). I’d like to do both.

    To fix that, you could just put another very small LCD on the back of the screen. It would show only the histogram, so that you could still have a full sized version of your picture.

    2. Three Dials

    When you set the exposure level of your pictures, there are three controls: shutter speed, aperture, and ISO.

    At the same time, how many dials do we have to set those three controls? Two – and that’s if we’re lucky. Entry level cameras often only have one. To change all three exposure controls with only two dials, means you have to press buttons while turning dials. It’s a rather cumbersome process, for the most important and commonly used functions of the camera. If we have three exposure settings, shouldn’t we have three dials to set them?

    The odd man out is always ISO, and I personally think this is a hold-over from the days of film. Back then, you couldn’t change the ISO except by changing your film. When digital came along, everyone was pretty happy to be able to change the ISO at all, so having to press a button didn’t seem like a big deal. In addition, at that time, available ISO ranges were extremely limited and if you raised the ISO much then digital noise quickly became a problem.

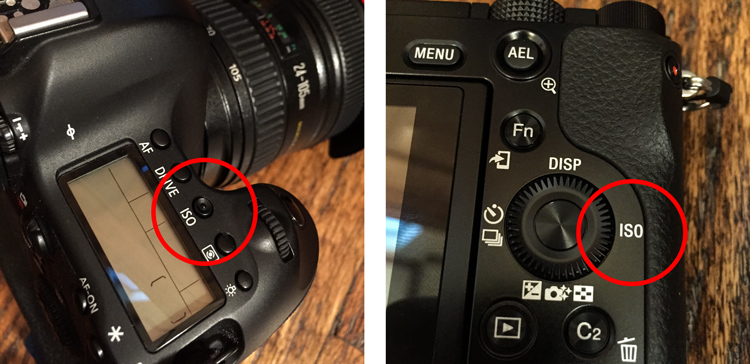
    But now? ISO ranges are huge! Even entry level cameras have ISO ranges up to 25,000. ISO is now truly a equal partner in the exposure triangle. It should be treated as such. That means it should have its own dial. You shouldn’t have to press buttons to adjust it.
    ISO-controls-graphic

    Stop ISO discrimination! Let’s make it an equal member of the exposure triangle by giving ISO its own dial!

    Where would you put the extra dial? There are many places you could choose from, but one thought is to get rid of the mode dial. Having a dedicated dial to quickly change the mode is another hold-over from a time when there were fewer camera controls (and no menus). Who changes their modes so frequently that the most valuable real estate on the camera needs to be taken up with a dial for it? Don’t most people just pick a mode and use it most, or all of the time? Even those that change modes don’t do so often enough that it needs its own dial.

    Note: It actually appears that this change might be on the way. There are three dials on most Fujifilm mirrorless cameras and one of them is dedicated to ISO. Perhaps others will follow suit.
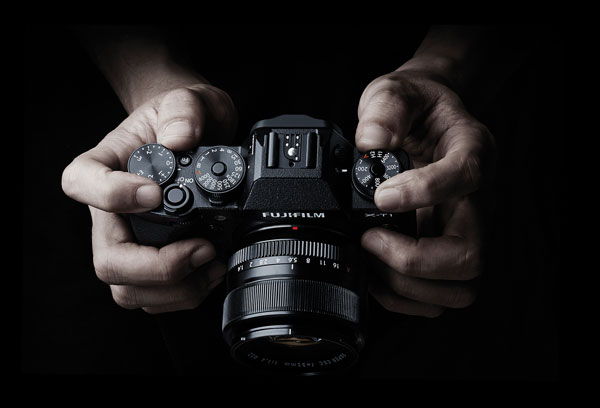
    Supplied by Fujifilm

    Supplied by Fujifilm

    3. Lower ISOs

    Speaking of ISO, in the rush to expand ISO values on the high side, the lower side of the ISO scale has been completely neglected. The camera manufacturers have worked very hard to make digital sensors more sensitive to light. It would seem like a simple thing to make the sensor less sensitive to light. Why couldn’t cameras have ISO levels of 50, 25, 12, and so on?

    Why would that matter? It would put us in more control over shutter speed, and avoid the necessity of carrying around neutral density filters. Why do landscape photographers need to carry around a bunch of neutral density filters to slow down their shutter speeds? If we could lower the ISO, that would require a longer shutter speed for a proper exposure. It seems like that could just be built in, and would make it much simpler. Instead of adding a 3-stop neutral density filter to your lens, you could then just reduce the ISO from 100 down to 12 (3 stops).
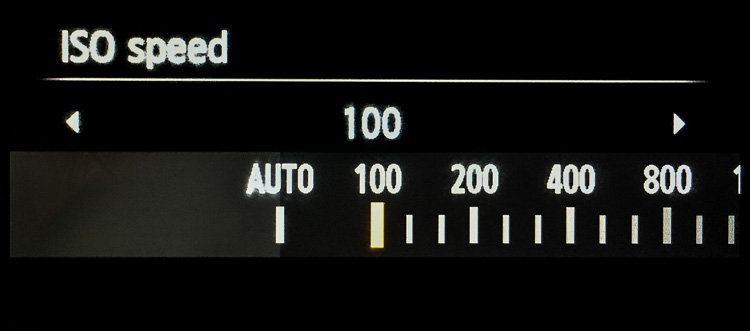
    Why stop at ISO 100? We should see ISO 50, 25, 12, 6, 3, and so on.

    Why stop at ISO 100? We should see ISO 50, 25, 12, 6, 3, and so on.

    Of course, we might need to talk about the numbering system for these low ISOs. Moving down 10 stops from ISO 100 would result in ISO .09 which may not work.

    4. Retractable Remote Shutter Release

    Speaking of landscape photographers, something every one of them needs is a remote shutter release, or an intervalometer. It seems like the shutter release could detach from the camera with a retractable cable. That way you could pop it out and trip the shutter, without moving the camera or risking vibration.
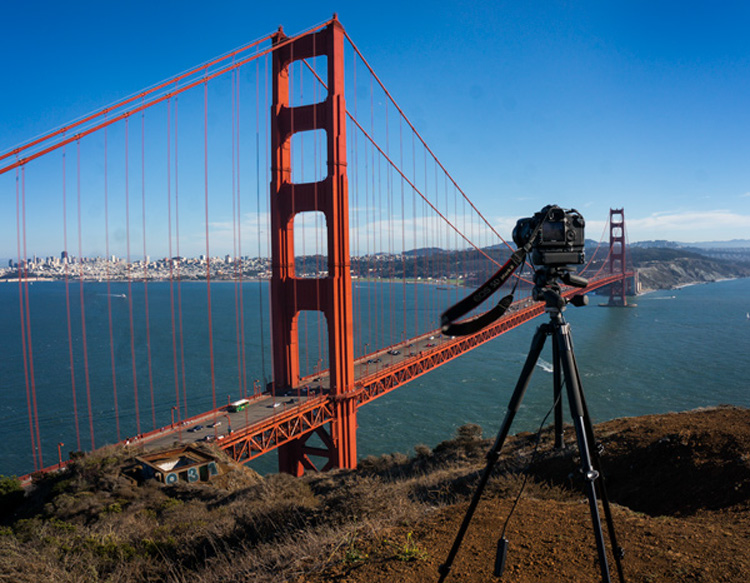
    TripodAtGoldenGate

    Note the remote shutter release hanging down. Wouldn’t it be nice to have a retractable unit?

    It would mean that we wouldn’t have to carry around remote shutter releases.

    5. Allowing Longer Shutter Speeds

    Another improvement would be to allow longer shutter speeds without the need to switch over to Bulb mode. At present, most cameras limit the length of shutter speeds to 30 seconds. If you want to use a longer shutter speed than that you can, but you have to switch over to Bulb mode. It would be nice to be able to take exposures of a minute or longer without having to switch modes.

    Why is this important? Largely because of bracketing (or Auto Exposure Bracketing, or just AEB for short). When you bracket, you are taking three (or more) exposures: one at normal exposure, one underexposed, and one overexposed. If you are starting with a long shutter speed, then the longer shutter speed required for the overexposed picture will often need to be longer than 30 seconds.

    For example, if you are taking a bracket of three photos, with your starting shutter speed at 15 seconds, and you set the exposures 2 stops apart, the bracket won’t work as you hope. In this example, the overexposed picture of the bracket would need a shutter speed of one minute (starting at 15 seconds, adding one stop doubles your shutter speed to 30 seconds, and the second stop doubles it again to one minute). But your camera will only allow a shutter speed of 30 seconds, so that won’t work. Your camera will take the normal and underexposed photos, but the overexposed one will be limited to 30 seconds.
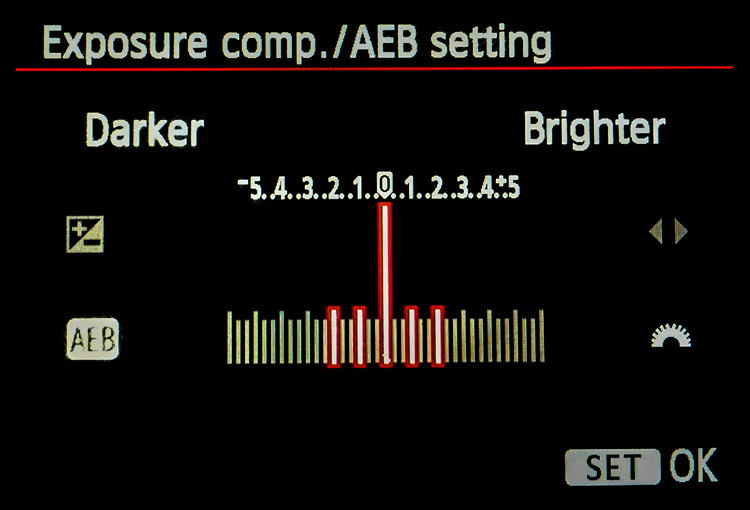
    Here is a pretty common bracket for those who use them (5-shots, with each shot separated by 1 stop). If the original shutter speed is longer than 6 seconds, the camera will not capture the entire bracket because the most overexposed picture would need longer than 30 seconds.

    Here is a pretty common bracket: 5-shots, with each shot separated by 1 stop. If the original shutter speed is longer than 6 seconds, the camera will not capture the entire bracket because the most overexposed picture would need longer than 30 seconds to expose.

    How often does this happen? A lot more than you might think. Landscape photographers are known for being out before the sun is up, and they all want to use a combination of a small aperture to maximize depth of field and a low ISO to minimize noise. The only way to get a proper exposure in these conditions is to use very long shutter speeds. These are the same people who have very little control over their lighting and often face dynamic range problems, so they are the most likely to bracket their photos.

    6. Self-Timers

    Why are self-timers on cameras limited to two and 10 seconds? A reader named Jeff Johnson wondered about this (as well as raising some of the other improvements mentioned in this article). Every $ 10 digital watch in the discount store will allow you to set timers of different ranges, why not our digital cameras?

    This is another one that seems to be a hold-over from a prior era. Timers were mechanical devices at one time, and it may have made a lot of sense to limit the options. Now, it doesn’t make sense. It seems like we ought to be able to set whatever length of timer we want, or at least have a few more options.

    7. Improved Wifi

    One exciting recent development in cameras has been the introduction of Wifi. It allows you to transfer your pictures to your phone or other device wirelessly. But it is usually clunky. You have to turn off your phone’s data connection to connect with your camera. Some have raised the idea of using bluetooth for connection to phones, tablets, and laptops (in addition to wifi). dPS writer John McIntire echoed that, and pointed out the smartphone and tablet control for things like timelapse and long exposures.

     8. Hyperfocal Distance Calculator

    Despite its name, the concept of hyperfocal distance is not that complicated. It is just the closest point at which you can focus, and still keep your entire background acceptably sharp. It depends on only three factors:

    1. The sensor size of your camera
    2. The focal length you are using
    3. Your aperture setting.

    There are charts and apps that will help you calculate the hyperfocal distance for your shot.
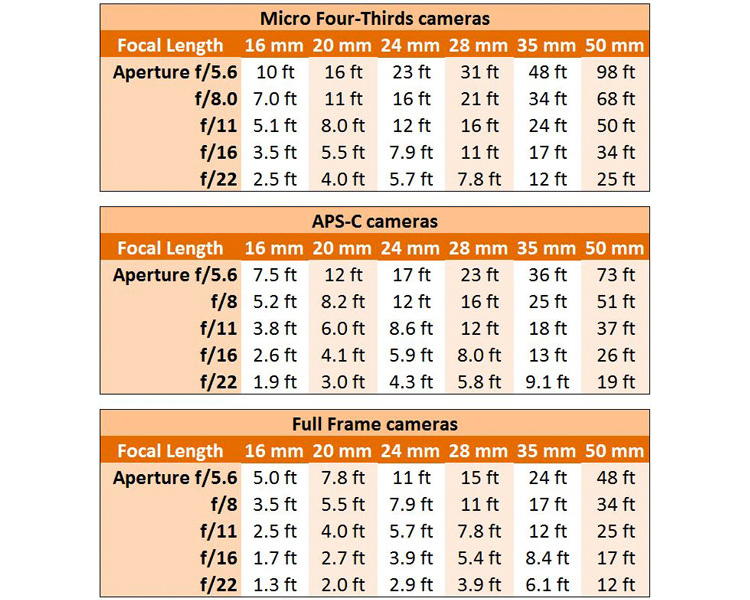
    Hyperfocal Distance Charts

    Hyperfocal Distance Charts

    But why should you be forced to calculate it at all? The aforementioned Jeff Johnson had another great idea of having the camera calculate it for you. After all, the camera is a computer. It already knows all three of the variables involved. Why couldn’t the camera just tell you the hyperfocal distance? It could be part of the camera’s display.

    Note: Once again the Fuji cameras lead the way, as the X-T1 and possibly others, do indeed have a hyperfocal distance display inside the viewfinder.

    9. Internal storage

    Storage has changed remarkably fast in a short period of time. Just a few years ago, you might have been carrying around a bunch of 4 GB memory cards with you. After a couple hundred pictures, you’d swap it out for another. But now, the sizes of memory cards are huge. 128 GB is commonplace, and not all that outrageously expensive. There are even 256 GB cards or even 512 GB cards available as well. As a result, most of us just buy a large card and leave it in the camera. We download the pictures periodically, and resume shooting with the same card.

    That’s already a better situation than what we had a few years ago, but doesn’t it seem weird that there is no storage at all in digital cameras (at least not in the mirrorless cameras and DSLRs we tend to use)? It did to Leanne Cole, who wondered why we are fooling around with memory cards at all at this point. Given how much storage can fit in a small place, haven’t we reached the point where storage should be built-in to the camera? Why not have a 500 GB drive already added?

    10. Your Changes

    These are some items we’d like to see. I think some of these are good ideas, but I suspect there are better ideas out there. So what would you change? Are there things you would add? Are there features you’d like to see put on the digital camera wish list?

    Please let us know in the comments below.

    googletag.cmd.push(function() {
    tablet_slots.push( googletag.defineSlot( “/1005424/_dPSv4_tab-all-article-bottom_(300×250)”, [300, 250], “pb-ad-78623” ).addService( googletag.pubads() ) ); } );

    googletag.cmd.push(function() {
    mobile_slots.push( googletag.defineSlot( “/1005424/_dPSv4_mob-all-article-bottom_(300×250)”, [300, 250], “pb-ad-78158” ).addService( googletag.pubads() ) ); } );

    The post The Top 10 Camera Features Wish List of dPS Readers and Writers by Jim Hamel appeared first on Digital Photography School.


    Digital Photography School

  • Fruitless: 10 Abandoned Roadside Fruit & Produce Stands

    [ By Steve in Abandoned Places & Architecture. ]

    abandoned-produce-stand-0
    Once vital threads in the fabric of Americana, these abandoned fruit & produce stands no longer entice hungry travelers into making roadside pit stops.

    abandoned-produce-stand-1a

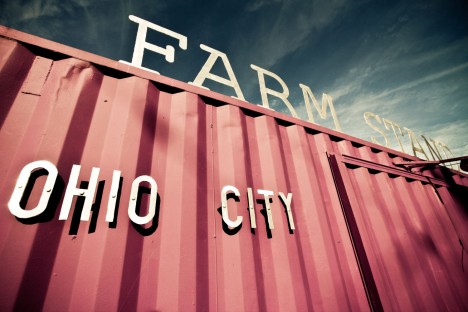
    An urban farm in a state whose rivers have been known to catch on fire? It’s more likely than you think: the six-acre Ohio City Farm in Cleveland operates between June and November though the Farm Stand only opens on weekends.

    abandoned-produce-stand-1b

    Etsy member GregMurrayPhoto and Flickr users MMW Horticulture Group and LAND studio, respectively, snapped the photos above. Gotta love that eggplant-purple, zombie-proof corrugated facade – all that’s missing is a herd of vegetarian walkers milling about in front. BROOOCCCOLIIII…

    An Apple Less

    abandoned-produce-stand-2

    North of the border, a similar unsavory situation is unfolding as Canada builds more major highways and country farms lose access to vehicular travelers – and vice-versa. The abandoned apple stand above was snapped along Highway 11 near Coulson’s Hill in northern Ontario

    Michaux Lonely

    abandoned-produce-stand-3b

    abandoned-produce-stand-3a

    Speaking of TWD, the abandoned Michaux Produce stand (and matching flatbed truck) in Goochland County, VA might have served as an alternate filming location had Georgia’s governor not vetoed a certain bill. They could call it “Michonne’s Produce”, harvested with a samurai sword while-u-wait! Kudos to Flickr user Aes D for getting up close and personal with the pleasant yet eerie scene in September of 2015.

    Sign of the Times

    abandoned-produce-stand-4

    No sign remains of this Florida roadside produce stand – er, the stand seems to be gone but the sign remains, though not for much longer by the looks of it. Flickr user Dan Optimus Prime (dvn225) captured the sorry signboard standing – barely – just outside Daytona Beach in March of 2013.

    Next Page – Click Below to Read More:
    Fruitless 10 Abandoned Roadside Fruit Produce Stands

    Share on Facebook


    [ By Steve in Abandoned Places & Architecture. ]

    [ WebUrbanist | Archives | Galleries | Privacy | TOS ]


    WebUrbanist

  • A small project: iFixit Samsung NX Mini disassembly guide

    iFixit Samsung NX Mini disassembly guide

    As far as small cameras go, the Samsung NX Mini is one of the most impressively small we’ve come across. The Mini manages to fit a 20.9MP 1″-type sensor into a super-slim body that’s just 22.5mm thick. It’s been discontinued, but when we saw iFixit post a disassembly guide for the littlest NX we just had to see what was inside. See some of the highlights from a safe distance here, and if you’re feeling adventurous head over to iFixit and find a step-by-step guide to taking the NX Mini apart.

    iFixit Samsung NX Mini disassembly guide

    After removing the battery and various screws from the battery compartment and external flash port, you’ll be ready to unscrew the lens mount. That teeny, tiny lens mount.

    Image courtesy of iFixit

    iFixit Samsung NX Mini disassembly guide

    Removing a few more screws from the bottom of the camera frees the front housing, revealing the sensor and NFC chip. Relative to the camera body, the 1″-type sensor looks pretty big.

    Image courtesy of iFixit

    iFixit Samsung NX Mini disassembly guide

    The NFC target lives on top of the battery compartment, which can be removed as seen here to reveal the motherboard underneath. The sensor cover has also been removed at this stage, giving a better view of the 20MP chip underneath. And that’s the next bit to go…

    Image courtesy of iFixit

    iFixit Samsung NX Mini disassembly guide

    A little spudger action frees the sensor module from the motherboard so it’s ready to be carefully removed.

    Image courtesy of iFixit

    iFixit Samsung NX Mini disassembly guide

    There’s one more screw to remove to disconnect the motherboard, and just above it is the Wi-Fi antenna. Of course, you’ll want to carefully disconnect the ribbon cables connected to the motherboard before it goes anywhere.

    Image courtesy of iFixit

    iFixit Samsung NX Mini disassembly guide

    This step requires some careful spudger work to release the ribbon cables…

    Image courtesy of iFixit

    iFixit Samsung NX Mini disassembly guide

    …and once those have all been removed the motherboard is free.

    Image courtesy of iFixit

    iFixit Samsung NX Mini disassembly guide

    The flash assembly is the last piece to come out of the chassis, and takes with it the Wi-Fi antenna as it’s removed.

    Image courtesy of iFixit

    iFixit Samsung NX Mini disassembly guide

    The tilting LCD twists free of the housing and there you have it – one tiny camera in lots of tiny pieces. Check out the whole guide on iFixit for the play-by-play disassembly instructions.

    Image courtesy of iFixit

    Articles: Digital Photography Review (dpreview.com)

  • 10 Tips for Photographing Wide-Angle Landscapes

    A wide-angle lens is considered an essential piece of gear for any landscape photographer because it gives you a perspective that you cannot achieve with any other lens. You’ll not only be able to photograph grand vistas, but you’ll see lines in a different way, and emphasize subjects by getting super close.

    So if you haven’t tried one yet, borrow or rent a wide angle lens and get ready to make images with a different flavour using these tips.

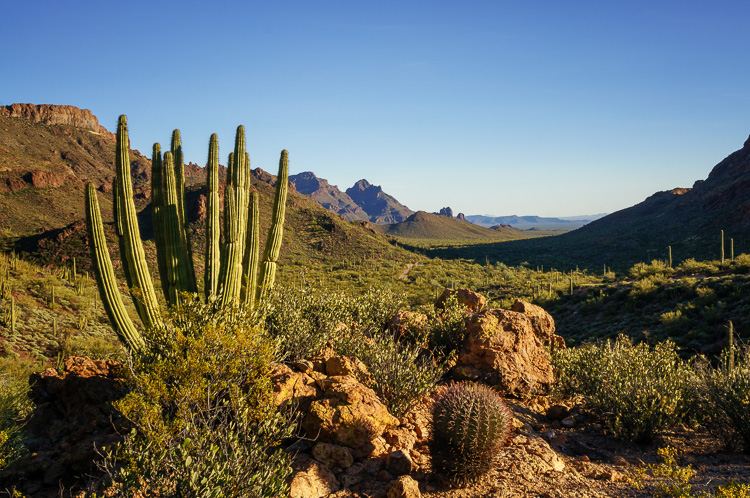
    Organ Pipe Cactus National Monument, Arizona

    21mm, ISO 100, f/18, 1/15 second

    What is a wide-angle lens?

    Camera lenses are defined by comparison to the field of view that the eye naturally sees – which is 50mm on a full frame camera or 35mm on a crop sensor camera. This is known as a normal focal length. Any wider than that is a considered wide-angle.

    My favourite wide-angle lens is in the 10-20mm range on my crop sensor camera, or 16-35mm on a full frame camera.

    When to use a wide-angle lens

    Many people think the purpose of a wide-angle lens is to photograph grand vistas and get a lot in the frame. While that is one purpose for a wide-angle lens, its real power is in using its perspective to emphasize objects that are very close to you and de-emphasizing objects that are farther away.

    1. Emphasize a foreground element

    Wide-angle lenses allow you to get really close to something in the foreground, which will emphasize it and make it look larger and more important than the background elements. A wide lens has a way of changing the relative size of the objects in the frame, so that things that are closer to the lens appear larger, and things in the background appear smaller proportionally.

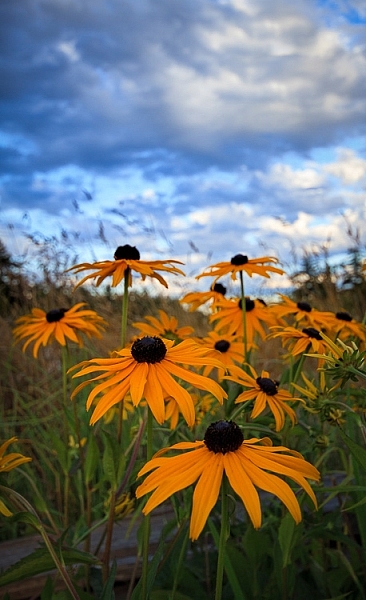
    Black Eyed Susan by Anne McKinnell

    20mm, ISO 200. f/5.6, 1/160 second

    Try using a low angle and getting very close to your main subject. By close, I mean inches away. You’ll be surprised when you look through the viewfinder and discover that objects don’t appear quite so close through the lens.

    2. Photograph your subject and its environment

    My favourite way to use the lens is to get very close to my main subject so it is large in the frame, as mentioned above, but also include other elements in its environment in the frame. This is a great way to create a story-telling image that provides context for the main subject.

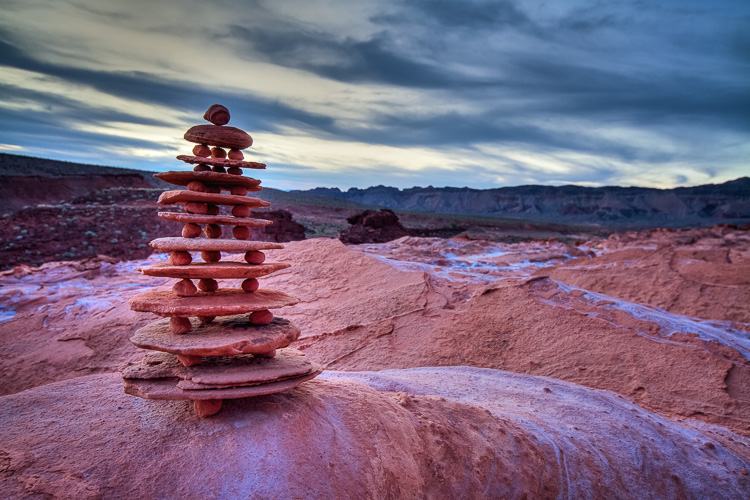
    Balancing Rocks at Little Finland, Nevada by Anne McKinnell

    16mm, ISO 200, f/8, 1.3 seconds

    3. Get everything in focus

    Another great power of a wide-angle lens is its ability to have incredible depth of field. You can get everything from two feet away to infinity in focus. Of course, this depends on the exact lens and the aperture you choose, but all wide-angle lenses have a greater ability to get more in focus than a telephoto lens (which is excellent at shallow depth of field by blurring the background). You’d be hard pressed to blur the background with a wide-angle lens.

    Whitney Pockets, Nevada by Anne McKinnell

    19mm, ISO 100, f/20, 1/20 second

    You can use a hyperfocal distance calculator to figure out exactly what will be in focus for your lens at the aperture you choose. But generally speaking, if you focus on something close to you and use a small aperture like f/18, everything from front to back will be in focus.

    4. Watch out for distractions

    Since wide-angle lenses include a lot in the frame, you’ll need to be extra vigilant to make sure there are no distractions. Everything that is in the frame should have a purpose.

    Check your composition to make sure there is nothing in the foreground that you didn’t notice, since objects just inches away from you will be in the frame. As well, check the background to make sure there you haven’t included something unintentional.

    Ideally, your composition should clearly show what the main subject is, what the supporting elements are using an interesting graphic design, and not include anything else. Simplify the composition as much as possible.

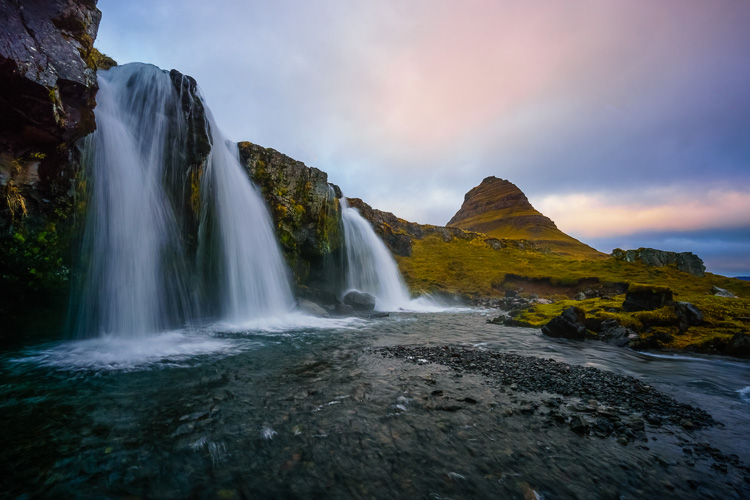
    Kirkjufellsfoss, Iceland by Anne McKinnell

    11mm, ISO 100, f/20, 1/6 second

    Because the frame contains such a wide field of view, it will have a lot in it, so it is especially important that the main subject is obvious.

    5. Keep the camera level

    Wide-angle lenses are notorious for displaying distortion around the edges. Anything with straight lines at the edges of the frame will appear to lean inwards. To avoid or minimize distortion, keep the camera level with the ground and don’t angle it up or down.

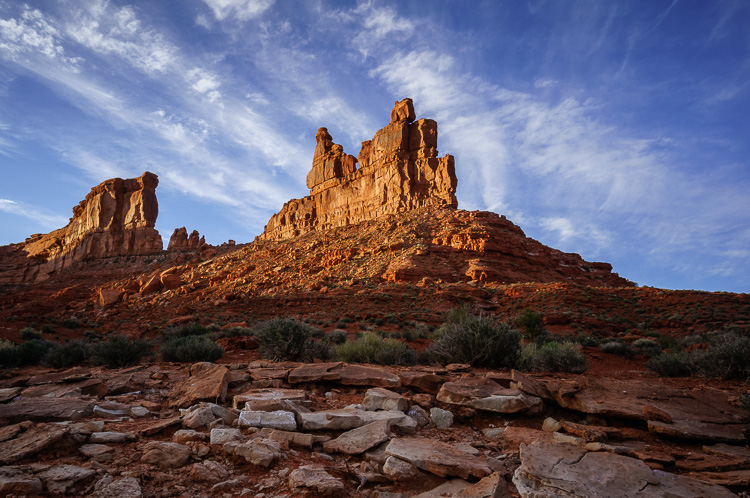
    6. Angle your camera upwards

    On the other hand, you can use this distortion to your advantage! Just make sure it is intentional and you are using it to emphasize something. For example, by angling the camera upwards you can emphasize the sky, and any clouds in it will appear to point towards the center of the frame.

    Valley of the Gods, Utah by Anne McKinnell

    15mm, ISO 100, f/11, 1/60 second

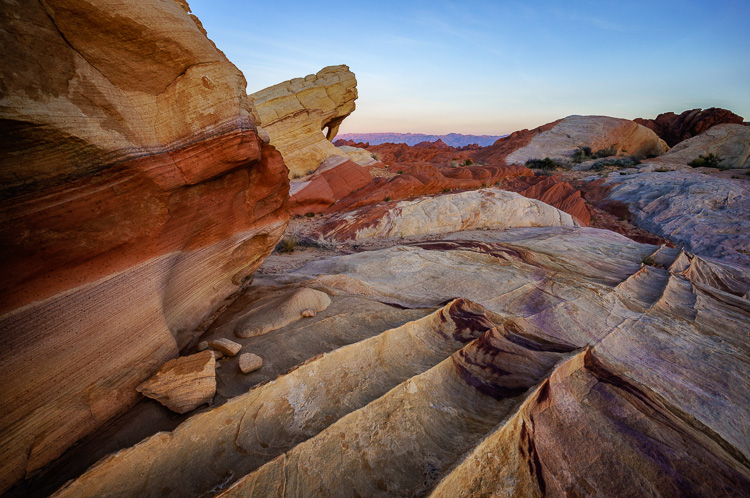
    7. Angle your camera downwards

    Similarly, if you angle your camera downwards you can emphasize leading lines on the ground and create a perspective that really draws the viewer in.

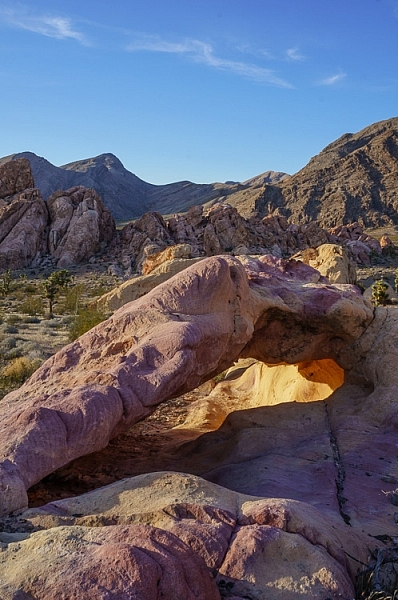
    Fire Canyon Arch in the Valley of Fire State Park, Nevada by Anne McKinnell

    10mm, ISO 200, f/11, 1/20 second

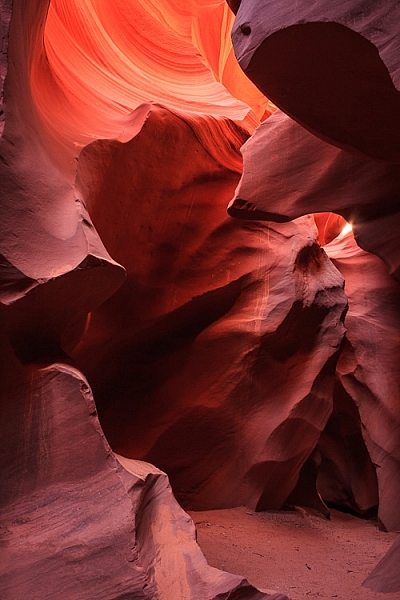
    8. Make images in close quarters

    Whenever you are in an enclosed space, making images with impact can become difficult, since you cannot get far enough away from your subject. If you are in a tight situation, a wide-angle lens is a necessity!

    Antelope Canyon, Arizona by Anne McKinnell

    21mm, ISO 100, f/11, 5.0 seconds

    9. Beware of polarizing filters

    You may already know that polarizing filters can darken skies, emphasize clouds, and saturate colours when you are photographing in a 90 degree angle to the sun. If you are photographing with the sun directly in front of you or behind you, the filter does not have this affect.

    With a wide-angle lens, you may find that part of the scene in the frame is at a 90 degree angle and is affected by the polarizing filter, and the other side is not. When this happens, it is better not to use the polarizing filter at all (it will give you an uneven sky which is darker on one side).

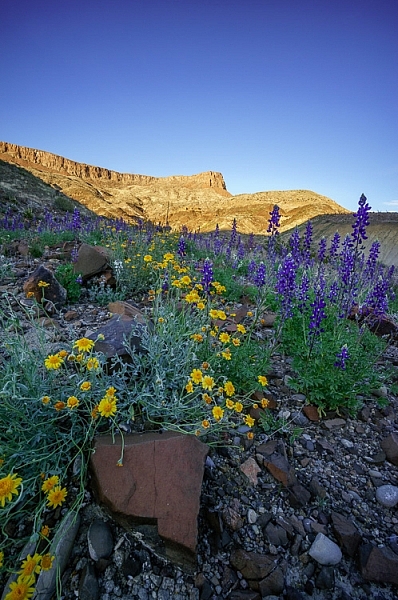
    10. Manage uneven light

    When photographing landscapes with a wide-angle lens you’ll frequently encounter varying amounts of light in the frame. Often the sky in the background is much brighter than your foreground. When this happens, you can use a graduated neutral density filter to darken the top portion of your image and even out the exposure.

    Wildflowers in Big Bend Ranch State Park, Texas by Anne McKinnell

    10mm, ISO 200, f/11, 1/100 second

    A wide-angle lens is often the favourite lens in the kit for landscape photographers and with these tips it may become your favourite lens too.

    What do you like to shoot with your wide lens? Please share your tips and images below.

    googletag.cmd.push(function() {
    tablet_slots.push( googletag.defineSlot( “/1005424/_dPSv4_tab-all-article-bottom_(300×250)”, [300, 250], “pb-ad-78623” ).addService( googletag.pubads() ) ); } );

    googletag.cmd.push(function() {
    mobile_slots.push( googletag.defineSlot( “/1005424/_dPSv4_mob-all-article-bottom_(300×250)”, [300, 250], “pb-ad-78158” ).addService( googletag.pubads() ) ); } );

    The post 10 Tips for Photographing Wide-Angle Landscapes by Anne McKinnell appeared first on Digital Photography School.


    Digital Photography School
  • How to Create a Silky Water Effect in Post-Processing without Using Filters or a Tripod

    Affiniy-photo-mean-stack-mode

    Smooth water effect edited in Affinity Photo using the Live Stacks feature.

    Even if you don’t shoot landscape photography, photos of waterfalls with the smooth water and glassy appearance are awesome. The gist to achieving this, and I do stand corrected if I have this wrong, is as follows:

    • Slow shutter speeds – the need for a tripod
    • A remote shutter release or your camera’s timer
    • Wide angle lens and the camera settings using a small aperture of f/22, ISO 100
    • Neutral Density and/or polarizer filters, as you’ll be shooting long exposures during the day
    • Of course the scene and by all accounts patience too

    However, I personally don’t own ND or polarizer filters. These type of filters are required for long exposures during the day, so that your shutter speeds are slow enough, possibly one minute or more to get that misty look. On top of which, you have to get the exposure right, which requires a bit of math and experimentation. ND filters block out the light in terms of stops.

    So taking long exposures during the day is an involved process, especially if you want to create that smooth, silky water effect in-camera. But, is there a way to simulate this effect in Photoshop or other post-processing software? Yes there is! It does require that you take multiple shots. I’m not advocating that this technique in post editing is a replacement to going out and achieving long exposures out in the field, far from it. But, I hope this technique may serve as a stepping stone or inspiration to go out and capture silky waters, clouds etc., in-camera.

    This article will demonstrate how you can achieve a similar result by taking a bunch of photos in continuous mode without using any filters or a tripod. Although, I would recommend you use a tripod.

    First, I’ll demonstrate this effect using a manual method in Photoshop CS6 (standard version). There is an automated way to do this with the Stack Mode feature, which I believe is in Photoshop CC. If you have previous versions of Photoshop, the Stack Mode feature is only available in extended versions, not standard, unfortunately. However, Gimp has this Stack Mode feature and it’s free. Then, I will compare the manual method in Photoshop with Affinity Photo, using Live Stacks. I was really impressed with this feature.

    Photoshop manual method

    Let’s begin. On the day I took these images, I was pressed for time. So I took a series of shots in continuous mode, and handheld the camera while I focused on this part of a small river. I would recommend that you use a tripod and give yourself some time. It will be easier to align the images later.

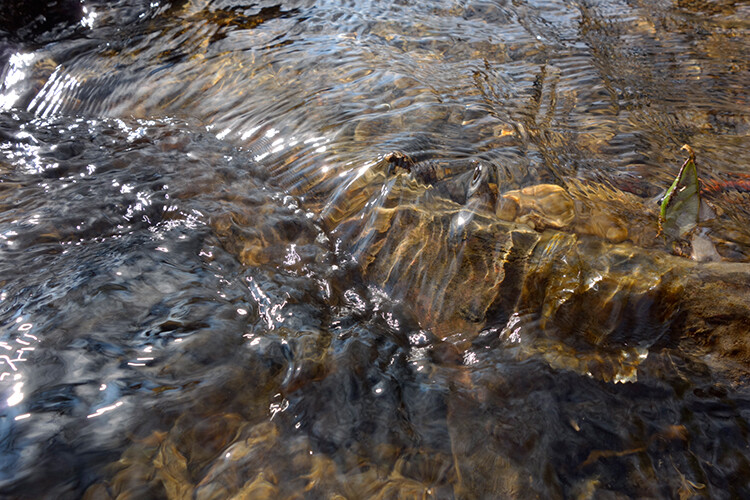
    small-river-handheld

    I took a bunch of images in continuous mode of this small river, close-up deliberately for this article.

    You will need to load your images as layers into one document in Photoshop, as follows:

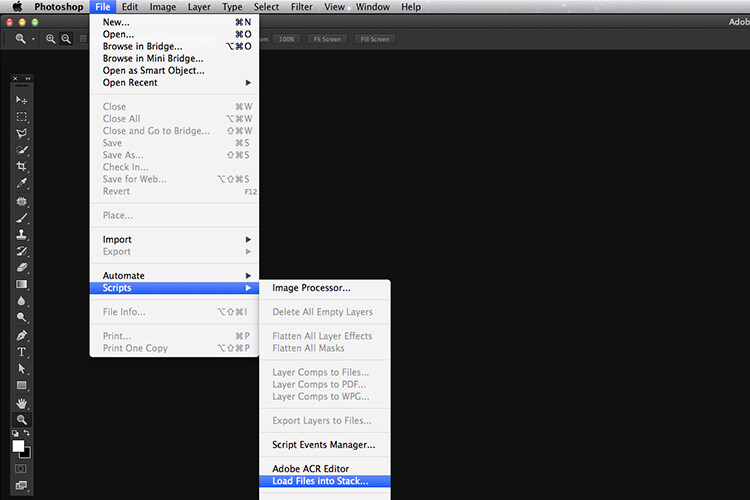
    file-scripts-load-files-into-stack

    Loading multiple images into one document in Photoshop. File>Scripts>Load Files into Stack

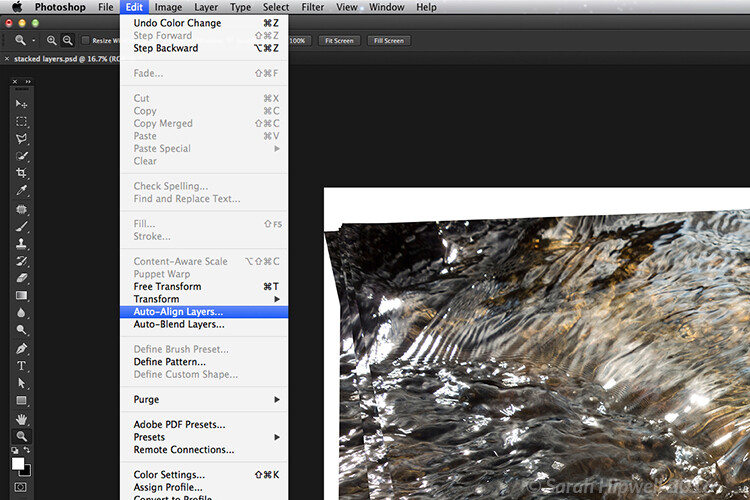
    Go up to the Menu Bar > File > Scripts > Load Files into Stack. As I didn’t use a tripod, I selected all the layers to align them. Go to Auto-Align under Edit. As you can see, Photoshop had its work cut out trying to align the images.

    images-after-auto-align-photoshop

    I handheld my camera when I took a bunch of shots in continuous mode. As you can see from this screenshot, I needed to use Auto-Align Layers in Photoshop. If you use a tripod the alignment will be much easier.

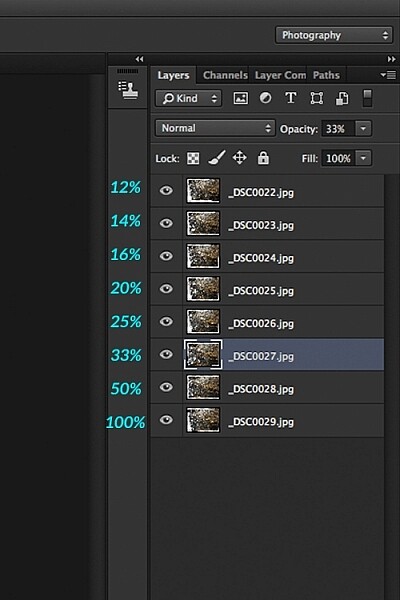
    Now that the layers are stacked on top of each other. Start at the bottom and leave this layer at 100%, go to second layer above and reduce the opacity by 50%(100÷2=50). Continue with the next layer and reduce the opacity by 33%(100÷3=33).

    percentages-opacity-reduced

    Reducing the opacity of each layer by dividing the number of the layer into 100%. The bottom layer remains at 100%. The second layer is 50% and so on.

    Therefore, depending on the amount of layers you have, and where they come in the stack, divide this number into 100. So if you had 30 images, the opacity for the top layer in the stack will be 3% (100÷30=3). Remember the bottom layer is always 1=100%. What this is doing is averaging out the layers. This may sound complicated, but in practice, it’s more straightforward. Although it is a bit more tedious than the automated way.

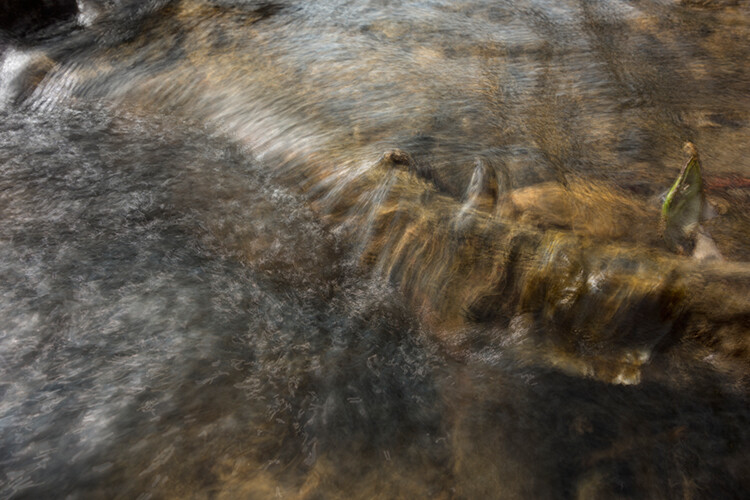
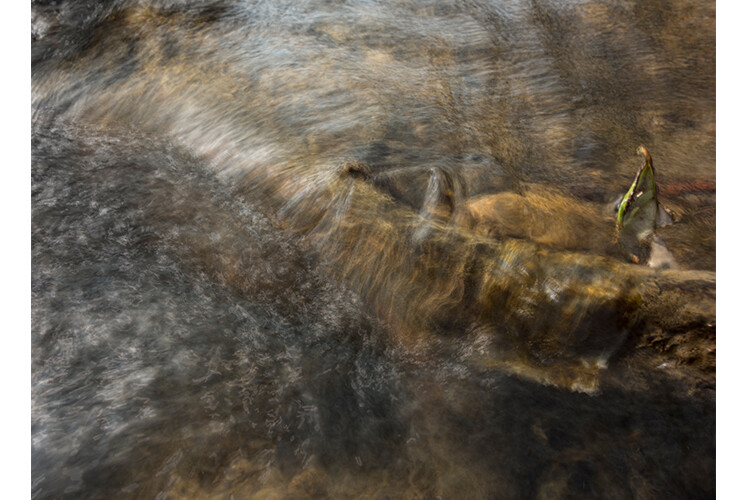
    This is the effect of averaging out the layers in Photoshop - reducing the stacked layer's opacity by X amount. I also had to crop this image, whereas the same image when edited in Affinity Photo kept more of the image. See below.

    This is the effect of averaging out the layers in Photoshop – reducing the stacked layer’s opacity by X amount. I also had to crop this image, whereas the same image when edited in Affinity Photo kept more of the image. See below.

    I have been keeping a close eye on Serif’s Affinity Photo. So I took the plunge and purchased it for (€39) $ 44 USD. That was a discounted offer. At such an affordable price, I was curious to see how this software performs and what it can do.

    In Affinity Photo, there is a Live Stacks feature which is similar to Stack Mode in Photoshop. It was easy and simple to use, and the process was fast.

    Affiniy-photo-mean-stack-mode

    Affinity-photo-new-stack

    The equivalent Stack Mode feature in Photoshop is called Live Stacks in Affinity Photo.

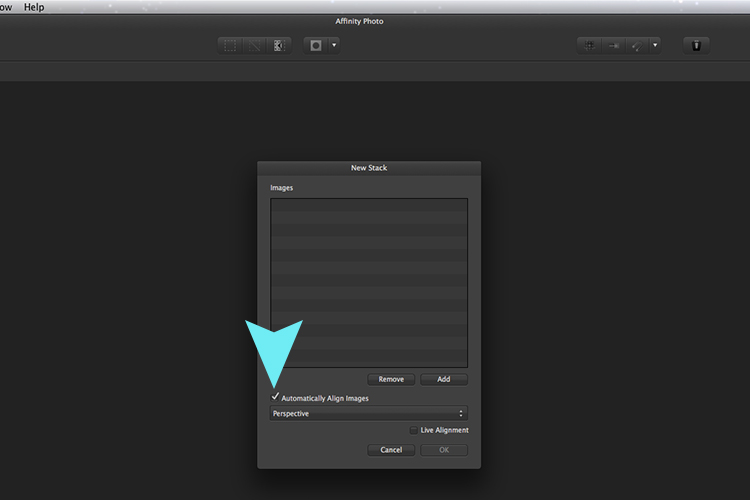
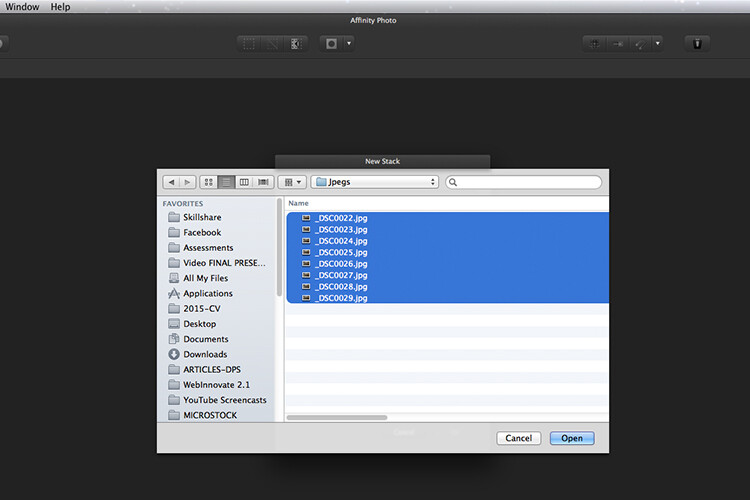
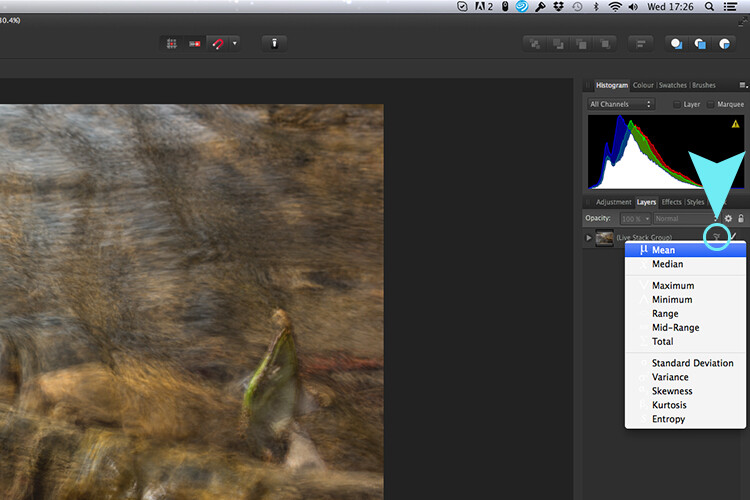
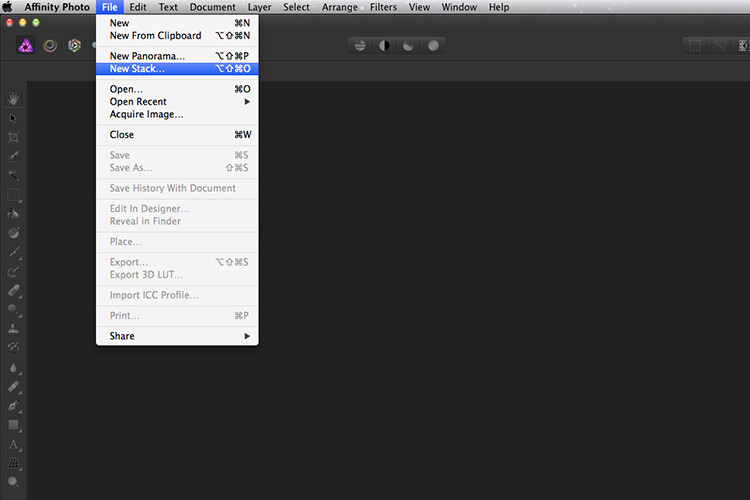
    Go to File > New Stack. The pop up dialog box appears where you select your images. Make sure Automatically Align Images box is ticked. Click Ok. This takes a couple of seconds. It defaults to Median in the Live Stack Group, but scroll up to the next one and this is Mean. That’s the one you want.

    Affinity-photo-auto-align-images

    images-selected-after-new-stack

    When you create a New Stack, the pop up dialog box appears. Select your images on your computer and click Open.

    Affinity-photo-live-stacks-mean

    The stacked images are grouped into a folder called Live Stack Group. The different stack options are located by clicking on the small icon, circled in blue. It defaults to Median but I changed it to Mean.

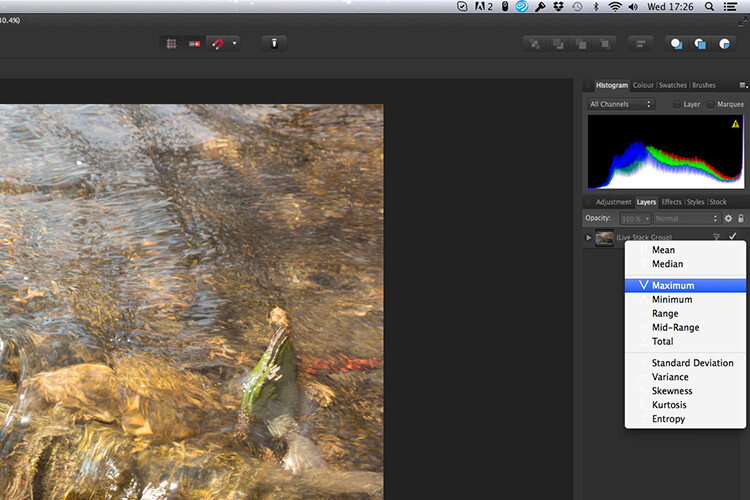
    The cool thing about this feature is when you scroll through each of the different stack modes, it shows the different results live.

    Affinity-photo-live-stacks-maximum

    Different stack options can be scrolled through one by one, and the results can be seen live, which is impressive.

    When I compared the two results from Photoshop and Affinity Photo, I could see no obvious difference, with the exception that I had to crop the image of the river more in Photoshop, whereas the auto alignment in Affinity Photo meant I didn’t lose much of the image at all.

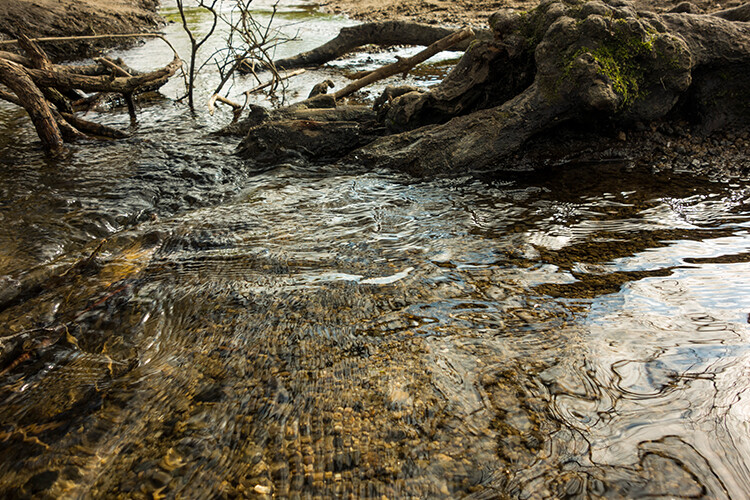
    second-river-original

    Here is another example of moving water.

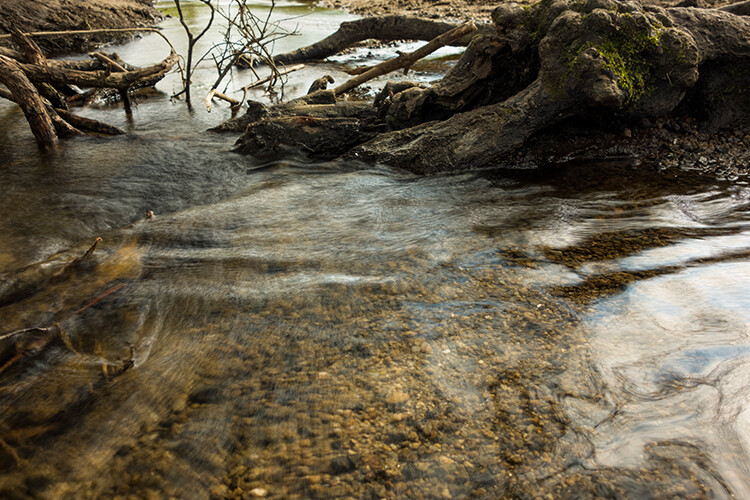
    The same image as above edited in Affinity Photo using Mean in Live Stacks. I got the same result using the manual method in Photoshop.

    The same image as above edited in Affinity Photo using Mean in Live Stacks. I got the same result using the manual method in Photoshop.

    Take away tip:

    In my examples, I didn’t use a tripod. I would recommend using one. I also took only a series of 8-10 shots. I would recommend taking at least 15 or more.

    I found this technique interesting and fun, and I am now inspired to go out and take images of waterfalls. The good thing about this technique is if you don’t have ND or polarizing filters, it doesn’t prevent you from going out and taking shots of waterfalls. Then when you get back to your computer, you can create your own silky, smooth effect.

    Let’s see some of your examples below.

    googletag.cmd.push(function() {
    tablet_slots.push( googletag.defineSlot( “/1005424/_dPSv4_tab-all-article-bottom_(300×250)”, [300, 250], “pb-ad-78623” ).addService( googletag.pubads() ) ); } );

    googletag.cmd.push(function() {
    mobile_slots.push( googletag.defineSlot( “/1005424/_dPSv4_mob-all-article-bottom_(300×250)”, [300, 250], “pb-ad-78158” ).addService( googletag.pubads() ) ); } );

    The post How to Create a Silky Water Effect in Post-Processing without Using Filters or a Tripod by Sarah Hipwell appeared first on Digital Photography School.


    Digital Photography School

  • Secret Rooms Installed in Deserted Sewers & Maintenance Shafts

    [ By WebUrbanist in Art & Installation & Sound. ]
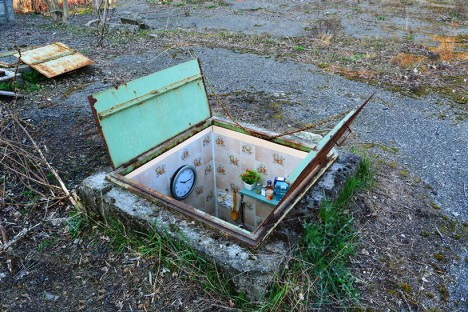
    underground art installation

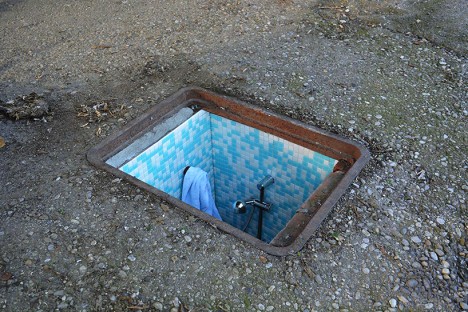
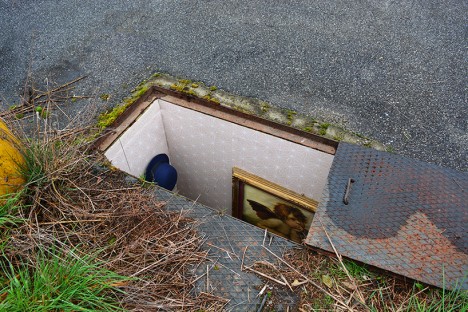
    A series of abandoned subterranean spaces in Milan have been transformed into tiny living rooms, dining rooms, bedrooms and kitchens, complete with furniture and fixtures.

    underground bathroom shower

    Designed by Italian artist Biancoshock, these small dwellings are rendered especially surreal thanks to bright colors and attention to detail. The project has a social dimension as well, inspired by the actual people forced to live in extreme spaces thanks to unfortunate circumstances, including the hundreds that live in the sewer systems of Romania or places like Las Vegas.

    underground manhole shaft room

    Whatever your own interpretation, the next time you pass a sewer grate, manhole cover or set of maintenance doors on the streets of Milan, it might be worth taking a closer look. More about the artist and his philosophy: “Ephemeralism has the purpose of producing works of art that have to exist briefly in space but limitlessly in time through the photography, the video and the media. He has realized more that 650 interventions in the streets of Italy, Croatia, Czech Republic, France, Germany, England, Hungary, Lithuania, Malesia, Malta, Norway, Poland, Portugal, Singapore, Slovak, Slovenia and Spain and he is not thinking about stopping.”

    Share on Facebook


    [ By WebUrbanist in Art & Installation & Sound. ]

    [ WebUrbanist | Archives | Galleries | Privacy | TOS ]


    WebUrbanist