Blog

  • Tamron SP 90mm F2.8 DI Macro VC USD real-world sample gallery

    Tamron’s venerable 90mm F2.8 Macro is re-born. This iteration, announced in February of this year, offers stabilization, 1:1 magnification and focusing as close as 13.9cm/5.5in. And as far as full-frame primes go, it’s on the less-expensive side at $ 650. Spring is definitely springing in Seattle, and an abundance of tulips (we’re really not kidding, there are tons of them) provided a great starting point for our real-world Tamron 90mm F2.8 sample gallery. 

    Articles: Digital Photography Review (dpreview.com)

  • House of Eternal Return: Trippy Exhibit Owned by George RR Martin

    [ By Steph in Destinations & Sights & Travel. ]

    Meow Wolf House of Eternal Return

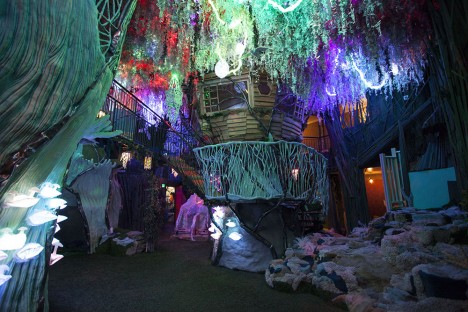
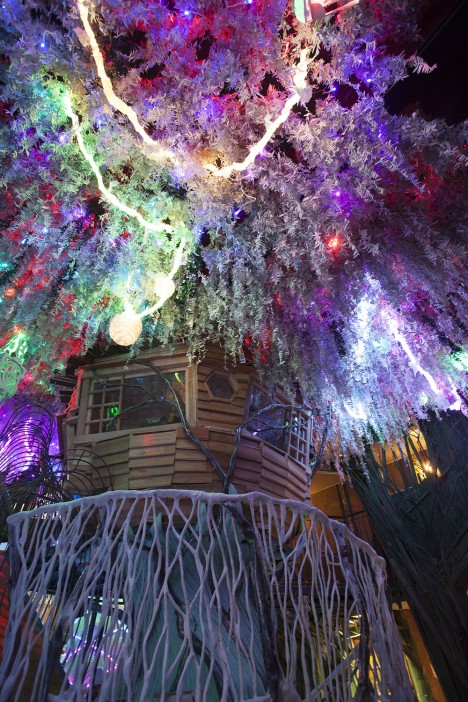
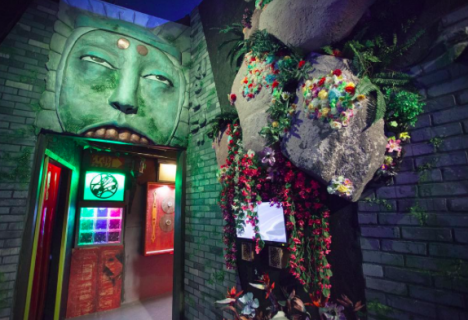
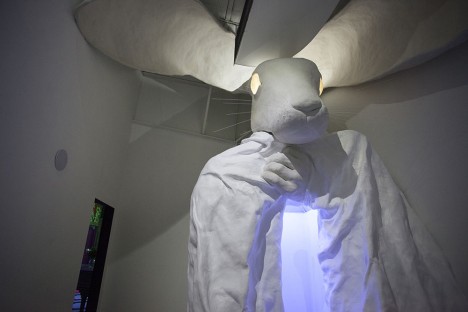
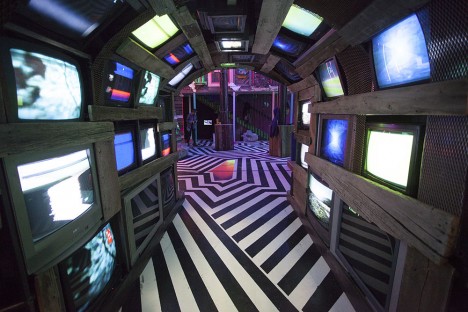
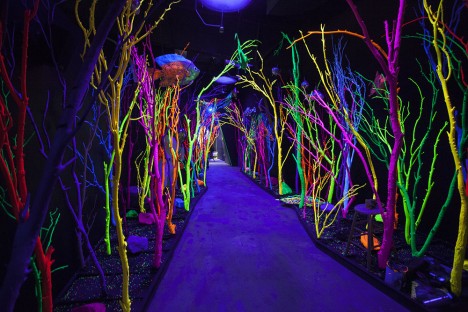
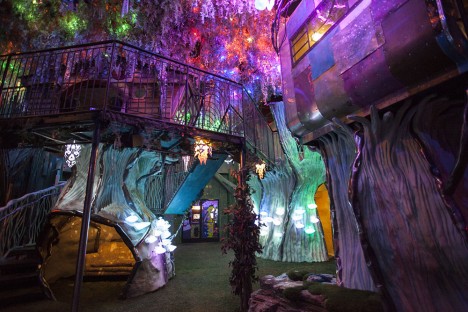
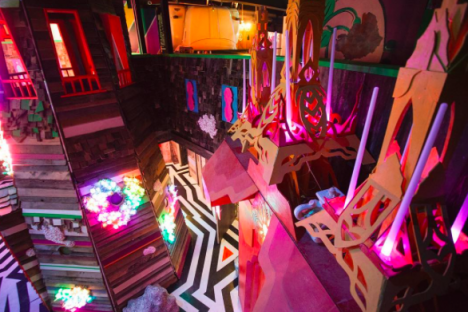
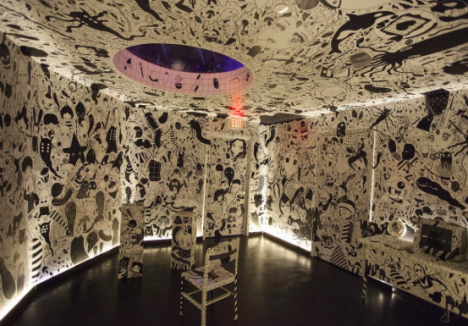
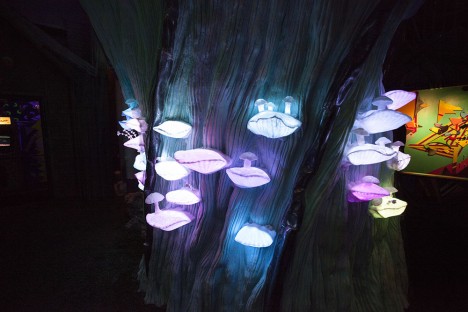
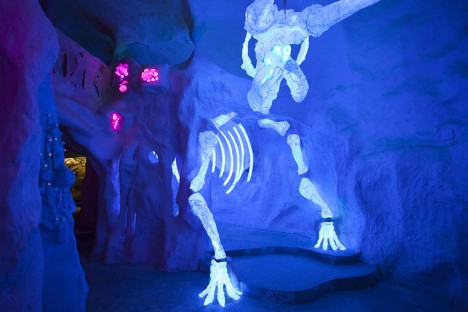
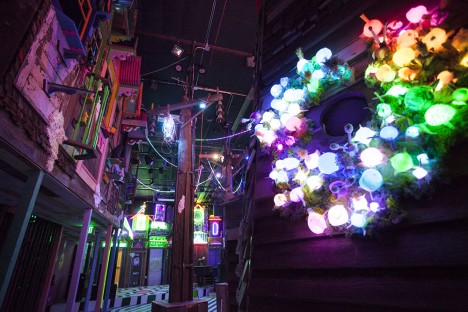
    Game of Thrones author George R.R. Martin purchased a sprawling abandoned bowling alley in Santa Fe, New Mexico so an art collective called Meow Wolf could transform it into a bizarre and colorful immersive environment called The House of Eternal Return. Step inside to find 20,000 square feet of trippy black-lit spaces you can literally get lost within, crawling into a fireplace to find an expansive new space full of surreal wonders like neon forests, alien plants and twenty-foot rabbits.

    Screen Shot 2016-04-18 at 3.43.44 PM

    house of eternal return 1

    Screen Shot 2016-04-18 at 3.44.23 PM

    house of eternal return 9

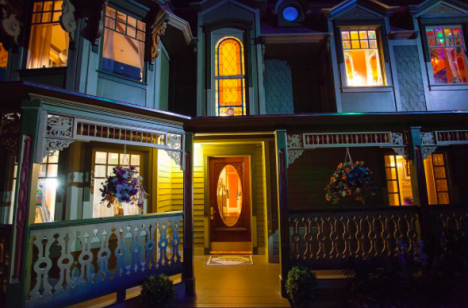
    Unlike most art installations, it’s made to be experienced physically, with strange new sights around every corner waiting for you to touch, climb, squeeze and swing your way through all of their secrets. The result of a collaboration between over 100 artists, the House of Eternal Return is a “wild new form of non-linear storytelling which unfolds through exploration, discovery and 21st century interactivity. The premise: Something has happened inside a mysterious Victorian house that has dissolved the nature of time and space. Venture through the house of the Selig family, and discover secret passageways into fantastic dimensions!”


    Meow Wolf House of Eternal Return

    house of eternal return 10

    Meow Wolf House of Eternal Return

    house of eternal return 2

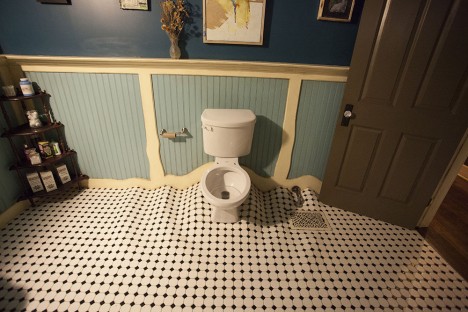
    There are no guides, maps or pathways, and you could have a different experience in the space no matter how many times you explore it. At the center of the massive facility is a full-sized Victorian house where everything’s a little bit off: floors ripple, lights come streaming out of drains, refrigerators lead to secret tunnels and even the toilets contain unexpected surprises. You may enter through the front door, but you don’t leave that way. In fact, it’s hard to tell whether you’ll ever leave.

    Screen Shot 2016-04-18 at 3.43.52 PM

    Screen Shot 2016-04-18 at 3.44.43 PM

    Meow Wolf House of Eternal Return

    Meow Wolf House of Eternal Return

    Meow Wolf House of Eternal Return

    A team of six writers created the story elements, taking cues from the objects the various participating artists produced for the installation. In addition to this art exhibit turned fantasy world, there’s a jungle gym, a children’s museum and a music venue hosting such acts as CocoRosie and Mykki Blanco. Martin has granted Meow Wolf with a ten-year lease to do whatever they want with the space, so there’s plenty of time to plan a road trip to check it out. In the meantime, check out all the photos on Meow World’s Instagram.

    Share on Facebook


    [ By Steph in Destinations & Sights & Travel. ]

    [ WebUrbanist | Archives | Galleries | Privacy | TOS ]


    WebUrbanist

  • Fujifilm X70 Review

    The Fujifilm X70 is fixed-lens APS-C compact camera with a 16.3MP X-Trans sensor and a 18.5mm (28mm field of view equivalent) F2.8 Fujinon lens. It shares many design elements and some specifications with Fujifilm’s popular X100-series, but omits their hybrid optical/electronic viewfinder – or indeed any kind of built-in viewfinder at all. Instead, the X70’s user interface employs a Fujifilm first: a touchscreen. And a tilting one, at that.

    What the X70 does share with the X100 lineup is a metal chassis adorned with dials upon dials, putting camera settings exactly where you left them every time. It’s a setup that any vintage camera user can appreciate, but one that still makes sense in the digital age. It also represents a completely different approach to this camera’s closest competitor, the venerable Ricoh GR (II)*.

    Let’s see what else the X70 brings to the market:

    Fujifilm X70 Features:

    • 16.3MP X-Trans CMOS II APS-C sensor
    • Fixed Fujinon 28mm equiv. F2.8 lens
    • 77-point hybrid autofocus system (49 PDAF+CDAF points, plus 28 CDAF)
    • 3″ tilting 1.04M dot touchscreen LCD
    • Abundant physical controls, including shutter speed, aperture and exposure compensation
    • All-metal build
    • Both mechanical (leaf) and electronic shutter
    • Digital 35mm and 50mm teleconverter with upscaling to full-resolution
    • Wi-Fi

    The fixed-lens 28mm camera segment already has quite a few current and defunct members, including the Nikon Coolpix A, Ricoh GR II, Sigma DP1Q and Leica Q. Still, the Fuji has plenty going for it. Of these cameras, the closest competitor is definitely the Ricoh GR II. Let’s take a look at its specs against the X70:

      Fujfilm X70 Ricoh GR II
     Effective pixels 16 megapixels 16 megapixels
     ISO Auto, 200-6400 (expandable to 100-51200) Auto, 100-25600
     Aperture F2.8 – F16.0  F2.8 – F16.0
     Autofocus Modes
    • Contrast Detect (sensor)
    • Phase Detect
    • Multi-area
    • Center
    • Selective single-point
    • Tracking
    • Single
    • Continuous
    • Touch
    • Face Detection
    • Live View
    • Contrast Detect (sensor)
    • Multi-area
    • Center
    • Selective single-point
    • Tracking
    • Single
    • Continuous
    • Face Detection
    • Live View
     Focus Range 10 cm (3.94″) 30 cm (11.81″)
    Macro mode: 10 cm (3.94″)
     Rear Screen Tilting

    Fixed

     Battery Life (CIPA) 330 320
     Weight (inc. batteries) 340 g (0.75 lb / 11.99 oz)
    251 g (0.55 lb / 8.85 oz)
     Dimensions 113 x 64 x 44 mm (4.45 x 2.52 x 1.73?)

    117 x 63 x 35 mm (4.61 x 2.48 x 1.38?

    The X70 and GR II offer very similar feature sets. Both use 16MP APS-C sensors, but the GR is able to beat out the Fujifilm in both size and mass, although that doesn’t suddenly make the Fujifilm big. In fact, they’re almost the same size.

    The similarities to the Ricoh GR II are almost uncanny.

    So is the X70 a travel camera? A landscaper’s lightweight companion? A street shooter’s delight? Come with us to look deeper in to the X70 and to find out just how it fits in (and stands out) in this corner of the market.

    * We put the (II) in parentheses because the main hardware differentiation between the 3 year-old Ricoh GR and last year’s GR II is the addition of Wi-Fi. The lens, AF, and sensor all remain the same.

    Articles: Digital Photography Review (dpreview.com)

  • How to Choose the Right Digital Camera for a Specific Type of Photography

    Are you overwhelmed with the many digital camera options available in the market? This article will help you determine the right camera for your specific photography need. Whether it’s portrait, landscape, travel, sports and adventure, or aerial photography that you want to get into, you can’t just settle for the most popular. So before you go checking out what the Continue Reading

    The post How to Choose the Right Digital Camera for a Specific Type of Photography appeared first on Photodoto.


    Photodoto

  • Lexar offers microSD dongle with an Apple Lightning connector

    Lexar has launched a microSD-to-Apple Lightning reader for transferring files from a media card directly to an iPhone or iPad. The dongle works in conjunction with an iOS file management app, and is designed to make file transfers possible from other devices, whether a camera, drone, or another phone at fast speeds via a wired connection.

    “Users no longer need to wait until they’re back in front of their main computer at home or in the office to upload content captured on-the-go,’ said Lexar product marketing manager Steffi Ho. According to the company, the card reader’s Lightning connector can fit in ‘most iOS cases.’

    The microSD reader is priced at $ 41.99; though it officially launched for purchase today, Lexar’s website still lists it as ‘coming soon.’


    Press release:

    New Lexar microSD Reader with Lightening Connector Allows for Rapid Transfer and Easy Offload of Content for On-the-Go Users   

    Reader Designed for Management of Video and Photo Content from Sports and Aerial Cameras to the Latest iOS Devices

    MILPITAS, Calif., April 14, 2016 (GLOBE NEWSWIRE) — Lexar, a leading global brand of flash memory products, today announced the Lexar® microSD™ Reader, allowing users to easily offload content from their sports camcorder or aerial camera to an iPhone® or iPad®. The small, portable reader features a Lightning® connector for quick transfer of files on the go, allowing users to view and playback photos and videos on their Apple device*. It also works with an easy-to-use and free file management app on the App Store®.**

    “Users who are looking to capture more content in real time while on the move can find it challenging to manage that content, especially in an iOS device,” said Steffi Ho, product marketing manager, Lexar. “Shooters can now take advantage of the large screens and connectivity of their iOS devices by editing and uploading content captured on their action sports and aerial cameras wirelessly. Users no longer need to wait until they’re back in front of their main computer at home or in the office to upload content captured on-the-go.”

    The new microSD Reader also allows users to offload files and store more on the card, creating more device space to capture content on the go. It also provides an easy way to move files from Android™ or other microSD-based device to an iPhone or iPad, and swap content between iOS devices. It has a small, portable design that makes it easy to take on the go, and its Lightning connector fits with most iOS cases, providing simple plug-and-play functionality. Furthermore, the microSD reader works with a free file management app on the App Store, allowing users to back up files when connected.

    All Lexar product designs undergo extensive testing in the Lexar Quality Labs, facilities with more than 1,100 digital devices, to ensure performance, quality, compatibility, and reliability. The new microSD Reader is available for purchase in April 18, 2016 with an MSRP of $ 41.99, and includes a one-year limited warranty. For more information about Lexar products, visit www.lexar.com.

    *Files supported: Music—MP3/CAF/ACC/AIF/WAV/AIFF/M4A. Video—AVI/FLV/MP4/MOV/M4V/MKV/MPG/RM/RMVB/WMV.

    ** App required for product use.

    Articles: Digital Photography Review (dpreview.com)

  • Huawei P9 Leica-branded dual-cam made by Sunny Optical

    The Huawei P9’s camera may bear Leica’s name, but the innovative dual-cam module comes from Sunny Optical Technology of China. Read more

    Articles: Digital Photography Review (dpreview.com)

  • How to do Light Painting Photography Art with Endless Possibilities

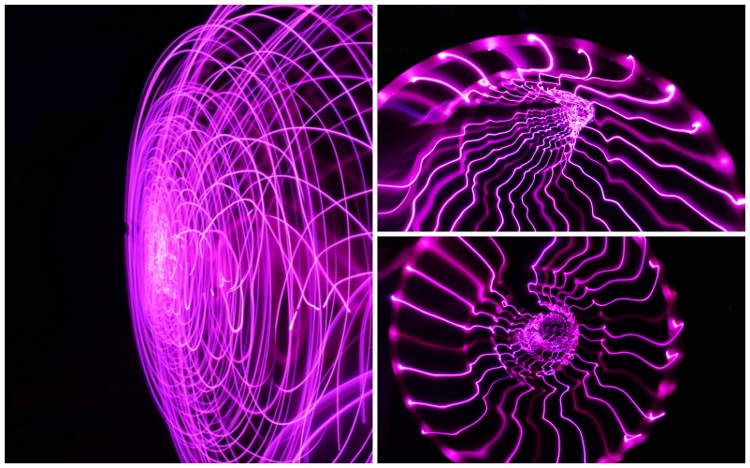
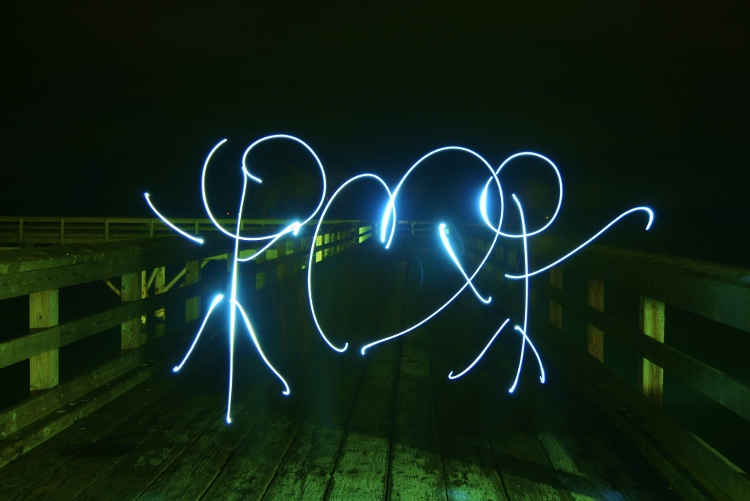
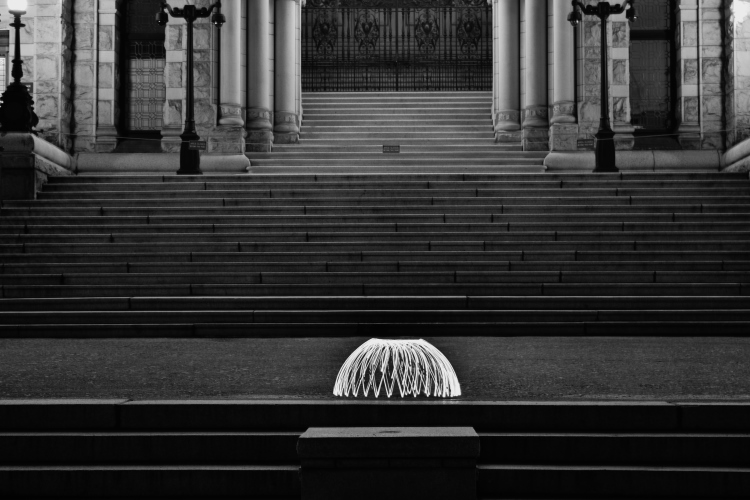
    Wikipedia defines light painting as “A photographic technique in which exposures are made by moving a hand-held light source while taking a long exposure photograph, either to illuminate a subject or to shine a point of light directly at the camera.” In essence, with a basic DSLR, a tripod, and a light source of some kind, you have endless possibilities to create unique images. This technique is a way to unleash your imagination and inner artist – this article will show you how to do it.

    Photo 7c (750x501)

    When I realized this artistry had endless possibilities and creativity, I was in. Who wouldn’t be, right? Light painting always amazes me as to how you can create beautiful photos by simply capturing light. I started doing light painting for fun, but then it became a very therapeutic regime for me. If I was having a tough or bad day I would grab my gear, wait for it to get dark, and start painting.

    Some basics before you begin:

    • You don’t need any fancy equipment.
    • Wear dark clothes if you don’t want to be seen in the image.
    • Typical camera settings for long exposure light painting are: Manual Mode, aperture f/3.5-5.6, exposure 10-30 seconds, ISO 100-125, lens 18-55mm.
    • Bring a friend. While you can do light painting solo (and I often do), it’s a lot more fun with a buddy.

    Beginner DIY light painting tools you can make

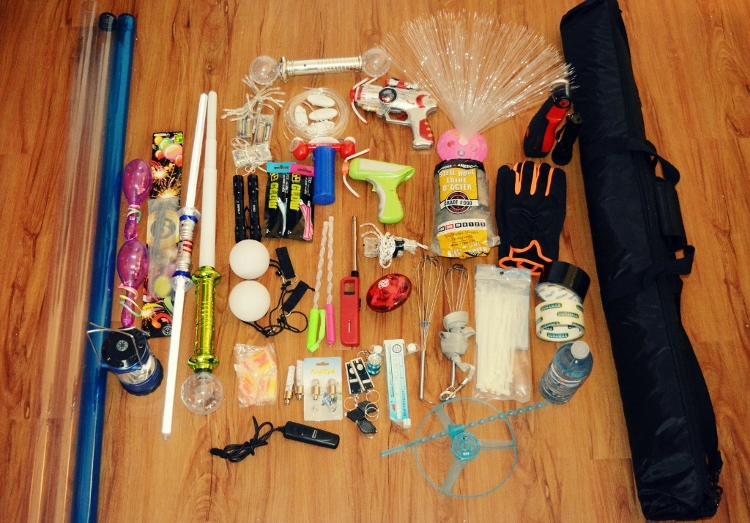
    I bought all of my supplies from the dollar store, ebay, or home depot. In my kit, I currently have:

    • Basic DSLR + wireless remote (optional) + tripod
    • Flashlights (all different sizes)
    • Mini keychain flashlights
    • Glow sticks
    • LED battery operated fairy lights (variety of colors)
    • Hoola-hoops (regular and small)
    • Sparklers (variety of sizes) + a lighter
    • Steel wool kit (wire whisk, dog leash, gloves, lighter, steel wool grade #000)
    • A variety of light sabres and flashing rave toys

    Photo 1 750x523

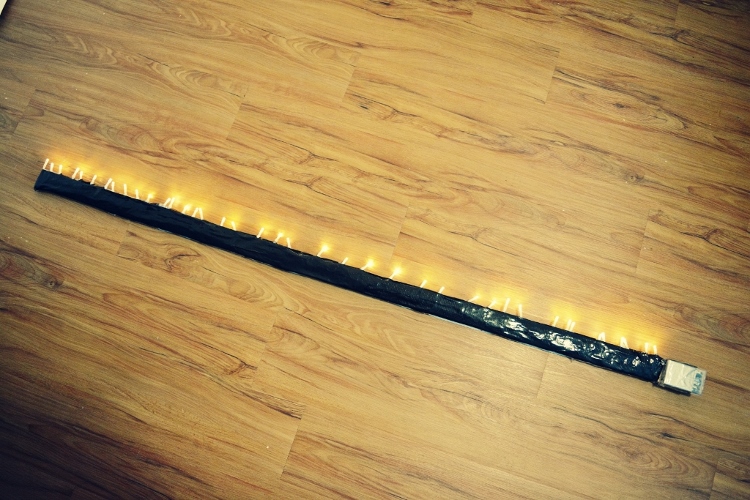
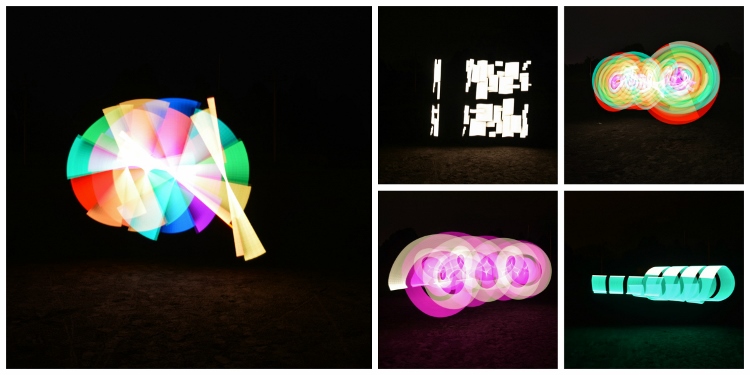
    The first two tools that I ever made were a light stick and a light hoola-hoop. They both serve me well. For the light stick you need a piece of wood (any size you want, mine is 57×2″), tape, and one string of battery operated fairy lights.

    Lay out your lights next to your piece of wood and tape them on. Viola! A home-made light stick. If you use white lights, you can tint your photo with your basic windows photo gallery editor. I have two, one with white lights and one with multi-colored lights.

    Photo 2 750x500

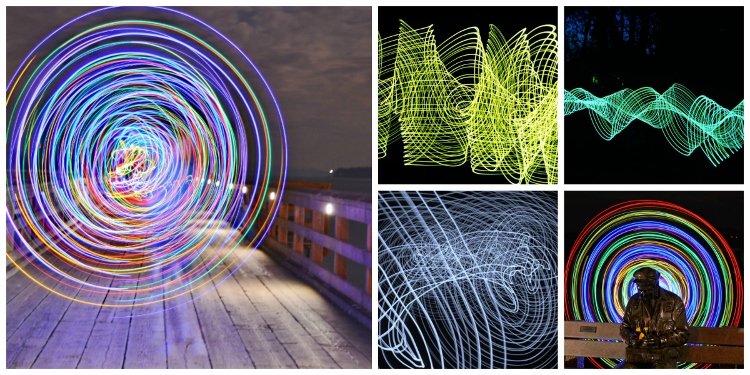
    Here are some of my top photos using just a light stick.

    Photo 3 750x375

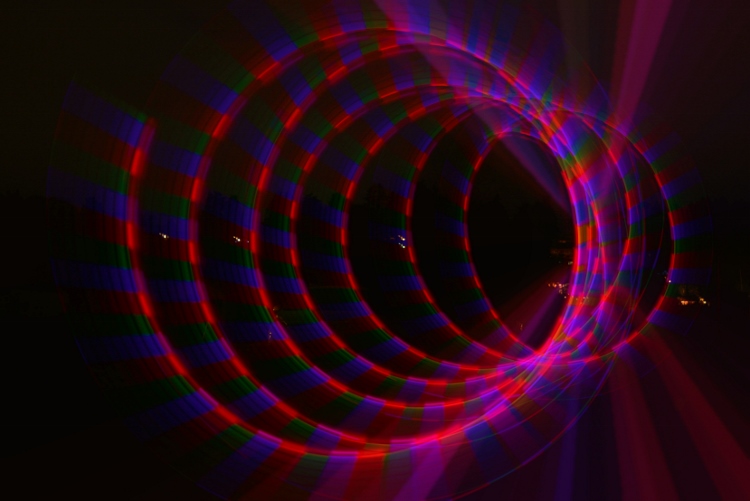
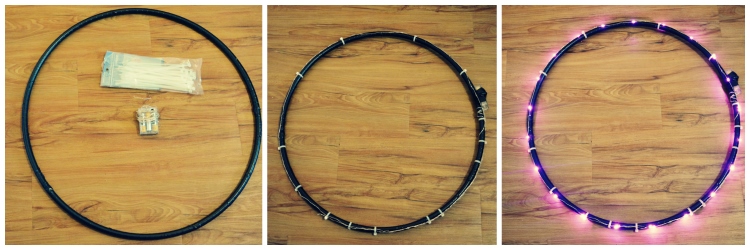
    For the second tool I made, the light hoola hoop you need: a hoop, one string of battery operated fairy lights (approximately eight feet long or less, depending on how big your hoop is) and some tape or zip ties. Tape or zip tie your lights around your hoola-hoop. Bam!

    Photo 4a 750x250

    Photo 4b 750x468

    Advanced light painting tools (The Pixelstick)

    For those of you who have had experience with light painting, you might be asking, what’s next? Well, that’s where the Pixel Stick from Bitbanger Labs comes in. I recently purchased one on sale from Photojojo.com (thank you Boxing Day sales!).

    Each one of pixelstick’s 200 LEDs acts like a pixel on a screen, displaying your image one vertical line at a time as you walk. These vertical lines, when captured by a long exposure, combine to recreate your image in mid-air leaving pixelstick (and the person using it) invisible. – according to Bitbanger Labs.

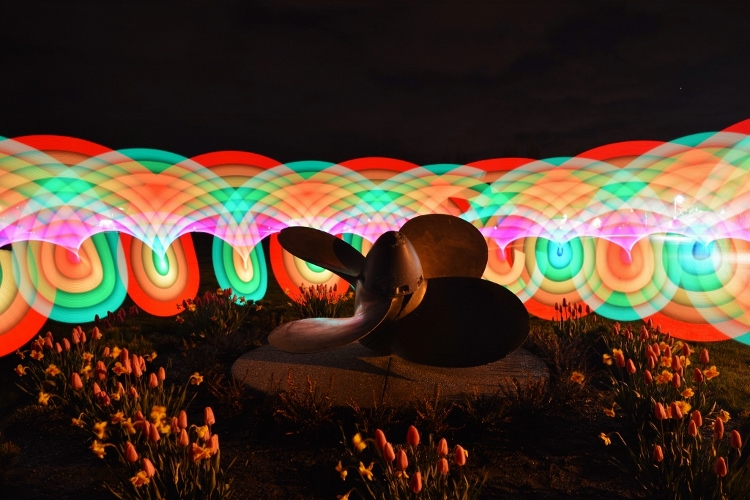
    Let’s just say, it’s the ultimate light painting artist’s tool. It takes a bit of practice to get used to, but once you have, you can create some pretty incredible photos. Here are a few of my favorite pictures that I was able to do with the pixelstick.

    Photo 5 750x375

    Ideas for light painting from abstract to using your city as inspiration

    You can pretty much light paint anywhere however, please be respectful of your environment. Never damage, negatively impact, or harm a location in pursuit of light painting.

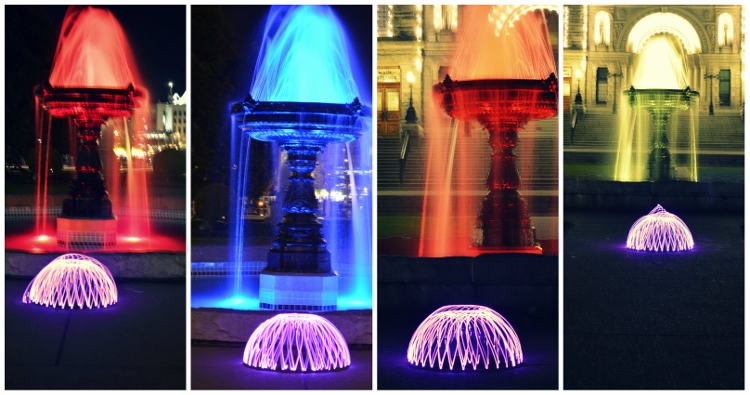
    Having the right background or location can give your picture the right ambience, and add some dimension and feel to your photo. My preference is to use a black background most times so I usually find an empty dark field, but sometimes it’s nice to incorporate your surroundings.

    Photo 6 750x395

    Photo 7a

    Photo 7b
    Photo 7d

    Photo 8 750x500

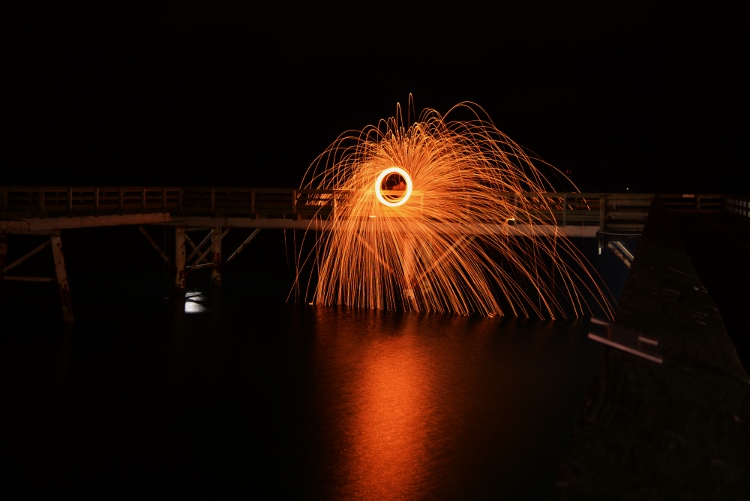
    As you can see in this photo, I used a local anchor to center my picture around.

    Inspiring light painting artists

    When I was getting into the light painting community, I came across some great resources and artists that you may not know about.

    • Light Painting World Alliance
    • Light Painting Photography
    • Rob Tourney Visuals
    • Darius Twin
    • Denis Smith creator of the ball of light

    So now that you know about light painting photography why not go out there and create some unique images yourself? Up for the challenge?

    See more light painting articles here on dPS:

    • How to Make Unique Portraits Using Light Painting
    • Beginner’s Guide to Light Painting
    • Light Painting Part One – the Photography
    • Light Painting Part Two – Photoshop
    • How to Build an LED Light and Make an Orb
    • Fire Spinning with Steel Wool – A Special Effects Tutorial

    googletag.cmd.push(function() {
    tablet_slots.push( googletag.defineSlot( “/1005424/_dPSv4_tab-all-article-bottom_(300×250)”, [300, 250], “pb-ad-78623” ).addService( googletag.pubads() ) ); } );

    googletag.cmd.push(function() {
    mobile_slots.push( googletag.defineSlot( “/1005424/_dPSv4_mob-all-article-bottom_(300×250)”, [300, 250], “pb-ad-78158” ).addService( googletag.pubads() ) ); } );

    The post How to do Light Painting Photography Art with Endless Possibilities by Jennifer Dowd appeared first on Digital Photography School.


    Digital Photography School

  • Phottix launches Cerberus adapter for using hotshoe flashes in Bowens and Elinchrom studio head modifiers

    Flash manufacturer Phottix has launched a new adapter that is designed to allow hotshoe flash units to be used with standard studio accessories, such as softboxes, umbrellas and snoots. The Cerberus consists of a universal grip that holds the flash directly in the middle of an adapter ring that can be used to attach existing studio flash accessories in the Bowens S, Elinchrom and the Phottix Transfolder softbox range. The idea is that if users already have studio light modifiers they can use them with their hotshoe guns instead of having to buy accessories dedicated to smaller units.

    The clamp used is the Phottix Griffin, which has a pair of spring-loaded jaws that close around the head of the flash unit, leaving the hotshoe free for remote triggers. The clamp is attached to a mounting bracket that can be fitted with the adapter ring to suit the mount of the modifiers you want to use. The unit is called Cerberus after the three-headed hound of Hades from Greek mythology because its interchangeable mount can accept modifiers in three different fittings.

    The kit comes with a Phottix Varos Pro BG jointed Umbrella Adapter that is used to mount the whole kit on to a lighting stand or tripod. The Phottix Cerberus multi-mount kit, which includes the Bowens and Elinchrom rings, costs $ 92.50. For more information visit the Phottix website.


    Manufacturer’s dramatic product video:

    Press release:

    Meet the Phottix Cerberus Flash Mount

    There’s a new mounting system in town – the Phottix Cerberus Multi Mount.

    The Phottix Cerberus Multi Mount is your all-in-one mounting solution for hot shoe flashes. Use your hot shoe flashes with Bowens-compatible accessories, Elinchrom-compatible accessories, and the Phottix Transfolder Softbox range.

    The Cerberus system comes with:

    • Phottix Griffin with Phottix Easy-Folder-Compatible Mount and Phottix Varos Pro BG *
    • Cerberus Elinchrom-Compatible Mount
    • Cerberus Bowens-Compatible Mount
    • Cerberus Phottix Transfolder-Compatible Mount

    Like the mythical Cerberus, the Phottix Cerberus Multi Mount has three heads. The standard round mount works with the range of Phottix Transfolder Softboxes. Add the Bowen-compatible mount – and traditional S-Mount compatible accessories can be used with your hot shoe flash. Swap that out for the Elinchrom-compatible mount and use Elinchrom’s vast array of accessories with your hot shoe flash.

    The durable and patented Phottix Griffin Universal Flash Mount holds many popular hot shoe flash models secure in a synthetic-lined spring-loaded clamp. The system was designed to be both durable and easy to use. A Phottix Varos Pro BG Umbrella Adapter is included to mount the Phottix Cerberus Multi Mount to a light stand or boom. The Phottiax Griffin is available on its own as well as being included with the Cerberus Multi Mount set.

    Several configurations of the Phottix Cerberus are avaialble. Talk to you local Phottix dealer or buy from the Phottix Online Store.

    * Note: The Phottix Griffin Mount with this set is affixed to the Phottix Cerberus Softbox Mount and cannot be removed. Varos Pro BG does not come with metal Coldshoe and male 3/8” and ¼ “ screw.

    Articles: Digital Photography Review (dpreview.com)

  • Buildings in Motion: 15 Most Mesmerizing Architecture Gifs

    [ By Steph in Art & Drawing & Digital & Photography & Video. ]

    architecture gif stampa 2

    Architecture spins, zooms, slides, grows, shrinks and blooms like oversized artificial flowers in animated GIF form, with the effects originating from both fantasy motions that the real-life buildings don’t actually perform and functional movable parts. With these graphics we see architecture from a new perspective as it seems to take on a life of its own – and while watching elements of a building click into place from the sky like a game of Tetris is satisfying, it’s also really cool to see how transforming elements of real buildings work, like a massive sliding metal roof that covers or uncovers an all-glass house at the push of a button.

    M.C. Escher and the Droste Effect

    architecture gif escher

    M.C. Escher’s drawing of a landscape. spotted inside a window (Prentententoonstelling or ‘Print Gallery’, 1956), serves as the basis of this Droste effect gif. The artist used a mathematical grid to create the twisted perspective in the original drawing, and then researchers at Leiden University reproduced it on a computer, adjusted the perspective and applied the zooming effect.

    Rapid Perspective Shift
    architecture gif perspective shift

    This somewhat disorienting gif gives us an idea of what it would be like to zoom through a city in a flying car, quickly shifting our perspective of a single building’s corner several times.

    8 Animated Architectural Images by Axel de Stampa

    architecture gif stampa 4

    architecture gif stampa 5

    architecture gif stampa 6

    architecture gif stampa 7

    architecture gif stampa 9

    architecture gif stampa 1

    architecture gif stampa 2

    architecture gif stampa 3

    A series of structures by famous architecture firms like MVRDV and Herzog de Meuron come to life in these gifs by Paris-based architects Axel de Stampa and Sylvain Macaux. The Mirador Buidling by the former zooms into place on the ground like a life-sized game of Tetris, while the randomly stacked levels of the latter’s Vitra House appear and disappear. ‘Architecture Animée’ adds a fourth dimension to architecture by quickly applying changes that normally would only be seen with the passage of time.

    Sliding Pergolas House
    architecture gif pergolas house

    We get to see just how the star feature of the ‘Sliding Pergolas House’ in Brazil by FGMF Arquitetos works in this fun gif. The movable roof elements make it possible to shelter some areas of the spacious courtyard while letting sun stream into others.

    Next Page – Click Below to Read More:
    Buildings In Motion 15 Most Mesmerizing Architecture Gifs

    Share on Facebook


    [ By Steph in Art & Drawing & Digital & Photography & Video. ]

    [ WebUrbanist | Archives | Galleries | Privacy | TOS ]


    WebUrbanist

  • 4 Steps on How to Read Images and Learn to Replicate the Results

    Earlier, I wrote an article called: why asking what camera settings were used may not be as helpful as you think, and in it, I touched on the concept of reading an image.

    Learning to read images – from a technical perspective and not a conceptual one – is something that I believe all photographers must be able to do, as it allows you to get a rough guide on what settings may have been used to create an image. They won’t be the exact settings; but you’re most likely not going to have the exact same lighting environment as what a particular photo was taken in.

    Shallow Apeture 1

    A wide aperture was used her to achieve a shallow depth of field.

    Dive in to read an image

    To begin reading images you must have, at the very least, a good understanding of aperture, shutter speed and to a lesser extent, ISO. You’ll want to understand how these things affect the image in different ways. For example, if you saw an image with a lot of motion blur, you would know from your understanding of shutter speed that a slower shutter speed was used.

    As you become more proficient with lighting and off-camera flash, you can even read how the subject was lit with artificial lighting, and begin to replicate how it was done. But don’t worry! This article will be focussing on the three major aspects of photography exposure (aperture, shutter speed and ISO) to help you begin your journey to reading images.
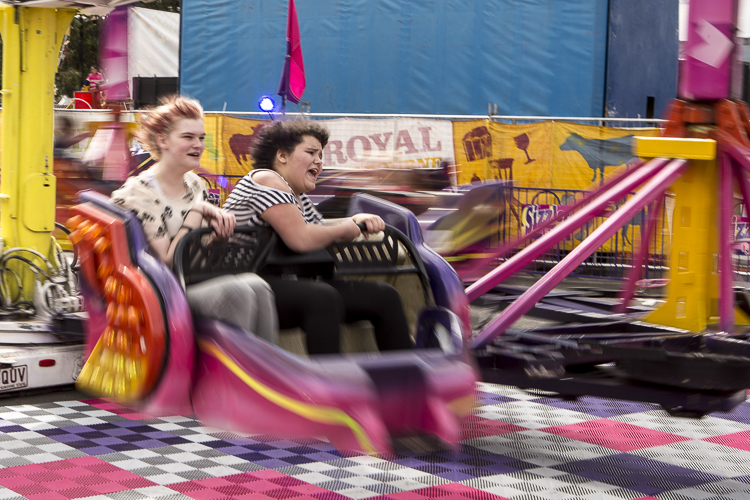
    Slow Shutter 2

    What shutter speed was used here – a fast or slow one?

    Step 1: Shutter Speed – Fast or Slow?

    I find that determining whether a fast or slow shutter speed was used first, can help greatly when it comes to determining aperture and ISO later. The first thing you will want to ask yourself when assessing shutter speed is; was it fast or slow? This can be decided by how much, or how little, motion blur is present in the image, as that is what shutter speed controls.

    If everything in the image is pin sharp, and there is absolutely no motion blur at all, then a fast shutter speed would have been used. However, if there is a lot of motion blur, then a slow shutter speed was used.
    Here are some points that you can take out of knowing if the shutter speed is fast or slow:
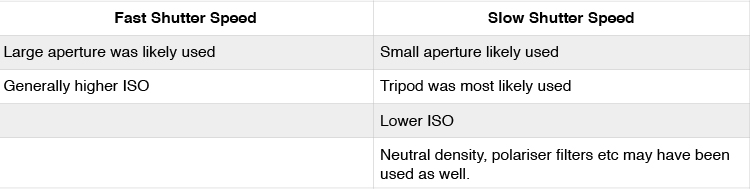
    Shutter Speed Table

    But how fast is a fast shutter speed, and at what point does the shutter speed become slow? To answer this, think of your shutter speed in relation to your subject’s speed. For example, when photographing sports or other fast action, you may find using a shutter speed of 1/1000th is required to freeze your subjects. This is because your subjects are moving quite fast. However, if you were to photograph people walking down the street, you would not need the same shutter speed, as your subjects are not moving as fast.

    Below are examples of slow and fast shutter speeds. Notice the presence of motion blur in the images where a slower shutter speed was used, but action is frozen with a fast shutter speed. In images that will use a slow shutter speed, it is often recommended you use a tripod to stabilize your camera, and prevent camera shake.

    What isn’t important is knowing the exact shutter speed; that is something that you will be able to experiment with to get the results you want. All you are doing here is identifying if a slow or fast shutter speed was used, to give you a starting point.
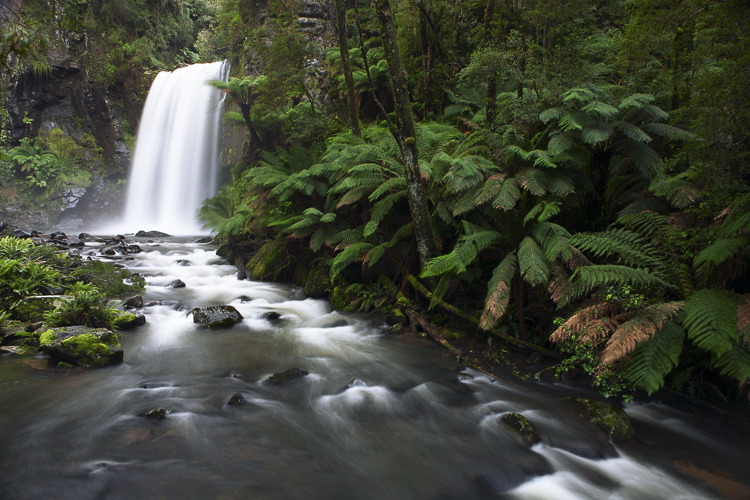
    Slow Shutter 3

    A tripod was used when taking this photograph to prevent blur that can be caused by camera shake. The shutter speed was 3.2 seconds.
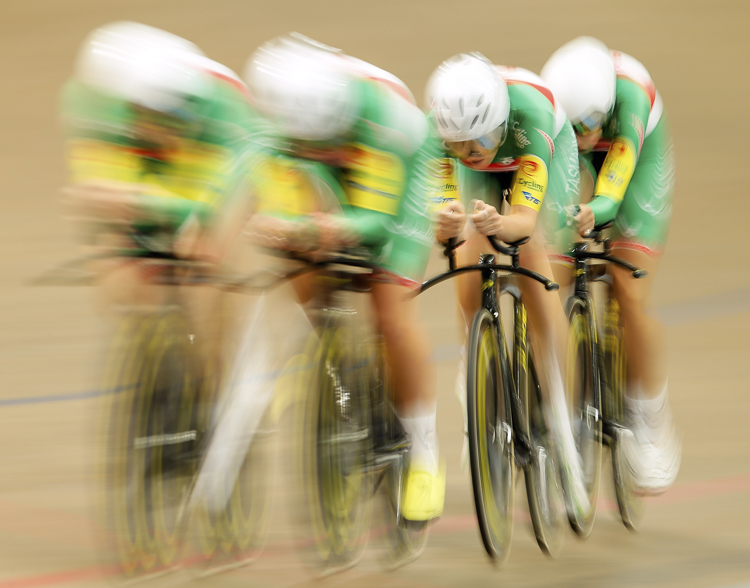
    Slow Shutter 4

    The reason there is one rider sharper than the others in this frame, is because even though all riders are moving at the same speed, the rider who is sharpest is moving slower, relative to where I was positioned taking this photograph. The shutter speed used here was 1/6th.
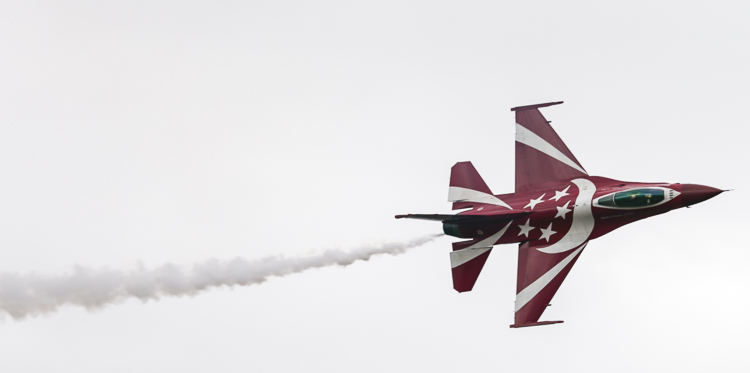
    Fast Shutter 2

    Notice how everything is sharp in this image, and there is no blur? This means that a fast shutter speed was used (in this case 1/2000th), and because the subject is quite fast, a faster than normal shutter speed was needed.

    Fast Shutter 1

    Again, notice how everything is sharp and there is no blur? This means that a fast shutter speed (1/1250th) was once again used.

    Step 2: Aperture – Large or Small?

    In step one I mentioned that determining whether a fast or slow shutter speed was used first, can greatly help you in determining the aperture. Here’s why. If you are familiar with the exposure triangle you will know that in nearly all cases when a fast shutter speed is used, it is associated with a large aperture (small f-number). Conversely, the slower the shutter speed, the smaller the aperture becomes. So if you see a photo that has motion blur present, it is highly likely that the photographer used a smaller aperture; or if you see a photo where moving objects are frozen, the photographer has most likely used a larger aperture to enable a faster shutter speed.

    Another way you can determine the aperture is by looking for bokeh, or subject isolation. The more bokeh that is present in the image, the more the subject is isolated. To achieve this, the photographer would use a larger aperture. On the other hand, if everything in the image is in focus, then the photographer employed a smaller aperture to increase their depth of field.
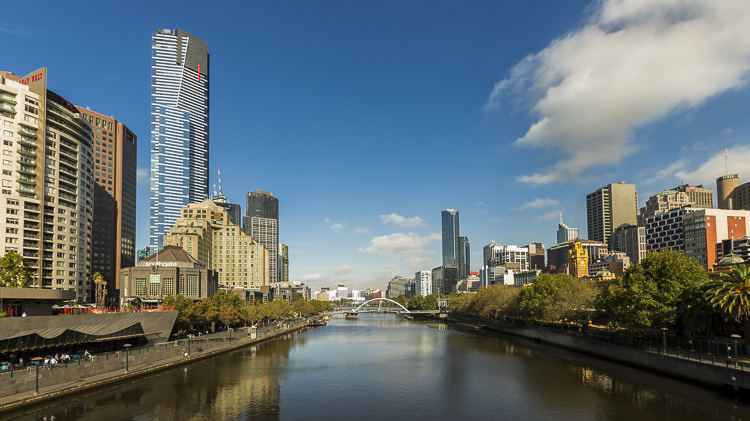
    Small Aperture 1

    Everything in this photograph is in focus, which would mean that a small aperture (larger f-number; like f/11 in this image) was used to increase the depth of field.
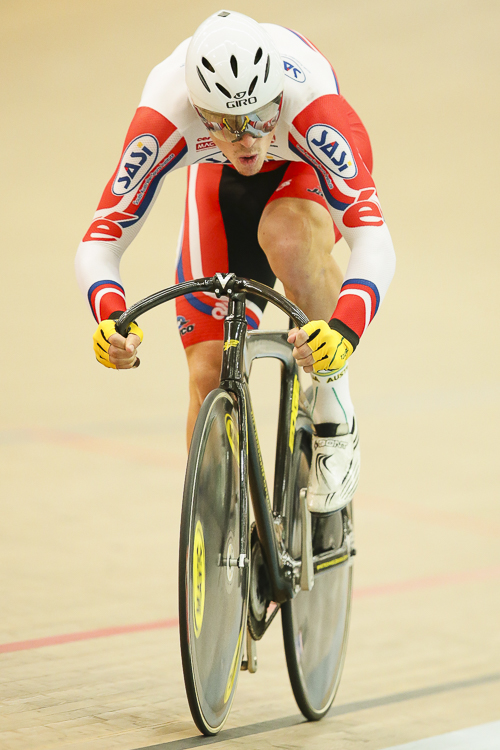
    Shallow Aperture 2

    Notice how the background in this image is blurred out a lot, and the subject is very isolated? This is a sign that a larger aperture (small f-number; in this example f/3.5) was used to decrease the depth of field.

    Step 3: ISO

    ISO is one of the parameters that isn’t so important in determining what settings may have been used when reading an image. Use ISO to get the settings that you need to use, to create the shot you want. For example, if you want to use the slowest shutter speed you can, set your camera’s ISO to its lowest setting. Conversely, if you want to use a very fast shutter speed, you may find that you have to increase your ISO.

    Step 4: Focal Length

    Focal length is something that is often overlooked in images, but it is a very important element indeed. It does more than simply allow a photograph to add more in the frame, or zoom in closer. Different focal lengths evoke different emotions in the viewer when looking at an image. For instance, if a wide angle lens was used, it places the viewer in the scene and can make them feel like they were there; whereas a longer focal length places the viewer further away from the subject, and evokes a more voyeur emotion.

    The great thing about focal length is that it is quite easy to distinguish approximately which one was used. To make it simpler, breaking down focal lengths in to three groups can help greatly.

    • Wide: <50mm (i.e. 14-50mm on full frame, 10-35mm on cropped or APS-C sensor)
    • Normal: ~50mm-85mm (35-56mm cropped sensor)
    • Telephoto: 85mm+ (130mm+ on cropped sensor)

    You can use the presence of compression to distinguish the different types of focal length. A wide angle lens accentuates the foreground and increases distances in the frame, as well as having a very wide field of view. This effect increases as the focal length decreases – or gets wider. On the other end, a telephoto lens will give you much more compression, and make distances in the frame look shorter. Their field of view will decrease, and the affects of aperture, particularly larger apertures, will be more pronounced. That’s why f/2.8 at 16mm looks different than f/2.8 at 200mm, if your subject is kept the same size in the frame.

    Here is a small table with examples of the same scene photographed from the same point, but with different focal lengths.
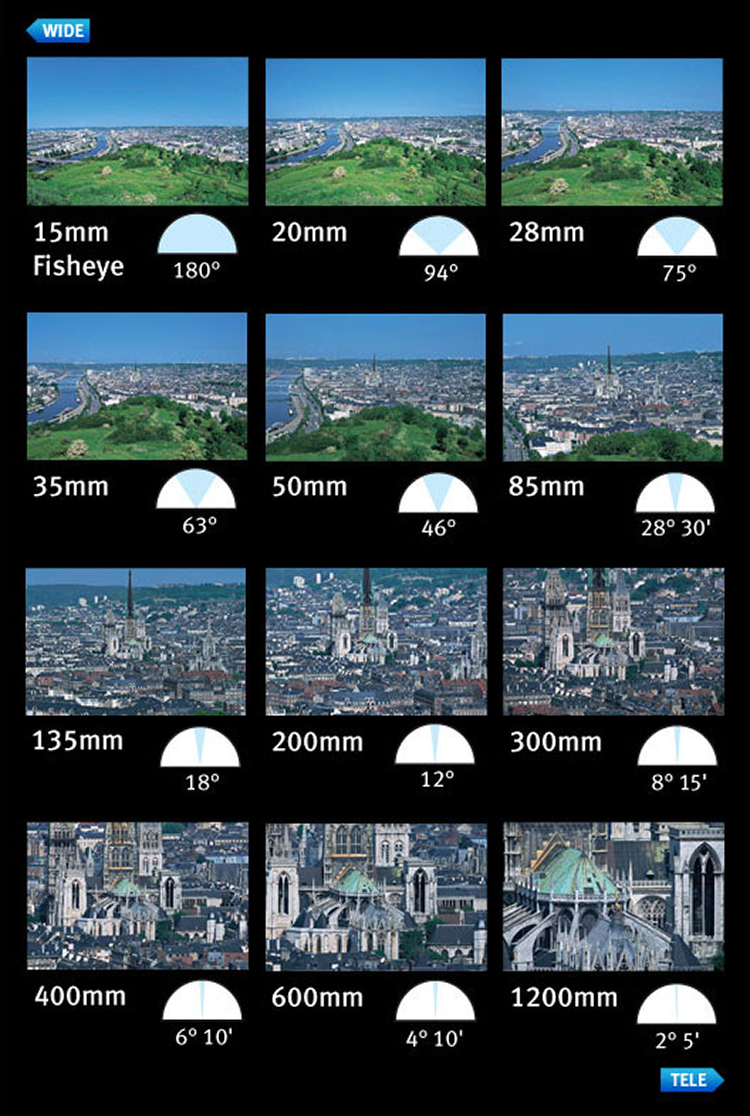
    Image courtesy of Canon

    Image courtesy of Canon

    Now you have had a quick introduction on how to read images. Remember, knowing the exact settings is not important, but knowing how to get an approximate guess is better than not knowing anything at all! With experience, you will become more proficient at reading images, and will be able to guess with more precision. The more you understand aperture, shutter speed, and ISO, the better you will be at reading images.

    Along the way, you will also learn that different genres within photography use a different set of settings. For example, most landscape photographers will use smaller apertures, lower ISOs, and slower shutter speeds; whereas sports shooters for instance, will generally use higher ISOs, larger apertures, and faster shutter speeds.

    googletag.cmd.push(function() {
    tablet_slots.push( googletag.defineSlot( “/1005424/_dPSv4_tab-all-article-bottom_(300×250)”, [300, 250], “pb-ad-78623” ).addService( googletag.pubads() ) ); } );

    googletag.cmd.push(function() {
    mobile_slots.push( googletag.defineSlot( “/1005424/_dPSv4_mob-all-article-bottom_(300×250)”, [300, 250], “pb-ad-78158” ).addService( googletag.pubads() ) ); } );

    The post 4 Steps on How to Read Images and Learn to Replicate the Results by Daniel Smith appeared first on Digital Photography School.


    Digital Photography School