Blog

  • No Place (to Work) Like Home: 15 Extraordinary Office Designs

    [ By Steph in Design & Furniture & Decor. ]

    shoffice main

    Warning – your cramped, cluttered cubicle might seem even more soulless than usual compared to the magnificence of these beautifully appointed home offices, some with all glass walls overlooking the ocean, others set into the backyard for privacy and connection to nature. From prefab pods to brilliant DIY creations, these unusual home office designs make the prospect of working feel downright pleasant.

    Office In Flight
    home office flight 1

    home office flight 2

    home office flight 3

    A wing of this vacation house in the woods of California lifts up into the air as if it’s about to take off, its glass walls the only thing separating the home office inside from the natural surroundings.

    Park-Like Office with Swing Table & Moss Carpet
    home office park 1

    home office park 2

    hoem office park 3

    home office park 4

    When you can’t actually take your work outside, you can just feel like you’re outdoors with a little creative decorating. Nidolab Arquitectura outfitted this home in Argentina with a hanging table and real moss floor covering in lush green hues, illuminating the whole thing with natural daylight via an oversized skylight.

    Lush Ivy-Covered Backyard Office
    Home office backyard ivy

    home office backyard ivy 2

    You can barely even tell there’s a building under all of the ivy that’s been trained to grow up trellises on the outside of this gorgeous backyard office in San Francisco. ‘Parkside Garden’ by Scott Lewis Landscaping Architecture creates a visual link between the main house on the property, and the adjacent public park.

    Vintage Ikarus Bus Turned Office Cube
    Home office vintage bus

    home office vintage bus 2

    home office vintage bus 3

    The cab of an old Ikarus bus was cut in half and inserted into the corner of a living room to create a tiny enclosed home office in Hungary. The owner spruced up the vintage find and added a corner desk to the interior to make it a cozy place for concentration.

    Shingled Spherical Office Pod
    hoem office sphere

    home office sphere 2

    This shingled orb by Archipod looks like it could have fallen right out of a massive tree and into the backyard. Each one of these luxury prefabs comes equipped with porthole windows, top-hinged gull doors, electrical hookups, a semicircular interior desk, lighting and a heater.

    Next Page – Click Below to Read More:
    No Place To Work Like Home 15 Extraordinary Office Designs

    Share on Facebook


    [ By Steph in Design & Furniture & Decor. ]

    [ WebUrbanist | Archives | Galleries | Privacy | TOS ]


    WebUrbanist

  • Kumamoto earthquake keeps Sony sensor factory shuttered

    The major earthquakes that struck Japan on April 14th and 15th have closed Sony’s Kumamoto factory, which primarily manufactures sensors for digital cameras. Due to ongoing aftershocks and inspections of the buildings and manufacturing equipment, it’s not clear when the Kumamoto factory will be back in business.

    The company’s factories in Isahaya City and Oita City were shuttered briefly, but have since resumed normal operations. Sony says that the impact on its financials is ‘currently being evaluated.’

    Nikon says that it too is affected by the earthquakes due to damage at their component suppliers (Sony is a known supplier of Nikon’s sensors), which has greatly delayed the release of its three DL enthusiast compacts, the KeyMission 360 action cam and a pair of Coolpix cameras. 

    Press Releases:

    Status of Sony Group Manufacturing Operations Affected by 2016 Kumamoto Earthquakes

    (Tokyo, April 18, 2016) Sony Corporation (“Sony”) extends its deepest sympathies to all those affected by the earthquakes in Kumamoto.

    Due to the earthquake of April 14 and subsequent earthquakes in the Kumamoto region, the following Sony Group manufacturing sites have been affected:

    Operations at Sony Semiconductor Manufacturing Corporation’s Kumamoto Technology Center (located in Kikuchi Gun, Kumamoto Prefecture), which primarily manufactures image sensors for digital cameras and security cameras as well as micro-display devices, were halted after the earthquake on April 14, and currently remain suspended. Damage to the site’s building and manufacturing lines is currently being evaluated, and with aftershocks continuing, the timeframe for resuming operations has yet to be determined.

    Although some of the manufacturing equipment at Sony Semiconductor Manufacturing Corporation’s Nagasaki Technology Center (located in Isahaya City, Nagasaki Prefecture), which is Sony’s main facility for smartphone image sensor production, and Oita Technology Center (located in Oita City, Oita Prefecture), which commenced operations as a wholly-owned facility of Sony Semiconductor Manufacturing Corporation on April 1, had been temporarily halted, the affected equipment has been sequentially restarted from April 17, and production has resumed. Sony Semiconductor Manufacturing Corporation’s Kagoshima Technology Center (located in Kirishima City, Kagoshima Prefecture) has continued its production operations after the earthquakes, and there have been no major effects on its operations.

    Sony has confirmed the safety of all of its and its group companies’ employees in the region affected by the earthquakes.

    The impact of these events on Sony’s consolidated results is currently being evaluated.

    Articles: Digital Photography Review (dpreview.com)

  • Prime time: Sigma 30mm F1.4 DC DN | C full-production sample gallery

    We had our first opportunity to shoot with the Sigma 30mm F1.4 Contemporary at CP+, spending some time with a pre-production lens taking in Japan’s freshly snow-coated landscapes. With a full-production lens in hand and good weather in the air, we’ve put the Sigma 30mm through its paces a little closer to home. Designed for Micro Four Thirds and Sony E-mount cameras, the featherweight prime is at home on Sony’s a6300 and a6000. Take a look at what this combo can do.

    Articles: Digital Photography Review (dpreview.com)

  • How to Take Low-Key Head Shots

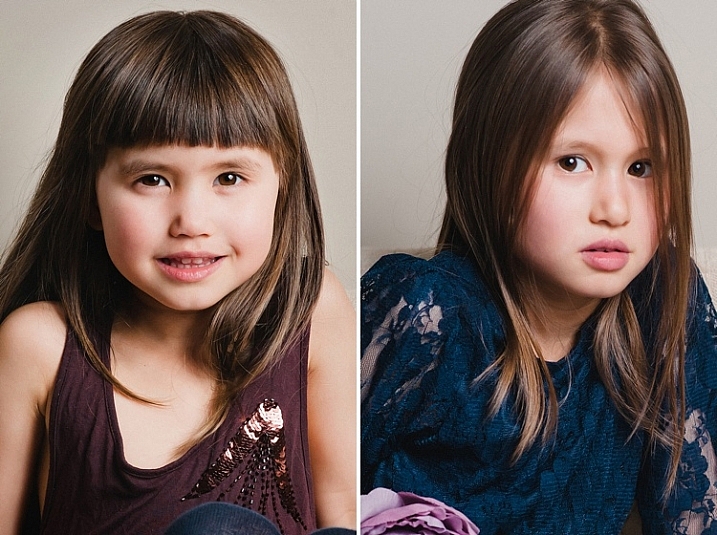
    When talking about head shots, there are so many different types of lighting and styles, that there almost seem to be no hard and fast rules on how to take good ones. There are the basic lighting patterns for portraits that are applicable to head shots. The most commonly used lighting for head-shots is often the clean, classic corporate look; generally speaking a bright background and even lighting. The type of head shot also depends on what it’s for, or if there are prescribed guidelines which must be adhered to.

    moody-headshots-tutorial_0012

    Typical head shots: two light basic setup

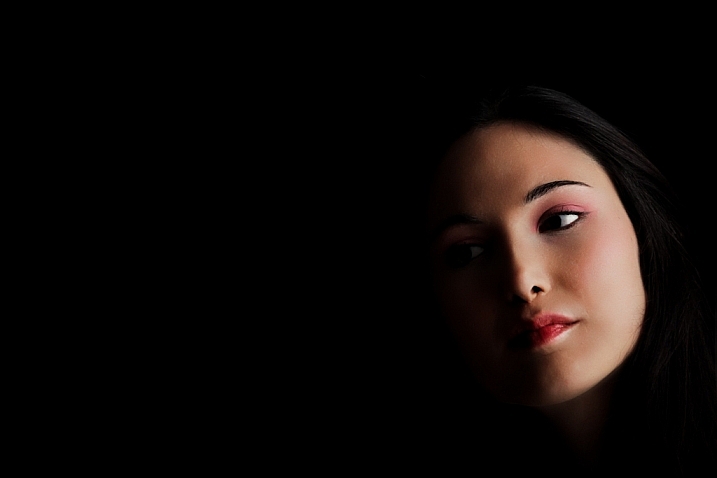
    This article will show you how you can take more low-key head shots. By tweaking a few things in your setup and settings, starting from the commonly used lighting setup, you can achieve darker lighting and a moody look, while still looking very professional.

    moody-headshots-tutorial-photography

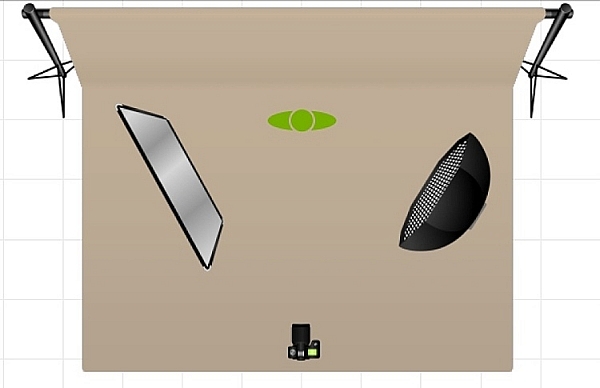
    The setup for this one is a light beige background, with a strobe attached on a gridded octabox as the main light, positioned 45 degrees to the subject. Opposite the the main light is a speedlight with a snoot, set up on a stand. The speedlight reduces any shadows on the background which may be cast by the main light, and also provides a hair light and a little backlight. A typical camera setting would be ISO 100, between f/2.8 – f/5.6 and a shutter speed of 1/125 – 1/200 (make sure you don’t go faster that your camera’s sync speed). Of course you adjust the power of the strobe, but the typical look is plenty of light, and pretty brightly illuminated faces (not much or deep shadows).

    moody-headshots-tutorial-photography

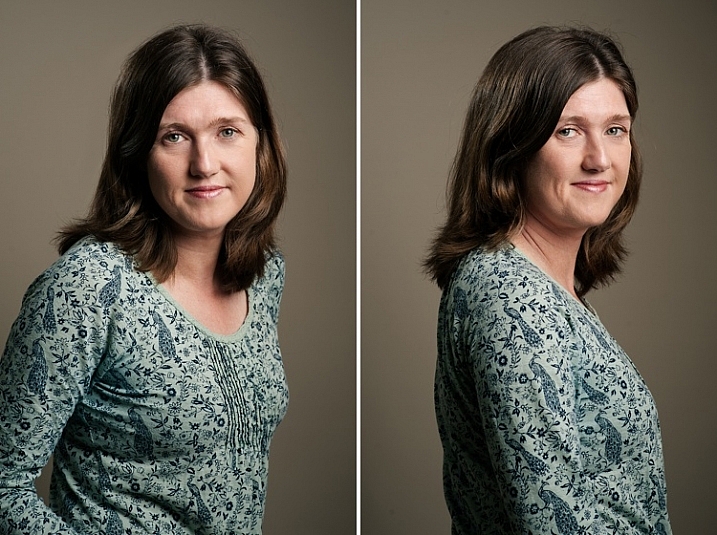
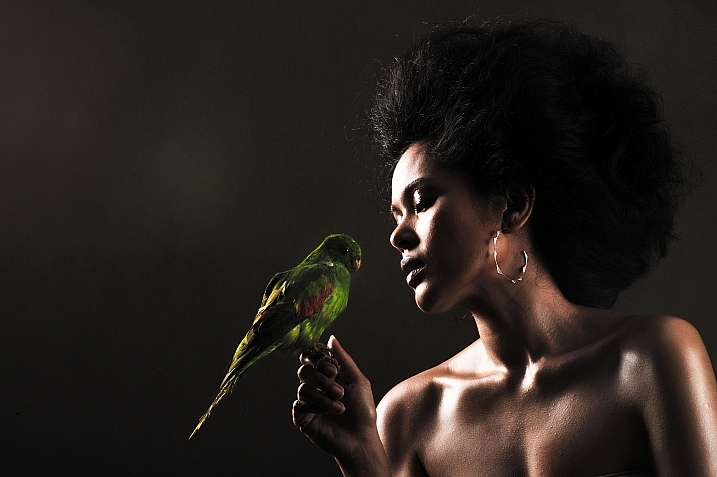
    Normal head-shots have the face more brightly and fully lit, with less shadows. If you want a more dramatic low-key head-shot you can play around with using more shadows and contrast on the face and a darker background. Try split lighting or Rembrandt style which both have more shadow.

    By stopping down to f/10, which is what I did on the photos above, still using exactly the same setup, you can cut out a huge amount of the main light, the background will be darker (less light will get to it), and there will be more shadows on the faces. You will have a more low-key look and feel to the image too, softer but with some light and shadow. However, this is still not low-key enough!

    moody-headshots-tutorial-photography

    Low-key head shots: one light

    Tweak the lighting setup further by removing the hair light, replacing it with a silver reflector (on the face), and stopping down to f/11 you will be cutting out more light. Now there is only one light, and any light that hits the reflector will bounce light back on the subject’s face. Remember, that the main light is gridded so there is not much spill at all. The background is so much darker, the catchlights are still visible on the eyes, but there are no more hotspots on the face. There is a lot more shadow on the unlit side, and no hair light. The result is almost painterly, as you can see below.

    moody-headshots-tutorial-photography

    More shadows in this Rembrandt lighting pattern produce a more low-key result.

    Low-key head shots: natural light and speedlight

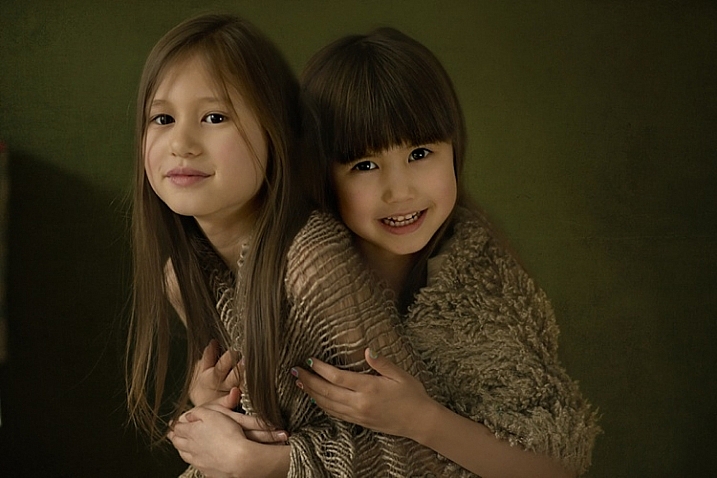
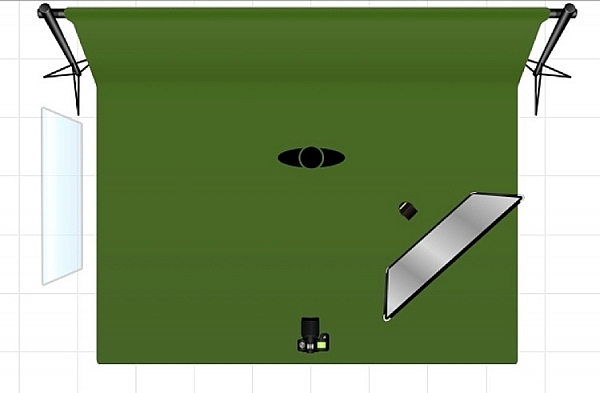
    I wanted to see if I could achieve this painterly look for head-shots by removing the strobe as the main light, and replacing it with a window light. The setup below shows the window light on camera left, and a speedlight, bounced into a silver reflector, as a secondary light on camera right. I also changed the background to dark green.

    moody-headshots-tutorial-photography

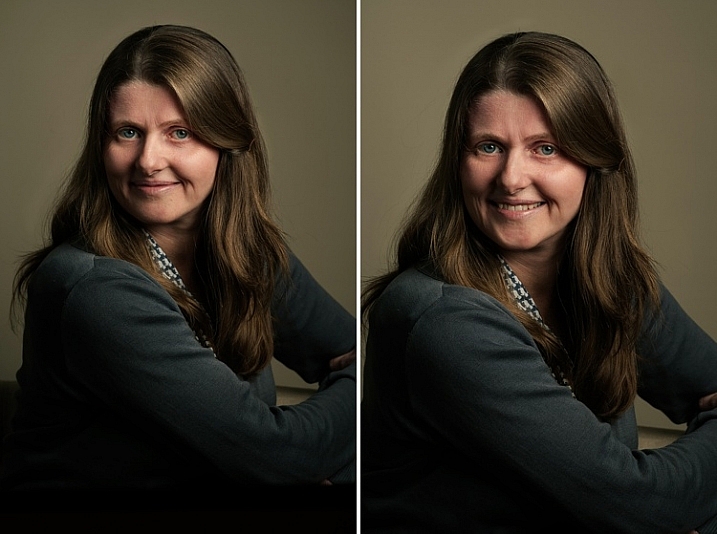
    The results below show two catchlights on the eyes from the window and reflector; the lighting is flatter (less contrast or ratio) but the mood is soft and painterly. If you want deeper shadows use a white reflector instead of silver, or take it away entirely.

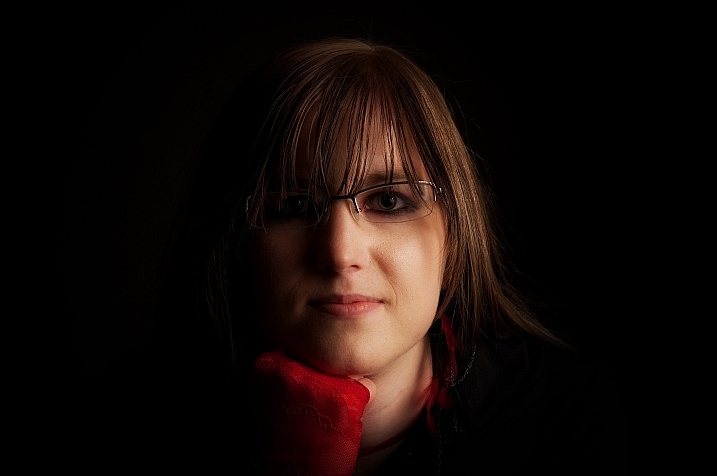
    The portrait at the top of this article was taken using this setup. The lesson here is that by making small tweaks to your lighting setup you are able to achieve different looks for your images. Don’t be afraid to experiment.

    moody-headshots-tutorial-photography

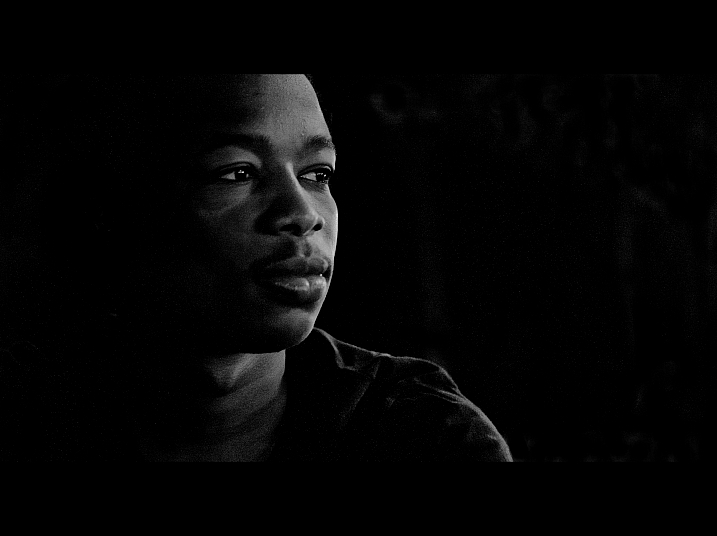
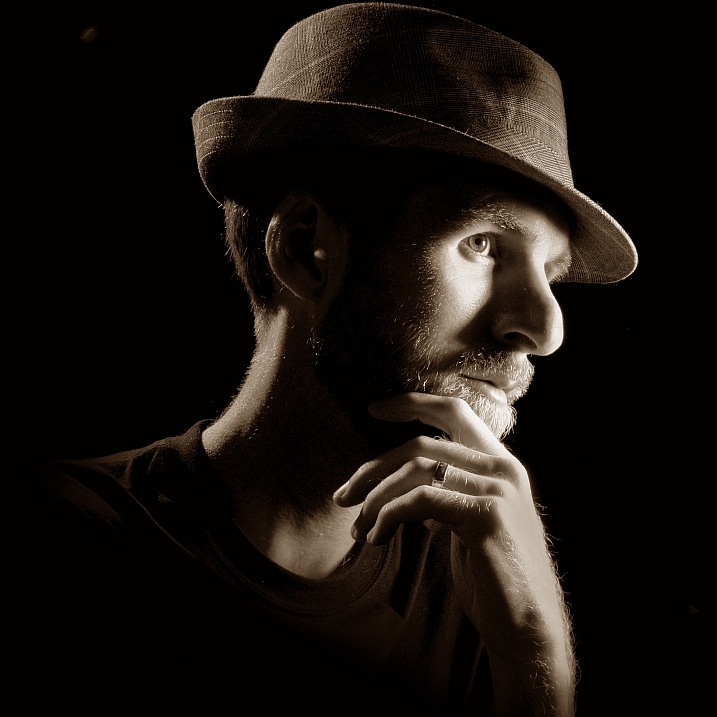
    Here are a few examples of really moody low-key head shots I found on Flickr to give you some ideas to make your own:

    Scott Butner

    By Scott Butner

    Al Ibrahim

    By Al Ibrahim

    Stephen Poff

    By Stephen Poff

    Stefano Corso

    By Stefano Corso

    Jason Tan

    By Jason Tan

    Do you have any tips in getting moody low-key head shots and portraits? Please share them here.

    People photography week

    This week on dPS we’re featuring articles all about different kinds of people photography including portrait, event and travel photography. This is the first of the bunch, watch for more people photography articles over the next few days.

    googletag.cmd.push(function() {
    tablet_slots.push( googletag.defineSlot( “/1005424/_dPSv4_tab-all-article-bottom_(300×250)”, [300, 250], “pb-ad-78623” ).addService( googletag.pubads() ) ); } );

    googletag.cmd.push(function() {
    mobile_slots.push( googletag.defineSlot( “/1005424/_dPSv4_mob-all-article-bottom_(300×250)”, [300, 250], “pb-ad-78158” ).addService( googletag.pubads() ) ); } );

    The post How to Take Low-Key Head Shots by Lily Sawyer appeared first on Digital Photography School.


    Digital Photography School

  • Miggo wants to ‘DSLR your iPhone’ with the Pictar grip

    $ (document).ready(function() { SampleGalleryV2({“containerId”:”embeddedSampleGallery_4966451279″,”galleryId”:”4966451279″,”isEmbeddedWidget”:true,”standalone”:false,”selectedImageIndex”:0,”startInCommentsView”:false,”isMobile”:false}) });

    Accessory manufacturer miggo has launched a Kickstarter campaign to fund a new iPhone grip that it says brings DSLR-style controls to many current iPhone models. The Pictar grip uses conventional buttons, wheels and dials to deliver a traditional camera experience that makes the photo feature of the phone easier to navigate, and the company claims the app that complements the grip allows greater camera control than the standard iPhone interface.

    While most devices that connect wirelessly with smartphones do so using potentially battery-draining Bluetooth, the Pictar grip communicates with an iPhone app using high frequency sound that humans can’t hear but which the phone’s microphone can. It’s definitely a unique approach, and it’s not clear whether it will drive your dog crazy.

    Turning the wheels and dials creates unique tones that instruct the app what it is the user wants to do. All of the controls can be customized to suit the user, but by default one of the top plate dials is set to deliver exposure compensation while the finger wheel on the front of the camera is used as a zoom or, when pressed, to switch from front to rear cameras – for selfies.

    The Pictar grip is adjustable which allows it to work with a range of past, current (excluding the larger 6s Plus) and future models, and as there is no physical communications plug or socket the company says its device is not reliant on Apple maintaining its current form factor or connections.

    The Pictar grip provides a cold shoe for microphones and lighting, as well as a tripod socket on its base. It is powered by a CR ½ AA battery which miggo says will last between six and eight months. The miggo Pictar will cost $ 90 and, if the campaign is successful, will come to market in December.

    For more information see the miggo website, and the Pictar Kickstarter campaign page.


    Press release:

    miggo Transcends the Limitations of Mobile Photography with the Launch of Pictar

    Inspired by classic camera design, Pictar unleashes the true photographic power of iPhones

    New York – miggo, which first made its worldwide debut with the innovative Strap & Wrap and Grip & Wrap protective carrying solutions for digital cameras, today unveiled its most revolutionary offering yet – Pictar. High-tech and cutting edge, Pictar is an ergonomically advanced Camera-Grip for the iPhone that brings the familiar controls of a DSLR right to users’ fingertips.

    Key features of Pictar include:
    – Five user programmable wheels/buttons for full user control.
    – Ergonomic grip for one handed use.
    – Revolutionary communication between hardware and App via ultrasonic sounds.
    – Compatibility with most iPhone models (4-6s and planned support for future models).
    – Control over iPhone camera features not possible in the native App.

    While the digital camera incorporated in each new generation of the iPhone has improved dramatically, what has stayed the same since its introduction is the way consumers hold the device and navigate its features and settings. With that in mind, when it comes to taking a photo, it’s not very ergonomic and simply does not compare to the traditional experience offered by that of a dedicated DSLR. Advanced shooters welcome a DSLR’s physical controls which put frequently used settings right at their fingertips – something Pictar was designed specifically to replicate. By bringing these physical controls to the iPhone, Pictar offers unprecedented control and gives users the ability to take their iPhone photography to a completely new level and transform the way they use it to take photos and video.

    “As the adage goes, the best camera you have is the one you have with you,” said Guy Sprukt, co-founder of miggo. “It’s no secret that one of the most popular smartphones in the world is also one of the most widely used digital cameras.  The image quality of the phone can rival that of some of the best digital cameras on the market. With Pictar, we’re looking to give users – whether they be professionals or social shutterbugs — the ability to DSLR their iPhone and completely unleash its full potential.”

    The Pictar project is the result of over a year of extensive research and development focusing on alleviating the shortcomings as it relates to the ergonomics and control of the iPhone. miggo’s product design engineers devoted significant resources to developing a solution to address these shortcomings and help deliver an experience that’s more natural, more comfortable, and that delivers better results.

    Key shortcomings addressed by Pictar include:
    * Poor control – while touchscreens have proven to be the method of choice for many of today’s mobile devices, they simply aren’t fast enough when it comes to navigating menus or accessing camera controls. Because of this, users choose to simply press capture or record i.e. take the pictures on Auto and fail to truly experience what the iPhone could offer.

    * Uncomfortable grip- sleek and slim, the iPhone simply does not offer users a comfortable or secure grip when using the device to capture photos or videos. Due to the way users are forced to hold the phone, it’s often easily dropped or results are often not sharp enough because of an unsteady hand, especially when operating with just one hand.

    Pictar features five external controls which operate key settings and includes a patented, revolutionary interface which utilizes high-frequency dual tone sound to activate and control the camera, saving significant battery power compared to standard Bluetooth connectivity. In addition, the ergonomically designed grip allows for one handed operation and sharper images.

    In addition, users will also benefit from the optional hand and neck straps, which offer peace of mind, saving Pictar and the user’s iPhone from damage in the event of accidental drops. Both straps feature quick release buckles which enable the user to effortlessly switch between both to suit their needs. Moreover, for safe storage, miggo also includes a stylish padded pouch. Manufactured from neoprene, the pouch will protect Pictar when not in use and can also be attached to a belt or bag for easy transport.

    External controls and features include:
    1. Multi-state shutter button – electronically calibrated to provide maximum sensitivity, just like that of a traditional DSLR. Pictar’s shutter button offers a “half press” mode to lock focus and exposure for easy tracking of a moving object or to create a desired composition, as well as full-press for immediate shutter release.

    2. Zoom ring – located right under the index finger, the rotating zoom ring alleviates the need to touch the screen to pinch-and-zoom, making it easy for the user to zoom in and out with just one hand. The zoom ring can also be programmed and changed by user to suit specific needs.

    3. Selfie button – clicking the zoom ring will switch between the iPhone’s front and back camera for easy “selfie” shots.  Like the rotation of the zoom ring, the button can also be programmed and changed by user to suit specific needs and control other settings.

    4. Exposure compensation wheel – located on the rear of Pictar, the exposure compensation wheel helps the user determine the exact level of exposure. Based on the user’s preference, the exposure compensation wheel – like Pictar’s selfie button and zoom ring – can also be programmed and changed from its default setting to control other features

    5. Smart wheel – customizable, the smart wheel allows users – beginners and advanced – to control a variety of functions. In default mode it changes the camera’s preset modes: sports, landscape, portrait and for the more advanced users, full manual, aperture priority and more. Advanced photographers can choose to program the smart wheel to control other functions, such as manual mode, shutter speed, iso, flash modes and white balance settings.

    6. Tripod mount – for those photographers looking for added stability, for landscapes or for video recording, Pictar offers a ¼” standard tripod mount located on the bottom of the device.

    7. Cold shoe – located on top of Pictar, the integrated cold shoe will allow users to mount a variety of LED lighting accessories or mics for added creativity and control.

    A powerful, dedicated app featuring patented high-frequency dual tone sound control:
    Pictar is designed to communicate with the iPhone via a dedicated camera app which unlocks key features inaccessible on the native app to iPhone users. Each of the physical controls found on Pictar drive a specific function or setting and does so using high-frequency dual tone sounds. Each physical control is assigned a specific tone, and with each turn of a dial, press of a button or turn of a wheel, Pictar omits a sound that – when detected by the app – generates a corresponding action. The high-frequency dual tone (18,500 – 20,000 khz) is inaudible to the human ear and significantly increases battery life when compared to Bluetooth connectivity. Using a standard CR ½ AA battery which is easily found worldwide, miggo estimates 6-8 months of use before the need to replace the power source is required.

    The Kickstarter campaign is now live with an introductory price of $ 90 USD. Full retail availability is slated for December 2016.

    miggo was founded 2013 by a group of designers with extensive experience in developing award-winning camera cases and bags, as well as a passion for bringing to market innovative concepts for carrying and supporting cameras. In just three years, miggo expanded its portfolio to include patented game-changing camera carriers, multi-functional camera and binocular straps and innovative compact tripods. These products are successfully marketed in over 30 countries around the world.

    Today, with two highly-successful Kickstarter projects under the company’s belt – the 2014 “Strap & Wrap” campaign and the 2015 “agua” campaign – miggo returns to Kickstarter for the third time with its sights set on the trend of mobile photography. With Pictar, the company’s new state-of-the-art grip enclosure, miggo is giving consumers the ability to truly unleash the power of their iPhone camera and take their mobile photography to a completely new level. 

    For more information please visit www.mymiggo.com or follow us on Facebook.

    Articles: Digital Photography Review (dpreview.com)

  • Mother’s Day Gift Guide

    Mama gave you life and your creative eye.

    Say thanks with a Photojojo gift and take 10% off with the code Mama10.

    Plus, if you use Mama10 by 5/2, you’ll get $ 15 to spend in the Parabo Press photo printing app on 5/7 – Mother’s Day Eve.

    Pass it along to Mom, or keep if for yourself (we won’t tell).

    (…)
    Read the rest of Mother’s Day Gift Guide (0 words)


    © laurel for Photojojo, 2016. |
    Permalink |
    No comment |
    Add to
    del.icio.us

    Post tags:


    Photojojo

  • My Favourite Travel Lens – The Tamron 28-300mm

    Last year I was given an incredible opportunity to travel to the US for three and half weeks just to take photos. My trip was sponsored by an amazing woman, which spurred me to try and get other sponsors for my photography. When you are travelling you can’t take everything with you, so being able to get a lens that could handle a lot of the scenes that I wanted to shoot was very handy. To be able to go from a wide angle view, then zoom right in, was going to be a great lens for travelling, I hoped.

    LeanneCole-tamronlens-28-300mm

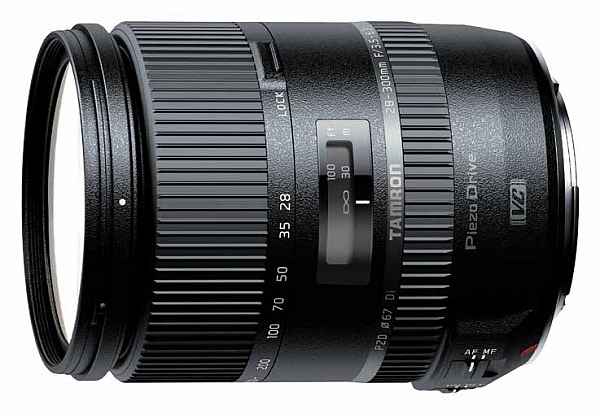
    Tamron 28-300mm Lens – image courtesy of Tamron for both Canon and Nikon mounts.

    I had read about the Tamron 28-300mm lens, and how it was a good for travelling. I decided to contact Tamron Australia to see if they would loan me the 28-300mm for my trip, and they did. It is a full frame lens and if you have a cropped sensor then you need to remember that you won’t be able to get 28mm (more like 42mm), and that it will be far longer than 300mm (similar to 450mm).

    LeanneCole-tamronlens-goldengatebridge-65mm

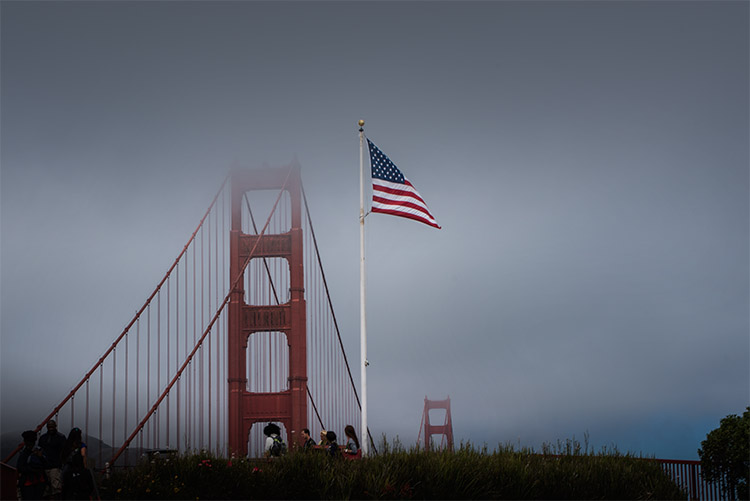
    Golden Gate Bridge with US Flag, taken through a car window. Focal length 65mm

    Physical Size

    The first thing I noticed when I opened the box was the size. For a lens with such a big zoom length, it’s quite small. It isn’t a heavy lens either. Straight away it seemed like the perfect lens to carry, that wouldn’t contribute to breaking my back.

    It fits nicely into any camera bag, due to its compact size. The bag I used on my trip was quite small, and it was easy to pack. The light weight meant I didn’t have to worry about making my bag heavier. Imagine how your back would feel if you had to carry a bunch of other lenses to cover that range!

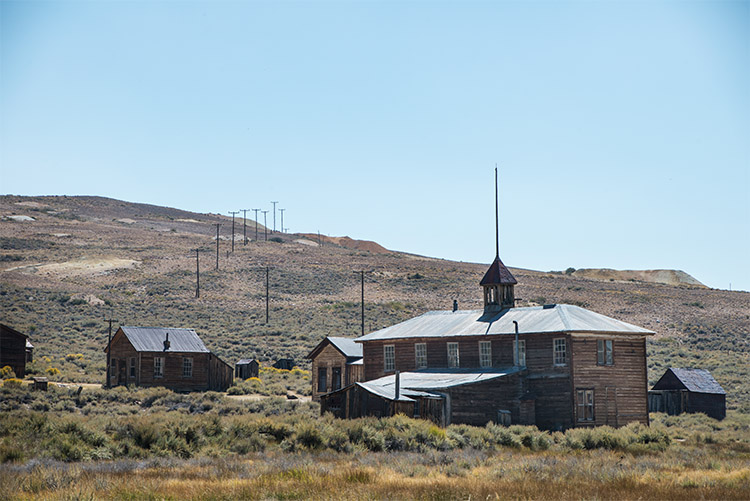
    LeanneCole-tamronlens-bodieghosttown-122mm

    Some of the old building at the ghost town in Bodie, CA, focal length 122mm.

    Versatility

    When travelling you can’t always get close to places to get the best angles, and having a lens that allows you to take photos when you are close, or far away, is an advantage. You can take an image of a building and get most of it in, then zoom in to get some details of it as well.

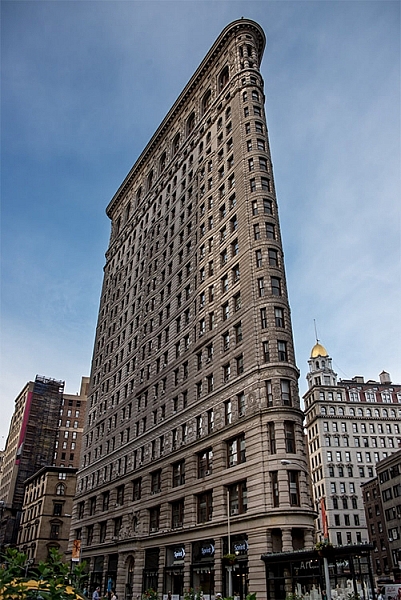
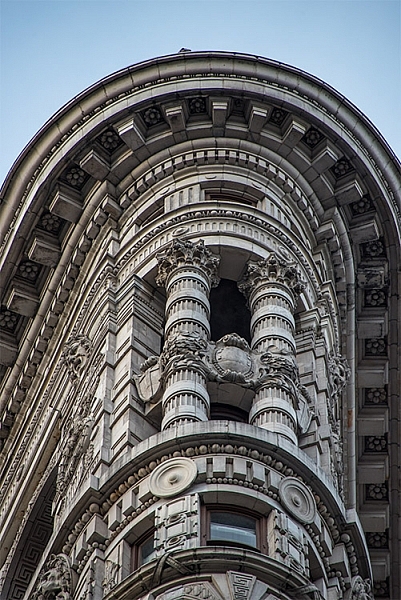
    The following images of the Flatiron Building in NYC, show how you can take a photo of the whole building, and then a close up of some detail using the 28-300mm lens.

    LeanneCole-tamronlens-flatiron-28mm

    The Flatiron Building in New York, focal length 28mm.

    LeanneCole-tamronlens-flatiron-300mm

    Detail of the Flatiron Building, focal length 300mm.

    There is also the advantage of not having to constantly change your lens. If it is busy, or crowded, you won’t have to stop, get out another lens and change it. This compact lens is great for most situations.

    LeanneCole-tamronlens-beemountain-300mm

    A bee on a flower, taken at 300mm.

    Compromises

    With any lens that has this kind of focal length range, you are going to have to compromise somewhere.

    Sharpness

    When you take photos at 300mm, the images are not as sharp as they are at 150mm. This is a common problem with most lenses, and more so with ones that have longer lengths such as the Tamron 28-300mm.

    Slower Lens

    A lens is judged by the size of the largest aperture. A fast lens has a large aperture of f/2.8 or, as is the case with some of the prime lenses, maybe f/1.4. The largest aperture means that when there is lower light you can get a faster shutter speed, which makes it a faster lens.

    This Tamron 28-300mm lens has an aperture range of f/3.5 – 6.3, which translates to being able to have the faster aperture of f3.5 at 28mm, but when you zoom out to 300mm the fastest (widest) one you can get is only f/6.3. Most of the time it isn’t a problem, and only becomes one when the light is low, or when shooting indoors. The compromise is, when those conditions arise you have to put up your ISO, which introduces noise into your images, or, in old terms, grain.

    Vignetting when zoomed out

    One of the things I found, was that there was some vignetting when the lens was zoomed all the way out to 300mm. I was a bit annoyed initially, but when I was given an opportunity to try out the Nikon 28-300mm I noticed it did the same. It is just one of the disadvantages working with lenses such as these.

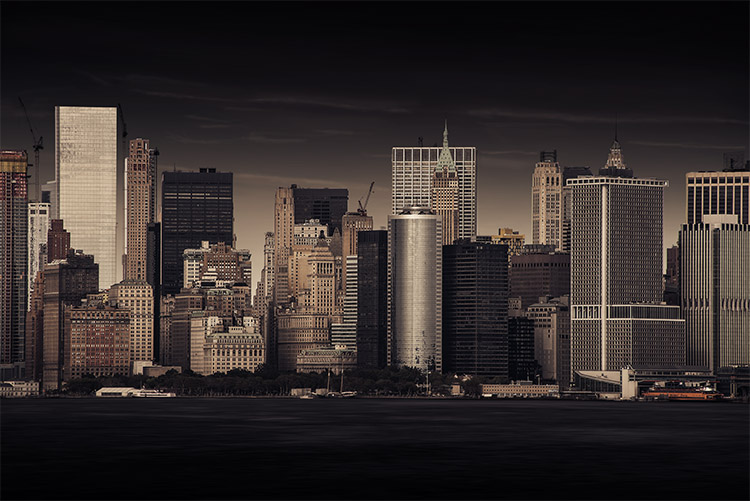
    LeanneCole-tamronlens-NewYork-300mm

    A view of New York Skyline from Staten Island ferry. Focal length 300mm,

    The Other Factors

    Weight

    The lens weighs just over half a kilogram or 19oz. Compare it with the Nikon lens which is 800 grams or 28.2oz. As stated previously, it is quite a light lens, and an easy one to carry around and store.

    LeanneCole-tamronlens-yosemite-28mm

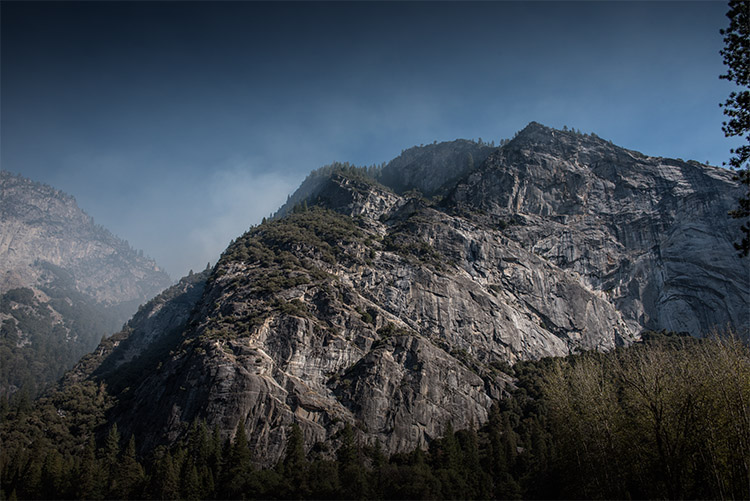
    One of the many mountains at Yosemite, focal length 28mm.

    Price

    The lens is around US$ 850, which makes it a good price for the versatility that you get. It makes it an affordable lens, and a very good option for a beginner who wants to find one lens that will suit almost any situation or occasion.

    In conclusion

    This was a perfect lens for travelling. I found it so versatile, and to tell the truth, while I took a couple of other lenses, this one was on my camera 80% of the time. I didn’t want to take it off. It was very sad when the lens had to be returned to Tamron, I know when I can get the money together, it will be the next lens in my kit.

    LeanneCole-tamronlens-santacruz-135mm

    Seal at Santa Cruz Boardwalk. Focal length 135mm.

    googletag.cmd.push(function() {
    tablet_slots.push( googletag.defineSlot( “/1005424/_dPSv4_tab-all-article-bottom_(300×250)”, [300, 250], “pb-ad-78623” ).addService( googletag.pubads() ) ); } );

    googletag.cmd.push(function() {
    mobile_slots.push( googletag.defineSlot( “/1005424/_dPSv4_mob-all-article-bottom_(300×250)”, [300, 250], “pb-ad-78158” ).addService( googletag.pubads() ) ); } );

    The post My Favourite Travel Lens – The Tamron 28-300mm by Leanne Cole appeared first on Digital Photography School.


    Digital Photography School

  • Nikon SnapBridge now available for Android, iOS to follow this summer

    Nikon’s SnapBridge app is now available for Android. First announced as a feature on the Nikon D500, SnapBridge allows photographers with a compatible Nikon digital camera to maintain a connection to a mobile device using Bluetooth low energy. Read more

    Articles: Digital Photography Review (dpreview.com)

  • Tips for Processing Winter Landscapes in Lightroom

    I see a lot of winter. The interior of Alaska, where I live, gets a solid six months, often seven, of the white stuff. Essentially anytime from October to mid-April, we are likely to have snow on the ground. Unless I put the camera down for most of the year (which I don’t), I end up with a lot of photos on my computer of snowy mountains, forest, and tundra. Come the early-spring, brown season, I have a lot of computer work to take care of.
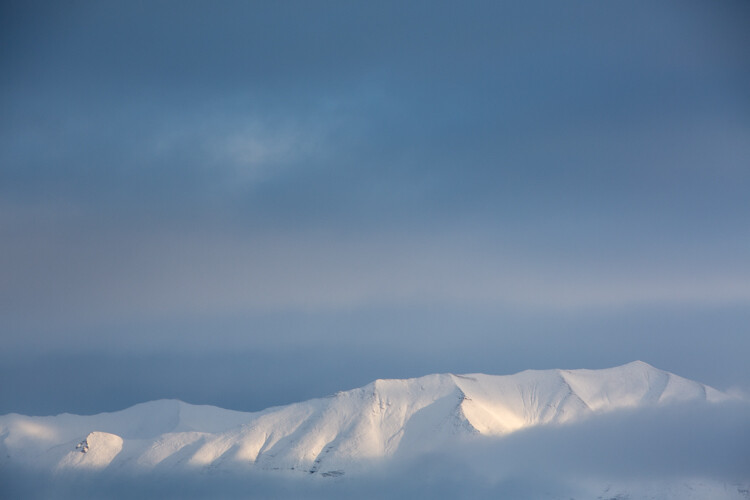
    Kelly DONE-1

    Though the method of processing winter images is largely the same as many other types of outdoor images, you’ve got to approach snowy images with cold focus (insert laughter here). I jest, but actually the cold, and bright blue tones of winter, are elements that should not be forgotten (or overdone).

    My Approach

    When I come at an image in Lightroom, I don’t tackle it with a standard formula. Rather, I consider the time and place I made it, what the landscape looked like, and just as importantly, how it felt. Those memories play an important role in my vision for the final image.

    With that in mind let’s dive into the first of the three winter images I want to walk you through my processing steps.

    Brooks Range, Alaska – Early winter
    Kelly 1

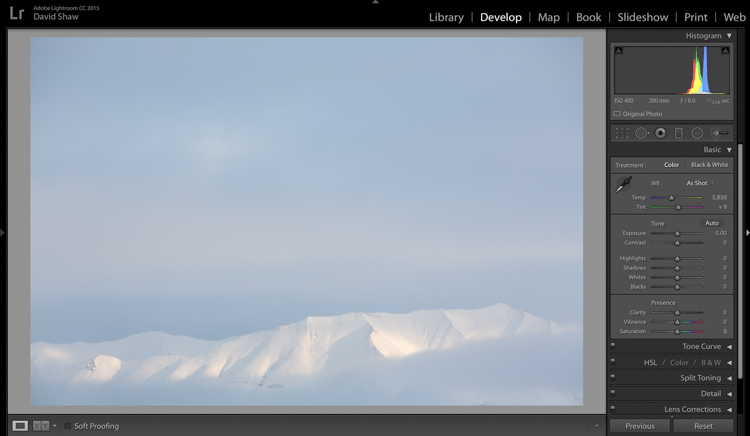
    On a river trip in early September, down the remote Kelly River of the western Brooks Range, my clients and I were hit by the first snowfall of winter. It started the evening before I made this image, with a few big, wet flakes falling from the overcast sky. By the following morning, my tent, the gravel bar on which we were camped, and the entire landscape, was covered in six inches of fresh snow. The snow was tapering off, and I could see breaks in the clouds where patches of blue sky shone through. It didn’t take long before those patches were turned into beams of sunlight on the mountains. I walked down to the river with my camera, and started making images of the shifting light on the land. This shot came out of that session.

    The light and color is typical of many winter images, bright, with lots of blue. Take a look at the histogram in the upper right, and you can see how it’s pushed to the right, meaning the image is on the bright side (but no blown-out highlights), exactly what I want with an out-of-camera winter shot.

    Step One – White Balance

    The first thing to consider is the white balance. Cloudy days tend to cause warmer tones, and snow, particularly under-exposed snow, can take on a yellowish hue. This can be off-putting, so pushing your white balance toward the blues can help provide a more pleasing, and accurate tonality. In this case, my camera selected an appropriate White Balance in the field, and didn’t need any adjustment in Lightroom. But keep this in mind when processing your own images.

    Step Two – Exposure
    Kelly 2

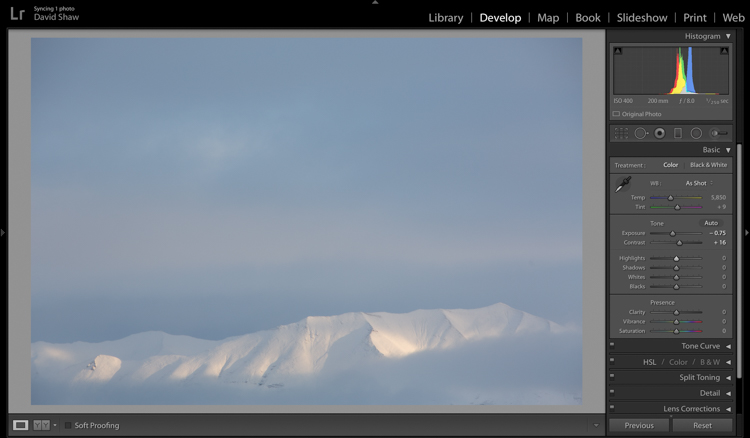
    The next step was to bring down the exposure by 0.75 stops, making the image a bit moodier, and less bright. I then bumped the contrast a hair to +16 just to make those highlights more clear before I dove into the more important contrast adjustments.

    As a quick note, I bet I do 85% of my Lightroom edits in the Basic panel. This very effective section of the program is one you should know intimately, before you go exploring too much of the huge variety of other tools provided by the software.
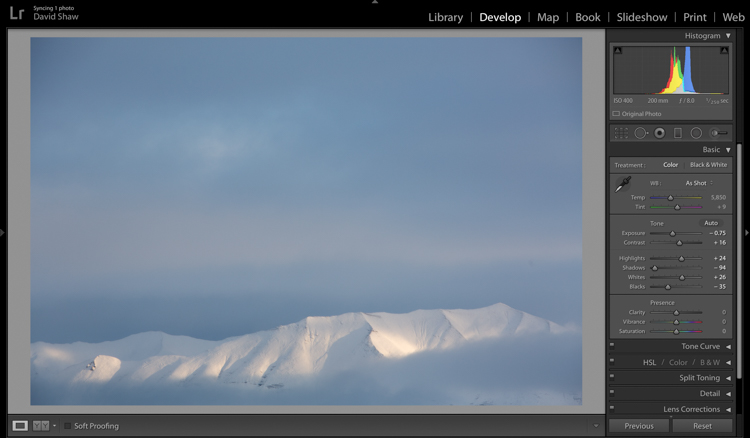
    Kelly 3

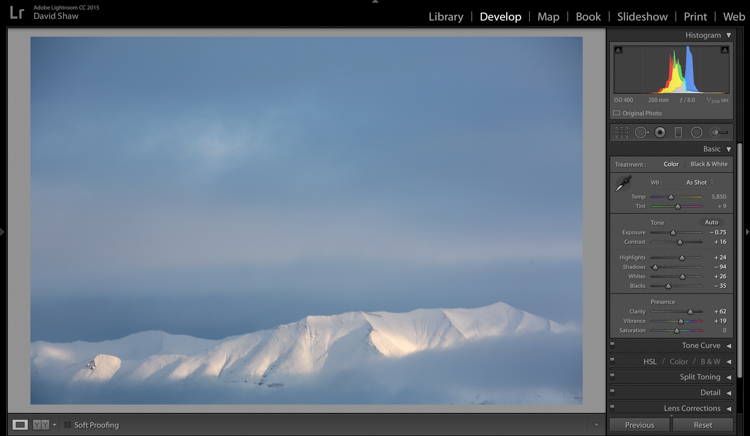
    The next four sliders provide a more specific modification of lighting in the image. In this case, I wanted to recollect some of the feeling of the dissipating storm by emphasizing the dark clouds. To do so, I pulled the Shadows slider down nearly all the way, making the dark blues and grays of the clouds appear more menacing. The Highlights, I bumped just a notch, adding some pop to the bright patch on the mountains. Whites and Blacks each got a nudge up (Whites) and down (Blacks) respectively, finishing the job I started with the first two sliders.

    Step Three – Clarity
    Kelly 4

    The first of the next three sliders is Clarity. This nifty tool, increases the contrast where dark and bright edges meet, and adds apparent sharpness to the image. On the morning I made the image, the clear morning light made the mountains very sharp to the eye. Wanting to emulate that effect in the image, I gave the Clarity a substantial boost to +62. That’s about as high as you can go on most images without appearing artificial.

    Step Four – Vibrance and Saturation

    The Vibrance and Saturation sliders are dangerous. Photographers tend to believe that bright colors mean a good image. I want to say this very clearly: Do NOT over-saturate your images. It doesn’t look as good as you think it does, so, you know, just don’t.

    Vibrance increases the intensity of the less saturated tones. When used in moderation it adds pop. In this image, I left the saturation slider completely alone.
    Kelly 5

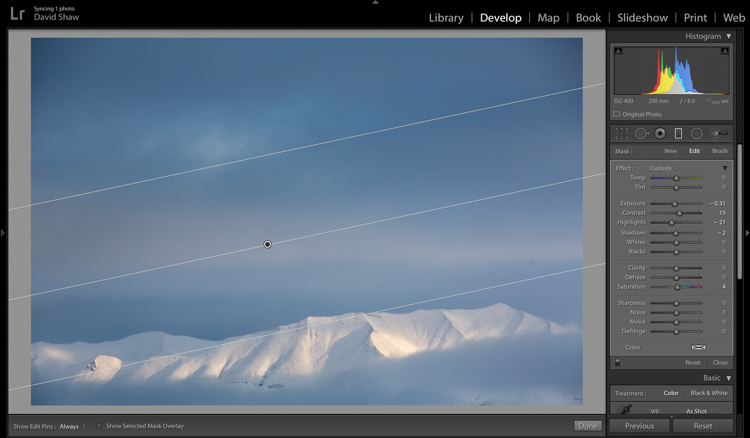
    The rectangular icon in the row below the histogram is the Graduated Filter. This useful tool allows you to adjust a portion of the frame, without affecting the other areas. Just as importantly, you can adjust the edge softness (transition area) as hard or soft as you like. In this case, I wanted my changes to taper naturally into the frame so made the filter edge fairly wide (set feather to a high number). Using this tool, I chose to darken the sky, and draw attention to the mountains at the bottom of the frame. After adjusting the placement, I lowered the exposure in the sky. This allowed me to subtly darken the sky, without affecting the brighter tones of the mountains.
    Kelly 6

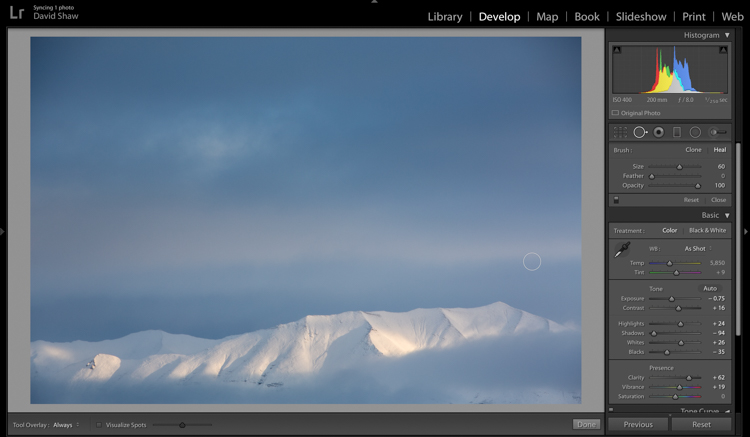
    Adjusting contrast can cause previously invisible imperfections to appear. In this case, it was a dust spot on my sensor, which I cloned out using the “Heal” tool.

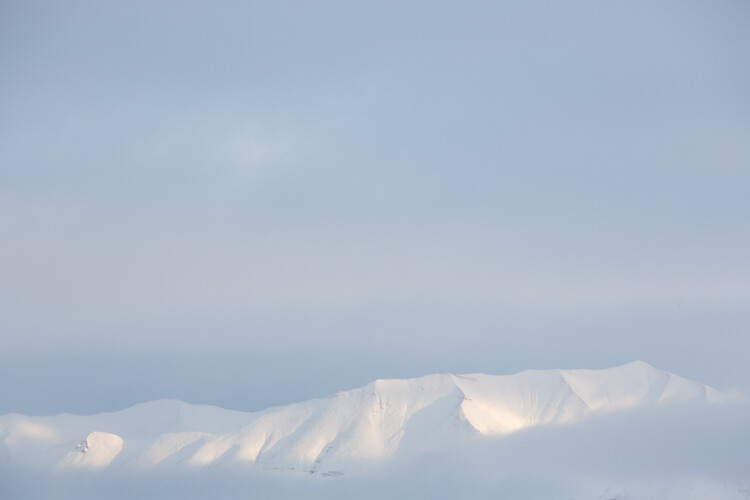
    The final image, as you can see, is a substantial improvement over the original, and holds true to the scene as I remember it.
    Before

    Before processing

    Kelly DONE-1

    After processing

    Color in the Cold

    Not all images of the winter rely on cool tones for their success. At times, it is the juxtaposition of those cool tones and bright warm colors that make an image.
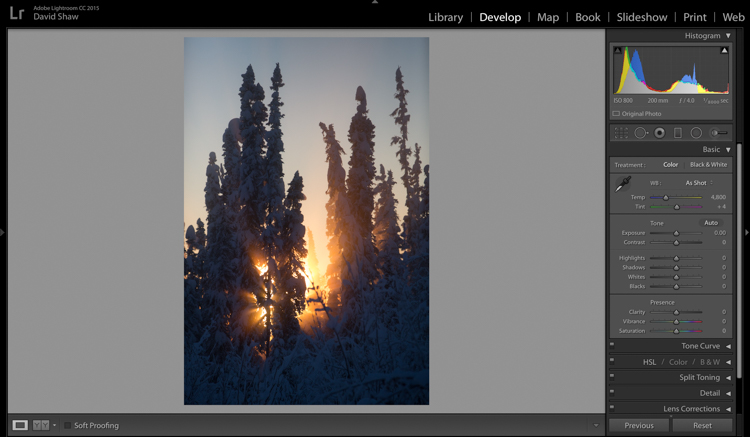
    Beams 1

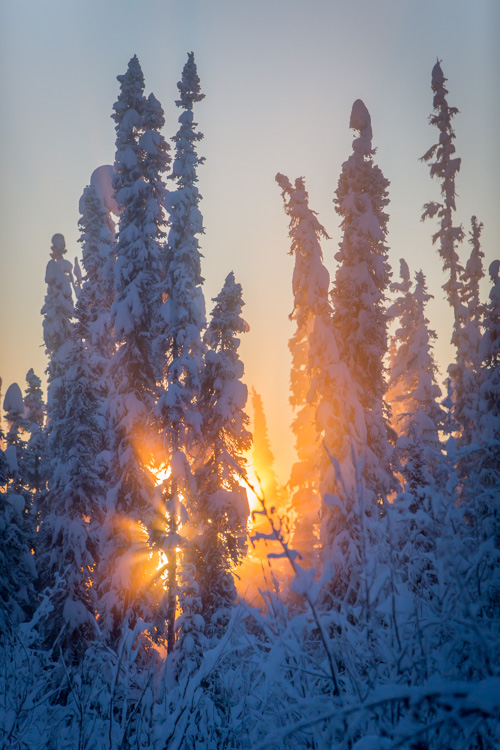
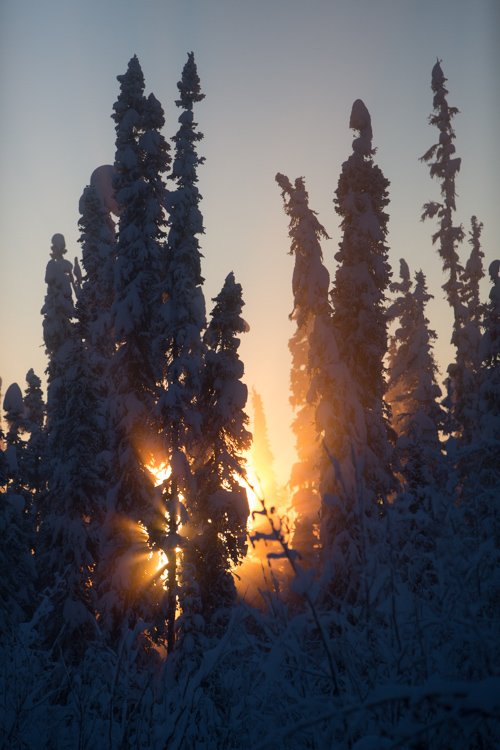
    This is one such image. I made it on an extremely cold mid-winter day, on the ice of the small creek that flows on the lower part of my property north of Fairbanks, Alaska. It was about -35f (-37c), and water, pushed up from the bottom of the creek by the pressure of the ice, was trickling out onto the surface where it steamed into the frigid air, before freezing. It was midday, and the sun, just a few ticks above the horizon to the south, was throwing orange beams through the branches of the snow-colored spruces. Fortunately, I had my camera, and managed this photo before the sun slipped away.
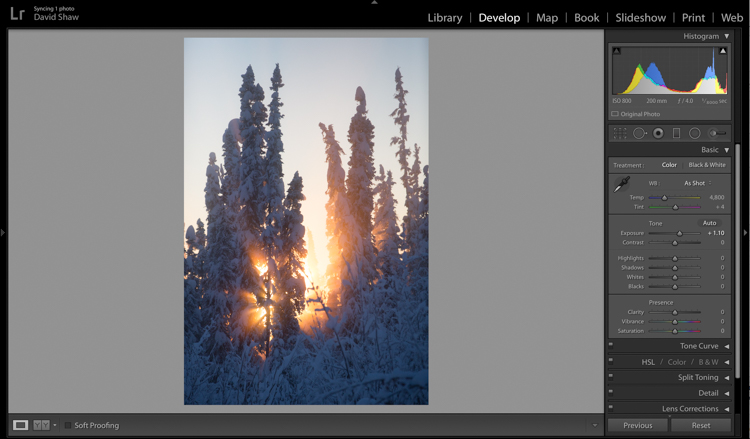
    Beams 2

    On that cold day, I was forced to underexpose the image to keep the beams of sunlight and the sky from blowing out. My first step was to return some of that brightness to the image by raising the Exposure +1.10 stops.
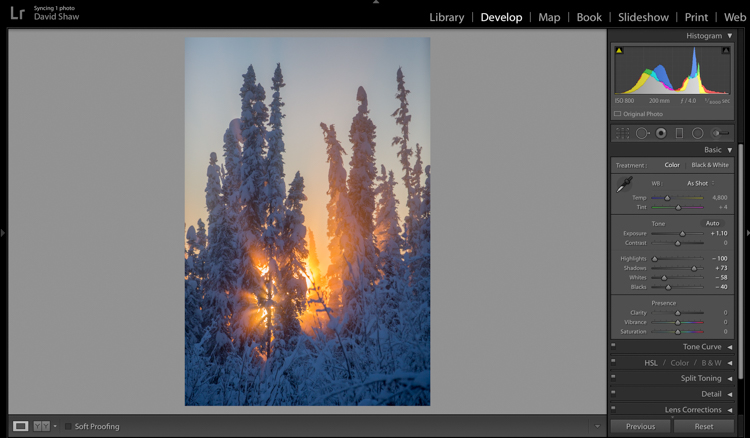
    Beams 3

    In general, I dislike High Dynamic Range (HDR) images, particularly the over-processed ones that appear regularly on Facebook and Instagram feeds. That said, HDR, or my Lightroom version of it, can be helpful in highly contrasted images like this one. Here, I pulled the highlights all the way down, bringing the beams and the sky back to more appealing levels. The Shadows I brought up, which revealed details in the trees and shrubs which were previously too dark to see. The effect, when used appropriately, does not look artificial.
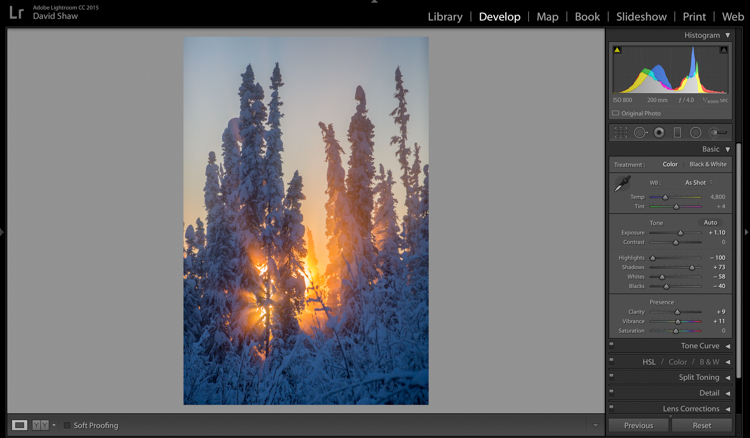
    Beams 4

    The image was already colorful and sharp so required very little in the way of Clarity, Vibrance or Saturation. A small boost (+9) to Clarity, +11 to Vibrance, and no change in Saturation was all the image needed.
    Beams 6

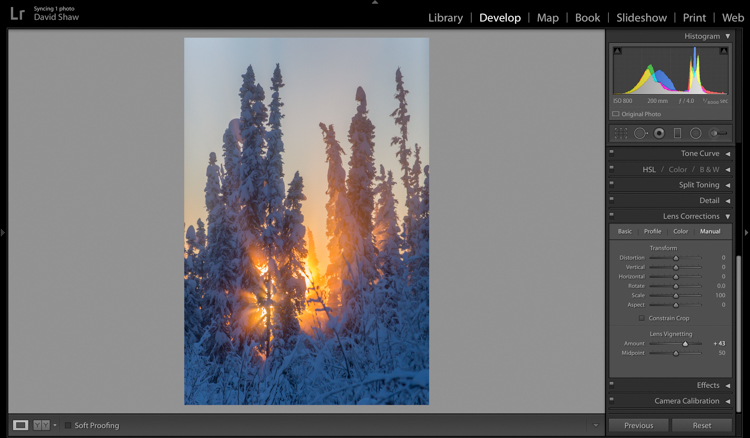
    The lens I used to make the image has a hood, which I realized after the fact, was slightly mis-aligned and threw a vignette over the corners of the photo. If I want a vignette (see next), it needs to be purposeful, not the accident of a poorly fitted hood. So, using the Lens Corrections module, I made a single adjustment, sliding the Lens Vignetting slider to the right, brightening the corners, and almost entirely eliminating the ugly dark area in the top right.
    Beams 7

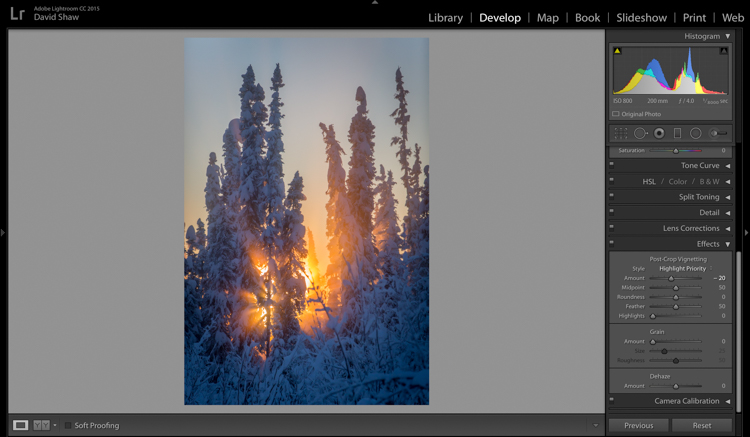
    The last thing I wanted to do was darken the sky a touch more, and bring further attention to the starburst of sunbeams coming through the trees. So, using the Effects Module, I added a -20 Post-crop Vignette, which effectively darkened the sky and lower corners.

    With that final change, the image was complete, a starburst of color on a brutal winter day.
    Before processing

    Before processing

    Beams Done-1

    After processing

    The Storm

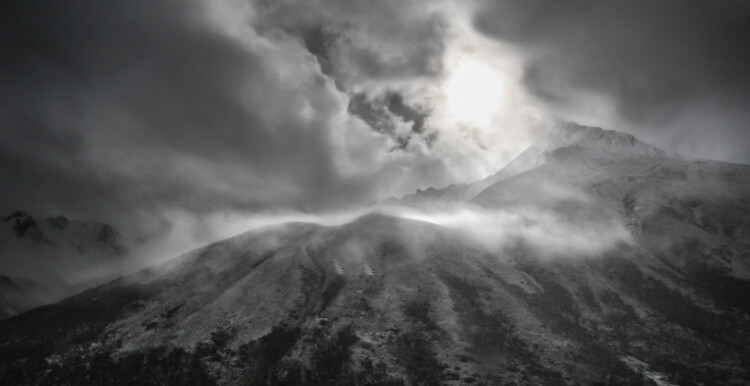
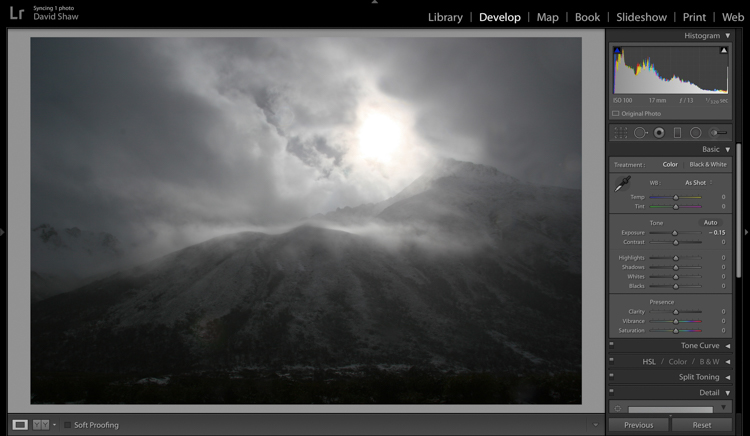
    A number of years ago, I spent 10 days trekking through the Himalayas of Bhutan. It was October, the tail end of the trekking season for the little mountain kingdom. My group and I hiked up from the lowlands, to a high camp at over 13,000 feet, where we planned to cross over two 15,000 foot passes before making a long descent back to the city of Thimpu. It didn’t work out as planned. We’d scheduled two nights at the high camp to acclimatize before crossing the passes. Just before bed on the second night, a storm rolled in, and by the time we woke up the following morning, there were eight inches of snow on the ground. Any hopes of penetrating higher into the mountains were dashed. Making the best of it, I rose and made photos of the dark mountains and falling snow.
    Bhutan 1

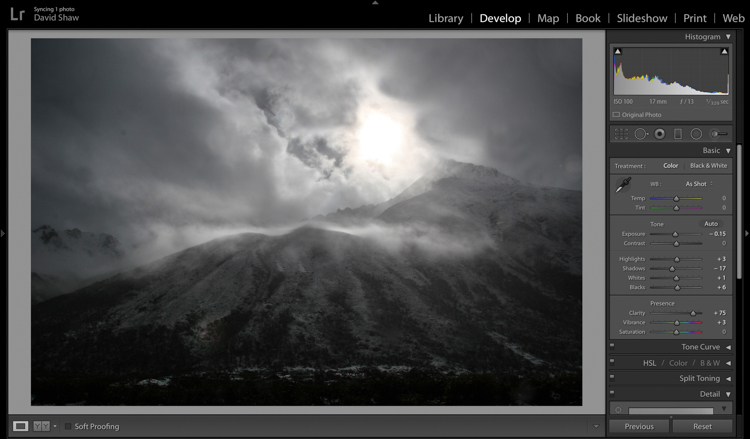
    In the field, I purposely underexposed to keep the small patch of bright sky surrounding the sun from blowing out entirely. The mountains ended up nearly black, and the sky dark gray. Though consistent with my desire to make a moody, foreboding image, I wanted to emphasize that feeling even more.
    Bhutan 2

    In the Basic Module, you can see that I darkened the image a bit more, left the highlights more or less alone, darkened the shadows a hair, and bumped the blacks just a bit to bring some texture into the dark lower corners. The Clarity slider I pushed notably to the right, which made the textures in the sky and mountain pop against the otherwise soft grays. I left the color adjustments mostly alone.
    Bhutan 3

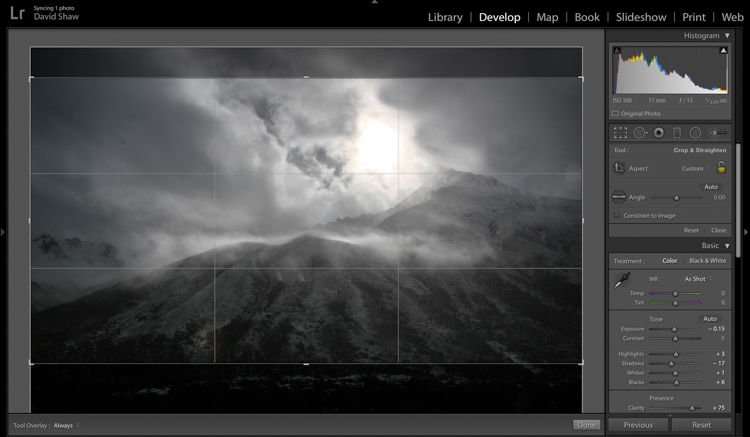
    The more I looked a the photo, the more I realized the top and bottom edges added nothing to the image. Using the crop tool, I nipped them off, bringing all the attention to the action in the central part of the frame.
    Bhutan 4

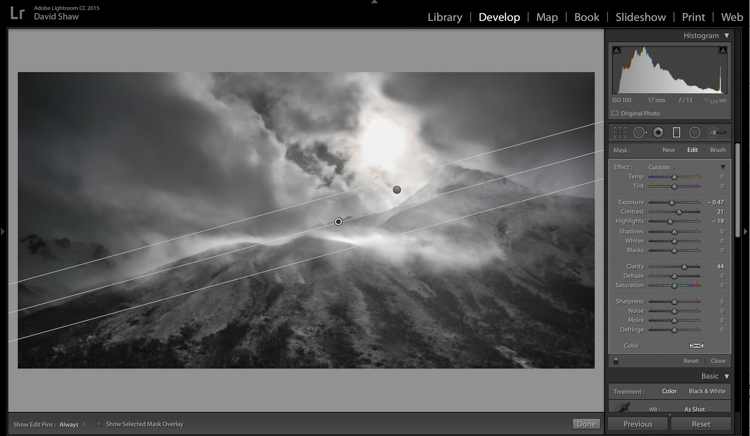
    At this point, the processing got a bit complicated. I wanted to deal with the sky and mountains separately. One I wanted to brighten, the other darken. There were two ways to deal with this:

    1. Use the Adjustment Brush tool to select and develop the two areas
    2. Use Graduated filters to accomplish the same thing. Because the Graduated filter allows more flexibility to change the softness of the adjustment edge, I decided to use that.

    The filter that adjusted the sky I darkened, and increased the clarity. The one for the mountains, I brightened, boosted the highlights, to make the scudding clouds pop, and added some clarity.
    Bhutan 5

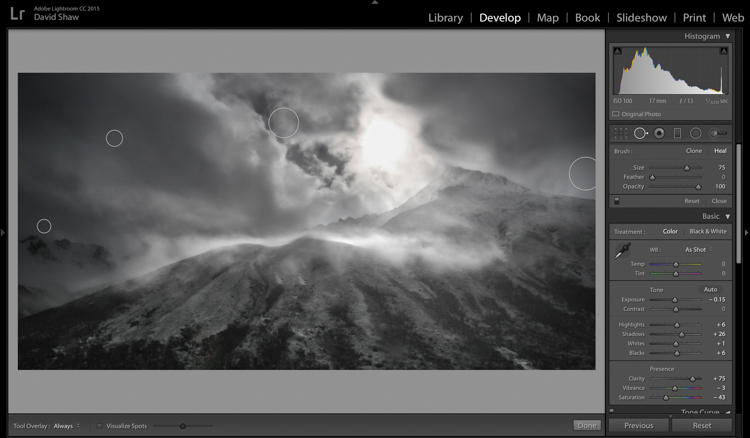
    As noted earlier, the changes in contrast can emphasize imperfections, and I took a moment to remove lens flares and dust spots.

    Last, I did a second pass of the Vibrance and Saturation. The yellowish patch around the sun was annoying me, so I dropped both the color sliders down reducing the image to a near black-and-white.
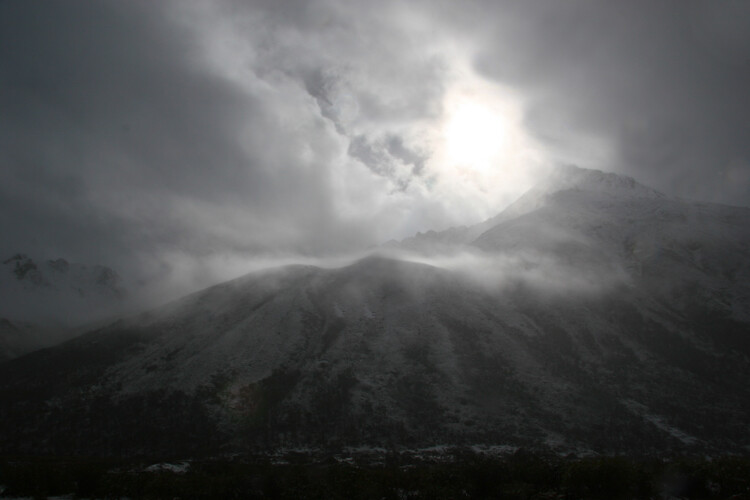
    Bhutan-Jangothang-snowstorm-04

    Before processing

    Bhutan Done-1

    Finished image after processing

    I really like the final image. It provides a sense of the storm and the foreboding nature of mountain weather. Looking back, I can easily remember my nervousness that snowy morning, the uncertainty, and eventually, our retreat back the way we’d come.

    Conclusion

    Great images can come from snow. Many photographers put their cameras away during a winter storm, but I strongly recommend you don’t because there is great stuff out there if you’ve got the perseverance to suffer through some cold days. The images you gather, like these, can be optimized in your computer. Remember to take a moment before you begin, to recall how the scene looked and felt when you made the image, then use those memories as your guide.

    Do you have any winter images on your computer that are begging to be processed? Now’s the time to do it, please share your images and comments below.

    googletag.cmd.push(function() {
    tablet_slots.push( googletag.defineSlot( “/1005424/_dPSv4_tab-all-article-bottom_(300×250)”, [300, 250], “pb-ad-78623” ).addService( googletag.pubads() ) ); } );

    googletag.cmd.push(function() {
    mobile_slots.push( googletag.defineSlot( “/1005424/_dPSv4_mob-all-article-bottom_(300×250)”, [300, 250], “pb-ad-78158” ).addService( googletag.pubads() ) ); } );

    The post Tips for Processing Winter Landscapes in Lightroom by David Shaw appeared first on Digital Photography School.


    Digital Photography School

  • Blue Light Special: Colored Streetlamps Precede Decline in Crime

    [ By WebUrbanist in Architecture & Cities & Urbanism. ]

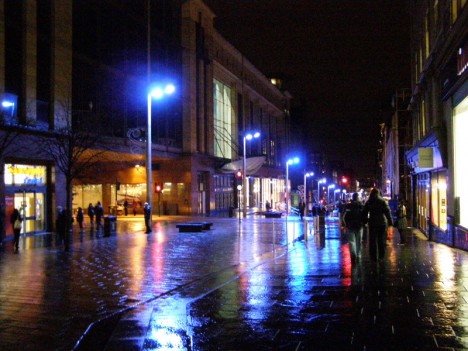
    blue lights glasgow downtown

    In the early 2000s, the city of Glasgow, Scotland, changed over to blue street lighting in an effort to improve the appearance of the city, but areas with the newly blue lights saw an unexpected and disproportionate decrease in crime.

    blue lights street japan

    No one could say for sure whether there was a causal correlation, but half a world away another city followed suit – Nara, Japan, experimentally began turning their street lamps blue. They also saw a decrease in crime.

    blue light highway signs

    In  the years that followed, similar deployments were tested, including the addition of over 150 blue lights to an expressway near Tokyo, aimed at reducing accidents.

    blue lights underground

    The Keihin Electric Express Railway Co. even changed the color of eight lights on the ends of platforms at Gumyoji Station in Yokohama, Japan, to curb track-jumping suicides. A subsequent report showed that in the years following, the station saw no suicide attempts (after previously being the site of multiple suicides per year).

    There are a number of theories about why the blue light could be causing a decrease in criminal behavior.

    Some argue the association of blue with police presence, except: Japanese police use mostly red lights.

    Another theory posits that blue light has a calming effect, feeling more pleasant than orange or red. Indeed, studies have shown that blue lights (associated with calm waters and open skies) can reduce stress responses in fish and be used to treat SAD (Seasonal Affective Disorder) in humans.

    blue light versus red

    Of course, it is also possible that the new colored lights are simply different and unfamiliar enough to cause people to feel awkward engaging in illicit or dangerous behavior where they are present. And if that is the case, changing all the public lights in the world to blue might be at best temporary fix, working until people get used to the new blue lighting. Experts have warned not to read too much into the effect, regardless, since the causal mechanism or connection has not yet been definitively determined.

    Share on Facebook


    [ By WebUrbanist in Architecture & Cities & Urbanism. ]

    [ WebUrbanist | Archives | Galleries | Privacy | TOS ]


    WebUrbanist