Blog

  • Flat-Pack Wall Furniture Folds into its Own Isometric Projection

    [ By WebUrbanist in Design & Furniture & Decor. ]

    3d wall flat pack

    This furniture series not only folks up to pack flat for shipping or storage, but also hangs on the wall, each piece in the shape of a two-dimensional isometric drawing of itself.

    De-Dimension by Jongha Choi uses a set of hinges and locking pins to fold out and lock into position, providing support when the pieces are used as seats and tables. Like other flat-pack furniture designs, this set boasts reduced weight and space requirements, though arguably at the expense of long-term durability and stability (depending in part on hidden bracing and the quality of components used).

    3d furniture designs

    The set is in part a commentary on representation versus reality, two-dimensional forms versus three-dimensional figures. From the designer: “Even the advent of 3D printing skills shake our fundamental notion of the image. Unlike the past, we are not only seeing the image as a means of reproducing objects, but also giving essential identity to the image itself. In other words, though the image still shows its visual effect on a flat plane, it is not just an expression of representation, but a making real an experience.

    3d wall furniture

    “In our current situation, in which modern society experiences the image, in relation to advertising, image circulation and the internet, why do we not question an images’ confinement to a flat surface. Why don’t we try to get more stereoscopic and attempt for direct experience with the image. My question started with this point and I tried several experiments in order to realize this idea from a personal point of view.”

    Share on Facebook


    [ By WebUrbanist in Design & Furniture & Decor. ]

    [ WebUrbanist | Archives | Galleries | Privacy | TOS ]


    WebUrbanist

  • Fujifilm X70 User Review: Sweet for Street

    Fujifilm x70 is the newest little beast in Fujifilm lineup of premium compact cameras. This camera is targeted towards enthusiast and professional photographers (thanks to retro styling and large APS-C sensor) who want to travel light and want image quality at the same time. Fuji x70 is a trade-off between the legendary Fujifilm x100T and more travel oriented point and Continue Reading

    The post Fujifilm X70 User Review: Sweet for Street appeared first on Photodoto.


    Photodoto

  • Sweet Spot: Panasonic Lumix DMC-GX85 Real World Samples

    The Panasonic Lumix DMC-GX85 has the makings of one sweet camera. It uses a well-regarded 16MP Four Thirds sensor (with no AA filter), is 4K capable and features Panasonic’s depth from defocus AF system.

    Packed inside a sleek, customizable body, the GX85 features a new shutter mechanism that appears to solve the thorny issue of shutter shock, a problem that plagued its big brother, the GX8. The GX85 also features a 3-axis stabilized sensor, that when combined with a Panasonic stabilized lens, offers 5-axis of stabilization, making it the most steady Panasonic Four Thirds camera to date.

    DPReview writer Dan Bracaglia has been using the GX85 for a while, and as well as various locations around Seattle he also took it on a recent trip to New Jersey.

    Articles: Digital Photography Review (dpreview.com)

  • Vitrima lens aims to bring low-cost 3D video capture to GoPro action cameras

    $ (document).ready(function() { SampleGalleryV2({“containerId”:”embeddedSampleGallery_0450741422″,”galleryId”:”0450741422″,”isEmbeddedWidget”:true,”standalone”:false,”selectedImageIndex”:0,”startInCommentsView”:false,”isMobile”:false}) });

    Looking to bring more excitement to your POV snowboarding videos? A new case called Vitrima is in the works, which would enable GoPro action cameras to record 3D video. The lens attachment uses mirrors to deliver two images to the GoPro camera’s own lens. The resulting resulting stereoscopic videos appear to be 3D when viewed through a VR viewer like Google Cardboard or the Gear VR.

    The Vitrima lens is waterproof and will ship already attached to a standard GoPro camera housing, and can also be used with various mounts. Because the lens is simply composed of carefully arranged mirrors, it works out of the box without any software. Though the resulting videos won’t feature 3D audio, the lens – which will cost $ 50 when the product launches – presents a low-cost way for someone to record 3D videos without purchasing a dedicated 3D camera like the $ 799 Vuze VR camera.

    The website lists Vitrima as ‘launching soon.’

    Articles: Digital Photography Review (dpreview.com)

  • Waterfails: We test Pentax K-1’s Pixel Shift

    Punch Bowl Falls in the Columbia River Gorge of Oregon State offered a unique setting to push the limits of the K-1’s pixel shift technology.  This is a conventional single exposure utilizing no Pixel Shift. Pentax K-1, HD Pentax D FA 24-70mm F2.8 ED SDM WR 70mm, F16, 0.3 sec, ISO 100.

    Introduction

    It’s clear that the Pixel Shift Resolution shooting modes make a huge difference to image quality from our studio tests, but how does that translate to real world shooting situations?

    In previous iterations of this feature (in the K3 II) we found that movement within a scene could cause major issues during Pixel Shift Capture in ACR conversions. So if leaves rustled in the wind or your subject moved in any way the camera compensated poorly for the movement, which then resulted in pixel blur and artifacts in the regions where the movement occurred.

    The latest iteration of Ricoh’s Pixel Shift technology found in the K-1 takes four separate images that it uses to build the final full resolution image upon and if movement occurred in subsequent images, the camera is supposedly able to differentiate the pixels that moved from the first frame it shot and clone in pixels for that area from the sharpest (for that region) of the four single (demosaiced) Raws to produce a much sharper final product then was possible in the Pentax K3 II.

    To determine just how much the technology has improved in the K-1 over the previous iterations, I took the camera out into the field to really push the limits of the Pixel Shift Resolution shooting modes.

    The Gorge

    The Columbia River Gorge, located along the Columbia River that borders Washington and Oregon state offers a variety of amazing scenic locations in addition to a number of challenging shooting environments. In order to test the capabilities and limitations of the Pixel Shift resolution mode in the K-1, I decided to focus on the seemingly endless amount of waterfalls that parallel the Columbia River about an hour or so outside of Portland, OR.

    In an effort to get the most bang for my buck I decided to hike along the Eagle Creek trail, heading toward Punch Bowl Falls. There are a number of beautiful spots to take in the views and two waterfalls (Punch Bowl and Metlako falls) to make the trip more than worthwhile. The weather conditions were, well, pretty miserable. My fiancé and I experienced moderate rain throughout most of the day which definitely put a damper (literally) on the trip.

    Most of the Eagle Creek trail is carved into some fairly steep cliffs and snakes its way back along the deep river valley that lies several hundred feet below the trail. 

    Pentax K-1, HD PENTAX-D FA 28-105mm F3.5-5.6 ED DC WR, 28mm, F6.3, 1/50, ISO 100

    Pixel Shift Real World Testing

    Our first stop was Metlako Falls located about a mile from the trail head. The access trail to Metlako is poorly marked, so it’s definitely easy to miss if you aren’t careful. I chose this waterfall because it offers an excellent opportunity to examine not only how the Pixel Shift deals with movement but also detail resolution as well.  

    The widget below gives you an idea of the detail resolution that is possible when you are able to use the Pixel Shift Resolution shooting mode. The files were shot at an aperture of F10 to avoid the effects of diffraction at smaller apertures. The two files below were shot either (1) without Pixel Shift Resolution, or (2) with Pixel Shift Resolution with Motion Correction turned on.

    $ (document).ready(function() { ImageComparisonWidget({“containerId”:”reviewImageComparisonWidget-22760863″,”widgetId”:363,”initialStateId”:null}) })

    As you can see, despite the issues with movement, there are benefits to shooting with the Pixel Shift Resolution mode turned on. The detail in the foliage is much better with Pixel Shift, and a nearly 2EV theoretical increase in dynamic range means greater latitude for Raw processing of contrasty scenes. 

    We already knew from our studio tests that in static environments with little to no movement, Pixel Shift mode allows you to attain a huge amount of noise-free detail in a single file.

    Unfortunately, at least when it comes to landscapes, finding truly static shooting environments can be difficult, if not impossible. To examine how the Pixel Shift modes handles movement, I took three separate exposures within a few seconds of each other, at the same settings, using the same lens for each test. The photos were shot with either (1) Pixel Shift Resolution mode turned off, (2) Pixel Shift Resolution Mode turned on without Motion Correction, or (3) Pixel Shift Resolution mode turned on with Motion Correction. The following are ACR conversions of the Raw files.

    $ (document).ready(function() { ImageComparisonWidget({“containerId”:”reviewImageComparisonWidget-38320267″,”widgetId”:362,”initialStateId”:null}) })

    From looking at these shots, it’s obvious that Pixel Shift Resolution shooting modes are challenged by motion of any kind. Immediately obvious in the ACR conversions above are the large patches of green and magenta artifacts in the ‘On’ shot, and cross-hatching in both ‘On’ and ‘On w/ Motion Correction’ shots. The lack of large color artifacts in the ‘On w/ Motion Correction’ shot is really just dumb luck: recall that a similar Raw above had such artifacts. Note that artifacts are drastically reduced in out-of-camera JPEGs with Motion Correction on (not shown), but the issues with the Raws might crop up whenever motion is present in the scene. 

    We continued our trip up the Eagle Creek trail to the lower Punch Bowl falls trail where you can get up close and personal with one of the most gorgeous waterfalls in the Columbia River Gorge. I decided to focus on just the Motion Correction Pixel Shift Resolution shooting mode for this test as I really wanted to see how it handled subtle water movement away from the main waterfall compared to the normal shooting mode.   

    Normal Shooting Mode (Raw scaled 50%)

    HD Pentax D FA 24-70mm F2.8 ED SDM WR, 70mm, F16, 1/4, ISO 100

    Download Raw (PEF) file

    Pixel Shift Resolution with Motion Correction (Raw scaled 50%)

    HD Pentax D FA 24-70mm F2.8 ED SDM WR, 70mm, F16, 1/4, ISO 100

    Download Raw (PEF) file

    In the above image you can see how poorly the Pixel Shift mode fared in this test. It had a great deal of difficulty even in areas where movement was a lot more subtle such as water lapping at the rocks in the lower left-hand corner of the frame. The green and magenta artifacts can be seen here along with a fair amount of pixelation in any area that showed movement during the imaging process.

    If you don’t mind JPEG output, there is some good news. You can retroactively add motion correction in-camera to an image shot as part of a Pixel Shift burst.

    After applying the Pixel Shift to the file you can export it as an out of camera JPEG. With that said, I don’t know too many landscape photographers that shoot in JPEG or want to produce out of camera JPEGs, since they’re mostly un-editable from a post processing standpoint.

    Out of Camera JPEG Pixel Shift (50% crop)

    No Motion Correction

    HD Pentax D FA 24-70mm F2.8 ED SDM WR, 70mm, F16, 1/4, ISO 100

    Out of Camera JPEG Pixel Shift (50% crop)

    Motion Correction

    HD Pentax D FA 24-70mm F2.8 ED SDM WR, 70mm, F16, 1/4, ISO 100

    There’s another benefit to Pixel Shift we briefly alluded to: since information from four Raw files are essentially combined, noise is decreased, since you’re effectively averaging 4 frames. This nearly 2 EV increase in dynamic range is evident in the example below: while the non-pixel shift file still shows respectable noise performance, thanks to the very high dynamic range sensor, the Pixel Shift file is even cleaner, particularly at 100%. 

    $ (document).ready(function() { ImageComparisonWidget({“containerId”:”reviewImageComparisonWidget-54913034″,”widgetId”:364,”initialStateId”:null}) })

    So what does this mean?

    After analyzing the results from this test we determined that there really is no difference (outside of shooting variables such as water current and wind) between the Motion Corrected Raw files and the Normal Pixel Shift Raw files with no Motion Correction applied. It appears that Motion Correction is a JPEG only process that the camera’s JPEG engine is able to apply to the Pixel Shift files (even retrospectively for Pixel Shift Raw files). 

    That explains why it appears that the Motion Corrected Raws actually looked worse in some cases than the non-motion corrected Raws in some of the examples provided above; there really wasn’t a difference in what the camera ‘did’ per se but more in the shooting conditions at hand (water motion, wind, current etc). This also explains why the motion corrected in camera JPEGs looked much better than the non-Motion Corrected JPEGs that the camera produced. 

    With that said the waterfall Raw examples just provided too many variables (wind, variable water motion and current) to really nail down a firm explanation of what we were seeing from this small sample set of images.  We are currently working on a supplemental piece with some nice concrete image examples and data that will really solidify what the differences are between the Pixel Shift Motion Corrected and Non-Motion Corrected Raw and JPEG files. 

    Conclusion

    Overall, the results of this test were honestly a bit disappointing. I think that everyone here, myself included, had hoped that Pentax was able to get the Pixel Shift movement issues we saw in the K3-II resolved, but it looks as though the company still has a lot of work to do. The amount of detail in the Pixel Shift files is markedly better than those taken with the mode turned off, but for landscape work (assuming anything short of totally still conditions) artifacts caused by movement in the scene almost negate the benefits. It should be noted that the color artifact issues can be rectified with processing software such as Silkypix, but the issues with pixel blur wherever motion occurred are still apparent even when using other post processing tools.   

    In absolutely perfect conditions, the K-1’s Pixel Shift shooting modes can offer outstanding results, but if there is a chance of any movement occurring in the frame I would definitely recommend staying away from them or at least backing your files up with non-pixel shift exposures as well. We’ll be posting more sample images from my trip to the Gorge soon, and and be on the look out for our forthcoming full review of the K-1 as well!


    Please note that all of the images published in this article were processed using Adobe Camera Raw 9.5 (unless otherwise stated). We’re currently examining the appearance of Pixel Shift files processed using other Raw converters and we’ll continue to update this article with our findings.

    Articles: Digital Photography Review (dpreview.com)

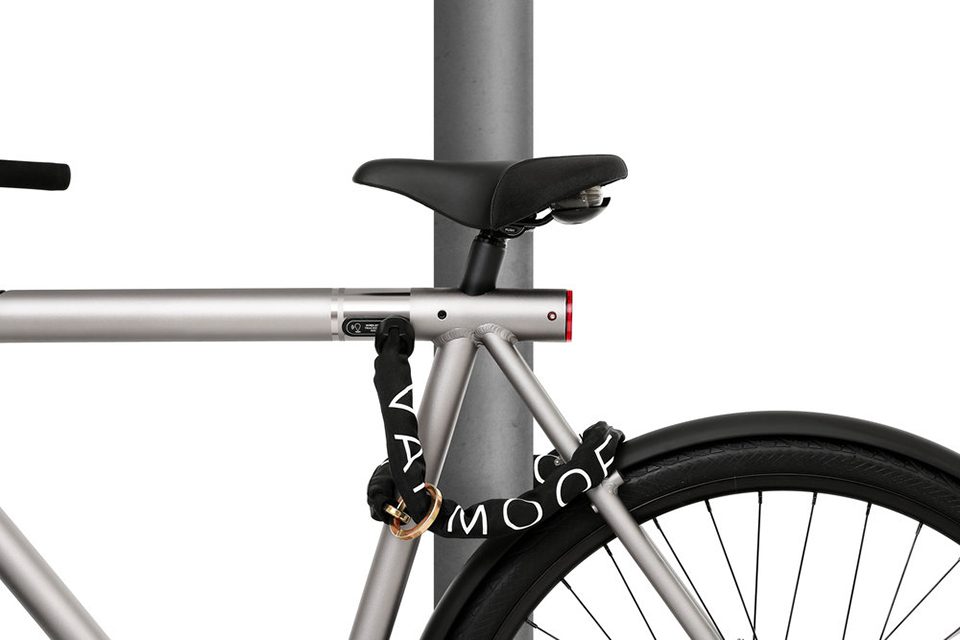
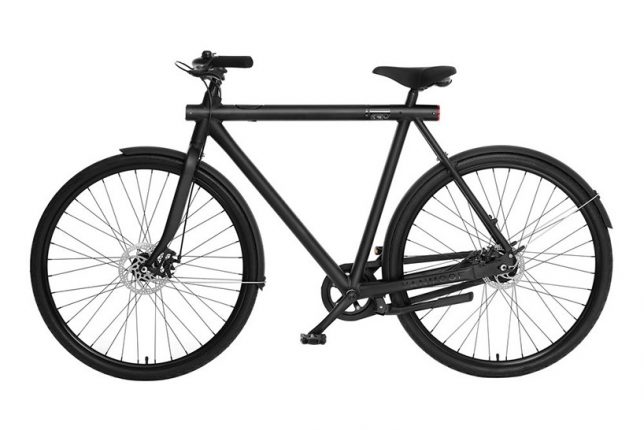
  • Street Smart: Theft-Proof Bike Comes With Recovery Service Guarantee

    theft proof smart bike 8

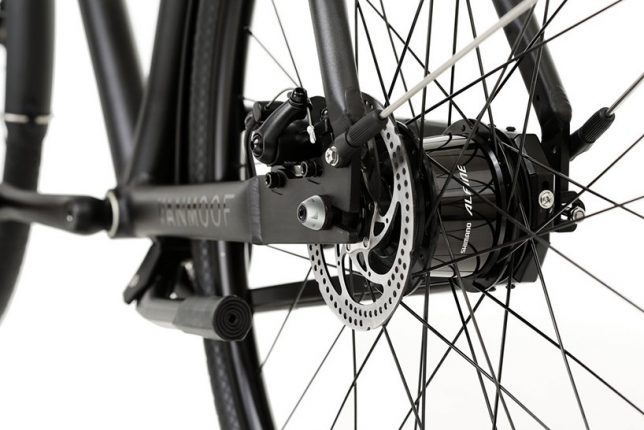
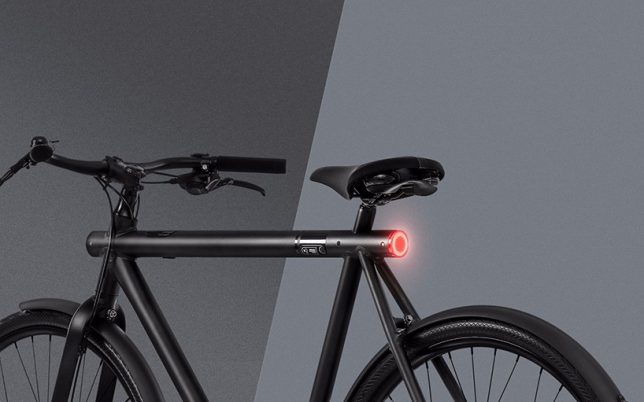
    Even the strongest bike locks aren’t totally foolproof, but when locks fail or risky storage options don’t pay off, the makers of this smart bike will send a recovery team after your ride. The ‘SmartBike’ by Amsterdam-based bike specialists VanMoof comes with a lot of cool features, but this anti-theft guarantee is definitely the most valuable of them all, and they’ll even buy you a new one if they can’t find it once it’s stolen.

    theft proof smart bike 3

    theft proof smart bike 2

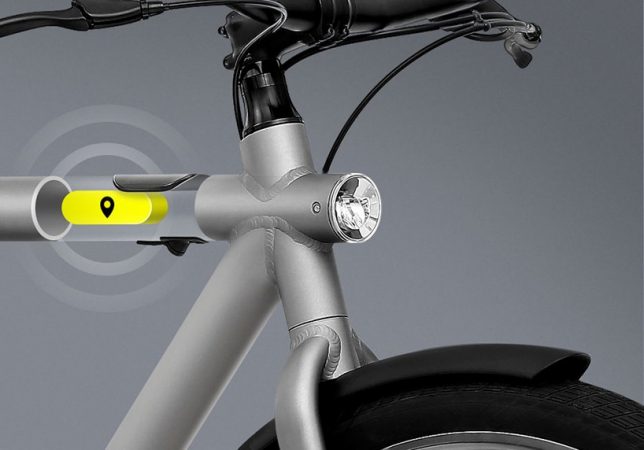
    Available in 3 speed in grey or 8 speed in black, the VanMoof SmartBike features GSM anti-theft tracking with ‘Peace of Mind Service’ free of charge for the first two years of ownership. If a thief manages to make it past all the built-in anti-theft parts, like tamper-proof nuts and screws, the GSM cellular info will activate, allowing the recovery team to find it even if it’s inside a building. They promise to get it back within two weeks, with the last mile of tracking powered by a “top-secret” locating technology.

    theft proof smart bike 6

    theft proof smart bike 7

    theft proof smart bike 5

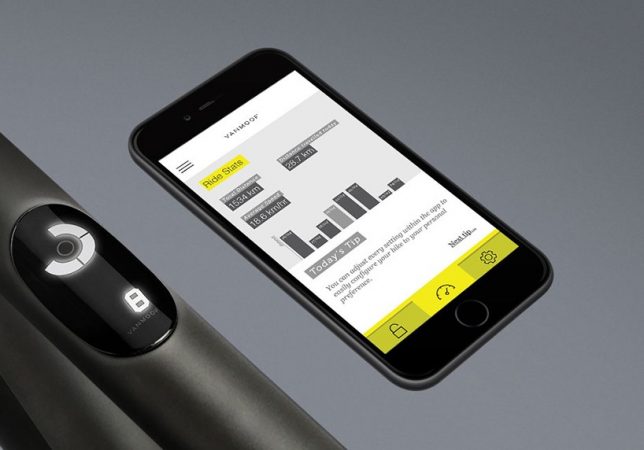
    But theft isn’t the only special feature on this bike. Designed to be the ultimate city ride, this one comes with a smartphone app, and can be unlocked with a tap of your finger on your phone or the bike’s dashboard. The software will automatically check via your smartphone’s Bluetooth that it’s really you before it unlocks your bike, so freeing it takes seconds. The app also offers personalized direction and weather for your commute and ride stats, and the bike has head and tail lights that automatically turn on and off. All electric components are pedal-powered, so there’s no charging required.

    theft proof smartbike 1

    theft proof smart bike 4

    The bike is now available for pre-order starting at $ 1098.00, with free shipping.


    WebUrbanist

  • Rainbow Connection: Huge Mural Spans 200 Houses on Hillside in Mexico

    painted town after

    Representing an enormous collective effort, this remarkable mural manages to look complete from a distance while, upon closer inspection, brightening 209 houses occupied by 452 families, impacting the lives of 1808 residents of this hillside community.

    painted town before

    painted town hillside

    Even more remarkably, the color selections for different sections (totalling over 200,000 square feet of paint) were worked out in conjunction with those occupying the houses of Palmitas, who were asked about their favorite colors and included in the design scheme. The project has been credited with reducing youth violence and local crime rates while creating jobs for the area.

    painted town tour

    painted wall house closeup

    The group orchestrating this massive undertaking is called Germen Crew, self-named after germs, the seeds of ideas and art. Led by Mibe, a street artist from nearby Mexico City, the group sees itself as much as collection of community organizers and facilitators as artists or creators.

    painted town mexico

    For them, residents provide multiplier effects strengthening project, process and outcome and making for a much different endeavor than murals made under the radar by individuals. In turn, the artists used a simple pallet of conventional and replicable paint colors, making it both easy to maintain but also enabling those in the neighborhood to turn doing so into a collaborative activity.

    painted town steps

    Like the Favela Project in Rio or Blue Town of Morocco, there are secondary benefits for the locals as well, including projected increases in tourism. In the case of the latter, the strange site of a single-colored town brought in close to 100,000 visitors in the six months following its completion. This project was completed with support from regional governments as well as the national government of Mexico


    WebUrbanist

  • The Not-So-Obvious Reason for Using HDR

    Get Viktor’s Rapid Editing for HDR eBook, Course & Presets Bundle at 60% off now over at Snapndeals, only until June 7th (AUS time). 

    Over the past five years or so, HDR (high dynamic range) has become a huge part of my photography.

    Even with the latest advances in camera sensor technology, the dynamic range of the human eye is much wider than any modern camera sensor, and as a result, can only partly interpret the human experience. The goal of HDR photography is to artificially increase the dynamic range of a given photograph, making it as close as possible to the human experience.

    Images The Not So Obvious Reason 01

    I do not consider HDR to be a photography style, but rather, a technology that helps us to extend our creative reach and overcome the limitations of modern photo equipment, specifically a camera’s sensor.

    When the dynamic range of the scene we capture exceeds the dynamic range of the camera’s sensor, it results in the loss of information (or details) in both the highlight and shadow areas. HDR technology allows us to separately capture these details from the darker and brighter areas of the scene, and merge that information during the editing process.

    Even though every generation of modern camera offers a larger and larger dynamic range that gets even closer to the human experience, HDR technology continues to be an extremely valuable tool to have in your toolkit.

    But, those who read my blog and follow me on social media often give me a hard time when I post an HDR processed image with a dynamic range that is not extreme. As a result, I get blamed for using HDR for no reason and am accused of intentionally complicating the editing process.

    Images The Not So Obvious Reason 02

    In this article, I will demonstrate exactly why and how I use HDR when the lighting of a scene is not too extreme.
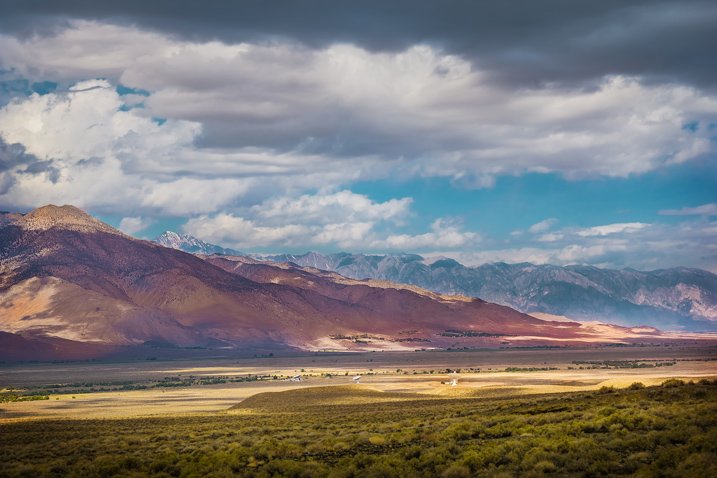
    I took the featured photo in the Eastern Sierra during my driving trip to the Southwest.

    Images The Not So Obvious Reason 03

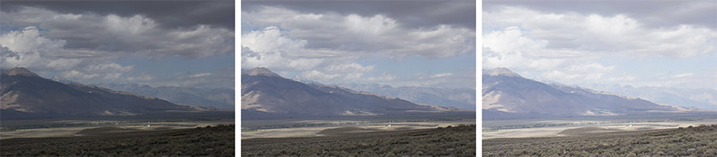
    Covered by the clouds, the sun diffused the light and made it less dynamic. I could see right away that I did not need HDR processing to capture and preserve the entire light range. However, I took three bracketed shots anyway just to make sure I collected as much information from the scene as possible.

    When I started editing the photo in Lightroom, I only used a single RAW image (middle bracket). The challenge was to overcome the mild haze in the air, so I had to apply pretty aggressive edits in Lightroom (contrast, clarity and vibrance) to bring back the contrast and colors of the scene.

    Once I was happy with the result, I evaluated the image by zooming in to 100% (1:1 in Lightroom), in order to see what noise reduction setting to use. When I did this, I realized that the image started to break up because of my aggressive editing. The deterioration in the image was beyond digital noise and was almost impossible to fix even using the dedicated noise reduction tool.

    Images The Not So Obvious Reason 04

    This is when HDR came to the rescue. I selected three bracketed shots and merged them to HDR using the HDR Merge module of Lightroom.

    Images The Not So Obvious Reason 06

    After Lightroom produced a brand new HDR image in DNG format, I used the Sync functionality of the program to apply the editing setting of the original RAW file, to the new HDR image.

    The effect of the edits were identical to the original RAW file, but the image was much cleaner without any traces of deterioration. The newly created HDR file had much more information and details, which allowed me to push it much harder without producing negative artifacts.

    Images The Not So Obvious Reason 05

    The image is cropped 100% without any noise reduction added.

    The digital noise of the image was mild and was completely eliminated using the noise reduction plugin.

    Conclusion

    By merging multiple images to HDR, it not only helps us overcome the dynamic range limitations of modern photo equipment, but can also to produce images that have more digital information and details, compared to individual out-of-camera RAW files.

    Get Viktor’s Rapid Editing for HDR eBook, Course & Presets Bundle at 60% off now over at Snapndeals, only until June 7th (AUS time). 

    googletag.cmd.push(function() {
    tablet_slots.push( googletag.defineSlot( “/1005424/_dPSv4_tab-all-article-bottom_(300×250)”, [300, 250], “pb-ad-78623” ).addService( googletag.pubads() ) ); } );

    googletag.cmd.push(function() {
    mobile_slots.push( googletag.defineSlot( “/1005424/_dPSv4_mob-all-article-bottom_(300×250)”, [300, 250], “pb-ad-78158” ).addService( googletag.pubads() ) ); } );

    The post The Not-So-Obvious Reason for Using HDR by Viktor Elizarov appeared first on Digital Photography School.


    Digital Photography School

  • Photomyne app scans multiple prints at a time

    Last week we wrote about the Unfade app that lets you to scan and restore old photos using an iPhone. One of Unfade’s downsides, depending on your personal preference, is its simplistic approach that uses an almost fully automated process and hardly allows for any user input. The good news is that there are alternatives for those who want a little more control and efficiency.

    One of them is Photomyne. The app is currently available for iOS, with an Android version to be released in the near future. Its main advantage over Unfade is the ability to scan more than one print at once, allowing for faster throughput. You can simply lay out several prints on a desk or scan directly out of an album. Of course this means reduced scanning resolution compared to Unfade’s one-print-at-a-time approach, but most users of this kind of app can probably live with the image quality. 

    Once images have been scanned, Photomyne gives a few more retouching and restoring options than Unfade and sharing features are on board as well. A ‘discover’ feature lets you see other users’ scanned images in an Instagram-like image feed, as long as they have decided to make them public. Collaborative albums and cloud-only backup are currently in the development pipeline. Photomyme comes in several variants: you can either install a free version that lets you pay per session via in-app purchase, or a paid version for $ 5 that gives you a range of basic features. On top of that there is a $ 12 per year premium plan that includes unlimited saves, backup and access to your scans from desktop computers. 

    Articles: Digital Photography Review (dpreview.com)

  • Review of the Sigma 150-600mm Contemporary Lens Plus TC-1401 Teleconverter Bundle

    One of my favorite subjects to photograph is wildlife, so when asked to review the Sigma 150-600mm lens, I was excited about the opportunity to see how its results compared to my Tamron 150-600mm.
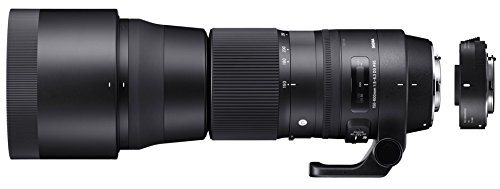
    Sigma 150-600mm

    In addition, Sigma recently began offering a bundle for their 150-600mm with a 1.4x teleconverter. Since I shoot mainly with a Nikon D750 full frame, the lens bundled with a 1.4x TC interested me very much. The 1.4x TC makes the 600mm, an 840mm on a full frame camera, so in theory this allows my full frame camera to shoot wildlife with nearly the same zoom factor as a crop sensor. (Nikon crop sensors are 1.5 and Canon, 1.6)

    There are two things to consider when looking at a new lens:

    1. First is its ease of use
    2. Second is the quality of its optics.

    In this article I’ll be applying both of these considerations as I review Sigma’s new bundle, and make comparisons between the Sigma and Tamron lenses. All images in this article were captured with the Sigma 150-600mm with the 1.4x TC.

    sigma-150-600-4

    Focusing

    The Tamron features a larger, thicker focusing ring than the Sigma, which makes it easier to manually focus the lens. As for the Sigma, it has an extra setting on the autofocus switch for manual override (MO) which combines autofocus with an option to manually focus. I did not notice any major difference in the focusing responsiveness between the two lenses. Both did a fair job when grabbing focus, though neither lens is going to focus as quickly as a much more costly 600mm prime lens. The minimum focusing distance on the Tamron is just slightly less than the Sigma – not a game changer, but nevertheless a plus for the Tamron.

    Focus Limiter switch

    While both lenses have a focus limiter switch, with settings between Full and 10m (Sigma) or 15m (Tamron) to infinity, the Sigma features a third option on the limiter switch for 10m to 2.8m. In my testing, this third option proved very useful and was easy to locate and use, in order to focus on closer objects much quicker.

    Customization

    A feature the Sigma lens offers that the Tamron does not is an extra customization switch, which provides for an optional USB docking station (purchased separately). This allows a photographer to create two customized setting for OS (Optical Stabilization), AF, and focus-distance limits, and can also be used to download firmware updates directly to the lens.

    sigma-150-600-5

    Zoom Lock

    Both the Tamron and the Sigma have a locking switch to prevent zoom creep at 150mm. However, the Sigma can also lock at several other focal settings, and what is even better, a quick twist of the zoom ring will unlock the it, without having to fumble around to find the switch. (In some cases this might be the difference between capturing and missing a killer shot!)

    I found that my Tamron lens crept more than the Sigma, but this could be caused by the fact that it is an older lens with more use. Still, the lock switch on the Sigma is a great feature, especially since one can “soft lock” at many focal lengths.

    Image Stabilization

    Both lenses have their own image stabilization systems: Tamron’s VC (Vibration Compensation) and Sigma’s OS (Optical Stabilization). The Tamron has a simple on and off for the VC, while the Sigma has two settings: #1 is the standard setting for normal lens movement, and setting #2 is used for hand-held panning on a vertical plane, which will correct for up and down movement in subjects, such as birds in flight.

    sigma-150-600-3

    Zoom Ring

    The zoom ring on the Sigma turns counter clock-wise, which is no big deal for Canon shooters. But for Nikon users, this is opposite from the normal zoom rotation on most Nikon lenses. It’s not a big deal, but does take some getting used to.

    Tripod Collar

    Both lens come standard with a tripod collar, but the foot on the Sigma collar is much smaller than the Tamron’s. This is only a minor problem, but I found a solution for it. I added a 5 inch quick release plate to the foot, which makes a great handle to carry the Sigma lens, as well as a plate to connect to a tripod.

    sigma-150-600-1

    Image Quality

    Here is where the comparison gets tougher, as both lenses are much sharper at the shorter focal lengths, and both are softer at the longer focal lengths. Both are sharper when stopped down to f/8 or f/9, than wide open. In my opinion, the difference in image quality between the two is negligible. There is no clear winner here, both having areas where they are slightly better than the other.

    The addition of the 1.4x TC to the Sigma when stopped down, doesn’t seem to affect the image quality. The Sigma seems to have a clear advantage when it comes to chromatic aberration (CA), and even using the 1.4x TC there was noticeably less fringing in high contrast areas, when compared to the Tamron. Of course, CA is very easily corrected in Camera RAW or Lightroom when shooting in RAW.


    sigma-150-600-7

    sigma-150-600-6

    Warranty

    The advantage for warranty goes to Tamron, which offers a 6 year one, compared to 4 years with the Sigma. Still, in my opinion, both lenses are well constructed, and I am not convinced how much of an advantage that is, as most warranty issues show up early on.

    1.4x Teleconverter

    Adding the bundle of the 1.4x TC, and the 150-600mm Sigma can get your full frame camera back in the field when it comes to wildlife photography. While adding the teleconverter seems to slow the autofocus a bit, I shot with this bundle on both my crop sensor and full frame sensor cameras, and I believe the autofocus was more responsive on the full frame.

    NOTE: Before purchasing the 1.4x TC, make sure the camera will autofocus at f/8. Many entry model DSLRs will not autofocus above f/5.6, so while this bundle may fit those cameras, manual focus will be necessary. Other models may only autofocus on the center focus point, and still others may have a limited number of focus points with the 1.4x TC.

    Adding the 1.4x TC did seem to give a softer image when the lens was extended to 600mm (840mm), but if you stop down to f/10 to f/11 the images are nearly as sharp as at 600mm without the TC. Of course, stopping down means either using a slower shutter speed or a higher ISO, which may add some blur or noise to an image. I did find that the OS on the Sigma did a nice job of reducing camera shake, when hand holding at slower shutter speeds.
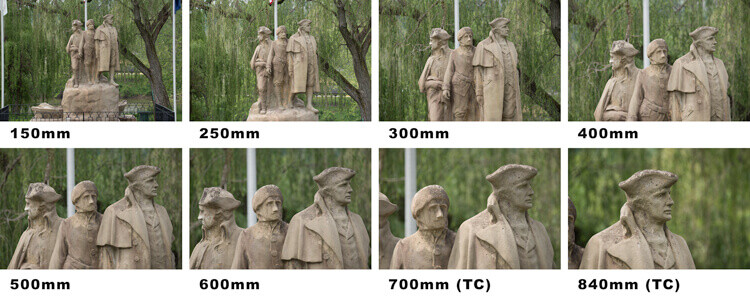
    The above images show the range and extra reach of the Sigma 150-600mm with the last 2 images having the 1.4 TC added for an extra 240mm of reach.

    The above images show the range and extra reach of the Sigma 150-600mm with the last two images having the 1.4x TC added for an extra 240mm of reach.

    Tips

    The rule of thumb when shooting with long focal lengths is to set the shutter speed equal to, or greater than the focal length, so remember that when by adding the 1.4x TC to a 600mm, one is now shooting at 840mm on a full frame, and 1260 mm on a crop sensor. For sharp images, a shutter speed over 1/1000th of a second is a must.

    When carrying your camera with a large lens such as these 150-600mm lenses, it’s best to hold them by the lens rather than your camera. These lenses weigh much more than your camera and can put a lot of stress on the lens mount if carried by the camera. Likewise, when mounting on a tripod, always use the tripod collar to reduce stress on your camera’s lens mount (it is better balanced using the collar and won’t be front heavy).

    Conclusion

    Both the Tamron and Sigma lenses are well designed, and for the price range are great equipment investments. As mentioned earlier, I feel the image quality compared very closely. The Sigma does offer some useful extra features, out-weighing the issues of the smaller focusing ring and the counter-clockwise turning of the zoom ring for a Nikon shooter.

    If you currently have a Tamron it may not be worth making a switch. But with the addition of the 1.4x TC, the Sigma bundle offers a great setup for full frame cameras, as well as crop sensors for some extra reach. So if you are looking for some extra reach (and we all are) the addition of the 1.4 TC to the Sigma may be a game changer. It was for me!

    As a result of my review of the Sigma bundle for this article, I sold my Tamron 150-600mm, and purchased the Sigma 150-600mm bundled with the 1.4 TC, to extend the usage of my full frame Nikon D750, especially for photographing wildlife.

    googletag.cmd.push(function() {
    tablet_slots.push( googletag.defineSlot( “/1005424/_dPSv4_tab-all-article-bottom_(300×250)”, [300, 250], “pb-ad-78623” ).addService( googletag.pubads() ) ); } );

    googletag.cmd.push(function() {
    mobile_slots.push( googletag.defineSlot( “/1005424/_dPSv4_mob-all-article-bottom_(300×250)”, [300, 250], “pb-ad-78158” ).addService( googletag.pubads() ) ); } );

    The post Review of the Sigma 150-600mm Contemporary Lens Plus TC-1401 Teleconverter Bundle by Bruce Wunderlich appeared first on Digital Photography School.


    Digital Photography School