Blog

  • Pokédrone Go: Micro-Drone Augments Reach for Pokémon Players

    [ By WebUrbanist in Gaming & Computing & Technology. ]

    pokeman mini drone game

    Pokémon Go has hit the ground running, breaking game release records and getting people out of the house and onto city streets. This new drone promises to take the game even further, allowing aerial access to hard-to-reach spots. Designed by TRNDlabs, the Pokédrone lets users slot their smartphone into a controller, then steer the small drone to the target location, extending reach in real life.

    The tiny four-prop toy addresses a persistent problem with game: sometimes the spots players need to get to (or at least: get a phone-connected camera to) IRL are located above water or in the middle of roads, either hard or dangerous to reach. Its creators promise it will make the tagline of the game a reality and let you “catch ’em all.”

    pokedrones

    This design solution release comes amidst an onslaught of press around the game, from stories of player-related accidents and muggings to uplifting tales of people getting out and meeting strangers on the streets.

    flying drone capture

    Relying on data from Ingress, the Pokémon game is still a work in progress, but supplemental projects like the drone above may prove helpful in fixing its problems and filling in its gaps.

    trndlabs-2652-SKEYE-nano-drone-FPV-DIECUT01-aw-v3-OL

    It is hard to say whether Pokémon-as-such will retain its popularity over time, but so far it seems to have broken down the wall between console gaming, mobile games and urban exploration. As such, it is opening a (virtual, real and metaphorical) door for similar interactive technologies aiming to gain ground.

    pokeman joe

    Who knows, maybe the next iteration of the game (Poké-Man Joe?) will let users seek out other players and digitally “capture” them by conversing or swapping data, a kind of meta-Pokémon as it were aimed at generating not just urban but human interaction.

    Meanwhile, the game is already helping people rediscover their civic surroundings, getting them to engage with architecture, parks, plazas, monuments and memorials in new and compelling ways (at least when they glance up from their screens).

    Share on Facebook


    [ By WebUrbanist in Gaming & Computing & Technology. ]

    [ WebUrbanist | Archives | Galleries | Privacy | TOS ]


    WebUrbanist

  • Aputure Amaran AL-M9 is a pocket-sized adjustable LED fill light

    Still photography and video accessory purveyor Aputure has unveiled the Amaran AL-M9, an affordable pocket-sized LED panel. It uses 9 SMD TLCI 99 bulbs, an integrated rechargeable Li-ion battery, offers 9-step brightness adjustment and 120-degree light beam angle, and is a lightweight at 140g. Aputure bills the Amaran AL-M9 as a multi-purpose light for macro photography and ‘run and gun video,’ among other uses.

    Aputure says the Amaran AL-M9 is the size of a credit card with an 11mm thickness, and offers 350 lux at a distance of 0.5m. The light can be attached to a standard 1/4-20” mount, and includes a pair of magnetic diffusion filters.

    The Amaran AL-M9 is available for pre-order from Amazon for $ 45 with a launch date of August 6. Shipping is currently estimated to happen between August 17 and 26, however.

    Via: PetaPixel

    Articles: Digital Photography Review (dpreview.com)

  • Comparison Review: Sony FE 50mm F1.4 ZA vs 55mm F1.8 ZA

    Sony has announced a high-end ‘normal’ prime for its Alpha E-mount line of cameras: the Planar T* 50mm F1.4 ZA lens. As the third normal prime for the system, we wanted to know what it offers over the already excellent FE 55mm F1.8 ZA, so we set about performing some benchmark tests.

    We’ll take a look at sharpness on this page, and bokeh, coma, and longitudinal chromatic aberration on the next.

    Sharpness

    Below, you’ll see a series of aperture progressions for the 50mm F1.4 ZA and 55mm F1.8 ZA. Have a look around the scene at various apertures to get an idea of the capabilities of these two lenses – with the caveat that this performance is only representative of our single copy of each lens.

    $ (document).ready(function() { ImageComparisonWidget({“containerId”:”reviewImageComparisonWidget-27965628″,”widgetId”:381,”initialStateId”:null}) })

    Wide-open, the 55/1.8 is slightly sharper than the 50/1.4, both centrally$ (document).ready(function() { $ (“#imageComparisonLink2690”).click(function() { ImageComparisonWidgetLink(2690); }); }) and peripherally$ (document).ready(function() { $ (“#imageComparisonLink2691”).click(function() { ImageComparisonWidgetLink(2691); }); }) (the advantage is retained on the left side$ (document).ready(function() { $ (“#imageComparisonLink2692”).click(function() { ImageComparisonWidgetLink(2692); }); }) of the frame as well, despite the fact that our 55/1.8 is slightly decentered and has poorer left side performance). But none of this should be too surprising, since sharpness at F1.4 is far more challenging than at F1.8. In fact, the 50/1.4 holds up very well considering the 2/3 EV disparity in f-stop.

    Comparing both lenses at F1.8 (a more level playing field), the 50/1.4 catches up to the 55/1.8 in terms of center sharpness$ (document).ready(function() { $ (“#imageComparisonLink2695”).click(function() { ImageComparisonWidgetLink(2695); }); }), but still lags in peripheral sharpness on the left$ (document).ready(function() { $ (“#imageComparisonLink2693”).click(function() { ImageComparisonWidgetLink(2693); }); }) and right$ (document).ready(function() { $ (“#imageComparisonLink2694”).click(function() { ImageComparisonWidgetLink(2694); }); }) sides of the frame. By F2, though, the 50/1.4 just surpasses$ (document).ready(function() { $ (“#imageComparisonLink2701”).click(function() { ImageComparisonWidgetLink(2701); }); }) the 55/1.8 in central sharpness, though off-center it still lags a bit$ (document).ready(function() { $ (“#imageComparisonLink2702”).click(function() { ImageComparisonWidgetLink(2702); }); }). By F2.8 though, the 50/1.4 pulls ahead$ (document).ready(function() { $ (“#imageComparisonLink2703”).click(function() { ImageComparisonWidgetLink(2703); }); }) of the 55/1.8 even here off-center, and particularly at center$ (document).ready(function() { $ (“#imageComparisonLink2696”).click(function() { ImageComparisonWidgetLink(2696); }); }) where it pulls and stays ahead at higher F- numbers. Peripherally, though, the 50/1.4 never quite catches up to the 55/1.8, not at F2.8$ (document).ready(function() { $ (“#imageComparisonLink2697”).click(function() { ImageComparisonWidgetLink(2697); }); }), and not even by F5.6$ (document).ready(function() { $ (“#imageComparisonLink2698”).click(function() { ImageComparisonWidgetLink(2698); }); }) (the lenses are a bit more even on the left side at F2.8$ (document).ready(function() { $ (“#imageComparisonLink2699”).click(function() { ImageComparisonWidgetLink(2699); }); }) and F5.6$ (document).ready(function() { $ (“#imageComparisonLink2700”).click(function() { ImageComparisonWidgetLink(2700); }); }) due to the weaker performance of our 55/1.8 on the left but, technically, the F1.4 is still a little bit behind).

    What does this mean?

    The new 50/1.4 ZA displays impressive sharpness and contrast at F1.4. Not quite as much as the venerable 55/1.8 wide open, but a respectable amount considering the 2/3 stop light and depth-of-field advantage. These new lens designs deliver sharp and punchy images wide open, instead of the soft and hazy images you may be used to getting if you slap on old F1.4 designs on such high resolution sensors (remember that we’re using the unforgiving 42MP a7R II for this test).

    That said, the new 50/1.4 does not retain this sharpness across the field as well as the 55/1.8, which offers better field uniformity at all apertures. By F2, though, the new 50/1.4 ZA matches the 55/1.8 in central sharpness, and surpasses it at all smaller apertures. Considering the high bar set by the 55/1.8 ZA, this is very impressive. However, you give up off-center sharpness at the widest apertures. If we were forced to pick an overall winner here in terms of sharpness, we’d probably go with the 55/1.8, but really there isn’t a huge difference between the two.

    Roger Cicala over at LensRentals found the Sony 50mm F1.4 lens to be the sharpest centrally of any 50mm prime, outperforming the 55mm F1.8 ZA. However, peripherally, the 50/1.4 takes a plunge in terms of resolution, and the 55mm F1.8 pulls ahead. In fact, just 4mm out from center in the image circle, tangential resolution (which we assess by considering the highest frequency MTF trace: 50 lp/mm) drops below that of the 55/1.8 (solid purple line). Source: LensRentals Blog

    It’s worth noting that Roger Cicala at LensRentals found the central sharpness wide open of the 50/1.4 to exceed the 55/1.8 (see MTF traces above), while our visual results don’t show the 50/1.4 to exceed the 55/1.8 until F2.8. We can’t rule out the possibility that our copy of the 50/1.4 slightly under-performed relative to the average, perhaps due to decentering; however, it’s reassuring that he found the 55/1.8 to offer greater uniformity. This difference in peripheral sharpness may be the reason for the apparent discrepancy in our results.

    Below, we show our infinity scene overlaid with red and blue rings representing image heights of 4mm and 16mm, respectively: the two points where the 50 lp/mm MTF traces of the two lenses intersect. Between these rings, Roger’s 50/1.4 sagittal 50 lp/mm trace falls well below the 55/1.8. Hence, our visual shootout seems to agree with Roger’s results: aside from a very small region in the center, the 55/1.8 does outperform the 50/1.4 wide open (though we don’t see the improvement towards the edges of the 50/1.4: our 55/1.8 remains better). 

    Our infinity scene with red and blue rings that represent 4mm and 16mm image heights (distance from center in the image circle). Between these regions, Roger’s own MTF data indicate a dip in sagittal resolution. It’s likely only the small region in the center (within the red circle) where the 50/1.4 resolves more than the 55/1.8 wide open, which would explain the apparent discrepancy between Roger’s results and ours. 

    All that said, sharpness isn’t everything. How does the new 50/1.4 fare in terms of bokeh, coma, and purple/green fringing? Let’s take a look on the next page.

    Articles: Digital Photography Review (dpreview.com)

  • Review: Light Painting Brushes – Tools for Creativity

    If you enjoy light painting photography, I think this review of tools from Light Painting Brushes (LPB) will interest you. All photographers know that light is essential to taking a successful photograph. At night, when light is limited, light painting can be a fun and artistic form of photography that may stretch a shutter-bug’s creativity by creating light, solely for the purpose of photographing light. If you are new to light painting please read my article – Beginner’s Guide to Light Painting for some ideas to get started.

    Light-Painting-Brushes-10

    Also, Light Painting Brushes has a great online presence, full of ideas, examples and tutorials. Check out this example of the great tutorial video available:

    There are two main types of light painting:

    1. Off-camera painting, by which a light source, unseen to the camera’s view, is used to illuminate a scene or objects so as to make them appear out of the dark in an image. Here the light is only showing the subject and is not part of the image.
    2. Secondly, on-camera painting, in which the light source is seen by the camera and is a subject to be photographed. So here the light IS the subject.

    The tools I am reviewing in this article are used for on-camera light painting. With Light Painting Brushes, most of the tools are used to add a graffiti-type light to a scene. This can be lots of fun (especially in social situations) and the creative options are endless! Listed here are the items from Light Painting Brushes that I will be reviewing in this article. (Spoiler alert. they are really cool!)

    • Universal Connectors
    • Set of 8 Opaque Light Writers
    • Set of 6 Translucent Light Writers
    • White Fiber Optic
    • Black Fiber Optic
    • Plexiglass Diamond
    • 22″ Light Sword
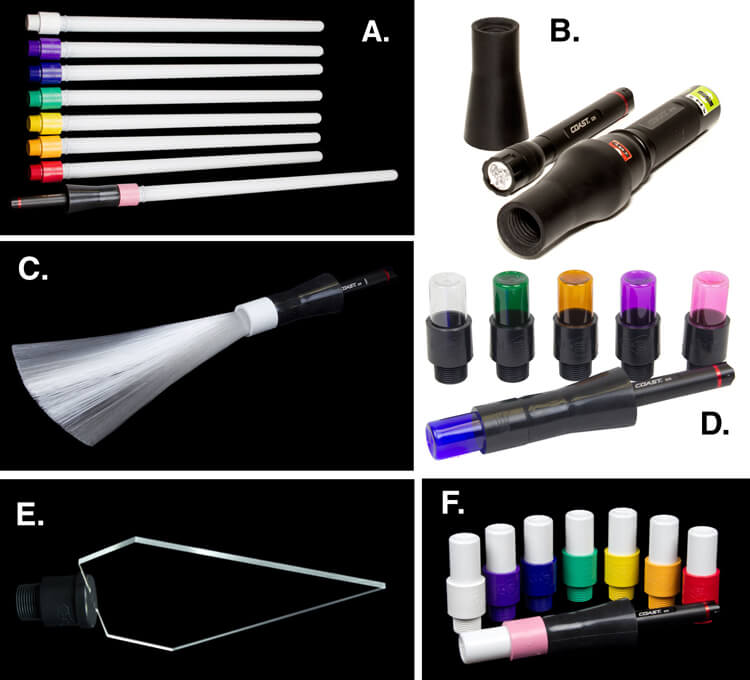
    Light-Painting-Brushes-Tools

    A. – Light Sword, B. – Universal Connectors, C. – White Fiber Optic, D. – Translucent Light Writers, E. – Plexiglass Diamond, F. Opaque Light Writers

    Universal Connectors

    The universal connector is the glue that literally holds this whole system together. Made of a durable rubber, the universal connector allows any flashlight with a diameter of .975″ to 1.5″ to connect to any of Light Painting Brushes’ tools. The end of the universal connector appears to be threaded, but don’t try to screw the brushes into the connector. The thread’s function is to just grip the brush and hold it tightly it in place.Light-Painting-Brush-Universal-Connector-2-750px

    Flashlights will easily insert into the other end, but never hold the whole thing by just the flashlight, as the brush may slide out. Instead, hold it by the universal connector. The universal connector may also be used to connect a “brush” of one’s own making, such as a pop bottle, to a light source (your flashlight).

    Opaque Light Writers (Set of 8)

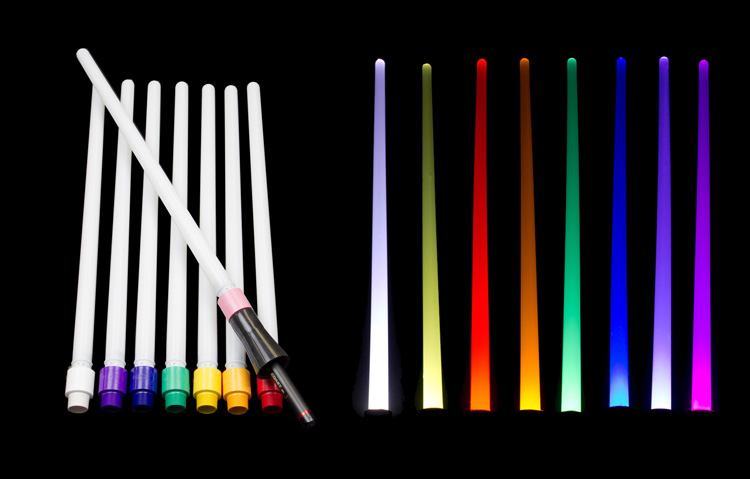
    Use the universal connector to connect these opaque colored lights to your light source. The set is available in eight hues including white, purple, blue, green, yellow, orange, red, and pink. The opaque color makes them excellent tools for light writing, drawing or graffiti, and creative uses limited only by one’s own imagination. Because of the opaque colors of these light brushes, a very crisp drawing or writing source results. After some practice with this tool, I am sure some very detailed light drawings can be captured within a photograph.

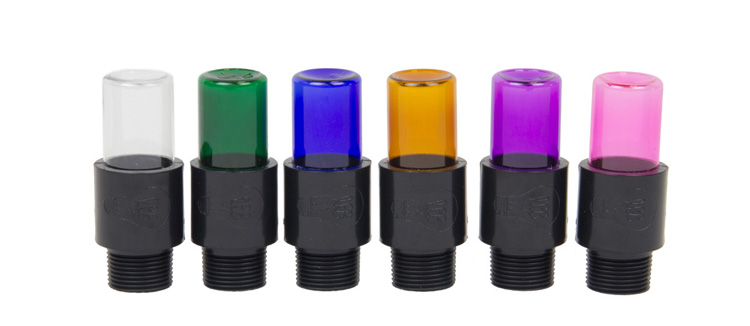
    Translucent Light Writers (Set of 6)

    Light_Painting_Brushes_Translucent_Light_Writer_Set-750px

    These attachments are very similar to the opaque light painting brushes, but because they are translucent the lights create a more textured effect than the opaque lights. Another tool for artistic expression lighting up the night!

    White Fiber Optic

    Light-Painting-Brushes-9

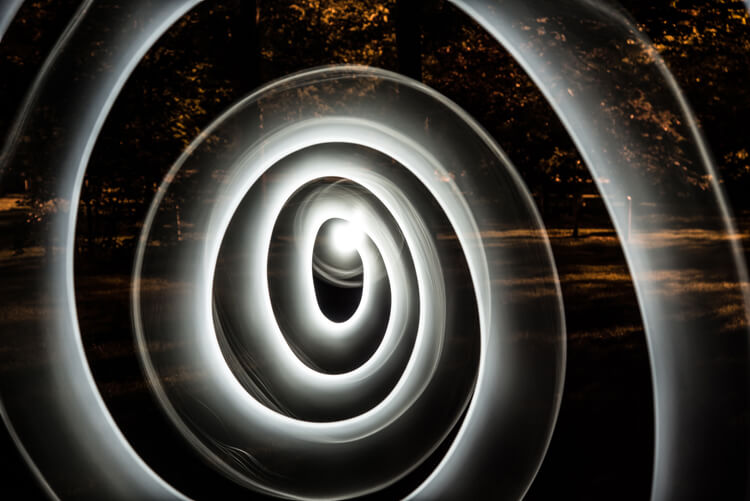
    Spiral design created using the White Fiber Optic brush

    The fiber optic brush connected to a light source really makes some awesome wispy lines. The white light has great depth as the whole strand of the brush lights up. This tool really gave me the feeling that I was actually painting with light! The white fiber optics is so much fun to use, creating some great effects and can be used for many light painting applications.

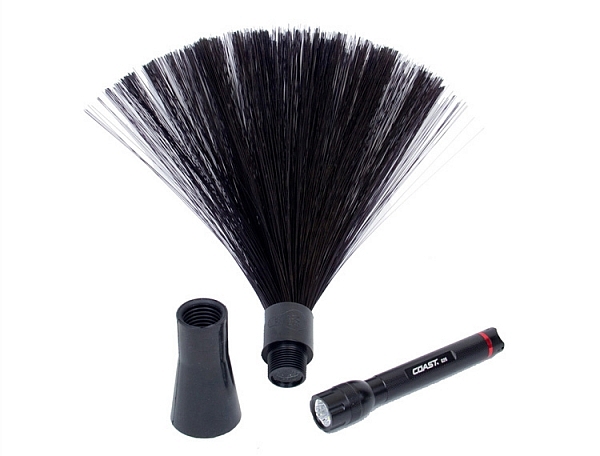
    Black Fiber Optic

    Light-Painting-Brushes-Black-Fiber-Optic-02-750px

    The black fiber optic tool only lights up the ends of the brush, great for use in portraits. However, I feel it has a more limited use for other types of light painting, since it puts out a lesser amount of light.

    Plexiglass Diamond

    Light-Painting-Brushes-11

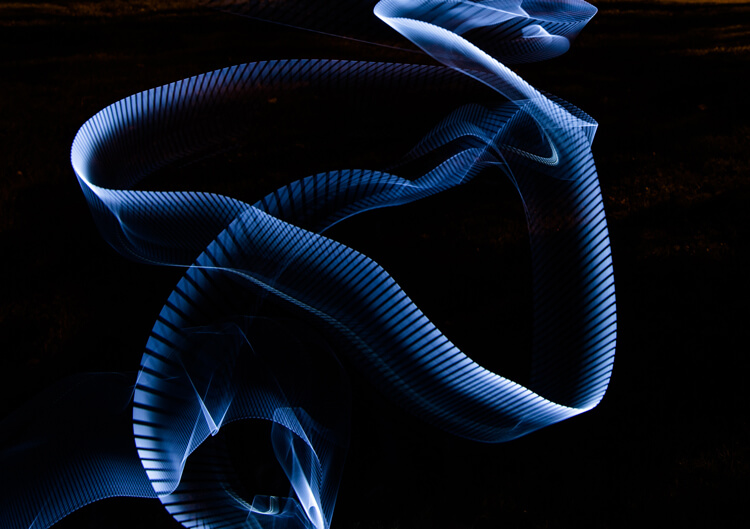
    Abstract design created using the Plexiglass Diamond brush

    The 9” Plexiglass Diamond shines light out through the cut edges, creating interesting and unique textures when waved about as the image is being shot. This tool is great for light graffiti, portraits, and abstract designs. It is my favorite tool of all the ones I’ve reviewed in this article!

    22″ Light Sword

    22in-Light-Swords-Illuminated-750px

    These tools create a very wide path of light, and are available in 8 different colors: blue, green, orange, pink, purple, red, yellow and white. The colored swords cause some stunning effects, but while the white sword can make some nice strokes of light, in my opinion its results are not as exciting as the colors.

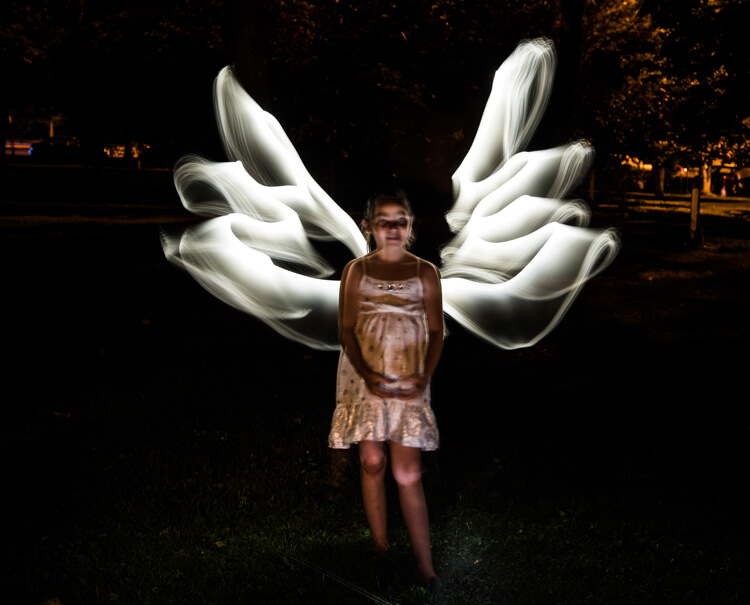
    Light-Painting-Brushes-8

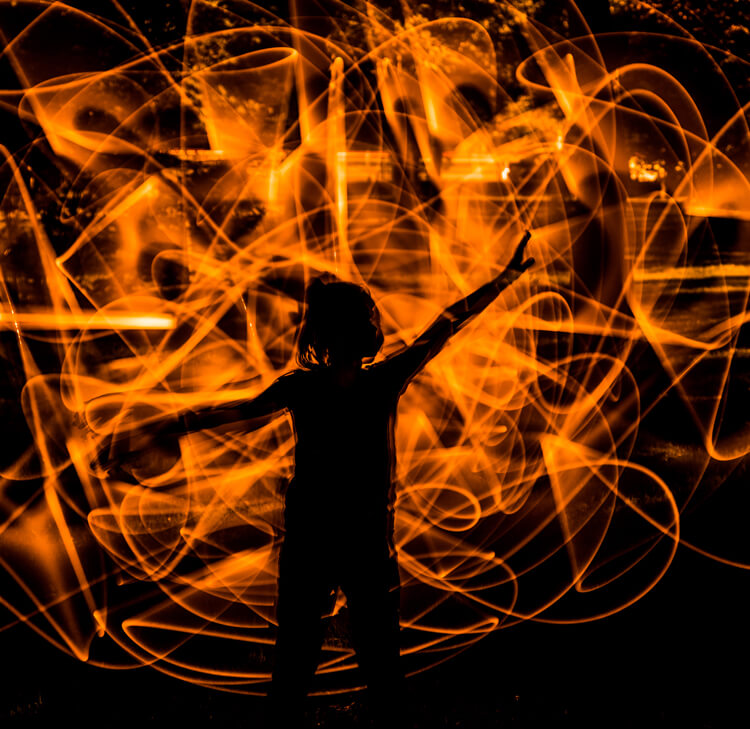
    This silhouetted image of a girl was created using the orange 22″ sword brush

    Tips:

    • To remain as invisible as possible when trying to photograph a light painting, wear dark colored clothing, keep moving, and avoid holding the light source too close to your body.
    • Speed of motion can make a big difference with many of these tools: the slower the motion, the more vibrant and textured the effect; the faster the motion, the smoother but fainter the effect.

    First impressions

    Light-Painting-Brushes-7

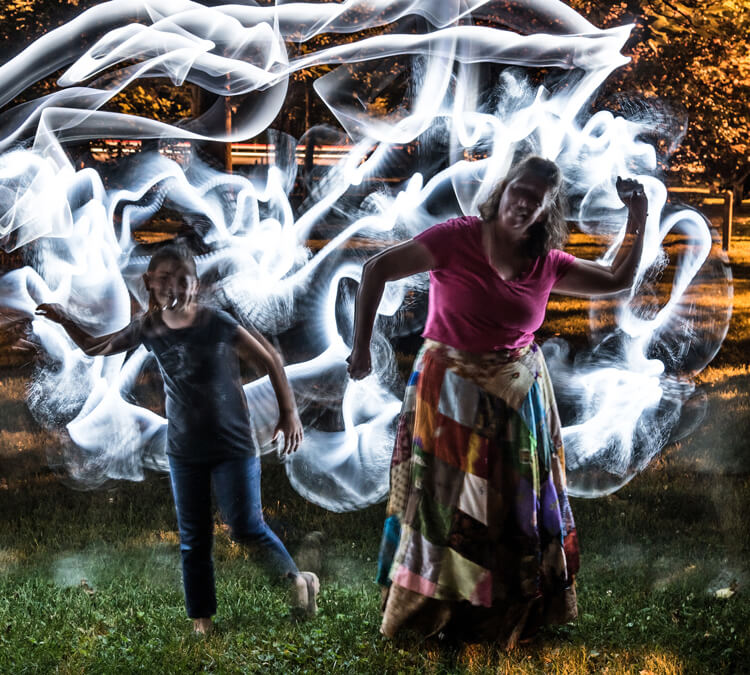
    I recently had the privilege to lead a light painting workshop with some local photographers, so I introduced the Light Painting Brush system to them during our course. The following feedback comes from a few of the participants:

    • “I felt like a kid, amazed and surprised with all the images we shot and with the numerous options we used to create and express ourselves as we played with the Light Painting Brushes. My favorite was the colored ones because they made things and shapes look like I was using chalk, and the colors were great in the pictures! It helped me to express and to imagine numerous things. I just wish we’d had two more hours!”
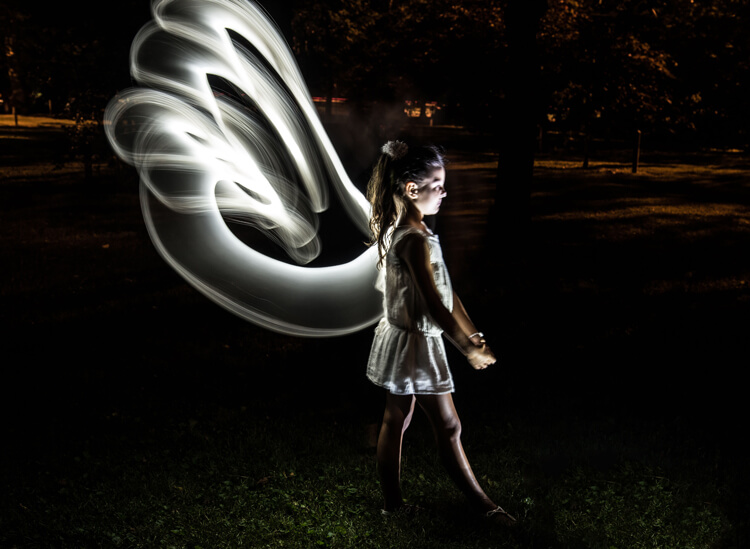
    • “Several lighting methods were demonstrated, but my favorite was using light painting brushes to create an angel figure out of a beautiful little girl.”
    • “My favorite was the white fiber optic, as it made a really pretty effect and I felt I could be more creative with it.”
    • “I was very impressed with the quality and the different possibilities of the light painting tools! I love that it gives you the ability to add your own personal unique touch to a photo!”

    The brushes were easy to use, even for beginners, and cast a new “light” giving night photography a new perspective and dream like world.

    Light-Painting-Brushes-13


    Conclusion

    Whether you are an experienced light painter or just wanting to give this technique a try for the first time, these tools from Light Painting Brushes are a fantastic addition to your accessory arsenal. They are designed by light painters who create and use their products. If you watch their tutorials online you’ll see that they have a passion to create tools that are to be used to create works of art in Light Painting.

    Here’s another really cool thing you can do with these tools – make a spirograph!

    The Universal Connector is the essential tool for using the actual brushes. I really like the unique textures and shaping possibilities of my two personal favorite brushes, the White Fiber Optics and the Plexiglass Diamond. My previous experience with light painting has mostly been of the off-camera type, but after using these Light Painting Brushes my interest has really been piqued to pursue on-camera light painting.

    googletag.cmd.push(function() {
    tablet_slots.push( googletag.defineSlot( “/1005424/_dPSv4_tab-all-article-bottom_(300×250)”, [300, 250], “pb-ad-78623” ).addService( googletag.pubads() ) ); } );

    googletag.cmd.push(function() {
    mobile_slots.push( googletag.defineSlot( “/1005424/_dPSv4_mob-all-article-bottom_(300×250)”, [300, 250], “pb-ad-78158” ).addService( googletag.pubads() ) ); } );

    The post Review: Light Painting Brushes – Tools for Creativity by Bruce Wunderlich appeared first on Digital Photography School.


    Digital Photography School

  • How To Retouch Skin And Still Look Natural

    Skin Retouching for Dummies


    Hey FashionPhotographyBlog.com readers. Retouching… A LOT of people have asked for it so here it is:


    When it comes to retouching skin, it’s really quite simple. In fact, you can do it in two simple steps. However, it’s also really quite time consuming. Take your time and don’t rush through it. Following these few simple steps will pay off in the end!


    Whatever you do: DON’T BLUR YOUR SUBJECT’S SKIN! Skin is full of texture – keep it that way. Eliminating pores is an obvious sign of someone who doesn’t know what they’re doing. Study your face in the mirror. Texture changes as you move throughout the face and body, be conscious of this when retouching skin.


    Don’t blur your subject’s skin! Skin is full of texture – Keep it that way #fpblog
    Click To Tweet


    (Remember: It always helps to have a good makeup artist and start with an even base of foundation. A good makeup artist can drastically cut down your time spent retouching skin in Photoshop.)


    How To Retouch Skin


    First things first, NEVER-EVER work directly on your background layer. This is an extremely bad habit most people have. This is considered destructive. Once you work directly on your background layer, there is no going back. Whereas, if you work on layers independent from your background layer, you can always delete them and start from scratch.


    1. Select your image and open it up in Photoshop.


    retouching_skin_original_imageOriginal, untouched image


    2. Start by removing blemishes. To do this, I typically switch between the Healing Brush and the Clone Stamp.


    The Healing Brush (band-aid tool) works by merging texture, color and luminosity from the sample area to the destination area.


    The Clone Stamp (stamp) takes the information from the sample area and moves it to the destination area (no automatic blending in of texture, color and luminosity.)


    retouching_skin_heal_patch_clone_stamp


    Create a new, empty layer and at the top change the setting from “Current Layer” to “Current & Below.”


    To remove blemishes and wrinkles, make the brush size just a bit larger than the size of the blemish. To select a source point, hold down “Option” (Mac) or “Alt” (PC) and click, then paint over the blemish to remove it. The healing brush tends to spread out a bit so it works best by using a harder brush rather than a softer brush.


    BE CAREFUL* When healing, many people have a tendency to pull source areas from right next to the destination area. Doing this will create repetitions in texture. This is a major no-no. Repetitions in texture make it known that the image has been manipulated. It’s a sign of an amateur. If you see this, take a step back and try again. Are there naturally occurring patterns? Break them up. Keep your hand light – a heavy hand is also a sign of an amateur and leaves your subject looking unnatural. 


    retouching_skin_after_healing_cloningAfter Healing/Cloning


    2. Next up: Dodge and Burn! Dodging and Burning is the process of manipulating tone in order to even out blotches in skin. This is fantastic for (painstakingly) taking out goosebumps or evening out the blotches most people have on their skin.


    Dodging and Burning is derived from a darkroom process. Dodging is lightning of tones and burning is the darkening of tones. By dodging and burning simultaneously, you’re able to even out tones and create smooth, perfect looking skin.


    To begin, create a new layer set “mode” to “soft light” and select “fill with 50% grey.”


    retouching skin photoshop new options

    New layer options: Mode: Soft Light, Select “Fill with 50% grey”


    Using the Dodge/Burn tool (J) you can choose which tones to work with – highlights, midtones or shadows. I typically start with midtones and then work my way around the image switching between midtones, highlights and shadows. Keep your exposure low. I usually work around 9%. Start small and you can gradually build your way up. 


    Continuously switch between Dodge and Burn – an easy way to do this is to hold down the “Option” key. If you’re dodging midtones at an exposure of 9% and hold down the “option” key, you’ll burn midtones at 9% as long as the option key is held down. Essentially, it gives you the opposite tool of what you’re working on, however whatever settings you already have chosen (midtone/shadow/highlight and exposure) will remain the same.


    *Dodging and Burning can be tricky! Until you train your eyes to see the difference between tones, it’s really easy to over-do your dodging and burning. In order to help you better see the differences in tone, you can create a guide to help train your eyes! To do this, create a “Hue/Saturation” adjustment layer and desaturate the image. Then, create a new “Curve” adjustment layer and make a deep curve. This will separate the tones and make it easier to see where you need to dodge and where you need to burn.


    retouching_skin_photoshop_eye_guide_d&b_curveEye Guide: Deep Curve


    retouching skin eye guide help before dodge and burnretouching_skin_eye_guide_help_before_dodge_and_burnWith Eye Guide on: Before Dodging and Burning. Notice the blotchy patches.


    retouching_skin_eye_guide_help_after_dodge_and_burnWith Eye Guide on: After Dodging and Burning. Notice the smooth transitions between tones.


    retouching_skin_eye_guide_help_after_dodging_and_burningAfter Dodging & Burning


    Over-do it? That’s okay. Lower the opacity of your layer until it looks right. This is the beauty of working on a layer independent from your background layer.


    3. After Healing, Dodging and Burning, now is time for color! ALWAYS be careful of where you place your color layers. For those just starting out, it’s best to do color last. If you manipulate color before you retouch, make sure your color layers stay on top of all the retouching layers you create.  IF YOU RETOUCH ON TOP OF COLOR MANIPULATIONS, YOU CAN’T UNDO THE COLOR. 


    If you retouch on top of color manipulations, you can’t undo the color #fpblog
    Click To Tweet


    If you decide you don’t like the color and try to remove or change it, you’ll have to re-do all of your retouching work. Since the healing layer is set to “current and below” it is pulling color and texture from the layers below it (this would include your color layers). When you delete the color layer, the color remains in the areas which have been healed or cloned above it, leaving you with a mess that looks like this:


    retouching_skin_on_top_color_manipulationsImage that has had retouching done on-top of color manipulations. The colour manipulations were removed resulting in an unusable mess!


    So, those just starting out with this method of skin retouching, play it safe and work with color last.


    retouching_final_skin_retouch_with_color_appliedFinal skin retouching with color applied


    So – as a reminder, the order you retouch skin:

    1. Heal/Clone – Remove wrinkles and blemishes

    2. Dodge/Burn – Even out skin tone

    3. Manipulate Color


    Stay as organized as possible! It helps to make a group for retouching and a group for color to keep everything straight.

    retouching_skin_layers_from_completed_retouched_imageLayers from completed retouched image (pictured above)


    Good luck! Remember to take your time and practice. It takes a long time to be able to really see what you’re doing. Train your eye and you’ll be able to pick apart tones and see imperfections in skin more easily. Feel free to share your retouching here in the comments for feedback and critique!


    And remember, if you have any questions, feel free to ask!


    Alana


    retouching_skin_animation


    IMAGE SOURCE:

    Feature image and images 1-12: courtesy of Alana Tyler Slutsky


    Fashion Photography Blog

  • CASE Remote Air is the world’s smallest smart camera controller

    CheeringTech, the maker of the CASE smartphone remote for DSLRs, has launched a crowdfunding campaign on Indiegogo for a lighter and smaller next-generation version, the CASE Remote Air.

    CheerinTech says at 2.4″ x 1.6″ x 0.2″ the CASE Remote Air is the world’s smallest smart camera controller. At only 50 grams it is also very lightweight. Like similar devices, it connects to the USB-port of your DSLR and creates a Wi-Fi hotspot that allows for a wireless connection to your smartphone or PC. Using a dedicated app you can then see the camera’s live view image on the display of your smartphone, alter camera parameters, control video shooting or use one of the special modes, such as focus-stacking or time-lapse. In addition, you can download images from the camera to your device, including Raw files.

    CASE Remote Air works with many Canon and Nikon DSLRs and can be controlled from Android and iOS mobile devices or PC and Apple computers. You can currently reserve a CASE Remote Air for $ 79 plus shipping. Delivery is expected for October. More information, including a full list of compatible cameras, can be found on the Indiegogo crowdfunding site. 

    Articles: Digital Photography Review (dpreview.com)

  • Tips for Processing Landscape Photos – from Basic Edits to Artistic Interpretation

    All professional, and many hobbyist photographers, post-process their photos. There are various reasons why you want to edit your photos, besides the fact RAW files need some level of processing, including:

    • To fix minor errors made when you took the image.
    • To make the image look more like you envisioned when you took it.
    • To add your artistic touch to the image.
    • Because image editing is fun, and is an important part of photography.

    Sunrise 0

    Landscape photography is often about being in the right spot at the right time. This is not always possible, so a little post-processing might help. “Why make it when you can fake it” seems to have become more and more common.

    One question often raised, is how much editing you can do before you have over-processed your photo. Too much and your photo no longer represents the reality of the landscape.

    It’s subjective how much editing is acceptable. Some argue the editing has gone way too far and is destroying photography. Others put their heart and soul into image editing. They try to get the most out of every detail in the photo, and to make their personal interpretation.

    Landscape photographers are not photojournalists documenting reality. As such there should be plenty of room for an artistic interpretation of landscape photos. In the rest of this article, I’m going to discuss different levels of editing, using one of my own landscape photos as an example.

    1. The leave as is approach – no editing

    The easiest method is to save your files as JPG and do no editing at all. If you don’t want to buy an image editing software, or you simply don’t care to spend time on post-processing, that’s fine. It’s your decision. You can still enjoy the time you spend out in nature taking photos.

    Obviously, with this approach, nobody can accuse your photos of not being real. But unless you learn some basic editing skills and post-process your images, you’re likely not to be regarded as a serious photographer.

    Hardly any of the images with most likes on social media and photo sharing sites are unedited. In digital photography capturing the photo is just half the work, the rest is about post-processing techniques.
    Sunrise 1

    2. Basic editing

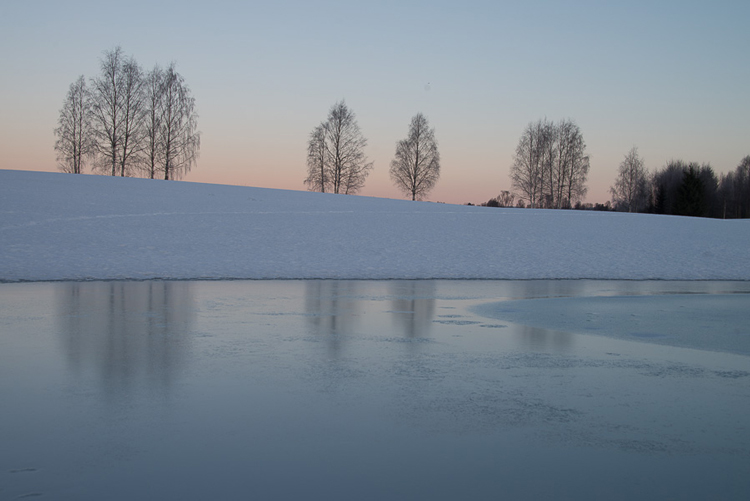
    In my image (above), I realized I was sloppy with the composition when I took it. I had to fix this. Often one adjustment leads to another. Let’s go through the different steps I applied to this image.

    The image above is the untouched RAW file straight out of the camera. Some photographers are happy with this result, and leave it there. After a closer look, I found there were several other things with the image I could improve. Because it’s a RAW file, I knew there was a lot of image data to work with.

    Basic editing is supposed to enhance what’s already in the photo, not fix what is wrong. Ideally, you should get the shot as technically correct as possible in the camera. One nice thing about digital photography is how easy it is to make small adjustments after the shot. If you fail on the exposure or the horizon is not perfectly straight, no problem, you can fix it

    Levelling a tilted horizon and verticals, cropping, and dust spot removal
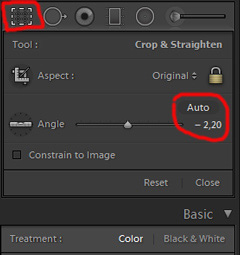
    capture-2bWhile you edit, you can make simple adjustments to your composition, like levelling the horizon and cropping. By cropping, you can tighten the composition, and to some extent “move” elements, so they align according to the rule of thirds or golden mean.

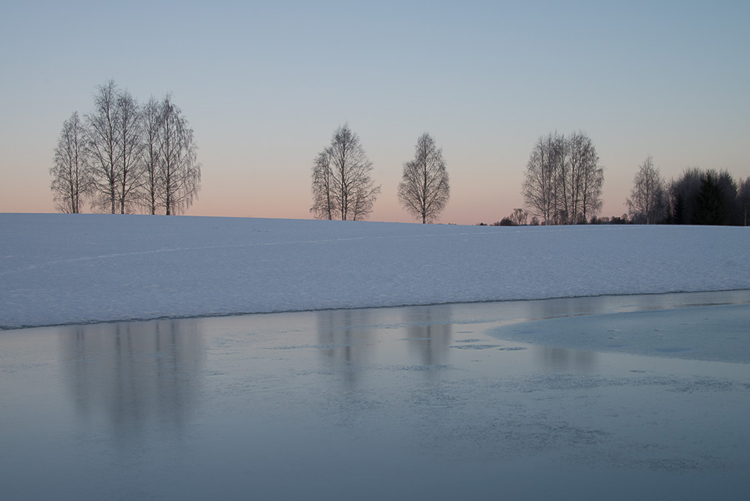
    In the photo below I have levelled the trees, as they were leaning slightly to the right. I did not notice that when I took the photo. Most photographers will not question if levelling the horizon, cropping, and removing dust spots are acceptable image editing. It’s part of the workflow.
    Sunrise 2

    Adjusting the White Balance (WB)

    I took this image an early morning, at sunrise. The reflections from the clear blue sky gave the scene an overall blue color cast. At the computer, I remembered the scene as being warmer. Warmer is perceived as more pleasing. I could be wrong, because who remembers exactly what colors a scene had at the time they took the image?

    Photographers often claim they edit their photos to represent how they saw the scene. It is probably more correct to say they edit their photos the way they wish they saw the scene.
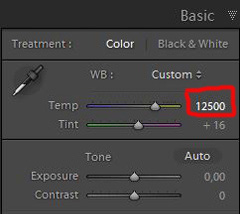
    capture-3bSo I decided I wanted my image to have a warmer color tone. I adjusted the White Balance by adding more yellow.

    I could have achieved something similar by setting the camera White Balance to the Cloudy preset, at the time I took the image. Changing the White Balance after the shot is another advantage when you shoot your files as RAW. Either way, the result is altered, and to some extent, the reality is changed.

    Although the significant impact changing the White Balance can have on an image, it is usually accepted as part of the post-processing workflow.
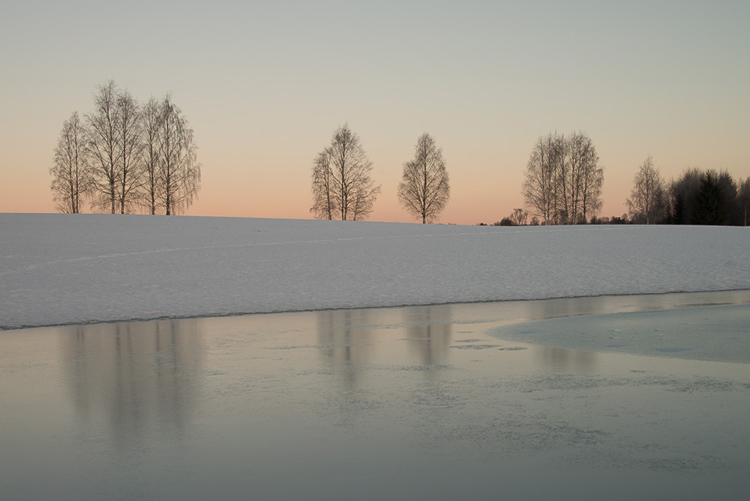
    Sunrise 3

    Increasing Exposure and Contrast

    Because no adjustments are made to the RAW files in camera, the images look unfinished when you open them up on your computer. The preview on the LCD is an embedded JPG version of the photo, which often looks much better.
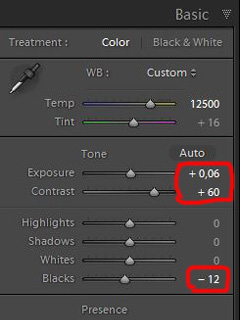
    capture-4bEven with modern digital cameras you don’t always hit spot on with the exposure. If you don’t get it right in-camera, with RAW files you can easily correct the exposure one two stops when post-processing.

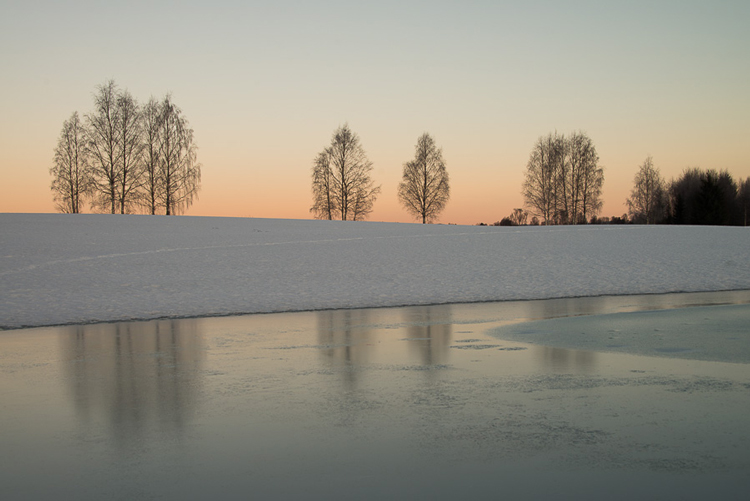
    My image is no exception, it looks flat, and needs a few more adjustments. So I increased the contrast slightly. When you increase contrast, the image tends to get a little darker. To compensate for this, I had to increase the exposure a tiny bit. You can see the result so far below.
    Sunrise 4

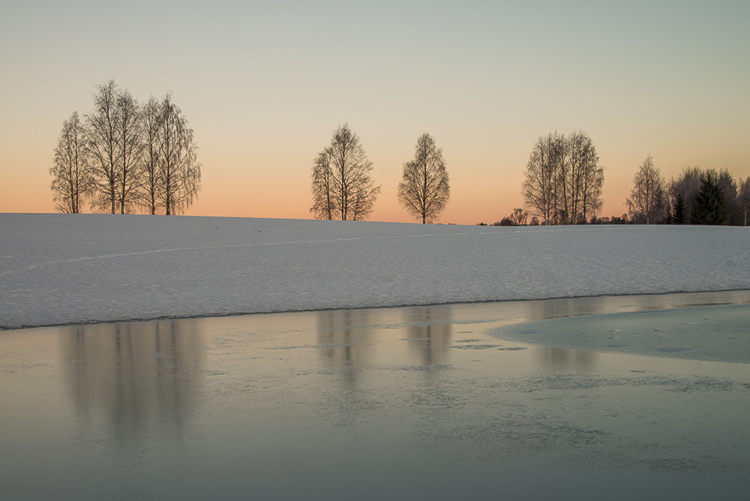
    Decreasing Highlights and increasing Shadows
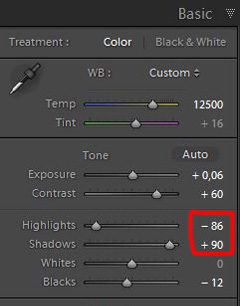
    capture-5bOne more thing that bothered me was the black chunk of trees to the far right. The trees have now become too dark with no details in the shadows. I fixed this by increasing the shadows slightly. I also lowered the highlights a little to bring out more of the texture in the ice. In the version below the trees to the right are no longer completely black.

    With these last adjustments, the image starts to look pretty decent. So far so good. All of the edits I have done until now are within what most photographers will find acceptable.
    Sunrise 5

    3. Beyond basic editing

    Oversaturated colors

    Photos with saturated and vibrant colors are eye catching. If you want attention when you post your images on social media sites, it’s a good idea to boost the colors first.capture-6
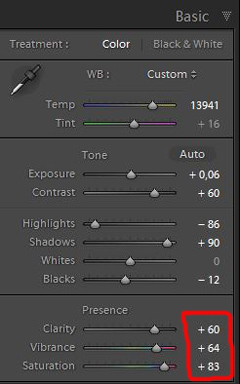
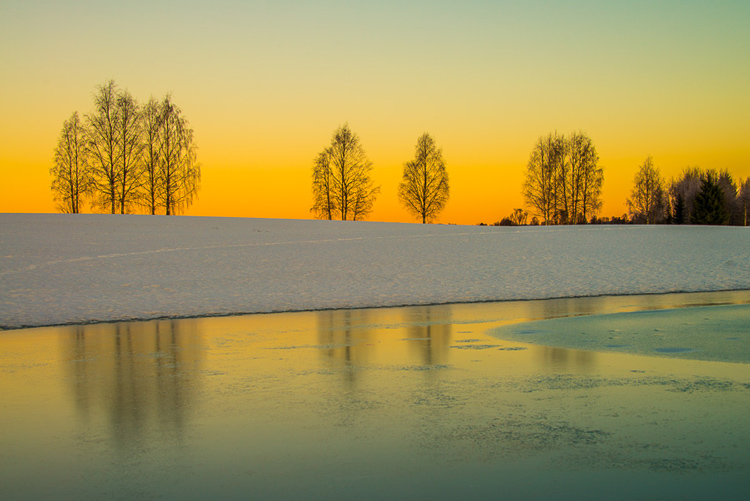
    At this stage, it was attempting to make the sunrise more beautiful. To me, it was already an awesome winter morning sunrise. But I felt I could make it even better – with some over-processing.

    I did this simply by increasing vibrance and saturation significantly. The image now has an entirely different feel. To me, it looks fake. But I bet this version would have received more attention on my social media sites if I posted both versions there. I have seen this happen with some of my other images before.

    With this level of editing, the discussions start as to whether or not the image represents a realistic landscape. It can be your artistic interpretation of the scene, but to me it’s not authentic anymore.
    Sunrise 6

    4. Photo editing artistically

    Adding texture for a complete different look

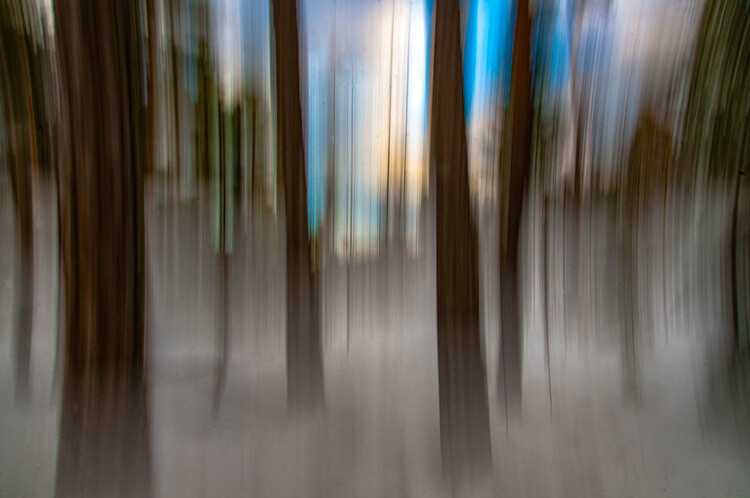
    In the next image I have used my artistic freedom as a photographer and artist. I blended in a couple of texture layers and photo filters with the original image. By using textures properly, you can create some interesting effects on your images.

    If this is a realistic landscape photo or not, is no longer a relevant question. It’s not, nor is it supposed to be. But you can discuss whether or not you like this style. While all the previous edits were made in Lightroom, the last two versions were made in Photoshop, as Lightroom doesn’t have the layers function which is needed.

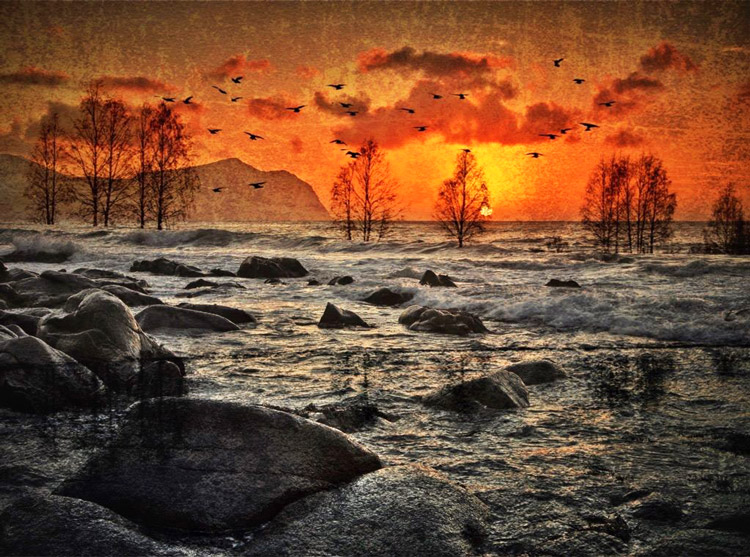
    Sunrise 7

    Composite of several images makes this surreal piece

    The last version of my image is a composite. Only a few elements are left from the original, but you can tell it’s still there. The result is so extreme that nobody can blame you for faking a realistic landscape image. Everybody know this is a creative piece of art. Again it’s very subjective whether like the style or not. Compositing is a whole new level of photo editing, it’s not for everyone.

    When you create composites, you need many of the same skills as when you photograph. For a balanced composite, you must know about composition techniques and how to deal with light and shadows, as well as colors.
    Sunrise 8

    Conclusion

    With digital photography it’s possible to create the image you want. Your imagination and skills are your only limitations. The general trend is bold and vivid colors get a lot of attention, at least among some photographers. Whether you want to follow this trend or not, is your decision. The fact is that more of the images you see online look similar, due to the same post-processing techniques. It’s getting harder to be recognized online unless you make something different.

    As a landscape photographers you have a few challenge to tackle because the elements of nature are limiting. Light and weather conditions might not be as you wish when you’re at your dream scene. Maybe you never come back to the same spot again. In such a situation it’s tempting to fix the light (slightly) in post-production. In other words, to fake reality like I did with the oversaturated image.
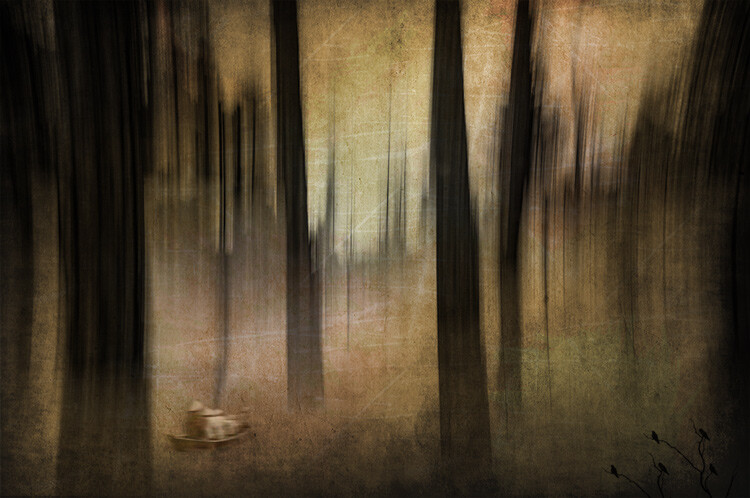
    ICM_forest_original_edit

    Original edit

    ICM_forest_creative_edit

    Creative edit

    Photography is art, so it’s not wrong if you choose to do so, but be open with what you have done. Don’t pretend you experienced the sunrise of your life if you didn’t. In the end, it’s up to you what you’re comfortable with. Nobody can take away your creative vision.

    You can do more advanced editing in Lightroom than I have shown in this tutorial. In Photoshop however the possibilities are endless. You can manipulate, remove, and add content to your images. With such drastic steps, you’re not only altering the reality, but you’re cheating. That’s if you claim your photo is real.

    Now it’s your turn. What’s your opinion about how much you can edit landscape photos? Please share your thoughts in the comments below.
    Original edit

    Original edit

    Creative edit

    Creative edit

    This week we are doing a series of articles to help you do better nature photography. See previous articles here:

    • 3 Habits Every Outdoor Photographer Should Develop to Avoid Missing Shots
    • 5 Tips for Better Nature Photography
    • 27 Serene Images of the Natural World
    • Weekly Photography Challenge – Nature
    • 10 Ideas for Photographing Nature in your Backyard
    • 6 Tips for Capturing Character and Personality in Wildlife Photography
    • 5 Tips for Setting the Focus in Your Landscape Photography
    • 7 Tips for Better Marine Wildlife Photography

    googletag.cmd.push(function() {
    tablet_slots.push( googletag.defineSlot( “/1005424/_dPSv4_tab-all-article-bottom_(300×250)”, [300, 250], “pb-ad-78623” ).addService( googletag.pubads() ) ); } );

    googletag.cmd.push(function() {
    mobile_slots.push( googletag.defineSlot( “/1005424/_dPSv4_mob-all-article-bottom_(300×250)”, [300, 250], “pb-ad-78158” ).addService( googletag.pubads() ) ); } );

    The post Tips for Processing Landscape Photos – from Basic Edits to Artistic Interpretation by Kim Rormark appeared first on Digital Photography School.


    Digital Photography School

  • Deep dive: the Canon EOS-1D X Mark II is an underwater ace

    Canon 1Dx Mark II Underwater Camera Review

    By Backscatter Staff

    Backscatter Underwater Video & Photo is the largest underwater imaging equipment supplier in the world. They love the water, and they personally dive and shoot with the gear they sell. This article originally appeared on their website and is reproduced here with their permission.

    Backscatter is fortunate to have a large customer base of professional underwater filmmakers. This year our conversations on 4K cinema have revolved around three cameras: Red Weapon/EPIC Dragon, Sony a7R Mark II, and the new Canon EOS-1DX II. We’ve spent many hours underwater with each of these cameras and this article compiles our Canon 1DX II tests from four uniquely skilled underwater professionals.

    Canon 1Dx Mark II underwater housing system configured for wide angle.
    Nauticam NA-1DXII Underwater Housing, Nauticam 8.5 inch Dome Port, Keldan 8,000 Lumen Video Lights,Canon 1Dx Mark II Camera, Canon 8-15mm Fisheye Lens.

    Who is this camera for?

    If you’re both an underwater photographer and filmmaker, our test results confirm the Canon 1DX II is hands down the greatest camera we’ve tested to date. It’s a no compromise professional photography camera capable of shooting both 20MP stills at 14fps and 4K 60p video in incredibly low light. While it doesn’t offer the raw video and flexibility of a RED, it shoots broadcast quality 4K motion at a fraction of the size and cost and out performs favorites such as the Sony A7 series in low noise when tasked with the extreme requirements of underwater white balance.

    Backscatter has spent over 20 years finding the best underwater cameras and we’ve learned that a chart-topping land camera is not always the best underwater camera. The new Canon 1DX Mark II is a good example. While leading groups such as DxOMark give it a ranking of 21st place, we give the Canon 1DX MK II a clear first place position for underwater applications.

    The high ISO and high bit rate of the Canon 1Dx II combine to make smooth blue water transitions without banding or red channel noise even at extreme underwater white balance settings of 50,000K+. This video was shot with Canon 1DX II, Canon 8-15mm lens, and ISO settings from 320-6400. Select HD playback of 4K for full experience. Video by Backscatter staff Berkley White.

    Real-world underwater low light performance

    ISO performance results can vary greatly between underwater and land environments. Underwater we are forced to use extreme white balance settings of 30,000K – 50,000K or swim around with 10,000 Lumen lights just to illuminate a subject 3 feet from the camera. These underwater requirements can turn land camera test results upside down.

    Our previous tests showed the Canon 1Dc was a top performer with a maximum of ISO 1250 for images in blue water and a maximum of ISO 2500 when shooting in high contrast or artificial light. The new Canon 1DX MK II now opens up blue water scenes to ISO 2500 and high contrast shots such as caves or wrecks in ambient light up to ISO 6400 even at extreme white balance settings.

    White balance is less of an issue for underwater photography as raw files are easily corrected in post. For this application we do agree that cameras such as the Sony A7 series and Nikon D810 offer better low light performace, but we found the Canon 1DX II’s combination of great white balance capabilities, high bit rate video, and great ISO performance make it the best performing camera for photographer / videographer professionals.

    This video was shot at 50 feet underwater with only a manual white balance and no artifical light. Canon remains king when it comes to nailing color underwater with a manual white balance. The live autofocus of the Canon 1DX II was able to stay focused on this grouper, even at lips to lens distances with thin depth of field. Shot with Canon 1DX II and Canon 8-15mm lens. Select HD playback of 4K for full experience. Video by Backscatter Pro Team member Erin Quigley.

    The simplicity of underwater white balance – without filters or lights

    Most underwater videographers have preferred Canon cameras for a good reason. Red light is lost within the first 10 feet underwater and you’re quickly left with nothing but the blues. To make whites appear white in ambient light, you’ll need an extreme white balance setting of 30,000K – 50,000K or more. Currently only Canon DSLRs offer this extreme white balance range to produce brilliant underwater color in-camera. As our previous testing shows, Sony cameras such as the entire A7 series are unable to white balance below 10 feet without a red filter on the lens as it is limited to 9,900K. Required filter use makes shooting in mixed lighting difficult or logistically impossible underwater. Our latest tests with the new Nikon D500 revealed it to be the best Nikon to date, but it often takes 10 to 20 attempts to register an underwater white balance at depth. RED cameras can white balance without a filter, but even modified with a H2O ELPF can’t match the rich blues that are so easily produced with Canon cameras. 

    When performed correctly underwater, a manual white balance with the Canon 1DX II will almost eliminate the need for color correction in post and not burden the underwater videographer with filter maintenance or the requirement to always keep subjects within 3 feet of even the brightest underwater lights. If you want to keep it simple underwater, nothing beats a camera that produces great underwater color with a manual white balance.

    While Canon’s new autofocus system stunned us in wide angle and on-land tracking tests, it’s still not quite there for real world underwater macro without further experimentation. Stay tuned for our new tests. Video by Backscatter staff Rusty Sanoian.

    Autofocus with underwater cinema? Almost!

    Canon’s new Dual Pixel Autofocus performed incredibly well on land and we were excited to put it to the test underwater. This new autofocus system includes Flexizone Mode which offers a manually positioned zone at any point on the screen while the new AF Tracking Mode allows the focus zone to follow a moving subject across the frame. Experienced underwater videographers know that autofocus has only spelled certain death with all large sensor cameras to date. Thus, we were stunned to discover that Flexizone AF Mode was not only fast but extremely accurate in underwater wide angle scenes. For example, Erin Quigley’s video of the grouper was shot in full AF Servo mode even at close focus and low depth of field. We were even able to start a clip two meters away from a subject and push in until the subject touched the dome with smooth focus throughout. Flexizone AF Mode was the most accurate and responsive system we’ve seen for underwater wide angle.

    We hoped AF Tracking Mode would shine with the razor thin depth of field in underwater macro scenes. This mode worked surprisingly well on land, but was not a slam dunk underwater. First, underwater housings don’t yet offer the ability to use the touchscreen to select focus points and require the user to position the focus zone with the joystick and activate with the set button. Secondly, water motion and passing particles seemed to cause the focus to hunt enough that we preferred to set and lock focus for most macro subjects. While some of Rusty Sanoian’s Monterey macro video used AF Tracking Mode, the majority was captured by locking focus before each shot. We are currently testing lowering the secondary menu options that Canon has cryptically named “When Active” and “AF Speed” to see if we can make AF Tracking a reliable function for underwater macro.

    Experienced underwater videographers should also note that the Canon 1Dx Mark II default setting is for Movie Servo AF to be enabled and thus the camera will AF continuously even when not recording. We recommend modifying the custom controls menu to reprogram the Set or the front Function button to Pause Movie Servo AF and always monitor the LCD to verify AF is paused during low contrast pans. Further, it’s important to note that Pause Movie Servo AF will sometimes turn off after the camera goes to sleep or is cycled on and off causing unwanted AF activation. Underwater camera operators might find it best to turn Movie Servo AF off when shooting a full dive in very low contrast conditions.

    Videos shot at 60p then slowed down to 30p has the effect of adding more drama to the image. More importantly, underwater shooters can’t always set up a tripod on a pristine reef and slow motion helps us eliminate camera shake for hand held sequences. Video by Backscatter Pro Team member Dustin Adamson.

    Why is 4K 60fps amazing for underwater video? Stability!

    We’ve all fallen in love with slow motion videos and the hidden world that is exposed when we slow down real time. The Canon 1DX II would not be considered a slow motion camera on land, but 60fps and 120fps video is about all we need in the fluid underwater environment. On land it may be easy to mount a camera to a tripod for rock steady footage, but we can’t always drop a tripod on a pristine reef. Slowing down reality helps us add stability to our shots. Maybe that clip of the mother humpback with her calf caught you unexpectedly and you had some camera shake? Slowing your 60fps video to 30fps will double your clip length and smooth out your camera wobbles. Maybe you were fighting your tripod when a tiny jaw fish was aerating his eggs? Playback your video at 30fps to get 2x the time on a great macro behavior shot with less camera shake. You’ll pay a price on hard drives when shooting higher frame rates, but you’ll double your chances to get the shot.

    Cons of large file sizes and issues with new CFast cards

    The Canon 1DX II is outfitted with (1) CF and (1) CFast card slot. All 4K 60P recording longer than 10 seconds must be recorded to the new CFast card. At a blistering 6GB per minute, you’ll need to buy 256GB CFast cards to get roughly 40 minutes of recording time per dive. Newcomers to low compression 4K will also need to upgrade their portable and home hard disks in a major way. Hard drives are inexpensive these days, but CFast cards are bleeding edge and still demand a premium price.

    Canon recently issued a firmware update to fix issues with Sandisk CFast cards. Our test pilots didn’t experience any of these Sandisk issues, but one had a catastrophic issue with a Lexar 256GB card that was unrecoverable. Currently Backscatter is only recommending Delkin 256GB CFast cards as they have been the only cards without reported issues. Stay tuned for more feedback from the field.

    Which 4K camera is best underwater? 

    Canon 1DX II VS. SONY A7 SERIES CAMERAS

    In an era where airline baggage fees have people compromising with smaller cameras, the mirrorless Sony a7R Mark II has been a crowd favorite for good reason. Its large sensor produces beautiful low noise 42MP stills, 4K 30p video, and a complete system is easily carried on a plane all at a great price. It performs best when shooting macro scenes where features such as focus peaking and super 35 mode really shine. The Sony a7R Mark II becomes difficult to use for underwater wide angle. The above-mentioned inability to white balance without a filter makes shooting with or without lights on the same dive almost impossible. Advanced photographers will miss an optical viewfinder when trying to compose wide-angle scenes at upward angles. In these situations the mirrorless screen overexposes and only provides a guess on classic underwater photo compositions. Filmmakers will greatly prefer the 800mbps data rate and 60fps of the Canon 1DX II over the Sony’s 100mbps and 30fps when scaling to larger projects. For most people the choice between these two cameras will be a mater of budget, physical size, and ability to overcome the limitations of the Sony a7R Mark II. 

    Canon 1DX II VS. RED EPIC DRAGON

    If your project has the budget, the RED EPIC DRAGON remains the ultimate “fix it in post camera.” RED continues to offer the greatest dynamic range, bitrate, and lens selection. If your project has skilled editors and colorists, they’ll prefer the flexibility that raw video offers to correct shooting errors and ability to color match a project across a wide range of unpredictable natural light sequences. The H2O OLPF filter and Dragoncolor 2 color space have significantly helped RED reproduce underwater color, but we’d like to see more underwater performance in a system in this price range. While RED remains king of large budget projects, the Canon 1DX II will certainly be the top pick for streamlined underwater productions. Based on our tests, the Canon 1DX II offers better saturated blues and overall lower noise in the blue light (red light starved) underwater environment. Assuming the proper white balance and exposure is attained while in water, the 1Dx Mark II footage looks fantastic out of the camera and is ready to pass to the Director or Producer in the field eliminating the need for expert level grading. If your project is heavy underwater and you have a medium to small budget, the 1Dx Mark II is an easy win.

    Canon 1Dx Mark II underwater housing configured for macro.
    Nauticam NA-1DXII Underwater Housing, Nauticam Flat Port, Nauticam SMC Macro Lens, Dive & See 5 inch Monitor, Light & Motion Sola Video 2500 Lumen Lights, XIT404 Tripod Plate, XIT404 Tripod Legs, Canon 1Dx Mark II Camera, Canon 100 IS Macro Lens.

    We know you have questions – give us a call!

    The team here at Backscatter is just like you. We want to spend the least on our personal gear, but still get the most future-proof camera system available. Give our cinema experts a call. We’re happy to walk you through all of the options and guide you towards the best camera for your goals and budget. 


    Backscatter Underwater Video & Photo is the largest underwater imaging equipment supplier in the world. Since 1994, Backscatter has supported sport divers, filmmakers, and production companies with gear and technical support from its locations in Monterey, California and Derry, New Hampshire. Backscatter is far from a typical retailer and lives by its motto, “We dive, shoot, and service everything we sell” by publishing hundreds of detailed gear reviews from first hand experience and offering instructional seminars and trips around the world.

    Backscatter is the only US retailer with a complete in-house warranty service center for all major underwater brands. Backscatter is the US distributor for Olympus in the scuba diving retail channel and also manufacturers its own line of underwater camera accessories such as the FLIP system of color correction optics for GoPro cameras. For more about Backscatter or articles on equipment and technique, please see http://www.backscatter.com

    Articles: Digital Photography Review (dpreview.com)

  • Trippy mirrored timelapse turns Hong Kong upside down

    Skill, dedication, vision: a good timelapse requires all of these things. A really cool subject helps too. ‘The Allegory of the Cave,’ a new timelapse from Visual Suspect, checks all of those boxes. By mirroring Hong Kong’s vibrant cityscapes, its creators aim to play with themes of ‘perception and knowledge as reflection of our reality.’ 

    Familiar images of skyscrapers in clouds or boats in a harbor become abstract shapes – where does one image stop and its reflection begin? Is anything real?

    See? We told you it was trippy. 

    Articles: Digital Photography Review (dpreview.com)

  • Photographers to Get (Small) Reward for Their Creative Commons Images

    dotspin

    Image courtesy: Dotspin

    Someone is benefitting from your Creative Commons-licensed images, and it probably isn’t you. Sure, you might get a little thrill out of knowing that you’re helping a designer with a small budget (or a blogger with no budget) to use an attractive image. And if you’re able to see your pictures in use, the validation can be a fun boost. But that’s a big ‘if’ and it’s pretty much where the benefits end. One new company, though, believes that photographers willing to give away their pictures should receive more for their efforts. Dotspin is trying to line up gifts for photographers who apply Creative Commons licenses to their pictures and give them away on social media sites.

    The company has been online since the beginning of May and is still in beta. Its aim, says co-founder Gastón Paladini, is to reward photographers for their contributions to the Internet.

    “The idea come from a vision to have a more fair web for all. We think that social media users should be recognized for good content (photos) shared and to be protected in a legal way (copyrights).”

    Dotspin is connected to both Instagram and Twitter. Having signed in using an account on either one of those services, Dotspin’s users can take a picture, apply their filters and upload it to their account, tagging the image with the hashtag #dotspin.

    The hashtag ensures that the photo is also submitted to Dotspin where, by default, it is licensed as Creative Commons. A settings page, however, allows photographers to change the type of license applied. Rather than selecting one of the various Creative Commons licenses in use, they’re asked whether they’re willing to allow modifications and commercial usage in addition to personal use.

    The image will appear in Dotspin’s galleries watermarked with a colored dot, but not before the community has voted on it. Users are presented with two random pictures and asked which they prefer. Images that receive a large number of votes receive “dotcredits,” points which they can redeem for rewards.

    At the moment those rewards come from Dotspin, based on “some agreements with Amazon.”

    “But we think that soon the suppliers and brands will come to us to offer their products on the Dotspin catalogue,” says Gastón.

    Put Your Ads in Front of… Picture-Takers

    He may be right.  Instagram currently has more than 100 million users, offering a massive potential market for sellers looking to promote their goods. It’s likely that Dotspin will be able to find some companies who are willing to offer vouchers or freebies in the hope of turning the winners, as well as the site’s users, into future customers.

    But the site will face a number of challenges too.

    The first is the lack of demographic data. Awarding points that users can redeem means that suppliers can’t target their advertising. They’ll have to settle for offering their products to a demographic made up of roughly of people who like taking pictures. That’s a broad category.

    The voting system, too, leaves much to be desired. At the moment, two images are placed against each other at random, forcing users to choose between a picturesque sunset and a mirror-shot selfie, for example. A voting system that pitched two images showing similar topics or that were shot in similar styles against each other might be a more serious way of judging talent.

    But a bigger problem is the site’s goal itself. Gastón’s aim to reward people willing to give away their images may be fair and reasonable, but the lack of rewards on offer so far hasn’t stopped people from sharing their pictures. Flickr alone has more than a quarter of a billion photos available under one form of Creative Commons license or another. Donors of those images have made them available with no hope of reward. Gastón wouldn’t say how many photographers have signed up since the site’s beta launch but he did indicate that the numbers are “much more than we thought.”

    That could be a good sign but it will be interesting to see whether Dotspin is able to capture a good chunk of the photographers willing to allow people to use their images.

    Creative Commons Users Want Tracking for Their Photos, Not Thanks

    The most likely outcome is that some photographers currently sharing their images through Instagram and Twitter will sign up to Dotspin and start adding the hashtag. They’ll enjoy the extra feedback provided by the voting system, especially if it’s enhanced. And if the site is able to bring in donors, they might feel a rush if they’re able to win enough credits to pick up a free app download or a discount from a printing service.

    But none of those rewards is likely to have an impact on photo-sharing as a whole. They aren’t likely to encourage it and the odd prize isn’t going to come close to rewarding photographers for giving away for free an asset that costs other photographers a great deal to produce.

    That’s because when photographers add a Creative Commons license they aren’t doing it for the reward. They’re doing it because they want people to use their images — even the images that few people are ever likely to use. And most of all they want to see their pictures in use.

    That would have been a much more powerful reward than goodies redeemable against voted credits. If a platform were produced that highlighted the best of the most recent Creative Commons-licensed images, helped publishers, bloggers and editors to find them, and informed the photographers each time an image was downloaded and told them where it was going to be used, that would be much more rewarding.

    And if that service also gave the photographers a share of the page’s revenues, then photographers who applied Creative Commons licenses to their images would really start to feel the benefits.


    Photopreneur – Make Money Selling Your Photos