Blog

  • 5 Tips for Setting the Focus in Your Landscape Photography

    In many types of photography the question of where you should set your focus is pretty simple. For example, in portrait photography, there is one simple rule: focus on the eyes. When the eyes aren’t on the same plane of focus, focus on the near eye. End of story.

    It is pretty simple with other types of photography as well. In wildlife photography you focus on the animal. In fact, in any type of photography where there is a clear subject, you always focus on that subject. That’s not to say it is always easy, but at least it isn’t difficult to figure out.
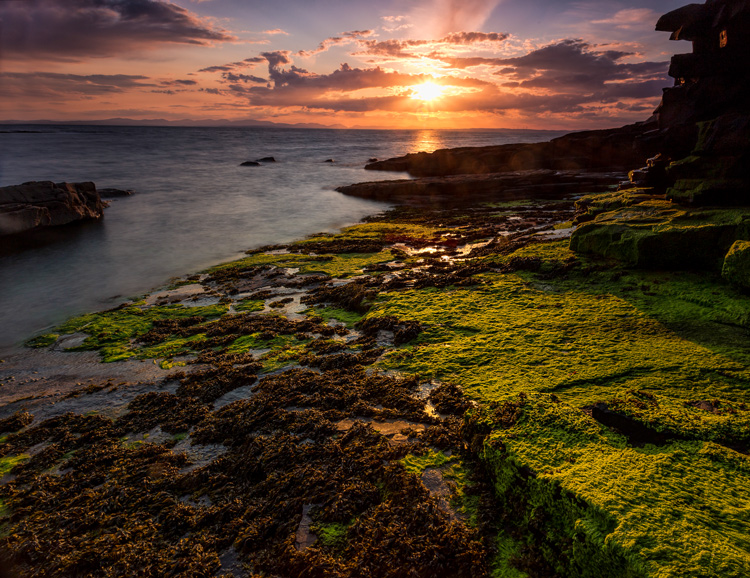
    Mullaghmore

    Foreground sharpness is paramount in many landscape photos.

    But what about landscape photography where you are generally capturing more of a scene than a solitary subject? Where do you focus to ensure that everything in the scene is as sharp as possible? The answer isn’t always so clear. Therefore, in this article, we’ll cover some tips for helping you know where to set the focus.

    Tip 1: Don’t Just Set the Focus at Infinity

    Again, oftentimes in landscape photography, you are trying to capture a scene rather than a solitary thing. Many times, the scene you are trying to capture is far away from you. Most lenses have a range of focus values, and once you get beyond a certain distance (often 20-30 feet, or 8-10 meters) the focus is set at infinity. Everything beyond that point will just be infinity. Therefore, if you are taking a picture where most things in the frame are far away, it might seem that you should just set the focus at infinity. If you are using autofocus (and most of us are), you might be inclined to set the focus using something that is very far away from you.

    If everything in the frame is truly at infinity, then setting the focus at its maximum distance is not a horrible idea. If there is nothing close to you, then there is just no need to do anything else, you don’t need to overly complicate things. But more commonly there are aspects of the scene that are closer to you than infinity. Where do you set the focus then?
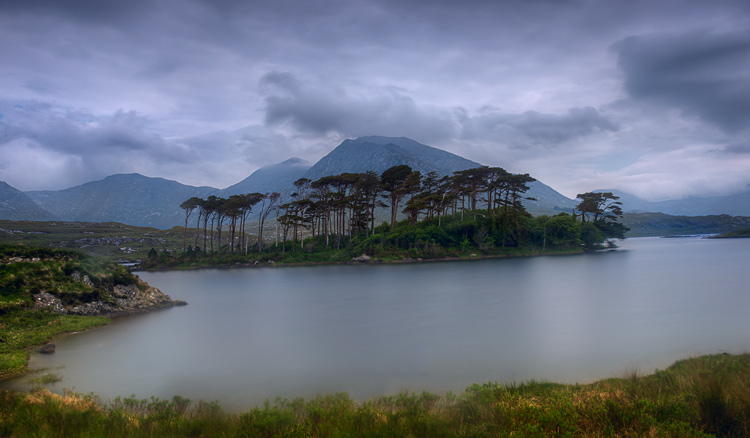
    Derryclare

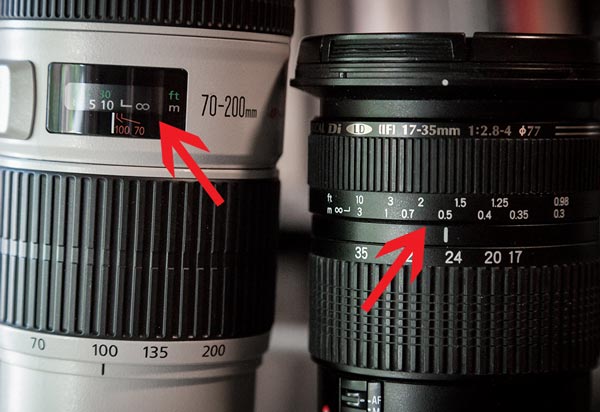
    You can get into hyperfocal distance (we’ll talk more about that in a minute) and make this as technical as you want. But often your time is precious when you’re out shooting. The light is changing and things are moving. You can get a pretty good sense of things without resorting to calculations. As a result, consider this rule of thumb: set the focus at infinity and then just turn it back a little bit. The obvious question is what is, how do you define a little bit, and I’m afraid I don’t have a good answer for you. It will vary from lens to lens, but will usually be about a 5-10° turn or just to the highest distance number printed on the lens (if your lens has these numbers).
    focus-ring-distance-600px

    Why would you want to do that? Because of the depth of field that will be in your picture (more on depth of field below). Since you are taking an outdoor photo, you will probably not be shooting wide open, or even with a large aperture. So, there will likely be some depth depth of field involved. It doesn’t necessarily have to be a large depth of field, but the point is that it gives you some leeway. By pulling the focus forward, that leeway will still get everything out to infinity in focus. It will also get things a little closer in focus as well.

    Tip 2: Try Focusing a Third of the Way into the Picture

    Many pictures are ruined because the foreground is not sharp. It happens all the time. Therefore, if you have something in your scene that is close to the camera, focus on it. If the ground is prominent in your picture, set your focus close to you. Make sure that foreground is in focus. Often you will set the focus only a few feet in front of you.

    But wait a second, you might ask, what about my background? Won’t it be out of focus or blurry? Probably not. If you’re using your wide-angle lens (and if you are taking a outdoor photo that has a discrete foreground, then you probably are) you will have a wide depth of field, even at moderate to large apertures.
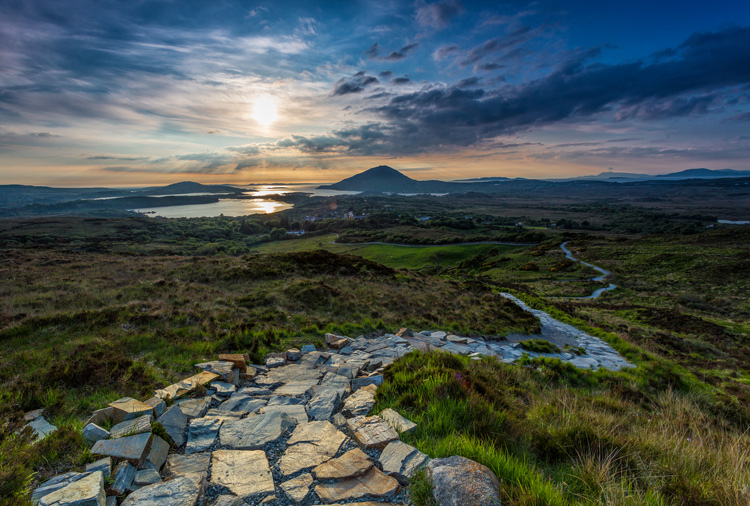
    Connemara

    A sharp foregound focus furthers the viewer’s sense that they can walk into the picture.

    Tip 3: Focus on the Subject Matter

    Let’s not lose sight of the obvious though. When you have a definite subject or center of interest in your photo, just focus on that. It is the most important part of your picture and you absolutely need it in focus. Don’t worry about your foreground, don’t worry about your background. Just make sure the subject is in focus. Frankly, if there is a little fall-off in sharpness from your subject, that will probably not be such a bad thing.
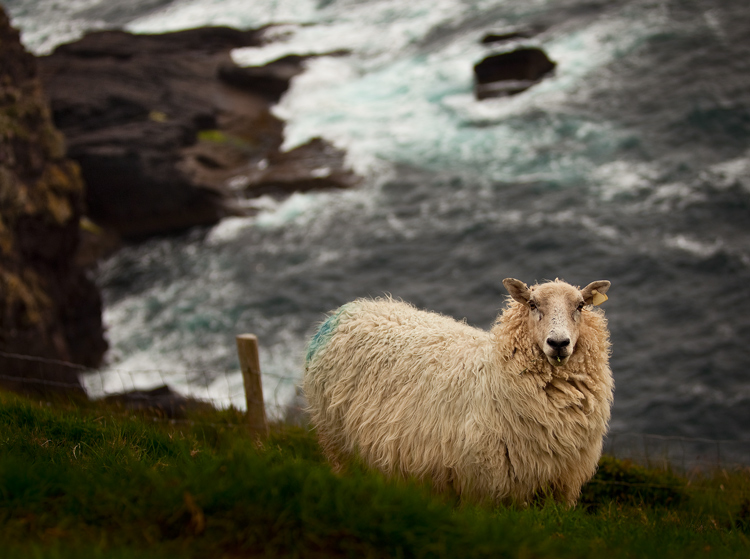
    Dingle-Sheep

    Sometimes you just want a definite subject in focus, and having the background start to blur out is just fine, as in this image of a sheep.

    Tip 4: Watch the Aperture

    There are no free lunches in photography. You probably already know that by using a smaller aperture to get a larger depth of field, it will cost you light. The smaller aperture lets in less light so you will have to use a longer shutter speed (risking blur if you aren’t using a tripod) or raise the ISO (risking digital noise in your picture). But the smaller aperture will also lead to something called diffraction, particularly in cameras with smaller digital sensors. Therefore, just using the smallest aperture possible isn’t always the answer. You cannot just set your focus anywhere and rely on a super-wide depth of field to save you.

    There are two ways around this issue though, which we’ll talk about next.
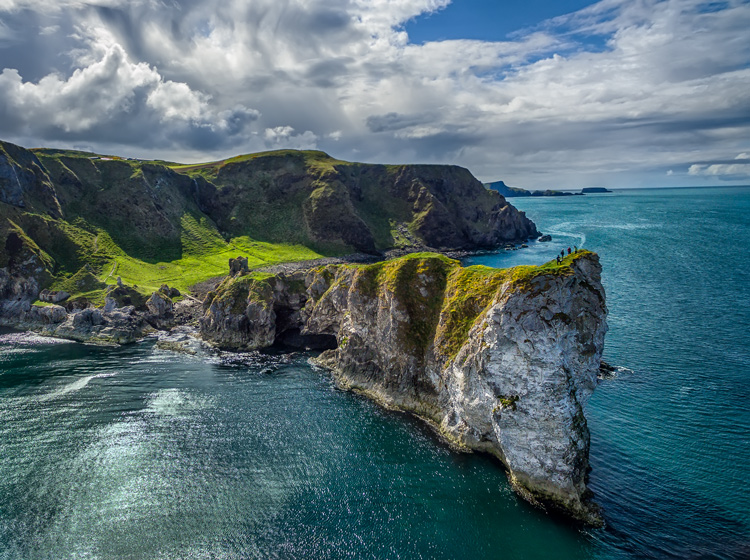
    Kinbane-Head

    With everything in the shot at a distance of infinity (30 feet or more), I did not need a wide depth of field to keep everything in focus.

    Tip 5: Know Your Hyperfocal Distance

    Hyperfocal distance is just a fancy name for determining how close you can set your focus, and still keep your background acceptably sharp. There are apps and calculators that will tell you this distance depending on your aperture, sensor size, and focal length. For a full explanation of hyperfocal distance along with some charts and links to apps that will calculate it for you, check out How to Find and Use Hyperfocal Distance for Sharp Backgrounds .

    An example will illustrate the point made above about backgrounds tending to remain sharp when you are using wide angle lenses. If you’re using a 16mm lens on a full frame camera, and shooting at f/11, your hyperfocal distance is only 2.5 feet. That means you can set the focus on a point just in front of you, and keep everything behind that point sharp.

    Knowing the hyperfocal distance will often liberate you to set the focus point quite close, in order to maintain sharp foregrounds in your picture. It also means you often don’t need to use the smallest aperture your lens offers, so you can avoid the effects of diffraction.
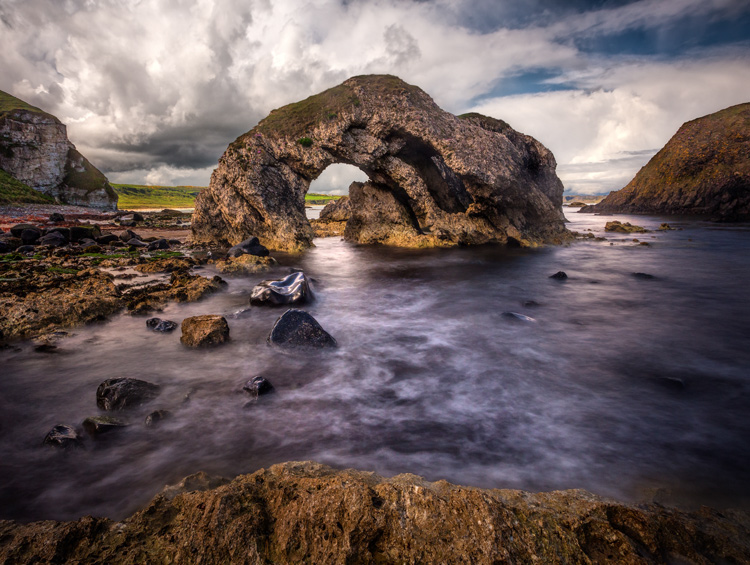
    Ballintoy-Arch

    Tip 6: Consider Focus Stacking

    When the methods above won’t work for you, or you just need to make sure absolutely everything in the photo from front to back is tack sharp, you may want to consider focus stacking. Here you take multiple pictures of the same scene using different focus points.

    Start by setting the aperture of your lens where it is sharpest (also called the sweet spot – if you don’t know, that is usually in the range of f/5.6 – f/8). Take a shot with the focus set close to you, then repeat the process, gradually setting the focus point farther and farther away with each shot. Later you blend your pictures in Photoshop (for more about how to do that check out Maximizing Depth of Field Without Diffraction).

    This method is not a cure-all. It obviously won’t work with moving subject matter. In addition, it can be tedious, and you risk slightly moving the camera since you have to twist the focus ring between shots. Still it can be a powerful tool for maintaining focus and sharpness throughout your entire picture.

    Setting the Focus Summary

    No rule is going to cover every situation when it comes to focus. As with many aspects of photography, you’ll just have to use your own judgment in the field. Hopefully, as you do so, these tips will help you nail the focus and keep the picture tack sharp where it matters.

    This week we are doing a series of articles to help you do better nature photography. See previous articles here:

    • 3 Habits Every Outdoor Photographer Should Develop to Avoid Missing Shots
    • 5 Tips for Better Nature Photography
    • 27 Serene Images of the Natural World
    • Weekly Photography Challenge – Nature
    • 10 Ideas for Photographing Nature in your Backyard
    • 6 Tips for Capturing Character and Personality in Wildlife Photography

    googletag.cmd.push(function() {
    tablet_slots.push( googletag.defineSlot( “/1005424/_dPSv4_tab-all-article-bottom_(300×250)”, [300, 250], “pb-ad-78623” ).addService( googletag.pubads() ) ); } );

    googletag.cmd.push(function() {
    mobile_slots.push( googletag.defineSlot( “/1005424/_dPSv4_mob-all-article-bottom_(300×250)”, [300, 250], “pb-ad-78158” ).addService( googletag.pubads() ) ); } );

    The post 5 Tips for Setting the Focus in Your Landscape Photography by Jim Hamel appeared first on Digital Photography School.


    Digital Photography School

  • Mood Boards: Communicate Your Ideas To Your Creative Team

    Communicate Your Ideas Clearly With Your Team Using Mood Boards


    Hey FashionPhotographyBlog.com readers,

    Last time we discussed planning a shoot, getting inspired and finding your creative team. Today we’re going through how to effectively communicate your photography vision for the shoot with your team members and get the most out of them in terms of collaboration.


    This is the time to hear out others opinions (if you’re open to them, which it’s always good to be) and really hammer down the details. When reaching out to your team, it’s standard protocol to provide them with a mood board.


    What is a mood board? Essentially, it’s a collection of images to serve as inspiration and direction for how the shoot is to be pulled together. Typically, it’s a page (can be more) that compiles images and ideas which allows everyone to be on the same wavelength. Often it’s a good idea to include keywords and color references. If you’re not the kind to make a mood board, you can also compile images into a folder to send to your team but it’s the norm to compile it all on a single board.


    On a mood board I tend to include inspiration for hair, makeup and styling along with an idea of how I want the image to look in the end. Sometimes this last bit will be a drawing or an image that has the same type of color scheme I’ll end up applying. Anything it takes to get your idea across. Don’t overcomplicate it.


    The mood board is then followed up with emails (meetings or phone calls) to clarify any questions, hear out any suggestions and really communicate the idea to be portrayed. Jocelyne and I spent the next week exchanging numerous emails, deciding exactly which clothing to use, which trends to reference, what type of accessories to incorporate, etc. She would show me clothing which I would sort through and show images to Matt. Together we all made decisions which clothing to work with and which to forget about. No stone was left unturned.


    *** It’s important to be involved with choosing which clothing you’re going to shoot. Especially if you are working with a new stylist or one that is just starting out in the field. Often times people will listen to what you say but pull clothing that suits their vision, not yours. There have been several times that I’ve showed up to a shoot to find awful clothing that was not at all what was described in the mood board. Sometimes you just have to learn the hard way. Being hands on is the only way to guarantee results that perfectly match your vision.


    On the day of the shoot, make sure when your team gets there they have a clear idea of what is to happen for the day. I always take ideas and advice from my creative team but ultimately it comes down to the final concept and what is going to work best. If someone is giving you trouble on set and trying to override your ideas, pull them aside and speak with them. Don’t make it an awkward thing. “I respect your ideas but I don’t necessarily see it working with the overall concept for this shoot,” is all it takes.


    Pardon for the quickly thrown together mood board – I couldn’t find the original.

    Mood board


    So that’s how you can get the most out of your creative team using mood boards. I hope that helps. If you have any suggestions you would like to share on how you use mood boards, please feel free to leave it in the comment section below. We’d love to see it!


    Now that everyone on your creative team is onboard with your photography vision it’s now time to shoot it & wrap it up in post production. Stay tuned, because next time I will be sharing with you my tips for making the time during the shoot and after the shoot in post production run smoothly.


    Until then – 

    Alana


    IMAGE SOURCE:

    Feature image & image 1: courtesy of Alana Tyler Slutsky


    Fashion Photography Blog

  • Shooting With Your Creative Team & Post Production

    Make It happen & Post-Production


    Hi FashionPhotographyBlog.com readers,

    Last time we talked about how to communicate with your creative team clearly using mood boards, today we are talking about how to make the process of shooting with your team and taking the shots into post-production run smoothly. So here we go…


    Once everyone on the creative team and everything for the shoot is confirmed, I’ll reach out to agencies and find a girl that suits the idea. This isn’t always the case. Oftentimes you’ll see a model and be inspired by their look. 


    Be sure to send out a call sheet the day before your shoot. This serves as a reminder for everyone as to the time and location of the shoot as well as provides everyone with the contact information for all involved. This is a standard protocol on any professional shoot.


    fashion-photoshoot-run-sheet-example

     Then… Shoot! If you keep everything organized and set yourself a bit of a time table to stick to, you’ll be on track for a successful shoot. For “Surrealia,” we managed to shoot two models with several looks in just a few hours.


    Remember, make it fun! If everyone is enjoying what they’re doing, it will show. Put on some music – ask the model what their favorite band is or put on something that sets the mood to help convey the feeling in the images.


    Post-Production


    I know, this is the least fun part of any shoot. The edit. Jocelyne and I decided to pick our final images together and made sure our selects portrayed the model and clothing nicely.


    As with any good retouch.. It took forever. Well worth it though! After retouching the images and converting to black and white, it was time to send them off to Matt for illustration.


    The process I went through with Matt is basically the same as the process you go through when sending images off to a retoucher:


    1) Send over the images and let them do their thing (of course, with a general sense of guidance from you.)

    2) You’ll receive a “first round” which you can mark up anything you dislike or don’t see fit and send it back for revisions.

    3) Repeat the process of markups and revisions until the image is complete. Don’t forget to be conscious of budget when working with a retoucher.


    Working with Matt was fantastic. There was bright color, organic shape, line; all the elements we had like in the editorials we found when doing our research. Except they suited us! Matt did an excellent job of taking those elements we liked and translating them to suit his vision and compliment my photographs.


    The result? A batch of images I’m proud to have my name on and remain some of my favorites to this day.


    The best thing you can do when planning a shoot is be meticulous. Leave no leaf unturned. Be sure to think of every detail and put your stamp on it. The same type of work goes into planning a test, however you don’t need as extensive a concept. It can be as simple as just shooting a portrait.


    Hope you liked my posts about finding, planning and working with a creative team. As always, if you have any questions, feel free to leave a comment below or shoot me an email.


    Until next time.. See ya!

    Alana


    IMAGE SOURCE:

    Feature image: Ophelia by Gregory Crewdson

    Image 1: courtesy of Alana Tyler Slutsky


    Fashion Photography Blog

  • Photographers Need To Stop Taking Pictures

    stop-taking-pictures

    Stop taking pictures – OK – I assume that that headline grabbed your attention – and that was what it was designed for.  (I have to say that I’m only half-joking about this – I’ll explain…)   Recently I realized that – that for me as a photographer – one of the most effective and valuable things I could do with my time is NOT taking pictures!  I have to admit it was a bit of a shock when the reality of this started to sink in but now it makes absolute sense to me.


    What, you might say – You’re a photographer. What’s going on here?


    I’ll explain…  Since you only have a limited amount of time each day you need to prioritise and figure out what actions brings you the “biggest bang for your buck” or the highest lifetime value (you can use the term ROI [Return On Investment] as well).


    In our every day we are juggling a lot of roles and I dare to say that most of us are running around “putting out fires” as they flame up instead of working on the really important stuff. The really important stuff are the things that will bring us a lot of value for a limited effort. I’m sure you’ve heard about the 80/20 rule (the Pareto Principle) – this is it!


    Photographers – Stop taking pictures #photography #GettingThingsDone
    Click To Tweet


    Surprisingly taking pictures does NOT bring me the highest life-time value.  Building processes and workflows for my photography brings me the highest lifetime value because once they are in place they run on auto-pilot, automatically.  You spend some time on it but after that the process will just run and run and run…   See what i mean?   Taking pictures gives you some money – but you have to repeat it – over and over again…

    productivity-pyramid

    And here is the beauty of the whole thing – When you start putting processes and effective workflows in place for your photography you will increase the ROI on your work because the new processes will add  value to what you do – automatically!


    IMAGE SOURCE:

    Feature image & image 1: courtesy of Per Zennstrom


    Fashion Photography Blog

  • Concept To Creation: Editorial Versus Campaign

    Editorial vs. Campaign


    Hey FashionPhotographyBlog.com readers.


    Thanks for joining us on our “Concept to Creation” series where we walk you through the process of taking an idea into an image. If you were here with us last time, we investigated examples of how working fashion photographers in the industry turn their inspirations into a concepts.


    Concept – crucial to binding your images together. You’ll find that any high end magazine only published editorials that has a concept holding the story together so today we are going discuss the difference between editorial and campaign images and how these can affect the concept for your shoots.


    There’s a bit of a formula to it all. A set of rules that can, and are, broken.. But for the most part hold true to all editorials and campaigns you see.


    Campaigns


    Typical, successful campaigns do a few things. Obviously, they showcase the clothing. If you can’t see the clothing, you’re not getting paid. In fashion, clothing is king. It comes before all else.


    You’ll notice that campaigns shot on location tend to stick to one area. If you’re on a sofa in a house- you’re on that sofa, in that house, for all of the images. A lot of campaign images tend to look the same. That’s a job well done! It’s this repetition that makes you remember “Oh, the girl on the blue couch with a million men is that Brian Atwood campaign.” So every time you see a girl on a blue couch with a million men, what do you think? That’s right! Subconsciously you recall Brian Atwood’s name!


    Brian Atwood’s Fall 2012 Campaign by Mert & Marcus:


    Notice all the images have the same general perspective, are in the same place, and are essentially the same image (with variations).

    brian-atwood-fall-2012-campaign-by-mert-and-marcusbrian-atwood-fall-2012-campaign-by-mert-and-marcusbrian-atwood-fall-2012-campaign-by-mert-and-marcus


    Louis Vuitton Spring 2012 by Steven Meisel

    Notice a pattern?louis-vuitton-2012-by-steven-meisellouis-vuitton-2012-by-steven-meisel

    EDITORIALS


    With an editorial, you have more freedom! You’re not glued to one location, you can play with lighting (it should be relatively consistent but doesn’t necessarily have to be exactly the same in every shot), you can play with angles, etc.


    As long as all the images are tied together via concept, have some fun with it. Editorials do showcase clothing however you can be a bit more liberal and artistic with how it’s shown. And one day, if you have enough power in the fashion world like Steven Meisel or Steven Klein, you can sometimes get away with having the dress you’re supposed to feature laying on the floor or hardly showing. (This only applies to the big players in the fashion photography industry.. don’t get any ideas!)


    Steven Klein for Interview Magazine


    Observe that there is a definite concept. However, unlike a campaign, there is more variation between the shots.

    steven-klein-for-interview-magazinesteven-klein-for-interview-magazinesteven-klein-for-interview-magazinesteven-klein-for-interview-magazine 

    Tim Walker (& Tim Burton!) for Harper’s Bazaar


    tim-walker-and-tim-burton-for-harpers-bazaartim-walker-and-tim-burton-for-harpers-bazaartim-walker-and-tim-burton-for-harpers-bazaartim-walker-and-tim-burton-for-harpers-bazaar

    I hope you all enjoyed discovering the difference between editorial and campaign images. It’s definitely something you want to keep in mind when you’re translating your inspirations into concepts. With a better understanding of the concept to creation process, you’ll be able to turn your shoot ideas into reality.

    As always, if you have any questions, feel free to shoot over an email!


    Alana


    IMAGE SOURCE:

    Feature image & images 1-3: Mert & Marcus for Brian Atwood’s Fall 2012 Campaign

    Images 4 & 5: Steven Meisel for Louis Vuitton Spring 2012 by Steven Meisel

    Images 6-9: Steven Klein for Interview Magazine

    Images 10-13: Tim Walker (& Tim Burton!) for Harper’s Bazaar


    Fashion Photography Blog

  • Stopped Steps: 10 Declining Abandoned Escalators

    [ By Steve in Abandoned Places & Architecture. ]

    abandoned_escalator_8b

    Well, that did NOT escalate quickly. These busted up and broken down abandoned escalators won’t be devouring any CROC plastic sandals anytime soon.

    abandoned_escalator_8a

    abandoned_escalator_8c

    An outdoor escalator? In damp, rainy England? It’s more likely than you think, and most likely to be abandoned like this mossy ex-people-mover in Leeds. Snapped by Flickr user Paul Williams (Bluelemur), the long-neglected electric stairway once ferried shoppers from a pedestrian underpass up to a shopping mall. These images were taken in March of 2006; both the mall and its escalators were demolished shortly thereafter.

    Somewhere Under The Rainbow

    abandoned_escalator_3b

    abandoned_escalator_3c

    Think “La Rainbow Hotel” and a spectrum of brilliant colors come to mind. The above post-apocalyptic scene certainly wasn’t in the minds of those who named the long-abandoned hotel though it DOES display an impressive visual palette. Jordy Meow of Haikyo.org captured the former (1990-97) hotel’s silent, seized-up & spooky escalator in July of 2012.

    Narrowed Down

    abandoned_escalator_6a

    abandoned_escalator_6b

    abandoned_escalator_6c

    When Hunter’s Point Naval Shipyard in San Francisco, CA closed in 1994, the “tallest industrial escalator” (according to Flickr user TunnelBug) closed along with it. We’re guessing it was the narrowest industrial escalator as well though no one to our knowledge has done a comparative survey. The images above date from 2006, 2005 and 2009 respectively.

    Out Of Warranty

    abandoned_escalator_7b

    abandoned_escalator_7a

    If Hyundai built this escalator as well as they build their current automobiles, it might still be working today. Instead, however, the abandoned mobile stairway in South Jakarta, Indonesia’s Tebet market dates from a time when Hyundai exported the infamous Pony and Stellar to unsuspecting North American shores… just typing those names evokes the aroma of cooked engine oil. Phew!

    Next Page – Click Below to Read More:
    Stopped Steps 10 Declining Abandoned Escalators

    Share on Facebook


    [ By Steve in Abandoned Places & Architecture. ]

    [ WebUrbanist | Archives | Galleries | Privacy | TOS ]


    WebUrbanist

  • 6 Tips for Capturing Character and Personality in Wildlife Photography

    If you want to take your wildlife photography to the next level, then you need to look at capturing the character and personality of an animal. This makes for a much more appealing image, rather than simply a bird on a stick. A photo always needs to tell a story, but I think many photographers don’t realize that this applies to wildlife photography too.

    Even though we can’t directly relate to most wild animals, it is still possible to document a story through a single image, or a sequence of images.

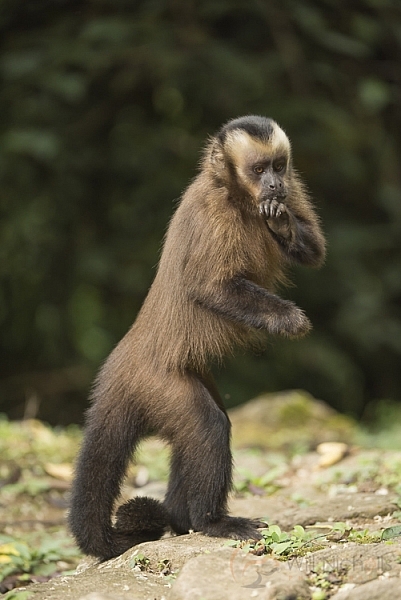
    Tufted Capuchin

    Tufted Capuchin

    Without anthropomorphising animals, many do have their own personalities. I am doubtful this applies to something like an ant, but mammals in particular can be observed to have particular traits and habits. Some may be bold and investigate new things, whereas others may retreat and shy away from disturbances. This can be seen as the animal’s personality, and it is up to us as wildlife photographers to capture this on camera.

    It’s definitely not easy though, as stills photography captures one moment in time and freezes it forever. Working with video makes it far easier to convey character, but it’s not impossible to do it in a single frame. Here are some tips to help you get character in your wildlife photography.

    #1 – Behaviour

    As a zoologist, I am fascinated by animal behaviour. Some behaviours we see as normal and predictable, whereas others shock and surprise us. Did you know that fish swallow small stones to aid digestion?

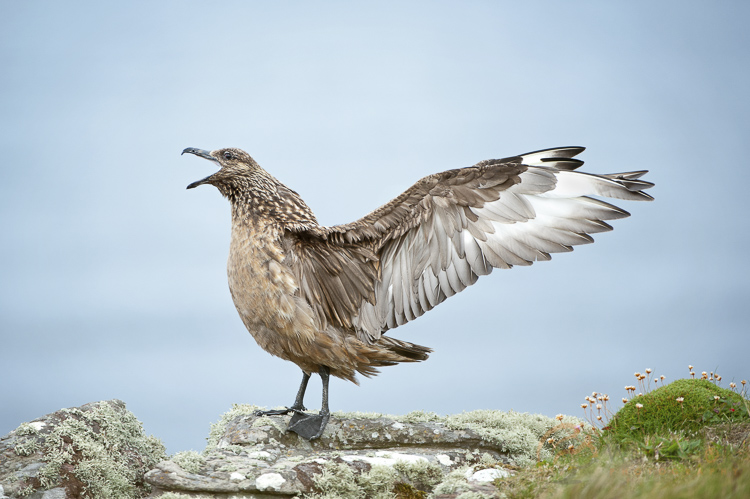
    It’s capturing these interesting behaviours on camera that properly conveys the essence of a particular species. When you’re behind the camera, it’s easy to stare through the viewfinder and get tunnel vision. But if you step back and study an animal, reading up about it beforehand, you’ll learn what you need to look out for. Many animals have giveaway moves that warn you of an impending display – which is the case with great skuas, a seabird found in the northern hemisphere.

    great skua

    Great Skua, photographed in Scotland (Stercorarius skua)

    In this particular case, the skua was preening its feathers continuously. This is a typical thing for birds to do before flapping their wings or displaying. It’s almost like a big stretch and yawn. I waited patiently for 15 minutes while the bird preened, knowing that I would probably be rewarded with such a display afterwards (image above).

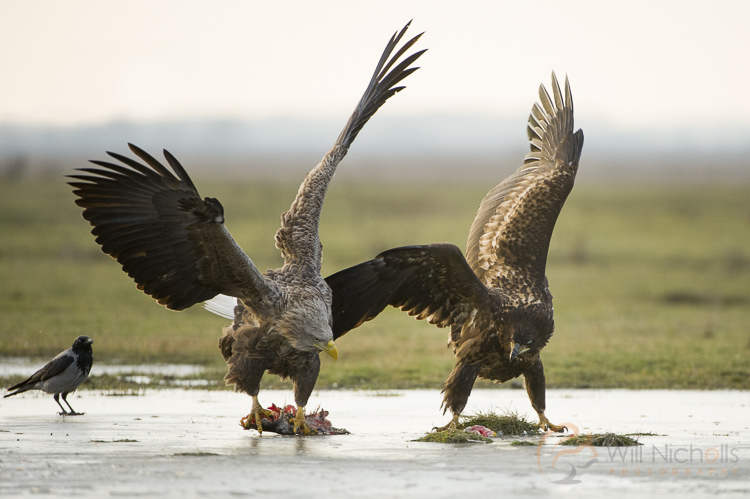
    Confrontations between two animals are commonplace. If you see one animal, even if it’s of a different species, approaching another, then chances are you’ll see some sort of interaction. Take these white-tailed eagles, for example. I was pretty sure that they’d both have a disagreement over who had rights to the tasty fish laying on the ice. With my focus nailed, I kept the shutter half-pressed and fired as soon as they lifted their wings.

    white tailed eagles

    White-tailed Eagles, photographed in Hungary.

    #2 – Humour

    While animals won’t inherently try to be funny, they often do things that make us chuckle. These are usually opportunistic photos that you can’t prepare for, but being poised and ready at all moments is key to capturing them.

    When I lead workshops, one of the main things I try to get my clients to realize is that as soon as you drop your camera down, you’re risking missing the shot. If your subject is in front of you, then you’ve done the hard bit of waiting for an appearance – keep your eye to the viewfinder and remain at the ready, almost like a sniper training his eye on a target.

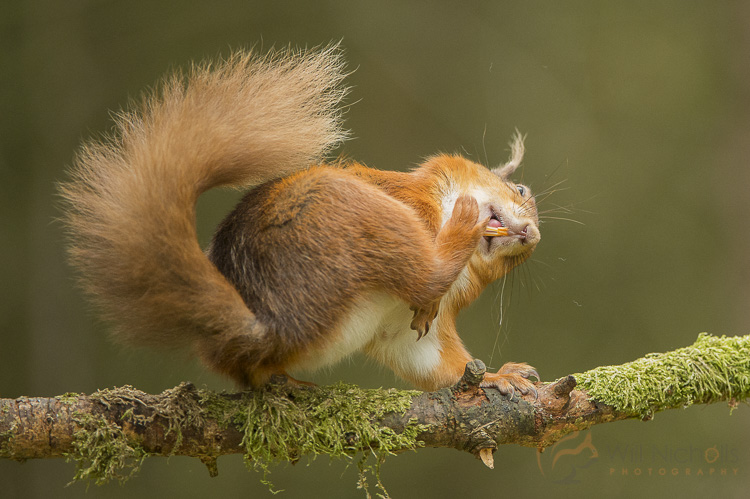
    red squirrel

    Eurasian red squirrel (Sciurus vulgaris), photographed in England.

    A quick scratch from a squirrel lasting just a couple of seconds was possible to catch on camera, because I was already following its progress along the branch through the viewfinder.

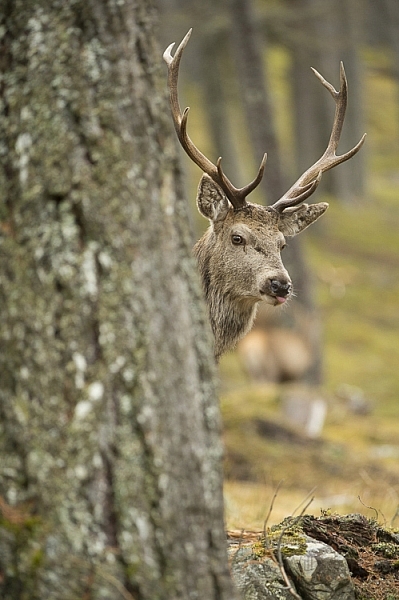
    Red deer

    A red deer stag in the Scottish Highlands.

    I had been looking to capture a stag peering through the trees, and while this wasn’t my intended outcome, I couldn’t help but click away when this stag stuck its tongue out round the tree. It’s little things like this that bring a smile to the viewer, and bring in personality and character to your wildlife photos. Although they make some chuckle more than others…

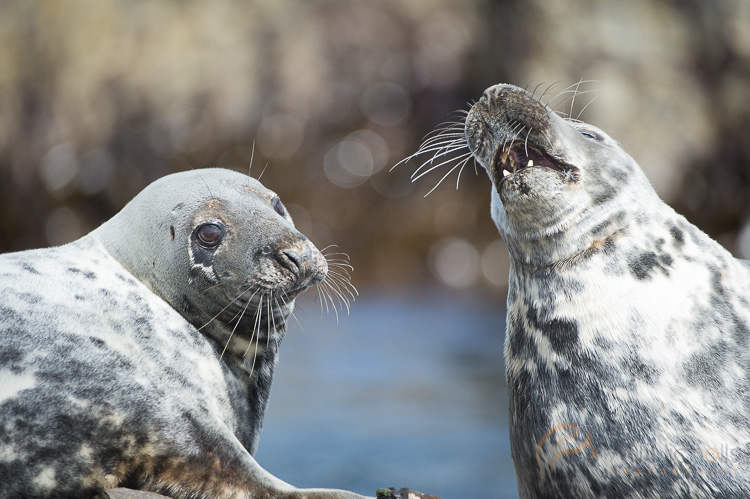
    atlantic seals

    #3 – Tight in the Frame

    All the images I’ve shared so far in this article are fairly tight in the frame. This is a particularly useful composition technique you can use to bring the focus solely to the animal. The bokeh also helps, isolating the subject against the background – this is done using a wide aperture (and subsequently a shallow depth of field), most often successfully with a telephoto lens.

    red squirrel

    Eurasian red squirrel (Sciurus vulgaris).

    When the attention of the viewer is trained on the animal alone, without distracting background elements to tear the eye away, then they feel more interacted with the animal in the image. It perhaps sounds a little cliché, but it is true. In this image of a squirrel, you can see that eye contact, along with a catchlight in the eye, really makes the photo pop.

    When doing tight compositions like this, be careful not to chop limbs off half way down their length. It’s all or nothing, I always say!

    #4 – Family Ties

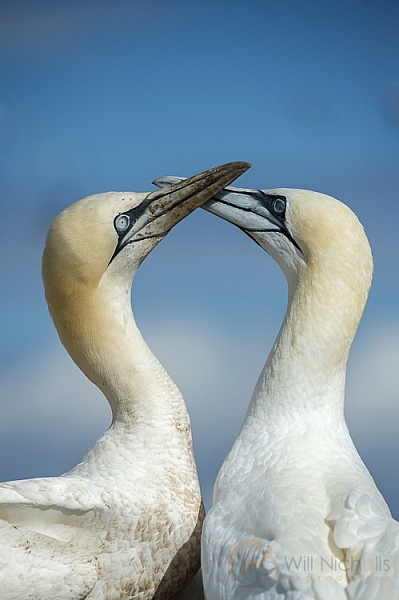
    If there’s anything humans can relate to with animals, it’s the bond between parents and offspring. Not all animals care for their young, of course, but those that do can be seen to care and work endlessly to raise their young. Take these two gannets – a male and a female – courting to reaffirm their bond each time the other returns to the nest from gathering fish.

    gannet

    Northern gannets (Morris bassanus).

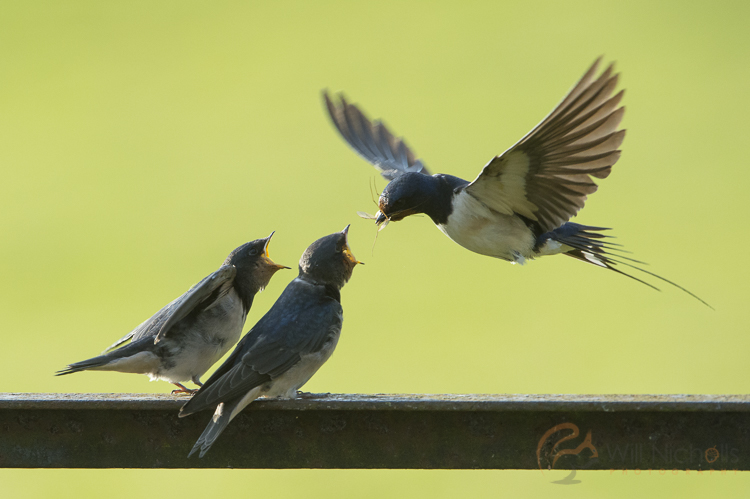
    If you can capture the parents feeding their young, even better. It doesn’t have to be a feeding behaviour though, and in particular playful shots between a family will give your shots the aww factor. Obviously, you have to be in the right place at the right time, and these particular kinds of shots require a lot of dedication and time to achieve, due to their rare nature.

    barn swallow

    Barn swallows feeding fledglings in British countryside.

    #5 Try Something Different

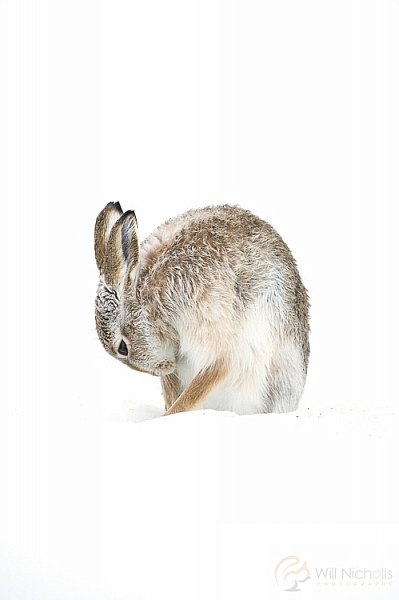
    Experimenting is something you’ve probably been told to do again and again – but it works. I am a particular fan of the high-key style of photography for wildlife, isolating the subject against the background by blowing out the highlights in an image. This mountain hare was grooming its fur, but as it bowed its head it looked rather solemn. The white background makes it almost look like a painting, and personally I think this is a rather intimate portrait.

    Mountain Hare

    Be prepared to step outside your comfort zone. That is where the photos are, that set you apart from the endless bird on a stick shots we see day to day. At first it’ll probably all go wrong, but that’s okay! You know all those rules you’ve been told? Rule of thirds, golden triangle, etc., break them, and see what happens.

    #6 – Light

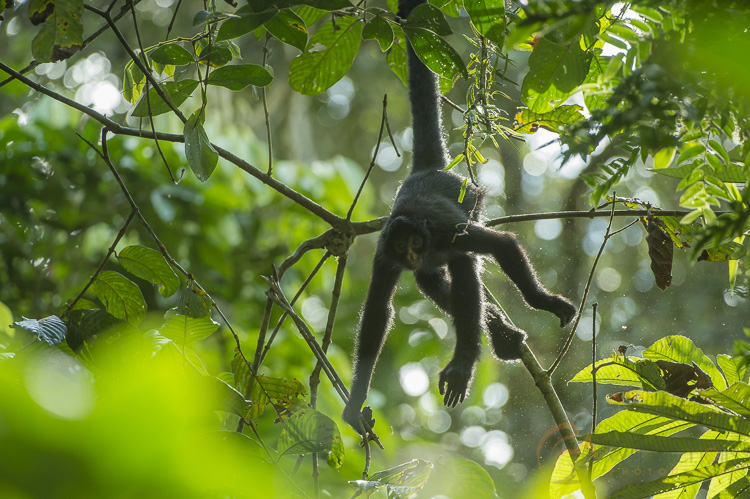
    Ooh, it’s that scary unknown again. Light. It’s a maker or breaker for photography, and that doesn’t change when you step into nature photography either. Backlighting is particularly effective for conveying mystery and magic in an image. I used this to my advantage when photographing Peruvian spider monkeys – a primate that is unfortunately on the endangered list. Even so, the backlighting breaking through the rainforest canopy makes this image appear magical.

    A backlit Peruvian spider monkey in the Amazon Rainforest in Manu, Peru.

    A backlit Peruvian spider monkey in the Amazon Rainforest in Manu, Peru.

    If you see interesting light like this, then be careful about your exposure. It’s important not to blow the highlights rim-lighting the animal, while at the same time keeping the individual exposed properly too. But when it works, it really works.

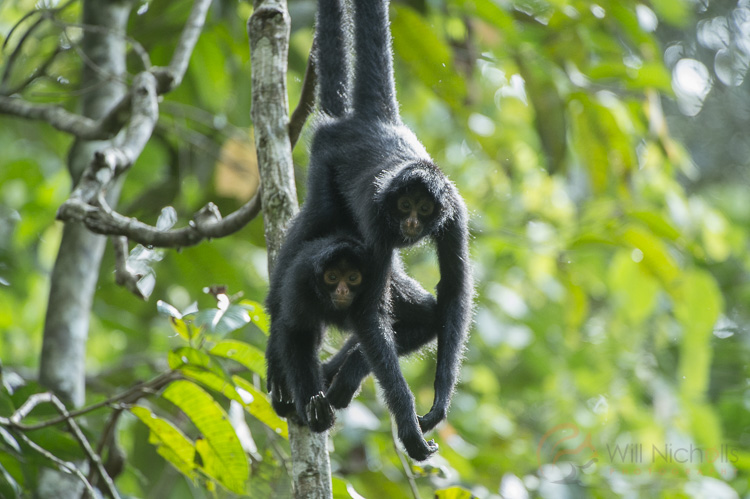
    I feel that to end an article about character and personality, it is only right to use primates as an example. We can really relate to them, more than any other animal, due to our close relations. They’re curious, intelligent, and a clear example of an animal capable of emotions.

    A male and female black-faced spider monkey stick together in the Peruvian Amazon Rainforest. These two individuals are displaying courting behaviour.

    A male and female black-faced spider monkey stick together in the Peruvian Amazon Rainforest. These two individuals are displaying courting behaviour.

    So keep clicking the shutter each time something of interest happens. Don’t wait and savour space on your memory card, because you might just miss something amazing.

    This week we are doing a series of articles to help you do better nature photography. See previous articles here:

    • 3 Habits Every Outdoor Photographer Should Develop to Avoid Missing Shots
    • 5 Tips for Better Nature Photography
    • 27 Serene Images of the Natural World
    • Weekly Photography Challenge – Nature
    • 10 Ideas for Photographing Nature in your Backyard

    googletag.cmd.push(function() {
    tablet_slots.push( googletag.defineSlot( “/1005424/_dPSv4_tab-all-article-bottom_(300×250)”, [300, 250], “pb-ad-78623” ).addService( googletag.pubads() ) ); } );

    googletag.cmd.push(function() {
    mobile_slots.push( googletag.defineSlot( “/1005424/_dPSv4_mob-all-article-bottom_(300×250)”, [300, 250], “pb-ad-78158” ).addService( googletag.pubads() ) ); } );

    The post 6 Tips for Capturing Character and Personality in Wildlife Photography by Will Nicholls appeared first on Digital Photography School.


    Digital Photography School

  • Fujifilm X-Pro2 versus X-T2: Seven key differences

    Fujifilm X-Pro2 versus X-T2: Seven key differences

    In the X-T2 and X-Pro2, Fujifilm offers two flagship cameras that have a lot in common, but are designed for slightly different purposes. So which one should you buy? We’ve broken down the key differences.

    Video

    Let’s get probably the biggest differentiator out of the way right up front – the X-T2 offers 4K video, while the X-Pro2 makes do with standard HD. The addition of 4K to the X-T2 surprised us a little when we first saw it on the spec sheet, but it’s clear that Fujifilm sees this feature as an important ‘must have’ in a camera as versatile as the X-T2. The X-T2 can record video in clips up to 10min duration, or 30min when the optional power booster grip is attached. 

    The X-Pro2, on the other hand, is meant for a different kind of photographer – one who is more stills-oriented, and more likely to shoot with prime lenses than zooms. The addition of 4K to the X-Pro2 would have certainly increased its cost – and the engineers tell us that it would also have increased its size and weight as a consequence of the necessity for a beefed-up heat sink. So if you need 4K, the X-T2 is the camera for you. 

    Rear LCD screen

    The X-Pro2, being the more ‘traditional’ of the two cameras, has a simple, fixed rear LCD. In contrast, and in keeping with its ultra-versatile ‘do anything’ design philosophy, the X-T2 features a complex, multi-articulating screen that enables easy framing from high and low angles in both landscape and portrait orientations. This articulating design is also more useful for video work.

    The decision by Fujifilm (which actually manufactures capacitive membranes for touchscreens) not to include touch sensitivity in either camera is a little disappointing. Also a bit odd is the resolution difference between the screens on the back of the X-T2 and X-Pro2. The X-Pro2’s screen resolution is 1.6 million dots – somewhat higher than the 1.04 million-dot screen on the back of the X-T2 (it’s the difference between 900 x 600 rather than 720 x 480 pixels).

    So in summary: If you want screen articulation, go for the X-T2. If you don’t mind a fixed screen, you’ll get slightly higher resolution from the X-Pro2.

    Viewfinder

    At a quick glance, the electronic viewfinder specifications of the X-Pro2 and X-T2 are very similar. Both are centered around the same 2.36 million-dot OLED display, and both offer a window on the world that is both sharp and detailed. But the X-T2’s electronic viewfinder is the better of the two, for a couple of important reasons.
    First is the addition of ‘burst mode’ to the X-T2, which increases the refresh rate of the live view image in the camera’s viewfinder to 100fps. And second is the complex optical assembly (shown above) that focuses the viewfinder’s image into your eye. The X-T2’s EVF is one of the best electronic finder that we’ve ever used. Its unusually high magnification of 0.77X and 100% frame coverage place it a level above the 92% coverage and 0.60X of the X-Pro2.

    But before we dismiss the X-Pro2 altogether…

    Viewfinder

    The X-Pro has one major trick up its sleeve – its viewfinder is a ‘hybrid’ type, that also offers a rangefinder-style optical view, which employs frame-lines to preview composition.

    The difference between an optical and electronic viewfinder experience is hard to explain until you’ve compared them directly, but if you’re shooting with prime lenses between 28 and 50mm equivalent, the X-Pro2’s optical finder is a delight. Electronic manual focus assist in optical finder mode is an added bonus. The X-T2’s fully electronic finder is a better choice if you’re primarily a zoom lens user.

    Ergonomics

    While the basic control logic of the X-T2 and X-Pro2 is very similar (and more or less standard across the entire X-series) the two cameras are ergonomically quite different. The rangefinder-style X-Pro2’s viewfinder is positioned off to the left of the camera (with its back facing you) while the X-T2’s finder sits in a DSLR-style ‘hump’ in line with the lens axis. 

    Which of these designs appeals more to you is a matter of personal preference (skip back to the previous slide for a better explanation of the technical differences between the two cameras’ viewfinders) but the experience of shooting with them is subtly different as a result.

    The X-Pro2 (shown above) is designed with stills shooters primarily in mind, and more specifically, stills shooters who like to use prime lenses. The X-Pro2 doesn’t handle quite as well with Fujifilm’s longer, heavier zooms, whereas these are the kinds of lenses that the X-T2 is specifically designed to be paired with. With the optional power booster grip attached, the X-T2 balances nicely, even with Fujifilm’s beefiest lenses. And of course, that grip also duplicates key controls for vertical format shooting. 

    Faster…

    Of these two cameras, the X-T2 is the faster. Designed to cater to the needs of sports and action photographers the X-T2 boasts a maximum continuous shooting rate of 8 fps, with continuous autofocus. This can be increased to 11 fps in boost mode, with the optional grip. The fastest framerate with live view maintained is less, at 5 fps, but this is still plenty fast enough for most subjects. In fully electronic shutter mode, maximum framerate caps out at 14 fps.

    The X-Pro2, in contrast, is limited to 8 fps with autofocus, and a mere 3 fps with live view maintained in the viewfinder.

    These are different horses designed for different courses. The speed-oriented X-T2 also boasts a USB 3.0 interface, capable of considerably greater data transfer rates than the USB 2.0 interface of the X-Pro 2. In addition both the X-T2’s SD card slots are compatible with the latest UHS-II interface type, whereas only the #1 slot of the X-Pro2 can make full use of these cards.

    …and longer

    As well as increasing the X-T2’s speed and duplicating its controls for vertical format shooting, the optional power booster grip also triples the camera’s battery life. It’s not magic – the grip simply accommodates an additional two batteries, bringing the total number of available cells to three. Hence three times the endurance, to a rated ~1000 exposures.

    The X-Pro2 lacks an accessory grip, and endurance caps out at around 250 exposures with the EVF, and ~350 when the optical finder is used (CIPA ratings in all cases).

    Autofocus

    The X-T2 incorporates Fujifilm’s most advanced autofocus system yet. It boasts 325 AF points (169 of which offer phase detection) which work in concert to offer a ‘hybrid’ autofocus system. Extensive customization of the X-T2’s continuous autofocus performance is made possible with Canon-style AF setting ‘sets’.

    For now, the X-T2’s AF is superior to the very similar system found in the X-Pro2, but this is Fujifilm we’re talking about – the most firmware updatey company of them all (except perhaps Samsung – RIP). As such, we’re told that the X-Pro2’s autofocus system will be brought up to par with the X-T2’s in terms of baseline performance by way of a firmware update scheduled for autumn.

    Autofocus

    Note that the X-T2’s AF-C customization options (above) will remain unique to this model though, meaning that the X-T2 will remain a better choice if AF performance – or action photography in general – are your priorities. 

    Which one should you buy?

    If you’re in the market for a new camera and the Fujifilm X-Pro2 and X-T2 are on your list, chances are that both will keep you pretty happy. As far as image quality is concerned, we’re very pleased by the output from their 24MP APS-C sensor, and in video mode, both models are lightyears ahead of previous-generation X-series cameras. The X-T2 scores over the X-Pro2 in terms of video simply by the addition of a pretty impressive 4K specification, and both cameras produce good-looking HD footage.

    Beyond the basics, the X-Pro2 is probably a better choice for prime lens photographers, thanks to its off-center hybrid viewfinder which offers both electronic and optical viewing options. If you mostly shoot candids, street portraits or non-moving subjects in general, its lower maximum shooting rate, (slightly) more basic AF system and non-articulating LCD screen might not bother you at all.

    In contrast, the faster, more action-oriented X-T2 is a better all-rounder. It can take pictures more quickly, its viewfinder can refresh more quickly, the rear LCD articulates in useful ways, and with the optional power booster grip attached, it offers a vastly better battery life. It’s also much more comfortable to use with Fujifilm’s heavier zoom lenses than the boxier X-Pro2.

    Did we miss anything? Let us know in the comments. 

    Articles: Digital Photography Review (dpreview.com)

  • Side by Side Comparison: The Sony a6300 Versus Fujifilm X-Pro2

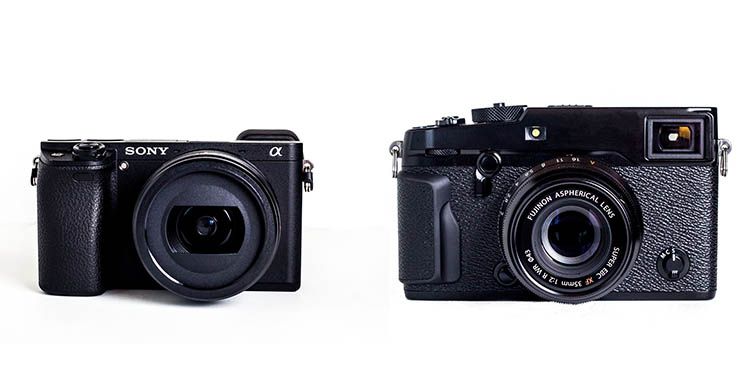
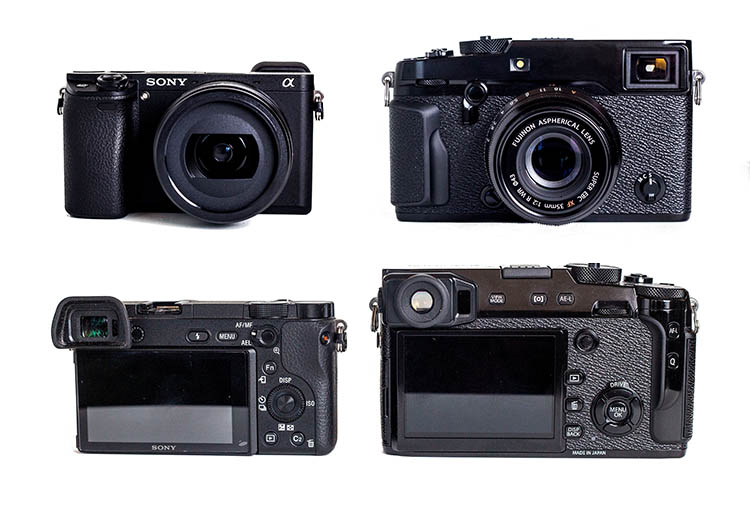
    The Sony a6300 and Fujifilm X-Pro2 are two mirrorless cameras that debuted very recently as updated versions of their popular and beloved predecessors. Both cameras are comparable in technical specs and appeal, but how does each fare when compared side-by-side? Find out below!

    Fujifilm X-Pro2 versus Sony a6300 6

    Technical Specs: Main Similarities

    Camera Sensors and Format

    Both the a6300 and X-Pro2 are APC-C crop sensor bodies with a 1.5x crop factor. Each has a CMOS sensor with 24-megapixel resolution and is capable of shooting in both JPG and RAW on SD memory cards.

    Solid, Weather-Resistant Body

    Perhaps the biggest cosmetic upgrade that Sony made to the a63000 was including a tougher, more weather-resistant body. Like the X-Pro2, the a6300 is composed of magnesium alloy promises to be dust and moisture resistant.

    Fujifilm X-Pro2 versus Sony a6300 6

    In-Camera Wi-Fi

    Like most modern digital cameras, both the X-Pro2 and a6300 have built-in Wi-Fi, making it a snap to transfer photos from your camera to your mobile phone, or shoot remotely via a mobile app.

    Technical Specs: Main Differences

    Price

    The a6300 can be purchased body-only for $ 998.00, while the X-Pro2 is quite a bit more expensive at $ 1,699.00. Accompanying Fujifilm lenses also tend to be pricier than Sony equivalents.

    Size and Weight

    The X-Pro2 is quite a bit bulkier and heavier, weighing in at 15.70 ounces (445 g) body-only compared to the a6300’s 14.25 ounces (404 g). In terms of dimensions, the X-Pro2 is also slightly bigger with dimensions of 5.5 x 3.3 x 1.8″ (141 x 83 x 56 mm), compared to the a6300’s dimensions of 4.7 x 2.6 x 1.9″ (120 x 67 x 49 mm). Accompanying Fujifilm lenses are also heavier and larger than Sony equivalents.

    Sony a6300

    Sony a6300

    Fuji X-Pro2

    Fuji X-Pro2

    Both shot with the same settings. Images are straight from the camera, unedited.

    Video

    The a6300 can record 4K video, while the X-Pro2 can only record video at 1080p. Interestingly, the Fujifilm offers two SD-card slots compared to the Sony’s single SD-card slot. You’d think Sony would squeeze in another slot to accommodate their higher-quality video formats.

    Viewfinders

    Among the unique features of Fujifilm’s digital cameras is their signature hybrid viewfinder which really shines on the X-Pro2. For those unfamiliar, the hybrid viewfinder offers the ability to switch between optical (rangefinder style) and electronic viewfinders , which can be a huge advantage for photographers who dislike shooting with electronic viewfinders only, which is what you get with the a6300.

    Focus Tracking

    Besides the inclusion of 4K video, the main selling point of the a6300 was its brand new sensor, and what Sony claims is the world’s fastest autofocus (dubbed “4D focus”) with 425 phase detection autofocus points. Combined with the Sony’s ability to shoot at up to 11 frames per second and accurate lock-on AF, the a6300 is a beast for shooting sports and action photography.

    Comparatively, the X-Pro2 sports a total of 273 AF points including 169 embedded phase-detect AF points, plus a maximum burst rate of 8 frames per second.

    Sony a6300

    Sony a6300

    Fuji X-Pro2

    Fuji X-Pro2

    Display Screen

    While both cameras have a 3-inch rear LCD screen, the a6300 has a pop-out tilting screen, while the Fujifilm’s screen is melded to the camera body.

    Built-in Flash

    The a6300 offers a small pop-up flash that can be angled to bounce off the ceiling, in addition to a hot-shoe mount, while the X-Pro2 does not have a built-in flash (only a hot-shoe mount).

    In Practice

    Given the technical similarities and differences above, how did it actually feel to handle both cameras? The Fujfilm’s weight and size were definite factors, especially while switching between the smaller, lighter-weight Sony. With that being said, one could definitely argue that Fujifilm’s heavier, more solid camera and lenses felt like a higher-quality investment compared to some of Sony’s lightweight, plastic-based lenses.

    Sony’s newly engineered 4D focus tracking was incredibly spot-on and accurate, especially compared to the Fuji. However, unless you’re shooting a ton of action scenes, Sony’s ultra-fast autofocus is a luxury that isn’t a make or break feature. One feature on the Sony that did come in handy was the flexible pop-up flash that would have been nice to have on the Fuji.

    Fujifilm X-Pro2 versus Sony a6300 6

    Sony a6300 photo on the left; Fujifilm X-Pro2 photo on the right. Both shot with the same settings. Images are straight from the camera, unedited.

    The X-Pro2 has a clear vintage, rangefinder look and feel to it, which some photographers may prefer. Personally, I preferred the feel and overall button placement of the Sony, and was ultimately able to customize buttons and settings to operate it similarly to my Canon 5D Mark III.

    On both cameras, the built-in Wi-Fi was a little tricky to set up, but from then on was incredibly intuitive and easy to wirelessly transfer images straight from the cameras to cell phones.

    Sony a6300

    Sony a6300

    Fuji X-Pro2

    Fuji X-Pro2

    One last consideration – lens availability

    Since both the a6300 and X-Pro2 are interchangeable lens cameras, compatible lens selection is another crucial difference between the two brands. Fujifilm lenses, while more solid and often more expensive, are contained to primes with a rather limited selection of zoom lenses, most of which have variable maximum apertures. In comparison, Sony offers a slightly more varied selection of lenses from primes and wides to mid-range and telephoto zooms.

    Which is better for you?

    Both the X-Pro2 and a6300 are feature-packed, brand new cameras that will appeal to different types of photographers.

    Go Sony: If you value wicked fast autofocus, enhanced video recording capabilities, and/or are on a bit of a budget, the Sony a6300 is probably best for you.

    Go Fuji: If you love the look and feel of a rangefinder camera, value Fuji’s unique hybrid viewfinder, and/or have a larger budget, the X-Pro2 will be your new favorite camera.

    Sony a6300

    Sony a6300

    Fuji X-Pro2

    Fuji X-Pro2

    Have you tried either or both of these cameras? What are your thoughts?

    googletag.cmd.push(function() {
    tablet_slots.push( googletag.defineSlot( “/1005424/_dPSv4_tab-all-article-bottom_(300×250)”, [300, 250], “pb-ad-78623” ).addService( googletag.pubads() ) ); } );

    googletag.cmd.push(function() {
    mobile_slots.push( googletag.defineSlot( “/1005424/_dPSv4_mob-all-article-bottom_(300×250)”, [300, 250], “pb-ad-78158” ).addService( googletag.pubads() ) ); } );

    The post Side by Side Comparison: The Sony a6300 Versus Fujifilm X-Pro2 by Suzi Pratt appeared first on Digital Photography School.


    Digital Photography School

  • Speed Up Your Photography Site

    Speed Up Your Photography Site

    I recently started paying more attention to my site’s loading speed since that is a very important aspect of Google’s algorithm. Google wants to provide a great user experience and a slow site will be penalised.  As a photographer I have lots of images and many images are really big – I really like my full screen slide show very much.


    So what to do if you’re a WordPress user with lot’s and lot’s of big images?  Below is a workflow and some of the free tools and WordPress plugins I’m using to load faster and rank higher.


    4 Easy And Free Steps to Speed Up Your Site And Rank Higher #photography
    Click To Tweet


     – Start by testing your site loading speed. I use Pingdom.com’s Free Loading Speed Test Tool. Make a note of the  and/or rank and refer to this later on to evaluate your success.


    – Trash un-necessary plugins that might cause your site to load slower.  Just today I trashed 3 plugins that didn’t contribute anything, on the contrary, they just bloated my site and made it load slower. Take a long hard look and weigh the benefits vs. the cost.  Kill your darlings.


    – Optimize and re-size your images. It might seem contradictory to first tell you to trash plugins and in the next step tell you to install a new one, but believe me – this will really help. I’m using the free WP plugin EWWW Image Optimiser. There are a number of other ones as well but I really like the bulk optimise option of EWWW. it took me about 15 minutes to optimise and re-size all of my images on my site – Sweet!


    – Cloudflare – speed up your site.  This free tool allows You to dramatically speed up and at the same time protect Your site by distributing your content around the world –  so it’s closer to your visitors = speeding up your site.


    Having done all the steps above I saw an instant improvement – going from a load time of about 9 seconds (which means that my site was in the slowest 10%) to a load time of about 4-5 seconds. This puts my site in the fastest 40% – Not bad for a very image heavy site!


    IMAGE SOURCE:

    Feature image & image 1: courtesy of Per Zennstrom


    Fashion Photography Blog