Blog

  • Finding Comfort with Off-Season Photography

    When you are learning photography you read so much about golden hours, the right time of the day to take photos, and other rules. What about the sort of photos to take depending on the weather? People tend to think that you need good weather to get good photos.
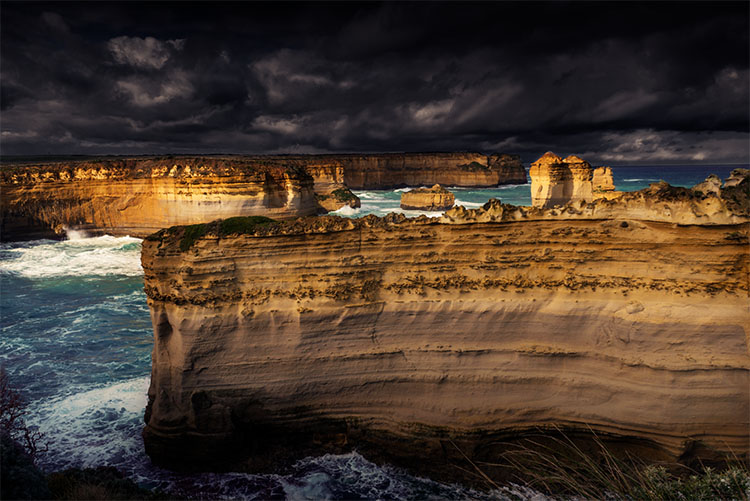
    leannecole-winter-photography-razorback-gor

    What happens when all there is only rain, fog, overcast skies, and all you want to do is sit inside, keep warm, and drink coffee? However, what if you disregard all that, and decide that you like the image you get in the winter or just bad weather?

    There is no question that the images you get in the off-season (that could be snow, monsoon, or heat wave depending where you live), when you would rather stay indoors, are going to be very different. It should be considered as opportunity to see nature in a different light, and a challenge to be brave, to try new types of images. It is also important to take steps to make sure you and your gear are protected from the elements.
    LeanneCole-winter-photography-008

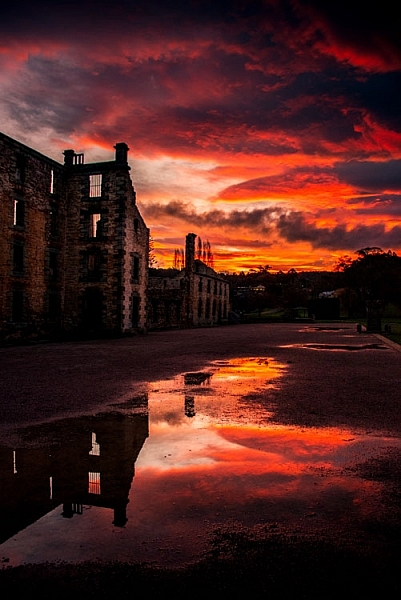
    A winter sunset at Port Arthur in Tasmania made even bigger by all the rain and the puddles creating fantastic reflections.

    Here are a few reasons why off-season is a great time to take photos:

    Not many people around

    If you are anything like me, you dislike people who walk into your shot, or just won’t leave an area you want to photograph. During the popular vacation times you will be surrounded by people, and many other photographers who think that taking photos in popular places is also a good idea. It can be very crowded.

    Winter (or off-season) is a time that most people decide not to travel, they don’t want the weather ruining their trip. This makes it the best time for you to go out and take photos. You may find that many spots are devoid of people, or there won’t as be many.
    leannecole-winter-photography-richmond-bridge

    It is an opportunity to take photos that others will not

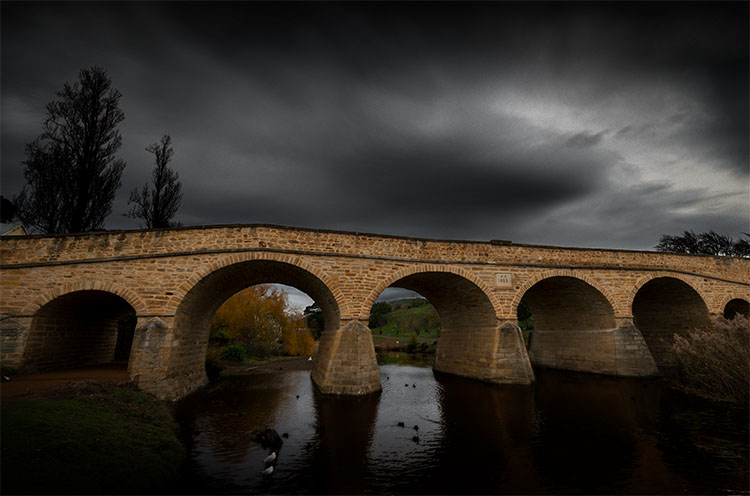
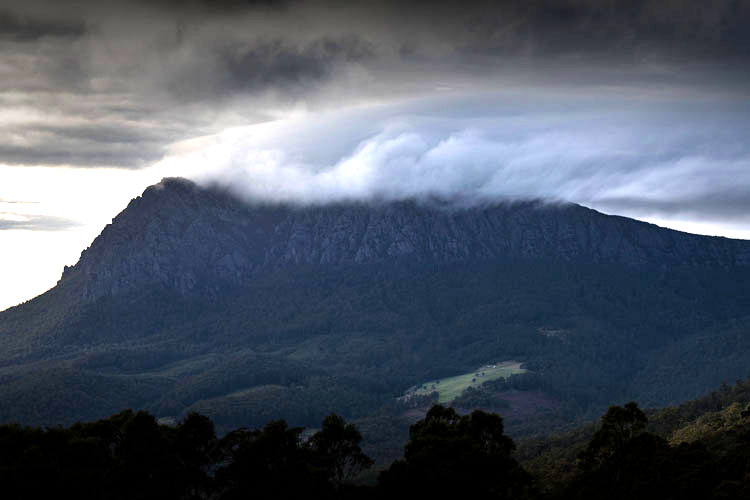
    As most people will stay indoors when the weather is bad, you will be able to get out and take the photos the others miss out on. Rain, fog and snow can all give you incredible images. Even overcast grey days will give you a different look. There are some of us who would go for an overcast sky any day, over a beautiful blue one with no clouds.
    Making the most of breaks in bad weather

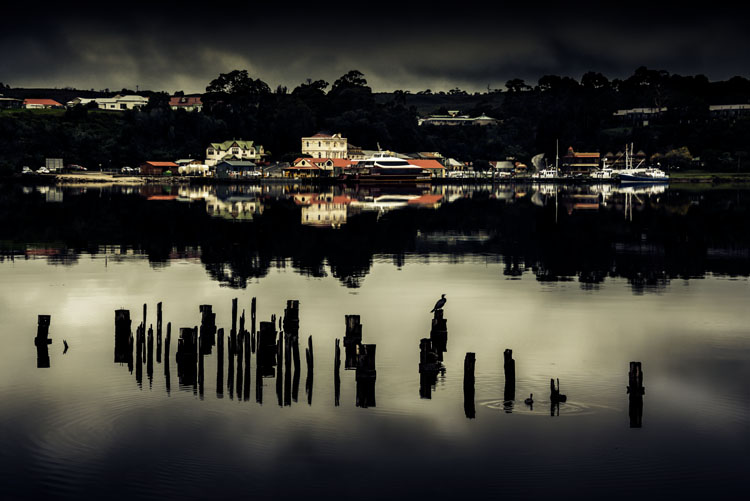
    During bad weather there are going to be breaks where the rain (snow, or whatever you get there) will stop and if you are lucky the sun might even come out. In southern Australia that often happens. You might only get 10 minutes of it, or a few hours, so you have to make the most of it.

    You can’t be lazy. If you see the weather improving, you need to get out there fast. Visit all the places on your list and see what you can get. In some instances, it may be the only opportunity you get to shoot some spots.
    LeanneCole-winter-photography-009

    A break in the rain at Strahan, Tasmania, so we spent four hours getting what we could before it started again.

    Water in winter

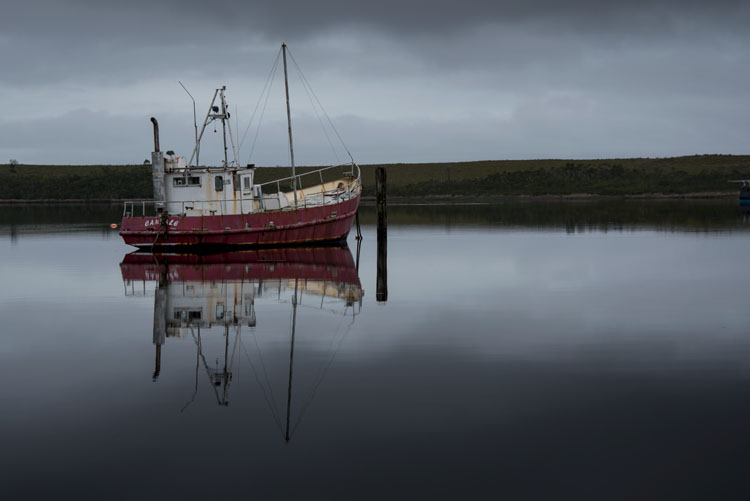
    There is something quite magical about water in the winter or off-season. When it isn’t raining, the stillness can create some magical landscapes where the water will be so calm, that everything reflects in it. Often after light rain you can get that flat reflective surface.
    LeanneCole-winter-photography-003

    Reflections in the water can be wonderful, especially when you get an overcast sky reflected as well.

    Rain gives a natural vibrance

    Have you ever noticed how a dry seashell is dull, and the vibrancy that you saw in it on the beach is gone? That is, until you wet it again! When I was a child we used to paint shells with clear nail varnish so they would keep that wet look.

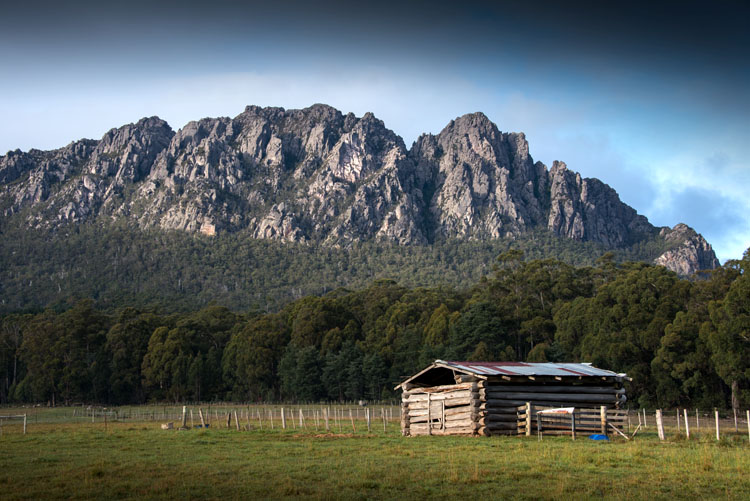
    The landscape is not that much different. You can’t paint it with varnish, but you can look for rainy days that make it all wet. Colours are saturated and just pop out. Grass appears a lot greener, and warm tones like red and yellow stand out a lot more. You get a landscape that is grey, but in it there are also saturated colours that are accentuated to make the image more interesting.
    LeanneCole-winter-photography-010

    Colours can appear saturated during and after rain.

    Moody landscapes

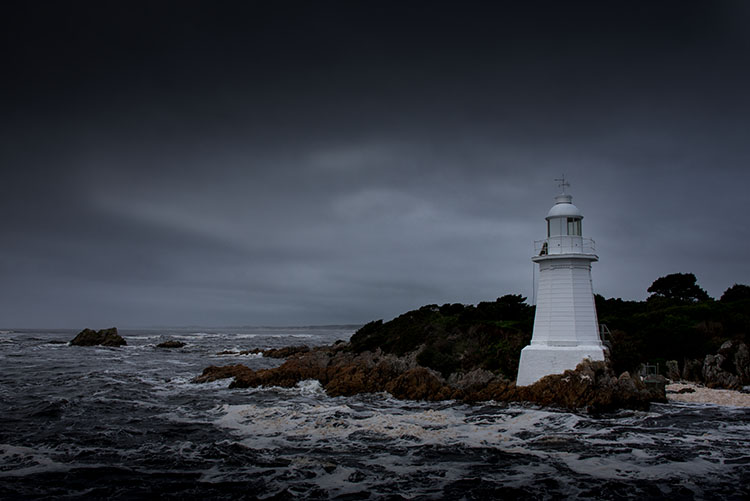
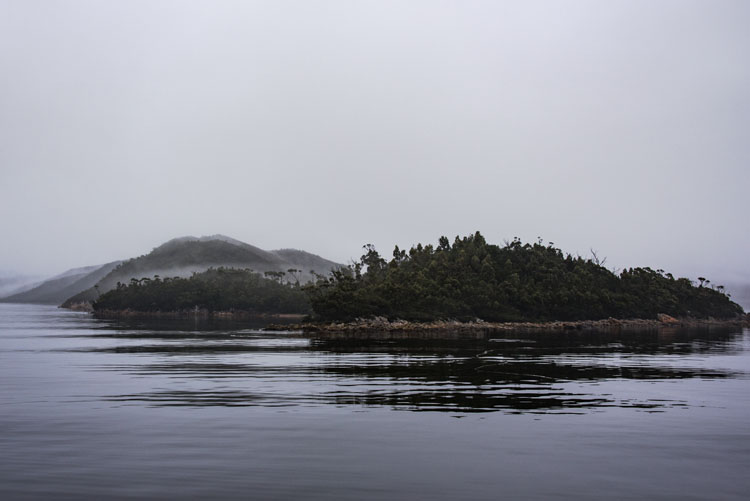
    Off-season gives you so many more opportunities to get moody landscapes. Nothing says mood like a scene drenched in fog. It has a way of isolating your subject, and making it the most important thing in the image. The mist is also great for getting silhouettes of objects, especially around water.

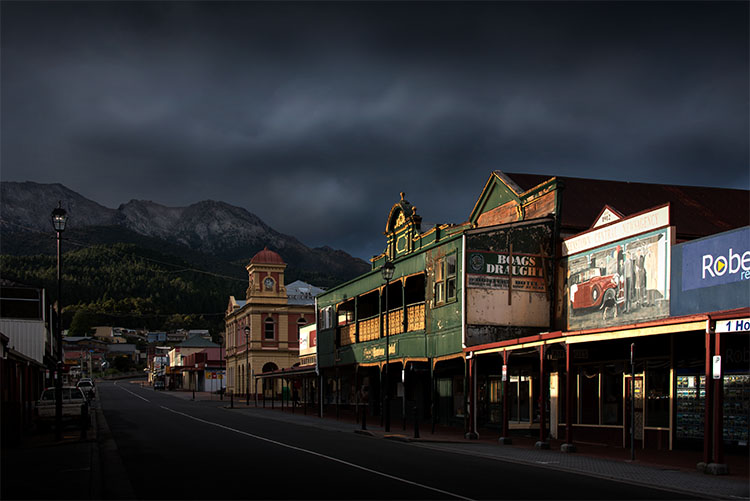
    Overcast skies can do the same. Dark foreboding clouds can create darkness in landscapes, and give a sense of dread, tinged with some scariness. The absolutely best scene is the one with a dark overcast sky, then the sun peeks through a break in the clouds, and highlights an aspect of the image. It’s like hitting the jackpot, you get the best of everything. It is one of my favourite things to capture.

    If you are out and see fog, frost, or lots of clouds, try to figure out how to make them work for you in your image. See if you can get lots of different angles, and what you can do with them.
    leannecole-winter-photography-hellsgate-lighthouse

    LeanneCole-winter-photography-004

    Fog can create moody landscapes and isolate areas.

    Light

    Photography is full of rules, how to take photos, when to take photos; it is said that you shouldn’t take photos between 10am and 4pm. Is this true? Perhaps in the summer, and those places that don’t really have winter, but if you live a long way from the equator this rule may not apply to you. The further you are away from it the less it applies.
    leannecole-winter-photography-queenstown

    Winter (off-season) light is quite beautiful. There is a softness to it that makes photographing wonderful, and you can get some incredible images. The shadows are soft, meaning the edges aren’t hard and sharp like they are in the summer. The sun doesn’t get as high in the sky so the shadows are always long.

    Living in a country like Australia where the summers are hot and harsh, I look forward to winter every year. It means I can go out and take photos for as long as I like, when I like. The clock doesn’t dictate when it is a good time. Winter is my absolute favourite time for photography here.
    LeanneCole-winter-photography-007

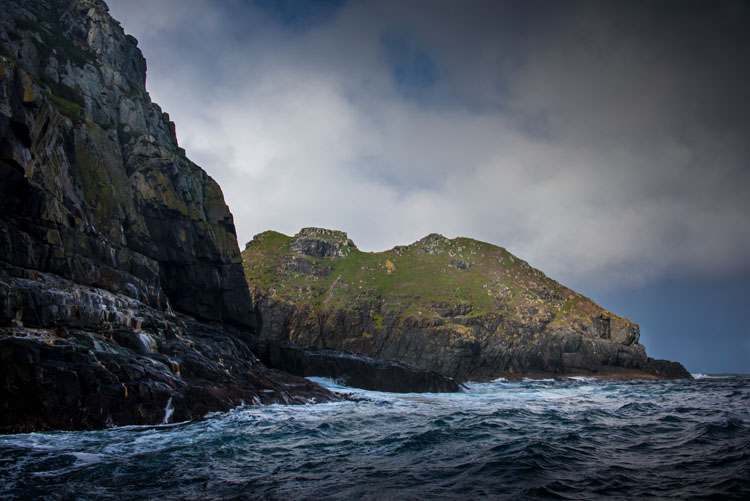
    On an overcast day the sun could suddenly come out and give your landscape a spotlight effect.

    Equipment you need to take with you

    When you are travelling in the off-season you have to be prepared for wet and cold weather. It’s likely going to mean that you will have to take more gear with you so that you can protect your gear.

    In your kit it’s good to have a plastic raincoat cover for your camera; a sleeve that will fit over your camera, but the end is open for your lens so you can still take unobstructed photos. Many cameras can take a certain amount of water, the more high end ones more so, but you don’t want to push it much. If you are out in the rain constantly, then protect it as much as you can.
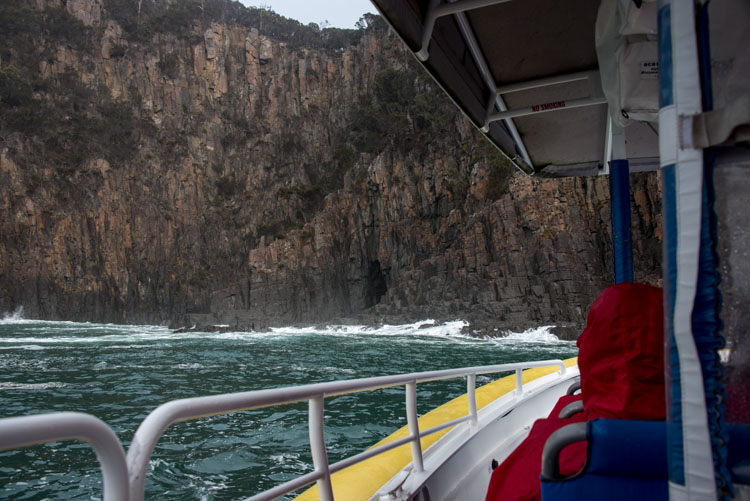
    LeanneCole-winter-photography-006

    Riding in a boat in open water in inclement weather is a disaster waiting to happen, so make sure you protect the camera and keep it covered up.

    A lens hood is one of the best ways to protect the end of your lens when it is misty and raining. The sides of it can help prevent water from ruining your photos, unless you are shooting straight into the wind.

    Having a lens cloth close by is an absolute must. As much as you try to keep the lens dry if there is any breeze, you will get drops of water on the end. It is good to keep it in your pocket for quick access. Nothing spoils a photo more than water drops on the lens.
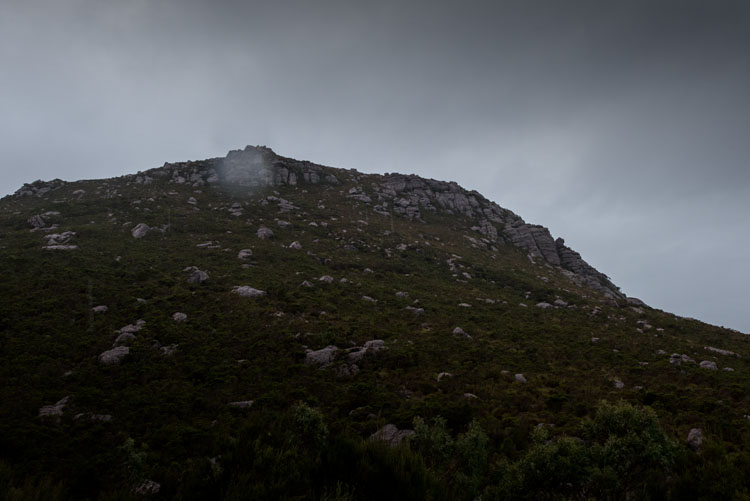
    LeanneCole-winter-photography-002

    Waterdrops on your lens can ruin your images, and can be very hard to remove in post-production, especially if there are lots of them.

    Making the most of it

    You shouldn’t think of the off-season as a time to hibernate, but make the most of weather that other photographers don’t consider. Think about how you can get the weather conditions to enhance your images, and give you a final photo that is unique. Good luck with it and remember to rug up and keep warm.
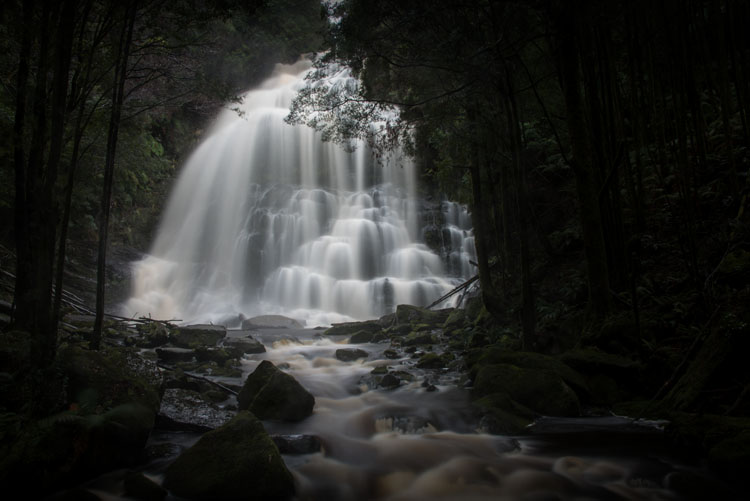
    LeanneCole-winter-photography-005

    Waterfalls can be full of water from lots of rain.
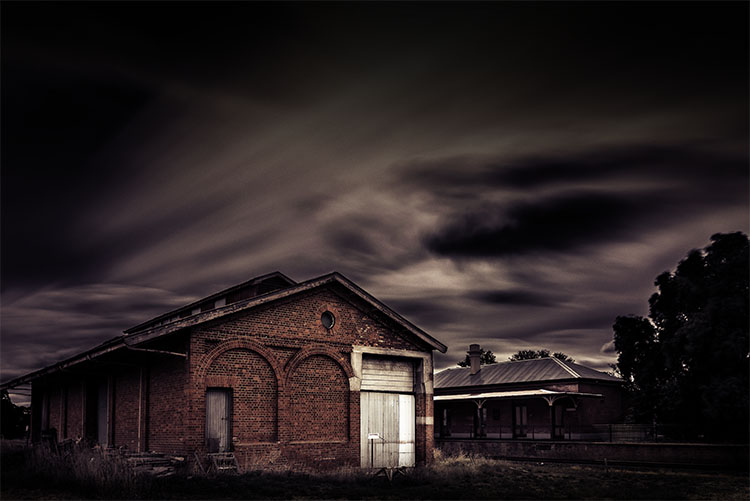
    leannecole-winter-photography-newstead-railwayshed

    googletag.cmd.push(function() {
    tablet_slots.push( googletag.defineSlot( “/1005424/_dPSv4_tab-all-article-bottom_(300×250)”, [300, 250], “pb-ad-78623” ).addService( googletag.pubads() ) ); } );

    googletag.cmd.push(function() {
    mobile_slots.push( googletag.defineSlot( “/1005424/_dPSv4_mob-all-article-bottom_(300×250)”, [300, 250], “pb-ad-78158” ).addService( googletag.pubads() ) ); } );

    The post Finding Comfort with Off-Season Photography by Leanne Cole appeared first on Digital Photography School.


    Digital Photography School

  • Getting up close: Canon EF-M 28mm macro hands-on review

    Hands-on review: Canon EF-M 28mm Macro

    This is the Canon EF-M 28mm F3.5 Macro IS STM. It is a compact, light weight, close-focusing lens designed exclusively for Canon’s EOS M lineup. It’s image-stabilized and uses a quiet stepping motor mechanism for autofocus. It’s priced at $ 299.

    Hands-on review: Canon EF-M 28mm Macro

    The lens comes with a removable cover for the front

    $ 299 places it below a majority of macro primes for cost. However, the Nikon Micro?Nikkor 40mm F2.8 does still beat it out in price by around $ 50, and is 2/3-stop brighter.

    All the trump cards held by the Micro-Nikkor fold when other features of the EF-M 28mm Macro are brought in to consideration, though. First, even though it is a wider FOV lens, its nearest focus distance is 3.7″, nearly 3″ closer than the Micro-Nikkor. Even taking the slightly longer field of view of the Micro-Nikkor in to account, the Canon is able to achieve a 1.2x magnification in “Super Macro” mode over the Nikkor’s 1x magnification.

    When working at such diminutive focus distances, there’s an inherent issue that many experienced macro photographers have learned to work around. The camera, lens, and sometimes even photographer start blocking light from the itty bitty subject. To get around this, macro photographers will use specialized lights, typically ring lights mounted to the filter thread. 

    Canon has gone the extra mile (inch?) and included a pair of LED lights (hidden under their cover in this shot) mounted on the left and right hand side of the front of the lens, diffused by a clear white ring, eliminating the additional requirement of a macro light kit for those extreme close-ups.

    Hands-on review: Canon EF-M 28mm Macro

    3.7″ is quite an extreme working distance, and this means a maximum reproduction ratio of 1.2x in ‘Super Macro’ mode. Image stabilization is included and is effective for shooting in a wide range of scenarios, although for the extreme close-ups it’s better left switched off and replaced with a tripod.

    A subject at minimum focus distance illuminated by the two LED’s together receives about 8.9 EV illumination in normal macro and 9.1 EV in super macro mode when measured with an incident light meter. The lights have two levels of brightness, and are switched on via a button on the lens barrel. Both come on with a single press, and a press and hold switches to one light only. Sadly, there’s no ability to have just one LED on at full brightness and the other dimmed. They’re either both on at the same power level, or illuminated independently.

    The lightweight construction and STM focus motor also help this lens focus reasonably quickly, especially when compared to the painfully slow-focusing macro lenses of yore. It isn’t as fast as some of the quickest we’ve seen, but does very well, especially considering how close its MFD is.

    Hands-on review: Canon EF-M 28mm Macro

    By itself, this lens weighs 130 grams, making it so light Canon boasts about the 28mm F3.5 being the ‘world’s lightest autofocus macro lens for an ILC system.’ When mounted to the EOS M3 the total weight is a featherweight 492 grams, exemplifying the lightness and convenience benefit of mirrorless systems compared to DSLRs. By comparison, a Nikon D5500 body weighs 420 grams. Add another 235 grams for the 40mm Micro lens, then another 200+ for an LED macro light kit, and the total comes out to 855 grams, or nearly double the weight of the Canon kit.

    This diminutive size means weight can also be saved when making a tripod selection, as long as it is sturdy enough for work that is incredibly sensitive to vibrations.

    Less weight means less fatigue and more reasons to bring the camera on location.

    It resolves well…

    This graph shows the maximum resolution (as a percent of Nyquist) attained by our copy of the lens at various apertures. It uses MTF-10 criteria, which is a measure of the finest detail that can be resolved with at least 10% contrast. If that sounds complicated, just keep in mind this figure is well correlated to total resolution, though isn’t as great a representation of perceived sharpness, which correlates more with MTF-50 measurements (more on that on the next slide).

    Our results here show that center resolution peaks at 80% the linear resolution that can be theoretically attained, at F5.6 – a decent result. If this were resolved across the frame, you’d get about a 16MP image from this 24MP sensor. Of course it’s not, but corners aren’t too far behind, at 67% by F6.3. Not bad when you consider the higher resolving power demands placed on the lens by the smaller APS-C sensor… but what about perceived sharpness?

    … and is fairly sharp

    The MTF-50 result – better correlated with perceived sharpness – tells a slightly different story, indicating only around 875 line pairs per picture height resolved, which translates to ~4.6MP, or 19% of the total sensor resolution. It’s not a terrible result, but does indicate that while the lens resolves a lot of detail, it doesn’t quite maintain as much contrast as a higher performing lens might. This is no surprise, given the lens’ size, weight, and price.

    While performance isn’t state of the art in terms of macro lenses (the Sony FE 90mm F2.8 deserves a shout out here), it does a good job throughout the aperture range, with good field uniformity, and fair ability to resolve fine detail, particularly when you factor in the disadvantages of the smaller APS-C sensor (which places high demands on lens’ resolving power). It doesn’t have L-series levels of contrast and perceived sharpness – but we wouldn’t expect it to.

    See our gallery for a set of infinity shots to see how this tiny macro resolves real-world detail on a flat plane.

    How well does it work with EOS M3?

    The EOS M3’s articulating touch screen is great for close-up work when using this lens. It takes a lot of strain out of working low when one doesn’t need to peer through a viewfinder or crouch low to see the screen. Magnifying the image for focus checking also works brilliantly on the M3. There’s no pixel binning or frame rate drops in 100% magnification mode, which helps the touch-enabled panning function to operate quickly and smoothly, helping ensure the narrow focus plane is placed exactly where you want it.

    It’s creative

    Even club soda can make an interesting photo when shooting this close

    Or rather, it can be used creatively. 1.2x magnification means that objects are 1.2 times their actual size on the sensor plane. This means objects, details or textures can completely fill the frame, creating wonderful abstract shots that aren’t usually possible without a fair bit of kit. Combine this ability with a set up that is easily carried around and opportunities for interesting shots begin to pop up everywhere, as it offers a whole new view on the seemingly mundane.

    It isn’t perfect…

    This image was taken with just the built-in LED lights for illumination, and was cropped and brightened in post.

    Well, for $ 300, expecting absolute perfection is unrealistic, especially in the photo world. 

    First, it isn’t the sharpest lens out there. It’s pretty good, but in the macro world there are better options. That said, none of them have those lovely lights and will probably cost more.

    The lights and image stabilization aren’t powerful enough to make this a hand-holdable macro, so don’t make the mistake of expecting that. The handheld spider shot above illustrates the pitfalls of lighting exclusively with the on board LEDs.  

    First, the light cast by the LEDs isn’t particularly intense. It’s bright enough to light subjects at minimum focus distance outdoors, but only when its overcast. Any direct sunlight will overpower the light and will make the lens’ shadow very obvious. By itself, the light needs to be combined with a tripod, and should be thought of as a way to avoid the complications of a ring light system (batteries, cables, etc) instead of an all-purpose fill light.

    Second, when working with a high reproduction ratio, depth of field is inherently incredibly shallow. The LED lights aren’t bright enough to allow for stopping down for deep depth of field while shooting handheld in dim ambient light. 

    …but is still very usable

    Using a narrow aperture can achieve deep depth of field when close focusing, but diffraction will decrease sharpness, as can be seen in this shot at F18.

    It is important to remember that shallow depth of field is a challenge with all macro lenses. One way to get around that issue is by focus stacking. There are many software solutions to focus stacking, and Olympus has even gone as far as to include it as an automatic function in some of its cameras. One can only hope Canon does eventually as well.

    The only other gripe is with the lights and their configuration. It would be nice to be able to rotate the lights 90 degrees for a sort of “clamshell” lighting instead of being stuck with the “copystand” lighting constantly, or to be able to have them configured either way regardless of wether the camera is being used in portrait or landscape orientation. 

    As a standard lens, it performs fine in normal working distances, but vignetting is strong wide-open, making the EF-M 22 F2 a better general use prime lens if you don’t need the macro performance. 

    Hands-on review: Canon EF-M 28mm Macro

    This image used a combination of the built-in lights and a back lit semi-transparent surface

    For beginners looking to shoot macro, the EF-M 28mm F3.5 Macro is a great place to start. Its close focus abilities mean it has a wide range of macro use cases, and the built-in LEDs mean one doesn’t have to budget for a set of lights when just getting started. It’s a great starting point for learning the challenges and pitfalls of macro photography, and will produce great results when applying those lessons.

    Articles: Digital Photography Review (dpreview.com)

  • How to Enhance Portraits Using Gray Layers to Dodge and Burn in Photoshop

    What is dodging and burning?

    The techniques of dodging and burning are hand-me-downs from the days of the darkroom. The idea was to manipulate parts of an image while the paper was being exposed to light from the enlarger, where the negative was fitted. In order to decrease the exposure (lighten) on parts of an image, the paper had to be exposed for less time, which was dodging. To increase exposure (darken) it needed to be exposed for more time, which was burning.

    Before dodging and burning

    Before dodging and burning

    After dodging and burning (it’s subtle, look at her hair and cheeks – don’t overdo it with this technique)

    One way of doing this, was by holding bits of paper or card over the parts of the image that didn’t require manipulation. Because these adjustments only applied to certain parts of an image, it required a certain amount of dexterity (as well as a lot of paper) to get right. Because of this complexity and precariousness, dodging was used primarily to lighten dark areas. Burning was then used to darken highlight areas.

    The Photoshop version of the technique; however, is far more forgiving. Photoshop allows very fine control over an image and even allows pixel by pixel retouching. The versatility this provides turns the traditional darkroom method on its head. It allows you to use small brush strokes to brighten and exaggerate small areas of highlights, or darken shadows, instead of applying to only broad areas.

    This technique is very easy to learn, but it does require some practice to get down, as it’s very easy to go overboard with it, and overcook your images.

    Why dodge and burn?

    Tools like curves and levels give you control over the tonality and contrast of an entire image (excluding the use of layer masks). This is called a global adjustment, but they aren’t always effective for most images.

    Dodging and burning allows you fine control over the tonality of your images in small, concentrated areas. These are called local adjustments. This allows you to pick out small parts of an image to work on, while leaving areas that need no work untouched.

    While useful in all genres of photography, the use of local adjustments comes into its own in portraiture. If you think in terms of contrast alone; hair, eyes, skin, and clothes all require very different treatments in order to look their best. For example, if you pump up the contrast in an image to make a pair of jeans look punchy, that will wind up destroying the skin tones in your portrait. One of the easiest ways to overcome this is using a local adjustment technique like dodging and burning.

    This tutorial will get you started with a two layer dodging and burning technique, that will give you far more control over your images than you would have with global adjustment tools alone. This is an intermediate technique and you need to have a basic understanding of how to use layers in Photoshop.

    For this demonstration, I am going to go beyond what I would normally consider acceptable and overcook the image, to ensure that it is visibly clear what is happening at various stages of the process.

    Setting up the layers

    Before you start this technique, I suggest that you first finish any blemish removal in your image.

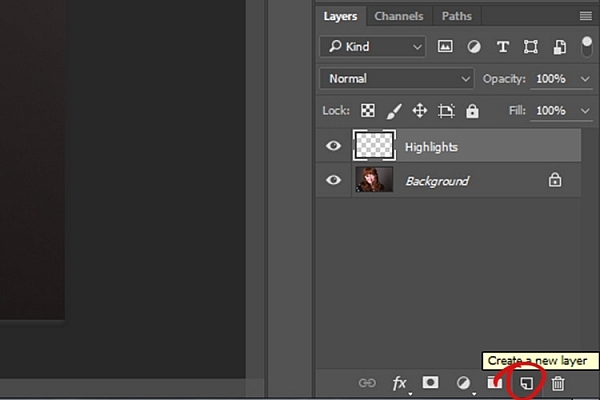
    That said, the first step in Photoshop is to create a new layer by going to Layer>New Layer or by pressing ctrl+shift-n. Rename this layer, “Highlights”.

    dodging-and-burning-with-grey-layers-newlayer

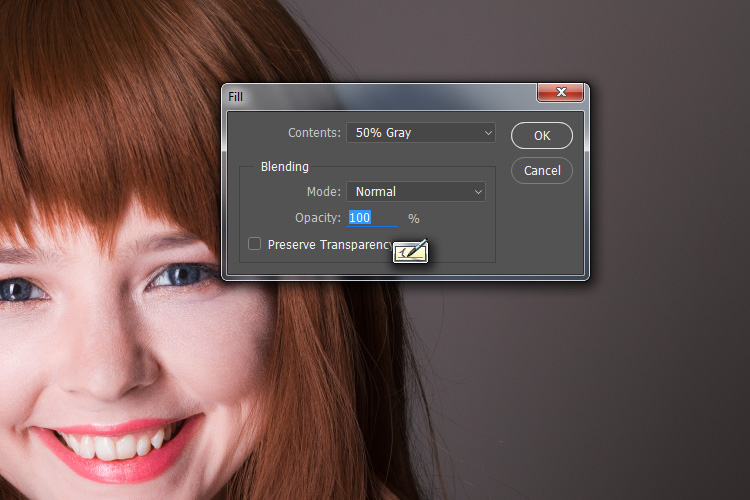
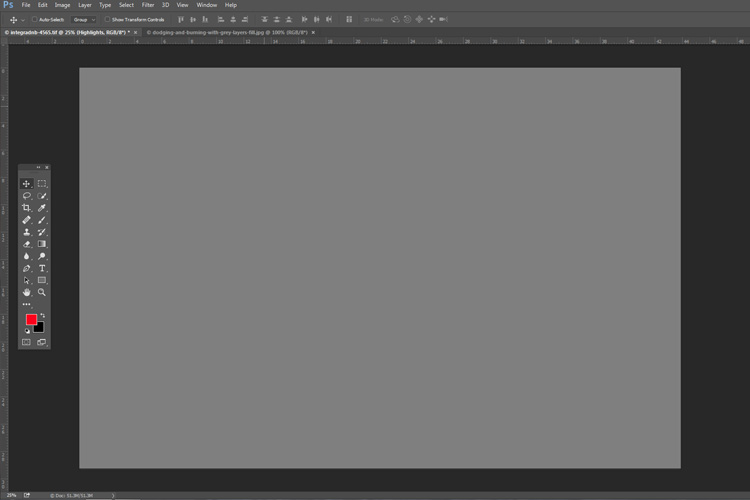
    With this new layer selected, go to Edit>Fill or shift+f5 and choose 50% gray from the menu. Press OK. Your image should now be entirely gray.

    dodging-and-burning-with-grey-layers-fill

    dodging-and-burning-with-grey-layers

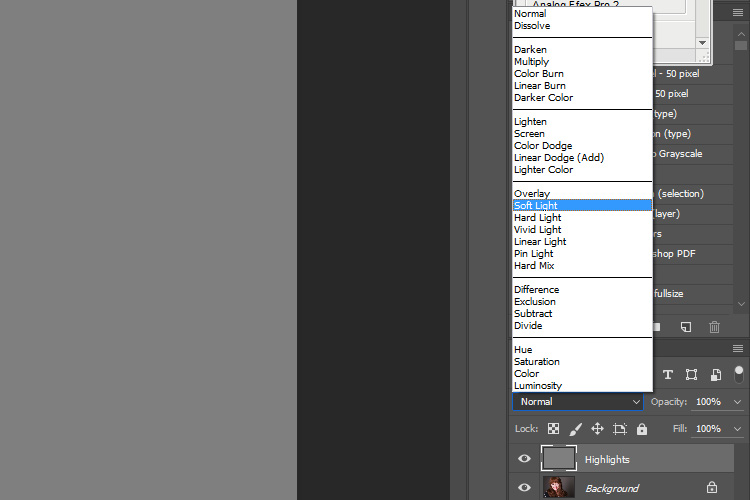
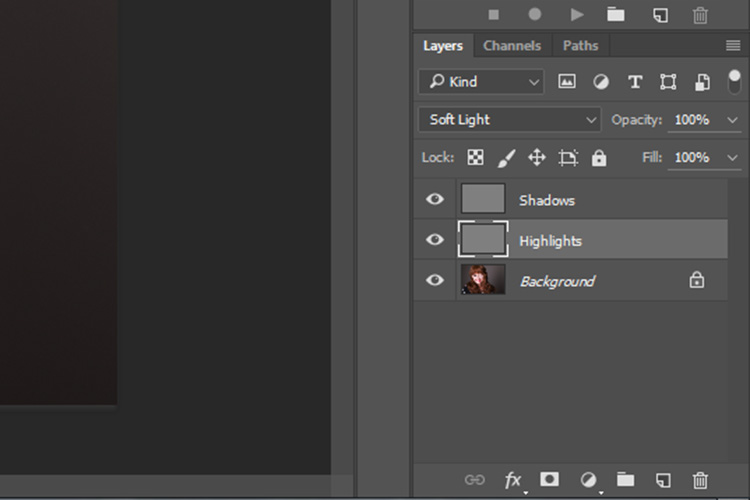
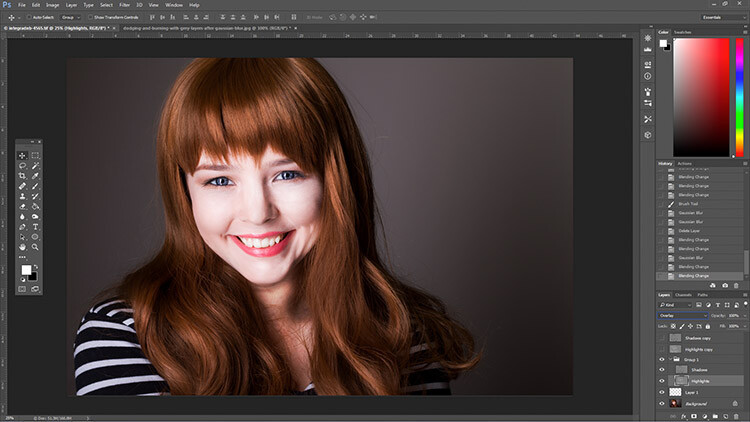
    The next step is to change the blending mode of your gray layer. From the drop down menu in the layers palette, choose Overlay or Soft Light. Either choice is fine, but using Overlay will result in a far more pronounced effect than Soft Light. Experiment with both, see how it works for you, and which you prefer. Once the blending mode is changed, you should be able to see your image again.

    dodging-and-burning-with-grey-layers-softlight

    Next, create another new layer. Layer>New Layer or ctrl+shift+n and rename it to “Shadows”. Again, fill it with 50% gray. Edit>Fill>50% Gray or shift+f5

    dodging-and-burning-with-grey-layers-layers

    Set this layer’s blending mode to the same as the one you chose for your Highlight layer.

    That’s the preparation work done. Once you’re used to it, this whole process only takes a few seconds. It’s also possible to set it up as an action, so Photoshop will do it for you at the press of a button.

    Dodging

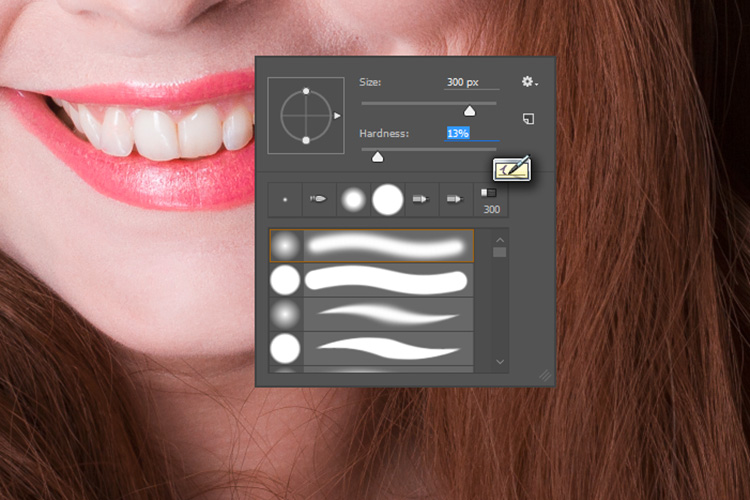
    To start, select your Highlight layer and choose the brush tool. Pick a large, soft brush (Hardness number is low and edges are fuzzy). You can change the brush settings by right clicking within your image.

    dodging-and-burning-with-grey-layers-brush

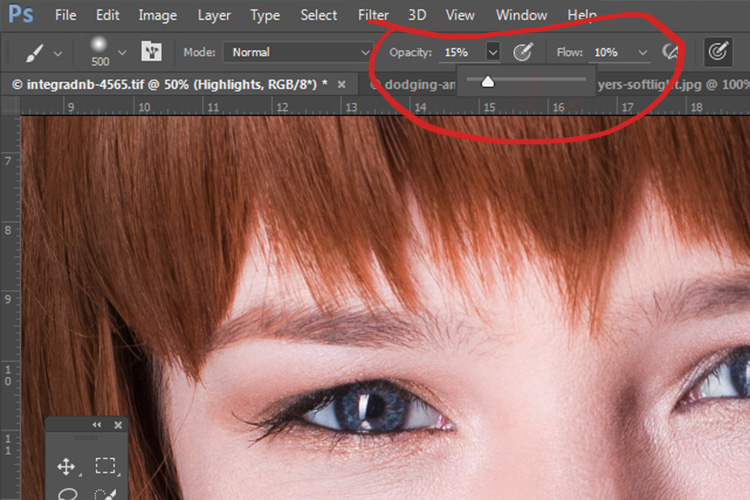
    With the brush selected, look for the tool settings at the top of your screen. You’re looking for a pair of sliders labeled opacity and flow. Set your brush’s opacity to 15% and the flow to 10% (see below circled in red). You can change them later, but this is a good starting point.

    dodging-and-burning-with-grey-layers-brushopacity

    Make sure that your brush colors are set to white and black. You can press D (default) on your keyboard to do this. Also, you can press X to swap between them. Knowing these shortcuts will save you an incredible amount of time.

    Now you’re ready to dodge.

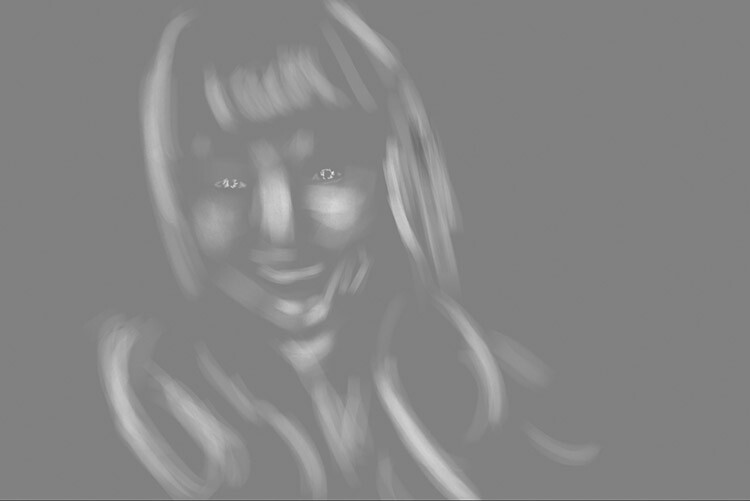
    Assuming you’re working on a portrait, find a highlight area on your subject’s skin that you would like to emphasize. With white set as your foreground color, paint into that area (make sure you are on the Highlight layer not your image). Because the brush’s opacity is so low, you may not notice a difference at first. Just keep brushing into it, and build up strokes until you have the desired effect. Do this for all of your highlight areas.

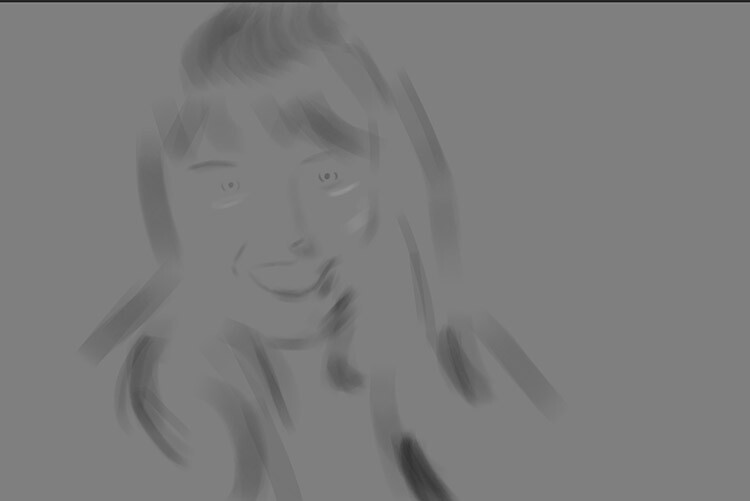
    With the blending mode set to normal, your highlight layer may look something like this.

    Note: If you decide that you’ve gone too far, just fill the layer with 50% gray again and start over.

    Burning

    With your highlights done, select your Shadow layer by clicking on it in the layer palette. Select black as your foreground color and paint into the shadows in the same manner you did for your highlights (make sure you are painting on the Shadow layer not your image).

    With the blending mode set to normal, your shadow layer may look something like this.

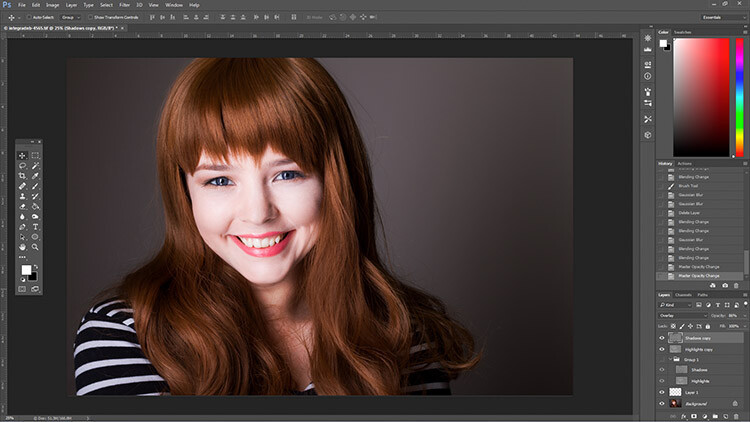
    After dodging and burning is complete, you may have something that looks like this.

    Add Gaussian Blur

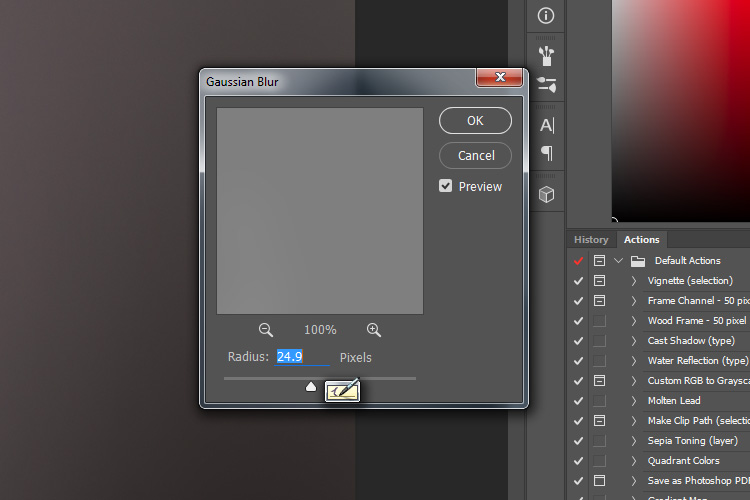
    The next step is to smooth out your brush strokes. Select your Highlight layer and select Filter>Blur>Gaussian Blur. Choose an amount between 20 and 40 pixels, and press okay.

    dodging-and-burning-with-grey-layers-gaussian

    After the Gaussian Blur filter is applied.

    Do the same for your shadow layer.

    Final Steps

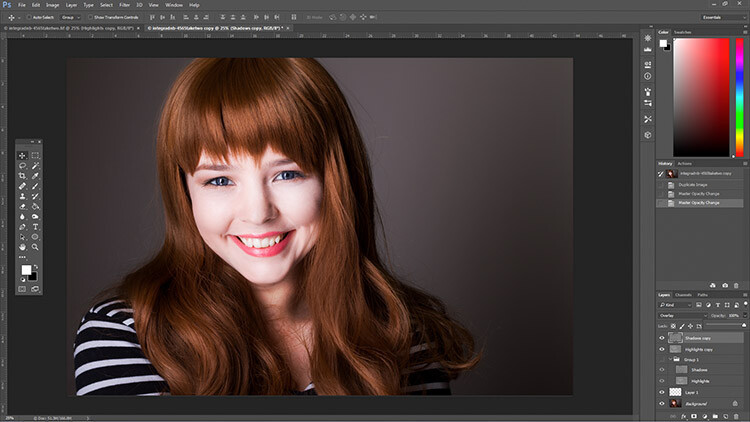
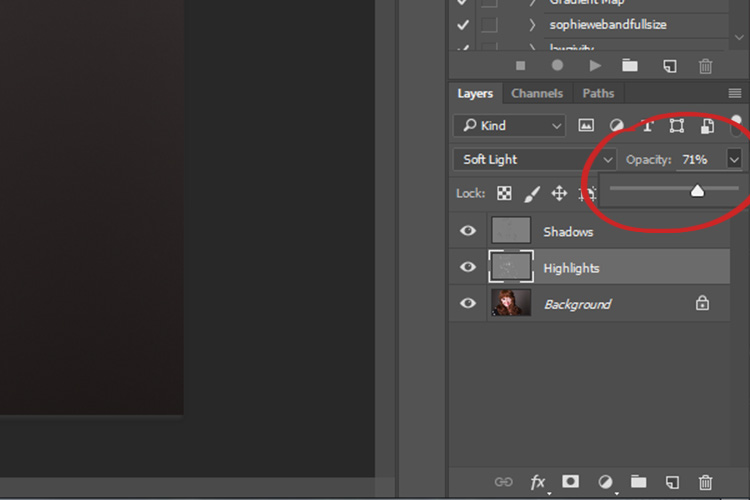
    The last thing to do is is change the opacity of your layers. It may not seem like it, but at this point the effect is probably way too strong.

    Select one of your painted layers. Find the opacity slider in the layer palette, and drag it to the left. Watch your image as you move the slider and stop once you’ve reached the desired effect.

    dodging-and-burning-with-grey-layers-layeropacity

    Do this for the second layer, and that’s it! You have dodged and burned.

    The final image after the opacity of the dodge and burn layers has been reduced.

    It's really easy to overcook an image with this technique. Use low opacity brush strokes and take your time to avoid having your images look like this one.

    It’s really easy to overcook an image with this technique. Use low opacity brush strokes and take your time to avoid having your images look like this one.

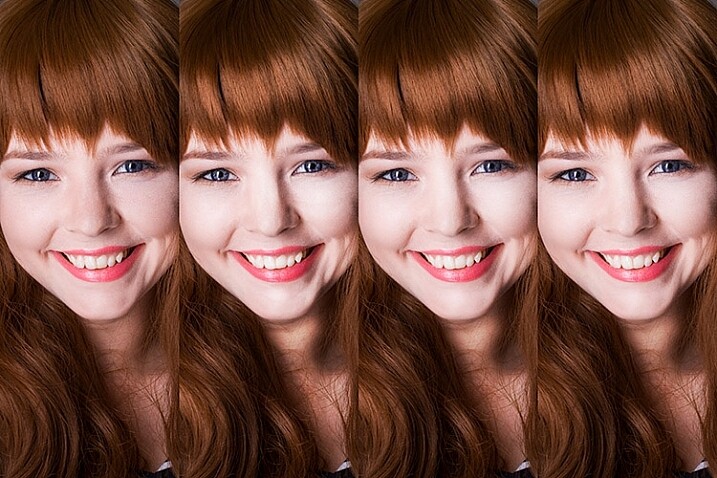
    From Left to right: 1) Before 2) Dodge and burn with no blur. 3) Gaussian Blur filter applied. 4) Opacity of dodge and burn layers reduced.

    Tips and Notes

    • Like most retouching techniques, subtlety is key. At first, overcooking your images with this technique is inevitable. Keep practicing and you’ll figure it out in no time.
    • Always zoom in to 100% or closer when working on small areas like eyes.
    • A graphics tablet will help with smooth, natural brush strokes. If you can only use a mouse or trackpad, experiment with more liberal use of Gaussian Blur to mask the brush strokes.
    • When painting shadows or highlights, try to match the light in the image. You can paint white (dodge) into your shadows, but this will probably look very strange in the end.
    • Change the brush size often, and appropriately, to the area you are working on. Keyboard shortcuts make this a breeze (use [ and ] to increase and decrease brush size).
    • Experiment with different brushes until you find one that suits your taste.
    Before dodging and burning

    Before dodging and burning

    After dodging and burning

    More Tips and Notes

    • It’s all too easy to concentrate on the face, but try not to forget other parts of the image like your subject’s hair, clothes, and the rest of their body.
    • Both dodging and burning can be done on a single gray layer. Feel free to do this, but the two layer technique grants you even more control, without much extra effort.
    • Consider setting up a keyboard shortcut for Gaussian Blur. This saves a lot of time.
    • You can create as many sets of gray layers as you want. For example, if you want to use very small brushes to dodge and burn the eyes, you might choose to do this on a separate set of layers in order to use less blur at the end. If you use a lot of layers sets like this, consider using layer groups to keep them organized and don’t forget to name your layers.
    • If the shadows and highlights you are working with have very hard edges, try using a harder brush and a lower amount of Gaussian Blur.
    • Consider watching and trying some digital painting and sketching tutorials for Photoshop. These can really help to increase your brush control and lend to more natural results.

    googletag.cmd.push(function() {
    tablet_slots.push( googletag.defineSlot( “/1005424/_dPSv4_tab-all-article-bottom_(300×250)”, [300, 250], “pb-ad-78623” ).addService( googletag.pubads() ) ); } );

    googletag.cmd.push(function() {
    mobile_slots.push( googletag.defineSlot( “/1005424/_dPSv4_mob-all-article-bottom_(300×250)”, [300, 250], “pb-ad-78158” ).addService( googletag.pubads() ) ); } );

    The post How to Enhance Portraits Using Gray Layers to Dodge and Burn in Photoshop by John McIntire appeared first on Digital Photography School.


    Digital Photography School

  • All about control: Huawei P9 camera review

    DPReview smartphone reviews are written with the needs of photographers in mind. We focus on camera features, performance, and image quality.

    $ (document).ready(function() { SampleGalleryV2({“containerId”:”embeddedSampleGallery_8524135201″,”galleryId”:”8524135201″,”isEmbeddedWidget”:true,”standalone”:false,”selectedImageIndex”:0,”startInCommentsView”:false,”isMobile”:false}) });

    Right behind the LG G5, the Huawei P9 is the second device to launch in 2016 with dual cameras. However, while on the LG the secondary module essentially acts as a wide-angle extension, Huawei’s approach is different. In the Huawei system, which has been co-engineered with German camera manufacturer Leica, a 12MP RGB main sensor is accompanied by a 12MP monochrome chip. Huawei says combining image information from both sensors makes the P9 camera 100% more light-sensitive than conventional smartphone cameras which should, at least in theory, result in superior low light image quality.

    The P9 is also capable of some other dual-camera tricks that we’ve seen before, such as simulating shallow depth-of-field. While the camera is no doubt one of the most interesting we have seen this year, with an octa-core chipset and fingerprint reader the non-camera specifications are flagship-worthy as well. Read our full review to find out how the Huawei P9 performs in the hands of a mobile photographer.

    Key Photographic / Video Specifications

    • Dual Sony IMX 286 12MP sensors with 1.25µm pixel size
    • 27mm equivalent focal length
    • F2.2 aperture
    • Laser-assisted AF
    • DNG Raw capture
    • Manual control
    • 1080p Full-HD video
    • 720p, 120fps slow-motion video
    • 8MP front camera with F2.4 aperture

    Other Specifications

    • 5.2-inch 1080p IPS screen
    • HiSilicon Kirin 955 chipset
    • 3GB RAM/32GB storage or 4GB RAM/64GB storage
    • microSD slot
    • 3,000mAh battery
    • Fingerprint reader

    Articles: Digital Photography Review (dpreview.com)

  • Artist Socks Series: Wear Pairs of Figures from Famous Paintings

    [ By WebUrbanist in Design & Products & Packaging. ]

    artist socks abstract

    Simple stripes, colors and patterns are all that is visible when you are wearing shoes, but kick them off and you can show off famous figures from classic paintings. They may not be fit for formal wear situations, but are certainly fun for everyday occasions (and a great idea for sock puppet shows).

    vincent van socks

    artist sock box

    These series of silly socks from ChattyFeet is equally informal about their titling of the various pairs. Famous artists are given name twists, resulting in Andy Sock-Hole and David Sock-Knee. Other pairs include Frida Callus and Feetasso (from Frida Kahlo and Pablo Picasso).

    andy sock hole

    david sock knee

    From the designers: “The master of modern art David Sock-Knee is on hand (or foot) when you want to impress with your knowledge of home-grown British artists. They are just the thing to wear to that exhibition opening event and don’t forget to snap a ‘sockie’ photo when you visit famous galleries. Follow in this famous face’s footsteps by recreating your favourite holiday scenes in acrylic – just don’t splash any on your socks!”

    art fun socks

    artist feetaso

    ChattyFeet is a quirky brand that offers “silly sock personalities” for adults and children alike. The studio’s line of cheeky characters colorfully drawn onto comfortable cotton socks.

    Share on Facebook


    [ By WebUrbanist in Design & Products & Packaging. ]

    [ WebUrbanist | Archives | Galleries | Privacy | TOS ]


    WebUrbanist

  • A Beginner’s Guide to Minimalist Photography

    Minimalism is splitting the world in two. Love it or hate it, it’s a style with a very defined outline, one that has its roots in in the painted arts of the 20th century and that continued to branch out in other domains. These days, minimalism is especially present in design, fashion, and photography. A simple scout around websites such Continue Reading

    The post A Beginner’s Guide to Minimalist Photography appeared first on Photodoto.


    Photodoto

  • Top tips for composing great landscapes

    In this article I’ll try to outline a handful of the key elements that I look for when composing a photo in the field. The process of composing a photo can be daunting at times, but I hope that some of these tips will help you to lay the groundwork for developing an eye for composition in landscape photography.

    Compositional Visualization: See the ball, be the ball

    Developing an eye for composition in landscape photography is something that takes a great deal of time and practice in the field. Practice, persistence and due diligence do pay off and over time you will find yourself becoming more comfortable behind the lens.

    The Mossy Grotto in the Columbia River Gorge in Oregon is incredibly difficult to shoot due to the limited compositional choices. I hiked around for almost 30 minutes before I settled on this composition which had a lot of layering and some nice diagonal leading lines to help to lead the eye to the focal point.

    Mossy Grotto, Columbia River Gorge, OR

    Sony a7R, Canon 16-35mm F2.8, 16mm- multiple exposures used for focus stacking and water movement. 

    One thing that I’ve learned over time is that you absolutely have to pre-visualize your shot. This process starts with four key elements – the direction of the light, the focal point, the foreground and the leading line(s).

    The focal point is often the first thing that your eye gravitates toward. It could be a waterfall, a mountain or even a stand of trees. If your eye gravitates toward it chances are it may serve as a good focal point to build your composition around. The next step in the process is to look for a leading line that guides your eye through the scene to your focal point.

    I decided to use the river you see in this image as the leading line in this composition because it was able to the lead the viewer to the main focal point without detracting interest from it. I also enjoyed how the light in the composition added layers and depth to the image as well.

    Glacier National Park, MT

    Sony a7R, Canon 16-35mm F2.8, 16mm, F11, 1/15sec, ISO 160, single exposure

    The ‘line’ is figurative of course. It can be a rock formation, a river, a series of interesting trees, vegetation or foliage, flowers, or even a trail. Choosing the correct leading line can have a large impact on your image. It is important to note though that the leading line may not work depending upon the direction of the light in the scene.

    Let the light guide your eye to the focal point in the image

    All of the elements need to work together to form a pleasing composition. Let the light guide your eye to the focal point in the image. Shadows and light play a huge role in guiding your eye through the scene and, when used correctly, can add a great deal of depth and interest to your photo.

    I chose the Lupine you see here as my foreground because I felt the colors complimented the sky well (blue/purple and yellows tend to work well together) and the light play in the flowers also helped to guide your eye through the scene to the focal point at the back of the image.

    Sony a7R, Canon 16-35mm F2.8L II, 16mm, F10, 1/50sec, ISO 100, multiple exposures for focus stacking and sunstar.

    Choosing the correct foreground can have a large impact on the success of your image. I always try to choose a foreground that offers a complementary color palette to the other elements in the scene such as the sky or mountains. I also tend to look for elements that add depth and interest to the overall image without overwhelming the viewer- it’s a bit of a balancing act in regard to keeping the image dynamic yet visually pleasing. I also try to choose a foreground that offers a color palette that helps to ‘connect’ the overall image. When colors work well together they can really help to solidify an already aesthetically pleasing image.

    Ted Gore recently published an excellent article on color theory that complements this article nicely. Using groups of colors that work in harmony and flow nicely can help to solidify an already robust composition and can add a whole new ‘layer’ of interest to the photo.

    Articles: Digital Photography Review (dpreview.com)

  • Why Off-Camera Flash Isn’t as Scary as you Think

    Flash

    The word alone has the potential to cause dread, even among experienced photographers, bringing to mind images of overexposed faces and red eyes. Because of this, many photographers avoid flash altogether, keeping a safe distance at all times. I think that’s too bad.

    It’s a missed opportunity. Sure, flash may not always be applicable to your situation – but it’s very helpful to have another tool in your bag of tricks if and when it is needed.

    Portrait

    Off-camera flash gives you an incredible amount of control. Yes, understanding natural light is an important part of being a photographer – but working with off-camera flash lets you create your own lighting conditions. You can even mimic the elusive golden hour.

    This guide will explain off-camera flash in its simplest components, giving you the knowledge to begin to experiment, and to explore how it could help your photography.

    What you need to start

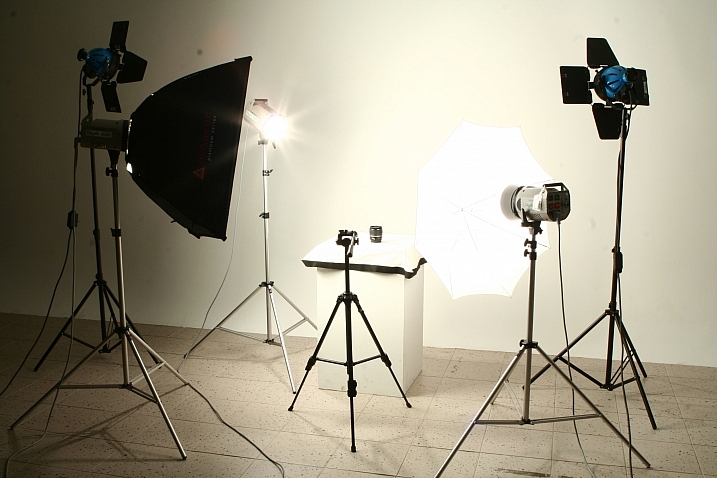
    When I talk about off-camera flash, you might be picturing something like this:

    ? ?? / Chris Lim

    By ? ?? / Chris Lim

    If that’s the case, I don’t blame you for being a bit nervous. In reality, all you need to get started with off-camera flash photography is:

    • A camera
    • An independent flash unit
    • A way to make them fire simultaneously
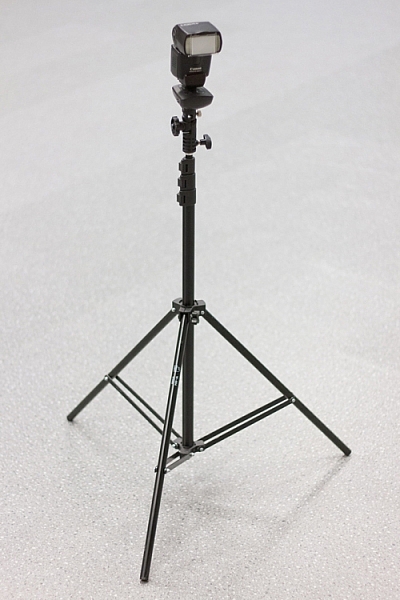
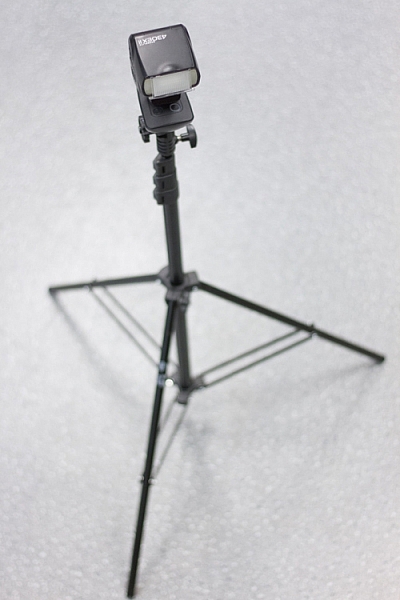
    • Something to hold your flash, like a light stand or a friend
    light-stand-1 light-stand-2

    Once you take your flash unit off of the camera, it won’t know that it is supposed to fire when you hit the shutter button. Fortunately, there are several ways that you can sync your flash.

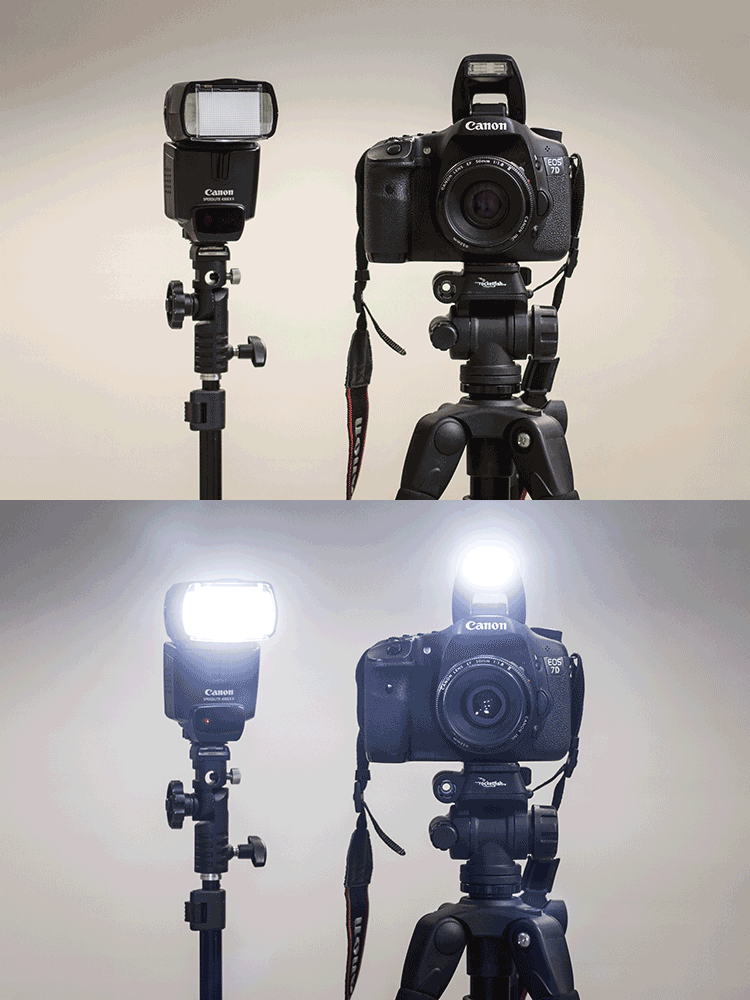
    Built-In Flash Control: Some cameras have a built-in setting that uses the pop-up flash to tell your off-camera flash to fire. Most flash units have a sensor on the front that recognizes the sudden burst of light (optical sensor), and fires accordingly.

    pop-up-flash

    Flash Sync Cord: This is a cord that runs from your camera to the flash. Think of it like an extension cord. These are useful and reliable, but it also limits how far away the flash can be from your camera.

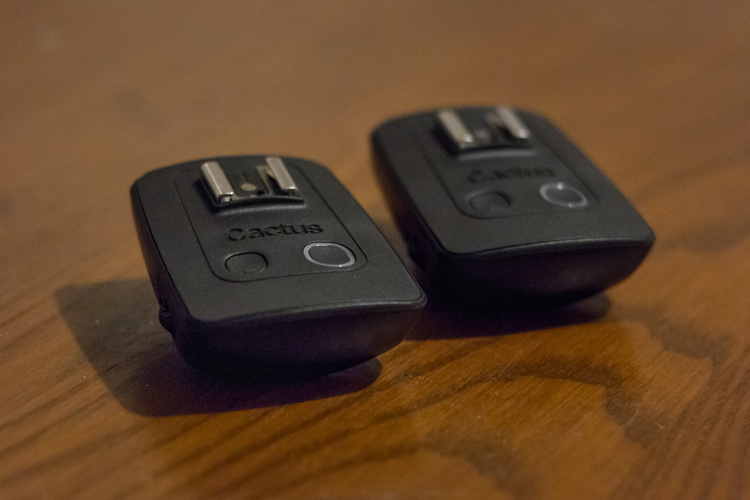
    Wireless Radio Transmitters: The preferred option, radio transmitters can sync your flash to your shutter even if they are at a significant distance away.

    bts-6855-edit

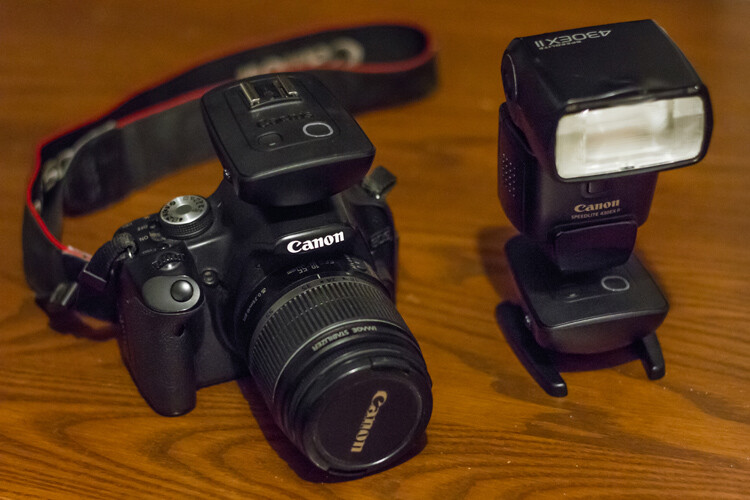
    Cactus brand remote triggers

    bts-6859-edit

    One remote goes on the camera, the other attaches to the flash. When the camera fires the one on the camera sends a signal to the other remote to fire the flash.

    Editor’s note: for more great tips read, A Beginner’s Guide to Working With Flash Off-Camera

    The basics – controlling your off-camera flash

    When you use a flash on-camera, it can determine the correct power settings and fire accordingly (TTL). Once you take the flash off the camera, however, you’re going to need to tell both the camera and the flash what to do manually.

    bts-6851-edit

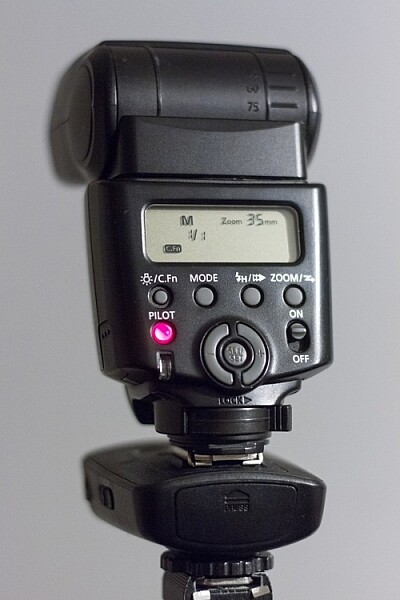
    M is Manual mode, and 1/1 is full power. Zoom level shows 35mm. Read the user manual for your flash to see how to adjust these items.

    If that sounds scary, just take a deep breath – we’ll get through this together.

    Fortunately, controlling flashes is quite simple. In manual mode (on the flash), you choose the amount of power at which the flash fires. This is expressed as a fraction: 1/1 means the flash is firing at full power, ¼ means the flash is firing at a quarter of its total power, and so on. Easy, right?

    Alright, so now we know how to control the flash. What about the settings on your camera?

    This is the cool part. You can control the effects of the flash using your ISO and aperture. Adjusting these two settings controls how sensitive your camera sensor is, and how much light it can collect.

    So here are the four ways to make the flash in your image stronger (more flash):

    • Turn up the flash power
    • Move the flash closer to your subject
    • Turn up the ISO
    • Make the aperture wider (smaller f-stop number)

    Piece of cake! Is your flash in your picture too strong? Well, simply do the opposite of one of the criteria mentioned above (turn the flash down, move it away from the subject, turn the ISO down, use a smaller aperture).

    You’ll notice that I haven’t mentioned shutter speed yet. That’s because your shutter speed doesn’t affect flash at all.

    Well, almost not at all. Every camera has a flash sync-speed. This is because if the shutter speed goes too fast, it won’t sync perfectly with the flash (the shutter will open and close before the flash goes off). As a result, part of your picture won’t see the effects of the flash – resulting in a black bar across part of the shot. For most consumer cameras, your maximum flash sync speed will be around 1/200 or 1/250. Keep your shutter speed under that (slower like 1/125th or 1/60th) and you’ll be fine.

    flash-sync-1

    Correct sync speed used the flash lights the entire image

    flash-sync-2

    If your shutter speed is too fast (higher than the sync speed) you will get something like this, where part of the image is not lit by the flash and is dark, or even black.

    Two exposures: Ambient and flash

    This is the key to understanding off-camera flash photography.

    Think of every picture taken with flash as being two exposures, overlapped on top of each other. The way you decide to balance the ambient lighting and the flash, sets the tone for the image. Let’s take it one layer at a time, and you’ll see how easy it can be to build an image using off-camera flash.

    THE FIRST LAYER: AMBIENT LIGHTING

    Ambient light is that which is already available in the area from the sun, window light, street lights, etc. At certain times of the day, your ambient light is going to be quite nice, like at Golden Hour. Other times, you may not be so lucky.

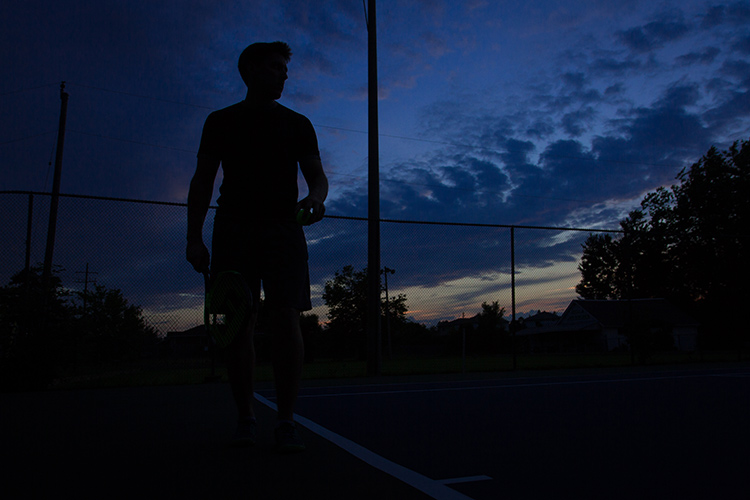
    Sunsets, for example, are especially tricky. This is because in order to bring out the colour and texture of a sunset, you need to keep the exposure dark – and as a result, your subject will be completely silhouetted.

    Here’s the first step for taking your off-camera flash picture – ignore your flash altogether. Turn it off.

    Find the normal, correct exposure for the existing (ambient or available) light, and then adjust your settings to intentionally make your image too dark. The darker your ambient exposure, the more dramatic the light from your flash will be.

    1 ambient

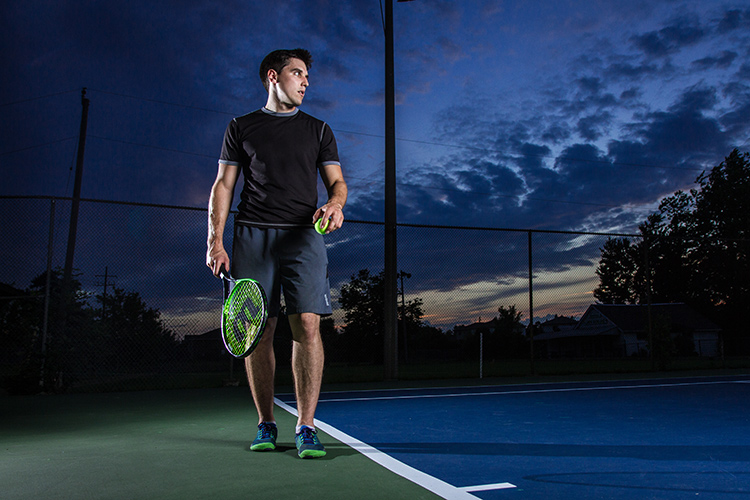
    Here is my exposure for the ambient light (above). We’re off to a good start! For this shot, I want to keep the dark, dramatic sky in the background, and I will rely on my flash to light up the tennis player.

    THE SECOND LAYER: FLASH

    Alright, now turn on your flash. By using flash to light my subject, I can get the best of both worlds – my sky remains dark and dramatic while my subject is well-lit.

    It will probably take a few shots to get your lighting right. That’s perfectly normal! Use the tips mentioned in the previous section to add more or less power to your flash.

    1 flash

    When we add the flashes, we get to keep the dramatic background, with the benefit of crisp lighting on our subject. This shot simply isn’t possible without flash.

    You can use what you know about ambient and flash lighting to set the tone of the image.

    If you keep your ambient light levels high, the flash will add just a kiss of light. If you start with a very dark ambient image (like the one above), your flash will sculpt and define the image much more strongly.

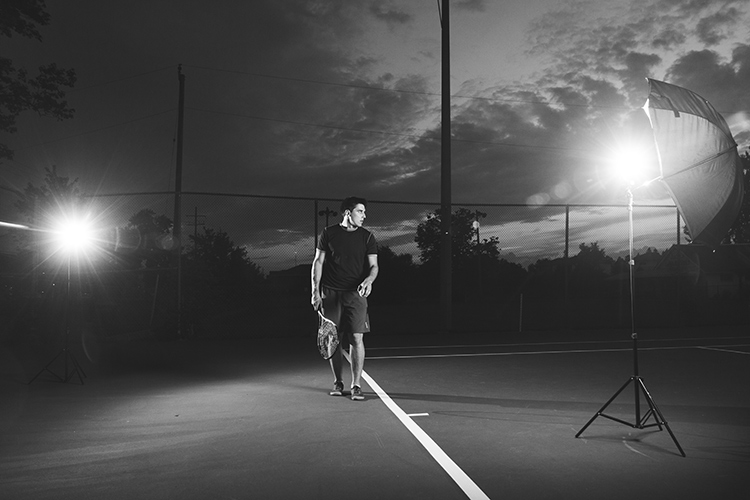
    1 behind the scenes

    Here’s the behind-the-scenes of our setup. Since the light is hitting the subject from an angle, it is dramatic and shows shape much more effectively than if the flash had been on the camera. One flash is to camera right, bouncing into an umbrella to soften it, the other is to camera left (and behind the subject) to add an accent light.

    Putting it into Practice

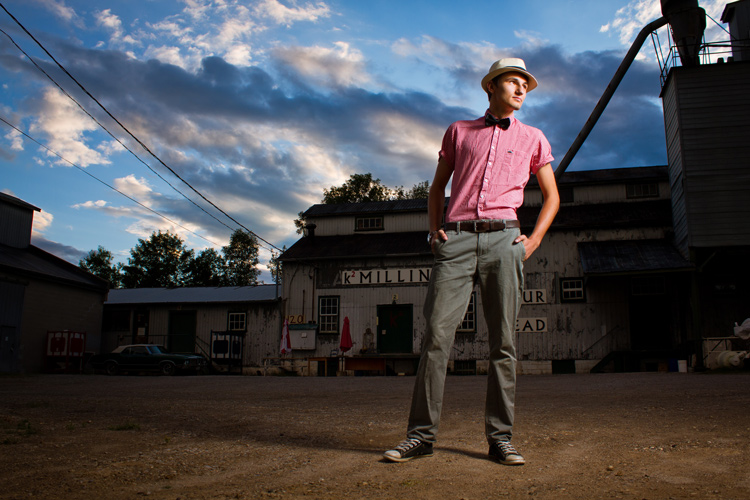
    Here’s another example, this time using flash to give a simple kick, to a liven up a portrait.

    2 natural

    This was shot with no flash, exposed for the skin tones.

    2 ambient

    Ambient light only, darkened for the background.

    The first step was to push the “correct” exposure down, making the overall image darker, so that we could use flash to highlight the subject.

    2 flash 2 double flash

    In the image above (left), the flash is coming from just left of the camera. It brightens the subject up (compared to the background), and makes the image seem more three dimensional. The background also pops more than it did with the “correct” exposure.

    If we want to, we can play around with the effects of a second flash (above right), maybe letting it aim directly toward the camera to create some lens flare?

    2 behind the scenes

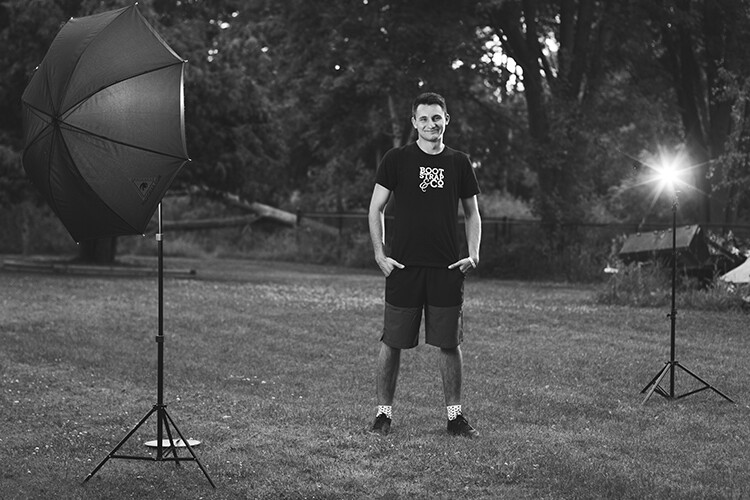
    Here’s the simple setup.

    Shaping and modifying your light

    Well done! You’ve made it through the basics of off-camera flash photography. Next, you can push your newfound skill to a whole new level by learning how to modify the light.

    If you’re familiar with how the light on a cloudy day is softer than the light on a sunny day, then you already know nearly everything you need to know about flash modifiers.

    The basic rule is this: the larger the light source, the softer the light.

    A flash unit is a small light source that creates harsh shadows. That isn’t always so flattering.

    The purpose of umbrellas, soft boxes, and other light modifiers, is to make the source of light larger. This softens the light, which is especially useful for portraits.

    flash-3

    Learning how to modify light lets you build a style that matches your image.

    Looking for a gritty photo? Shoot with a bare flash (no modifiers) and get sharp shadows. Looking for softer, more flattering light? Use a softbox.

    Practice, practice, practice

    Once you’ve got a feel for how to use your flash off-camera, you’ll have a whole new world of photography to explore. Try it. The worst thing that can possibly happen is that you’ll learn something.

    Using digital equipment gives you the ability to try things without any financial repercussions. Learning flash photography through trial and error was probably pretty expensive back in the days of film; today you can fire as many shots as you need in order to learn, without breaking the bank.

    Nobody ever got off-camera flash right on their first try – experiment and stick with it, and you’ll add a valuable new tool to your bag of tricks.

    flash-2

    More articles for you to read on dPS about off-camera flash:

    • How to Create Compelling Wide-Angle Portraits Using One Off-Camera Flash
    • 9 Steps to Get Over Your Fear of Off-Camera Flash
    • Supporting Your Off-Camera Flash – Tripods, Monopods or Light Stands?
    • Beginners Guide to Using TTL Off-Camera Flash
    • How to Get Started with Off-Camera Flash Photography – Start With One!
    • Getting Started with Off-Camera Flash
    • How to Balance Off-Camera Flash and Ambient Light on Location
    • A Beginner’s Guide to Working With Flash Off-Camera
    • The Ultimate Flash Photography Guide FAST FLASH FOR PORTRAIT PERFECTION a dPS ebook

    googletag.cmd.push(function() {
    tablet_slots.push( googletag.defineSlot( “/1005424/_dPSv4_tab-all-article-bottom_(300×250)”, [300, 250], “pb-ad-78623” ).addService( googletag.pubads() ) ); } );

    googletag.cmd.push(function() {
    mobile_slots.push( googletag.defineSlot( “/1005424/_dPSv4_mob-all-article-bottom_(300×250)”, [300, 250], “pb-ad-78158” ).addService( googletag.pubads() ) ); } );

    The post Why Off-Camera Flash Isn’t as Scary as you Think by Frank Myrland appeared first on Digital Photography School.


    Digital Photography School

  • Deconstructed: 25 Famous Floor Plans as Architectural Labyrinths

    [ By WebUrbanist in Art & Drawing & Digital. ]


    libeskind

    The most fundamental blueprint of a building is its floor plan, which organizes the spaces to be occupied, creating a footprint to be extruded into three dimensions. In his ARCHIPLAN series, Federico Babina splits the difference, pulling elements up high enough to form mazes for exploration.

    corbusier

    wright

    gehry

    His set of 25 compositions includes works by Le Corbusier, Mies van der Rohe, Louis Kahn, Zaha Hadid, Frank Gehry and other famous architects both past and present. In each case, a critical classic work is selected then, its plan extrapolated upward and its spaces filled in with roaming characters.

    sanna

    kahn

    ban

    In some cases, the cutaways are particularly revealing – the work of Shigeru Ban, for instance, represents experimentation with various materials like paper and bamboo, reflected in the hollows in the sliced drawing.

    koolhaas

    rossi

    meiere

    Solids and voids are shown through shading, shadows and light. These visual distinctions highlight straight and curved surfaces, walls and columns, while also revealing something about the stylistic approach of each designer.

    zumthor

    aalto

    niemeyer

    Other architects highlighted in the series include: Ando, Rossi, Niemeyer, Ando, Ito, Zumthor, Wright, Sanaa, Libeskind and Koolhaas, representing a range of Modernists, Postmodernists and Deconstructivists of the 20th Century.

    ando

    ito

    mies

    In other artistic sets, Babina has explored built phenomena in different ways, developing a series of architectural movie posters and re-imagining famous art as architecture.

    Share on Facebook


    [ By WebUrbanist in Art & Drawing & Digital. ]

    [ WebUrbanist | Archives | Galleries | Privacy | TOS ]


    WebUrbanist

  • Blincam is a wearable camera that takes a photo when you wink

    A Tokyo-based startup has successfully crowdfunded a wearable camera concept called Blincam. Much the way Google Glass works, Blincam would attach to a pair of glasses and snap photos when the wearer winks or blinks. According to the team behind the product, the final product will be compatible with a mobile app that immediately provides access to photos taken with the camera.

    Blincam is said to feature a patent-pending Eye Movement Sensor that detects when the wearer blinks, as well as an integrated speaker for playing a shutter sound, an LED battery indicator light, Bluetooth connectivity, microUSB, 32GB of internal storage and an ‘HD CMOS’ camera sensor. 

    Blincam Co Ltd, the company behind the campaign, claims to have already developed an alpha version of Blincam, and that it has worked out most of the technical issues. The crowdfunding campaign is intended to raise part of the funds needed to launch the camera. The company anticipates starting deliveries to backers this coming December; as with other crowdfunding projects, however, it is possible the device will never come to fruition.

    Articles: Digital Photography Review (dpreview.com)